
Now that you’ve seen a number of projects, ranging from very basic to advanced in difficulty, it is time to discuss how to make your IoT data viewable by others via the cloud. More specifically, you will get a small glimpse at what is possible with the Microsoft Azure cloud computing services and solutions.
I say a glimpse because it is not possible to cover all possible solutions available in Microsoft Azure for IoT solutions in a single chapter. Once again, this is a case where learning a little bit about something and seeing it in practice will help you get started. Like the other chapters where you’ve had a lightning tour, this chapter presents a few of the newer concepts and features of Microsoft Azure at a high level and in context of a sample project. You can therefore consider this chapter a bonus project chapter.
If you are just learning how to work with IoT solutions or have no plans to immediately host your solution in the cloud (or on Microsoft Azure), you can still learn quite a bit about the technology by following along and implementing the sample project.
Since the technologies presented are quite unique in implementation (but rather straightforward in concept), I keep the project hardware and programming to a minimal effort. In fact, you will reuse the weather sensor that you used Chapter 13. However, rather than saving the data in MySQL, you will send it to Microsoft Azure. You will also see how to present the data via a web site connected to the data in Microsoft Azure.
Let’s take a brief, short tour of Microsoft Azure before examining the goals of the project and what you need to get started.
What Is Microsoft Azure?
That is a very interesting question. As it turns out, Microsoft Azure (hence Azure) is a total cloud platform for all manner of cloud solutions. In fact, Azure1 is a growing collection of cloud products, such as virtual machines, databases, networking, storage, reporting, and more. Furthermore, Azure is Microsoft’s platform and infrastructure for building, deploying, and managing applications and services, including platform as a service (PaaS) and infrastructure as a service (IaaS).
You can use Azure from a host of different operating systems so it is not tied exclusively to Microsoft Windows. Together with programming APIs, frameworks, and drivers in Visual Studio, you can build solutions to run as a web application in Azure. Better still, you can write applications for Windows, Android, and even iOS that integrate with Azure through JavaScript, Python, Node.js, and other Web development tools and languages.
Getting Started with Microsoft Azure
As part of your tour, you will see how to use Azure with IoT solutions by writing a sample project to send messages to and from Azure. Consider it a Hello, World for Microsoft Azure. Naturally, Azure has features that fully support IoT solutions and you will concentrate on those features in this chapter.
As you will see, there are tools built into the Azure portal and Visual Studio extensions that work with your source code project files to aid in setting up applications to interact with Azure features. In fact, you will see how to gather sensor data on your Raspberry Pi and send it to Azure to be stored, processed, and displayed and hosted as a web site. Yes, Azure completes your IoT solutions by providing the Internet-facing systems and features to share your data.
Although you will only scratch the surface of what is possible with Azure, the projects in this chapter give you a taste of what is possible for IoT solutions using Azure. Let’s continue the lightning tour and see how to get started using Azure.
Note
This lightning tour is only one path to learn how to use Azure. The presentation is tailored for using Azure with IoT solutions. As such, I cover only a small portion of the features of Azure. Also, there may be more than one way to achieve your goals using other features in Azure. Indeed, you could spend a lot of time learning everything there is to know about Azure.2
Sign Up for an Azure Account
The very first thing you need to do to use Azure is to sign up and create an account. While Azure is a paid service platform, Microsoft permits you to create a temporary free account that is active for 30 days. After the 30 days, you can continue to use Azure but any resources you created or used during your trial period may become billable. Fortunately, your account is not automatically converted to a paid account. You must specifically request the upgrade. However, if you build your IoT solutions using an Azure free account, you can continue to use them as paid resources once you upgrade your account.
The process to create an Azure account is quite easy but requires a valid Microsoft account to get started. If you do not have a Microsoft account, you need to create one by following the steps on https://signup.live.com . You do not have to have a Microsoft e-mail account—any valid e-mail account is OK to use for setting up your Microsoft account.
You also need to enter a credit card to complete the Azure account signup. Microsoft bills you $1 when you set up your account, but they refund you within a few days. This is Microsoft’s way of verifying your account and is quite common for monthly subscription services that offer a trial period.
You may be wondering how Microsoft can offer a free account when all the resources are billable. They do this by crediting your account $200. This is normally more than enough to get you through the 30-day trial period. Having the credit card on file allows you to keep your resources going without interruption should you choose to continue your subscription.
Now, let’s see how to create your Microsoft Azure account. Visit https://azure.microsoft.com/en-us/free/ and click Start Now. Be sure to read the conditions of signing up on the bottom of the page. As you will see, there are some services that may be free beyond the 30-day trial, including a feature called an IoT Hub.
The process starts with entering your information—including your name, e-mail, and phone number, and then clicking Next. You are then asked to verify the account via a text sent to your phone. Enter the phone number that you want to receive the text, and then click the Text Me button. You receive a code that you then enter in the text box. Click the Verify Code button. Once the code is verified, you must enter your credit card information and then click the Next button. Finally, read the agreement statement, check the box, and click the Sign Up button to complete the process.
Once the process is complete, you should be redirected to the portal at https://portal.azure.com . Figure 16-1 shows the initial portal screen that you see once logged in.

Figure 16-1. Azure portal (initial login)
While you see only a portion of the features of Azure in this chapter, there are a few features, terminology, and concepts that you should understand in order to complete the projects. The following lists the Azure features and concepts used in this chapter. I discuss the more complex topics in more detail in the following sections. You will see the others in action as you explore the projects.
Azure IoT Hub: a relative recent addition to Azure, IoT Hubs allow you to create a service that allows you to send and store messages to the cloud as well as send messages from the cloud to a device. The IoT Hub can be connected to other Azure services to complete your IoT solution.
Azure IoT Suite: a dedicated solution for IoT projects that provides preconfigured templates for creating two types of common IoT solutions: predictive maintenance and remote monitoring. It combines a number of existing Azure features with a streamlined setup process.
Device Explorer: an application that can be used to monitor messages sent from and to devices connected to Azure
JavaScript Object Notation (JSON): an open-standard format that uses human-readable text to transmit data objects consisting of attribute–value pairs.3
Connected Services: a Visual Studio feature that allows you to add connections to online of services, including the Azure IoT Hub. It provides huge time savings in adding Azure connectivity to your project.
Note
The Azure portal is a relatively new addition. The old management console ( https://manage.windowsazure.com/ ) is still operational, and depending on what resources you use, you may be redirected to the management console.
Azure IoT Hub
The Azure IoT Hub is a service designed to allow bidirectional message passing between IoT devices and the cloud (the IoT Hub or connected services). Thus, the IoT Hub can be considered the main Azure feature for connecting your IoT solution to Azure. There are a number of features and benefits to using the IoT Hub, including the following.
Reliable device-to-cloud and cloud-to-device messaging
Includes provisions for security credentials and access control
Permits monitoring for device connectivity
Microsoft provides a number of libraries to support a host of devices, languages, and platforms
Additionally, Microsoft has provided a feature in Visual Studio called Connected Services that, together with the Azure IoT Hub Connected Services feature, simplifies application development. Furthermore, it supports .NET and UWP applications.
For more information about the Azure IoT Hub, see https://azure.microsoft.com/en-us/documentation/services/iot-hub/ .
Azure IoT Suite
The Azure IoT Suite is a combination of existing Azure enterprise-grade features, IoT services, and preconfigured solutions that allow you to get started quickly. The preconfigured solutions are complete implementations of common IoT solutions. This allows you to get started experimenting with Azure and linking your IoT solution to the cloud much more quickly and with far less effort than configuring the Azure features yourself individually.
The list of capabilities of the preconfigure solutions in Azure is quite impressive. The following is a list of the features and benefits of the preconfigured solutions.
Easy-to–set up devices to collect data
Built-in analytics to capture the data
Sample web application to display the data in real time
Sample alarms for watching the data for major events
Visualize real-time and historical data
If that list isn’t impressive enough, consider that you can take the preconfigured solution and modify it as your needs change. That is, you can start out with the basic solution and then add more capability in the form of faster processing, more devices, more storage, and so forth. It really is the best way to get your IoT solution up and running in the cloud and even mature it as you continue to develop.
For more information about the IoT Suite, see https://azure.microsoft.com/en-us/documentation/suites/iot-suite/ .
Device Explorer
When developing Azure IoT solutions (or any Azure solution), developers need a tool to help monitor and verify the messages that their solutions are sending to and receiving from Azure. Device Explorer is an answer to fill that need. With Device Explorer, you can connect to your IoT Hub and monitor the messages send to and from Azure making it easier to diagnose problems during the development process.
The Device Explorer is a Windows application that you can run on your PC. You can download the Device Explorer and learn more about the application at https://github.com/Azure/azure-iot-sdks/tree/master/tools/DeviceExplorer . You use the Device Explorer in this chapter, so download and install it now.
Now that you have an Azure account and know a bit more about the technologies that you will use, let’s now walk through creating a sample IoT application to demonstrate how to set up resources for storing IoT data in Azure.
Building IoT Solutions with Azure
Building IoT solutions that use Azure can be rather challenging. This is mostly due to the rather steep learning curve in understanding Azure and the Azure features needed. Rather than jump directly into a complex Azure-based IoT solution, let’s set the stage for the chapter project, where you see a simple demonstration on how messages are exchanged with Azure. Essentially, you will implement the project in two stages: one to see how to write sample data to Azure, and another to see how to connect real sensors to store and view data in the cloud using the Azure IoT Suite.
The project in this section is designed to learn how to set up an IoT Hub and connect the application running on your device to send and receive messages. This teaches you how the data is sent to the cloud and prepares you for writing code to send live data to Azure.
Thus, the application is simplistic in the sense that you will not use a sensor; rather, you will use a user interface to get sample values and send those to the IoT Hub. Once again, this is so that you can learn the basics of working with the IoT Hub, and not make the project more difficult from the complexity of reading data from sensors and viewing them in the cloud.
The steps in this section require several steps, taking you from setting up your IoT Hub to configuring your PC, and finally, seeing the cloud messages in action, as shown next. I discuss each in more detail in the upcoming sections.
Set up an IoT Hub in Azure.
Set up your PC for working with the Azure IoT Hub.
Create the example application.
Use the Device Explorer to monitor messages sent from the device to the IoT Hub message queue.
Use the Device Explorer to send a message from the IoT Hub to the device.
These steps sound daunting4 but if you follow along, you should be able to go through the steps in only a few minutes. Some of the steps you perform in this project can be reused in the chapter project.
Set up an IoT Hub
An IoT Hub is a feature in Azure for connecting devices to other features in Azure. Most notably, the IoT Hub provides a message queue for you to send messages to the cloud. These messages can then be consumed by other features (or other applications) in Azure or by another application connecting to Azure. Let's begin by logging into the Azure portal ( www.portal.azure.com ).
To add an IoT Hub, click New in the Azure portal. This opens a submenu that shows a list of categories. In the blade that opens, choose Internet of Things. Figure 16-2 shows the selections made.
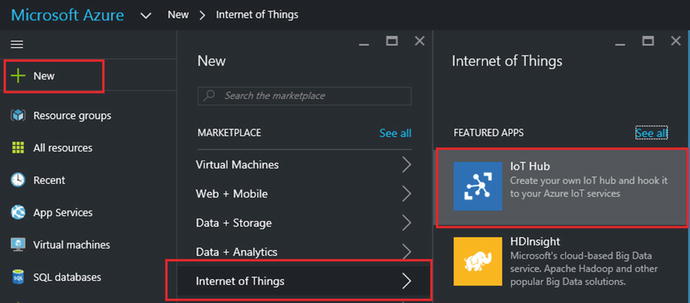
Figure 16-2. Adding an IoT Hub
The Azure portal page is best viewed on a wide screen because it spreads things out quite a bit by opening sliding forms (called blades) for settings, selections of features, and so forth.
Note
To make it easier to read the text, I use screen excerpts from the Azure portal.
On the next blade, you see the IoT specific features and products. Click the IoT Hub area. This opens a new blade, where you can fill in some information about the new IoT Hub , including the following.
Name: Choose a name that is unique (Azure tells you if it is not). You have only a few characters to work with so keep it short.
Pricing Tier: Use the free tier by clicking the arrow. Click F1 Free from the list and then click Select.
Number of IoT units: Leave this set to the default.
Device-to-cloud Partitions: Leave this set to the default. (Note: this equates to how many devices you can connect at one time.)
Resource Group: Choose a name that is unique. You can use shared groups, but I recommend creating your own.
Subscription: Leave this set to Free Trial.
Location: Choose your location.
Pin to Dashboard: Click this to place the IoT Hub on the dashboard for easy access.
Figure 16-3 shows the completed information for an IoT Hub I created when testing this project.
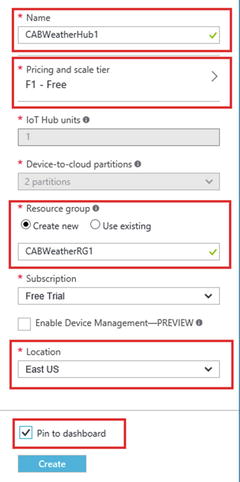
Figure 16-3. Setting up an IoT Hub
I highlight those areas you need to fill in when you create your own IoT Hub. Notice the names that I used. I simply used my initials and a short description. It's a bit cryptic, but remember, the names must be unique in the region where you are creating the resources. Add some numbers if you get a name violation to help make the names more unique.
Note
You can have only one free IoT Hub subscription per account.
The next step is the registration process. Azure merrily creates your IoT Hub for you in the background. An occasional pop-up message keeps you updated of the status. You can click the bell symbol in the top right of the portal to see your messages. I should note that, depending on resources being allocated; the registration could take some time. Now is a good time to refresh that beverage, pay some attention to the family, pet your dog, and so forth, and check back in about 15 to 30 minutes.5
Once created, you see a message stating, Deployments Complete. If at this point you do not see your IoT Hub in dashboard on the portal, you can try refreshing the screen or click Resource Groups to refresh the dashboard. Your IoT Hub should show up on your dashboard as a tile, as shown in Figure 16-4.
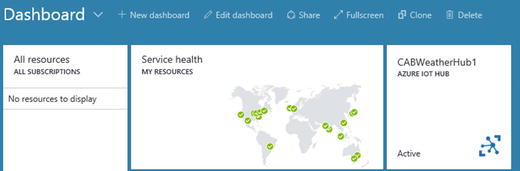
Figure 16-4. New IoT Hub on Dashboard
Click the tile for your IoT Hub. This takes you to the settings console, as shown in Figure 16-5. You can also see get to this by clicking All Resources and selecting your IoT Hub from the list.
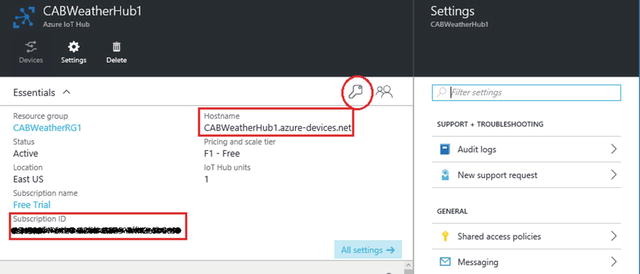
Figure 16-5. Settings page for the IoT Hub
Notice the area marked Usage. You will use that in a moment to verify that your messages have been sent to the cloud. Notice also the subscription id and URI (hostname). Make a note of these strings, as you need them again in the project. I have redacted mine to protect my account.
While you are on this page, it is a good idea to click the small key icon to get the keys for the policy that you need to use. Click the key and then click iothubowner in the list. You see all the keys and permissions for this policy in the next blade. Copy the strings using the copy icon next to each and place these in a file somewhere. You will use the primary key and the connection string for the primary key, as annotated in Figure 16-6.

Figure 16-6. Policy settings and keys
Caution
Your keys, Ids, and subscription-related tokens should be well protected. Someone with access to this data can create applications that can connect to your Azure account. Be sure to strip them or redact them before publishing any of your own code.
OK, the IoT Hub is ready for messages. Next, let's set up your PC.
Set up the PC
There are two things that you need to do on your PC to create the sample project: install the Device Explorer (if you haven’t already) and install an add-in to Visual Studio called Connected Service for Azure IoT Hub. You will use the Device Explorer to test the sample application.
Note
Some older documentation speaks of something called the iothubexplorer (npmjs.com/package/iothub-explorer/tutorial), which is a Node.js command-line tool. You can use that if you prefer command-line utilities, but you may need to install Node.js first.
You also need to install the Connected Service for IoT Hub. You can install this from within Visual Studio via the Tools ➤ Extensions and Updates dialog, as shown in Figure 16-7. The Connected Service for Azure IoT Hub is a utility to help you easily and quickly add Azure IoT Hub access to the project.
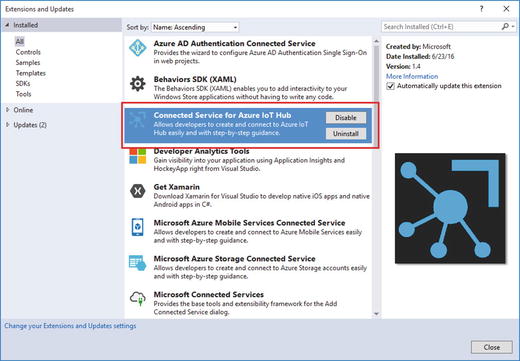
Figure 16-7. Adding the Connected Services for Azure IoT Hub
Now, let's create the sample Hello, World Azure style project.
Hello, World! Azure Style
In this section, you will see how to leverage the concepts and features you’ve seen in the previous sections to create a sample Azure IoT solution. In this case, you will create a simple application that uses a simulated sensor in the form of a user interface. You supply values, send them to the cloud, and see the last message received from the cloud.
The project covered all the basic things that you need to know to get an IoT solution talking to Azure. You will see the code for creating the connections to Azure as well as how to properly format and send messages using JSON strings.
As I mentioned previously, this project lays the groundwork for the chapter project. Indeed, much of what you develop in this project is used later. The only exception is the user interface. You use it as a means to test the Azure connection and message passing in this sample project, but you will not need it for the chapter project because it is a headless application.
Finally, this project runs on your PC, so there is no need for additional library references (but you can run it on your device if you want). Just make sure that you are connected to the Internet.6
Let’s start with creating the project.
New Project
You will use a C# project template for this project—the Blank App (Universal Windows) template. Use the name HelloAzure for the project name. You can save the project wherever you like or use the default location.
Azure IoT Hub Connected Service
You will use the connected service feature to add code to the project. The utility creates a new source file named AzureIoTHub.cs, which encapsulates what you need to communicate with the cloud. Let’s run the connected service now.
Right-click the References item in Solution Explorer and choose Add Connected Service. Scroll down the dialog and select the Azure IoT Hub entry, as shown in Figure 16-8. Click the Configure button.
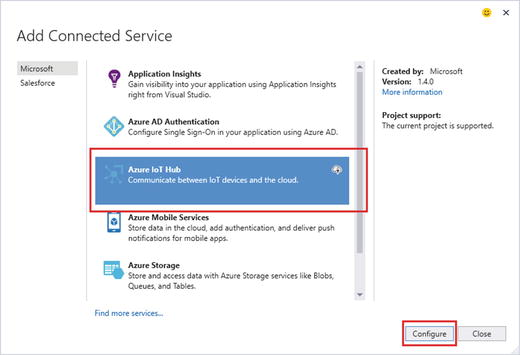
Figure 16-8. Adding the Azure IoT Hub Connected Service
You are asked to choose the security mode, as shown in Figure 16-9. Choose the hardcoded option. This is fine for small, experimental projects or projects for you own use. As you will see, you can choose a more restrictive method but this requires adding a bit more code in your project to use. Plus, it is still in an experimental stage. Click the OK button to continue.
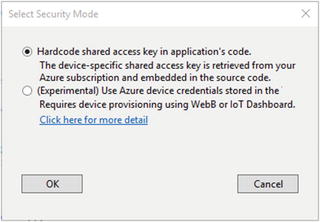
Figure 16-9. Select Security Mode
On the configuration page, you are asked to log in to your Azure account. You should see your account in the upper-left corner of the dialog. If you do not see it, choose the account from the drop-down box. If you see a small yellow triangle, it means there was an issue logging in. To retry, click Re-enter your credentials. Once logged in, you see your IoT Hubs, as shown in Figure 16-10. If you do not see them, click Refresh.
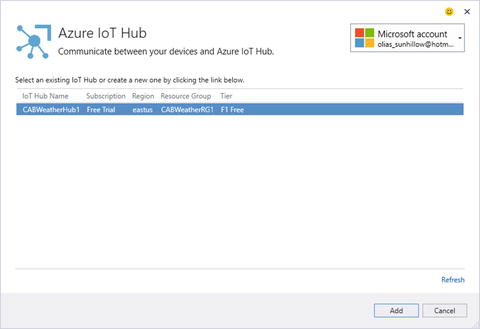
Figure 16-10. Connecting to your Azure account
Next, select your IoT Hub and then click the Add button. A dialog will appear, asking you to create a new device. Simply click New Device and enter a name for your device. I used HelloAzure. Click the OK button to create the device and then click OK again to continue the registration. If you already created a device, you can select it from the list.
You see a dialog showing the progress of the registration. When done, you notice a number of new resources and service references added to your project, as well as a new code file named AzureIoTHub.cs, as shown in Figure 16-11. It even added support for JSON! This is the beauty of the connected service—all of this used to be a very manually intensive process, but it is now automated for you! Neat.
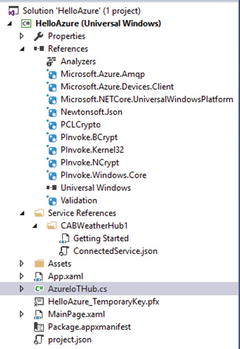
Figure 16-11. New files added to solution
You also see a list of what was installed in the Output window, as shown next.
Adding Azure IoT Hub to the project.Installing NuGet package 'Newtonsoft.Json' version 8.0.3.Installing NuGet package 'Microsoft.Azure.Amqp' version 1.1.5.Installing NuGet package 'Microsoft.Azure.Devices.Client' version 1.0.11.Installing NuGet package 'PCLCrypto' version 2.0.147.Installing NuGet package 'PInvoke.BCrypt' version 0.3.2.Installing NuGet package 'PInvoke.Kernel32' version 0.3.2.Installing NuGet package 'PInvoke.NCrypt' version 0.3.2.Installing NuGet package 'PInvoke.Windows.Core' version 0.3.2.Installing NuGet package 'Validation' version 2.2.8.New service instance CABWeatherHub1 createdSuccessfully added Azure IoT Hub to the project.
Go ahead and explore that new code file. In it, you see code to connect to the IoT Hub and code to send and receive messages. We’ll explore this code in more detail in a moment. There is also a link to the Getting Started page in Solution Explorer. Click that and learn a bit more about getting started writing C# Azure applications.
Now, let’s build a user interface and then you’ll add a class to simulate collecting data.
User Interface
Let’s build a simple user interface to send messages to the cloud as well as display the last message received from the cloud. Click the MainPage.xaml file and add the code shown in Listing 16-1.
Listing 16-1. User Interface XAML Code
<Grid Background="{ThemeResource ApplicationPageBackgroundThemeBrush}"><StackPanel Width="400" Height="400"><TextBlock x:Name="title" Height="60" TextWrapping="NoWrap"Text="Hello, World Azure Style!" FontSize="28" Foreground="Blue"Margin="10" HorizontalAlignment="Center"/><TextBlock Text="Temperature:" /><TextBox Name="InTemperature" Text="25.00" /><TextBlock Text="Pressure:" /><TextBox Name="InPressure" Text="10.00" /><Button x:Name="send_button" Content="Send Data" Width="75" ClickMode="Press"Click="send_button_Click" Height="50" FontSize="24"Margin="10" HorizontalAlignment="Center"/><TextBlock Text="Message from Azure:" /><TextBlock Name="OutAzure" Text="" /></StackPanel></Grid>
You create a number of labels as well as two text boxes to allow you to choose values for temperature and barometric pressure, and a button to send the data to Azure cloud. Figure 16-12 shows an example of what the user interface looks like when the application is running.
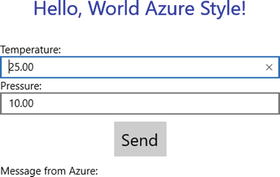
Figure 16-12. Sample user interface
There is just one more part you need to add to the code. You need a class to simulate encapsulation of capturing data from the sensor. Let's add a new class named SensorData.cs. You can add the new class by right clicking the project in the Solution Explorer and choose Add ➤ Add New Item... menu and then choose the Class entry in the list. Use the name SensorData and click the Add button.
Now, open that file and add the code to create a new setup attributes for the data values. Since you are simulating data from a sensor that reads temperature and barometric pressure, you create the two data attributes, as shown next.
namespace HelloAzure{class SensorData{public double Temperature { get; set; }public double Pressure { get; set; }}}
You use this class to fill in the data from the simulated sensor (the user interface). Return to the user interface MainPage.xaml.cs and add the code shown in Listing 16-2 to add the data from the user interface to the SensorData.
Listing 16-2. Code for Reading Sensor Data from User Interface
using System.Diagnostics; // Add for debuggingnamespace HelloAzure{public sealed partial class MainPage : Page{public MainPage(){this.InitializeComponent();}private void send_button_Click(object sender, RoutedEventArgs e){// Read data from the simulated sensorSensorData data = new SensorData();data.Temperature = Convert.ToDouble(this.InTemperature.Text);data.Pressure = Convert.ToDouble(this.InPressure.Text);Debug.WriteLine(String.Format("Data sent: {0}, {1}",data.Temperature, data.Pressure));}}}
OK, now you're ready to complete the Azure segments of the code.
Communicating with Azure
Fortunately, most of the work is done for you. All you need to do is add code to send the data to the cloud and code to read data from the code periodically. Let's work on the code to send the data first.
To send a message to Azure, you must format it as a JSON object, which is really easy to do. In the AzureIoTHub.cs file, you have a class named SendDeviceToCloudMessageAsync(). All you need to do is modify that method to accept the data you "read" and format it into a JSON document and send it to Azure; most of the code is already there!
First, you must add two using clauses, as shown next.
using HelloAzure; // Add for the SensorData classusing Newtonsoft.Json; // Add for JSON utilities
Next, you can modify the sample code and add code to serialize the data you "read" from the sensor. The following shows the modified method. I highlight the changes in bold.
public static async Task SendDeviceToCloudMessageAsync(SensorData data){var deviceClient = DeviceClient.CreateFromConnectionString(deviceConnectionString,TransportType.Amqp);var jsonMsg = JsonConvert.SerializeObject(data);var message = new Message(Encoding.ASCII.GetBytes(jsonMsg));await deviceClient.SendEventAsync(message);}
Now, let's return to the send button click event and complete the code to send the data to Azure. However, since the code is a task, you need to change the signature of the button click method, as shown in Listing 16-3.
Listing 16-3. Updated Send Button Click Method Code
private async void send_button_Click(object sender, RoutedEventArgs e){// Read data from the simulated sensorSensorData data = new SensorData();data.Temperature = Convert.ToDouble(this.InTemperature.Text);data.Pressure = Convert.ToDouble(this.InPressure.Text);// Send data to the cloudawait AzureIoTHub.SendDeviceToCloudMessageAsync(data);Debug.WriteLine(String.Format("Data sent: {0}, {1}",data.Temperature, data.Pressure));}
OK, you're nearly there! The next thing you need to do is add code to read messages from Azure cloud periodically. For this, you use a timer event. You've already added this code to several other projects so I omit the details and simply present the completed code for the module. Modify the MainPage.xaml.cs file as shown in Listing 16-4.
Listing 16-4. Completed User Interface Code
using System;using Windows.UI.Xaml;using Windows.UI.Xaml.Controls;using System.Diagnostics; // Add for debuggingnamespace HelloAzure{public sealed partial class MainPage : Page{public MainPage(){this.InitializeComponent();DispatcherTimer timer = new DispatcherTimer();timer.Tick += timerTick;timer.Interval = TimeSpan.FromSeconds(3);timer.Start();}private async void send_button_Click(object sender, RoutedEventArgs e){// Read data from the simulated sensorSensorData data = new SensorData();data.Temperature = Convert.ToDouble(this.InTemperature.Text);data.Pressure = Convert.ToDouble(this.InPressure.Text);// Send data to the cloudawait AzureIoTHub.SendDeviceToCloudMessageAsync(data);Debug.WriteLine(String.Format("Data sent: {0}, {1}",data.Temperature, data.Pressure));}private async void timerTick(object sender, object e){this.OutAzure.Text = await AzureIoTHub.ReceiveCloudToDeviceMessageAsync();}}}
OK, you’re now ready to test the application. Be sure that your code compiles without errors first.
Testing the Application
When ready, launch the Device Explorer and use the connection string you copied from the Azure IoT Hub Settings . Refer to Figure 16-6 if you forgot where this is. Paste the string into the IoT Hub Connection String text box on the Configuration tab and then click Update. This validates the connection string. Device Explorer fetches the correct keys for access, as shown at the bottom of the dialog. Figure 16-13 shows the completed process.

Figure 16-13. Connecting to Azure with Device Explorer
Next, you can click the Data tab to see messages from your device to the cloud. To do so, launch the application and click the Send button. Then, go back to the Device Explorer and click the Monitor button on the Data tab. Go ahead and click Send in your application a few times with different values. The values won't show up instantaneously, but they should show up within a few moments. You should see your events similar to Figure 16-14.
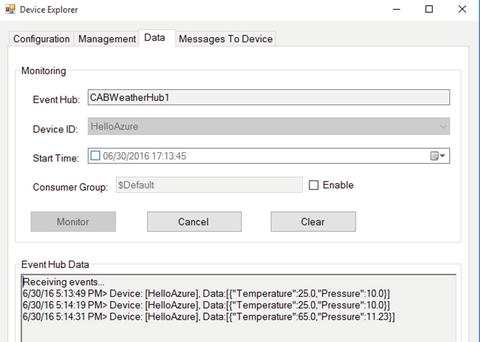
Figure 16-14. Monitoring messages in Device Explorer
OK, that was cool, eh? Now, let's send a message to the application from the cloud. You use the Message To Device tab in Device Explorer to send a message. Go ahead and click that tab now. In the Message text box, enter Hello, from Azure!, check the Add Time Stamp check box, and then click Send. You should see the output message in the Output area, as shown in Figure 16-15.

Figure 16-15. Sending a message to the cloud in Device Explorer
Now, go look at your application. Do you see the message? Figure 16-16 shows the result.
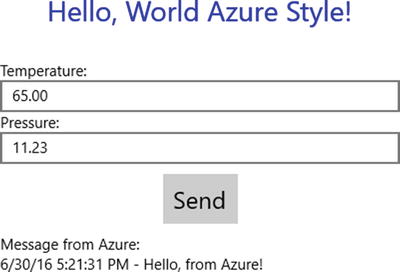
Figure 16-16. Message received!
So what just happened? Device Explorer formatted the message you wrote adding the timestamp and then sent it to the IoT Hub message queue. The application (in the timer tick event) connected to Azure and retrieved the message. How fantastic is that?
Now, let's go back to the Azure portal and look at the IoT Hub Settings page again. Figure 16-17 shows an excerpt from the page showing usage. Here you see that my IoT Hub sample logged 3 messages, which is exactly what I sent when I tested the application. You should see something similar in your IoT Hub usage data.
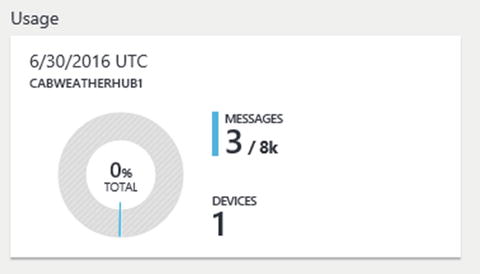
Figure 16-17. Checking Usage in the Azure portal
If you got all of this to work, take a victory lab around your house, apartment, or office. You've just created a sample project that stores data in the cloud.
In the next section, you see how to take this sample project and add real sensor data and view it in the cloud. Hold on, it's going to get a bit bumpy first. The technology and code is rather straightforward but a bit tedious to set up. However, I walk you through every step.
Overview
Now that you have seen how to get started writing IoT solutions with Azure, including how to set up an account, an IoT Hub, and a sample application that sends and receives messages from the cloud, let’s now see how to send real data to Azure, process the data, and view it in a web site—all of which is hosted in Azure. To do this, you are going to discover several new tools and features. It’s a bumpy ride through the many screens and a bit of a minefield with respect to terminology, but if you take your time and follow along, you can get this project running and see your IoT data in the cloud.
You want to make a version of the weather project from Chapter 13. Instead of writing the data to MySQL, you store it in an IoT Suite remote monitoring solution in Azure. While there’s a lot to do, the IoT Suite makes it a lot easier than doing it yourself step-by-step in Azure. But first, let’s get started with a review of the components and hardware that you need. I repeat some of the text from Chapter 13 for completeness.
Required Components
The following lists the components that you need. You can get the BMP280 sensor from Adafruit ( www.adafruit.com ) either in the Microsoft IoT Pack for Raspberry Pi or purchased separately, SparkFun ( www.sparkfun.com ), or any electronics store that carries electronic components. However, if you use a sensor made by someone other than Adafruit, you may need to alter the code to change the I2C address. Since this solution is a headless application, you do not need a monitor, keyboard, and mouse.
Adafruit BMP280 I2C or SPI barometric pressure and altitude sensor
Jumper wires: (4) male-to-female
Breadboard (full size recommended but half size is OK)
Raspberry Pi 2 or 3
Power supply
Set up the Hardware
Although there are only four connections needed for this project, you will make a plan for how things should connect, which is good practice to hone. To connect the components to the Raspberry Pi, you need four pins for the BMP280 sensor, which requires only power, ground, and two pins for the I2C interface. Refer to Chapter 12 for how to wire the sensor. I include Figure 16-18 as a reminder of how things are connected.
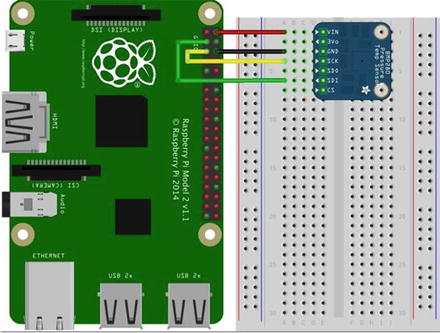
Figure 16-18. Connections for the Weather Sensor project
If you are following along with this chapter working on the project, go ahead and make the hardware connections now. Don’t power on the board yet, but do double and triple check the connections.
Set up a New Azure Remote Monitoring Solution
Before you get into the code, let’s set up a remote monitoring solution in Azure to host and present the data. The process is very straightforward (Microsoft has done an excellent job streamlining everything). Rather than connect to the Azure portal, you will use the Azure IoT Suite management web site at azureiotsuite.com/. You have to log in again using the same user account you used for the Azure portal (it’s all the same technology, just a different console).
Once you log in, you are presented with two choices: to create a predictive maintenance solution or a remote monitoring solution. A predictive maintenance solution allows you to analyze data and detect situations where maintenance of your infrastructure, machinery, and so forth, is needed either through regular preventative maintenance or corrective maintenance. A remote monitoring solution allows you to connect your devices to see data collection in real time, set alarms for threshold and similar important events, and conduct analysis on the data. For more information about the preconfigured solutions, see https://github.com/Azure/azure-content/blob/master/articles/iot-suite/iot-suite-what-are-preconfigured-solutions.md .
Figure 16-19 shows an excerpt of the initial page that you see at the IoT Suite web site.
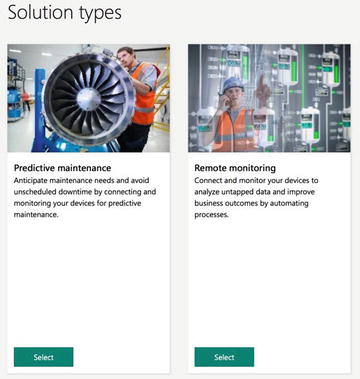
Figure 16-19. Choose a preconfigured solution
For this project, you set up a new remote monitoring solution. Click the Select button for the remote monitoring option . On the next screen, fill in the following text boxes.
Solution Name: Choose a name for your remote monitoring solution. It must be unique among the other remote monitoring solutions in your region so it is a good idea to use your initials or perhaps a number in the name. The name is validated and if the name is available, a green check mark appears next to the name. For example, I used CABWeatherHub1.
Region: Choose the closest region to your physical location. This isn’t that critical, but it is convention and generally expected as a best practice. If the IoT Suite and all of its components are available in your region, a green check mark appears to the right. If you see a red X, choose another nearby region.
Subscription: Choose the subscription you want to use. If you using the trial subscription select it; otherwise, Azure charges you for services setup.
Once you see three green check marks, as shown in Figure 16-20, you can click the Create Solution button to initiate the process.
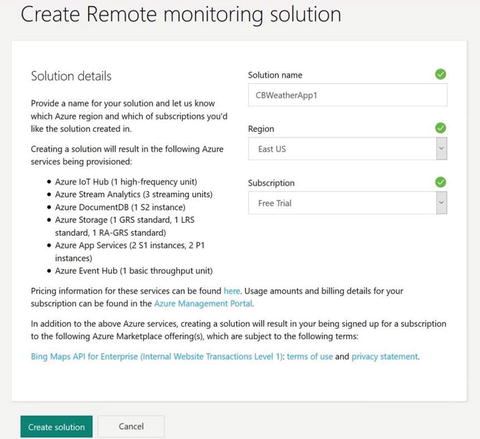
Figure 16-20. Setting up a Remote monitoring solution
Notice the list of services and features that are set up for you. As you can see, there is an IoT Hub, 3 Stream Analytics jobs, a DocumentDB store, a standard storage service, 2 application services, and an Event Hub. Wow, that’s a lot to configure. Again, you can do all of these steps yourself, but it is tedious and as I can attest, a little error-prone.
Once the process begins, it takes some time to execute. It could take as much as an hour to complete so take some time to pet your dog, catch up on your e-mail, and so forth. Once the process is complete, you see your new solution on the main page, similar to what’s shown in Figure 16-21.
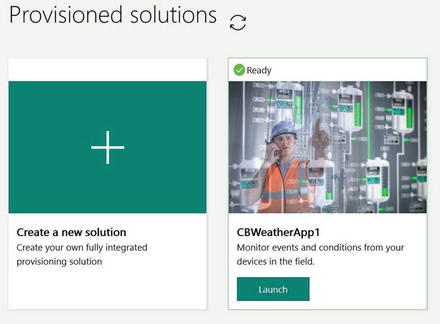
Figure 16-21. Remote solution ready
To see your solution’s dashboard, click the Launch button . This opens a new tab in your browser and you may need to log in again. Once logged in, you should see the initial, simulated data similar to what is shown in Figure 16-22. You won’t see all the features of the remote monitoring solution, but you see how to add a device and its data appears in the telemetry graph.
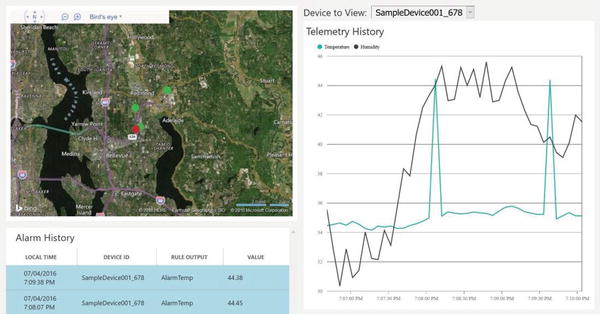
Figure 16-22. Initial dashboard
Wow, that’s impressive. What you see here is a small map that places a dot at the location of each device and a graph that shows the data being sent to Azure from the devices in real time. You also see a list of alarms in the bottom-left.
The devices shown in the preconfigured solution are all simulated. That is, they aren’t real and are generating fake data. This is to show you how the application works. However, the simulated devices consume Azure resources (they are billable) so you should feel free to poke around in the interface until the gee-gah7 effect wears off and then disable the simulated devices to save resources (money).
To disable the devices, click Devices on the left side panel. You see a dialog with list of all devices defined, similar to what’s shown in Figure 16-23. Notice the simulated devices.

Figure 16-23. Controlling devices
Click one of the devices. This opens the device details pane on the right. To disable the device, choose the Disable Device link. Once disabled, you can delete them by clicking the device in the list and choosing Remove Device... from the panel on the right. Simply disabling them is enough for this project.
Next, you need to create a device that you can use from the IoT application. Click the Devices button on the left and then click the Add a Device at the bottom left of the panel. You are given a choice of creating a simulated or custom device. This opens a three-step dialog, which you can use to create your device.8
The first step is to choose a simulated or custom device . Choose the custom device option and click Add New. On the next page, choose the Let me define my own device id option and enter a name for your device. Once again, the name is validated and if it is available, a green check mark appears to the right. When ready, click the Create button. On the next page, you see the credentials for your device, which you can copy and save for use in the application. I have blanked out the credentials in the figure, but you should see them for your device. Figures 16-24 through 16-26 show examples creating a device with the dialog.
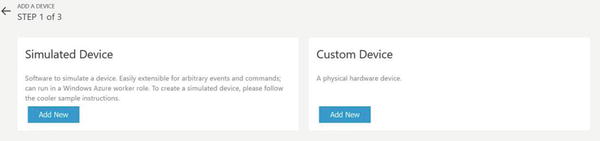
Figure 16-24. Adding a new device (choose Custom Device)
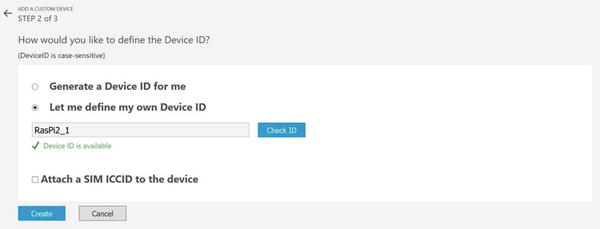
Figure 16-25. Adding a new device (Device id)
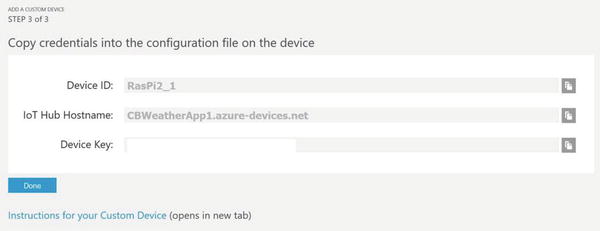
Figure 16-26. Adding a new device (Credentials)
When ready, click Done. After a few moments, you see your device in the list with a status of Pending. This changes once the device connects and starts sending data.
OK, you’re almost done. There is just one more step you need to do to get your device fully operational with the remote monitoring solution. You must modify the metadata for the device. For this, you need to return to the Azure portal ( www.portal.azure.com ). Once you log in, you see all the services and features created for you during the remote monitoring setup. Figure 16-27 shows an example of my account. You see the IoT Hub, apps, and more created by the IoT Suite preconfigured remote monitoring solution.
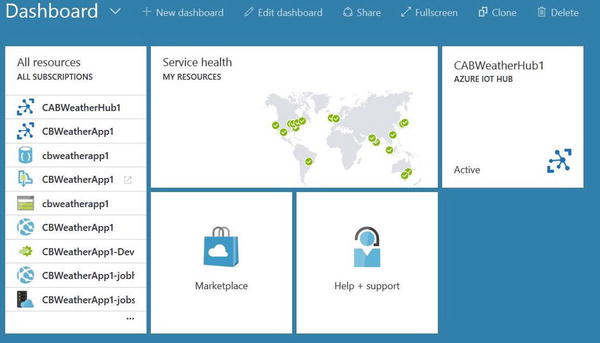
Figure 16-27. Returning to your Azure Portal to see the IoT Suite services
You must modify the device metadata in the Document DB resource in order to add the attributes that the remote monitoring solution expects, including the location and data elements. This seems to be a rough spot in the otherwise fantastic preconfigured solution. I expect that Microsoft will eventually include a better method of defining a custom device.
To modify the device metadata, click All Resources to show all of your Azure resources and then click the Document DB resource. Figure 16-28 shows these steps with my solution.
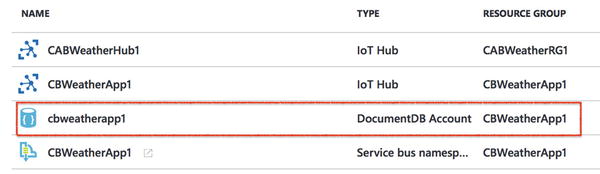
Figure 16-28. Select DocumentDB Resource
Next, open the settings blade and then click Document Explorer at the top. This opens a blade that shows all the documents listed for this resource. These are files formatted as JSON documents. You see a number of files with strange names—one for each device. Click the file names until you find your new device (look for the device id). This opens the document and lets you edit the file.
Figure 16-29 shows an example of the Document Explorer blades for my solution.
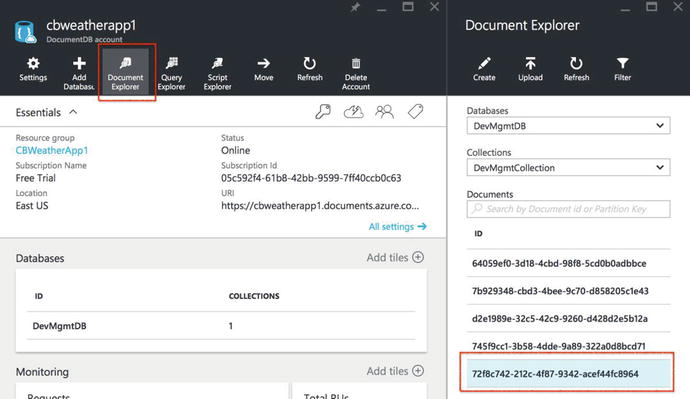
Figure 16-29. Document Explorer in Document DB Resource
You initially see only the device id and a few of the properties. What you need to do is add a few more properties, as shown in bold in Listing 16-5. Change your JSON document to include the new attributes (key/value pairs), as shown. Be sure to leave the existing attributes as they are and just add the missing ones. Use your own data, especially the latitude and longitude of your location so you can see your device on the map.
Listing 16-5. Modified JSON Document for the New Device
{"DeviceProperties": {"DeviceID": "RasPi2_1","HubEnabledState": null,"CreatedTime": "2016-07-04T23:20:19.7587277Z","DeviceState": "normal","UpdatedTime": null,"Manufacturer": "Chuck","ModelNumber": "test1","SerialNumber": "N/A","FirmwareVersion": "0","Platform": "Win10IOTCore","Processor": "ARM","InstalledRAM": "1 MB","Latitude": 37.5407,"Longitude": -77.436},"SystemProperties": {"ICCID": null},"Commands": [],"CommandHistory": [],"IsSimulatedDevice": false,"id": "72f8c742-212c-4f87-9342-acef44fc8964"}
Once you finish editing the file, click Save at the top, as shown in Figure 16-30.

Figure 16-30. Completing the JSON file for Device Settings
OK, now you’re ready to use the IoT Suite remote monitoring solution to see some data. Let’s get started with writing the code for the project!
Write the Code
Now it’s time to write the code for the project. You will use the same BMP280 sensor from Chapter 13 but instead of writing the data to MySQL, you will send it to the cloud. You will use the Glovebox.IoT.Devices and Units.NET libraries as well as the Azure IoT Hub connected service. You won’t use a user interface, so this is a headless solution. Let’s get started.
New Project
You will use a C# project template for this project—the Blank App (Universal Windows) template. Use the name AzureWeather for the project name. You can save the project wherever you like or use the default location. Once the project opens, double-click the MainPage.xaml.cs file. There are a number of namespaces you need to include. Go ahead and add those now, as shown next.
using System.Threading.Tasks; // Add for Task.Run()using System.Diagnostics; // Add for debuggingusing Glovebox.IoT.Devices.Sensors; // Add for BMP280 (or BME280)
Here you added namespaces for threading so you can run a task (for the BMP280 library), diagnostics for writing debug statements to the log, and finally the sensor library from Glovebox. You’ll see how to add the MySQL and Glovebox references in the next sections.
Next, you need to add some variables. You add a variable for the DispatcherTimer class , a variable for the MySQLConnection class, and a variable for the BMP280 class. The following shows the correct code for defining these variables. These are placed in the MainPage class.
private DispatcherTimer bmpTimer; // Timerprivate BMP280 tempAndPressure; // Instance of BMP280 class
The code in the MainPage() function initializes the components, the BMP280 class and sets up the timer. In this case, you use a value of 5000, which is 5 seconds. You may want to consider making value greater if you plan to use the project for practical use cases. Listing 16-6 shows the complete MainPage() method.
Listing 16-6. MainPage Method
public MainPage(){this.InitializeComponent();// Instantiate a new BMP280 class instancetempAndPressure = new BMP280();this.bmpTimer = new DispatcherTimer();this.bmpTimer.Interval = TimeSpan.FromMilliseconds(5000);this.bmpTimer.Tick += BmpTimer_Tick;this.bmpTimer.Start();}
Adding References for the Hardware
You need to add a few references and run the Azure IoT Hub connected service. You need the Glovebox.IoT.Devices and Units.NET libraries as well as the Windows 10 IoT Extensions. While you have seen how to use each in this and previous chapters, the following paragraphs remind you of how to do each.
Glovebox.IoT.Devices
The Glovebox.IoT.Devices is a library that makes it easy to use I2C sensors like the BMP280. All you need to do is instantiate the class and call the methods to read the data. To add the Glovebox.IoT.Devices library, use the NuGet Package Manager from the Tools ➤ NuGet Package Manager ➤ Manage NuGet Packages for Solution... menu. Click the Browse tab and then type glovebox in the search box. Select the entry named Glovebox.IoT.Devices in the list. Tick the project name (solution) on the right and then click Install.
Units.NET
You also need to install the Units.NET library because the Glovebox.IoT.Devices library requires it. To add the Units.NET library, use the NuGet Package Manager from the Tools ➤ NuGet Package Manager ➤ Manage NuGet Packages for Solution... menu. Click the Browse tab and then type units in the search box. Select the entry named Units.NET in the list. Tick the project name (solution) and then click Install.
Windows 10 IoT Extensions
You must add the reference to the Windows 10 IoT Extensions from the project property page. You do this by right-clicking the References item in Solution Explorer.
Azure IoT Hub Connected Service
You will use the connected service like you did in the sample project. This creates a new source file named AzureIoTHub.cs, which encapsulates what you need to communicate with the cloud. Go ahead and run it now.
Right-click the References item in Solution Explorer and choose Add Connected Service. Scroll down in the dialog and select the Azure IoT Hub entry for the IoT Solution you created and click the Configure button. Remember to choose the hard-coded security option and then click OK button to continue. On the configuration page, you are asked to log in to your Azure account.
Next, select your IoT Hub and then click the Add button. You should see both the IoT Hub you created earlier as well as the IoT Hub for the remote monitoring solution. Figure 16-31 shows an example of what you will see when you are asked to select your IoT Hub.
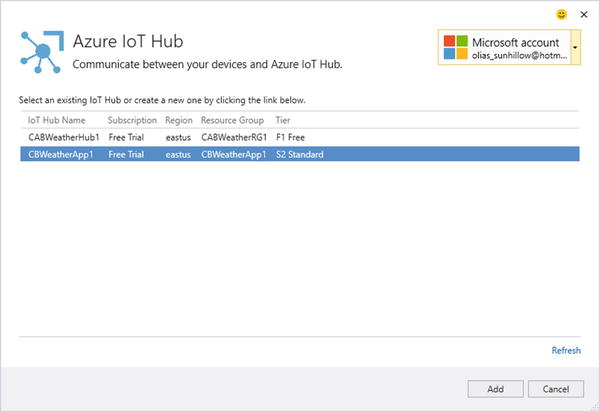
Figure 16-31. Selecting the IoT Hub
Next, a dialog appears, asking you to select your device, as shown in Figure 16-32. Choose the device that you created when you set up your remote monitoring solution. Click the OK button to select the device and click OK again to continue the registration.
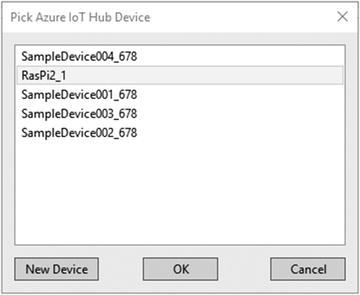
Figure 16-32. Selecting your device
Now you’re ready to add the code to connect everything together. Let’s begin by modifying the code you added using the IoT Hub connected service.
Create a Class for the Weather Data
Recall from the sample project that you need to add a new class to contain the data, which is updated by reading the data from the sensor and then sent to Azure using the IoT Hub class. Add a new class named WeatherData.cs. You can add the new class by right-clicking the project in the Solution Explorer. Select Add ➤ Add New Item.. . and then choose the Class entry in the list. Use the name WeatherData and click the Add button.
Now, open that file and add the code to create a new setup attributes for the data values. You need attributes for the device id, temperature, and barometric pressure, as shown next. Be sure to use the same name for device id that you used when you created your custom device.
namespace AzureWeather{class WeatherData{public string DeviceId = "RasPi2_1";public double Temperature { get; set; }public double Pressure { get; set; }}}
You use this class to fill in the data from the new methods to read the data in the MainPage.xaml.cs file.
Reading the Weather Data and Sending it to the Azure IoT Hub
Now let’s add the code to read the weather data from the BMP280. You are using a timer to fire an event every 5 seconds to read (and save) the data. Thus, you need the event for the DispatcherTimer object defined earlier, named BmpTimer_Tick().
However, instead of putting the code to read the data in this event, you use another method and run it as a task (in a new thread). This is because the BMP280 object cannot run in the user interface thread. Thus, you create a new method named getData() to read the data.
The BMP280 class from the Glovebox.IoT.Devices library provides a variety of data from the sensor, including temperature in both Fahrenheit and Celsius, and barometric pressure in several units. You read all of these with the Temperature and Pressure attributes, as shown in Listing 16-7.
Listing 16-7. Code to Populate the WeatherData Class
private void BmpTimer_Tick(object sender, object e){var t = Task.Run(() => getData());}public async void getData(){// Read data from the sensorWeatherData data = new WeatherData();data.Temperature = tempAndPressure.Temperature.DegreesCelsius;data.Pressure = tempAndPressure.Pressure.Bars;// Send data to the cloudawait AzureIoTHub.SendDeviceToCloudMessageAsync(data);Debug.WriteLine(String.Format("Data sent: {0}, {1}",data.Temperature, data.Pressure));}
You’re almost done with the code. All that is left is modifying the code to write the weather data to Azure.
Writing the Data to the IoT Hub
Finally, you need to modify the AzureIoTHub.cs file to change the SendDeviceToCloudMessageAsync() method to use the new WeatherData class to format the data in JSON format and send it to Azure. This is very similar to the code you used in the sample project. Listing 16-8 shows the completed new method. You also need to add a couple of references for the weather class and the JSON class.
Listing 16-8. New SendDeviceToCloudMessageAsync Method in AzureIoTHub.cs
using AzureWeather; // Add for the WeatherData classusing Newtonsoft.Json; // Add for JSON utilities...public static async Task SendDeviceToCloudMessageAsync(WeatherData data){var deviceClient = DeviceClient.CreateFromConnectionString(deviceConnectionString, TransportType.Amqp);var jsonMsg = JsonConvert.SerializeObject(data);var message = new Message(Encoding.ASCII.GetBytes(jsonMsg));await deviceClient.SendEventAsync(message);}
That’s it, you’re done! Now you can begin the deployment.
Deploy and Execute
Now it is time to deploy the application! Be sure to fix any compilation errors first. Like you have with other applications, you want to compile the application in debug first (but you can compile in release mode if you’d prefer) and you must turn on the debugger on your board. You do this with the device portal.
Go ahead and power on your board. When ready, connect to the board to run the device portal. Turn on the debugger, open the project properties to target the device, and run with the remote debugger.
Recall from the Chapter 9, you must modify two settings: the Remote machine name and the Authentication Mode. Set the Remote machine name to the IP address of your device with the port specified by the remote debugger when you started it from the device portal.
You may want to run the code in debug and watch the code run and fire events a few times. You can set a breakpoint in the SendDeviceToCloudMessageAsync() method and watch how the data is sent to Azure and displayed in the output window in Visual Studio.
Once you’re ready to run the application normally, use the Device Portal to start the application. You can start or stop the application from the Apps tab on the Device Portal. The triangle icon can be used to start the application and the square icon shows a running application that you can stop.
When you run your application, since it is headless, you won’t see anything happen. Let the application run for a few minutes and then return to your remote monitoring solution in the Azure IoT Suite. Launch your solution and then observe how the map changes. It should reorient to encompass all of your devices. That is, if you left the simulated devices running or did not remove them, you see dots located on the west coast of the United States. You should also see a dot for your device (RasPi2_1) located at the coordinates you put in the metadata.
To see the data for your device, click the dot and observe the data in the chart. Figure 16-33 shows an example of what you should see in the dashboard. This shows an interesting set of spikes in the data that I achieved by holding my finger on the sensor to increase the temperature. This does nothing for barometric pressure and since I ran the application indoors, the value remains constant.
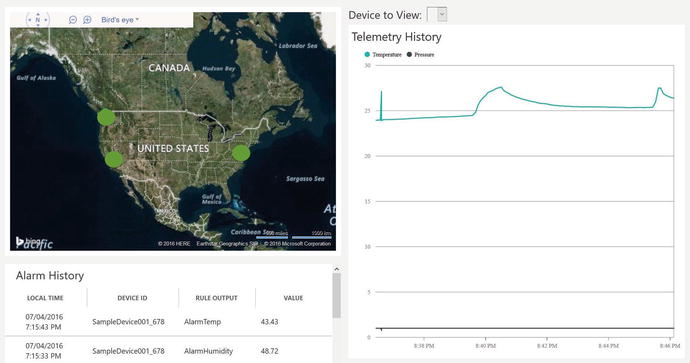
Figure 16-33. Real-time data from the sensor in Azure
If you see something similar to this, congratulations! You now know how to leverage Azure IoT Suite to create a remote monitoring solution. This gives you a firm foundation for starting to work with your own cloud-based IoT solutions.
Note
The default setting for free IoT Hub resources, including the IoT Suite preconfigured solution is to retain data for only one day. To store the data longer, you need to upgrade your subscription to one of the paid levels.
Summary
Using cloud computing services, especially those that provide tools and features specifically for IoT solutions, such as Microsoft Azure, can be a steep learning curve. Fortunately, Microsoft has worked very hard to streamline the process to get you going quickly with the Azure IoT Suite preconfigured solutions. While the setup process is easy and the code to interact with the services is created for you (in template form) via the Azure IoT Hub Connected Service, there is nothing simple or basic about the features included in the Azure IoT Suite.
In fact, you can build all manner of cloud-based solutions and services with Microsoft Azure. In this regard, Azure is very powerful, which is exactly what you want when developing IoT Solutions that you want to put into service as either a reliable enterprise-grade product or even as a product you sell to others.
In this chapter, you close your journey of discovering how powerful Windows 10 IoT Core is and how you can use Windows 10 to build sophisticated IoT solutions from simple projects that you run for fun to full cloud-based solutions in Azure. Now it’s time for you to engage your own imagination and put the tools and techniques you learned in this book toward building your own IoT solutions.
I hope you enjoyed the ride, and that reading about and working on the projects in this book were as much fun for you as I had writing them.
Footnotes
1 Yes, the Azure web sites are all colored an interesting shade of blue.
2 While I consider myself a veteran of cloud computing, learning Azure has proven to be like peeling an onion. Every time I use a new feature, I find another cool thing I want to explore.
4 I’ve condensed the essentials to make it easy to follow.
5 It usually only takes about 10 to 15 minutes, but since you're relaxing, take your time!
6 It’s easy to forget this step. Guess how I know.
7 A highly technical term to explain the blank looks, wry grins, and a host of assorted emotions displayed when experiencing cool technologies for the first time. Yes, it does wear off.
8 Yes, this device appears in the list that the Azure Connected Services retrieves from Azure.