Now that you have a basic understanding of how to use Visual Studio 2015, you can learn more about some of the languages you may encounter when developing your IoT solutions. One of those languages is Python—a very robust and powerful language that you can use to write very powerful applications. Mastering is very easy and some may suggest it doesn’t require any formal training to use. This is largely true and thus you should be able to write applications for Windows 10 IoT Core with only a little bit of knowledge about Python.
Thus, this chapter presents a crash course on the basics of Python programming in Visual Studio, including an explanation about some of the most commonly used language features. As such, this chapter provides you with the skills you need to understand the growing number of IoT project examples available on the Internet. The chapter concludes with a walk-through of an example project that shows you how to interact with hardware. Specifically, you will implement the LED project you saw in Chapter 3. Only this time, you’ll be writing it as a Windows 10 IoT Core application in Python. So let’s get started!
Tip
If you are not interested in using Python in your IoT solutions, or you already know the basics of Python programming, feel free to skim through this chapter. I recommend working through the example project at the end of the chapter, especially if you’ve not written IoT applications.
I briefly discussed Python in Chapter 3, but you will see much more of the language in the following sections. That is, I explain the code that you will see in the sample application at the end of the chapter.
Getting Started
Python is a high-level, interpreted, object-oriented scripting language . One of the biggest tenants of Python is to have a clear, easy to understand syntax that reads as close to English as possible. That is, you should be able to read a Python script and understand it even if you haven’t learned Python. Python also has less punctuation (special symbols) and fewer syntactical machinations than other languages.
Tip
Although you can terminate a statement with the semicolon (;), it is not needed and considered bad form.
Here are a few of the key features of Python.
An interpreter processes python at runtime. No compiler is used.
Python supports object-oriented programming constructs by way of a class.
Python is a great language for the beginner-level programmers and supports the development of a wide range of applications.
Python is a scripting language but can be used for a wide range of applications.
Python is very popular and used throughout the world giving it a huge support base.
Python has few keywords, simple structure, and a clearly defined syntax. This allows the student to pick up the language quickly.
Python code is easy to read and understand.
Python was developed by Guido van Rossum from the late 1980s to early 1990s at the National Research Institute for Mathematics and Computer Science in the Netherlands and maintained by a core development team at the institute. It was derived from and influenced by many languages, including Modula-3, C, C++, and even Unix shell scripting languages.
A fascinating fact about Python is it was named after the BBC show Monty Python’s Flying Circus and has nothing to do with the reptile by the same name.1 Quoting Monty Python in source code documentation (and even a humorous diversion for error messages) is very common and while some professional developers may cringe at the insinuation, it’s considered by Pythonistas2 as showing your Python street cred.
Python is available for download ( www.python.org/downloads ) for just about every platform that you may encounter or use—even Windows! However, the Python additions to Visual Studio and especially Windows 10 IoT are limited. In fact, you can only create background (headless) applications in Python for Windows 10 IoT Core.3 While this may seem very limited, there is a very good reason why I’ve included Python in this book.
Why Do I Need to Learn Python?
Recall that I stated that the volume of Python examples for the Raspberry Pi and other low-cost computing boards is vast. So much so that you can find Python code snippets to do just about anything you want when learning to work with the GPIO.
It would be very sad if Windows 10 IoT enthusiasts could not take advantage of the wealth of information available for programming the Raspberry Pi with Python. Fortunately, this is not the case! Indeed, many of the Python examples can be adapted for use on Windows 10 IoT Core. You may need to change the modules included (I’ll explain this later), and you may be limited to working with GPIO, but by and large you can reuse that Python code in your own solutions! Thus, learning Python is a powerful resource for developing applications for Windows 10 IoT Core.
Furthermore, you can often develop your Python scripts using the interpreter on the Raspberry Pi prior to building your Windows 10 solution. This is why I covered the topic in Chapter 3. Using the interpreter with a basic script on the Raspberry Pi is faster and less error-prone than developing it in Visual Studio and deploying it. This is because since Python is interpreted, the Visual Studio tools cannot catch all of the problems or errors in your code before you deploy and run it. Using the interpreter (either on Windows or Raspberry Pi if you’re using GPIO) allows you to correct any syntax errors before wasting effort in remote debugging (which can fail for simple syntax errors).
Tip
You can use the Windows Python interpreter to debug basic, non-GPIO code outside of Visual Studio.
Installing Python on Windows 10
How can you use it to write Windows 10 IoT applications? Fortunately, a Python interpreter is available for Windows 10 and indeed for the Windows 10 IoT Core. In fact, in order to use Python for your IoT projects, you need to download and install the following tools and components (if you haven’t already).
Python 3.5 for Windows: http://www.python.org/downloads
Python Tools for Visual Studio (PTVS): https://github.com/microsoft/ptvs/releases
Python UWP SDK (pyuwpsdk.vsix): https://github.com/ms-iot/python/releases
Python Windows Devices (pywindevices.zip) modules: https://github.com/ms-iot/python/releases
First and foremost, you must install Python 3.5 on your PC. If you have an older version, such as 2.6, 2.7, or even 3.4, you should uninstall them (if you don’t need them). This is because the PTVS requires Python 3.5 and ignore the older versions. If you attempt to work with Python solutions with an older version of Python, you may get some strange build or deployment errors or your solution will fail to run on the IoT device. Follow the instructions on the link to download and install Python 3.5.
Next, you need the Python Tools for Visual Studio. This is a third-party component that you can download and install but must do so in order to see the Python projects in the new project dialog tree. Follow the instructions on the web site to download and install PTVS. Note that this installation could take a while depending on your Internet connection and processor speed.
Next, you need to install the SDK for Python UWP applications. This is a Visual Studio plugin that you can install by double-clicking the file or by installing it via Visual Studio 2015.
Finally, you need the Python modules for the GPIO and other libraries. These are found in the pywindevices.zip file. Simply download this file and extract the files in a common place that you can find when building your solutions. For example, I placed mine in a folder (pywindevices) in the root of the Visual Studio project directory.
OK, once these prerequisites are complete, you’re ready to start wiring Python Windows 10 IoT solutions!
Note
You may encounter blogs that claim Python does not work on Windows 10 or that the projects cannot load or run. This is largely due to improper setup of the PC or project. If you follow the example in this chapter, your projects will work correctly.
Should you require more in-depth knowledge of Python, there are a number of excellent books on the topic. The following lists a few of my favorites. A great resource is the documentation on the Python site ( www.python.org/doc/ ) .
Pro Python, 2nd Edition, by J. Burton Browning and Marty Alchin (Apress, 2014)
Learning Python, 5th Edition, by Mark Lutz (O’Reilly Media, 2013)
Automate the Boring Stuff with Python: Practical Programming for Total Beginners by Al Sweigart (No Starch Press, 2015)
Python Crash Course
Now let’s learn some of the basic concepts of Python programming. Let’s begin with the building blocks of the language, such as variables, modules, and basic statements, and then move into the more complex concepts of flow control and data structures.
While the material may seem to come at you in a rush (hence the crash part), this crash course on Python covers only the most fundamental knowledge of the language and how to use it in Visual Studio. It is intended to get you started writing Python Windows 10 IoT Core applications. If you find that you want to write more complex applications than the examples in this book, I encourage you to acquire one or more of the resources listed earlier to learn more about Python programming.
The following sections present many of the basic features of Python programming that you need to know in order to understand example projects for Windows 10 IoT Core and vital to successfully implementing the Python projects in this book.
The Basics
Python is a very easy language to learn with very few constructs that are even mildly difficult to learn. Rather than toss out a sample application, let’s approach learning the basics of Python in a Python-like way: one step at a time.
The first thing you should learn is that Python does not use a code block demarcated with symbols like other languages. More specifically, code that is local to a construct, such as a function or conditional or loop is designated using indentation. Thus, the lines below that are indented (by spaces or, gag, tabs4) so that the starting characters align for the code body of the construct. The following shows this concept in action.
if (expr1):print("inside expr1")print("still inside expr1")else:print("inside else")print("still inside else")print("in outer level")
Here you see a conditional, or if, statement. Notice that the function call print() (a common way to display output to the console) is indented. This signals the interpreter that the lines belong to the construct above it. For example, the two print statements that mention expr1 form the code block for the if condition (expression evaluates to true). Similarly, the next two print statements form the code block for the else condition. Finally, the non-indented lines are not part of the conditional and thus are executed after either the if or else depending on the expression evaluation.
As you can see, indentation is a key concept to learn when writing Python. Even though it is very simple, making mistakes in indentation can result in code executing that you did not expect or worse errors from the interpreter.
Note
I use program and application interchangeably with script when discussing Python. While technically, Python code is a script, you often use it in contexts where program or application is more appropriate.
There is one special symbol that you will encounter frequently. Notice the use of the colon (:) in the preceding code. This symbol is used to terminate a construct and signals the interpreter that the declaration is complete and the body of the code block follows.
Now let’s look at how you can use variables in your programs (scripts).
Variables
Python does not have a formal type specification mechanism like other languages. However, you can still define variables to store anything you want. In fact, Python permits you to create and use variables based on context. However, you can use initialization to “set” the data type for the variable. The following show several examples.
# Numbersfloat_value = 9.75integer_value = 5# Stringsmy_string = "He says, he's already got one."print("Floating number: {0}".format(float_value))print("Integer number: {0}".format(integer_value))print(my_string)
For situations where you need to convert types or want to be sure values are typed a certain way, there are many functions for converting data. Table 7-1 shows a few of the more commonly used type conversion functions. I discuss some of the data structures in a later section.
Table 7-1. Type Conversion in Python
Function | Description |
|---|---|
int(x [,base]) | Converts x to an integer. Base is optional (e.g., 16 for hex). |
long(x [,base] ) | Converts x to a long integer. |
float(x) | Converts x to a floating-point. |
str(x) | Converts object x to a string. |
tuple(t) | Converts t to a tuple. |
list(l) | Converts l to a list. |
set(s) | Converts s to a set. |
dict(d) | Creates a dictionary. |
chr(x) | Converts an integer to a character. |
hex(x) | Converts an integer to a hexadecimal string. |
oct(x) | Converts an integer to an octal string. |
However, you should use these conversion functions with care to avoid data loss or rounding. For example, converting a float to an integer can result in truncation.
Including Modules
Python applications can be built from reusable libraries that are provided by the Python environment. They can also be built from custom modules or libraries that you create yourself or download from a third party. When you want to use a library (function, class, etc.) that is part of a module, you use the import keyword and list the name of the module. The following shows some examples.
import osimport sysimport mysql.utilities.common.serverimport _wingpio as gpio
The first two lines demonstrate how to import a base or common module provided by Python. In this case, you are using or importing modules for the os and sys modules (operating system and Python system functions).
Next, you see a special dotted notation in use. The dotted notation is realized by using folders. In this case, you’re using a module from MySQL Utilities (a set of MySQL scripts and library written in Python; see http://dev.mysql.com/doc/mysql-utilities/1.6/en/ ). Specifically, you’re using the module located in the utilities/common folder named server. Indeed, if you were to locate that module, you would find a file named server.py. The starting point of the module dotted notation reference is any path in the PYTHONPATH environment variable.
Finally, the last example shows how you can use the as keyword to rename the module (give it a different name or namespace label) to simplify your code by allowing you to use shorter names or names that make more sense in context.
Tip
It is customary (but not required) to list your imports in alphabetical order, with built-in modules first, and then third-party modules, and finally, your own modules.
Comments
One of the most fundamental concepts in any programming language is the ability to annotate your source code with text that not only allows you to make notes among the lines of code, but also forms a way to document your source code.
To add comments to your source code, use the pound sign (#).5 Place it at the start of the line to create a comment for that line; repeat the # symbol for each subsequent line. This creates what is known as a block comment, as shown next. Notice that I used a comment without any text to create white space. This helps with readability and is common practice with block comments.
## Windows 10 for the IoT## Example Python application.## Created by Dr. Charles Bell#
You can also place comments on the same line as the source code. The compiler will ignore anything from the pound sign to the end of the line. For example, the following shows a common method for documenting variables.
zip = 35012 # Zip or postal codeaddress1= "123 Main St." # Store the street address
Arithmetic
You can perform a number of mathematical operations in Python, including the usual primitives but also logical operations and operations used to compare values. Rather than discuss these in detail, I provide a quick reference in Table 7-2 that shows the operation and example of how to use the operation.
Table 7-2. Arithmetic, Logical, and Comparison Operators in Python
Type | Operator | Description | Example |
|---|---|---|---|
Arithmetic | + | Addition | int_var + 1 |
- | Subtraction | int_var - 1 | |
* | Multiplication | int_var * 2 | |
/ | Division | int_var / 3 | |
% | Modulus | int_var % 4 | |
- | Unary subtraction | -int_var | |
+ | Unary addition | +int_var | |
Logical | & | Bitwise and | var1&var2 |
| | Bitwise or | var1|var2 | |
^ | Bitwise exclusive | var1^var2 | |
∼ | Bitwise compliment | ∼var1 | |
&& | Logical and | var1&&var2 | |
|| | Logical or | var1||var2 | |
Comparison | == | Equal | expr1==expr2 |
!= | Not equal | expr1!=expr2 | |
< | Less than | expr1<expr2 | |
> | Greater than | expr1>expr2 | |
<= | Less than or equal | expr1<=expr2 | |
>= | Greater than or equal | expr1>=expr2 |
Bitwise operations produce a result on the values performed on each bit. Logical operators (and, or) produce a value that is either true or false and are often used with expressions or conditions.
Now that you understand variables and types, the operations permitted on them, and expressions, let’s look at how to use them in flow control statements.
Flow Control Statements
Flow control statements change the execution of the program. They can be conditionals that use expressions that restrict execution to only those cases where the expression evaluates true (or negated), special constructs that allow you to repeat a block of code (loops), and the use of functions to switch context to perform some special operations. You’ve already seen how functions work so let’s look at conditional and loop statements.
Conditionals
Conditional statements allow us to direct execution of your programs to sections (blocks) of code based on the evaluation of one or more expressions. There are two types of conditional statements in Python—the if statement and the switch statement.
You have seen the if statement in action in our example code. Notice in the example, you can have one or more (optional) else phrases that you execute once the expression for the if conditions evaluate to false. You can chain if / else statements to encompass multiple conditions, where the code executed depends on the evaluation of several conditions. The following shows the general structure of the if statement.
if (expr1):# execute only if expr1 is trueelif ((expr2) || (expr3)):# execute only if expr1 is false *and* either expr2 or expr3 is trueelse:# execute if both sets of if conditions evaluate to false
While you can chain the statement as much as you want, use some care here because the more elif sections you have, the harder it becomes to understand, maintain, and avoid logic errors in your expressions.
Loops
Loops are used to control the repetitive execution of a block of code. There are three forms of loops that have slightly different behavior. All loops use conditional statements to determine whether to repeat execution or not. That is, they repeat as long as the condition is true. The three types of loops are while, do, and for. I explain each with an example.
The while loop has its condition at the “top” or start of the block of code. Thus, while loops only execute the body if and only if the condition evaluates to true on the first pass. The following illustrates the syntax for a while loop. This form of loop is best used when you need to execute code only if some expression(s) evaluate to true. For example, iterating through a collection of things those number of elements is unknown (loop until you run out of things in the collection).
while (expression):# do something here
For loops are sometimes called counting loops because of their unique form. For loops allow you to define a counting variable and a range or list to iterate over. The following illustrates the structure of the for loop. This form of loop is best used for performing an operation in a collection. In this case, Python automatically places each item in the collection in the variable for each pass of the loop until no more items are available.
for variable_name in list:# do something here
You can also do range loops or counting loops. This uses a special function called range() that takes up to three parameters, range([start], stop[, step]), where start is the starting number (an integer), stop is the last number in the series, and step is the increment. So you can count by 1, 2, 3, and so forth through a range of numbers. The following shows a simple example.
for i in range(2,9):# do something here
There are other uses for range() that you may encounter. See the documentation on this function and other built-in functions at https://docs.python.org/3/library/functions.html for more information.
Python also provides a mechanism for controlling the flow of the loop (e.g., duration or termination) using a few special keywords as follows.
break: Exit the loop body immediately
continue: Skip to next iteration of the loop
else: Execute code when loop ends
There are some uses for these keywords, particularly break, but it is not the preferred method of terminating and controlling loops. That is, professionals believe the conditional expression or error handling code should behave well enough to not need these options.
Functions
Python allows you to use modularization in your code. While it supports object-oriented programming by way of classes (a more advanced feature that you are unlikely to encounter for most Python GPIO examples), on a more fundamental level you can break your code into smaller chunks using functions.
Functions use a special keyword construct (rare in Python) to define a function. You simply use def followed by a name and a parameter list in parenthesis. The colon is used to terminate the declaration. The following shows an example.
def print_dictionary(the_dictionary):for key, value in the_dictionary.items():print("'{0}': {1}".format(key, value))
You may be wondering what this strange code does. Note that the loop is assigning two values from the result of the items() function . This is a special function available from the dictionary object. (Yes, dictionaries are objects! So are tuples, lists, and many other data structures.) The items() function returns the key, value pairs; hence, the names of the variables.
The next line prints out the values. The use of formatting strings where the curly braces define the parameter number starting at 0 is common for Python 3.x applications. See the Python documentation for more information about formatting strings.
Here the body of the function is indented. All statements indented under this function declaration belong to the function and are executed when the function is called. You can call functions by name providing any parameters as follows.
print_dictionary(my_dictionary) This example, when executed, generates the following output as shown in Figure 7-1. I generated this by writing the function in the Python interpreter on my PC and executing it. To run the interpreter, search for Python and select the Python command window. Thus, this demonstrates how to use the Python interpreter to execute Python code on the fly (as you type each line and press Enter).

Figure 7-1. Using the Python interpreter
Tip
Functions (methods) provided by objects (classes) can be called using the syntax object_name.method_name().
Now let’s look at some commonly used data structures, including this strange thing called a dictionary.
Basic Data Structures
What you have learned so far about Python is enough to write the most basic programs and indeed more than enough to tackle the example project later in this chapter. However, when you start needing to operate on data (either from the user or from sensors and similar sources), you need a way to organize and store data and operations on the data in memory. The following introduces three data structures in order of complexity: lists, tuples, and so forth. Next, I demonstrate the three that you encounter most frequently.
Lists
Lists are a way to organize data in Python. It is a free-form way to build a collection. That is, the items (or elements) need not be the same data type. Lists also allow you to do some interesting operations, such as adding things at the end, beginning, or at a special index. The following demonstrates how to create a list.
# Listmy_list = ["abacab", 575, "rex, the wonder dog", 24, 5, 6]my_list.append("end")my_list.insert(0,"begin")for item in my_list:print("{0}".format(item))
Here you see I created the list using square brackets ([]). The items in the list definition are separated by commas. Note that you can create an empty list simply be setting a variable equal to []. Since lists, like other data structures, are objects, there are a number of operations available for lists, such as the following.
append(x): Add x to the end of the list
extend(l): Add all items to the end of the list
insert(pos,item): Insert item at a position pos
remove(value): Remove the first item that matches (==) the value
pop([i]): Remove the item at position i or end of list
index(value): Return index of first item that matches
count(value): Count occurrences of value
sort(): Sort the list (ascending)
reverse(): Reverse sort the list
Lists are like arrays in other languages and very useful for building dynamic collections of data.
Tuples
Tuples on the other hand, are a more restrictive type of collection. That is, they are built from a specific set of data and do not allow manipulation like a list. The following shows an example of a tuple and how to use it.
# Tuplemy_tuple = (0,1,2,3,4,5,6,7,8,"nine")for item in my_tuple:print("{0}".format(item))if 7 in my_tuple:print("7 is in the list")
Here you see I created the tuple using parenthesis (). The items in the tuple definition are separated by commas. Note that you can create an empty tuple simply be setting a variable equal to (). Since tuples, like other data structures, are objects, there are a number of operations available, such as the following, including operations for sequences such as inclusion, location, and so forth .
x in t: Determine if t contains x
x not in t: Determine if t does not contain x
s + t: Concatenate tuples
s[i]: Get element i
len(t): Length of t (number of elements)
min(t): Minimal (smallest value)
max(t): Maximal (largest value)
If you want even more structure with storing data in memory, you can use a special construct (object) called a dictionary.
Dictionaries
A dictionary is a data structure that allows you to store key/value pairs where the data is assessed via the keys. Dictionaries are a very structured way of working with data and they are the most logical form you want to use when collecting complex data. The following shows an example of a dictionary.
# Dictionarymy_dictionary = {'first_name': vChuck",'last_name': "Bell",'age': 36,'my_ip': (192,168,1,225),42: "What is the meaning of life?",}# Access the keys:print(my_dictionary.keys())# Access the items (key, value) pairsprint(my_dictionary.items())# Access the valuesprint(my_dictionary.values())# Create a list of dictionariesmy_addresses = [my_dictionary]
There is a lot going on here! You see a basic dictionary declaration that uses curly braces to create a dictionary. Inside that, you can create as many key/value pairs you want separated by commas. Keys are defined using strings (I use single quotes by convention but double quotes will work) or integers, values can be any data type you want. For the my_ip attribute, you are also storing a tuple.
Following the dictionary, you see a number of operations performed on the dictionary from printing the keys, printing all of the values, and printing only the values. The following shows the output of executing this code snippet from the Python interpreter.
[42, 'first_name', 'last_name', 'age', 'my_ip'][(42, 'what is the meaning of life?'), ('first_name', 'Chuck'), ('last_name', 'Bell'), ('age', 36), ('my_ip', (192, 168, 1, 225))]['what is the meaning of life?', 'Chuck', 'Bell', 36, (192, 168, 1, 225)]'42': what is the meaning of life?'first_name': Chuck'last_name': Bell'age': 36'my_ip': (192, 168, 1, 225)
As you have seen in this example, there are a number of operations (methods) available for dictionaries, including the following. Together this list of operations makes dictionaries a very powerful programming tool .
len(d): Number of items in d
d[k]: Item of d with key k
d[k] = x: Assign key k with value x
del d[k]: Delete item with key k
k in d: Determine if d has an item with key k
d.items(): Return a list of the (key, value) pairs in d
d.keys(): Return a list of the keys in d
d.values(): Return a list of the values in d
Best of all, objects can be placed inside other objects. For example, you can create a list of dictionaries like I did, a dictionary that contains lists and tuples, and any combination you need. Thus, using lists, tuples, and dictionaries are a powerful way to manage data for your program.
Wow! That was a wild ride, wasn’t it? I hope that this short crash course in Python has explained enough about the sample programs shown so far that you now know how they work. This crash course also forms the basis for understanding the other Python examples in this book.
OK, now it’s time to see some of these fundamental elements of Python in action. Let’s look at Let's look at the blink an LED application you saw in Chapter 3 only this time you’re going to write it for Windows 10 IoT Core!
Blink an LED, Python Style
OK, let’s write some Python code! This project is the same concept as the project from Chapter 3 where you used Python to blink an LED on the Raspberry Pi. Since we are limited to creating only a background application in Windows 10 IoT Core (recall that a headless application has no user interface), the code will be less and much simplified from the C++ and C# examples since there is no user interface code. In fact, you aren’t producing any output other than the blinking LED.
Also, the mechanisms you will use to deploy, start, and stop the application are different from headed applications. I explain how to do this in detail in the following sections. Before we get into the code, let’s look at the components that you will be using and set up the hardware.
Required Components
The following lists the components that you need. All of these are available in the Microsoft Internet of Things Pack for the Raspberry Pi from Adafruit. If you do not have that kit, you can find these components separately on the Adafruit web site ( www.adafruit.com ), from SparkFun ( www.sparkfun.com ), or any electronics store that carries electronic components.
560 ohm 5% 1/4W resistor (green, blue, brown stripes6)
Diffused 10mm red LED (or similar)
Breadboard (mini, half, or full sized)
(2) male-to-female jumper wires
You may notice that this is the same set of components that you used in Chapter 3.
Set up the Hardware
Begin by placing the breadboard next to your Raspberry Pi and power the Raspberry Pi off orienting the Raspberry Pi with the label facing you (GPIO pins in the upper-left). Next, take one of the jumper wires and connect the female connector to pin 6 on the GPIO. The pins are numbered left-to-right starting with the lower left pin. Thus, the left two pins are 1 and 2 with pin 1 below pin 2. Connect the other wire to pin 7 on the GPIO.
Tip
The only component that is polarized is the LED. This longer side is the positive side.
Next, plug the resistor into the breadboard with each pin on one side of the center groove. You can choose whichever area you want on the breadboard. Next, connect the LED so that the long leg is plugged into the same row as the resistor and the other pin on another row. Finally, connect the wire from pin 6 to the same row as the negative side of the LED and the wire from pin 7 to the row with the resistor. Figure 7-2 shows how all of the components are wired together. Be sure to study this drawing and double-check your connections prior to powering on your Raspberry Pi. Once you’re satisfied everything is connected correctly, you’re ready to power on the Raspberry Pi and write the code.

Figure 7-2. Wiring the LED to a Raspberry Pi
Since you are building a headed application, you'll also need a keyboard, mouse, and monitor connected to the Raspberry Pi.
OK, now you have the hardware set up, so it’s time to start writing the code.
Write the Code
Begin by opening a new project template. Choose Python ➤ Windows IoT Core in the tree and the Background Application (IoT) template in the list. This template creates a new solution with all of the source files and resources you need for a UWP headed application. Figure 7-3 shows the project template that you need. Use BlinkPythonStyle for the project name.

Figure 7-3. New Project dialog—Background Application (IoT)
Tip
If you attempt to create this example but do not see Python in the tree view, you may need to install the Python prerequisites. See the “Getting Started” section of this chapter for information on what you need to install .
Once the project is open, you see a number of files like any other project. However, Python projects only have the one source code file named StartupTask.py. You can rename this file by right-clicking it, but it isn’t necessary for our example. Go ahead and open that file now (just double-click it in the tree). Notice that the file is empty save for a single comment line (you can overwrite that).
The first thing you need to do is add a reference to the GPIO Python module. Remember that this is contained in the pywindevices.zip file from CPython UWP SDK. If you haven’t already done so, download the file and extract the files in a directory you can remember.
To add the reference, Right-click the References item in the project and choose Add Reference.... Once the dialog opens, click Browse and then navigate to the folder where you extracted the files. In that folder are subfolders for ARM or x86 builds. Choose the folder that matches your board (e.g., ARM for Raspberry Pi). Once selected, you see all of the available modules.
The module you want is named _wingpio. There are two versions of the reference; one for release builds (_wingpio.pyd) and one for debug builds (_wingpio_d.pyd). I recommend using the debug version until your application runs correctly. Figure 7-4 shows the dialog you can use to add the reference.
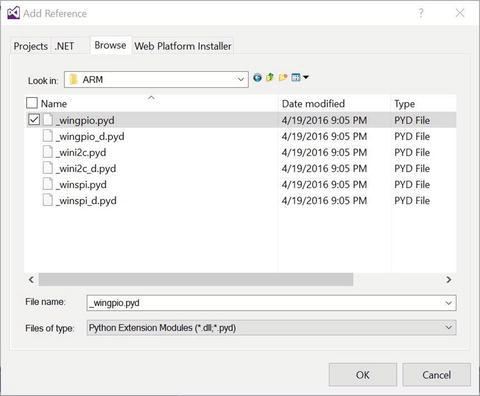
Figure 7-4. Adding the Python module references
Now you can return to the code file and add the modules you want to use. You need two: the GPIO module and the time module. You can add them as follows .
import _wingpio as gpio # The GPIO libraryimport time # Time functions
Next, you can write the code to create some variables that you need and to initialize the GPIO module. The code to do this is as follows.
BLINK_TIME = 30.0 # blink for 30 secondsGPIO_PIN = 4 # GPIO4 (not pin #4)pin_val = gpio.HIGH # Store pin value (high/low)elapsed_time = 0 # Store time in seconds# Setup thegpio.setup(GPIO_PIN, gpio.OUT, gpio.PUD_OFF, gpio.HIGH)
Here you have a variable to store how long you want to blink the LED, a variable to store the GPIO pin number (GPIO4), a variable to store the GPIO value (high/low), and a variable to store how much time has passed.
As you may have anticipated, you are going to implement the code to turn the LED on and off in a loop. The following shows the loop that you will use.
# Run the blink series forwhile (elapsed_time < BLINK_TIME):# If LED is on, turn it offif pin_val == gpio.HIGH:pin_val = gpio.LOWgpio.output(led_pin, pin_val)# else, turn it onelse:pin_val = gpio.HIGHgpio.output(led_pin, pin_val)# Sleep for 1/2 secondtime.sleep(1)elapsed_time = elapsed_time + 1
Notice that you simply turn the GPIO pin on (high) if it is off or off (low) if it is on. At the end of the loop, you sleep (pause) for one second and sum the time. Thus, the loop simply toggles from one state (on) to the other (off) thereby blinking the LED.
Finally, you clean up the GPIO object when the loop ends.
# Close down and cleanup the GPIOgpio.cleanup()
That's it! You’ve finished the code. Listing 7-1 shows the complete code.
Listing 7-1. Python Blink LED Script
import _wingpio as gpio # The GPIO libraryimport time # Time functionsBLINK_TIME = 30.0 # blink for 30 secondsGPIO_PIN = 4 # GPIO4 (not pin #4)pin_val = gpio.HIGH # Store pin value (high/low)elapsed_time = 0 # Store time in seconds# Setup the GPIOgpio.setup(GPIO_PIN, gpio.OUT, gpio.PUD_OFF, gpio.HIGH)# Run the blink series forwhile (elapsed_time < BLINK_TIME):# If LED is on, turn it offif pin_val == gpio.HIGH:pin_val = gpio.LOWgpio.output(GPIO_PIN, pin_val)# else, turn it onelse:pin_val = gpio.HIGHgpio.output(GPIO_PIN, pin_val)# Sleep for 1/2 secondtime.sleep(1)elapsed_time = elapsed_time + 1# Close down and cleanup the GPIOgpio.cleanup()
As you can see, the code is much smaller than the C++ or C# examples from the previous chapters. You do not need to build the code (Python is interpreted). Indeed, building the code only performs some very high-level checks and does not check the validity of the code.
Caution
Compiling or building the code performs only the most basic of tests. It does not verify that the code is correct.
OK, now you’re ready to deploy the application to your device. Go ahead and set everything up and power on your device.
Deploy and Set as Startup
Once the Raspberry Pi has booted, you’re ready to deploy the application to it (or other device). Recall from Chapter 4, that you have to set up the debug settings to specify the IP address of your Raspberry Pi. Fortunately, you only have to change two items as indicated in Figure 7-5. Note that you may not need to set the remote port (5678 is the default). Remember to choose ARM for the platform. Click Apply and then OK to close the dialog.

Figure 7-5. Setting Debug Settings for deployment
Notice that you use the IP address for the device. You can also use the computer name if you know that. Also, unlike the C++ example, you do not specify a port here. Instead, you must select port 5678. This is a special port that the Python debugger responds to when you deploy your application.
Once these are set, you can deploy the application from the Build menu. When complete, you’ll get messages like the following from the Output window .
------ Deploy started: Project: BlinkPythonStyle, Configuration: Debug ARM ------Creating a new clean layout...Copying files: Total 16 mb to layout...Checking whether required frameworks are installed...Framework: Microsoft.VCLibs.140.00.Debug/ARM, app package version 14.0.22929.0 is not currently installed.Installing missing frameworks...Registering the application to run from layout...Deployment complete (33566ms). Full package name: "BlinkPythonStyle_1.0.0.0_arm__2v0q544fdcg4c"========== Build: 0 succeeded, 0 failed, 1 up-to-date, 0 skipped ==================== Deploy: 1 succeeded, 0 failed, 0 skipped ==========
If your deployment succeeded, you may expect to see something happen on the Raspberry Pi, but you won’t see anything. That’s normal. A headless application must be set as a startup application in order to execute. You can set the startup application via the Windows Device Portal, but it is much easier to use a command-line tool on the device. Plus, while you can set the startup application with the Device Portal, you cannot start the application. This is an unfortunate limitation of the Device Portal currently. It can only start headed applications. As a workaround, in the Processes page, you can use Run command to execute this command to start a background application (by specifying it as one of the startup apps).
Recall that you use Putty (or a similar application) to connect to the device via SSH. The command is iostartup. Listing 7-2 shows the help output for the command, including all of the options to work with startup applications. As you can see, it is very comprehensive.
Listing 7-2. Help Output for iostartup Command
C:DataUsersadministrator>iotstartupUsage:IotStartup [list|add|remove|startup] ([headed|headless]) (std::regex regular expression with implied ^ prepended)IotStartup [help|-?|-h|--help]Examples:IotStartup list // list installed applicationsIotStartup list headed // list installed headed applicationsIotStartup list headless // list installed headless applicationsIotStartup list MyApp // list installed applications that match pattern MyAppIotStartup add headed MyApp // add headed application that matches pattern MyApp. Pattern must match only one application.IotStartup add headless Task1 // add headless applications that match pattern Task1IotStartup remove headless Task1 // remove headless applications that match pattern Task1IotStartup startup // list headed and headless applications registered for startupIotStartup startup MyApp // list headed and headless applications registered for startup that match pattern MyAppIotStartup startup headed MyApp // list headed applications registered for startup that match MyAppIotStartup startup headless Task1 // list headless applications registered for startup that match Task1
You can see what applications are set for startup (they execute when the device is booted) using the iostartup startup command, as shown next. This command lists all of the applications that start on boot, grouped by headless or headed applications. Notice that you do not have to use the complete name for the application. You can just use the first few characters, or to be safer, the base name you used in Visual Studio.
C:DataUsersadministrator>iotstartup startupHeaded : IoTCoreDefaultApp_1w720vyc4ccym!AppNo headless applications registered
To add an application that has been deployed to the device as a startup application, simply add the name of the application to the command, as shown next. Here you add the application and then use the command again without a name to verify that it has started.
C:DataUsersadministrator>iotstartup add headless BlinkPythonStyleAdded Headless: BlinkPythonStyle_1.0.0.0_arm__2v0q544fdcg4cC:DataUsersadministrator>iotstartup startupHeaded : IoTCoreDefaultApp_1w720vyc4ccym!AppHeadless : BlinkPythonStyle_1.0.0.0_arm__2v0q544fdcg4c
Caution
This command configures Windows 10 IoT Core to ensure that this background application is always running. If it crashes and you restart the device, the background application is started. If the crash is severe enough, it can cause Windows 10 to be unavailable, because the app will start and then immediately crash and force a reboot. The only way to break this cycle (sadly) is to reimage your SD card. Never attempt to set an untested application as a startup application.
The application should start running at this point. If it doesn’t start, try rebooting the device. You can reboot the device via the command line with the following command. For information about other command-line commands, see https://ms-iot.github.io/content/en-US/win10/tools/CommandLineUtils.htm .
shutdown /r /t 0To remove your application from the startup list, execute the following command.
iotstartup remove headless BlinkPythonStyleIf the LED is still not blinking after the reboot, double-check your wiring and ensure that you chose pin 4 in the code and pin 7 on the pin header (recall that the pin is named GPIO 4 but it is pin #7 on the header).
Once you get it working, you see the LED blink for 30 seconds and then the application stops. If this happens as expected, congratulations, you’ve just written your first Python application that uses the GPIO header to power some electronics!
Summary
If you are learning how to work with Windows 10 IoT Core and don’t know how to program with Python, learning Python can be fun given its easy to understand syntax. While there are many examples on the Internet that you can use, very few are documented in such a way as to provide enough information for someone new to Python to understand—much less get started or compile and deploy the sample!
This chapter has provided a crash course in Python that covers the basics of the things you encounter when examining most of the smaller example projects. You discovered the basic syntax and constructs of a Python application, including a walk-through of building a real Python application that blinks an LED. Through that example, you learned how to work with headless applications, including how to manage a startup background application.
The next chapter takes a short detour in your exploration of Windows 10 IoT Core projects. You are introduced to the basics of working with electronics. Like the programming crash course, the chapter provides a short introduction to working with electronics. A mastery of electronics in general is not required for the projects you explore, but if you’ve never worked with electronic components before, the next chapter will prepare you for the more advanced projects in Chapters 10–15.
Footnotes
1 Monty Python refers to a group of comedians and not a single individual. However, their comedy is undeniably brilliant. https://en.wikipedia.org/wiki/Monty_Python
2 Pythonistas are expert Python developers and advocates for all things Python.
3 Currently. Hopefully, more project types will be available in the future.
4 In my experience and travels through geekdom, few programmers prefer tabs over spaces. Indeed, many coding guidelines prohibit the use of tabs because they can interfere with certain offline code analysis tools. Plus, they can scramble the format of the code if your editor is set differently than others or if tabs are used inconsistently.
5 Sometimes called “hash” but I personally think that term is over used, especially by those that want to sound intelligent when speaking about social media.