
IoT solutions, by definition if not implementation, can generate a lot of data. Indeed, most IoT solutions observe the world in one or often several ways. Those observations generate data at whatever rate the solution specifies (called a sample rate). To make the data most useful for historical or similar analytics, you have to save the data for later processing. Database systems provide a perfect solution for storing IoT data and making it available for later use.
With the exception of the last project, you wouldn’t consider storing the data from the example projects you’ve seen thus far for any length of time. That changed when we started using sensors in our projects. The project from Chapter 12 is a perfect example; it observes weather data that could be useful for later analysis.
The project in this chapter takes the same project goals from the last chapter and implements them in a different way. There are two methods for connecting to an I2C device. You used one method in the last project; you will use the other in this project. You will also add a database element storing the data generated in a MySQL database. I demonstrate how to retrieve that data.
Tip
I cover incorporating database systems and specifically using MySQL for the IoT in my book MySQL for the Internet of Things (Apress, 2015). If you want to explore the theory and application of database systems in the IoT, this book will get you started, even if you know very little about IoT or MySQL.
Before we get into the project design and how to implement the code, let’s take a moment to discover MySQL. If you already have a lot of experience with MySQL, you may want to skim the section as a refresher. If you have never used MySQL, the following brief primer gets you started and covers everything you need to know in order to complete this project.
What Is MySQL?
MySQL is the world’s most popular open source database system for many excellent reasons. First and foremost, it is open source, which means anyone can use it for a wide variety of tasks for free.1 Best of all, MySQL is included in many platform repositories, making it easy to get and install. If your platform doesn’t include MySQL in the repository (such as aptitude), you can download it from the MySQL web site ( http://dev.mysql.com ).
Oracle Corporation owns MySQL. Oracle obtained MySQL through an acquisition of Sun Microsystems, which acquired MySQL from its original owners, MySQL AB. Despite fears to the contrary, Oracle has shown excellent stewardship of MySQL by continuing to invest in the evolution and development of new features as well as faithfully maintaining its open source heritage. Although Oracle also offers commercial licenses of MySQL—just as its prior owners did in the past—MySQL is still open source and available to everyone.
MySQL runs as a background process (or as a foreground process if you launch it from the command line)2 on your system. Like most database systems, MySQL supports Structured Query Language (SQL) . You can use SQL to create databases and objects (using data definition language [DDL] ), write or change data (using data manipulation language [DML] ), and execute various commands for managing the server.
To issue these commands, you must first connect to the database server. MySQL provides a client application that enables you to connect to and run commands on the server. The application is named mysql and is known as the mysql client (previously the mysql monitor). Note that Oracle has stopped using the older name so that it is not confused with the MySQL Enterprise Monitor, which is a premium product provided to customers who purchase an Enterprise license.
Listing 13-1 shows examples of each type of command in action using the mysql client:
Listing 13-1. Commands Using the mysql Client
$ mysql -uroot -pXXXXWelcome to the MySQL monitor. Commands end with ; or g.Your MySQL connection id is 4Server version: 5.7.10-log MySQL Community Server (GPL)Copyright (c) 2000, 2015, Oracle and/or its affiliates. All rights reserved.Oracle is a registered trademark of Oracle Corporation and/or itsaffiliates. Other names may be trademarks of their respectiveowners.Type 'help;' or 'h' for help. Type 'c' to clear the current input statement.mysql> CREATE DATABASE testme;Query OK, 1 row affected (0.00 sec)mysql> CREATE TABLE testme.table1 (sensor_node char(30), sensor_value int, sensor_event timestamp);Query OK, 0 rows affected (0.00 sec)mysql> INSERT INTO testme.table1 VALUES ('living room', 23, NULL);Query OK, 1 row affected (0.00 sec)mysql> SELECT * FROM testme.table1;+-------------+--------------+---------------------+| sensor_node | sensor_value | sensor_event |+-------------+--------------+---------------------+| living room | 23 | 2013-02-04 20:30:13 |+-------------+--------------+---------------------+1 row in set (0.00 sec)mysql> SET @@global.server_id = 111;Query OK, 0 rows affected (0.00 sec)mysql>
In this example, you see DDL in the form of the CREATE DATABASE and CREATE TABLE statements, DML in the form of the INSERT and SELECT statements, and a simple administrative command to set a global server variable. Next you see the creation of a database and a table to store the data, the addition of a row in the table, and finally retrieval of the data in the table.
A great many commands are available in MySQL. Fortunately, you need master only a few of the more common ones. The following are the commands that you use most often. The portions enclosed in <> indicate user-supplied components of the command, and [...] indicates that additional options are needed:
Tip
If you use the mysql client, you must terminate each command with a semicolon (;) or G.
CREATE DATABASE <database_name>: Creates a database.
USE <database>: Sets the default database.
CREATE TABLE <table_name> [...]: Creates a table or structure to store data.
INSERT INTO <table_name> [...]: Adds data to a table.
UPDATE [...]: Changes one or more values for a specific row.
DELETE FROM <table_name> [...]: Removes data from a table.
SELECT [...]: Retrieves data (rows) from the table.
Although this list is only a short introduction and nothing like a complete syntax guide, there is an excellent online reference manual that explains each and every command (and much more) in great detail. You should refer to the online reference manual whenever you have a question about anything in MySQL. You can find it at http://dev.mysql.com/doc/ .
If you are thinking that there is a lot more to MySQL than a few simple commands, you are absolutely correct. Despite its ease of use and fast startup time, MySQL is a full-fledged relational database management system (RDBMS). There is much more to it than you’ve seen here. For more information about MySQL, including all the advanced features, see the reference manual.
Getting Started with MySQL
Now that you know what MySQL is and how it is used, you need to know a bit more about RDBMSs and MySQL in particular before you start building your first database server. This section discusses how MySQL stores data (and where it is stored), how it communicates with other systems, and some basic administration tasks required in order to manage your new MySQL server.
How and Where MySQL Stores Data
The MySQL database system stores data via an interesting mechanism of programmatic isolation; it is called a storage engine, which is governed by the handler interface. The handler interface permits the use of interchangeable storage components in the MySQL server so that the parser, the optimizer, and all manner of components can interact in storing data on disk using a common mechanism. This is also referred to as a pluggable storage engine.5
Note
MySQL supports several storage engines. Most are designed to write data to disk by default. However, the MEMORY storage engine stores data in memory but is not persistent. That is, when the computer is rebooted, the data is lost. You can use the MEMORY storage engine for fast lookup tables. Indeed, one optimization technique is to create copies of lookup tables at startup using the MEMORY storage engine.
What does this mean to you? It means you have the choice of different mechanisms for storing data. You can specify the storage engine in the table CREATE statement shown in the following code sample. Notice the last line in the command; this is how a storage engine is specified. Leaving off this clause results in MySQL using the default storage engine.
Tip
The default storage engine was changed from MyISAM to InnoDB in MySQL version 5.6.
Create Table:CREATE TABLE `books` (`ISBN` varchar(15) DEFAULT NULL,`Title` varchar(125) DEFAULT NULL,`Authors` varchar(100) DEFAULT NULL,`Quantity` int(11) DEFAULT NULL,`Slot` int(11) DEFAULT NULL,`Thumbnail` varchar(100) DEFAULT NULL,`Description` text) ENGINE= MyISAM ;
Great! Now, what storage engines exist on MySQL? You can discover which storage engines are supported by issuing the following command. As you see, there are a lot to choose from. I cover a few that may be pertinent to planning sensor networks :
mysql> SHOW STORAGE ENGINES G*************************** 1. row ***************************Engine: InnoDBSupport: YESComment: Supports transactions, row-level locking, and foreign keysTransactions: YESXA: YESSavepoints: YES*************************** 2. row ***************************Engine: MRG_MYISAMSupport: YESComment: Collection of identical MyISAM tablesTransactions: NOXA: NOSavepoints: NO*************************** 3. row ***************************Engine: BLACKHOLESupport: YESComment: /dev/null storage engine (anything you write to it disappears)Transactions: NOXA: NOSavepoints: NO*************************** 4. row ***************************Engine: CSVSupport: YESComment: CSV storage engineTransactions: NOXA: NOSavepoints: NO*************************** 5. row ***************************Engine: MEMORYSupport: YESComment: Hash based, stored in memory, useful for temporary tablesTransactions: NOXA: NOSavepoints: NO*************************** 6. row ***************************Engine: FEDERATEDSupport: NOComment: Federated MySQL storage engineTransactions: NULLXA: NULLSavepoints: NULL*************************** 7. row ***************************Engine: ARCHIVESupport: YESComment: Archive storage engineTransactions: NOXA: NOSavepoints: NO*************************** 8. row ***************************Engine: MyISAMSupport: DEFAULTComment: Default engine as of MySQL 3.23 with great performanceTransactions: NOXA: NOSavepoints: NO8 rows in set (0.00 sec)
As of version 5.6, MySQL uses the InnoDB storage engine by default. Previous versions used MyISAM as the default. InnoDB is a fully transactional, ACID6 storage engine. A transactionis a batch of statements that must all succeed before any changes are written to disk. The classic example is a bank transfer. If you consider a system that requires deducting an amount from one account and then crediting that amount to another account to complete the act of moving funds, you would not want the first to succeed and the second to fail or vice versa!
Wrapping the statements in a transaction ensures that no data is written to disk until and unless all statements are completed without errors. Transactions in this case are designated with a BEGIN statement and concluded with either a COMMIT to save the changes or a ROLLBACK to undo the changes. InnoDB stores its data in a single file (with some additional files for managing indexes and transactions).
The MyISAM storage engine is optimized for reads. MyISAM has been the default for some time and was one of the first storage engines available. In fact, a large portion of the server is dedicated to supporting MyISAM. It differs from InnoDB in that it does not support transactions and stores its data in an indexed sequential access method format. This means it supports fast indexing. You would choose MyISAM over InnoDB if you did not need transactions and you wanted to be able to move or back up individual tables.
Another storage engine that you may want to consider, especially for sensor networks, is Archive. This engine does not support deletes (but you can drop entire tables) and is optimized for minimal storage on disk. Clearly, if you are running MySQL on a small system like a Raspberry Pi, small is almost always better! The inability to delete data may limit more advanced applications, but most sensor networks merely store data and rarely delete it. In this case, you can consider using the Archive storage engine.
There is also the CSV storage engine (where CSV stands for comma-separated values). This storage engine creates text files to store the data in plain text that can be read by other applications, such as a spreadsheet application. If you use your sensor data for statistical analysis, the CSV storage engine may make the process of ingesting the data easier.
So where is all this data? If you query the MySQL server and issue the SHOW VARIABLES LIKE "datadir"; command, you see the path to the location on disk that all storage engines use to store data. In the case of InnoDB, this is a single file on disk located in the data directory. InnoDB also creates a few administrative files, but the data is stored in the single file. For most other storage engines except NDB and MEMORY, the data for the tables is stored in a folder with the name of the database under the data directory. Listing 13-2 shows how to determine the location of the data directory (it is typically in a protected folder).
Listing 13-2. Finding Where Your Data Is Located
mysql> SHOW VARIABLES LIKE 'datadir';+---------------+------------------------+| Variable_name | Value |+---------------+------------------------+| datadir | /usr/local/mysql/data/ |+---------------+------------------------+1 row in set (0.00 sec)
If you navigate to the location (path) shown and (with elevated privileges) issue a directory listing command, you can see the InnoDB files identified by the ib and ibd prefixes. You may also see a number of directories, all of which are the databases on this server.
Tip
If you want to copy data from one server to another by copying files, be sure to copy the .frm files as well! This is easy for MyISAM and Archive but much harder with InnoDB. In the case of InnoDB, you have to copy all the database folders and the InnoDB files to make sure that you get everything.
Although it is unlikely that you would require a transactional storage engine for your IoT solutions, MySQL 5.6 has one, and it’s turned on by default. A more likely scenario is that you would use the MyISAM or Archive engine for your tables.
For more information about storage engines and the choices and features of each, please see the online MySQL Reference Manual section “Storage Engines” ( http://dev.mysql.com/doc/ ).
The MySQL Configuration File
The MySQL server can be configured using a configuration file, similar to the way you configure other Windows applications. On Windows, the MySQL configuration file is named my.ini and located in the program data folder under the MySQL server version (e.g., C:ProgramDataMySQLMySQL Server 5.7). This file contains several sections, one of which is labeled [mysqld]. The items in this list are key-value pairs: the name on the left of the equal sign is the option, and its value on the right. The following is a typical configuration file (with many lines suppressed for brevity):
[mysqld]port=3306datadir=C:/ProgramData/MySQL/MySQL Server 5.7Datacharacter-set-server=utf8default-storage-engine=INNODBsql-mode="STRICT_TRANS_TABLES,NO_AUTO_CREATE_USER,NO_ENGINE_SUBSTITUTION"log-output=FILEgeneral-log=0general_log_file="CHUCKSURFACE.log"slow-query-log=1slow_query_log_file="CHUCKSURFACE-slow.log"long_query_time=10log-error="CHUCKSURFACE.err"server-id=1
As you can see, this is a simple way to configure a system. This example sets the TCP port, base directory (the root of the MySQL installation, including the data as well as binary and auxiliary files), data directory, and server ID (used for replication, as discussed shortly) and turns on the general log (when the Boolean switch is included, it turns on the log). There are many such variables you can set for MySQL. See the online MySQL reference manual for details concerning using the configuration file.
How to Get and Install MySQL
The MySQL server is available for a variety of platforms, including most Linux and Unix platforms, Mac OS X, and Windows. To download MySQL server, visit http://dev.mysql.com/downloads/ and click Community and then MySQL Community Server. This is the GPLv2 license of MySQL. The page automatically detects your operating system. If you want to download for another platform, you can select it from the drop-down menu.
Oracle has provided a special installation packaging for Windows named the Windows Installer. This package includes all the MySQL products available under the community license, including MySQL Server, Workbench, Utilities, Fabric, and all the available connectors (program libraries for connecting to MySQL). This makes installing on Windows a one-stop, one-installation affair. How cool is that? Figure 13-1 shows the download page for the Windows installer.

Figure 13-1. Download page for Windows installer
To install MySQL, begin by choosing either the Windows installer 32- or 64-bit installation package that matches your Windows version. Once the file is downloaded, click the file to begin installation. Note that some browsers, such as the new Edge browser, may ask you if you want to launch the installation. You may need to reply to a dialog permitting the installation.
The installation is fully automated with a series of dialogs to help you configure your installation. Like most Windows installation packages, you can choose what you want to install as well as where to install it. I recommend accepting the defaults since these are optimized for typical use cases. You can even choose to automatically start MySQL. You may also be given a temporary password for the root user account. Be sure to write that down and change it later (with the SET PASSWORD command; see the following) .
How to Start, Stop, and Restart MySQL
While working with your databases and configuring MySQL on your Windows system, you may need to control the startup and shutdown of the MySQL server. The default mode for installing MySQL is to automatically start on boot and stop on shutdown, but you may want to change that, or you may need to stop and start the server after changing a parameter. In addition, when you change the configuration file, you need to restart the server to see the effect of your changes.
You can start, pause (stop), and restart the MySQL server with the Services application in Windows. Simply type Services in the search box and choose the application. You can then scroll down, choose MySQL from the list and start, stop, or restart the server using the links provided. Figure 13-2 shows an example of the application with the commands highlighted.
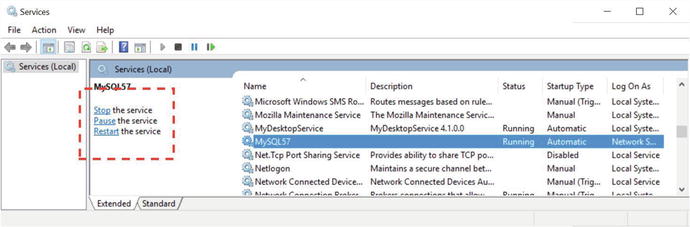
Figure 13-2. Services application
Creating Users and Granting Access
You need to know about two additional administrative operations before working with MySQL: creating user accounts and granting access to databases. MySQL can perform both of these with the GRANT statement, which automatically creates a user if one does not exist. But the more pedantic method is first to issue a CREATE USER command followed by one or more GRANT commands . For example, the following shows the creation of a user named sensor1 and grants the user access to the database room_temp:
CREATE USER 'sensor1'@'%' IDENTIFIED BY 'secret';GRANT SELECT, INSERT, UPDATE ON room_temp.* TO 'sensor1'@'%';
The first command creates the user named sensor1, but the name also has an @ followed by another string. This second string is the host name of the machine with which the user is associated. That is, each user in MySQL has both a user name and a host name, in the form user@host, to uniquely identify them. That means the user and host [email protected] and the user and host [email protected] are not the same. However, the % symbol can be used as a wildcard to associate the user with any host. The IDENTIFIED BY clause sets the password for the user.
The second command allows access to databases. There are many privileges that you can give a user. The example shows the most likely set that you would want to give a user of a sensor network database: read (SELECT), add data (INSERT), and change data (UPDATE). See the online reference manual for more about security and account access privileges.
The command also specifies a database and objects to which to grant the privilege. Thus, it is possible to give a user read (SELECT) privileges to some tables and write (INSERT, UPDATE) privileges to other tables. This example gives the user access to all objects (tables, views, and so on) in the room_temp database.
As mentioned, you can combine these two commands into a single command. You are likely to see this form more often in the literature. The following shows the combined syntax. In this case, all you need to do is add the IDENTIFIED BY clause to the GRANT statement. Cool!
GRANT SELECT, INSERT, UPDATE ON room_temp.* TO "sensor1 "@'%" IDENTIFIED BY "secret ";Now that you know more about MySQL, let’s talk about the project and how you will develop the database portion.
Overview
This project is a rewrite of the Weather project from the last chapter. The project uses a BMP280 sensor breakout board with an I2C interface. Unlike the last project, you will not be writing a user interface. Similarly, you will implement the project in C# rather than C++.
You will write this project purely in C# so that you can take advantage of a NuGet package to read data from the sensor using an I2C interface. This is because the library you want is written in C# and only works with C# applications. Interestingly, the library you will use provides a bit more data than the previous code library producing some different units for barometric precision. The extra data are extrapolated from the BMP280 data and may be interesting if you’re a real weather buff.
Otherwise, the project goals are the same as the previous project. You want to read data from the sensor but instead of displaying it for an instant and replacing it with new values, you will store the data in a MySQL database.
You will use the same hardware, as you did in the previous project except you won’t need a monitor, a keyboard, or a mouse since this project will run headless.
I demonstrate all the code necessary and more in the following sections. But first, let’s discover how to set up the MySQL database for the project.
Set up the Database
If you have not installed MySQL, you should consider doing that before you complete the code. You do not have to run MySQL on your laptop. You could run it on another machine, across the Internet, or wherever. You just need to have your IoT device configured so that it can connect to the MySQL server via TCP/IP.
I normally set up the database I want to use as a first step. That is, I design the database and table(s)7 before I write the code. In this case, I’ve done the design work for you. To keep things simple, you will store data in a single table one row at a time. That is, as you read data from the sensor, you will store it together as a single entry (via an INSERT statement).
In order to keep the rows unique, you will use an auto increment column, which is a surrogate key technique that generates an increasing integer value. This allows you to refer to a row by the key for faster access (via indexing). You will also use a special column called a timestamp that the server will automatically supply the current date and time you inserted the row. This is a great technique and a best practice for generating database tables that store data that may be used for historical analysis.
Finally, you add a column for each of the data elements you collect. This includes temperature (in both Celsius and Fahrenheit - the library converts it for you), and bars, hectopascals, and atmospheres for barometric pressure. Listing 13-3 shows the commands you issue to create a database named weather with a single table named history.
Listing 13-3. SQL Commands for Weather Database
mysql> CREATE DATABASE weather;Query OK, 1 row affected (0.01 sec)mysql> USE weather;Database changedmysql> CREATE TABLE history (-> id int not null auto_increment primary key,-> dateRecorded timestamp,-> degreesCelsius float,-> degreesFarenheit float,-> bars float,-> hectopascals float,-> atmospheres float-> );Query OK, 0 rows affected (0.10 sec)
There is just one more step to accomplish. It is always a good practice to create a new user account that has rights to update the database (and only the one database). This allows you to ensure that casual intrusion via your application limits exposure of other data on your system. The following command creates a user named w_user with a specific password and access only to the weather database. You can use a different password if you’d like, just be sure to remember it when you write the code.
mysql> CREATE USER w_user@'%' IDENTIFIED BY 'secret';Query OK, 0 rows affected (0.04 sec)mysql> GRANT ALL ON weather.* TO w_user@'%';Query OK, 0 rows affected (0.03 sec)
Note
Depending on how your MySQL server is set up, you may be able to issue only the GRANT command to create the user, but I like to use the CREATE command first.
Now that you have the database table set up, let’s review the hardware you need for this project. I repeat the data from the last chapter for clarity.
Required Components
The following lists the components that you need. You can get the BMP280 sensor from Adafruit ( www.adafruit.com ) either in the Microsoft IoT Pack for Raspberry Pi or purchased separately, SparkFun ( www.sparkfun.com ), or any electronics store that carries electronic components. However, if you use a sensor made by someone other than Adafruit, you may need to alter the code to change the I2C address. Since this solution is a headless application, you do not need a monitor, a keyboard, or a mouse.
Adafruit BMP280 I2C or SPI barometric pressure and altitude sensor
Jumper wires: (4) male-to-female
Breadboard (full size recommended but half size is OK)
Raspberry Pi 2 or 3
Power supply
Set up the Hardware
Although there are only four connections needed for this project, you will make a plan for how things should connect, which is good practice to hone. To connect the components to the Raspberry Pi, you need four pins for the BMP280 sensor, which requires only power, ground, and 2 pins for the I2C interface. Refer to Chapter 12 for how to wire the sensor. I include Figure 13-3 as a reminder of how things are connected.
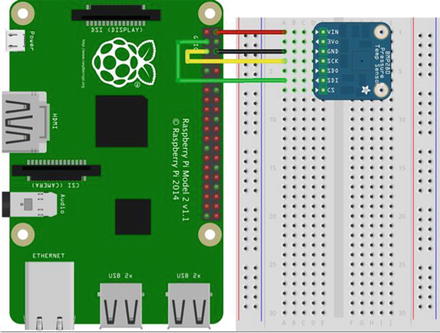
Figure 13-3. Connections for the Weather Sensor Project
If you are following along with this chapter working on the project, go ahead and make the hardware connections now. Don’t power on the board yet, but do double and triple check the connections .
Write the Code
Now it’s time to write the code for the project. You will use the same BMP280 sensor from the last project, but you will use a different library that you can download from NuGet. You will also be using the Connector/Net database connector from Oracle to connect to your MySQL server. You’ll use a timer to read the data and update the database. Once you launch the new project, you can monitor its progress by running a SELECT query on the MySQL server.
Let’s begin with setting up the new project, and then you’ll see how to add the new resources and complete the code for both reading from the sensor and writing the data to the database.
New Project
You will use a C# project template for this project—the Blank App (Universal Windows) template. Use the name WeatherDatabase for the project name. You can save the project wherever you like or use the default location. Once the project opens, double-click the MainPage.xaml.cs file. There are a number of namespaces you need to include. Go ahead and add those now, as shown next.
using System.Threading.Tasks; // Add for Task.Run()using MySql.Data.MySqlClient; // Add for MySQL connectionusing System.Diagnostics; // Add for debuggingusing Glovebox.IoT.Devices.Sensors; // Add for BMP280 (or BME280)
Here you added namespaces for threading so you can run a task (for the BMP280 library), the MySQL database client, the diagnostics for writing debug statements to the log, and finally, the sensor library from Glovebox. You’ll see how to add the MySQL and Glovebox references in the next sections.
Next, you need to add some variables. You add a variable for the DispatcherTimer class, a variable for the MySQLConnection class, and a variable for the BMP280 class. The following shows the correct code for defining these variables. These are placed in the MainPage class.
private DispatcherTimer bmpTimer; // Timerprivate MySqlConnection mysql_conn; // Connection to MySQLprivate BMP280 tempAndPressure; // Instance of BMP280 class
Next, you need to add some constants for the database. First, you add a connection string. This string contains several parts that you need to modify to match your systems. I highlight each in bold italics. These are the IP or hostname of the server, the user account and password that you want to use to connect to the MySQL server (you can use what is shown if you issued the preceding commands to create the user), the port (3306 is the default), the default database (can be omitted), and the SSL mode (which must be set to None because the RT version of the connector does not support SSL). Next, you add a formatted string so that you can issue the INSERT statement using parameters for the values.
// String constants for databaseprivate string connStr = "server=10.0.1.18;user=w_user;password=secret;" +"port=3306;database=weather;sslMode=None";private string INSERT = "INSERT INTO weather.history VALUES (null, null, " +"{0}, {1}, {2}, {3}, {4})";
You may notice that the first two columns for the INSERT statement are null. You do this to tell the database server to use the default values for the specific columns. In this case, the auto increment column named Id and the timestamp column named dateRecorded. I should note that you could have used a different form of the INSERT statement by specifying the columns by name but passing null is a bit easier if not a bit lazy.
The code in the MainPage() function initializes the components, the BMP280 class and call a new method imaginative named Connect() to connect to the database server. You make this a new method to keep things easier to write (and the code easier to understand). You’ll see this new method shortly. You also set up the timer. In this case, you use a value of 5000, which is 5 seconds. You may want to consider making value greater if you plan to use the project for practical use cases. Listing 13-4 shows the complete MainPage() method.
Listing 13-4. MainPage Method
public MainPage(){this.InitializeComponent();// Instantiate a new BMP280 class instancetempAndPressure = new BMP280();// Connect to MySQL. If successful, setup timerif (this.Connect()){this.bmpTimer = new DispatcherTimer();this.bmpTimer.Interval = TimeSpan.FromMilliseconds(5000);this.bmpTimer.Tick += BmpTimer_Tick;this.bmpTimer.Start();}else{Debug.WriteLine("ERROR: Cannot proceed without database connection.");}}
Notice that if the Connect() method returns false, you issue a debug statement stating you cannot connect to the MySQL server. Thus, you should run this project with debug to ensure that you are connecting to the server properly (see the “Why Can’t I Connect?” sidebar).
Now you need three references added to the solution. You need the Glovebox.IoT.Devices library from NuGet, which in turn requires the Units.NET library from NuGet. You add the reference to the Connector/Net library. Finally, you need the Windows 10 IoT Extensions library. Let’s discuss each of these in turn.
Glovebox.IoT.Devices
Glovebox.IoT.Devices is a library that supports a host of sensors—each presented as a separate class to make it easy to use for specific sensors, like the BMP280. It also takes care of the I2C communication for you. All you need to do is instantiate the class and call the methods to read the data.
To add the Glovebox.IoT.Devices library, use the NuGet Package Manager from the Tools ➤ NuGet Package Manager ➤ Manage NuGet Packages for Solution... menu. Click the Browse tab and then type glovebox in the search box, as shown in Figure 13-4.
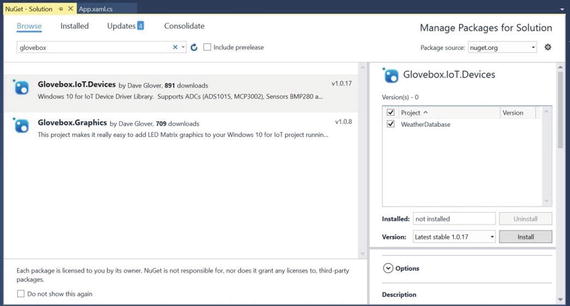
Figure 13-4. NuGet Package Manager, results for Glovebox
Select the entry named Glovebox.IoT.Devices in the list, tick the project name (solution) in the list on the right, and finally, click Install. The installation starts and Visual Studio downloads a number of packages and then asks you permission to install them. Go ahead and let the installation complete. A dialog box will open to tell you that the installation is complete.
Caution
If you have just finished the project from Chapter 11, be sure to switch the driver back to the default controller driver; otherwise, your project may not execute properly.
Unlike the lightning library you used in Chapter 11, there are no additional steps needed to use the library, however, the library requires another library—the Units.NET library, also available via NuGet.
Units.NET
Glovebox.IoT.Devices requires another library that provides helper methods for converting units of measure. The notes state you must have the Units.NET library installed.
To add the Units.NET library, use the NuGet Package Manager from the Tools ➤ NuGet Package Manager ➤ Manage NuGet Packages for Solution... menu. Click the Browse tab and then type units in the search box, as shown in Figure 13-5.
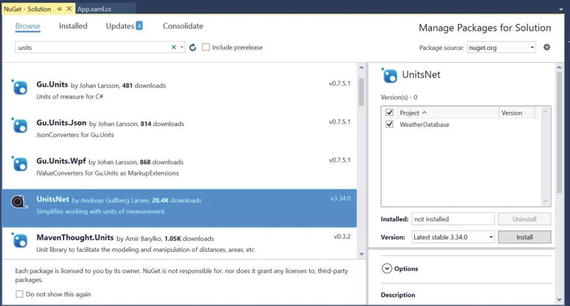
Figure 13-5. NuGet Package Manager, results for Units
Select the entry named Units.NET in the list, tick the project name (solution) in the list on the right, and finally, click Install. The installation starts and Visual Studio downloads a number of packages and then ask you permission to install them. Go ahead and let the installation complete. A dialog box opens to tell you when the installation is complete.
Now, let’s install the database connector library.
Connector/Net
Connector/Net is a Microsoft .NET database library for connecting to a MySQL database server. You can download the connector from Oracle at http://dev.mysql.com/downloads/connector/net/ .
Note
If you are building your project for the MinnowBoard Max–compatible board, you can use the normal .Net connector and these steps are unnecessary.
You need to download this library to use with the project. You can download the Windows (x86 or 64-bit) installer separately but if you installed MySQL with the MySQL Windows Installer, it is already installed on your system. However, you need a different version of the library to run on the Raspberry Pi.
Tip
Check your system before you download the connector. If you see the directory C:Program Files (x86)MySQLMySQL Connector Net 6.9.8AssembliesRT, you already have the library you need. You can skip ahead to adding it to your project but use this path instead.
In this case, you need the RT version of the connector. You can download it from the URL listed earlier, but instead of downloading the Windows version, click the drop-down menu and choose the .NET & Mono version. Figure 13-6 shows an excerpt from the download page with the correct version selected. This link downloads a compressed file named mysql-connector-net-6.9.8-noinstall.zip (or similar if using a different version).

Figure 13-6. Selecting the .NET & Mono version of Connector/Net for download
Once the file has downloaded, extract it and find it at <downloads folder>mysql-connector-net-6.9.8-noinstallRTMySql.Data.RT.dll, replacing the path with your downloads folder.
Now, return to Visual Studio and right-click the References item in the Solution Explorer and choose Add Resource .... When dialog opens, choose the Browse tab, click the Browse button, locate the MySql.Data.RT.dll file, and select it. This adds the library to your project.
Windows 10 IoT Extensions
Finally, you must add the reference to the Windows 10 IoT Extensions from the project property page. You do this by right-clicking the References item on the project in Solution Explorer. Once you have loaded the three references, Solution Explorer should show the resources shown in Figure 13-7.

Figure 13-7. References for the WeatherDatabase project
Now that you have all the resources you need, let’s see the code for connecting to MySQL.
Connecting to MySQL
Connecting to MySQL with Connector/Net is pretty easy. You simply need to instantiate a MySQLConnection object passing it the connection string defined earlier, and then you open the connection. You wrap the Open() call in a try block so that you can detect whether the connection fails (the library throws an exception). You add some debug statements to help diagnose the problem—just remember to run the project in debug to see the messages. Listing 13-5 shows the Connect() method .
Listing 13-5. Connecting to MySQL
private Boolean Connect(){mysql_conn = new MySqlConnection(connStr);try{Debug.WriteLine("Connecting to MySQL...");mysql_conn.Open();Debug.WriteLine("Connected to " + mysql_conn.ServerVersion + ".");}catch (Exception ex){Debug.Write("ERROR: ");Debug.WriteLine(ex.ToString());return false;}return true;}
Tip
For complete documentation on Connector/Net, see http://dev.mysql.com/doc/connector-net/en/ .
Now, let’s see the code for reading the weather data .
Reading the Weather Data
Now let’s add the code to read the weather data from the BMP280. A timer is used to fire an event every 5 seconds to read (and save) the data. Thus, you need the event for the DispatcherTimer object defined earlier, named BmpTimer_Tick().
However, instead of putting the code to read the data in this event, you use another method and run it as a task (in a new thread). This is because the BMP280 object cannot run in the user interface thread.9 Thus, you create a new method named getData() to read the data. You also write the data to MySQL in the same method, but you look at that in the next section.
The BMP280 class from the Glovebox.IoT.Devices library provides a variety of data from the sensor, including temperature in both Fahrenheit and Celsius, and barometric pressure in several units. You read all of these with the Temperature and Pressure attributes, as shown in Listing 13-6. This listing only shows the code for reading from the sensor. The code for writing the database is shown in the next section.
Listing 13-6. Reading the Weather Data
private void BmpTimer_Tick(object sender, object e){var t = Task.Run(() => getData());}public void getData(){var degreesCelsius = tempAndPressure.Temperature.DegreesCelsius;var degreesFahrenheit = tempAndPressure.Temperature.DegreesFahrenheit;var bars = tempAndPressure.Pressure.Bars;var hectopascals = tempAndPressure.Pressure.Hectopascals;var atmospheres = tempAndPressure.Pressure.Atmospheres;Debug.WriteLine(degreesCelsius);Debug.WriteLine(degreesFahrenheit);Debug.WriteLine(bars);Debug.WriteLine(hectopascals);Debug.WriteLine(atmospheres);...
Writing the Data to the Database
Writing data to the database is also easy to do. You create a string constant that you can use to fill in the data as parameters. Thus, you use the INSERT constant with the String.Format() method and pass in the data you read. You must put these values in the same order as the table columns. This means that you supply temperature in Celsius, temperature in Fahrenheit, bars, hectopascals, and atmospheres for the pressure.
Next, you create a new class instance for a MySQLCommand class passing the query you just formatted. Once the class is instantiated, you then call the method ExecuteNonQuery() to run the query. This method is the one you use if there are no results returned. Other methods are provided for reading data from the database server (see the documentation for more information).
You wrap all of this code in a try block so that you can capture any exceptions and display them using debug statements. Listing 13-7 shows the rest of the getData() method with the database code highlighted.
Listing 13-7. Writing Data to MySQL in the getData() Method
...try{// Format the query string with data readString insert_str = String.Format(INSERT, degreesCelsius, degreesFahrenheit,bars, hectopascals, atmospheres);// Create a new command and setup the queryMySqlCommand cmd = new MySqlCommand(insert_str, mysql_conn);// Execute the querycmd.ExecuteNonQuery();Debug.WriteLine("Data inserted.");}catch (Exception ex){Debug.Write("ERROR: ");Debug.WriteLine(ex.ToString());}}
A debug statement was added to inform you that the data was inserted in the database. This could be helpful if you are debugging the code.
That’s it! The code is complete and ready for compilation. Be sure to check the earlier listings to ensure that you have all the code in the right place. Once you have entered all the code, you should now attempt to compile the solution. Correct any errors you find until the code compiles without errors or warnings.
Deploy and Execute
Now it is time to deploy the application! Be sure to fix any compilation errors first. Like you have with other applications, you want to compile the application in debug first (but you can compile in release mode if you’d prefer) and you must turn on the debugger on your board. You do this with the device portal.
Go ahead and power on your board. When ready, connect to the board to run the device portal, turn on the debugger, and then open the project properties to target the device and run with the remote debugger.
Recall from Chapter 9 that you must modify two settings: the Remote machine name and the Authentication Mode. Set the Remote machine name to the IP address of your device with the port specified by the remote debugger when you started it from the device portal. Figure 13-8 shows the debug settings for the WeatherDatabase project.

Figure 13-8. WeatherDatabase project debug settings
Now you can deploy your application. Go ahead and do that now but run it in debug so that you can see any error messages. Run it a few times until you see the debug statements reporting the values read and the data being written to the database. If you encounter errors, stop the application and work through the problems.
You are most likely going to see problems making the connection. This is more likely if you use a MySQL server setup differently than the default, is managed by another entity, or you don’t have the database server or user accounts set up properly. If this is the case, take the following advice and be sure to run all the steps in the previous sections on setting up the database for the project. Correct any errors until the code is running properly in debug.
If you run the application in debug and have it stating it is writing data to the database, you can issue the following query to see the results , as shown in Listing 13-8.
Listing 13-8. Example Weather Data
mysql> select * from weather.history G*************************** 1. row ***************************id: 33dateRecorded: 2016-05-30 21:09:06degreesCelsius: 24.88degreesFarenheit: 76.784bars: 1.01215hectopascals: 1012.13atmospheres: 0.998898*************************** 2. row ***************************id: 34dateRecorded: 2016-05-30 21:09:10degreesCelsius: 24.89degreesFarenheit: 76.802bars: 1.01214hectopascals: 1012.14atmospheres: 0.998902*************************** 3. row ***************************id: 35dateRecorded: 2016-05-30 21:09:15degreesCelsius: 24.88degreesFarenheit: 76.784bars: 1.0121hectopascals: 1012.1atmospheres: 0.998864*************************** 4. row ***************************id: 36dateRecorded: 2016-05-30 21:09:21degreesCelsius: 24.88degreesFarenheit: 76.784bars: 1.01213hectopascals: 1012.13atmospheres: 0.99889*************************** 5. row ***************************id: 37dateRecorded: 2016-05-30 21:09:25degreesCelsius: 24.89degreesFarenheit: 76.802bars: 1.01213hectopascals: 1012.13atmospheres: 0.998892*************************** 6. row ***************************id: 38dateRecorded: 2016-05-30 21:09:30degreesCelsius: 24.89degreesFarenheit: 76.802bars: 1.01214hectopascals: 1012.14atmospheres: 0.9989046 rows in set (0.00 sec)
There are several things in this listing to note. First, the id column is filled in for you (you passed null for this column in the insert statement) as well as the timestamp column. Not only can you see the values change, you can also see when the sample was taken. Thus, you can issue queries later, such as the following (and many more).
Dates when the temperature exceeded a certain value
Average temperature for a day, week, month, and so forth
Plot temperature or pressure using a spreadsheet program
Tip
If you are interested in learning how to issue queries to find data for these or similar questions, see MySQL Cookbook: Solutions for Database Developers and Administrators by Paul DuBois (O’Reilly, 2014).
If you want to reset the data, you can issue the following command to empty the table thereby purging the data. Use this command with caution as a DELETE without a WHERE clause has ruined many database administrators’ day. Once run, you can’t undo it!
DELETE FROM weather.history;Once you have the application working correctly, you can deploy it to your device and start or stop the application from the Apps tab on the Device Portal, as shown in Figure 13-9. The triangle icon is used to start the application and the square icon shows a running application that you can stop.

Figure 13-9. Starting and stopping apps using the Device Portal
Now that you have the project working, rejoice! You have just completed the most sophisticated project in this book and have learning how to leverage off-device storage to keep your data in an organized, reliable storage medium—MySQL!
Summary
Now that you’ve seen how easy it is to save data to MySQL from your IoT projects, you can leverage the power and convenience of structured storage in a database in your own IoT projects. In fact, there are very few IoT projects that generate meaningful data that I would not consider using a database to store the data. Sure, there are plenty of projects that generate data that is only meaningful in the current context, but those IoT projects that I refer to are those that help you understand the world by drawing conclusions from the data. The best way to do that is to process the data using tools designed for such analysis and by putting the data in the database, you open the door to a host of tools that can read and process the data (including your own code!).
In this chapter, you saw how to add a database component to a C# project. As I mention in a sidebar, you can also use the Connector/Python database connector for the MinnowBoard Max–compatible boards (but not the ARM-based boards—yet). You now have an excellent template to use to write more IoT projects that store data in MySQL.
In the next chapter, you look at a different technique for IoT solutions—controlling hardware remotely via the Internet (Web). The project demonstrates what is possible with only a little bit of work.
Footnotes
1 According to GNU ( www.gnu.org/philosophy/free-sw.html ), “free software is a matter of liberty, not price. To understand the concept, you should think of “free” as in “free speech,” not as in “free beer.”
2 And use the --console command-line option on Windows systems.
3 C. J. Date, The Database Relational Model: A Retrospective Review and Analysis (Reading, MA: Addison-Wesley, 2001).
4 C. J. Date and H. Darwen, Foundation for Future Database Systems: The Third Manifesto (Reading, MA: Addison-Wesley, 2000).
5 If you would like to know more about storage engines and what makes them tick, see my book Expert MySQL (Apress, 2012).
7 And any additional database objects that I need.
8 I have yet to try this myself. I encourage you to try it yourself and blog about it!
9 You could overcome this by changing the project template, but I like to use the blank app template in case I ever decide to add a user interface.