
Windows 10 represents an exciting new entry in the IoT arena. Finally, Windows users have a native toolset to experiment with building IoT solutions. While some platforms such as the Arduino are very Windows-friendly, other platforms have forced users to learn about new, sometimes very different, operating systems or tools that are, by contrast to Visual Studio, very challenging to learn. In fact, I’ve heard of some people giving up altogether or not even trying because the operating system and tools seemed too intimidating.1 All of these became roadblocks for those wanting a familiar and easy to use platform to develop IoT solutions.
Microsoft has risen to the occasion creating a unique way to develop applications for and deploy solutions to hardware that traditionally has been off limits for many Windows users who did not want to learn a new operating system, such as Linux, which is the most popular choice for embedded hardware development. I firmly believe you should understand the basics of these other platforms and I present a short primer on the Raspberry Pi in the next chapter, including a look at the base or preferred operating system. But don’t worry; you need not become a Linux expert to use Windows 10 with the Raspberry Pi.
In this chapter, you discover a new version of Windows 10 called the Windows 10 IoT Core that runs on low-cost computers, such as the Raspberry Pi. You will discover the basic features of Windows 10, including how to prepare your PC and get started with the Windows 10 on your device. You will even see how to boot up the Raspberry Pi with Windows 10! Let’s get started.
Windows 10 IoT Core Features
The latest sensation in the world of Microsoft Windows and in particular the IoT is the ability for Windows users to leverage their experience and knowledge of developing applications for Windows on smaller devices. This new offering is called Windows 10 IoT Core. While Microsoft has offered several products designated as “embedded” or “compact” or “embedded compact”, which was a scaled-down version of the operating system, there were many differences and a few bridges that had to be crossed to use them. While highly touted, the offerings never really lived up to the “write the code once and deploy everywhere” mantra. That is, until now.
Unlike the previous products meant for smaller platforms, Windows 10 IoT Core shares many of the same components as the flagship operating system for PCs. That is, it has the same core components, kernel, and even some of the middleware is based on the same core code. In fact, the code generated can be binary-compatible with the other platforms, which means you can write code that can run on either the IoT device or your PC. It should be noted that this capability is highly dependent on what the code does. For example, if your code access the general-purpose input/output (GPIO) hardware pins on the low-cost computing board, you cannot run the application on the PC (there are no GPIO pins on the PC).2
Interacting with Hardware
The ability to access hardware directly—such as the GPIO pins—is what makes Windows 10 IoT Core so attractive to hobbyists and IoT enthusiasts who want to build custom hardware solutions using small, inexpensive hardware.
For example, if you wanted to build a simple device to signal you when someone opens your screen door, you would likely not use a PC costing several hundreds of dollars. Not only would that be expensive and bulky, there isn’t an easy way to connect a simple switch (sensor) to your PC, much less to a PC located elsewhere. It would be much more cost effective to use a simple switch connected to a small, inexpensive set of electronic components using a simple application to turn on an LED or ring a buzzer. What makes the Windows 10 IoT Core even more appealing is you don’t have to relearn how to write software—you can write a Windows application to run on the small device.
Video Support
Since most IoT devices do not include a monitor (some may), Windows 10 IoT Core is designed to run headless (without a monitor) or headed (with a monitor). Headless solutions require less memory since they do not load any video libraries or subsystems. Headed solutions are possible if the hardware chosen supports video (all current hardware options have HDMI video capabilities).
Thus, you can create IoT solutions with visual components or interactive applications, such as those for kiosks, or even interactive help systems. You choose whether the application is headless or headed by the configuration of the device. In fact, the configuration is accessible from the device or remotely through a set of tools running on your PC. You’ll see more about these features later in this chapter.
One Platform, Many Devices
For developers of Windows 10 applications, including IoT solutions, Microsoft has adopted a “one Windows” philosophy where developers can develop their code once and run it on any installation of Windows. This is accomplished with a technology called the Universal Windows Applications API (sometimes called UWP or universal applications or UWP apps).
Thus, developers can create an application that runs on phones, tablets, desktop, and even servers without having to change their code or exchange different libraries. A you will see once you start with the projects in this book, you are developing your applications (apps, scripts, etc.) on your Windows 10 desktop (tablet) and deploying them to the Raspberry Pi—all without having to move the code to the Raspberry Pi, alter it, compile it, and so on. This is a huge improvement for IoT developers over other development choices.
For example, if you chose to use a Raspberry Pi with its default operating system, you would have to learn how to develop Linux applications—complete with learning new development tools (if not a new code editor). With Windows 10, you use an old favorite—Visual Studio—to build and deploy the application. How cool is that?
The real power of the UWP API is discussed in Chapter 4 as you explore how a single application (code) can be compiled on your PC and deployed to the Raspberry Pi. Indeed, the UWP API allows you to write one solution (source code) and deploy it to any Windows 10 device from a phone, low-cost computing board, PC, tablet, and so forth. This opens the possibility of using any of the Windows 10 supported devices in your projects.
Supported Hardware
Windows 10 IoT Core is designed and optimized to run on smaller devices, such as low-cost computing boards. Furthermore, Windows 10 IoT Core can run headless3 (without a display) thereby removing the need for sophisticated graphics (but still supports graphic applications with special libraries). All this is possible with the extensible Universal Windows Platform (UWP) API, as described earlier.
The hardware requirements for running Windows 10 IoT Core include the following.
Memory (headless): 256MB RAM (at least 128MB free for the operating system)
Memory (with display): 512MB RAM (at least 256MB free for the operating system)
Storage: 2GB (can be SD card, non-volatile memory, or disk)
Processor: 400MHz or faster ARM or Intel x86
Currently, the Windows 10 IoT Core runs on the Raspberry Pi, MinnowBoard Max–compatible boards, and the Arrow DragonBoard 410c. All of these boards are considered low-cost computing platforms. I describe each of these briefly in the upcoming sections.
Note
Some early documentation, including web sites from Microsoft and Intel report and demonstrate using early releases of the Windows 10 IoT Core on the Intel Einstein and Galileo boards.4 However, the latest releases of Windows 10 IoT Core have dropped support for these boards.
Raspberry Pi
The Raspberry Pi 3 Model B is the latest iteration of the Raspberry Pi ( www.raspberrypi.org/products/raspberry-pi-3-model-b/ ). It has all the features of the original Raspberry Pi 2 but with a faster 64-bit quad core processor and onboard Wi-Fi (a first for the Raspberry Pi). However, the Raspberry Pi 2 is more than capable for running Windows 10 IoT Core solutions.
Note
I use the term Raspberry Pi henceforth to refer to either the Raspberry Pi 2 or 3.
The Raspberry Pi is a popular board with IoT developers mainly because of its low cost and ease of use. Given the popularity of the Raspberry Pi, I cover it in greater detail in Chapter 3, including a short tutorial on how to get started using it with its native operating system. Thus, I briefly cover the highlights here and reserve a more detailed discussion on using the board for Chapter 3.
Note
I describe the Raspberry Pi 2 here, but you can use either the Raspberry Pi 2 or Raspberry Pi 3 for this book.
The Raspberry Pi 2 hardware includes a 900MHz A7 ARM CPU, 1GB RAM, video graphics with HDMI output, four USB ports (up from just two on older boards), Ethernet, a camera interface (CSI), a display interface (DSI), a micro-SD card, and 40 GPIO pins. Figure 2-1 shows the Raspberry Pi 2 board.
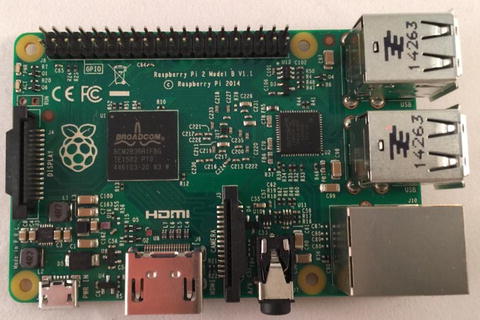
Figure 2-1. Raspberry Pi model 2
The camera interface is really interesting. You can buy a camera module like the ones at Adafruit ( http://adafruit.com/categories/177 ) and connect it to the board for use as a remote video-monitoring component. I’ve used this feature extensively by turning a couple of my Raspberry Pi boards into 3D-printing hubs where I can send print jobs over the network to print and check the progress of the prints remotely or as low-cost video surveillance devices.
The LCD interface is also interesting because there is now a 7-inch LCD touch panel that connects to the DSI port ( http://element14.com/community/docs/DOC-78156/l/raspberry-pi-7-touchscreen-display ). I have also seen a number of interesting Raspberry Pi tablets built using the new LCD touch panel. You can learn about one promising example (made by Adafruit, so I expect it to be excellent) at http://thingiverse.com/thing:1082431 .
To date, the Raspberry Pi has been my go-to board for all manner of small projects due to its low cost and availability. There are also many examples from the community on how to employ the Raspberry Pi in your projects. For more information about the Raspberry Pi, see Chapter 3.
Tip
There is a list of frequently asked questions (FAQ) on using Windows 10 IoT Core that includes a section on the Raspberry Pi ( http://ms-iot.github.io/content/en-US/Faqs.htm ). You may want to check it for answers if you encounter a problem using your Raspberry Pi.
One of the things I like about the Raspberry Pi is you can run a number of operating systems on it by installing the operating system on a micro-SD card. This allows me to use a single Raspberry Pi for a host of projects; each with its own micro-SD card. In fact, the basic setup at www.raspberrypi.org includes a special boot loaded that permits you to install the operating system of your choice. Sadly, Windows 10 is not on that list (yet) but Windows 10 permits you to load it directly from your PC.
MinnowBoard Max–Compatible Boards
The MinnowBoard Max and compatible boards are a very interesting lot. They use an Intel processor with a wider array of features than the other boards, including an Intel Atom E3826 dual core 1.46GHz CPU, integrated HDMI output Intel HD Graphics with hardware-accelerated drivers (for Linux), 2GB of fast DDR3L 1067MT/s DRAM, 8MB SPI Flash memory, Ethernet, USB, SATA (e.g., a hard drive), micro-SD card drive, GPIO, and more. In many respects, this is the most powerful board of the lot with more features. About the only thing lacking is onboard Wi-Fi but that can be quickly remedied with any number of Wi-Fi USB dongles.5
One very interesting aspect to the MinnowBoard Max is that the developer has retained compatibility over several iterations of the board. The Microsoft web site lists the MinnowBoard Max as officially supporting Windows 10 IoT Core but actually any MinnowBoard Max derivative will work. In fact, the MinnowBoard Wiki page ( www.minnowboard.org ) refers to the line as simply “MinnowBoard Max–compatible” boards.
When I purchased my board, I bought the latest, most powerful MinnowBoard Max–compatible board available: the MinnowBoard Max Turbot. The Turbot offers a number of minor improvements over the older boards, including improved performance and many smaller improvements in the GPIO subsystem as well as a defect repair or two. Figure 2-2 shows my MinnowBoard Max Turbot. Now, that’s a handsome board, isn’t it?

Figure 2-2. MinnowBoard Max Turbot
The MinnowBoard Max–compatible boards have one thing that may be very important for some IoT solutions that the Raspberry Pi lacks: an onboard Real Time Clock (RTC)—battery not included. You can see the battery holder in the photo between the power and Ethernet connectors on the left side of the board. Older boards did not come with this header installed but you can add it yourself if you know how to solder (or know someone who does). You can set the current date and time using the Unified Extensible Firmware Interface (UEFI) shell date command (see http://wiki.minnowboard.org/Shell_Commands ).
Note
The other board supported by Windows 10 IoT Core, the DragonBoard 410c, has a RTC too but it does not require an external battery, which suggests it must be reset on boot.
Another interesting thing about the MinnowBoard Max is that it is open hardware so if you wanted to build one yourself or a derivative or perhaps an accessory board (called a Lure), you can find all the information to do so online. In fact, there are a number of vendors offering Lures (add-on boards) for the MinnowBoard Max–compatible boards. The wiki at http://wiki.minnowboard.org/Lures lists a number of available Lures and accessories (and a few retired ones).
I much prefer an open hardware (or open source) solution to proprietary offerings because I find it is often the case that there is more information available about the products if they have a strong (and growing) community to support it. This is the case with the MinnowBoard Max. You can find almost anything you want to know about this board on the http://wiki.minnowboard.org wiki.
Tip
You can find additional information about the MinnowBoard Max–compatible boards at http://wiki.minnowboard.org .
As you can imagine, given the added performance, these boards do cost quite a bit more than the Raspberry Pi (about $150 vs. about $35) but the jump in performance may warrant the extra cost. If you search around, you may be able to save a bit by buying an older board rather than the newest board described here. Most sites I visited were out of stock but it is just a matter of time before they become more plentiful.
Thus, finding a MinnowBoard Max can be a bit of a challenge. Fortunately, the newer MinnowBoard Max Turbot is 100 percent–compatible (and a bit better) than the original MinnowBoard Max described on the Microsoft Windows 10 IoT web site. In the United States, you can buy a MinnowBoard Max Turbot at NetGate ( http://store.netgate.com/Turbot.aspx ). You can also find the MinnowBoard Turbot at Maker Shed at www.makershed.com/products/minnow-turbot . In the EU, you can find them at RS Components Ltd. ( http://uk.rs-online.com/web/cpo/8842199/?searchTerm=minnowboard+max ).
Arrow DragonBoard 410c
The Arrow DragonBoard 410c is a low-cost computing board that incorporates the Qualcomm quad core Snapdragon 410 processor. This processor is an ARM Cortex-based single-chip system supporting a wide variety of hardware from USB to networking. The processor runs up to 1.2GHz per core in either 32- or 64-bit mode, which is a bit more powerful than the Raspberry Pi.
The board is a fully featured low-cost computing platform complete with 1GB of RAM, 8GB onboard storage (eMMC), an HDMI 1080p display (with audio over HDMI), Wi-Fi, Bluetooth, GPS (yes, GPS!), USB ports, and even a micro-SD card. Figure 2-3 shows the DragonBoard 410c.
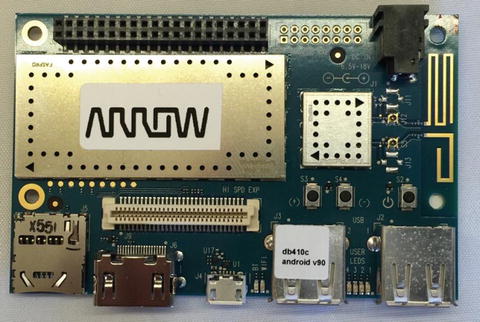
Figure 2-3. Arrow DragonBoard 410c
Interestingly, the DragonBoard 410c can be booted from the onboard memory using the Android 5.1 operating system; provided you haven’t loaded Windows 10 IoT Core because you will overwrite the base operating system. However, you can recover the factoring settings by following the procedure at https://github.com/96boards/documentation/wiki/Dragonboard-410c-Installation-Guide-for-Linux-and-Android . Figure 2-4 shows the default operating system (Android-based) of the DragonBoard 410c. Thus, you could use the DragonBoard 410c as an ultra-compact desktop or laptop computer.

Figure 2-4. Onboard Android OS on the DragonBoard 410c
Note
The DragonBoard 410c does not use an SD card to boot Windows 10 IoT Core. I discuss these differences in a later section.
Given its small size, onboard Wi-Fi, USB, GPIO header, and more, the DragonBoard 410c is a good alternative to the Raspberry Pi. Yes, it does cost more (about $75 versus about $35 for the Raspberry Pi), but if you need the more powerful processor and convenience of onboard Wi-Fi, you may want to consider it for solutions that need a bit more processing power.
Tip
For more details on the DragonBoard 410c, visit the Arrow data sheet at www.arrow.com/en/products/dragonboard410c/arrow-development-tools#partsDetailsDatasheet .
The best source for purchasing an Arrow DragonBoard 410c is from the manufacturer directly; go to www.arrow.com for details on ordering a board to complete your low-cost computer board arsenal. Note that the manufacturer stocks a host of additional electronic components making them another source for gathering components for your IoT project. You can also find it on Maker Shed at www.makershed.com/products/dragonboard .
So Which One Should I Choose?
The three boards are those that are currently supported for use with Windows 10 IoT Core. Which you choose is largely up to you as each has their merits. Perhaps the most compelling reasons to choose one over the others for most hobbyists and enthusiasts are cost and availability.
At the time of this writing, the Raspberry Pi costs less than the other boards and is much easier to find. The Raspberry Pi costs about $35, the DragonBoard 410c about $75, and the MinnowBoard Max Turbot about $150 making the Raspberry Pi the most economic for initial cost.
Since most readers want to limit their investment (hardware can get expensive quickly once you start buying sensors and other bits and bobs you need), I focus on the Raspberry Pi in this book. Even if you plan to use one of the other boards, following along with the Raspberry Pi helps you learn the skills that you need without spending considerably more for the base component. However, if you need to use one of the other boards, the examples in the rest of this book can be adapted without much fuss.
Consider another possibility. If you are new to electronics, or you make a mistake with powering your board or components, you could damage the board.7 Yikes! I have a small, sad box of components I’ve managed to destroy over the years. Fortunately, it is a small box with only a few inexpensive (but quite dead) components. I keep it around to remind me what a simple mistake reading a wiring diagram can do to your wallet. Wouldn’t a $35 board that you can get from a host of vendors be a bit easier to accept if you kill it?
Although this book favors the Raspberry Pi for its economy and availability , the other boards are strong alternatives that you should consider especially for IoT solutions that need more powerful hardware. My own experience with these boards shows each to be a great solution. If cost were not an option, I would likely use the other boards more often. I particularly like the features of the MinnowBoard Max Turbot but the DragonBoard 410c’s onboard Wi-Fi is a nice addition.
Things You’ll Need
If you are just getting started with these boards, there are a number of things that you need, including some additional hardware (e.g., cables) to connect to and use the boards. You also need some software to write and deploy your software to the board.
Additional Hardware
To use these boards, you need, at a minimum, a power supply, network connection, and a micro-SD card. There is some optional hardware you may want to have on hand as well. I explain some of these in more detail.
Power Supply
The Raspberry Pi can be powered by a USB port on your computer via a USB type A male to a micro-A male cable (a commonly used cable for small electronic devices). Be careful with this cable, as the smaller end is rather fragile and easy to damage.
The DragonBoard 410c and the MinnowBoard Max–compatible boards must be powered by a dedicated power supply. The DragonBoard needs a power supply capable of delivering 6.5-18V whereas the MinnowBoard Max–compatible boards require a 5V 2.5A power supply. You can buy the correct power supply for each of these boards from the supplier, but you can use any power supply rated for the correct voltage and amperage.
I like to use universal power supplies with a variety of connectors that can be switched to different voltages. Figure 2-5 shows a typical universal power supply with several tips. If you want to minimize the gear knocking around on your workbench, get a universal power supply like this one. However, be sure to test the adapter at the proper setting. Some inexpensive universal power supplies are quite inaccurate and may produce more or less voltage or amperage than what is advertised. Thus, you should buy one that has been reviewed by others and has good reviews from buyers.

Figure 2-5. Universal power supply
Be sure to get one that can generate at least 3.3V, has a variety of tips (sizes), and the polarity of the plug can be selected. That is, some devices require the center pin to be positive. Having the ability to switch the polarity of the center pin makes the power supply usable on a wider variety of boards. I should note that most of the power supplies I’ve seen that have replaceable tips permit selecting polarity by plugging in the tip in one of two ways. However, this isn’t always easy to tell which way the tip is oriented so check it twice before using it.
Caution
Some universal power supplies may not generate the required amperage for your board. Be sure to check the power rating of the power supply to be sure it matches your board before you buy or use it to power the board.
Networking
The Raspberry Pi and the MinnowBoard Max–compatible boards have an Ethernet port. While you can use wireless connections with both boards (via a USB dongle for example), it is easier to simply use an Ethernet cable and plug it into your network. The DragonBoard 410c , on the other hand, has wireless networking onboard and can be used to connect to your wireless network. If you choose to use a Raspberry Pi 3, you can use the onboard WiFi.
Optional Hardware
There are a number of optional hardware components you may want to have on hand. In fact, they can be quite convenient for getting started with the board. Fortunately, all the boards have built-in video and USB host capabilities making it easy to set them up with interactive peripherals.
You need an HDMI-compatible monitor . The monitor doesn’t have to be an expensive, 30-inch 4K display, since none of these boards has that sort of video capability. I recommend a small HDMI monitor of about 7 inches or larger. Naturally, you also need the appropriate HDMI cable. The Raspberry Pi and DragonBoard 410c use a standard HDMI cable , but the MinnowBoard Max–compatible boards use a micro-HDMI cable. When buying HDMI cables, be sure to purchase high-quality cables because not all cables are fully wired and they may not work. I’ve found the best are those designed to support audio and Ethernet but these do cost a bit more. The cables at www.mycablemart.com are of sufficient high quality and you can get whatever configuration of connectors you need including an assortment of adapters if you already have some HDMI cables.
If you want to interact with the device for setup or configuration, you should consider a small USB keyboard and mouse. Only the Raspberry Pi has a surplus of USB ports so you may want to consider a keyboard that has a USB hub or the mouse built in. Figure 2-6 shows an example of a compact wireless keyboard that I use for my low-cost computing boards (see https://www.adafruit.com/products/922 ). I like it for its small size, built-in mouse and even a small speaker for audio.8

Figure 2-6. Mini wireless keyboard
The keyboard is only about 6 inches long, making it easy to pack away in your kit bag but typing on one won’t earn you any speed typing merit badges and can be a bit tedious. The keyboard comes with its own USB dongle that is compatible with Windows 10 IoT Core. You can find these under various vendor names on Amazon and other popular online computer vendors.
However, since these small keyboards are sold in many slight variations, you may want to buy one from a vendor that is willing to accept it as a return if it doesn’t work. That said, a wired USB keyboard and mouse are the safer alternatives.
There is one other possibility you may want to consider. Motorola has been making a thin, compact clamshell keyboard and monitor, called a Lapdock, which permits certain mobile phones to connect to the Lapdock—turning the phone into a small laptop. The Lapdock has a small USB hub and battery. In fact, it has a micro-HDMI and micro-A USB port that you can use to connect to your low-cost computer board. Yes! This means you can turn your device into a laptop.
There is a catch, though. Depending on the power capabilities of your board, you have to find or build cables to connect the USB and micro-HDMI to your board. I have a detailed example of how to do this in my book Beginning Sensor Networks (Apress, 2013). In short, you must find a micro-A extension cable, cut the cable in the center and solder in a type-A male USB cable segment. This allows you to provide power to the Raspberry Pi and connect the keyboard to the USB host port. Of course, you can use the Lapdock and power your board with an external power supply, but powering it from the Lapdock makes it a bit more portable. Video connections are best done using a female-to-female micro-HDMI adapter and a micro-HDMI male to HDMI male cable. Finding these cables and connectors isn’t difficult but can be a little frustrating since most of the vendors are based in Asia. If you live in the United States, shipping can take a few weeks.
However, the wait is worth it as the Lapdock is really thin and with the battery means you can use your low-cost computing board as a laptop just about anywhere. Figure 2-7 shows a Lapdock connected to a Raspberry Pi running the Raspbian operating system .

Figure 2-7. Raspberry Pi laptop
Fortunately, the Lapdock is still available and many can be found on online auction sites in good condition and even some new, unopened examples can be found. Expect to pay about $50 for a used one and up to $99 for a new one. If you want one, I recommend shopping around for the best prices. Be sure to get one with the power adapter because it is an odd voltage (19V) and can be hard to find (and expensive).
Software Development Tools
The software development tool of choice for Windows 10 IoT Core is Visual Studio 2015 ( www.visualstudio.com ). You can use any version of Visual Studio 2015, including the free community version. Yes, this means developing applications for the Windows 10 IoT Core uses a very familiar tool with a robust feature set. As you will see, you can leverage nearly all the features of Visual Studio when developing and deploying your IoT solutions.
Better still, there is a growing list of add-ons, sample applications, and more resources available for Visual Studio 2015 and Windows 10 IoT Core. You can develop your UWP applications in a variety of languages, including C++, Python, Arduino Wiring, and more. I show you the Python and Arduino extensions for Visual Studio as you explore example IoT projects. However, most examples are written in C++, which is the more popular choice among the examples from Microsoft and the community.
If you have never used Visual Studio before, do not despair—I include a step-by-step description of how to use the tools in each of the proceeding project chapters with a quick-start walk-through in Chapter 4. The following section presents an overview of how to get started with the Windows 10 IoT Core and your low-cost computing board. That is, the section demonstrates how easy it is to set up your PC and your board to begin developing an IoT.
Getting Started with Windows 10 IoT Core
Now that you know more about the Windows 10 IoT Core and the hardware it runs on and the accessories you need to hook things up, let’s get your hands into the hardware and boot up Windows 10 IoT Core for the first time. As you may imagine, there are a few things that you need to do to get things going.
In this section, you see how to get all the prerequisites settled in order for you to start using the Windows 10 IoT Core. As you will see, this requires configuring your computer as well as setting up your board. I walk you through all of these steps for each of the boards available. Although this book focuses on the Raspberry Pi, I include all three boards so that when you want to work with one of the other boards, you will have everything that you need to get started.
Let’s begin with setting up your computer.
Setting up Your Computer
While most would expect this, the first thing you must know about using the Windows 10 IoT Core is that you need to have a Windows 10 PC. Moreover, you must be running Windows 10 version 10.0.1.10240 or greater. To check your Windows version, go to the search box next to the Start button and enter System Information. Click the menu item shown. You see the System Information dialog, as shown in Figure 2-8. I have Windows 10 version 10.0.1.10240, which is the minimal required version.
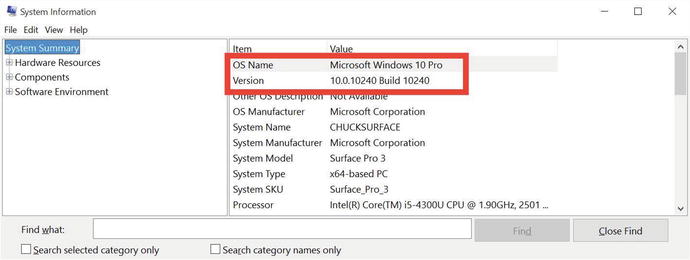
Figure 2-8. System Information
I’ve read some criticism about requiring a Windows 10 PC to use Windows 10 IoT Core, but again for Windows 10 users wanting to explore the IoT, it’s a non-issue. However, if you normally use another platform for your PC (or Mac), that you need a Windows 10 machine going forward.
But there is more. That you need to configure your PC for use with the Windows 10 IoT Core tools. Briefly, this includes the following. I explain each of these steps in more detail. Once all of these steps are complete, your PC is ready to set up and use Windows 10 IoT Core on your low-cost computing board.
Enable developer mode
Install Visual Studio 2015 and the sample templates for the IoT
Install the Windows 10 IoT Core Dashboard
Enable Developer Mode
This step is one that is often overlooked and easily forgotten, especially if you have more than one Windows 10 PC. Windows 10 has initiated a new licensing mechanism for developing applications. Rather than require a special developer license to develop and deploy your applications, you simply enable your Windows 10 PC to turn on developer mode, which allows you to compile, deploy, and test applications for Windows 10 IoT Core.
To enable developer mode, enter use developer features in the search box next to the Start button. Choose the Settings menu item by the same name. Alternatively, you can open the settings application, click Update & Security, and then click For developers. Once you have the dialog open, select the Developer mode radio button. Once you click the button, you are asked for confirmation to turn on developer mode. The message explains that using developer mode may increase your security risk. Be sure to take appropriate actions to ensure that you are protected while online. Click Yes in that dialog. Figure 2-9 shows the developer mode dialog with the correct settings selected.
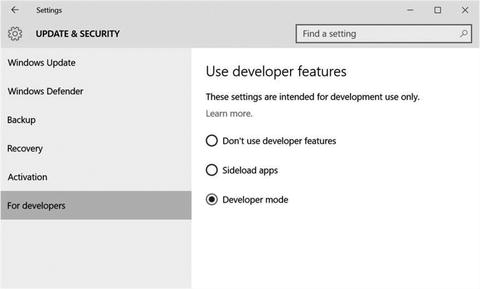
Figure 2-9. Enabling Developer Mode
Next, you need to install the software development tools. In this case, you want to install Visual Studio 2015. You also need to install the IoT templates and add-ons. You won’t use Visual Studio in this chapter but since it is required, you’ll discover how to install it so that you can complete the process to prepare your PC for developing IoT solutions.
Install Visual Studio Community 2015
If you do not have Visual Studio 2015, you can go to https://www.visualstudio.com/en-us/visual-studio-homepage-vs.aspx and click Download Community 2015. This version has a license making it free to use for individuals, open source projects, academic institutions, students, and small project teams. Visual Studio 2015 Community has everything that you need to develop Windows 10 IoT solutions.
The download consists of a small executable named vs_community_ENU.exe or similar, which you can execute once the download is complete. This is the Internet installation version, which downloads the components needed during installation. You use this version in this chapter since it is the easiest to do and requires less download time.9
Tip
If you would prefer to install from a local file, you can download an .iso file with all the components from https://www.microsoft.com/en-us/download/details.aspx?id=49988 .
Once Visual Studio Community Edition is downloaded, you can double-click the executable to begin the installation. Once the installer launches, you see the splash screen followed shortly by the installation type page. You also may need to authorize changes to the system via a pop-up dialog.
Next, you see a page that asks you what type of installation you want to choose: default or custom. You can also change the location of the installation but I recommend accepting the default location. If your Internet download speed is very slow, you may want to choose a custom installation and uncheck everything to install the basic components and install components, as you need them. Figure 2-10 shows the installation type dialog page.

Figure 2-10. Visual Studio 2015 Community: installation type
Tip
If you already have Visual Studio 2015 (either the Professional edition or the Enterprise edition), you can use that, but you have to install the Universal Windows App Development tools. You can do so by choosing a custom installation or by running the installer again and modifying the installation.
The basic components that you need for this book include the UWP and Python features. You can select these by clicking Custom and then clicking Next. Expanding the tree and check the entries you want in the list, as shown in Figure 2-11. Here you see I have selected the UWP feature along with the Python tools and Web development tools. The default installation choice is to install Visual C++, which you use in this book. The components that you need are listed next.

Figure 2-11. Visual Studio 2015 Community: custom installation
Visual C++ (selected by default)
Python Tools for Visual Studio
Universal Windows Platform (UWP)
Web Developer Tools (optional)
Be advised, if you check Select All, the installation could exceed 15GB and require over 6GB of download data.
Once you’ve selected the features and components you want, click the Next button. You are presented with a summary of the installation, as shown in Figure 2-12. Click Install to accept the license and install the components.

Figure 2-12. Visual Studio 2015 Community: accept license
Now comes the stage where the installer begins downloading the components you selected from the Internet and installs them. Depending on what options you chose, this could be a long list. Also, depending on your Internet download speed, downloads can take some time to complete.
Further, the installation of the components can also take a long time. It is not unusual to take several hours to complete the installation. Again, if this is a concern, you can use a custom installation and choose one component at a time. Once underway, you see a progress page like the excerpt shown in Figure 2-13.
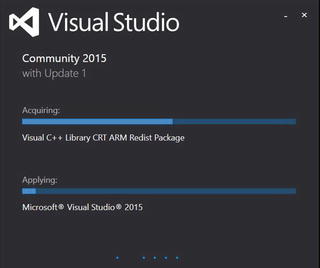
Figure 2-13. Visual Studio 2015 Community: progress
Tip
Do not cancel the installation. It may look like it is hung, but it may take several hours to complete the installation during which time it may appear as if nothing is happening (but it is). If you have a slow Internet connection, you may want to start the installation before you go to bed and let it run overnight.
When the installation completes, you see a dialog page that permits you to launch Visual Studio 2015 Community for the first time, as shown in Figure 2-14.

Figure 2-14. Visual Studio 2015 Community: installation complete
If you have been following along and installing Visual Studio 2015 Community, go ahead and launch it. When you first start Visual Studio 2015 Community, you may a delay as the application configures your system and the options you chose during installation. Figure 2-15 shows a typical layout of Visual Studio. Don’t worry about what all the panels, menus, and hundreds of options are at this time. You learn the essentials of what you need to know in Chapters 4 through 6.

Figure 2-15. Visual Studio 2015 Community user interface
Update Visual Studio 2015 Community
Next, you may need to update Visual Studio . If you just downloaded Visual Studio, this may not be necessary, but I will explain the steps in case you need to do this in the future. To update Visual Studio, open the Extensions and Updates dialog in Visual Studio via the Tools menu. Click Updates to connect to the Internet and check for updates. If an update is available (for example, Update 1), go ahead and select it for installation. Figure 2-16 shows the Extensions and Updates dialog.
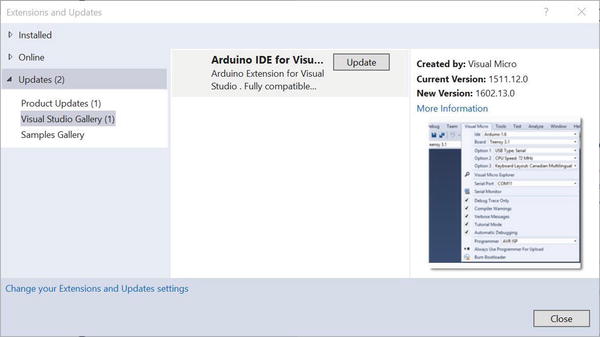
Figure 2-16. Extensions and Updates dialog: Updates
Install the Windows 10 IoT Core Templates
There is one more thing you need to install: the Windows 10 IoT Core templates. You can download the template installation file at https://visualstudiogallery.msdn.microsoft.com/55b357e1-a533-43ad-82a5-a88ac4b01dec . Once downloaded, double-click the file named WindowsIoTCoreTemplates.vsix or similar. This launches the installer for the templates. Follow the prompts to install the templates.
Alternatively, the templates can be found by searching for Windows IoT Core Project Templates in the Visual Studio Gallery.
Tip
You must restart Visual Studio if it was open when you installed the templates.
Validate Your Visual Studio 2015 Community Installation
OK, now you have Visual Studio installed and updated. You can validate the installation by opening Visual Studio and then selecting Help ➤ About Microsoft Visual Studio. Observe the version information, as shown in Figure 2-17.

Figure 2-17. Validating Visual Studio: About dialog
This lists a number of entries, but what you’re checking is the version of Visual Studio which should be 14.0.24720.00 Update 1 or later. Figure 2-17 shows an example dialog from my machine. I have the correct versions installed.
Troubleshooting Visual Studio Installation Problems
While the installation of Visual Studio can take a very long time to complete, there are sometimes cases where the installation fails. This is most often caused by loss of connectivity to the Internet or simply failed download of one or more components. You can recover from this form of failure by simply restarting the installation. Indeed, most installation failures can be fixed in this manner.
However, if something goes really wonky, you may need to repair the installation. Fortunately, you can restart the installation or open the Program and Features application. Select the Visual Studio 2015 entry and then click Change. You are presented with a dialog that allows you to modify or repair the installation. Click repair to recover from the installation failure.
On very rare occasions, the installation could fail in such a way that some components will not install, resulting in a failed installation. In these rare occasions, you can view the log of the failed installation (there is a link on the final dialog page for the installation) and try to determine the cause. Since there are so many things that could go wrong, it isn’t possible to list them. Thus, you must examine the log and fix each error as described. I recommend doing a search for the error on the Internet and read the suggested solutions. Be sure to read several solutions thoroughly before you attempt them. Also, make a restore point before continuing.
Tip
Always make a restore point when attempting to fix installation problems. If the solution fails or makes it worse, you can restore the system to the last checkpoint and try another solution.
When you find yourself spending a lot of time trying to fix really odd errors for which you can find no solutions on the Internet, you should first attempt to uninstall using the command line with the /uninstall /force options with vs_community_ENU.exe /uninstall /force and then restart the installation. If this does not work or gives the same errors, you can try deleting the contents of the ProgramData/Program Cache folder. Use this is a last resort because not only will it force installation to download all the packages again, but it also removes cached packages from other applications. However, I’ve found that this trick works very well.
Caution
Deleting cached packages from ProgramData/Package Cache may affect your other applications forcing them to download packages again. Use with care and only as a last resort.
Now that you have Visual Studio installed, you need only one more thing on your PC: the Windows 10 IoT tools.
Install the Windows 10 IoT Tools
The last step is to install the Windows 10 IoT Core development tools . You need these tools to complete the installation of Windows 10 IoT Core on your low-cost computing board. To download the installation, go to http://go.microsoft.com/fwlink/?LinkID=708576 . This link downloads an installation named setup.exe. Once downloaded, launch the executable and follow the prompts. The installation begins a small download of the tools, as shown in Figure 2-18.

Figure 2-18. Windows 10 IoT Core Dashboard installation
Once the installation is complete, the dashboard launches. Figure 2-19 shows the Windows 10 IoT Core Dashboard, which launches the Set up a new device page by default. This page is used to configure a bootable SD card for your device. You see how to use this in the next section. On subsequent launches, the application checks for updates and automatically downloads and installs them.

Figure 2-19. Windows 10 IoT Core Dashboard
There are three tags on the left side of the window. The My devices page lists the devices running Windows 10 IoT Core on your network. There is also a Try some samples link to a set of sample applications that you can use to get started. You see one of these in action in Chapter 4. Finally, the Settings link displays the version and builds information for the application.10 You explore this tool in more detail in the following sections as you set up your hardware for use with the Windows 10 IoT Core.
Now that your PC is ready to go, let’s see how each of the low-cost computing boards is set up to install Windows 10 IoT Core and boot for the first time.
Getting Started with Your Board
Windows 10 IoT Core is very easy to set up and get your board running. The general process is as follows. I describe each in more detail through examples of each board. I recommend reading through the setup of all the boards, especially if you haven’t decided which one you want to use. But first, I present some tips that may be helpful in setting up your board.
Download the Windows 10 board-specific installation package (via the .iso download) and install it. For the .iso images for the development boards, see http://ms-iot.github.io/content/en-US/Downloads.htm .
Download and write the Windows 10 IoT Core boot image to the SD card (or memory for the DragonBoard 410c).
Connect your hardware to power, monitor, keyboard, and mouse.
Power on the device.
Configure basic settings and connect to the network.
Connect to your device with the IoT Core Dashboard.
Tip: Be Patient and Thorough
I should encourage you to exercise patience and perseverance should you encounter problems. Although I will explain the steps you need to perform in detail, there are some things that could go wrong. I have included as many pitfalls as I can, but my experience has shown troubleshooting problems with the hardware may still arise.
For example, I spent quite some time trying to boot one of my boards only to discover one of the cables was defective. I neglected to consider the cable as the culprit because it was new. Thus, you should approach problems with an iterative mind-set where you check each component (SD card, cable, power supply, etc.) one at a time for correct working order and, more importantly, change only one thing at a time. If it doesn’t solve the problem, return it to the original setting. That is, if you swap the HDMI cable and it doesn’t fix the problem, go back to the original one.
Tip: Downloading the .iso Image
Downloading a bootable image can be accomplished in two ways: you can download the boot image (as an .iso file) or you can use the Windows 10 IoT Dashboard to download the image. There are also two ways to write the image to the SD card (for the Raspberry Pi and MinnowBoard Max–compatible boards). You can either use the Windows 10 IoT Dashboard or a helper application that comes with the .iso boot image. You’ll see how to do both in the following sections.
Tip: Use Class 10 SD Cards
Microsoft recommends using class 10 SD cards or higher.11 Currently, only two SD cards have been tested—Ultra cards from SanDisk and the EVO cards from Samsung. I’ve found other class 10 SD cards work well and some of the slower classes may work but results are mixed. If you observe your device booting slowly or the startup sequence seems jumpy (the screen flickers), you may need to use a faster SD card. Incompatible SD cards can result in unacceptable performance or failure to boot. If you are having problems with your device after initial setup, try a faster SD card. I prefer the SanDisk Ultra SD cards since they are more plentiful and thus can be a bit cheaper.
Tip: Double-Check Your Power Supply
Be sure to double-check your power supply to ensure that it has the proper rating for your board. The Raspberry Pi needs a 5V 1.5A power supply with a micro-USB connector, the MinnowBoard Max–compatible boards need a 5V 2A power supply with a 5mm connector, and the DragonBoard 410c works best with a 12V 2A power supply with a 4mm tip. If your board does not boot or powers off while running, it is possible the power supply is faulty or insufficient for the board and its peripherals.
Caution
Using the wrong tip can damage the power connector on the board.12
Now that you understand the basic process and have foreknowledge of some of the pitfalls, let’s see how to set up each of the boards in turn starting with the Raspberry Pi. You see how to connect to the board after you learn how to configure all the boards.
Raspberry Pi Configuration
This section demonstrates how to install and boot Windows 10 IoT Core on the Raspberry Pi. You see the specific steps needed to get your board ready for Windows 10 IoT Core, including the hardware that you need, how to connect to the board once Windows 10 IoT Core boots, and how to configure the board for your network.
Let’s begin with the prerequisite hardware that you need.
Prerequisites
The following are the miscellaneous hardware that you need to use Windows 10 IoT Core with your board. You will see where these cables are plugged into your board later in this section. For now, just gather the items you need.
Raspberry Pi
5V micro-USB power adapter, like the one at www.adafruit.com/products/1995
USB wired or wireless (not Bluetooth) keyboard and mouse
HDMI monitor with HDMI cable or a suitable adapter for use with a DVI monitor
Ethernet cable
micro-SD Card 8GB or larger: class 10 or better
SD card reader13 (if your computer doesn’t have one)
Download the .iso and Install the Board-specific Windows IoT Core Tools
The first step is to download the .iso file for the Raspberry Pi, mount the .iso file, and then install the board-specific setup using the .msi file. The installation installs a number of tools that you need, including the Windows IoT Core Watcher that monitors your devices, the binary boot image for your board, and a tool named the Windows IoT Image Helper that is an alternative tool for creating the SD image. Indeed, some older Windows web sites show procedures for using this application. You will use the newer Windows IoT Core Dashboard instead.
Note
The Windows IoT Core Watcher application loads on startup but you can change that behavior in the Startup tab on the task manager.
You can download the file from http://go.microsoft.com/fwlink/?LinkId=691711 . Once the .iso file is downloaded, simply double-click it. This mounts as a virtual drive that opens automatically. You see a file named Windows_10_IoT_Core_RPi2.msi or similar. Double-click that file to start the installation. You’ll need to do the usual steps for most installations, including accepting the license, permitting the change on your computer, and so on.
The binary image for the Raspberry Pi is named flash.ffu and installed in the c:Program Files (x86)Microsoft IoTFFURaspberryPi2. Once the installation is complete, you can unmount the virtual drive. If you changed the installation folder, be sure to note the correct path—you need it in the next step.
Creating the SD Card Image
Now you are ready to write the Windows 10 IoT Core bootable files to the micro-SD card. You can use the Windows 10 IoT Core dashboard to automatically download the .iso and build the image using the drop-down box selections, but since you downloaded and installed the tools manually, you can use the custom option in the dashboard. Let's see how to do that.
Caution
The SD card image overwrites all data on the SD card. Be sure to copy any data on the card before you start the load.
Open the Windows 10 IoT Core Dashboard and insert a suitable SD card into your SD card reader. Make sure that you’ve backed up and data on the card before you proceed because the next step overwrites the contents.
Begin by selecting the Set up a New Device tab. Figure 2-20 shows the initial setup screen.

Figure 2-20. Windows 10 IoT Core Dashboard: Set up new device
Next, click the Set up a new device button to start the build. On the next screen, you see a drop-down box that allows you to choose the board for automatic download. However, since we downloaded the image, you will use the custom installation option. Choose the Custom selection from the drop-down box. Once selected, you see a text box that contains the path to the image (the flash.ffu file).
Use the Browse button to locate the file and select it. If you have more than one SD card or USB device connected to your computer, use the Drive drop-down box to select the correct drive. Finally, check the license agreement checkbox at the bottom. Figure 2-21 shows the Windows 10 Core Dashboard with the correct settings.

Figure 2-21. Windows 10 IoT Core Dashboard: custom image build
When you are ready, click the Download and install button. Since you choose the custom installation, it copies the file from your computer and does not download anything. Once the process begins, you see a new console window open running the Deployment Image Servicing and Management tool (named dism.exe), which provides feedback during the copy. Figure 2-22 shows an example of the console.

Figure 2-22. Windows 10 IoT Core Dashboard: custom image build
Once the image build is complete, the window closes and the dashboard displays the process complete screen, as shown in Figure 2-23.

Figure 2-23. Windows 10 IoT Core Dashboard: image build complete
You can now take the SD card out of your computer. Be sure to eject it properly like you would any other USB or removable drive by using the Safely Remove Hardware and Eject Media icon on the system tray. Wait until you see a message that it is safe to remove the media before removing it. You’re now ready to connect the hardware and boot the image for the first time. Before you do that, click the My devices tab (or button) in the Windows 10 IoT Core Dashboard. You’ll be using this screen to connect to the Raspberry Pi in a later step.
Connecting the Hardware
If this is your first time using a Raspberry Pi, orient the board on the table with the Raspberry Pi logo facing you. Figure 2-24 helps you locate the connection points. Insert the micro-SD card into the Raspberry Pi SD card reader located on the bottom of the left side. Connect the HDMI monitor to the HDMI port located on the bottom. You can connect your Ethernet cable and USB mouse and keyboard to the ports on the right side of the board.

Figure 2-24. Connections for the Raspberry Pi
OK, you’re now ready to power the board and boot up Windows 10 IoT Core!
Booting Windows 10 IoT Core for the First Time
Now you can power on the board and boot from the SD card. Plug your AC adapter into a power source and then insert the micro-USB power located in the bottom-left corner of the board, as shown. You should see the power LED illuminate and the SD card activity LEDs blink. These LEDs are located on the left side of the board.
You see the Windows logo and an activity cursor appear on the monitor connected to the Raspberry Pi. The first boot may take some time but eventually you be asked to choose the default language. Use the mouse or keyboard to select your language.
Next, you see the boot up screen, as shown in Figure 2-25. You can configure your board using this screen, as well as shut down or reboot the board. The Device Settings button is the small gear located in the upper right portion of the screen. If you click it, you see the Device Settings screen that allows you to change the default language or connect to a Wi-Fi network if you have a wireless network adapter plugged into the Raspberry Pi. Finally, you can shut down or restart the board by clicking the power button in the upper right of the screen.

Figure 2-25. Windows 10 IoT Core boot screen : Raspberry Pi
I have highlighted the network information located on the left side of the screen. Take note of the IP address as you may need this if you want to connect to the Raspberry Pi from your computer. Since the methods for connecting are the same for all the boards, you will see how to connect to the board after you learn how to set up the other two boards.
MinnowBoard Max Turbot Configuration
This section demonstrates how to install and boot Windows 10 IoT Core on MinnowBoard Max–compatible boards as demonstrated with the MinnowBoard Max Turbot. You will see the specific steps needed to get your board ready for Windows 10 IoT Core, including the hardware you need and how to connect to the board once Windows 10 IoT Core boot as well as how to configure the board for your network.
Since many of the steps are similar for this board as the Raspberry Pi, some of the following is familiar if you read the section on the Raspberry Pi. However, I demonstrate an alternative method for building the SD card image. You will also see two additional steps that you need to perform on the MinnowBoard Max; you must ensure that the board has the 32-bit version of the firmware loaded. You do not need to do this step for the other boards and you need only do it once when setting up the board for the first time.
Let’s begin with the prerequisite hardware that you need.
Prerequisites
The following are the miscellaneous hardware that you need to use Windows 10 IoT Core with your board. You see where these cables are plugged into your board later in this section. For now, just gather the items you need.
MinnowBoard Max–compatible board
5V 2.5A power adapter with a 5.5mm × 2.1mm barrel male plug that is configured with the center pole positive and the outer casing negative. If you use a universal power adapter, you should double-check the power ratings.
USB wired or wireless (not Bluetooth) keyboard and mouse
HDMI monitor with HDMI cable or a suitable adapter for use with a DVI monitor. The board uses a micro-HDMI connector so make sure that you have the correct cable or a HDMI to micro-HDMI adapter.
Ethernet cable
micro-SD Card 8GB or larger: class 10 or better
SD card reader (if your computer doesn’t have one)
USB thumb drive, 2GB or larger (for loading the firmware)
Download the .iso and Install the Board-specific Windows IoT Core Tools
The first step is to download the .iso file for the MinnowBoard Max, mount the .iso file, and then install the board-specific setup using the .msi file. The installation installs a number of tools that you need, including the Windows IoT Core Watcher that monitors your devices, the binary boot image for your board, and a tool named the Windows IoT Image Helper that is an alternative tool for creating the SD image. Indeed, some older Windows web sites show procedures for using this application.
You can download the file from http://go.microsoft.com/fwlink/?LinkId=691712 . Once the .iso file is downloaded, simply double-click it. This mounts as a virtual drive that opens automatically. You see a file named Windows_10_IoT_Core_Mbm.msi or similar. Double-click that file to start the installation. You’ll need to do the usual steps for most installations, including accepting the license, permitting the change on your computer, and so on.
The binary image for the MinnowBoard Max is named flash.ffu and installed in the c:Program Files (x86)Microsoft IoTFFUMinnowBoardMax. Once the installation is complete, you can unmount the virtual drive. If you changed the installation folder, be sure to note the correct path—you need it in the next step.
Creating the SD Card Image
Now you are ready to write the Windows 10 IoT Core bootable files to the micro-SD card. Rather than use the Windows 10 IoT Core Dashboard to create the SD card image, you will use the older Windows IoT Image Helper application. Let’s see how to do that.
Open the Windows IoT Image Helper (search for the app named WindowsIOTImageHelper) and insert a suitable SD card into your SD card reader. Make sure you've backed up and data on the card before you proceed because the next step overwrites the contents. Simply select the drive associated with the SD card and then click the Browse button to locate the flash.ffu file. This is located in the c:Program Files (x86)Microsoft IoTFFUMinnowBoardMax folder. Figure 2-26 shows the Windows IoT Image Helper application with the drive and flash file selected.
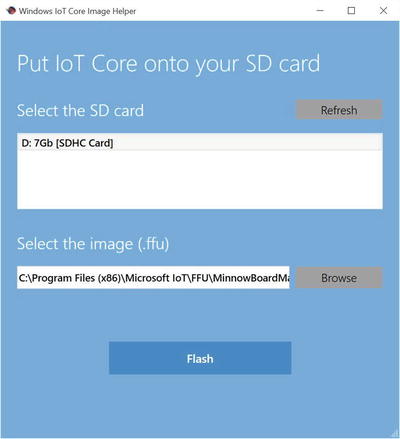
Figure 2-26. Windows IoT Image Helper
Caution
The SD card image overwrites all data on the SD card. Be sure to copy any data on the card before you start the load.
When you are ready, click the Flash button to begin writing the image to the SD card. You see a new console open that runs the Deployment Image Servicing and Management tool (dism.exe) to write the image. Figure 2-27 shows an example of the output.
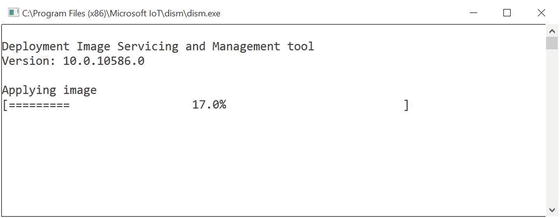
Figure 2-27. Deployment Image Servicing and Management tool
Once that is done, Windows mounts the card. Eject the SD card and set it aside. You will use it in a future step but first let’s see how to connect the hardware and prepare the firmware on the board for use with Windows 10 IoT Core.
Connecting the Hardware
If this is your first time using a MinnowBoard Max–compatible board, orient the board on the table with the Ethernet port on the left. Figure 2-28 helps you locate the connection points. The micro-SD card drive is located on the right side of the board. Don’t insert the card at this time. You must do one additional step before you can boot Windows 10 IoT Core.
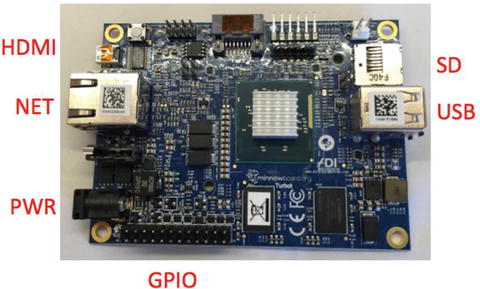
Figure 2-28. Connections for the MinnowBoard Turbot
Connect the HDMI monitor to the HDMI port located on the left side of the board. This is a micro-HDMI connector so you need to make sure that you have the correct cable. You can connect your Ethernet cable on the left side as well. Connect the USB mouse and keyboard to the USB ports on the right side of the board. Now that all the cables are connected, you can connect the power and let the board boot up.
Load the 32-bit Firmware
The MinnowBoard Max–compatible boards are preloaded with a 64-bit version of its firmware. Unfortunately, you need to use the 32-bit version of the firmware before you can boot Windows 10 IoT Core because Windows 10 IoT Core does not work with the 64-bit version. Loading (also called flashing) the new firmware requires downloading the firmware files, copying them to a USB thumb drive, booting the board and using commands entered in a special administration tool called the UEFI shell.
However, you should first check the current firmware version displayed on the boot configuration screen (also called BIOS like on your PC). If your board has the 32-bit firmware loaded, you may be able to skip this section. However, most new boards have the 64-bit version loaded. You may also want to load the latest version of the firmware since the newer firmware typically is more stable. Moreover, you need to know whether the current firmware is 32-bit or 64-bit.
Go ahead and connect your monitor, keyboard, network, and power as described in the previous section. Be sure to remove any SD card before you turn the power on. Once powered on, you see the boot up sequence. You can enter the BIOS by pressing F2 when the board boots up. If you miss it, you can simply wait until the UEFI shell is launched and then enter the EXIT command. Figure 2-29 shows the location of the firmware version on the screen (at the top). This statement is located in the upper-left corner of the BIOS screen.

Figure 2-29. MinnowBoard Max firmware version (courtesy of minnowboard.org)
In Figure 2-29 the BIOS is running a 64-bit version as noted by the X64 in the name. You can now power off the board and prepare the USB thumb drive for the next step.
You need to download several files. Visit the MinnowBoard Max firmware download page at http://firmware.intel.com/projects/minnowboard-max . Locate the latest version of the firmware and download both the 32-bit and 64-bit versions. The files are .zip archives, which you expand before placing on the USB thumb drive. For example, I downloaded version 0.90. You want the release versions of the software (there are links for both debug and release, choose release). Thus, I downloaded the MinnowBoard MAX 0.90 64-Bit and MinnowBoard MAX 0.90 32-Bit files.
Next, unzip the files and copy the contents to the USB thumb drive. The thumb drive does not need to be empty (so long as there is room for the files) but it must be formatted as a FAT drive (usable from a Windows PC). If you are using a larger SD card, you may need to use extFat. For example, my USB thumb drive has the following files loaded.
MinnowBoard.MAX.0.90.BIN-ReleaseNotes.txtMinnowBoard.MAX.FirmwareUpdateIA32.efiMinnowBoard.MAX.FirmwareUpdateX64.efiMinnowBoard.MAX.I32.90.R01.binMinnowBoard.MAX.X64.90.R01.bin
Note that the release notes file is the same in both archives. You only need the one file, and only for reference. Once you have the files copied, eject the drive, insert it into the MinnowBoard Max USB port, and power it on. Allow the board to boot into the UEFI shell. Once the shell is open, you can flash the firmware.
The command needed depends on whether your board has the 32-bit or 64-bit firmware loaded. More specifically, if it has the 32-bit firmware, you must use the 32-bit flashing tool to load the firmware. Similarly, if it has the 64-bit firmware, you must use the 64-bit flashing tool even though you are loading the newer 32-bit version.
The first step is to change to the USB thumb drive. This is either fs0: or fs1:. Enter the map -u command to see the drives attached. The following shows an example where my board associated the fs0: drive with the USB thumb drive.
EFI Shell version 2.40 [1.0]Current running mode 1.1.2Device mapping tablefs0 :Removable HardDisk - Alias hd15a0b blk0PciRoot(0x0)/Pci(0x14,0x0)/USB(0x0,0x0)/HD(1,MBR,0x3CAE3447,0x800,0x1DD0000)blk0 :Removable HardDisk - Alias hd15a0b fs0PciRoot(0x0)/Pci(0x14,0x0)/USB(0x0,0x0)/HD(1,MBR,0x3CAE3447,0x800,0x1DD0000)blk1 :Removable BlockDevice - Alias (null)PciRoot(0x0)/Pci(0x14,0x0)/USB(0x0,0x0)
You can change to the drive by entering its name, as shown next. You can also list the contents of the drive, as shown.
Shell> fs0:fs0:> lsDirectory of: fs0:01/27/16 06:20p 8,388,608 MinnowBoard.MAX.I32.090.R01.bin03/09/15 06:19p 8,388,608 MinnowBoard.MAX.X64.090.R01.bin08/14/14 07:54p 23,040 MinnowBoard.MAX.FirmwareUpdateX64.efi08/14/14 08:11p 14,144 MinnowBoard.MAX.FirmwareUpdateIA32.efi02/05/16 01:49p 9,806 MinnowBoard.MAX.0.90.BIN-ReleaseNotes.txt5 File(s) 16,824,448 bytes0 Dir(s)
Next, you flash the firmware. If you have the 32-bit version of the firmware, execute the following command substituting the version number of the firmware you downloaded. I highlight the executable in bold. Listing 2-1 shows the complete execution of the firmware update for the 32-bit version. You see the progress of the flashing and when it is done, the board reboots. Once rebooted, check the firmware version to make sure that the flashing was successful.
Listing 2-1. Flashing the MinnowBoard Max with 32-bit Firmware Loaded
fs0:> MinnowBoard.MAX.FirmwareUpdateA32.efi MinnowBoard.MAX.A32.090.R01.binIntel(R) UDK2014 Firmware Update Utility for the Intel(R) Server Board S1200V3RPSVersion 0.97Copyright(c) Intel Corporation 2006 - 2014Reading file MinnowBoard.MAX.A32.090.R01.binUpdating Firmware. This may take a few minutes.............................................................................................................................................................................................................................................................................................................Update successfulShutdown system in 5 seconds ...
If you have the 64-bit version of the firmware, execute the following command substituting the version number of the firmware you downloaded. I highlight the executable in bold. Listing 2-2 shows the complete execution of the firmware update for the 64-bit version. You will the progress of the flashing and when it is done, the board reboots. Once rebooted, check the firmware version to make sure that the flashing was successful.
Listing 2-2. Flashing the MinnowBoard Max with 64-bit Firmware Loaded
fs0:> MinnowBoard.MAX.FirmwareUpdateX64.efi MinnowBoard.MAX.A32.090.R01.binIntel(R) UDK2014 Firmware Update Utility for the Intel(R) Server Board S1200V3RPSVersion 0.97Copyright(c) Intel Corporation 2006 - 2014Reading file MinnowBoard.MAX.A32.090.R01.binUpdating Firmware. This may take a few minutes.............................................................................................................................................................................................................................................................................................................Update successfulShutdown system in 5 seconds ...
Now, there is just one more step to accomplish and you need to do this in the BIOS so while you’re there, let’s complete the BIOS setup.
Configure the BIOS
If you haven’t booted into the BIOS, do that now. Press F2 as the board boots or you can enter the EXIT command on the UEFI shell to enter the BIOS setup. In this step, that you need to change the boot order so that the SD card gets checked first and turn off a couple of BIOS settings.
First, enter the BIOS and use the down arrow to select Boot Maintenance Manager and press Enter. Choose the Boot Options option and then the Change Boot Order item. Use the arrow keys to select the EFI MISC Device option. Use the + key to move it to the top and then press Enter. This moves the SD card to the top. To save your changes, press F10 and reply Y to confirm the changes.
Next, you need to turn two settings off (disabled). Navigate to the main menu and select Device Manager ➤ System Setup ➤ South Cluster Configuration ➤ LPSS & SCC Configuration. Use the arrow keys to locate the following pulse-wave modulation extensions and set each to Disable. You do not need these for Windows 10 IoT Core.
LPSS PWM #1 SupportLPSS PWM #2 Support
When complete, press Esc until you are asked to save the changes. Save them and allow the board to reset. OK, you’re now ready to power the board and boot up Windows 10 IoT Core!
Booting Windows 10 IoT Core for the First Time
Now you can power on the board and boot from the SD card. Plug your AC adapter into a power source and then power on the board. You see the Windows logo and an activity cursor appear on the monitor. The first boot may take some time but eventually you be asked to choose the default language. Use the mouse or keyboard to select your language.
Once selected, you see the boot up screen, as shown in Figure 2-30. Recall from the “Raspberry Pi Configuration” section that you can configure your board using this screen, as well as shut down or reboot the board. The Device Settings button is the small gear located in the upper right portion of the screen. If you click it, you see the Device Settings screen that allows you to change the default language or connect to a Wi-Fi network if you have a wireless network adapter plugged into the USB port. Finally, you can shut down or restart the board by clicking the power button in the upper right of the screen.

Figure 2-30. Windows 10 IoT Core boot screen excerpt: MinnowBoard Turbot
Now let’s see how you can configure the DragonBoard 410c. After that section, you learn how you can connect to your board from your PC.
DragonBoard 410c Configuration
This section demonstrates how to install and boot Windows 10 IoT Core on the DragonBoard 410c. You see the specific steps needed to get your board ready for Windows 10 IoT Core, including the hardware that you need, how to connect to the board once Windows 10 IoT Core boot, and how to configure the board for your network.
Many of the steps are similar for this board as the Raspberry Pi. However, you do not use an SD card to boot the DragonBoard 410c. Instead, you will use a special application to download the boot image into a special memory drive (re-writable, non-volatile memory) on the DragonBoard 410c. Thus, that step is completely different that either of the other boards, but as you will see, you still download and install the firmware tools.
Let’s begin with the prerequisite hardware that you need.
Note
The DragonBoard 410c does not use an SD card to boot Windows 10 IoT Core.
Prerequisites
The following are the miscellaneous hardware that you need to use Windows 10 IoT Core with your board. You see where these cables are plugged into your board later in this section. For now, just gather the items you need.
DragonBoard 410c
+6.5V to +18Vpower adapter with a 4.75 x 1.75mm barrel male plug, like the one at www.arrow.com/en/products/wm24p-12-a-ql/autec-power-systems#page-1
USB wired or wireless (not Bluetooth) keyboard and mouse
HDMI monitor with HDMI cable or a suitable adapter for use with a DVI monitor
micro-SD Card 8GB or larger: class 10 or better
SD card reader (if your computer doesn’t have one)
Download the .iso and Install the Board-specific Windows IoT Core Tools
The first step is to download the .iso file for the DragonBoard 410c, mount the .iso file, and then install the board-specific setup using the .msi file. The installation installs a number of tools that you need, including the Windows IoT Core Watcher that monitors your devices, the binary boot image for your board, and a tool named the DragonBoard Update Tool, which permits you to download the binary image to the board.
You can download the file from http://go.microsoft.com/fwlink/?LinkId=691713 . Once the .iso file is downloaded, simply double-click it. This mounts as a virtual drive that opens automatically. You see a file named Windows_10_IoT_Core_QCDB410C.msi or similar. Double-click that file to start the installation. You’ll need to do the usual steps for most installations, including accepting the license, permitting the change on your computer, and so on.
The binary image for the Raspberry Pi is named flash.ffu and installed in the c:Program Files (x86)Microsoft IoTFFUQCDB410C. Once the installation is complete, you can unmount the virtual drive. If you changed the installation folder, be sure to note the correct path—you need it in the next step.
Connecting the Hardware
If this is your first time using a DragonBoard 410c, orient the board on the table with the Arrow logo facing you. Figure 2-31 helps you locate the connection points.

Figure 2-31. Connections for the DragonBoard 410c
Connect the HDMI monitor to the HDMI port located on the bottom of the board. Connect the USB mouse and keyboard to the USB ports on bottom of the board to the right of the HDMI connector. Now that all the cables are connected, you can connect the power and let the board boot up.
Downloading the Image to the DragonBoard 410c
The process to download the image to the DragonBoard 410c requires you to power it off, change one switch on the bottom of the board, and then use a USB to micro-USB cable to connect the board to your PC. Let’s begin with setting the micro switch.
If you turn the board over, you see a set of four small switches located in the lower-right corner (reorient the board so you can view it this way). If you look closely, the switches are labeled from the bottom up as the following and referred to in this order starting from switch 1. The default setting for all switches is off (tab oriented to the right): (1) USB BOOT, (2) SD BOOT, (3) USB HOST, and (4) HDMI SEL.
When the USB BOOT switch is turned on, the board boots from a USB host connected to the programming port (labeled PGM in Figure 2-31). Similarly, when the SD BOOT switch is turned on, the board boots from the SD drive. When both of these switches are off, the board boots from memory.
To download the Windows 10 IoT Core image to the board, power off the board and set the USB BOOT switch to the on position, as shown in Figure 2-32.
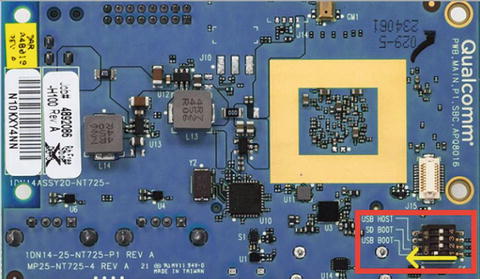
Figure 2-32. DragonBoard 410c USB boot mode
Next, you can connect the micro-USB to USB cable to the DragonBoard 410c and your PC. Launch the DragonBoard Update Tool (you can search for this string in the search box) on your PC and power on the board. Once your PC recognizes the board, the DragonBoard Update Tool connects and then prompts you for the image file. Click the Browse button and locate the flash.ffu file. This is located in the c:Program Files (x86)Microsoft IoTFFUQCDB410C folder and select it. You should now see the Program button and connection status light turn green, as shown in Figure 2-33.
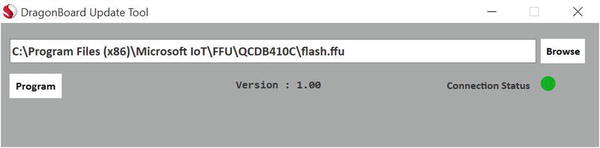
Figure 2-33. DragonBoard Update Tool: connection established
Tip
If the DragonBoard Update Tool does not connect, try using a different USB cable and that the board is powered on. If that doesn’t work, reinstall the DragonBoard 410c tools and reboot your computer. If you are still having problems, check the Device Manager for issues with the USB driver.
When you are ready, press the Program button. This begins the transfer of the image to the board. This overwrites the base Android image. Figure 2-34 shows the DragonBoard Update Tool in progress of downloading the image to the board.

Figure 2-34. DragonBoard Update Tool downloading
When the process is complete, you are prompted to power off the board and reset the USB BOOT switch, as shown in Figure 2-35.
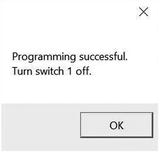
Figure 2-35. DragonBoard Update Tool: complete
Click OK and then power off the board and disconnect the USB cable from your computer. Then turn the USB BOOT switch to the off position. You will not need the USB cable for the next step.
Booting Windows 10 IoT Core for the First Time
Now it’s time to boot the board with Windows 10 IoT Core. Connect the HDMI monitor, USB keyboard and mouse, and then the power adapter. Power on the device. It takes a couple of minutes for Windows to boot the first time but subsequent boots are a bit faster. You see the Windows logo and an activity cursor appear on the monitor. The first boot may take some time but eventually you be asked to choose the default language. Use the mouse or keyboard to select your language.
Once selected, you see the bootup screen, as shown in Figure 2-36. Recall from the Raspberry Pi section, you can configure your board using this screen, as well as shut down or reboot the board. The Device Settings button is the small gear located in the upper right portion of the screen. If you click it, you see the Device Settings screen that allows you to change the default language and connect to a Wi-Fi network. Finally, you can shut down or restart the board by clicking the power button in the upper right of the screen.
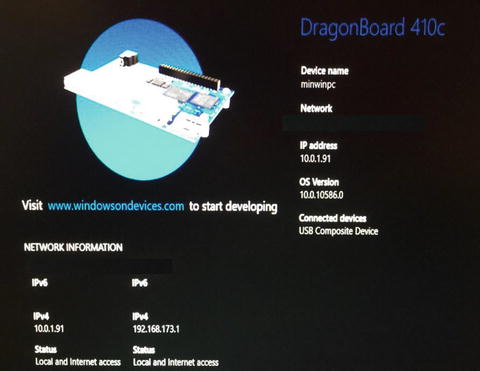
Figure 2-36. Windows 10 IoT Core boot screen excerpt: DragonBoard 410c
The DragonBoard 410c has Wi-Fi, so you can connect your board to your Wi-Fi network by clicking the Device Settings icon (looks like a gear) in the upper-right portion of the screen.
On the Device Settings page, select Network & Wi-Fi via the menu on the left. The board begins to search for Wi-Fi networks. When your Wi-Fi network name (SSID) appears in the list, select it and click the Connect button to connect. You can then close the Device Settings and view the network name and IP address on the home screen. Be sure to note this IP address as that you need it to connect to the board remotely.
Connecting to Your Board
Now that your board is booted and connected to your network, you can log in remotely from your computer. Indeed, once you’ve set up the board, you normally would not connect it to a monitor and keyboard. That is, it is more common that would deploy your board in your solution and run it headless.
Connecting to your board can be done in a number of ways, including the Windows 10 IoT Core Dashboard, a secure shell (SSH) connection via the command line, or using Windows PowerShell. There are other ways, but these are the most common and most useful. I’ll discuss each of these in the following sections. These methods are the same for all the boards—there are no special steps for the MinnowBoard Max–compatible or DragonBoard 410c boards.
Connect with the Windows 10 IoT Core Dashboard
The Windows 10 IoT Core Dashboard offers two ways to connect to your board, both of which are initiated from the My Devices panel. Once the board is booted, click the My Devices tab to see the list of all of your Windows 10 IoT Core devices. It could take a few minutes for your board to appear in the list. If it does not, make sure that the board is connected to the same network as your computer. If you have multiple boards running, you see all of them in the list. Figure 2-37 shows an example of the My Devices list.
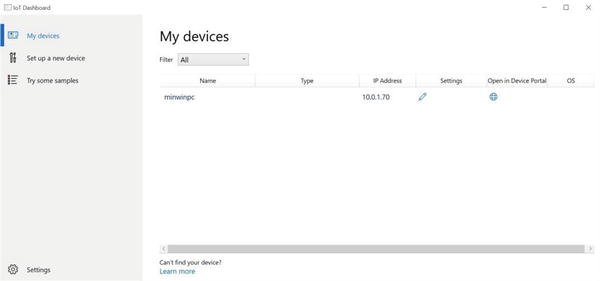
Figure 2-37. Windows 10 IoT Core Dashboard: My Devices list
Note
Once the board is booted, it could take a few minutes for the board to show up in the My Devices list.
There is one device in the list named miniwpc (the default name for all boards—but you can change that). You also see the IP address of the board and two small icons.
The first icon (shown as a pencil icon) permits you to connect to the board and change its name and password. I recommend you do this as your first action to secure your board. Simply click the pencil icon on the row that shows your board and enter the default password (p@ssw0rd). Optionally, you change the name of the board, choose a new password, and save the settings. Figure 2-38 shows the settings dialog.

Figure 2-38. Windows 10 IoT Core Dashboard: Settings dialog
Tip
The default password for the Windows 10 IoT Core is p@ssw0rd (the 0 is a zero). You should change the administrator password when your device boots for the first time.
The second method is where all the fun begins. You see the Windows Device Portal link (shown as a world icon). This option connects to a special web page running on the board that allows you to configure all manner of things on the board, including the following features, organized as a series of tabs or panels.
Apps: Allows you to install or uninstall packages on your device.
Processes: Allows you to see which processes are currently running as well as the memory used.
Performance: Displays real-time diagnostics of the CPU, I/O usage, and memory.
Debugging: Provides tools to help you diagnose problems with your application.
ETW: An advanced tool for Windows event tracing.
Perf Tracing: Allows you to create a log of system changes and settings.
Devices: Lists the devices connected to the board.
Bluetooth: Allows you to configure Bluetooth connections.
Audio: Allows you to configure the audio options (if audio capable).
Networking: Displays the IP address and description of the network.
Windows Update: Allows you to update the system files on the board (just like your computer).
Don’t worry about learning what each and every one of these do; you’ll discover the most frequently used throughout this book. As you can see, some of these are advanced features for performance testing, debugging, and event tracing. Most hobbyists and enthusiasts do not use these advanced features, but they’re there if you need them. Sadly, there isn’t a lot of documentation for how to use some of them.
To connect to the Windows Device Portal, click the world icon. You are asked to enter the user account and password. You want to use the administrator account and the new password you set previously. Figure 2-39 shows an example of the web page that you see once connected.
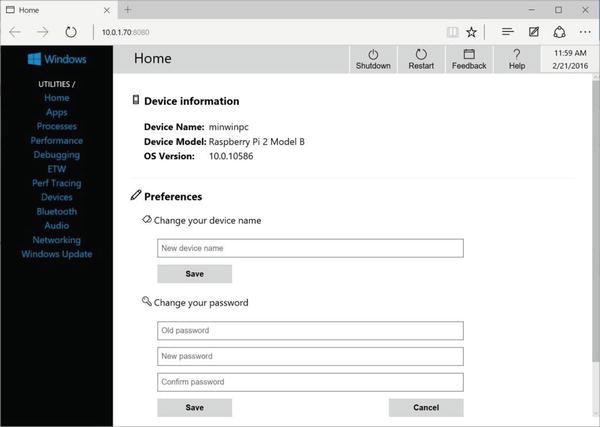
Figure 2-39. Windows Device Portal
You can also shut down and restart the board from this web page. Interestingly, there is help available for the options but the content is still rather terse. Again, you will see how to use some of these features in later chapters, starting with how to deploy applications in Chapter 4.
Connecting with SSH
Another, popular method for connecting to your board and indeed a method I use often is to use secure shell (SSH) . Sadly, Windows, unlike other platforms, does not come with a SSH client.14 Fortunately, there are several varieties available as third-party applications. One of the ones I like is called PuTTY, which is actually a general terminal session application. The SSH feature in PuTTY is very easy to use. What I like most about PuTTY is it is open source software and therefore free to download and use.
You can download PuTTY from www.chiark.greenend.org.uk/~sgtatham/putty/download.html . The download is not an installation package (.msi), rather, it is simply the PuTTY executable (putty.exe). Simply download the file and place it in a folder that is in your path environment variable. You can also put it in your documents folder and simply execute it from there or by referencing the folder.
There are other applications available from the download site, including an installation package that installs most of the tools. You only need the PuTTY executable for connecting to your boards but I encourage you to check out the other tools.
Tip
For more information about PuTTY, visit www.putty.org .
To connect to your board, you need the IP address from the Windows 10 IoT Core boot screen on the board. You captured this when you booted the board for the first time. When you launch the putty.exe executable, you see the initial dialog, as shown in Figure 2-40. Select the SSH radio button and enter the IP address of your board in the Host Name (or IP address) box. Leave the port as 22.
Figure 2-40. PuTTY dialog
When you are ready, click the Open button. Once the connection completes, you see a new command window open and be asked to log in. Enter Administrator as the user and press Enter. Then enter the password that you set in a previous step (or the default p@ssw0rd, if you have not changed it) and press Enter. Figure 2-41 shows an example of the SSH session.

Figure 2-41. SSH connection example
There are a variety of commands you can use. You can perform nearly all the operations on the home screen via command-line utilities, such as boot configuration, startup applications, shutdown, restart, and more.
Thus, you can do everything you need to do remotely via the command line rather than use the Windows Device Portal (but I’ve found the portal more convenient). For more details about the command utilities available, see https://ms-iot.github.io/content/en-US/win10/tools/CommandLineUtils.htm .
Connecting with the Windows PowerShell
You can also connect to your board with Windows PowerShell. However, it isn’t quite as obvious or intuitive unless you’ve used PowerShell previously. You can launch PowerShell, but you should do so as the administrator since some commands require elevated privileges. Simply search for powershell. When the application appears in the list, right-click it and select the Run as administrator option.
The steps you need to perform require starting the Windows remote management service, creating a trust relationship between your PC and the board, and then opening a session. See, not so intuitive, is it? Let’s see how to do this.
Note
Connecting to your board may take several seconds from the PowerShell.
Once the PowerShell launches, start the Windows remote management service with the following command. Since this is a network operation, you use the net command. You see messages stating that the service has started.
> net start WinRMNext, you create the trust relationship with the set-item command. Type the following command substituting the IP address from the board as you recorded earlier when you booted Windows 10 IoT Core for the first time. You are asked to confirm the change. Enter Y to continue.
> Set-Item WSMan:localhostClientTrustedHosts -Value 10.0.1.70Tip
If you want to connect to more than one board, you can place the list of IP addresses inside double quotes separated by commas, such as "10.0.1.70,10.0.1.71".
Finally, you can start a session with your Windows IoT Core device using the Enter-PSSession. Yes, another unintuitive command.15 Here you provide the computer name (IP address is fine) and user name (Administrator). You are prompted for the password in a pop-up dialog. The following shows the command I used to open a session to my board at 10.0.1.70. Figure 2-42 shows the PowerShell session once login succeeds.
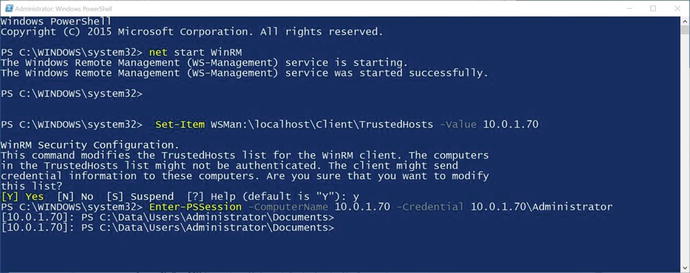
Figure 2-42. Connecting with the Windows PowerShell: session established
> Enter-PSSession -ComputerName 10.0.1.70 -Credential 10.0.1.70AdministratorThe IP address of the board is in square brackets. This lets you know which board you are currently connected to, should you connect to more than one at the same time. From here you can use the command-line utilities described in the previous section.
Summary
The Windows 10 IoT Core offers an option to explore electronics and the IoT for the rest of us. While there have been and continue to be options for exploring electronics and IoT for users of other platforms, Windows users have had to learn alternative operating systems and (seemingly) arcane commands in order to explore even the most basic of hobbyist electronics. With Windows 10, those days are gone!
This chapter explored the Windows 10 IoT Core and the hardware it runs on. You discovered some of the key features of the platform along with the details of the three low-cost computing boards that support Windows 10 IoT Core. You also discovered how to get your PC and your hardware configured to run Windows 10 IoT Core along with a walk-through for each of the available boards; from creating the boot image to booting and configuring the board to connecting to the board from your PC.
In the next chapter, you take a short break to examine the Raspberry Pi in more detail. You will learn more about the features and specifications of the Raspberry Pi, including a quick overview of how to boot it in its native operating system as well as how to write a simple program to illuminate an LED from code written in Python. While the chapter does not use Windows 10, you learn a great deal about the Raspberry Pi and a little bit about Python, which you will use in later chapters to write applications for Windows 10 IoT Core. How cool is that?
Footnotes
1 Learning Linux isn’t really so terrible, as you shall see, but if you’ve never used such an operating system, it can be frustratingly difficult to learn how to do even simple tasks.
2 Well, most PCs. Some low-cost computing boards are simply a fancy case away from a fully functional PC.
3 Oh, no, a harbinger for headless hardware!
5 Just make sure that you get one that is compatible with Windows 10 IoT Core.
6 There is much more to this than what I list, but suffice to say a typical clock on a computer cannot keep accurate time. That’s the whole point of the RTC.
7 Hey, it happens to everyone.
8 Not supported on all platforms but works great with Android OS.
9 This could be a big deal if your data plan is limited to a fixed amount of data per month. The full download with all options is approximately 5.8GB or more.
10 Oddly, there are no settings that you can change.
12 Can you guess how I know this? It is far too easy to bend the tabs inside the connector. This is more likely when using universal power supplies.
13 A standard micro-SD to SD adapter is included with the micro-SD card.
14 I’ve never understood why that is.
15 For muggles at least.