
IoT solutions often employ a number of sensors to observe the world around us and while you’ve explored a project with a simple sensor, you have yet to see how to work with more sophisticated sensors, such as those available as breakout boards. One of the more popular choices of sensors includes those you use to observe weather. In this case, you’ll start out with a sensor that measures temperature, barometric pressure, and calculates the altitude based on sea level pressure. There’s a lot you learn with only those two measurements.
The sensor that you will use is the BMP280 I2C or the SPI barometric pressure and altitude sensor breakout board from Adafruit ( www.adafruit.com/products/2651 ). This sensor comes with Microsoft IoT Pack for Raspberry Pi (but you can buy it separately). Although the board can be used with I2C or SPI, you will use the sensor with the I2C interface.
Note
Some newer releases of the Microsoft IoT Pack for Raspberry Pi come with a BME280 sensor instead of the BMP280. In which case, you cannot use it with this project because the library that we use only works with the BMP280 (but it can be modified to work; see the data sheet for the BME280). However, the project in the next chapter permits either the BMP280 or the BME280.
This project also represents another escalation of complexity from the last project. While you will learn how to use the I2C interface, you will also discover how to work with sensors and breakout boards that have a complex communication protocol. Recall from our work with the ADC chip, you had to interpret the data read from the chip. The same is true for most breakout boards and sensors. In the case of the BMP280, the protocol is quite a bit more complex. Fortunately, you are able to make use of code made by others and thus reduce the burden of having to figure it out for yourself.
Finally, you take a different tactic in this project and implement the project in Visual C++. However, since the third party code was written in C#, you also discover how to build a Windows 10 IoT solution that uses mixed languages. While this sounds like unnecessary complexity, it allows you to master leveraging one of the most impressive features of Visual Studio—mixing C# and C++ in the same solution. With so much to work on and learn about, let’s take a moment to examine the goals of the project and what you need to get started.
Overview
Weather projects can be a lot of fun since they are not only easy to wire up because the sensors are packaged in breakout boards, but also because they are more practical than projects that teach techniques alone. While the projects thus far have been mainly in that category1, this project is something you can build and use. You may even want to take it a bit further and add additional sensors and features.
To make it more practical, this project is written with a basic user interface, so you can adapt it to a desktop solution or even a wall-mounted weather station. For example, you could use the Raspberry Pi 7” Touch LCD Panel or similar LCD to display the weather conditions.
The hardware for this project is very simplistic. All you need are the BMP280 sensor and four wires to connect it to your device. What isn’t simplistic is the code needed to read data from the BMP280. Fortunately, there are two solutions available for you to use. More specifically, you do not have to write any code to use the BMP280 with these solutions (but you have to modify it slightly). One is a C# class that you can get from a tutorial from Adafruit and the other is a library that you can download and install from NuGet. Both of which are written in/for C#.
You use C++ to build this project to not only learn how to build Windows 10 IoT solutions in C++ but also to learn how to consume code and libraries built for other languages in the process. But don’t be alarmed. The process you need to use to enable this cross language solution is not difficult (but requires a precise set of steps and settings to get correct).
This project is part one of two for writing a weather solution. In this chapter, you use one of the solutions for the BMP280 and in the next chapter you use the other solution. In fact, you will see a pure C# implementation in the next chapter. For this chapter, you use the code class solution so that you can see how to modify it slightly for use in a C++ solution. Fortunately, the changes are minor and help understand what you may need to do to use a C# code library in other C++ applications.
I demonstrate all the code necessary and more in the following sections. But first, let’s talk briefly about the hardware that you need for this project.
Required Components
The following lists the components that you need. You can get the BMP280 sensor from Adafruit ( www.adafruit.com ) either in the Microsoft IoT Pack for Raspberry Pi or purchased separately, SparkFun ( www.sparkfun.com ), or any electronics store that carries electronic components. However, if you use a sensor made by someone other than Adafruit, you may need to alter the code to change the I2C address. Since this solution is a headed application, you also need a monitor, a keyboard, and a mouse.
Adafruit BMP280 I2C or SPI barometric pressure and altitude sensor
(4) jumper wires: male-to-female
Breadboard (full size recommended but half size is OK)
Raspberry Pi 2 or 3
Power supply
Monitor
Keyboard and Mouse
Setup the Hardware
Although there are only four connections needed for this project, you will make a plan for how things should connect, which is good practice to hone. To connect the components to the Raspberry Pi, you need four pins for the BMP280 sensor, which requires only power, ground, and 2 pins for the I2C interface. Table 12-1 shows the map I designed for this project. I list the physical pin numbers in parenthesis for the named pins. You use male-to-female jumper wires to make these connections.
Table 12-1. Connection Map for Weather Sensor Project
GPIO | Connection | Function | Notes |
|---|---|---|---|
5V (2) | BMP280 VIN | Power to breakout board | |
GND (6) | BMP280 GND | GND on breakout board | |
SDA1 (3) | SDI on breakout board | I2C | |
SCL1 (5) | SCK on breakout board | I2C |
Figure 12-1 shows all the connections needed.
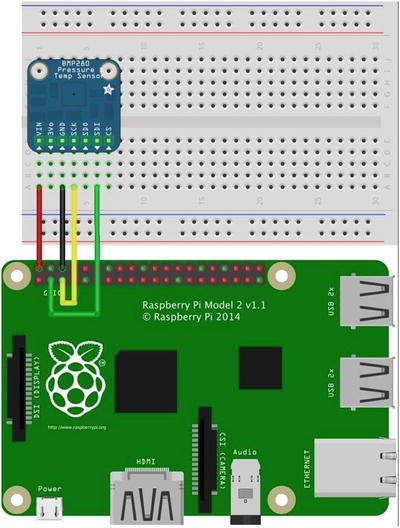
Figure 12-1. Connections for the Weather Sensor project
So what is this I2C interface? I2C2 (pronounced “eye-two-see” or the less popular “eye-squared-see”) is a fast digital protocol that uses two wires (plus power and ground) to read data from circuits, sensors, (or devices). One pin is used to read the data and the other is used as a clock to control how data is sent. There are several forms of how to read data from I2C, but fortunately the Windows 10 IoT Core has libraries that you can use to communicate with I2C devices. The IoT boards in this book all support the interface.
If you are following along with this chapter working on the project, go ahead and make the hardware connections now. Don’t power on the board yet, but do double and triple check the connections.
Write the Code
Now it’s time to write the code for our project. Since you are working with several new concepts as well as a new component (BMP280), I introduce the code for each in turn. I’ve decided to use a C++ project that consumes a C# project, which encapsulates a class library for the BMP280. You’ll use a timer to read the data and update the user interface.
Note
You may read that it is impossible to use a C# library in a C++ project. Sadly, that is a bit of misinformation. You can use a C# library in a C++ project provided they are compatible (same platform, etc.). However, you should implement the project in this chapter strictly as described. For example, if you use the wrong project template for the C# project, the solution will build and deploy, but may throw an exception or it will simply not work.
Recall that our project uses code to read the BMP280 from a tutorial written by someone else (Adafruit). In fact, the tutorial is one of the sample projects that Adafruit includes as an introduction to their Microsoft IoT Pack for the Raspberry Pi. Rather than simply present their solution, I present a C++ implementation that reuses their code for the BMP280. The code that you need can be downloaded from https://github.com/ms-iot/adafruitsample/tree/master/Lesson_203 /FullSolution. In this case, you only need the file named BMP280.cs. If you are following along with this chapter writing the code for the project, go ahead and download the sample code now then extract it. You will need the BMP280.cs shortly.
Once built, reading the temperature and pressure from the sensor is really easy. Rather than display the data using a debug interface, you will use a simple user interface to present the data. Yes, that means you will write some XAML code in our C++ project.
You are going to write the code in a slightly different order than previous projects. You first create the new projects in the same solution file then work on the C# code to get it correct then you’ll return to the C++ project to fill in the user interface and code to read the sensor. As you will see, there isn’t much code to write but there are a few things you must do in order to get everything working together. Let’s start with the first project.
New Project
Since you are using C++ for the active project (called the startup project ), you use the Blank App (Universal Windows) template under the C ++ ➤ Windows ➤ Universal category. Use the name Weather for the project name. You can save the project wherever you like or use the default location.
Caution
If you have just finished the project from Chapter 11, be sure to switch the driver back to the default controller driver otherwise, your project may not execute properly.
Add a C# Runtime Component Project
With the Weather C++ project open, right-click the solution and choose Add ➤ New Project…. For this project, you want a C# Runtime Component project. Use the Other Languages ➤ C# ➤ Windows ➤ Universal ➤ Windows Runtime Component template. Name the project WeatherSensor. You can save the project wherever you like or use the default location.
What you should see at this point is one solution entitled Solution ‘Weather’ with two projects: Weather and Weather Sensor. The Weather project is the startup project. Figure 12-2 shows an example of what you should see in the Solution Explorer. If the Weather project is not the startup project, you can right-click it and set it as the startup project.
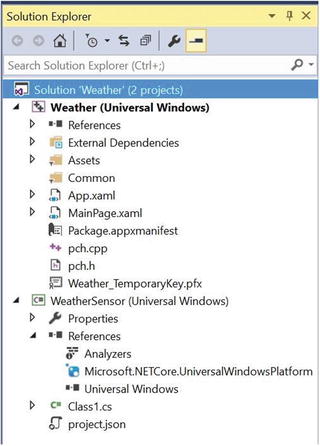
Figure 12-2. Solution Explorer with Weather and WeatherSensor projects
At this point, you have the projects created but you still must add the code for the BMP280 class, add references for the projects, the user interface, and code to read the sensor and display it in the user interface.
BMP280 Class
You are going to use the Adafruit code in our project. If you haven’t downloaded the sample project, do that now. You need the file named BMP280.cs. To add it to the project, right-click the WeatherSensor project and choose Add ➤ Existing Item… then browse for the file and select it. Visual Studio copies the file to your project folder.
You will have to edit this file because it is not in the correct state for use in a runtime component project. But first, you can delete the Class1.cs file that the template provided. You do not need it. Simply right-click the file and choose Delete.
The modifications you need to make include changes to the class decorations and some of the methods. You want to allow the code to read from the sensor to run as a task, however, the code as written won’t work. You must start the tasks from inside the project rather than from other code as it was originally written. You will change the following things. I go through each of them in turn. As you will see, the changes aren’t complex but they are required for the C# project to be used with the C++ project .
Class declarations must be sealed
The Initialize() method must run the set up code as a task
The Read* methods must be normal methods that run the Begin() code as a task
Note
The following listings show unified difference output generated from diff.3 Essentially, each line marked with a minus sign is replaced with the line immediately below marked with a plus sign (but you delete the plus sign).
Let’s begin with changes to the classes. Open the BMP280.cs file. You see two classes: BMP280_CalibrationData and BMP280. Change the class declaration to a sealed class, as shown in Listing 12-1. This is an excerpt of the affected code for brevity and adjacent lines to show context.
Listing 12-1. Changes to the Class Declarations
...using Windows.Devices.Gpio;using Windows.Devices.I2c;-namespace Lesson_203+namespace WeatherSensor{- public class BMP280_CalibrationData+ public sealed class BMP280_CalibrationData{//BMP280 Registerspublic UInt16 dig_T1 { get; set; }...public Int16 dig_P9 { get; set; }}- public class BMP280+ public sealed class BMP280{//The BMP280 register addresses according the the datasheet: http://www.adafruit.com/datasheets/BST-BMP280-DS001-11.pdfconst byte BMP280_Address = 0x77;...
Caution
Notice that you changed the namespace. If you skip this or forget to change it, your code will compile but fail to link or deploy presenting a strange and confusing set of errors regarding names missing from the template. If you see such, check your namespace declaration to make sure that it is correct.
Next, you must change the Initialize() method to call a new Setup() method as a task. Listing 12-2 shows the changes needed for that method.
Listing 12-2. Changes to the Initialize() Method
//Method to initialize the BMP280 sensor- public async Task Initialize()+ public void Initialize(){Debug.WriteLine("BMP280::Initialize");+ Task t_setup = Task.Run(() => Setup());+ t_setup.Wait();+ }++ private async Task Setup()+ {+ Debug.WriteLine("BMP280::Setup");...
You are splitting the set up code out as a separate method decorated to run as an asynchronous task. This is necessary to ensure that the code does not run in the same thread as the user interface (it can’t).
Next, you must change the ReadTemperature() method to remove the async decorator and to call the Begin() method as a task. This protects the thread and ensures that the code executes outside of the user interface thread. Listing 12-3 shows the changes needed.
Listing 12-3. Changes to the ReadTemperature() Method
...- public async Task<float> ReadTemperature()+ public float ReadTemperature(){//Make sure the I2C device is initialized- if (!init) await Begin();+ if (!init)+ {+ Task t_begin = Task.Run(() => Begin());+ t_begin.Wait();+ }...
You must change the ReadPressure() method in the same manner as ReadTemperature(). However, since this method must call ReadTemperature() and it is no longer a task, you can call the method directly. Listing 12-4 shows the changes needed.
Listing 12-4. Changes to the ReadPressure() Method
...- public async Task<float> ReadPreasure()+ public float ReadPreasure(){//Make sure the I2C device is initialized- if (!init) await Begin();+ if (!init)+ {+ Task t_begin = Task.Run(() => Begin());+ t_begin.Wait();+ }//Read the temperature first to load the t_fine value for compensationif (t_fine == Int32.MinValue){- await ReadTemperature();+ ReadTemperature();}...
Finally, you must change the ReadAltitude() method in the same manner. Listing 12-5 shows the changes needed.
Listing 12-5. Changes to the ReadAltitude() Method
...- public async Task<float> ReadAltitude(float seaLevel)+ public float ReadAltitude(float seaLevel){//Make sure the I2C device is initialized- if (!init) await Begin();+ if (!init)+ {+ Task t_begin = Task.Run(() => Begin());+ t_begin.Wait();+ }//Read the pressure first- float pressure = await ReadPreasure();+ float pressure = ReadPreasure();//Convert the pressure to Hectopascals(hPa)pressure /= 100;...
That’s it! Not too bad, eh? Remember, the complete source code is available for download from the Apress web site so if you don’t want to make these changes yourself, you can download the sample code and get the completed file. However, I do recommend you build the solution yourself otherwise so you can learn how to mix C++ and C# projects in the same solution.
You use a couple of tasks in the code. You do this because the initialization of the libraries (for example, the Wait() method) should not run in the UI thread. This is a very common technique when working with libraries and other assemblies.
But wait, how does this class work to read the data from the sensor? I mentioned the code needs to read multiple bytes from the sensor and decode them. The authors of the donor class have done their homework well and have implemented the code based on the recommendations from the manufacturer’s data sheet. Take a moment while you are in the code to look around. There is a whole lot more code in there than what you’ve seen in the last few code listings!
Tip
The data sheet for the BMP280 can be found at https://cdn-shop.adafruit.com/datasheets/BST-BMP280-DS001-11.pdf .
So, how did the authors know what to do? Figure 12-3 shows an excerpt from the data sheet that outlines how to read data from the sensor.

Figure 12-3. Excerpt from BMP280 data sheet
Clearly, there is a lot going on here! What complicates the code are features in the BMP280 to provide calibration data, which is used to correct the values read. Given you must read multiple bytes and interpret them, the code is quite complex. Fortunately, all the hard work has been done for us and you can simply use the code provided. This is often the case for complex breakout boards like the BMP280 from Adafruit. If you ever have to implement your own code for such a component, be sure to read and study the data sheet. You should also consider searching the Internet for solutions. Often times you can find a solution that may not be written in your language of choice but you can either rewrite or as you’ve seen in this chapter, use the power of Visual Studio to combine C# and C++ in the same solution.
Now, let’s add the user interface code.
User Interface
The user interface code is very simple—just four labels: one for the title, and one for each of the values read (temperature, pressure, and altitude). Listing 12-6 shows the XAML code for the interface. Open the MainPage.xaml file in the Weather project and edit the file as shown. The new lines you need to add are shown in bold.
Listing 12-6. User Interface Code
...<Grid Background="{ThemeResource ApplicationPageBackgroundThemeBrush}"><StackPanel Width="400" Height="400"><TextBlock x:Name="Title" Height="60" TextWrapping="NoWrap"Text="Weather Station" FontSize="28" Foreground="Blue"Margin="10" HorizontalAlignment="Center"/><TextBlock x:Name="Temp" Height="60" TextWrapping="NoWrap"Text="Initializing..." FontSize="28" Foreground="Blue"Margin="10" HorizontalAlignment="Center"/><TextBlock x:Name="Press" Height="60" TextWrapping="NoWrap"Text="Initializing..." FontSize="28" Foreground="Blue"Margin="10" HorizontalAlignment="Center"/><TextBlock x:Name="Alt" Height="60" TextWrapping="NoWrap"Text="Initializing..." FontSize="28" Foreground="Blue"Margin="10" HorizontalAlignment="Center"/></StackPanel></Grid>...
Figure 12-4 shows an example of what the user interface will look like when the application runs on the Raspberry Pi.

Figure 12-4. Example user interface
Add References
There are only two references needed—one for each project. Let’s start with the WeatherSensor project. Right-click References in the project tree in the Solution Explorer and add the Windows 10 IoT Extensions reference. You also need to add a reference in the Weather project that references the WeatherSensor project. Right-click References in the project tree in the Solution Explorer and add the WeatherSensor project, as shown in Figure 12-5. Be sure to tick the box before clicking OK.

Figure 12-5. Adding the WeatherSensor project reference
You should now see the WeatherSensor project in the Weather project references and the Windows 10 IoT extensions in the WeatherSensor project references. If you encounter strange build issues or errors, be sure to check the references.
You may be presented with a dialog during project creation or when you add references to the project. The dialog asks you to determine the minimum and required versions for the IoT extensions. You should choose the Build 10586 entries for both. Figure 12-6 shows an example of the dialog that you may see.
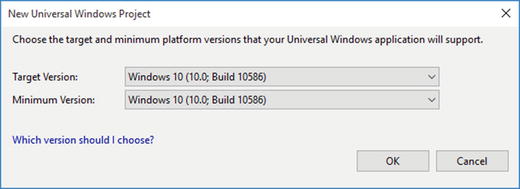
Figure 12-6. Target version dialog
You’re almost there! You just need to add the code to use the BMP280 class and update the user interface. Let’s do that now.
Reading the Weather Data
Now let’s add the code to read the temperature, pressure, and altitude from the BMP280 class and display it in the user interface you implemented. Since you are working with C++, you have a separate header file that you put the variables and declarations for methods (called functions in C++). Open the MainPage.xaml.h file and make the following changes. Listing 12-7 shows the entire code for the file.
Listing 12-7. The MainPage.xaml.h Header File
#pragma once#include "MainPage.g.h"using namespace WeatherSensor; // Add for sensor C# projectnamespace Weather{public ref class MainPage sealed{public:MainPage();private:// Reference to BMP280 C# classBMP280 ^bmp280 = ref new BMP280();// Variable for the timerWindows::UI::Xaml::DispatcherTimer ^timer_;// Timer on tick methodvoid OnTick(Platform::Object ^sender, Platform::Object ^args);};}
Notice you added a namespace that references the BMP280 class (the WeatherSensor namespace), and then added a variable reference to the class. You add these to the private section by convention. You also add a variable for a timer that you will use to read and update the user interface and the method, which is called on each “tick” of the timer event.
Next, you edit the MainPage.xaml.cpp file and add the code to read the data. But first, you need to add a namespace for the timer code. In this case, you need the currency namespace.
Next, you edit the constructor code to call the Initialize() method on the BMP280 instance and then set up the timer code. You use a small update (delay) but you can increase this once you are comfortable the solution is working correctly. If you have been following along with the projects in the previous projects, this code should look familiar in a not-C#-but-similar manner.
Next, you add the code for the OnTick() method. You use this method to read the data and update the user interface. You first read each of the values and then update the corresponding label in the user interface. Listing 12-8 shows an excerpt of the file with all the code needed for the constructor and the new method.
Listing 12-8. The MainPage.xaml.cpp Source File
...using namespace Windows::UI::Xaml::Navigation;using namespace concurrency; // Add for timerMainPage::MainPage(){InitializeComponent();// Initialize the sensorbmp280->Initialize();// Setup timertimer_ = ref new DispatcherTimer();TimeSpan interval;interval.Duration = 1000 * 1000 * 10;timer_->Interval = interval;timer_->Tick += ref new EventHandler<Object ^>(this, &MainPage::OnTick);timer_->Start();}void MainPage::OnTick(Object ^sender, Object ^args){// Initialize the variablesfloat temp = 0;float pressure = 0;float altitude = 0;// Create a constant for pressure at sea level.// This is based on your local sea level pressure (Unit: Hectopascal)// To find the sea level pressure for your area, go to:// weather.gov and enter your city then read the pressure from the// history.const float seaLevelPressure = 1013.25f;// Read samples of the data every 10 secondstemp = bmp280->ReadTemperature();pressure = bmp280->ReadPreasure();altitude = bmp280->ReadAltitude(seaLevelPressure);Temp->Text = "Temperature: " + temp + " C";Press->Text = "Pressure: " + pressure + " Pa";Alt->Text = "Altitude: " + altitude + " m";}
You supply a constant for the sea level pressure. This value may be different for your location. Check the weather web sites for your location to get the latest calculated sea level pressure. Substitute your value in the code to get more accurate altitude calculations. That is, the altitude is the result of a calculation based on the barometric pressure and sea level pressure values. Thus, it may not be accurate but should be pretty close if you use the correct value for your area.
That’s it! The code is complete and ready for compilation. Be sure to check the preceding listings to ensure that you have all the code in the right place. Once you have entered all the code, you should now attempt to compile the solution. You can compile the projects individually, but if you do so, start with the WeatherSensor project. Once that is compiling correctly, you can compile the weather project. Or you can just build the entire solution. Correct any errors you find until the code compiles without errors or warnings.
Caution
Be sure to choose the Any CPU platform before you build the solution. This ensures that the correct platform (WinRT) is built for the C# project.
Deploy and Execute
Now it is time to deploy the application! Be sure to fix any compilation errors first. Like you have with other applications, you want to compile the application in debug first (but you can compile in release mode if you’d prefer) and you must turn on the debugger on your board. You do this with the device portal.
Go ahead and power on your board. Be sure to connect a monitor, mouse, and keyboard so you can use the user interface. When ready, connect to the board to run the Device Portal, turn on the debugger, and then open the project properties to target the device and run with the remote debugger.
Recall from the Chapter 9, you must modify two settings: the Remote machine name and the Authentication Mode. Set the Remote machine name to the IP address of your device with the port specified by the remote debugger when you started it from the device portal. For example, my device gave me the port number 8116 so I use 10.0.1.89:8116. Set the Authentication Mode to None. Do this for the C++ startup project (Weather) and not the C# project (WeatherSensor).
Now you can deploy your application. Go ahead and do that now. You should see the user interface appear on the device after a few moments and then the screen update as the timer tick event fires.
If you do not see the user interface or you see the box with the X in it, then the default application reloads, chances are there is something wrong in your code. In this case, you should run the code in debug mode and observe the exception thrown. There are a number of things that can go wrong. The following summarizes some of the things (mistakes) I’ve encountered in designing this project.
Ensure that the correct project is marked as the startup project (should show name in bold in Solution Explorer).
Ensure that you are compiling the entire solution for any CPU.
Ensure that the namespace of the BMP280 class is set correctly if you copied it from the Adafruit sample.
Double-check your references to ensure they are correct.
Ensure that the BMP280 sensor is wired correctly to your device.
If you connected the sensor with 3.3V by mistake, it should still work, but double-check the GND pin is connected correctly.
Make sure that the namespaces are specified for concurrency and the WeatherSensor (and in the correct files).
Ensure that the debugger is started on your device before deploying.
Use the Device Portal to start and stop the application after deployment and do not set the application to run as a startup until you have successfully run and debugged the code.
Once the project is running correctly, enjoy it for a while then put the hardware aside. You will need it again for the next chapter .
Summary
Weather IoT solutions can be a lot of fun to develop and unlike an experiment that teaches techniques, it can be a very practical solution. Indeed, you can show it to your friends and family and possibly get more than a non-committal “that’s nice” accolade.4
In this chapter, you’ve seen a depth of complexity that presented a number of advanced tools and techniques from using a code library written by someone else to building a C++ headed application to incorporating a C# and C++ project in the same solution. Combining all of these together makes this project the most complex in the book.5
In the next chapter, you’ll step back a bit from escalating the complexity of this project by seeing a pure C# implementation. To make it interesting, you will add the ability to record the data read to a MySQL database. Adding a database storage feature makes the project much more interesting and useful for post-event analysis. That is, you cannot perform any form of analysis without having stored the data collected over time. You could do this with a log file (and many solutions do), but having the ability to use a powerful query language like SQL can give your solution a great deal of sophistication and capability for free.
Footnotes
1 But still fun, I think.
3 A utility that is very familiar to Linux and Mac developers. See http://gnuwin32.sourceforge.net/packages/diffutils.htm for a Windows port of this tool.
4 You do show off your projects don’t you? Well, this time you can show them something they can actually use!
5 But you see less complex yet more diverse projects in the following chapters.