In this chapter, we’ll now learn about modifying images (such as removing distracting objects or correcting a tilt in a building) to make them look their best.
Tutorial 13: Removing unwanted objects
Tutorial 14: Correcting perspective
Tutorial 15: Brightening teeth
Tutorial 16: Reducing wrinkles
Tutorial 17: Repairing scratches and damage
Chapter conclusion
Tutorial 13: Removing Unwanted Objects
- 1.
Open the practice image Ch6_Remove_Objects in Glimpse.
- 2.
Create a duplicate of the background layer (Right-Click ➤ Duplicate Layer) and rename it (Work Layer, or something similar).
- 3.
Select the Lasso Tool (L)—set the Feather Edges radius to 15, then select an area foliage just above the feeding dish (Figure 6-1).
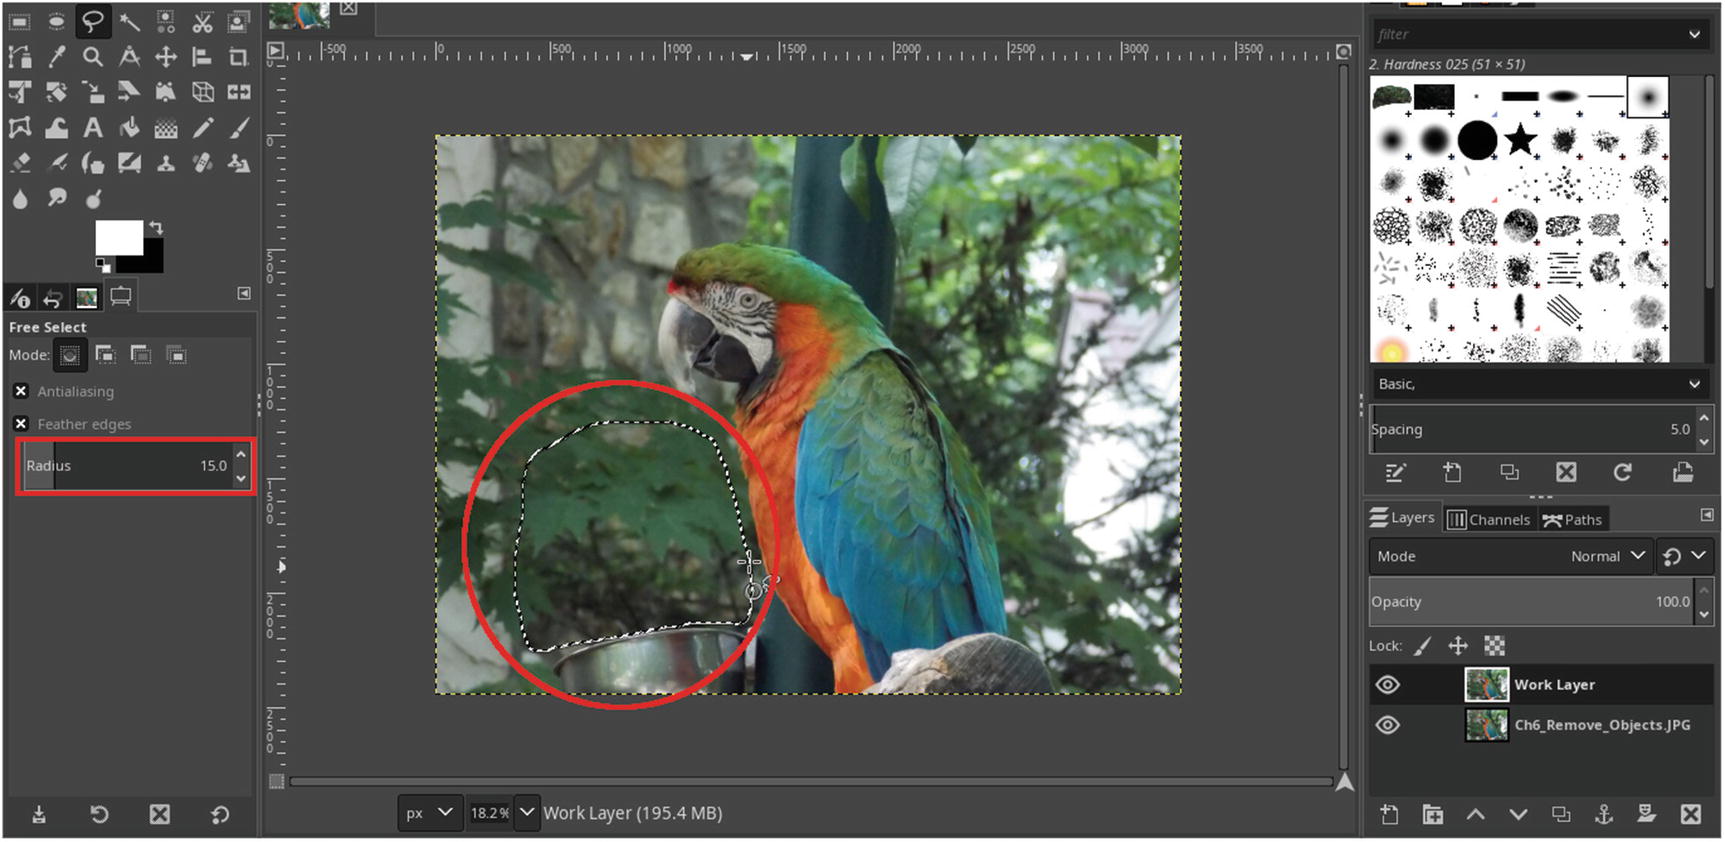
Use the Lasso Tool to select an area of foliage as shown
- 4.
We’ll now copy this selection onto its own layer (first Edit ➤ Copy, then Edit ➤ Paste as ➤ New Layer). Rename the new layer Foliage.
- 5.
Expand the layer boundary to match the image size by right-clicking the new layer’s thumbnail preview and selecting Layer to Image Size from the menu (Figure 6-2).
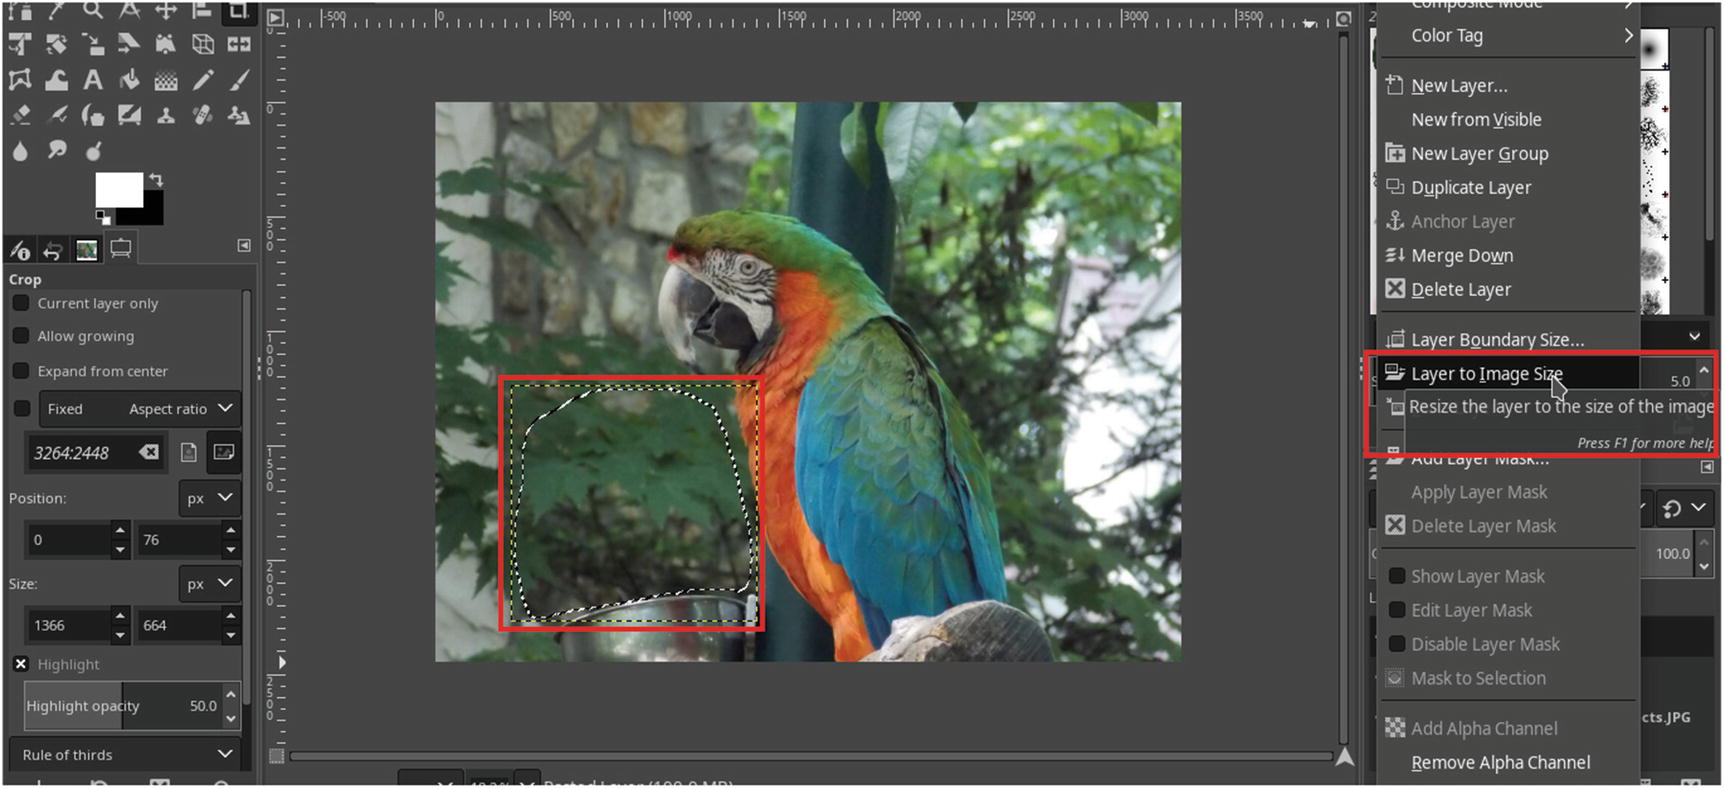
Increase the layer boundary to match the image size
- 6.
Deactivate the selection (Select ➤ Deselect).
- 7.
Use the Move Tool (M) to position the layer down and slightly to the right to cover (most of) the dish and the post (Figure 6-3).

Use the Move Tool to position the layer as shown
- 8.
Select the Clone Tool (C) and make sure Sample Merged is checked—pick the soft brush (2. Hardness 0.25) and adjust the diameter to about 150 pixels.
- 9.
Use the Clone Tool to cover the exposed part of the metal dish (Figure 6-4).

Use the Clone Tool to cover the exposed portion of the dish
- 10.
Lower the Foliage layer’s opacity to about 70% (enough to see the layer below).
- 11.
Switch to the Eraser Tool (Shift+E)—lower the brush diameter (about 40 pixels to work along the edge, larger the farther away from the edge you work) and remove the excess image area covering the bird (Figure 6-5). Increase the layer opacity to 100% when finished.

Use the Eraser Tool to remove the excess image area covering the bird
- 12.
Click the Work Layer thumbnail to make the layer active.
- 13.
Select the Lasso Tool (L) —set the Feather Edges radius to 15, then select an area foliage just to the right of the bird (Figure 6-6).
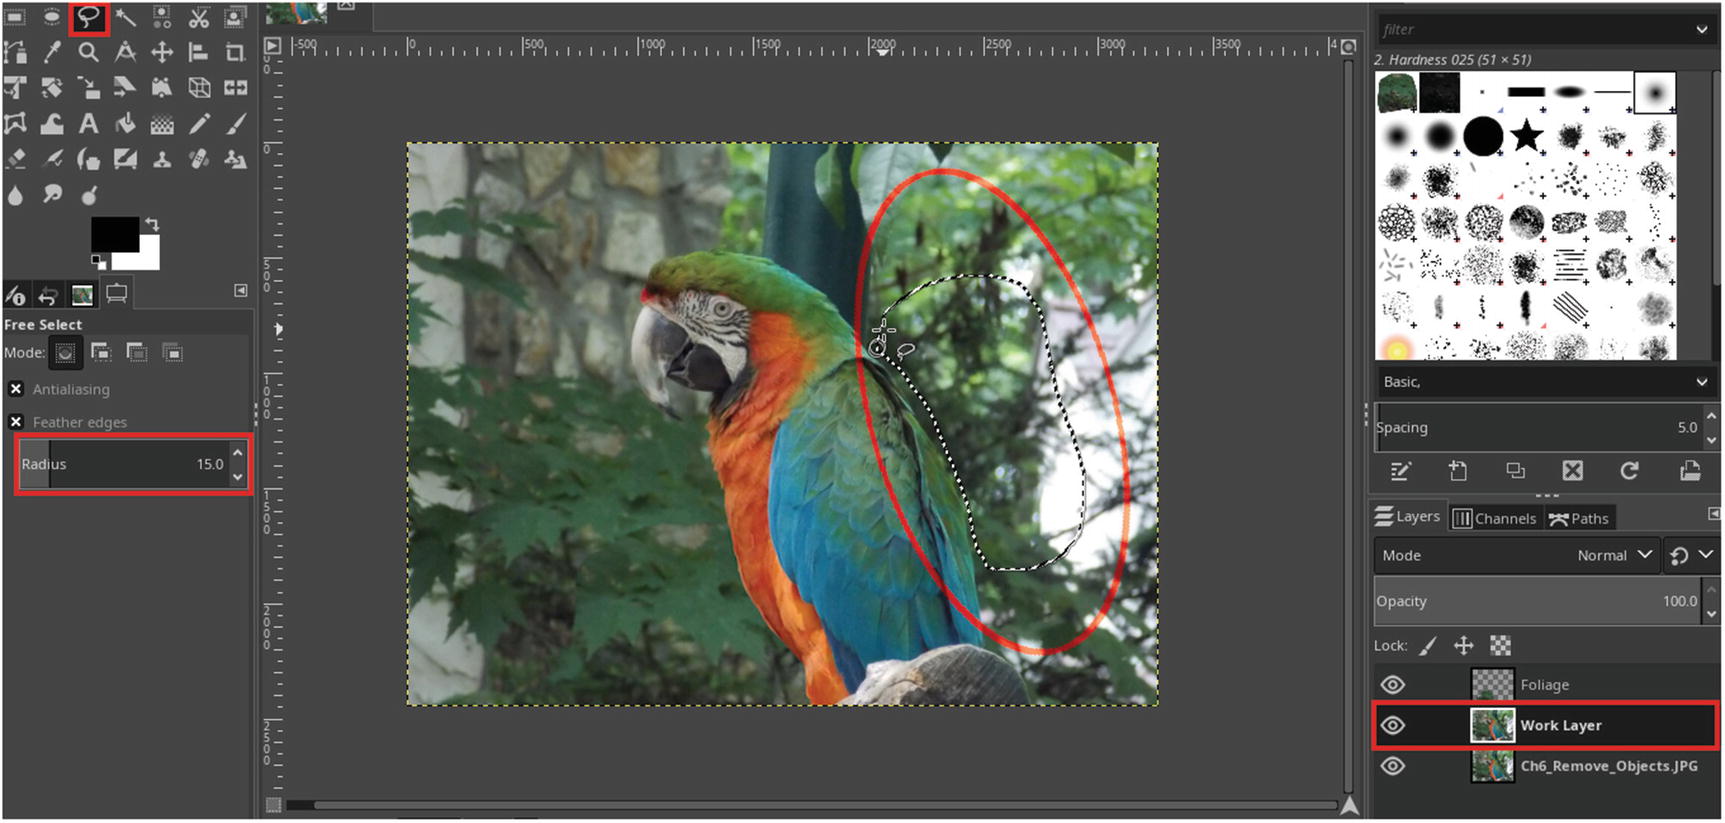
Use the Lasso Tool to select an area just to the right of the bird
- 14.
We’ll now copy this selection onto its own layer (first Edit ➤ Copy, then Edit ➤ Paste as ➤ New Layer). Rename the new layer Foliage 2.
- 15.
Use the Move Tool (M) to position the layer above the bird (Figure 6-7).
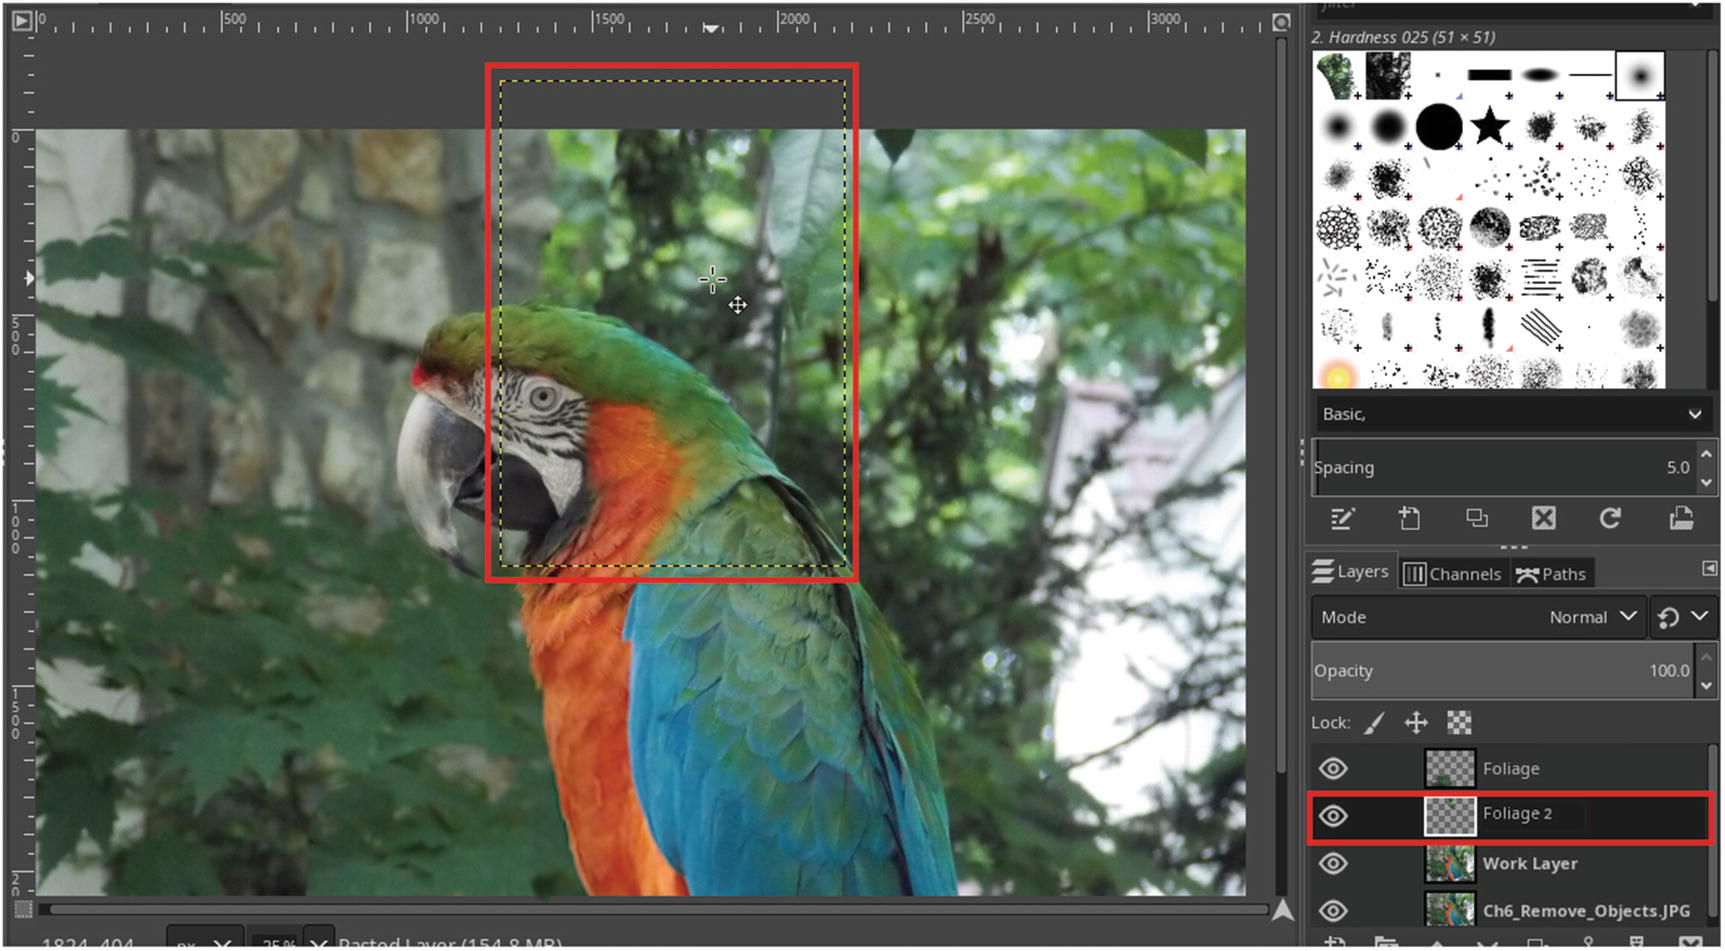
Use the Move Tool to position the layer as shown
- 16.
Lower the Foliage layer’s opacity to about 70% (enough to see the layer below).
- 17.
Switch to the Eraser Tool (Shift+E)—increase the brush diameter to about 150 pixels and remove the excess image area (Figure 6-8). Increase the layer opacity to 100% when finished.
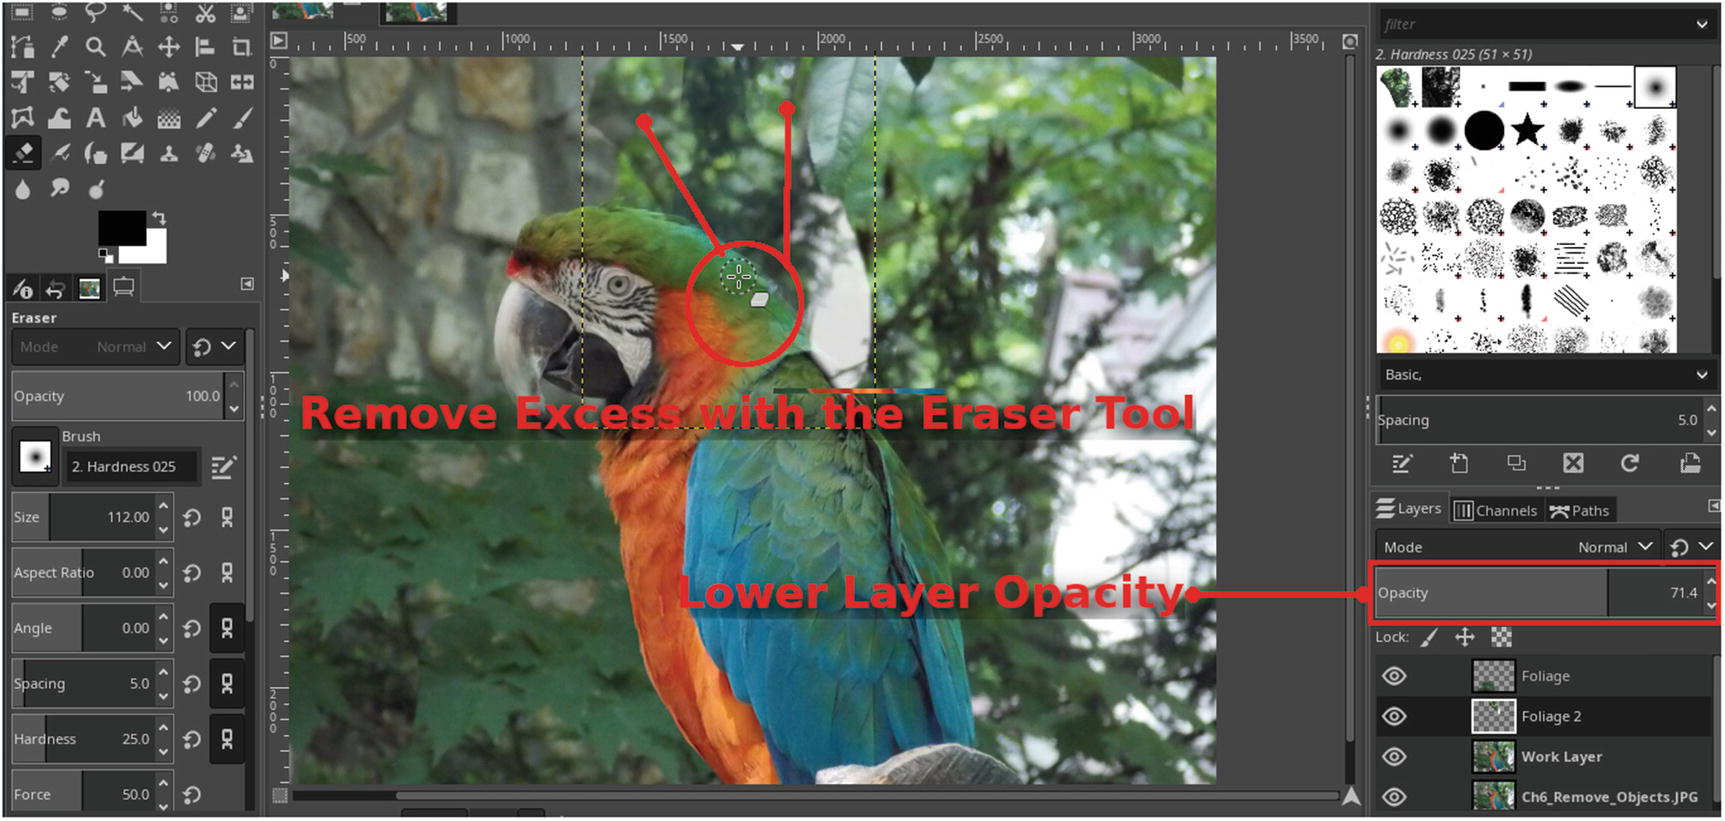
Use the Eraser Tool to remove the excess image area
- 18.
Merge the two Foliage layers onto the Work Layer (Layer ➤ Merge Down).
- 19.
The last thing to do is to slightly sharpen the image. Open the Unsharp Mask dialog (Filters ➤ Enhance ➤ Sharpen (Unsharp Mask)).
- 20.
Set the Radius to 1.00, leaving Amount and Threshold at their default settings, then click OK.
Figure 6-9 shows the before and after comparison. When done, you can save as an .XCF file if you want to keep the file, or simply close it out.
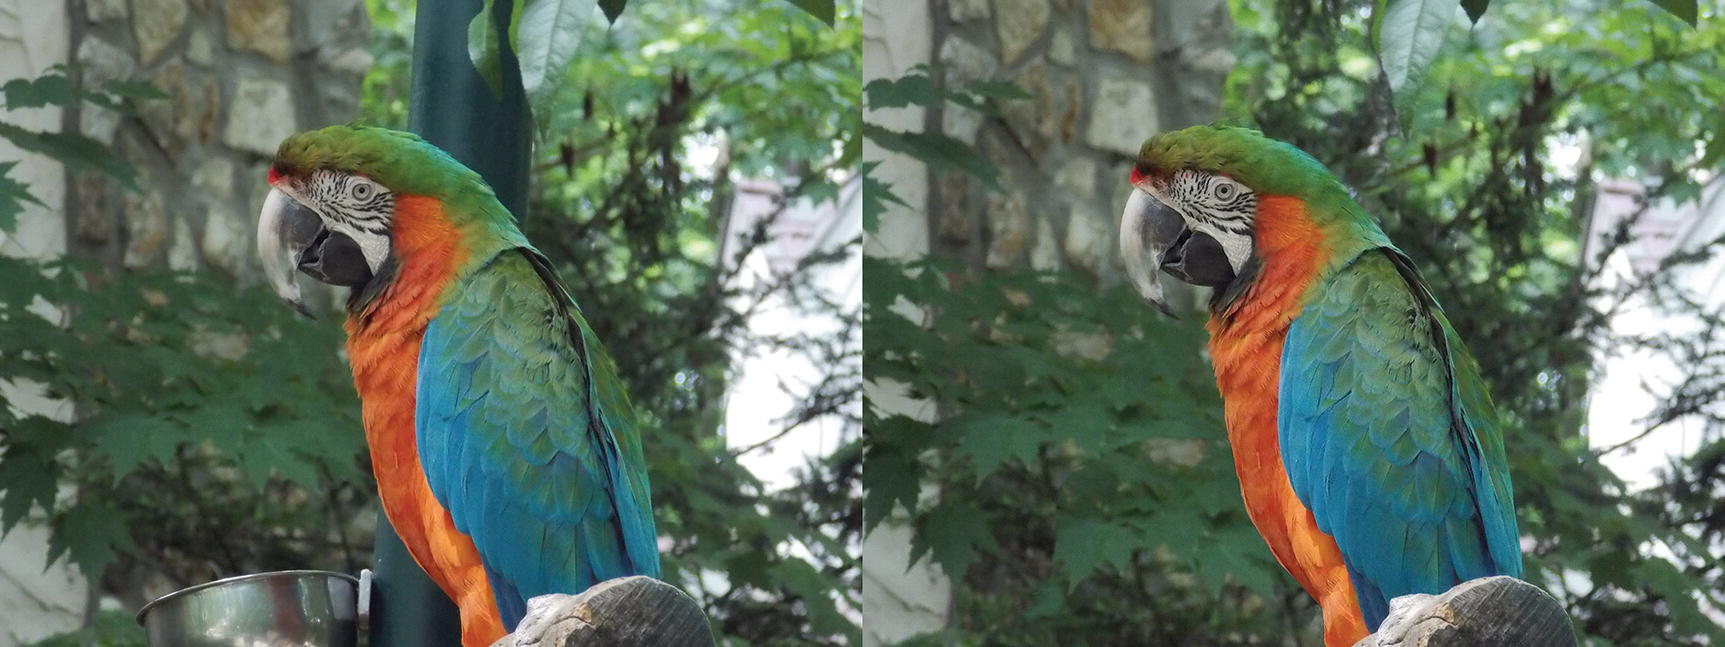
The before and after comparison
Tutorial 14: Correcting Perspective
- 1.
Open the practice image Ch6_Slant_Fix in Glimpse.
- 2.
Create a duplicate of the background layer (Right-Click ➤ Duplicate Layer) and rename it (Work Layer, or something similar).
- 3.
Select the Unified Transform Tool (Shift+T).
- 4.
Click and drag the left upper corner straight up slightly, and the right upper corner down and to the right slightly—the roofline should look even (Figure 6-10). Click Transform when done.
Tip For even greater precision, a horizontal guide can be used to aid in leveling the roofline—click the horizontal ruler to drag it into place.

Using the Unified Transform Tool to correct the image
- 5.
This action results in a couple of fairly obvious “seams” that will need to be corrected. They result because the Work Layer’s edge is now at an angle, part of the background layer is revealed.
- 6.
Create a new layer (Layer ➤ New Layer) and name it Clone—make sure the blend mode is set to Normal.
- 7.
Select the Clone Tool (C) and make sure Sample Merged is checked—pick the soft brush (2. Hardness 0.25) and adjust the diameter to 23–25 pixels.
- 8.
Use the Clone Tool to blend the grass over the seam in the lower-left corner (Figure 6-11).

Removing a seam in the lower-left corner using the Clone Tool
- 9.
Repeat this action in the upper-right corner (Figure 6-12).
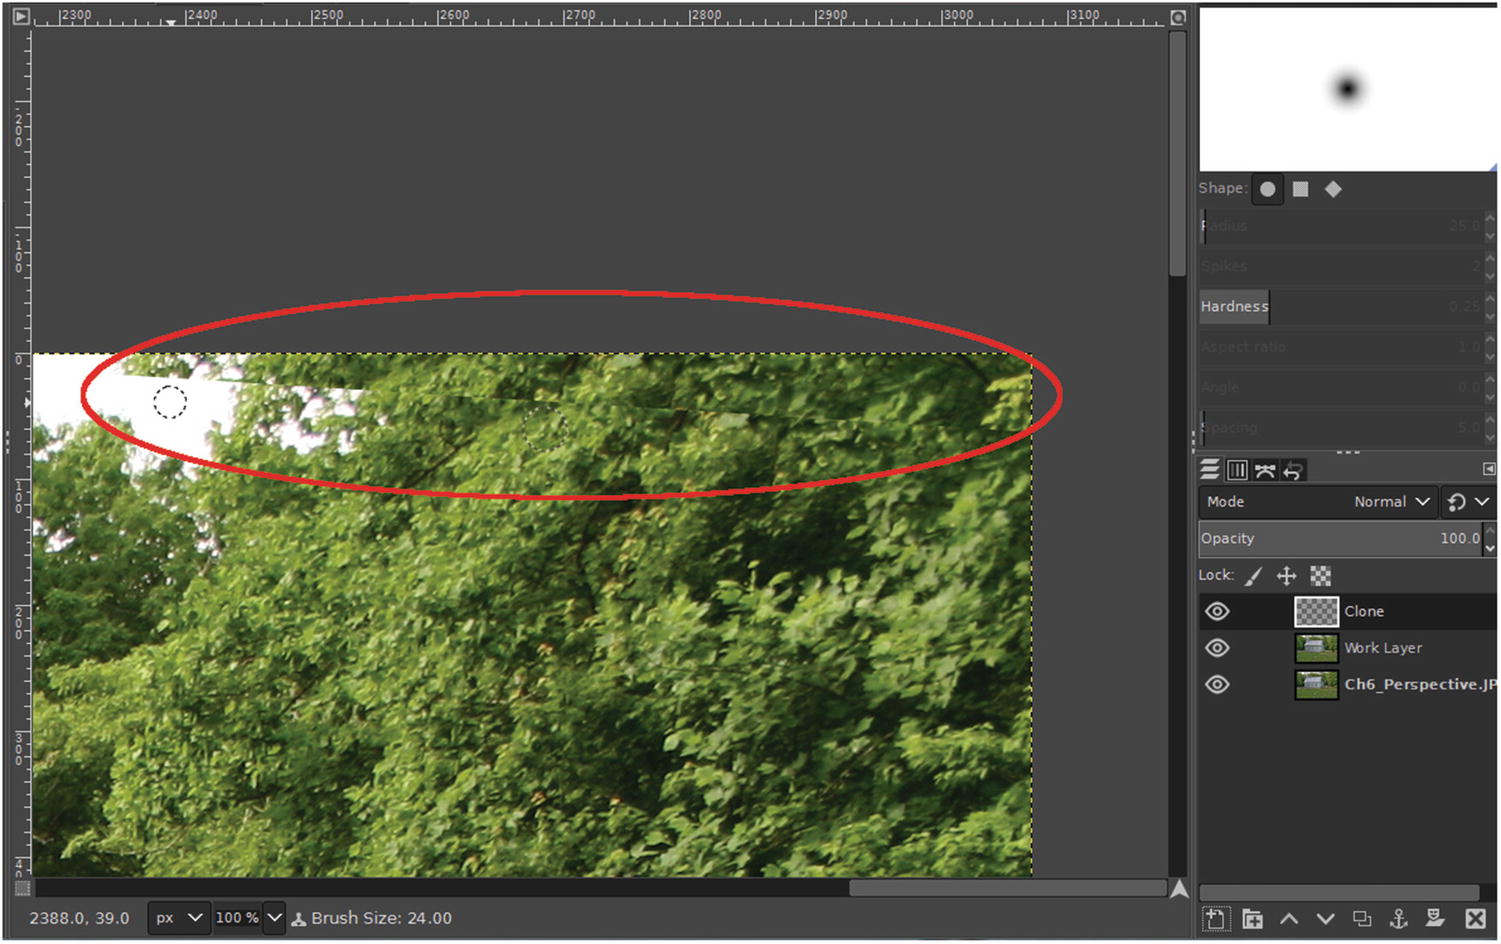
Removing a seam in the upper-right corner using the Clone Tool
In many instances, simply cropping the image will eliminate any seams and the need to use the Clone Tool—in this case cropping the image would have resulted in part of the steeple being cut off, so using the Clone Tool allowed me to preserve it.
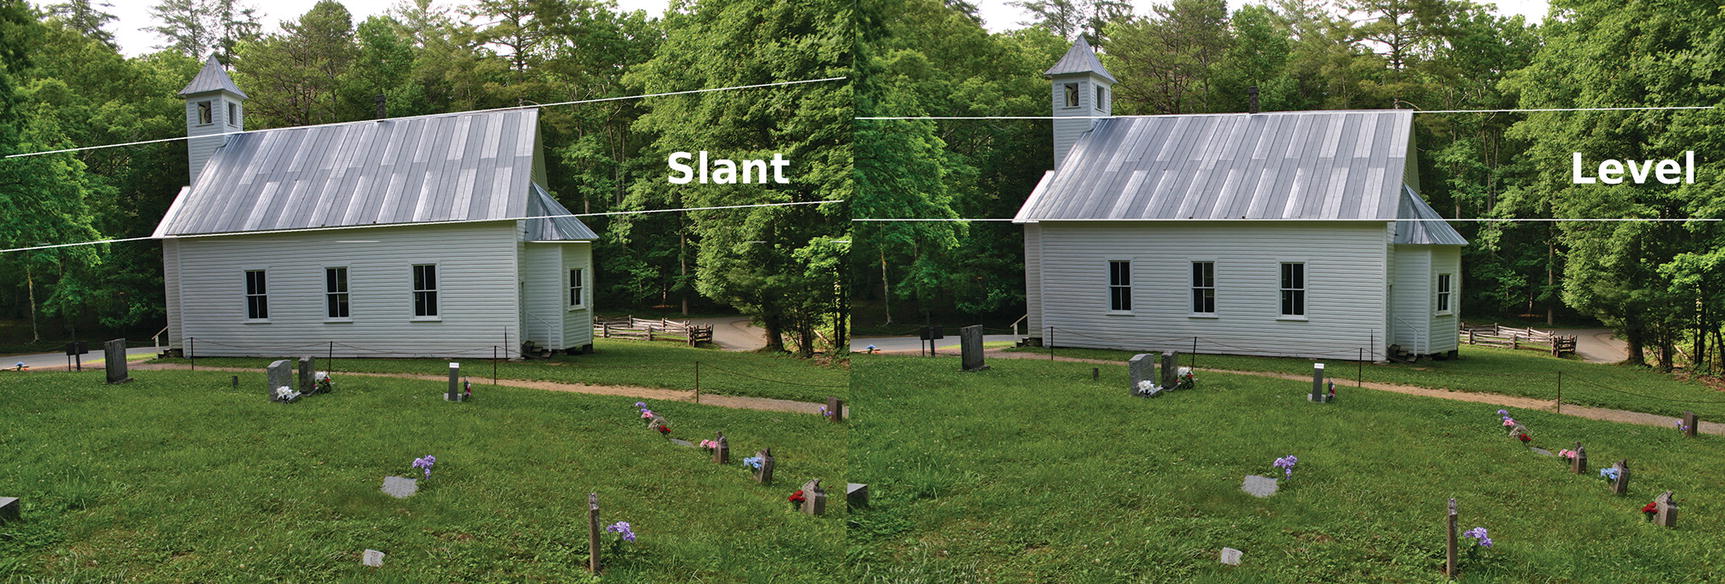
The before and after comparison
Tutorial 15: Brightening Teeth
Glimpse is a great program for retouching people to make them look their best. In this lesson, we’ll use Glimpse to brighten teeth (they won’t appear to be bleached, as in a glamour shot, just brightened enough to improve the image).
- 1.
Open the practice image Ch6_Brighten_Teeth in Glimpse.
- 2.
Create a duplicate of the background layer (Right-Click ➤ Duplicate Layer) and rename it (Work Layer, or something similar).
- 3.
Select the Lasso Tool (L)—set the Feather Edges radius to 3, then make a selection around the teeth (Figure 6-14).
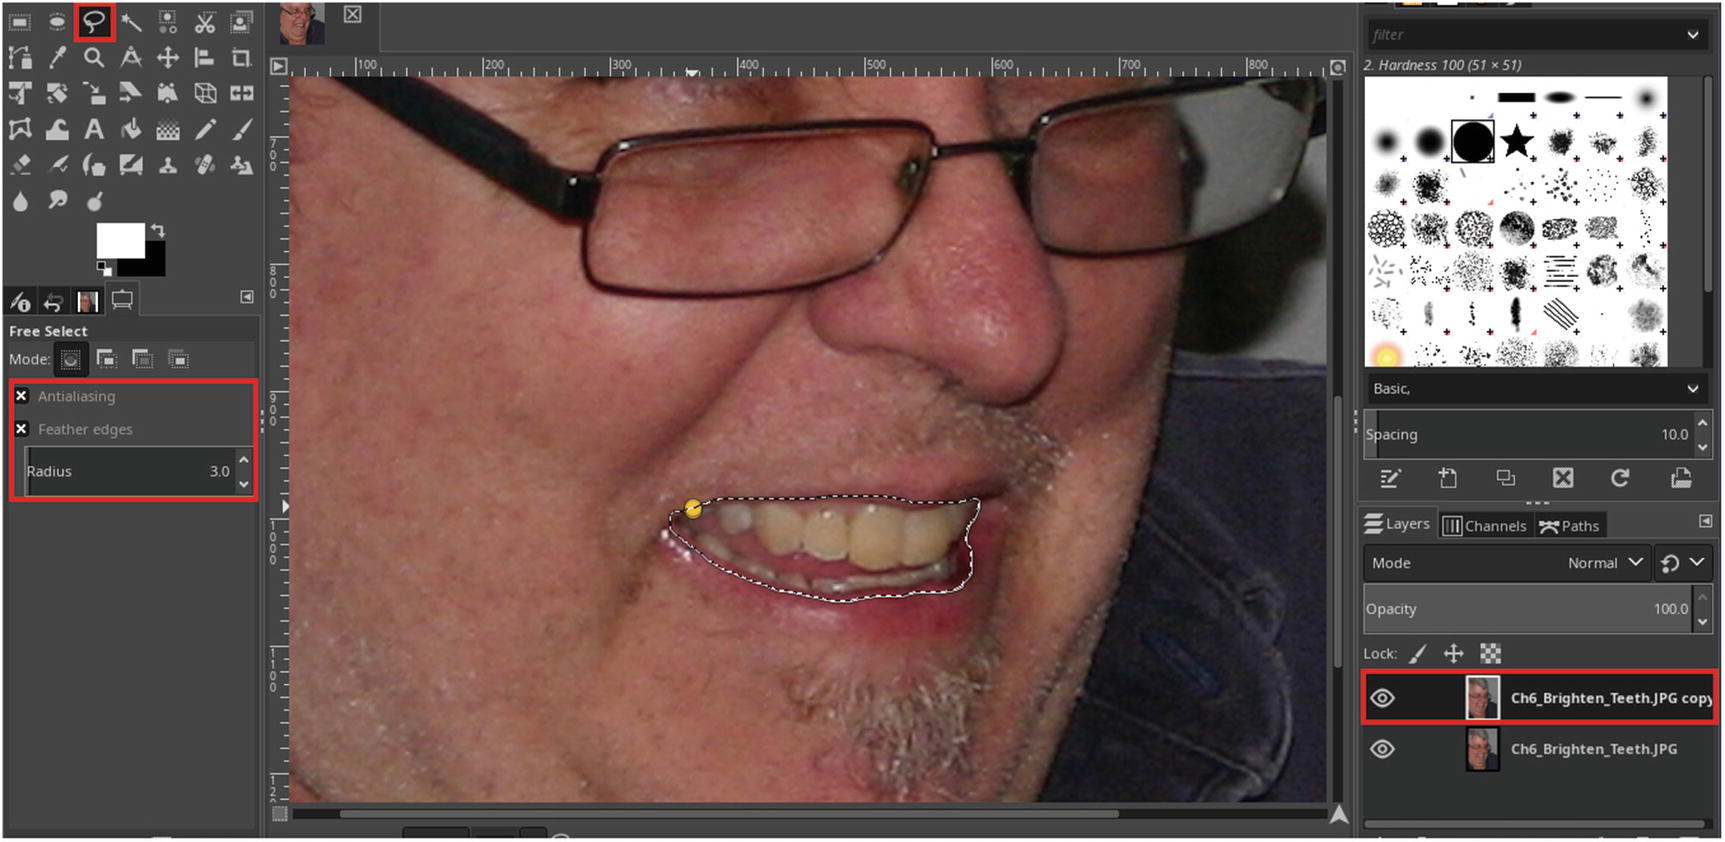
Use the Lasso Tool to make a selection around the teeth
- 4.
We’ll now copy this selection onto its own layer (first Edit ➤ Copy, then Edit ➤ Paste as ➤ New Layer). Rename the new layer Brighter Teeth.
- 5.
Open the Levels Dialog (Colors ➤ Levels), and move the white slider toward the left until the numeric value is 200 (Figure 6-15). Click OK when finished.
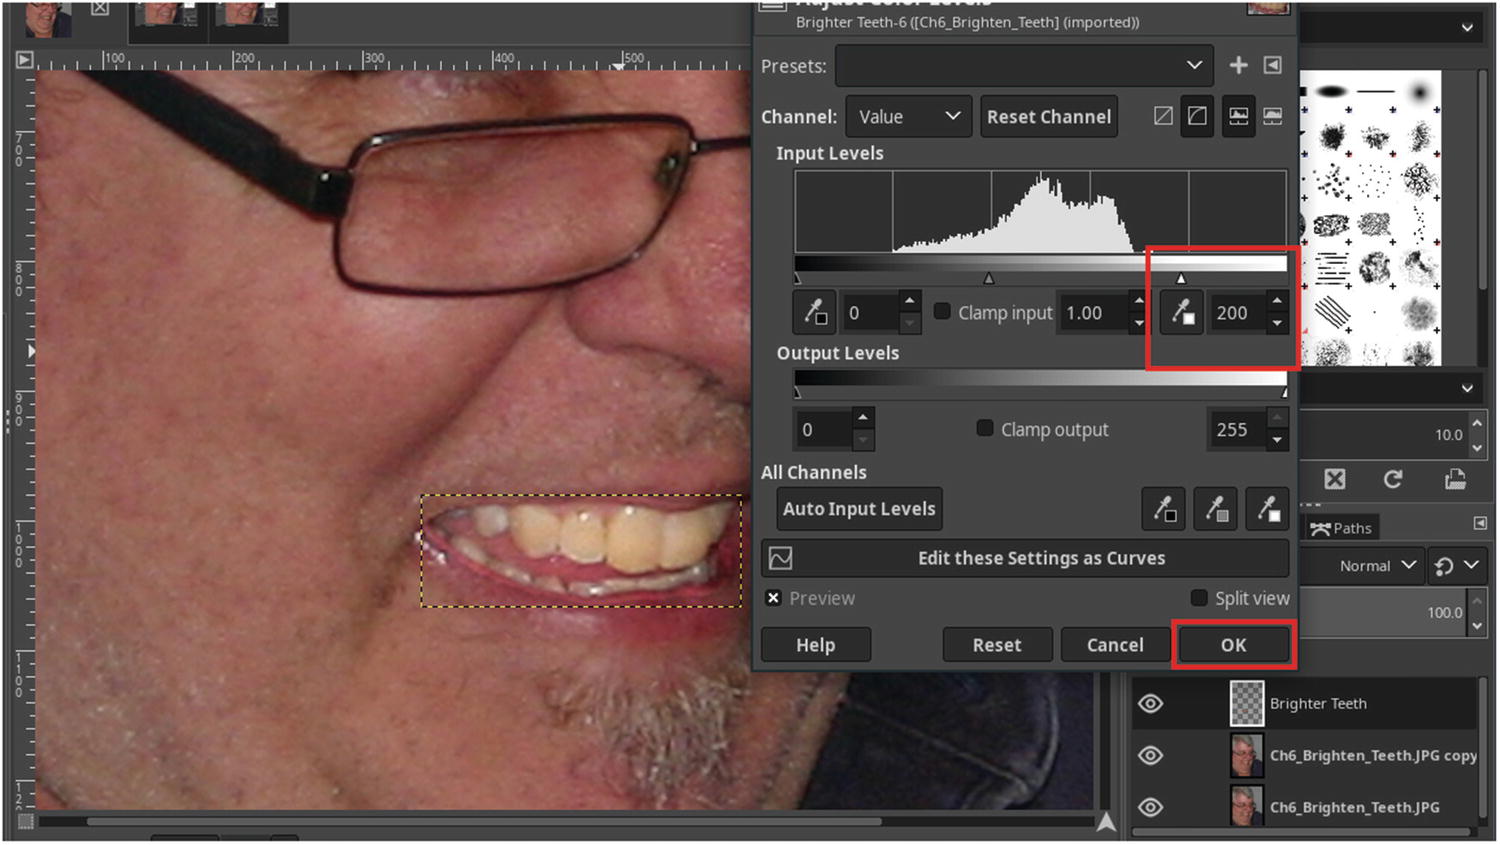
Use the Levels Dialog to lighten the teeth a little
- 6.
We’ll now reduce the color saturation of the teeth a bit. Open the Hue-Saturation dialog (Colors ➤ Hue-Saturation), and move the Saturation slider toward the left until the numeric value is –30 (Figure 6-16).
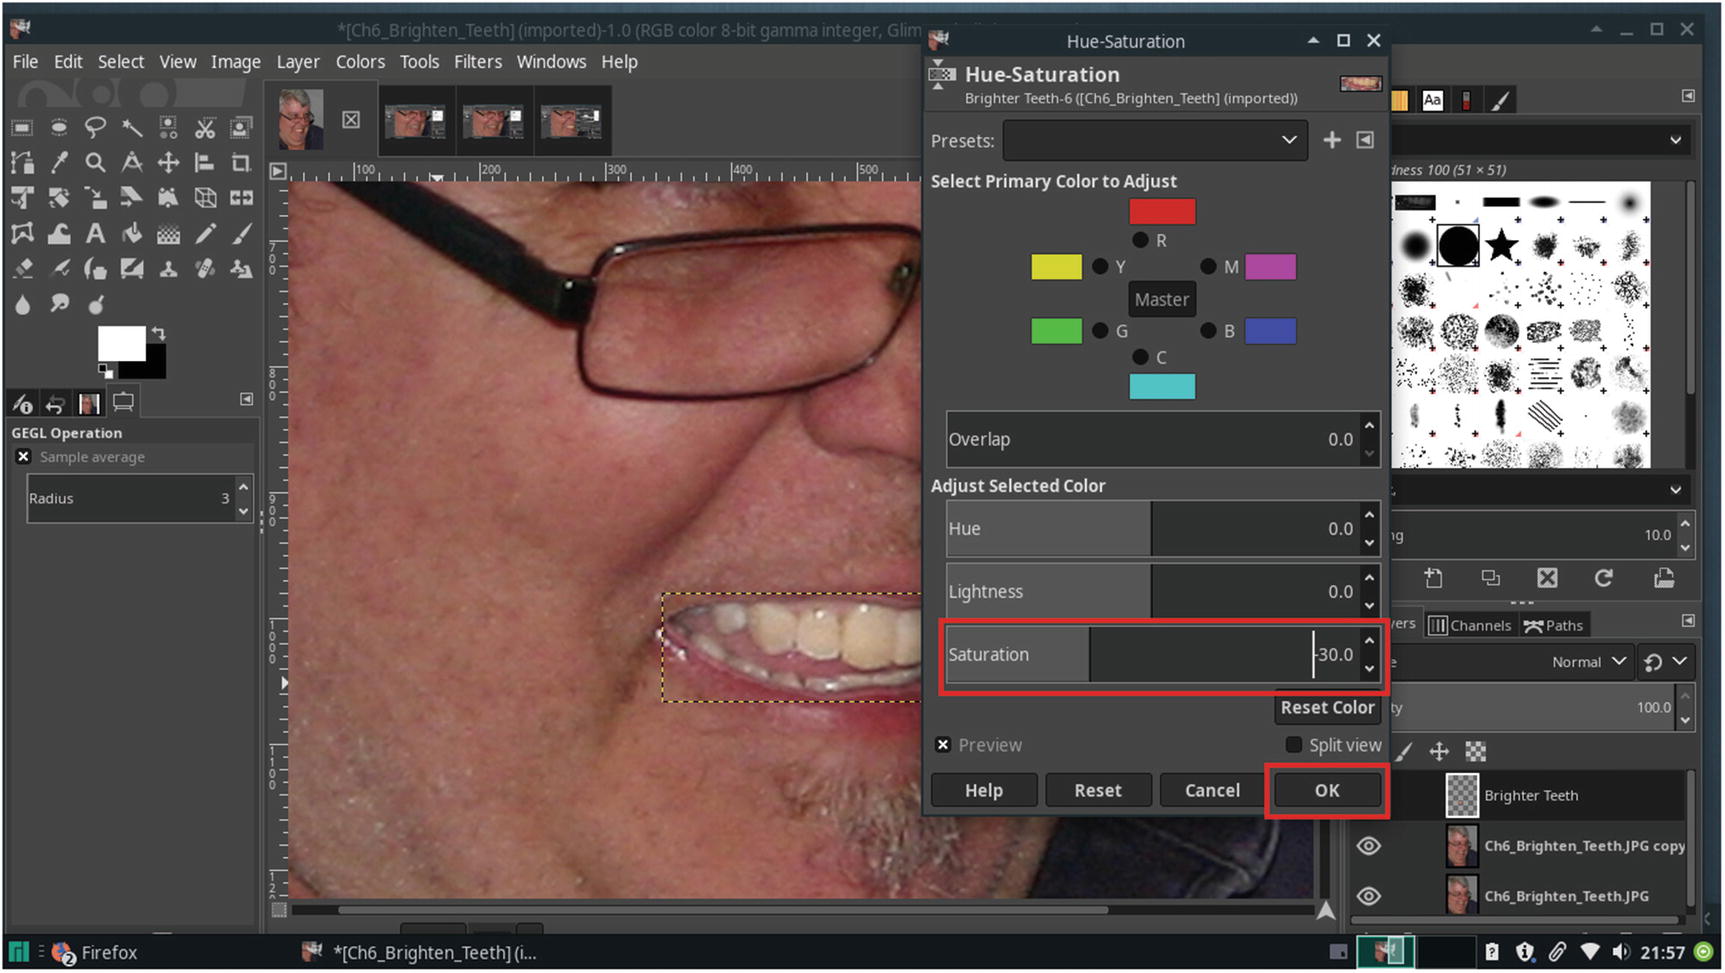
Use the Hue-Saturation dialog to reduce the color saturation of the teeth a bit
- 7.
Select the Eraser Tool (Shift+E)—using a small, soft brush, remove the excess pixels around the teeth.
- 8.
Lower the opacity of the layer named Brighter Teeth to about 75%.
Figure 6-17 shows the before and after comparison. When done, you can save as an .XCF file if you want to keep the file, or simply close it out.

The before and after comparison
Tutorial 16: Reducing Wrinkles
- 1.
Open the practice image Ch6_Reduce_Wrinkles in Glimpse.
- 2.
Create a duplicate of the background layer (Right-Click ➤ Duplicate Layer) and rename it (Work Layer, or something similar).
- 3.
Create a new layer (Layer ➤ New Layer) and name it Heal (or Wrinkles)—make sure the blend mode is set to Normal.
- 4.
Lower the layer opacity to 65%.
- 5.
Select the Healing Tool (H) and make sure Sample Merged is checked—pick the soft brush (2. Hardness 0.25) and adjust the diameter to 10–12 pixels.
- 6.
Lower the brush opacity to 30%.
- 7.
Click a source point, and work along the deepest wrinkles under the eyes (Figure 6-18). This doesn’t completely eliminate them; it just reduces the harshness.

Using the Healing Tool to reduce the harshness of the wrinkles
- 8.
After you’ve worked on the wrinkles under the eyes, use the Healing Tool on the birthmark next to the nose—again, this only diminishes it some (Figure 6-19).

Using the Healing Tool to diminish the birthmark
- 9.
Next, we’ll work on the creases around the mouth. Create a new layer (Layer ➤ New Layer) and name it Creases—make sure the blend mode is set to Normal.
- 10.
Change the brush size to around 22 pixels and the brush opacity to 50%.
- 11.
Use the Healing Tool to reduce the harshness of the creases (Figure 6-20).

Using the Healing Tool to diminish the creases
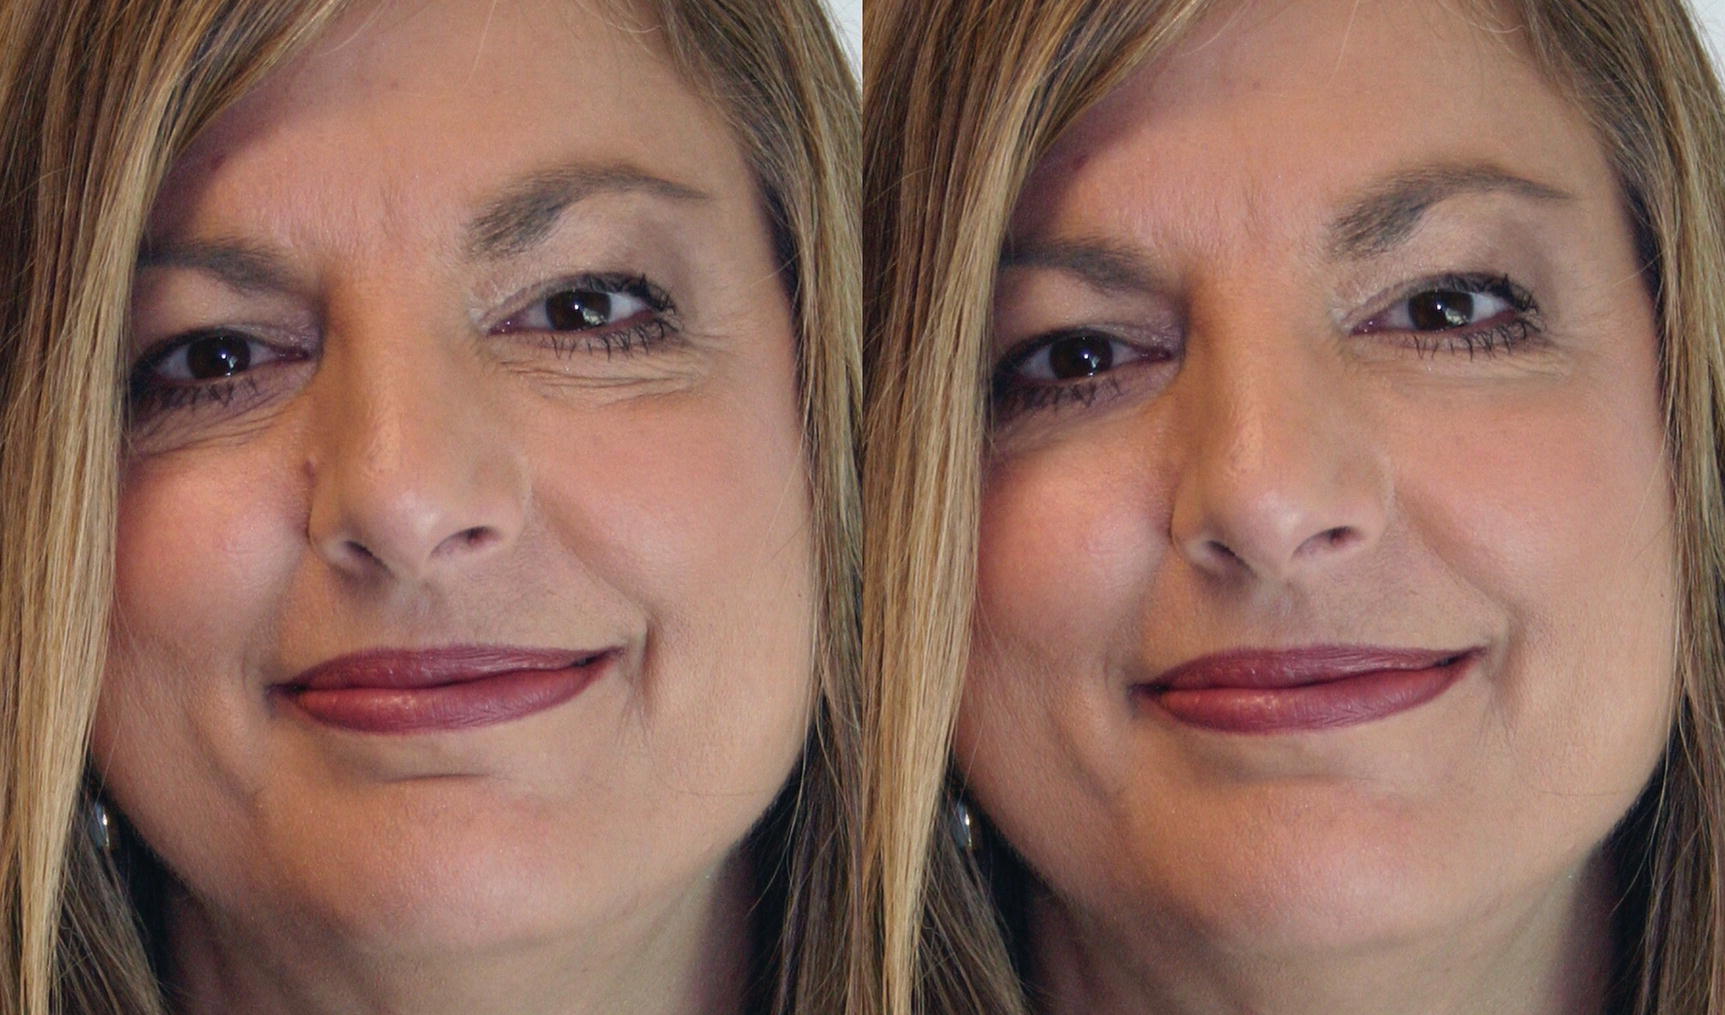
The before and after comparison
Tutorial 17: Repairing Scratches and Damage
- 1.
Open the practice image Ch6_Damaged_Photo in Glimpse.
- 2.
Create a duplicate of the background layer (Right-Click ➤ Duplicate Layer) and rename it (Work Layer, or something similar).
- 3.
The first thing to do is to patch the torn area on the left side. Select the Rectangle Select Tool (R)—set the Feather Edges radius to 10, then make a selection in the upper-left corner (Figure 6-22).
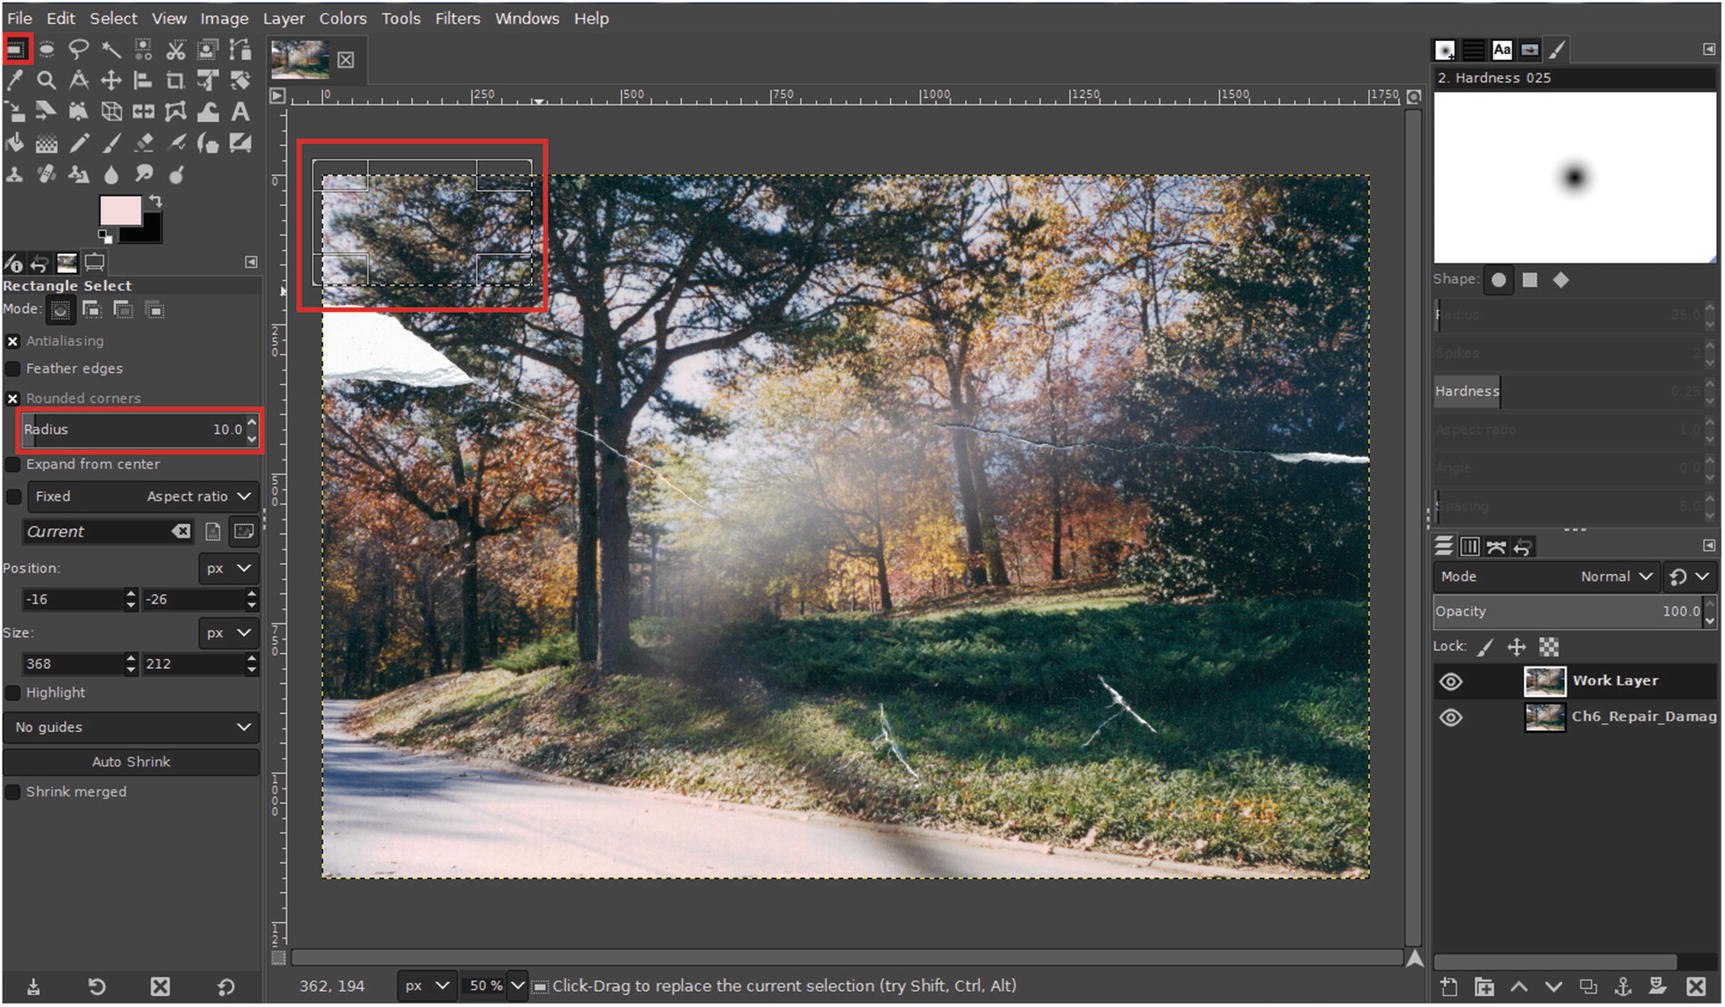
Use the Rectangle Select Tool to select the area shown
- 4.
We’ll now copy this selection onto its own layer (first Edit ➤ Copy, then Edit ➤ Paste as ➤ New Layer). Rename the new layer Repair Layer.
- 5.
Use the Move Tool (M) to position the layer over the missing area (Figure 6-23).
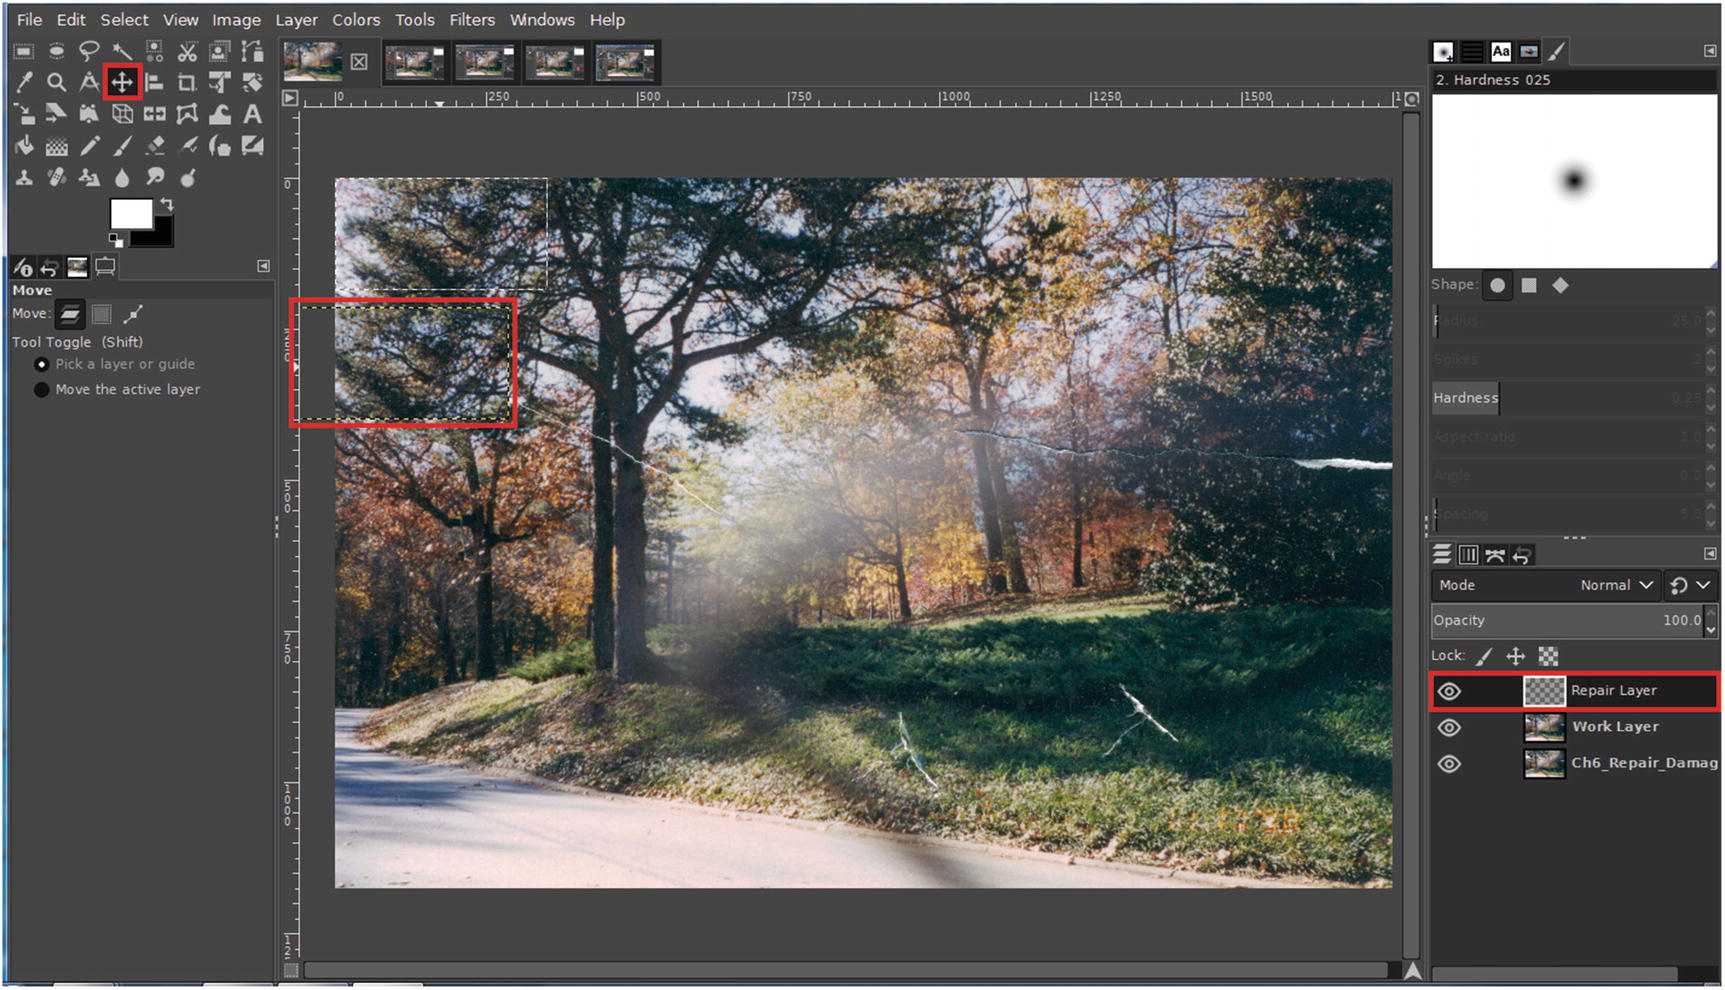
Use the Move Tool to position the layer over the missing area
- 6.
Lower the Repair Layer’s opacity to about 80% (enough to see the layer below).
- 7.
Expand the layer boundary to match the image size by right-clicking the new layer’s thumbnail preview and selecting Layer to Image Size from the menu (Figure 6-2).
- 8.
Select the Eraser Tool (Shift+E)—using the 2. Hardness 0.25 brush about 50 pixels in diameter, remove the excess pixels around the Repair Layer as shown in Figure 6-24, and restore layer opacity to 100% when finished.
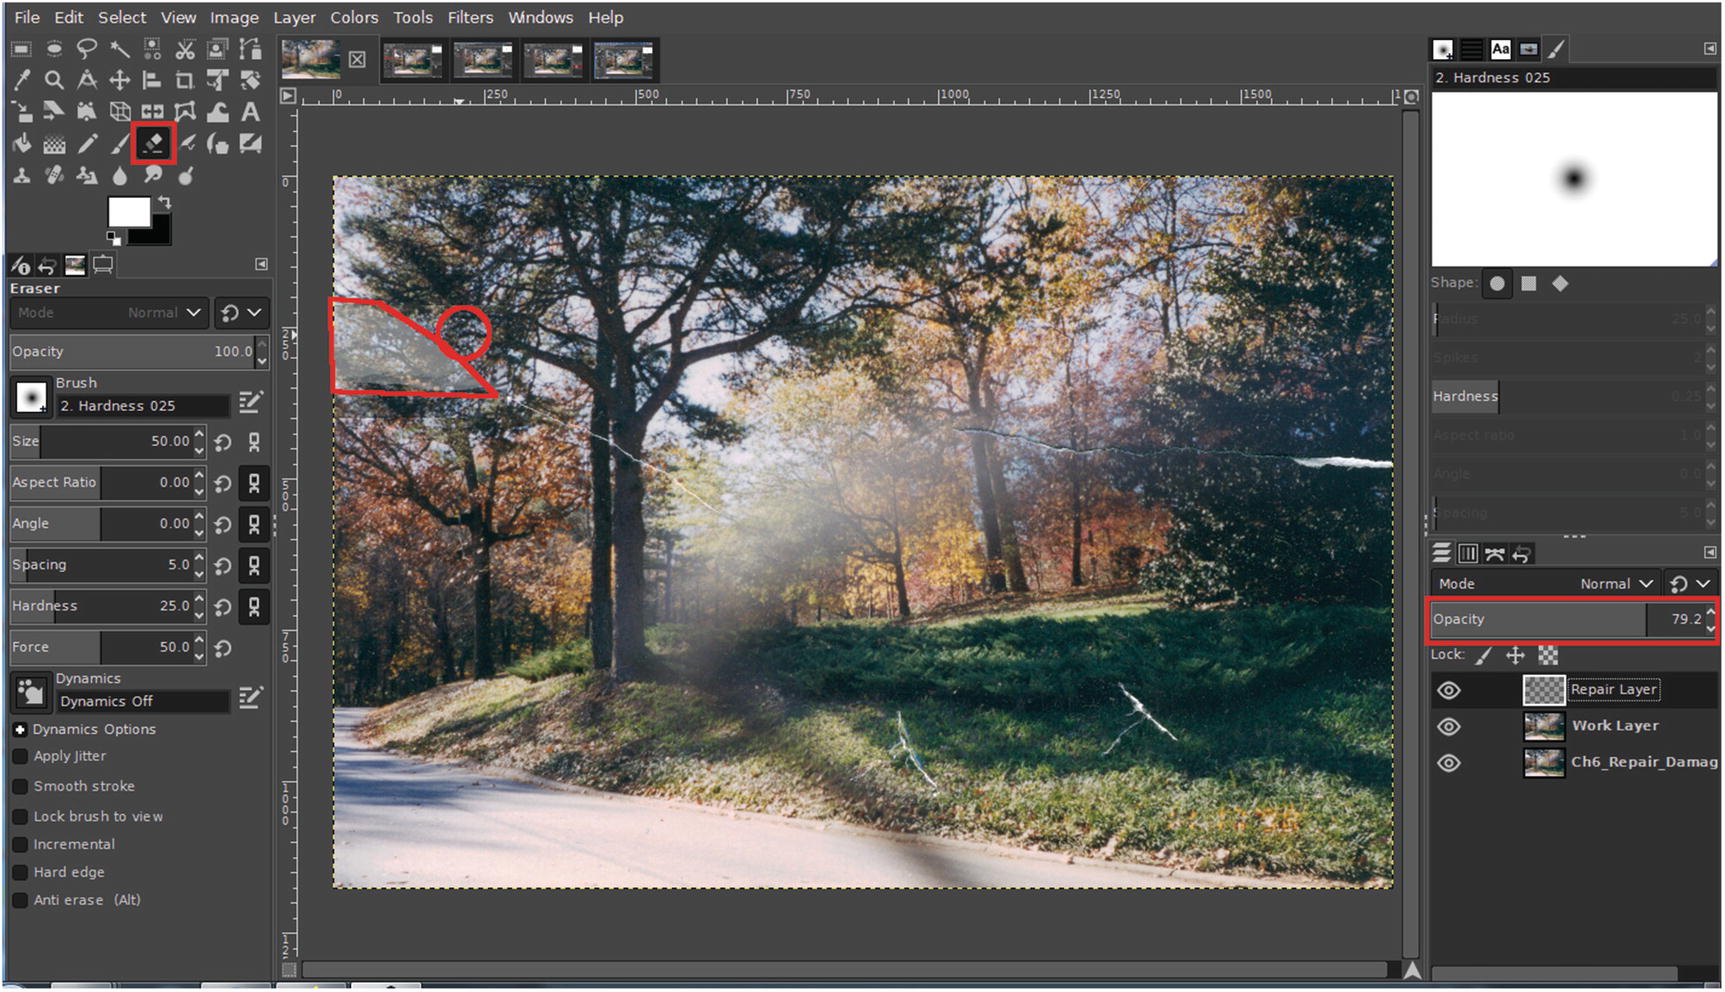
Use the Eraser Tool to remove excess pixels from around the patched area
- 9.
Select the Clone Tool (C) and make sure Sample Merged is checked—pick the soft brush (2. Hardness 0.25) and adjust the diameter to about 35 pixels.
- 10.
Use the Clone Tool to blend in the patched area with the surrounding pixels—be mindful of repeating patterns or areas that look obviously duplicated (Figure 6-25).

Use the Clone Tool to blend pixels in from the surrounding area
- 11.
Use the Healing Tool (H) to work along the smaller scratch (Figure 6-26)—you may encounter areas in which the Healing Tool doesn’t work well and will need to alternate between it and the Clone Tool.
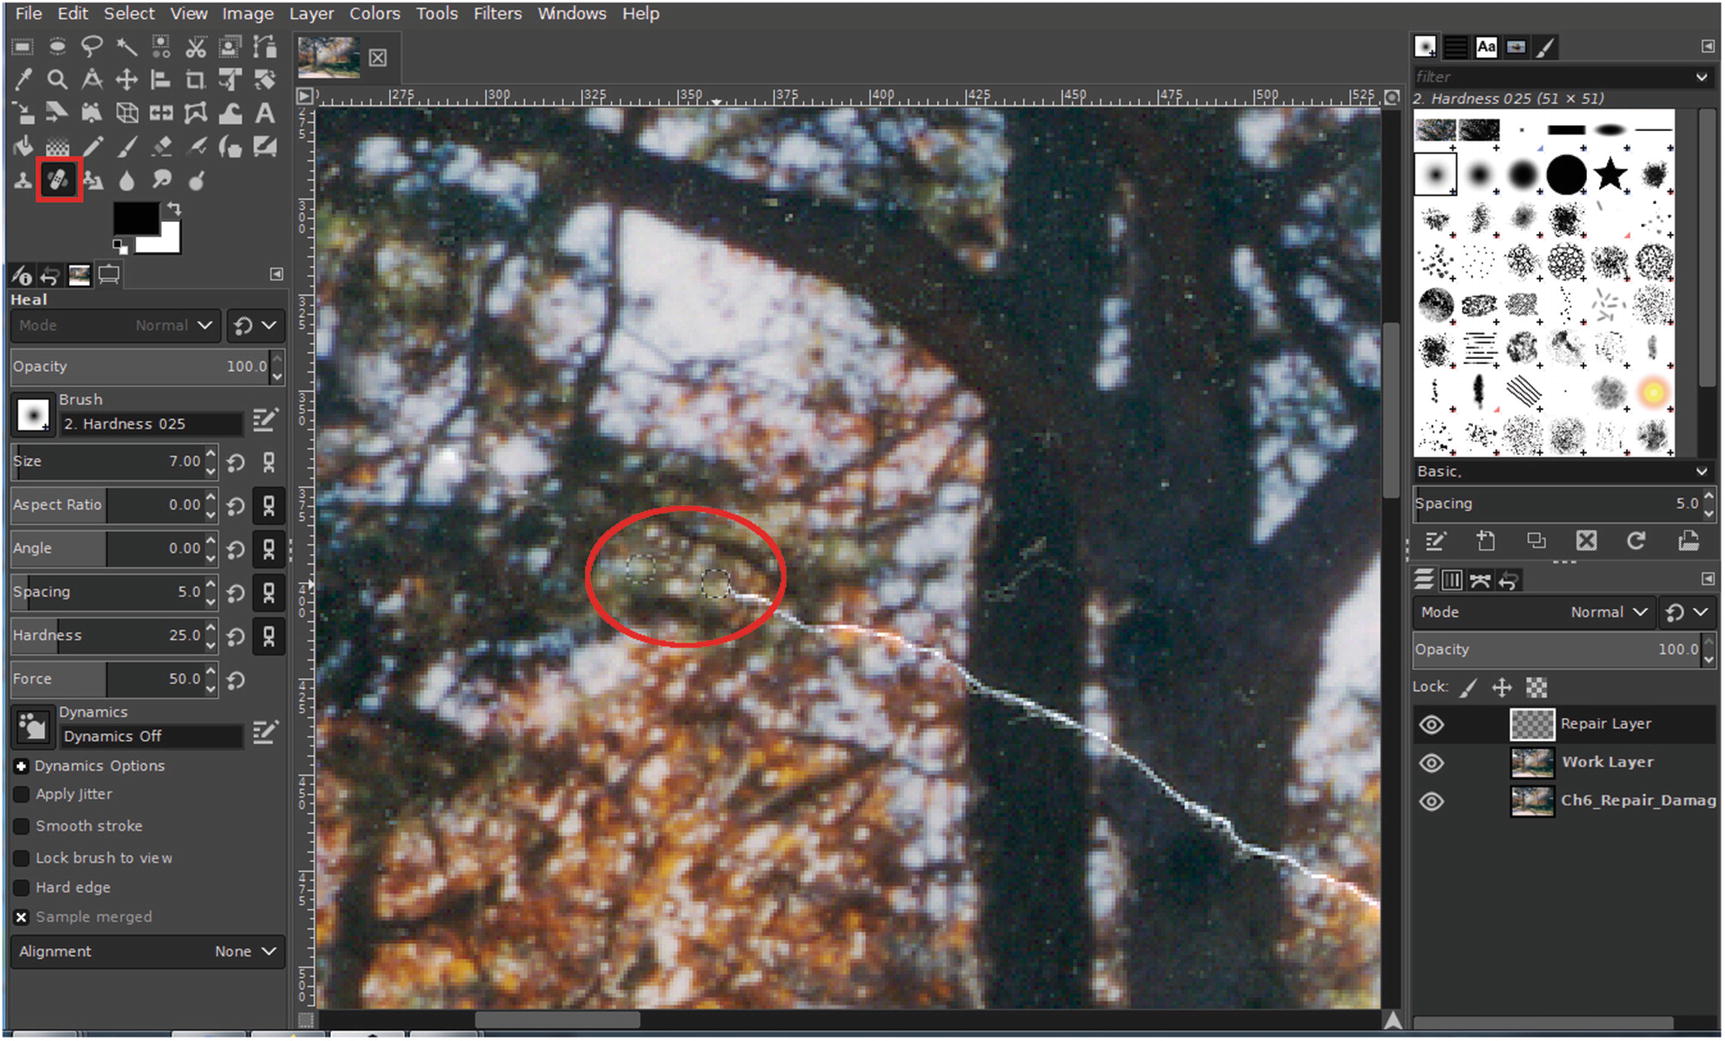
Use the Healing Tool to work along the smaller scratch, alternating with the Clone Tool as needed
- 12.
Use the Clone Tool to work in the larger areas, increasing brush size as needed (Figure 6-27).
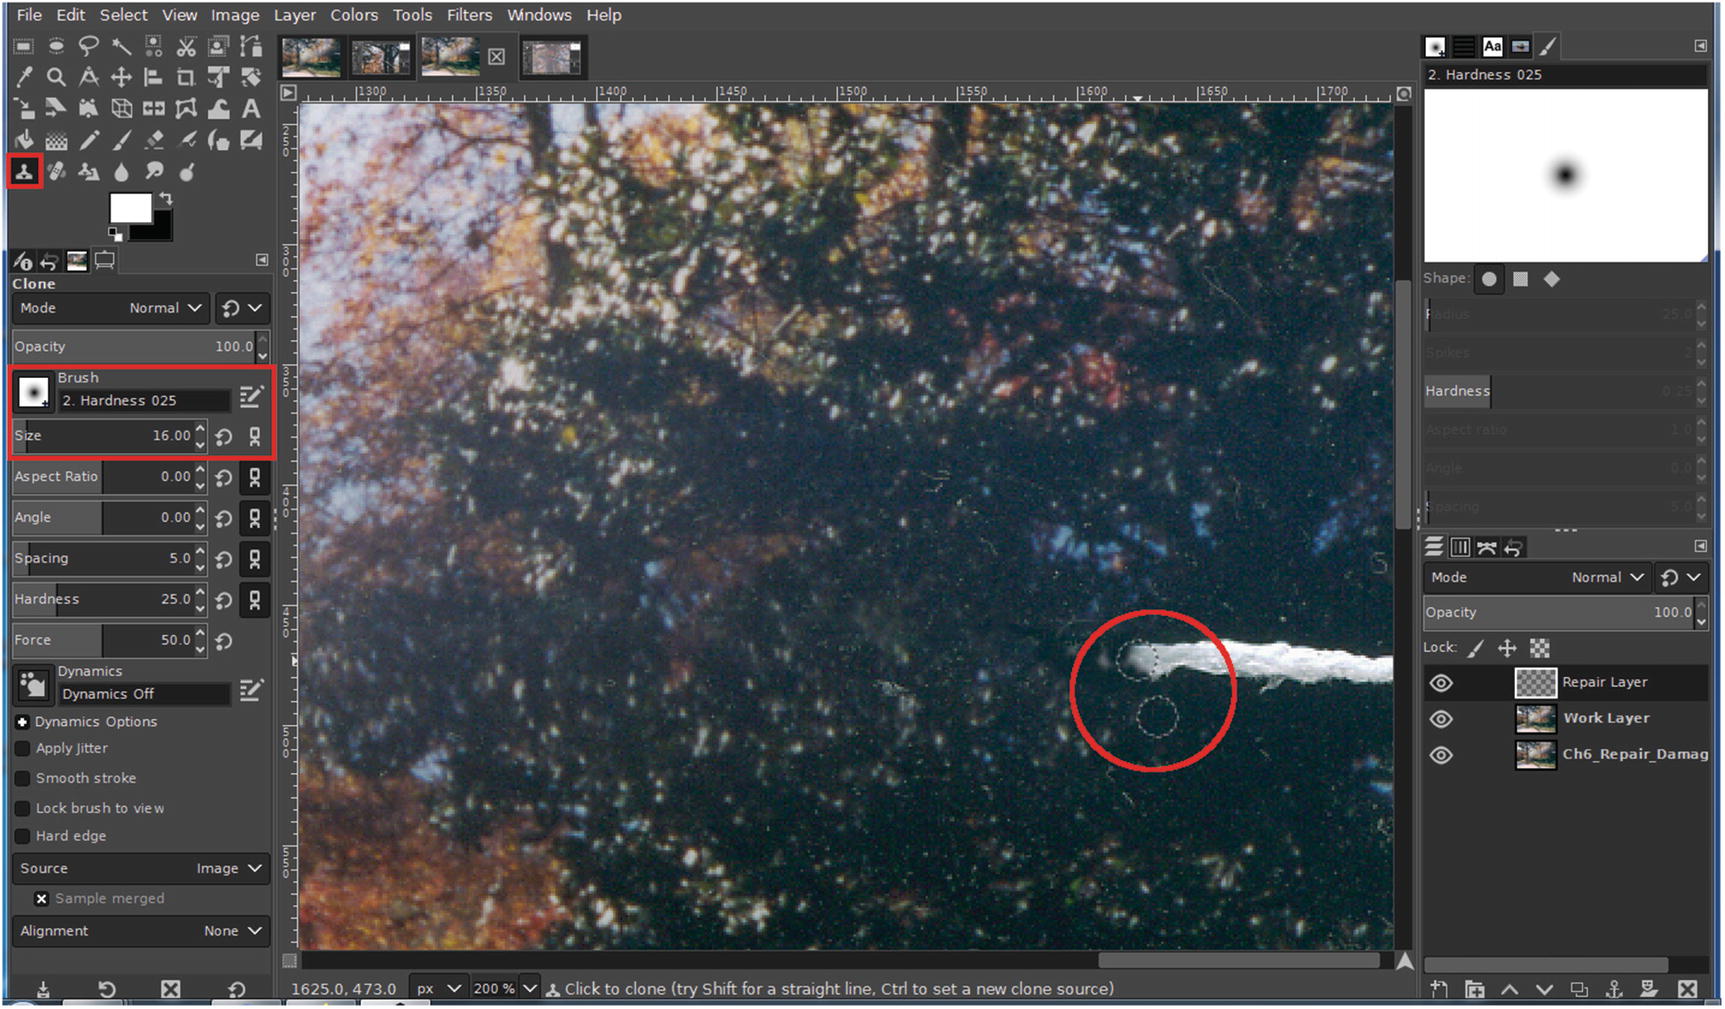
Increase the Clone Tool’s brush size as needed for working in larger areas
- 13.
Use the Clone Tool to remove the time/date stamp in the lower-right corner (Figure 6-28).
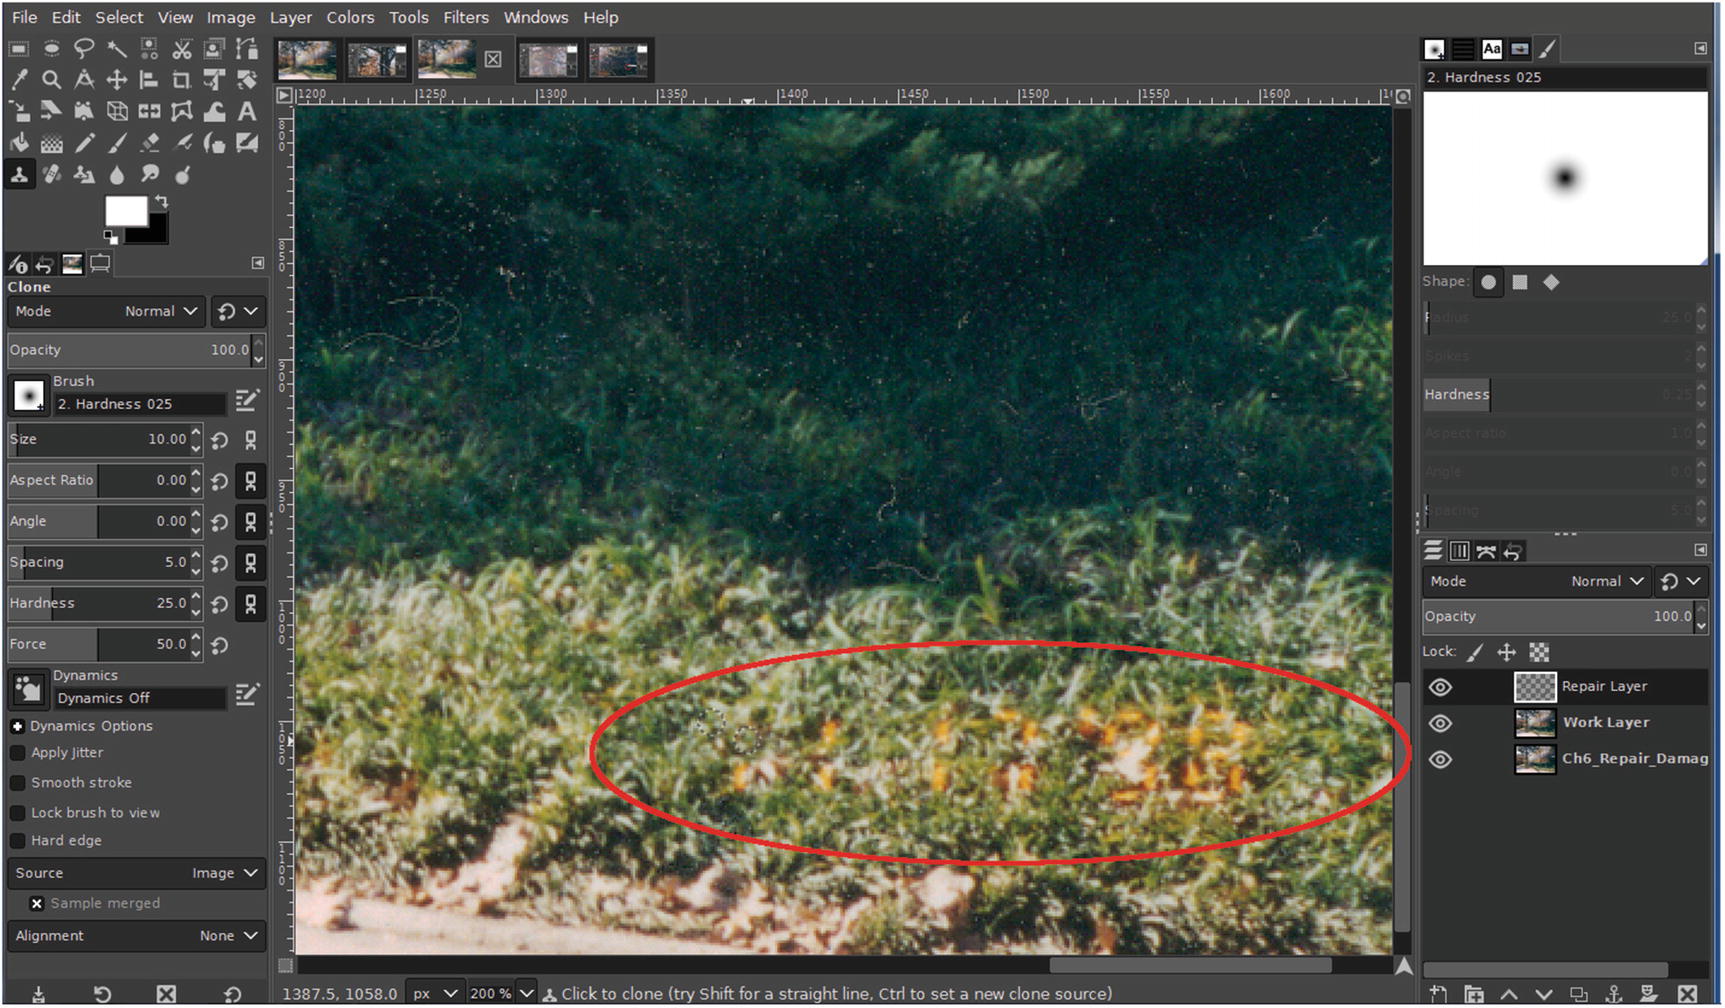
Use the Clone Tool to remove the time/date stamp
- 14.
Once the healing and cloning work is completed, merge the Repair Layer down onto the Work Layer (Layer ➤ Merge Down).
- 15.
We’ll now work on the areas with dust specks. Select the Lasso Tool (L)—set the Feather Edges radius to 5, then make a selection around the areas with the heaviest dust specks, such as the tree trunks and the open grassy area.
- 16.
Launch the Despeckle Dialog (Filters ➤ Enhance ➤ Despeckle)—leave at the default settings and click OK (Figure 6-29).
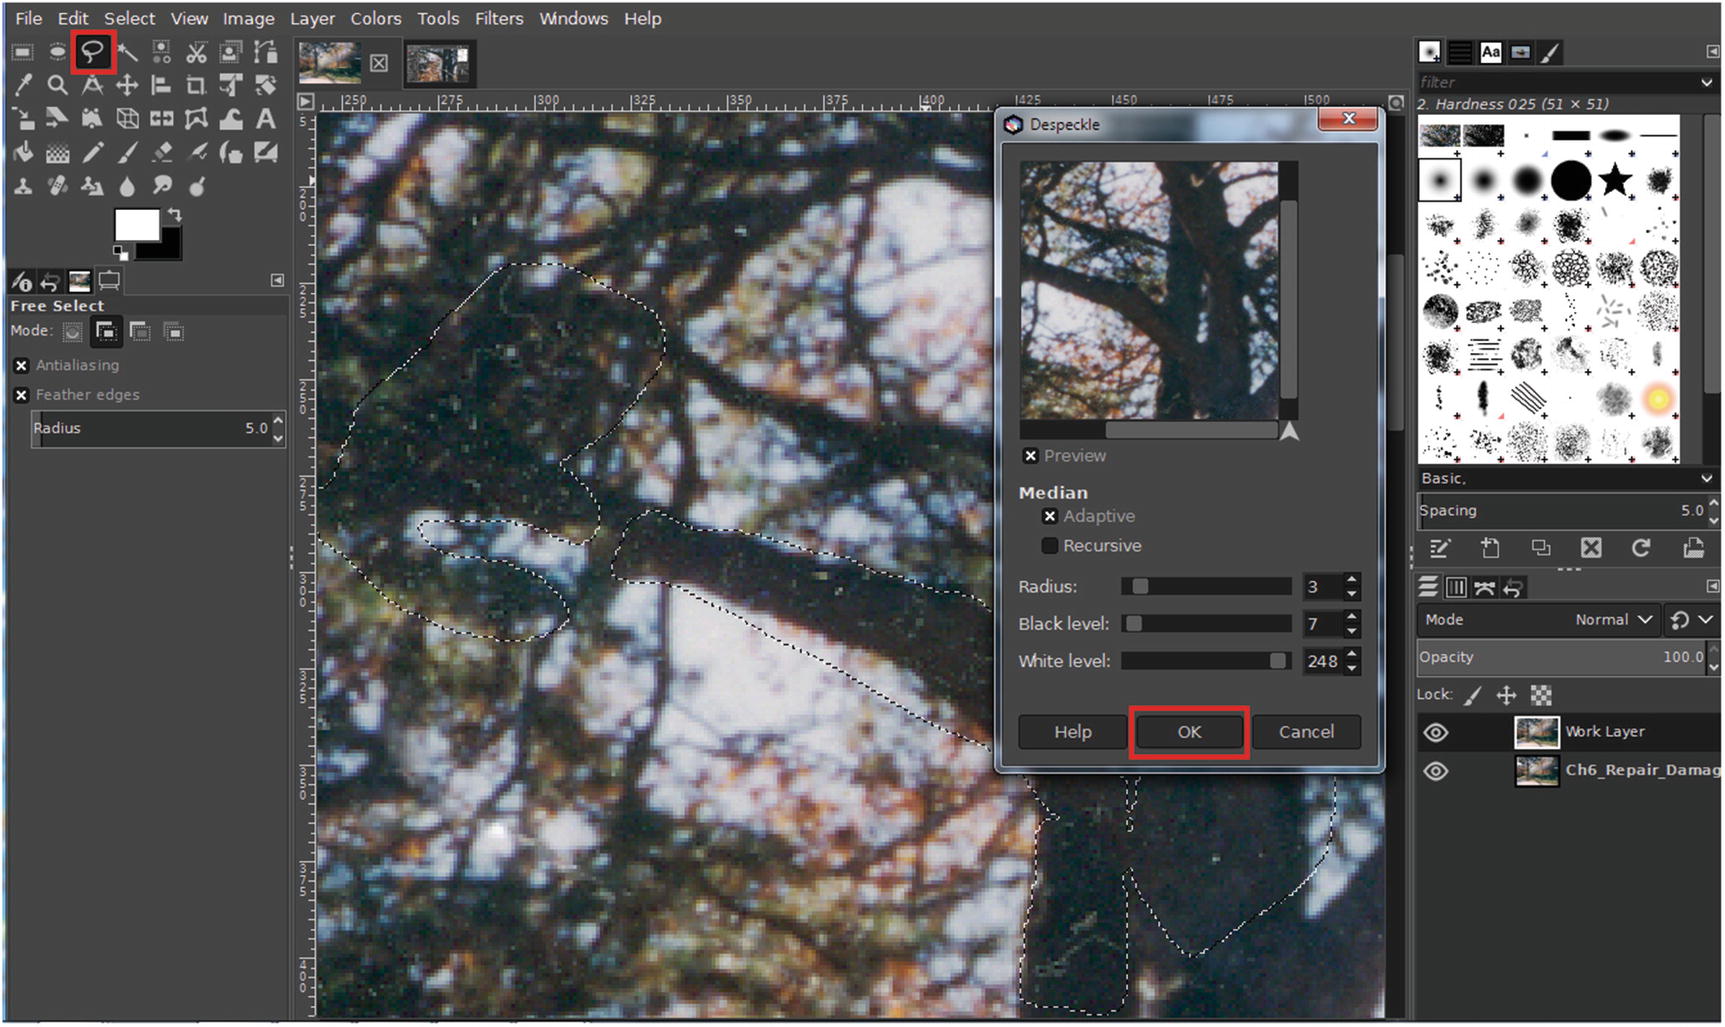
Use the Despeckle Dialog to remove the heaviest dust
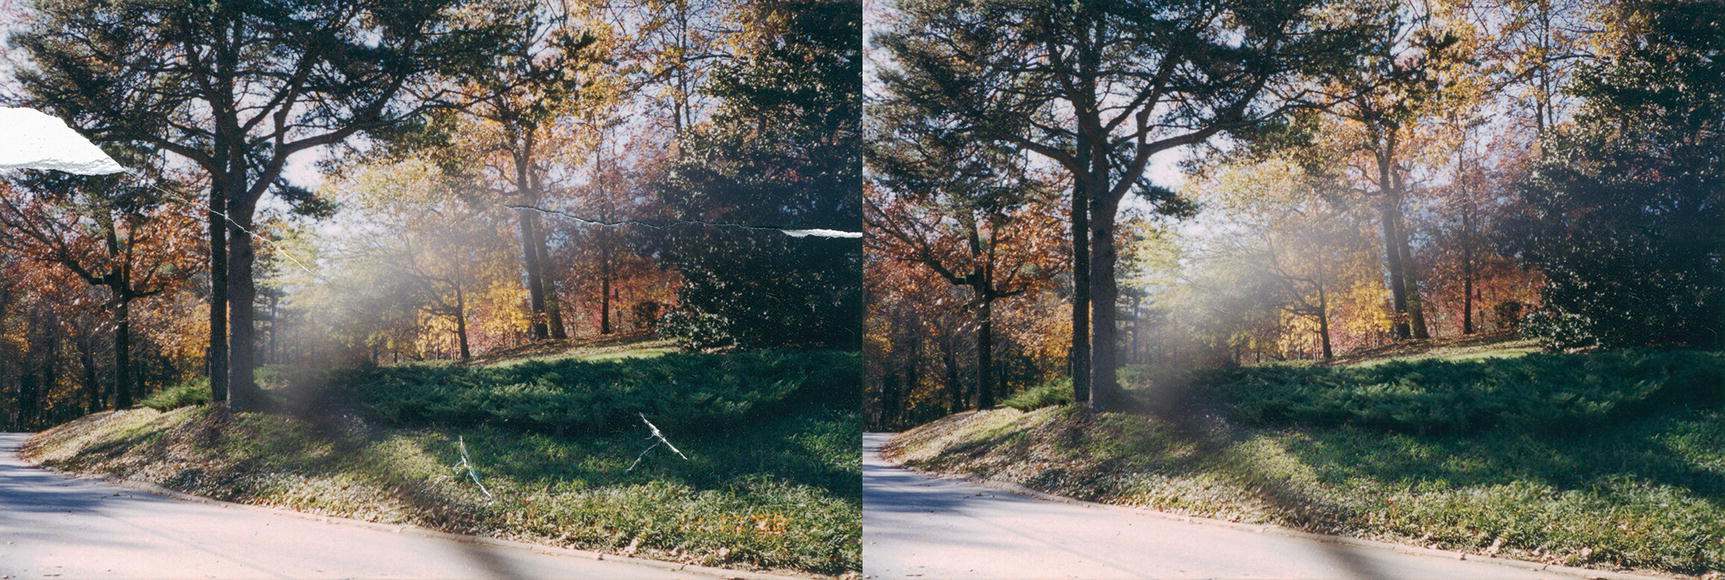
The before and after comparison
Chapter Conclusion
This chapter provided several tutorials on topics pertaining to modifying, retouching, and restoration.
Removing unwanted objects
Correcting perspective
Brightening teeth
Reducing wrinkles
Repairing scratches and damage
In the next chapter, we’ll look at compositing images.