Glimpse offers a wide assortment of filters for creating various effects. In this chapter, the focus will be on the artistic filters for turning photos into works of art.
Tutorial 26: Turn a photo into a digital oil painting
Tutorial 27: Turn a photo into a digital watercolor
Tutorial 28: Turn a photo into a digital pen and ink drawing
Tutorial 29: Turn a photo into a Warhol-like painting
Tutorial 30: Combine two images to create a digital mural
You’ll notice that the Artistic Filters menu has some of the same effects shown twice—one is the GEGL version, and the other Legacy version. GEGL (which stands for Generic Graphics Library) supports higher bit-depth images and displays on canvas previews.
- 1.
Downloading and installing Glimpse
- 2.
An overview of the workspace
- 3.
Customizing the workspace
- 4.
Menus, windows, and dialogs
Now, let’s proceed to the first tutorial in this chapter. By the way, the artistic filters are fun—please do follow the instructions, but experiment with the filters when you’re done and enjoy!
Tutorial 26: Turn a Photo into a Digital Oil Painting
- 1.
Open the practice image Ch_10_Dogwood_Tree in Glimpse.
- 2.
Create a duplicate of the background layer (Right-Click ➤ Duplicate Layer) and rename it (Work Layer, or something similar).
- 3.
Click the duplicate layer icon to make it active.
- 4.
Launch the Oilify filter dialog (Filter ➤ Artistic ➤ Oilify).
- 5.Change the values in the dialog as follows:
Mask Radius—12
Exponent—8
Number of intensities—90

Use these values in the Oilify Dialog
- 6.
Click OK to apply the filter.
- 7.
Now we’ll apply a light canvas texture to the image to add more realism. Launch the Apply Canvas dialog (Filter ➤ Artistic ➤ Apply Canvas).
- 8.Use the default settings as shown in Figure 10-2. If for some reason the settings are different when you launch the dialog, set them as follows:
Direction—Top-right
Depth—4
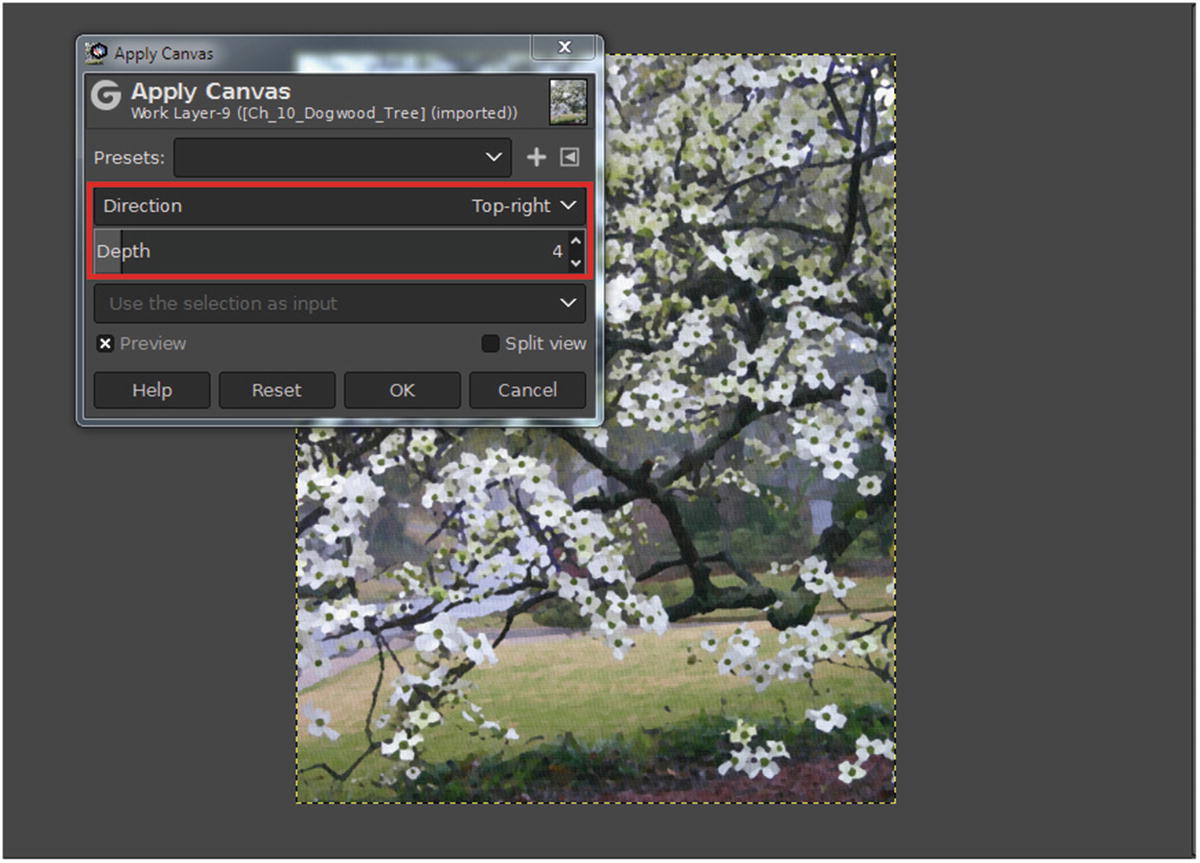
Use these values in the Apply Canvas dialog
- 9.
Figure 10-3 shows the before and after comparison . When done, you can save as an .XCF file if you want to keep the file, or simply close it out.

The before and after comparison
Tutorial 27: Turn a Photo into a Digital Watercolor
- 1.
Open the practice image Ch_10_Flowers in Glimpse.
- 2.
Create a duplicate of the background layer (Right-Click ➤ Duplicate Layer) and rename it (Work Layer, or something similar).
- 3.
Click the duplicate layer icon to make it active.
- 4.
Launch the Waterpixels filter dialog (Filter ➤ Artistic ➤ Waterpixels).
- 5.Use the default settings as shown in Figure 10-4. If for some reason the settings are different when you launch the dialog, set them as follows:
Superpixels size—32
Gradient smoothness—1.00
Spatial regularization—0
Superpixels color—Average

Use these values in the Waterpixels dialog
- 6.
Now we’ll apply a light cloth texture to the image to add more realism. Launch the Clothify dialog (Filter ➤ Artistic ➤ Clothify).
- 7.Use the settings as follows (shown in Figure 10-5):
Blur X—9
Blur Y—9
Azimuth—135.0
Elevation—45.0
Depth—1

Use these values in the Clothify dialog
- 8.
Figure 10-6 shows the before and after comparison. When done, you can save as an .XCF file if you want to keep the file, or simply close it out.
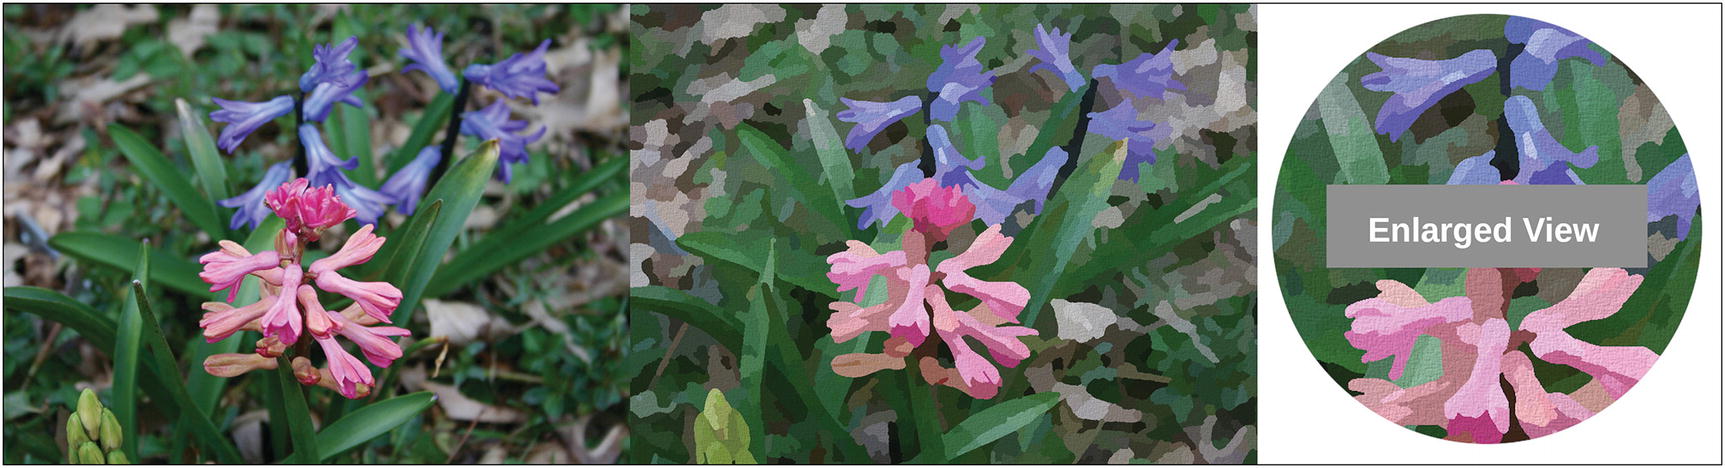
The before and after comparison
Tutorial 28: Turn a Photo into a Digital Pen and Ink Drawing
- 1.
Open the practice image Ch_10_Yellow_Flower in Glimpse.
- 2.
Create a duplicate of the background layer (Right-Click ➤ Duplicate Layer) and rename it (Work Layer, or something similar).
- 3.
Click the duplicate layer icon to make it active.
- 4.
Launch the Posterize dialog (Colors ➤ Posterize). This will reduce the number of colors in the image, making it look more like a drawing than a photograph.
- 5.
Set the Posterize levels to 5 (Figure 10-7), then click OK.
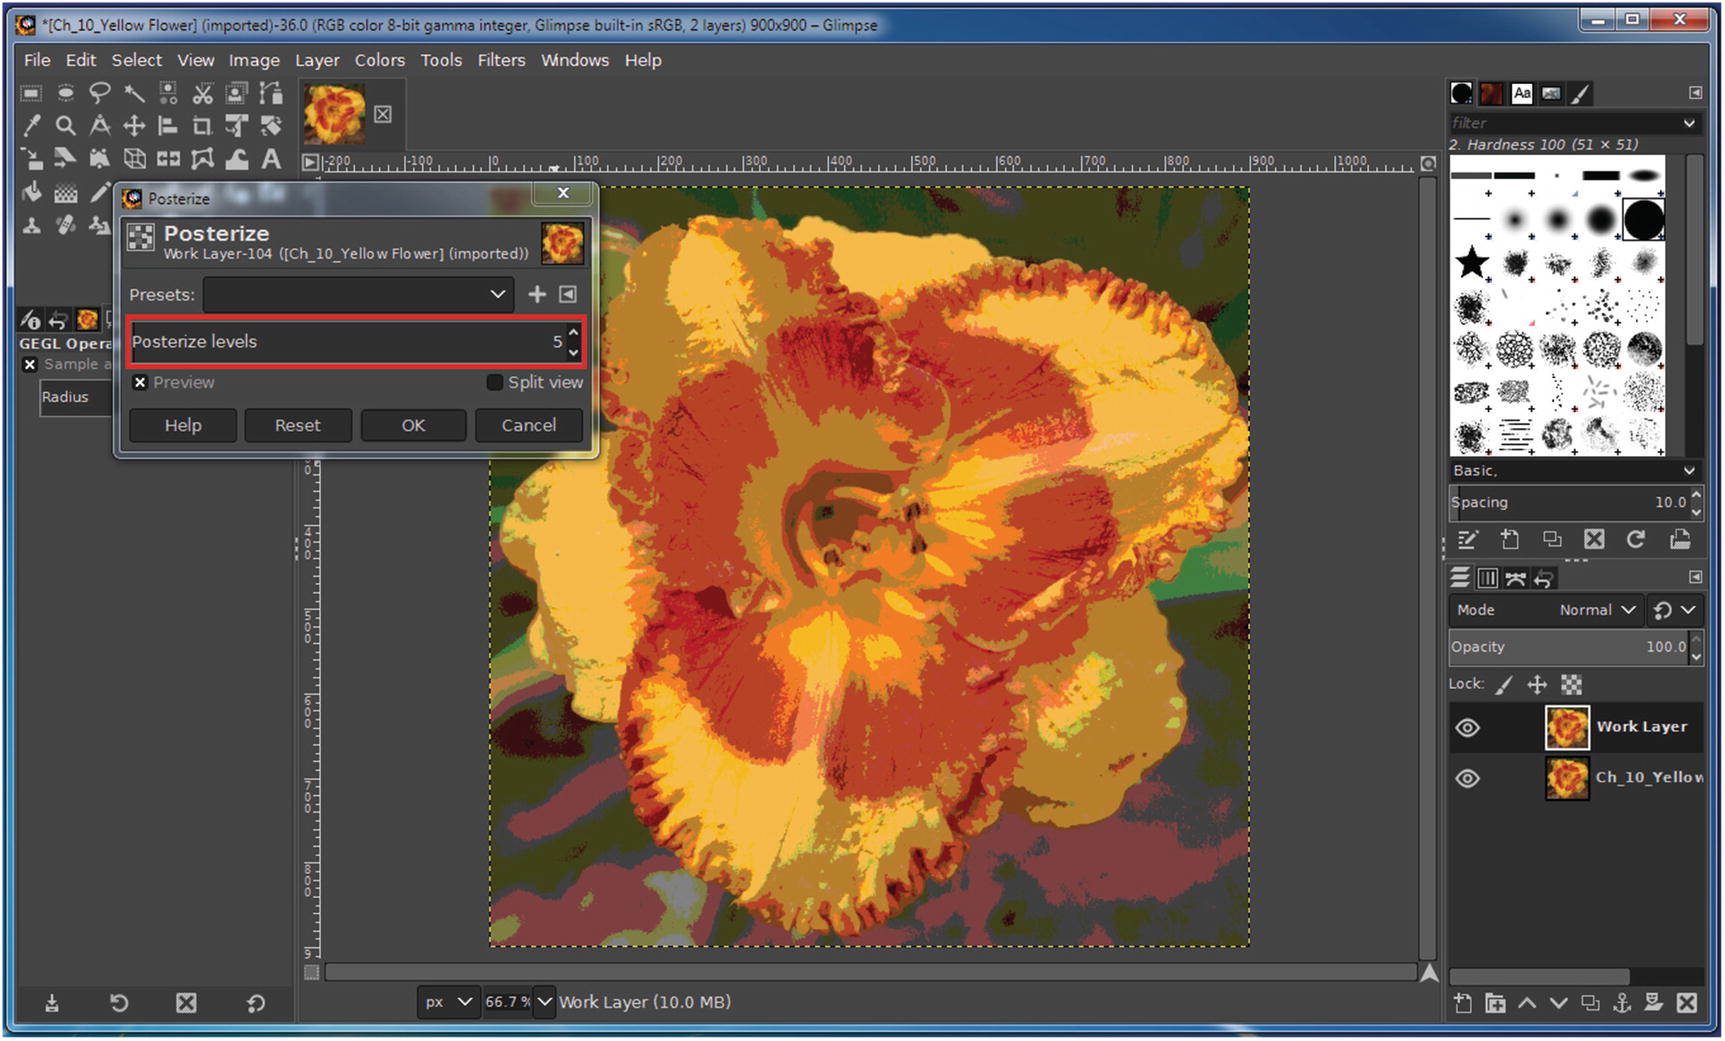
The Posterize levels set to 5
- 6.
Launch the Cartoon filter (Filter ➤ Artistic ➤ Cartoon).
- 7.Use the settings as follows (shown in Figure 10-8):
Mask radius—7.0
Percent black—0.200
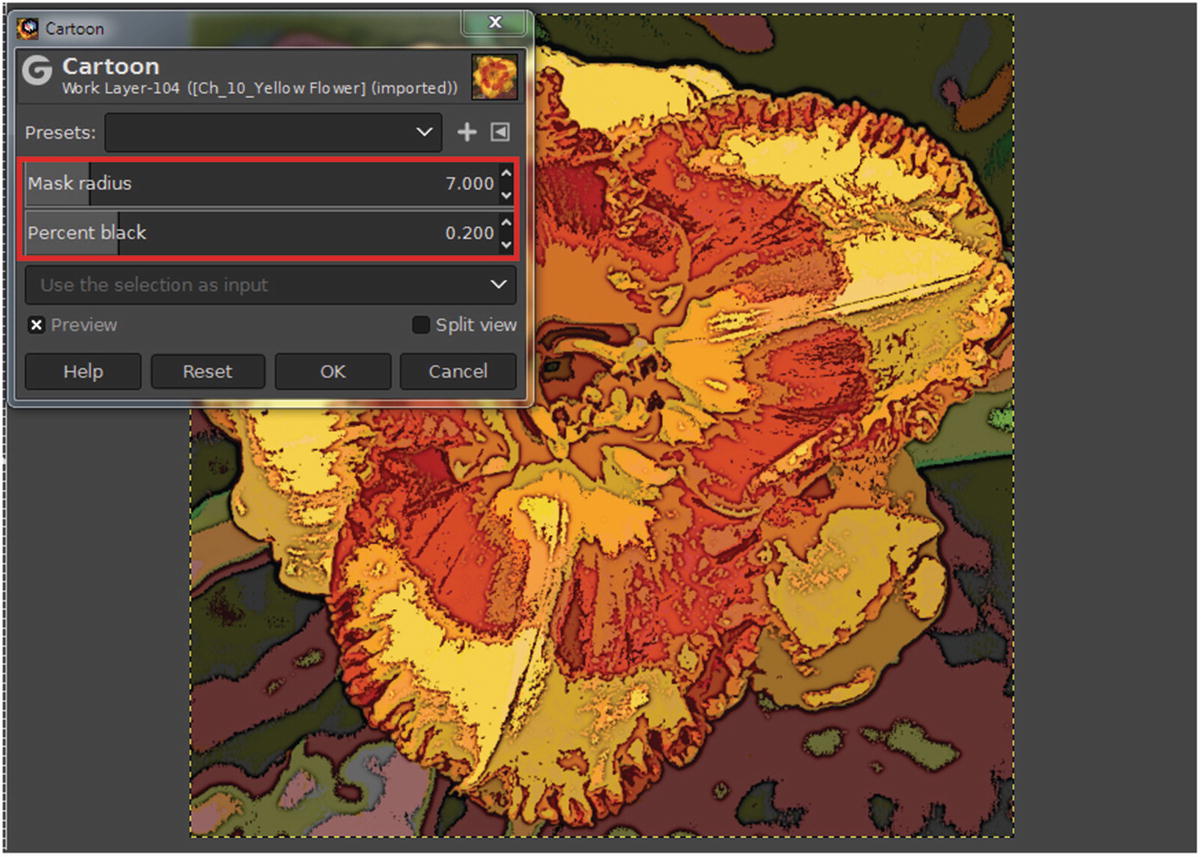
Use these values in the Cartoon dialog
- 8.
Figure 10-9 shows the before and after comparison. When done, you can save as an .XCF file if you want to keep the file, or simply close it out.
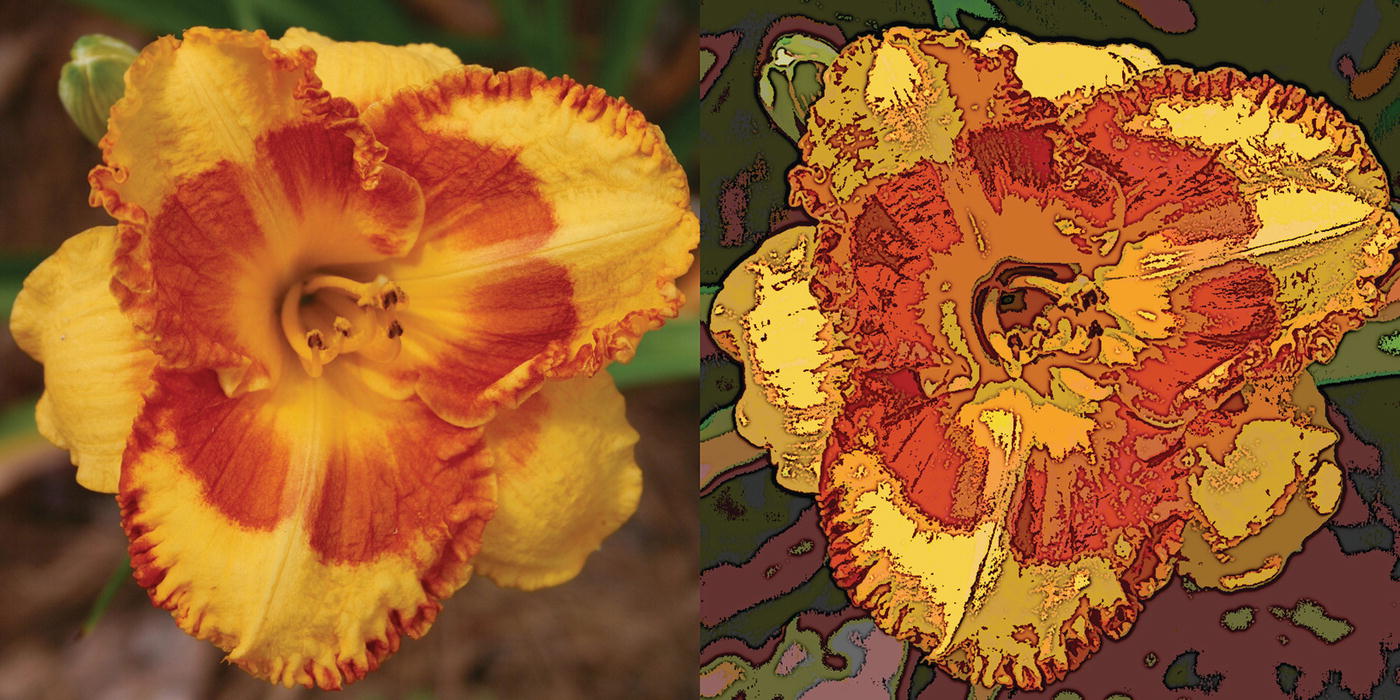
The before and after comparison
Tutorial 29: Turn a Photo into a Warhol-Like Painting
- 1.
Open the practice image Ch_10_Tropical_Birds in Glimpse.
- 2.
Launch the Posterize dialog (Colors ➤ Posterize). This will reduce the number of colors in the image, making it look more like a drawing than a photograph.
- 3.
Set the Posterize levels to 4, then click OK.
- 4.
Launch the Cartoon filter (Filter ➤ Artistic ➤ Cartoon).
- 5.

Use these values in the Cartoon dialog
- 6.Now we’ll need to expand the canvas (Image ➤ Canvas)—once the dialog is open (see Figure 10-11), set the values as follows:
Width: 200%
Height: 200%
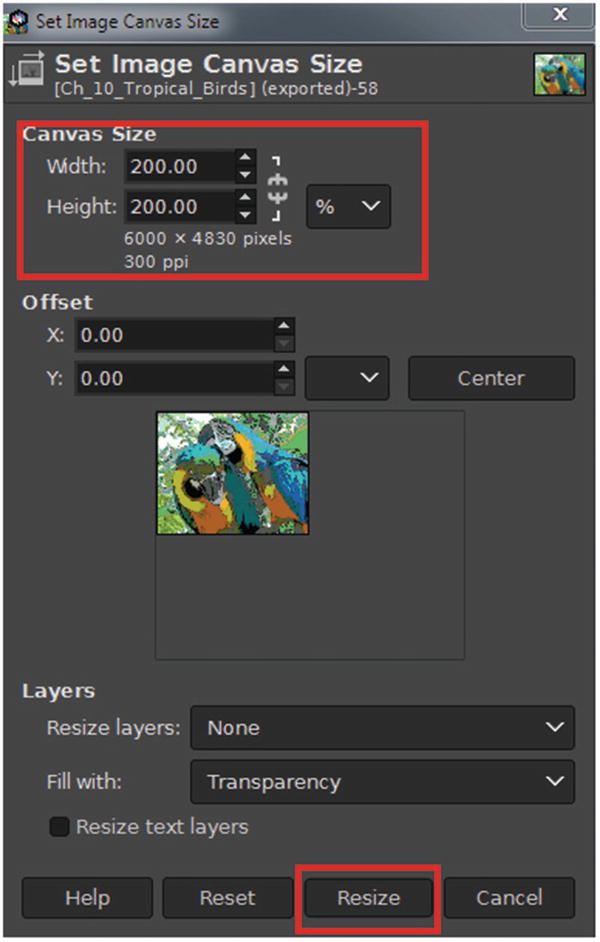
Set the canvas size (width and height 200%)
Click the Resize button after the size is set.
- 7.
Create three duplicates of the background layer (Right-Click ➤ Duplicate Layer)—you’ll need a total of four layers (Figure 10-12).
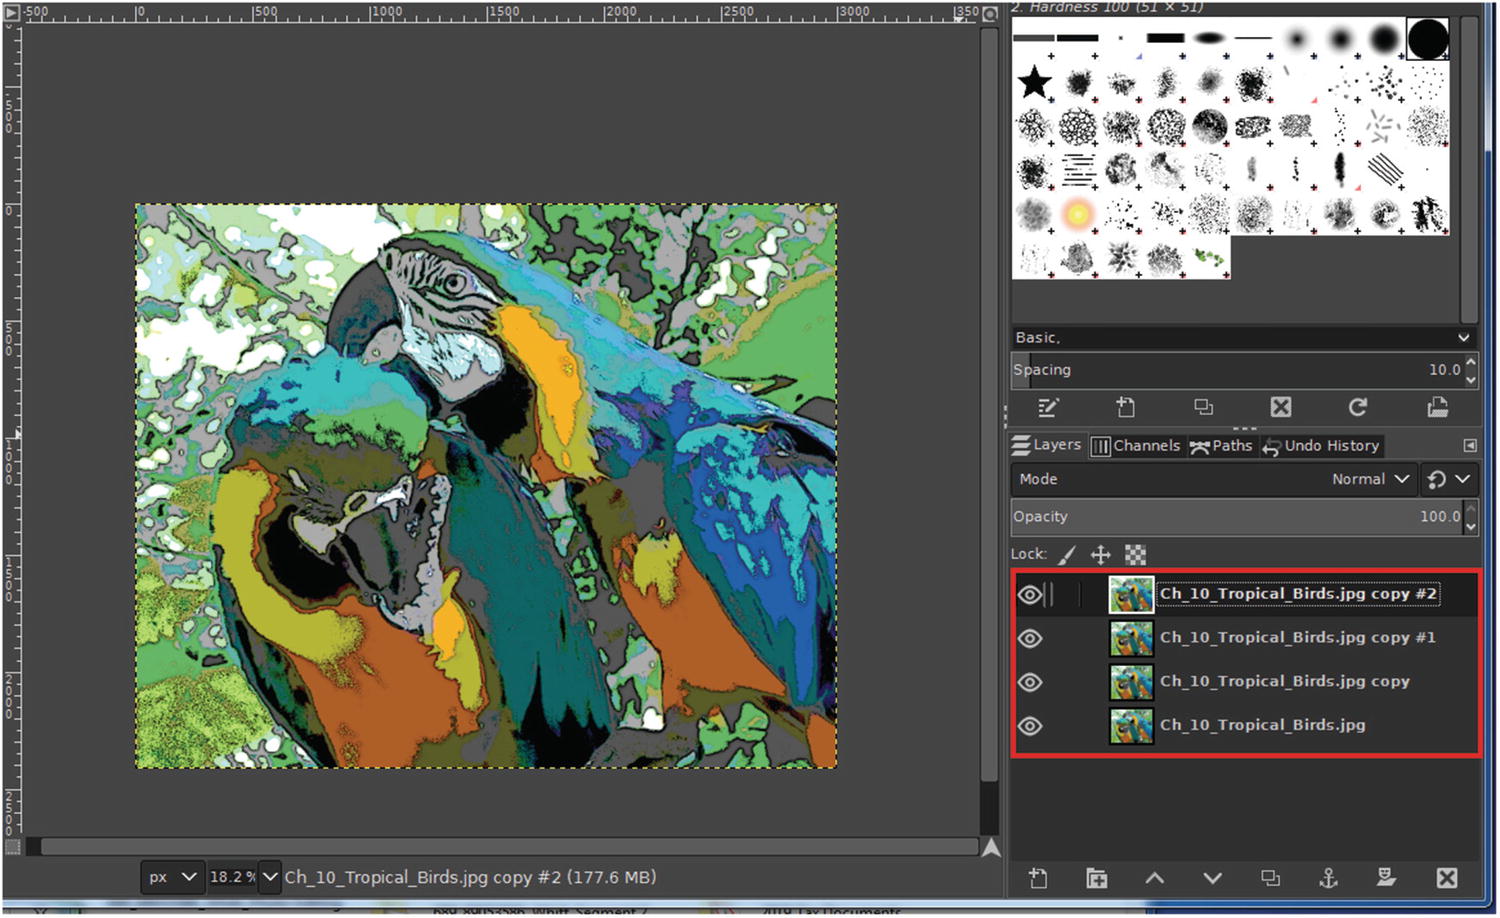
Duplicate the background layer until there is a total of four
- 8.Next, the layers will be put into place using the Alignment Tool; to do this, follow these steps (see Figure 10-13):
Click the Alignment Tool icon.
Click on top of the layer stack (indicated by a white node in each corner).
Click the layer thumbnail of the layer you want to move, then use the appropriate distribute buttons to put each layer in place.

Use the Alignment Tool to distribute each layer into place
- 9.
After the layers are in place, open the Hue-Saturation dialog (Colors ➤ Hue-Saturation). It will be used to change the hues in each layer.
- 10.
Click the layer thumbnail of the bottom left layer to make it active, and set the Hue slider to –180, then click OK (Figure 10-14).

Set the hue slider to –180 on the bottom left layer
- 11.
Repeat the steps on the top and bottom right side layers, using the values shown in Figure 10-15.
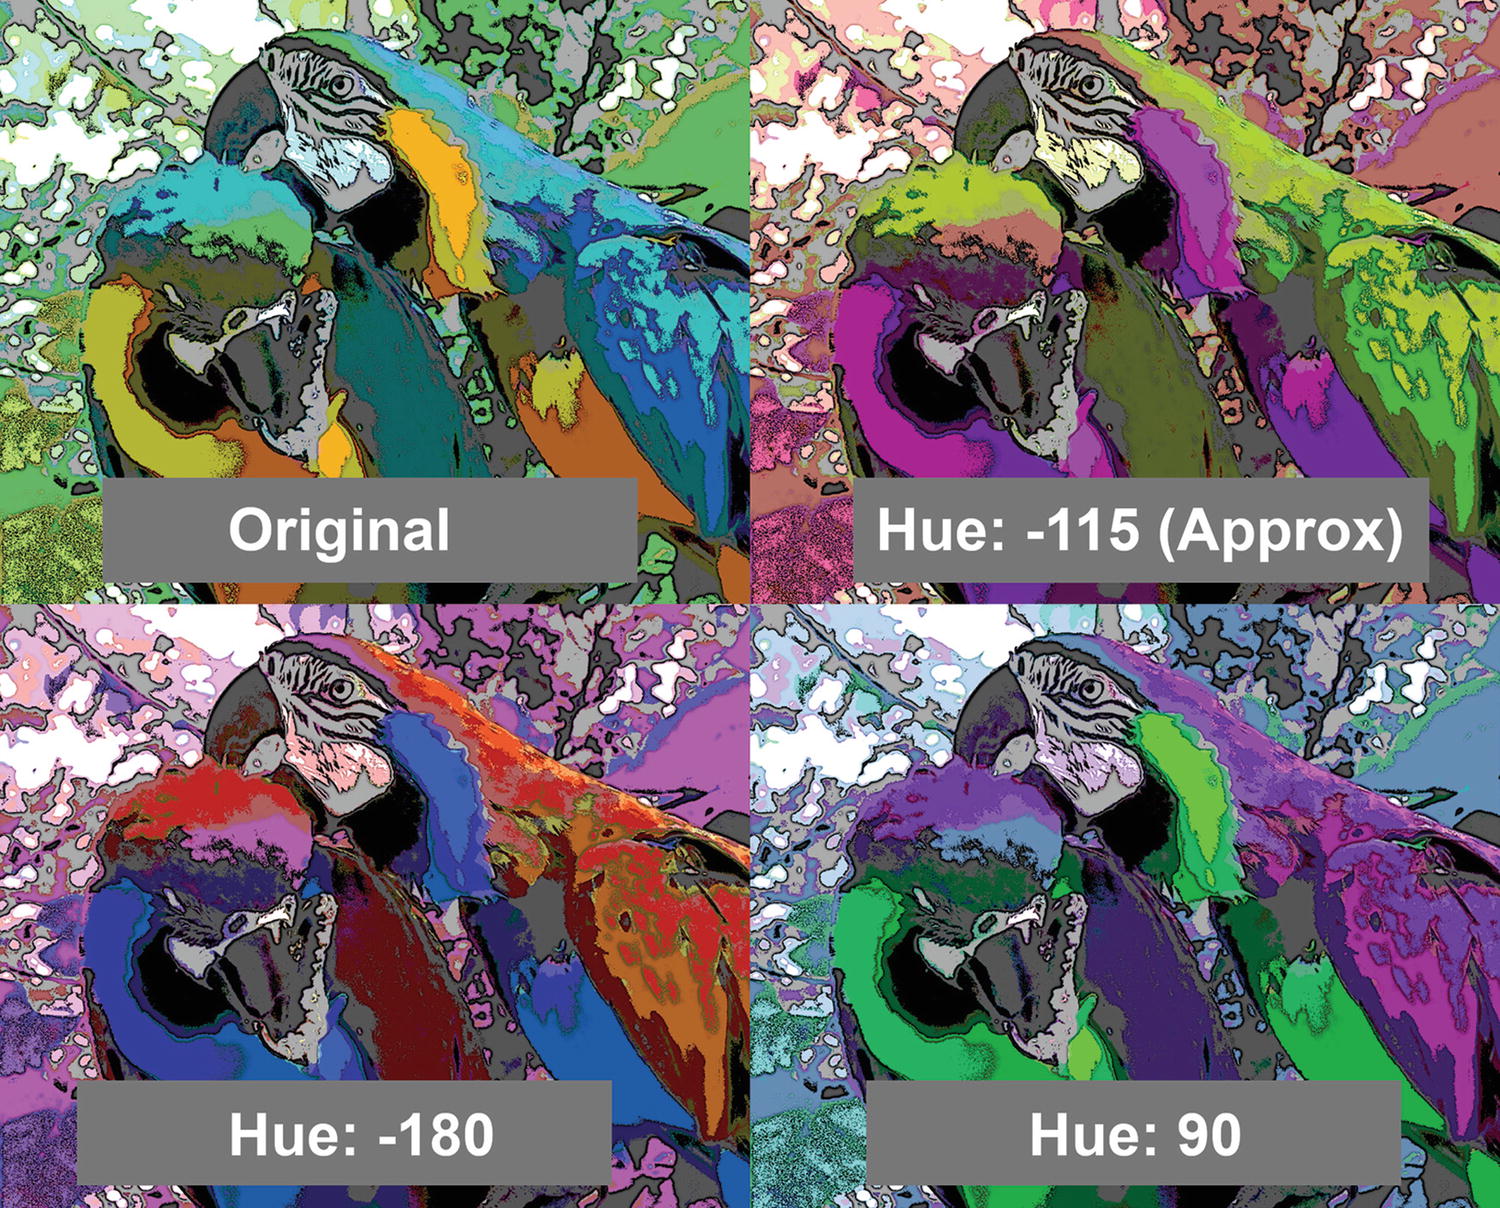
The hue value slider settings for each layer
- 12.
Figure 10-16 shows the final result. When done, you can save as an .XCF file if you want to keep the file, or simply close it out.

The final result
Tutorial 30: Combine Two Images to Create a Digital Mural
- 1.
Open the practice image Ch_10_Wooden_Fence in Glimpse.
- 2.
Open the practice image Ch_10_Red_Flower as a layer (File ➤ Open as Layers)—the image will open as a layer over the image of the wooden fence.
- 3.
Open the Posterize dialog (Colors ➤ Posterize) and set the Posterize levels to 4 (Figure 10-17), then click OK.
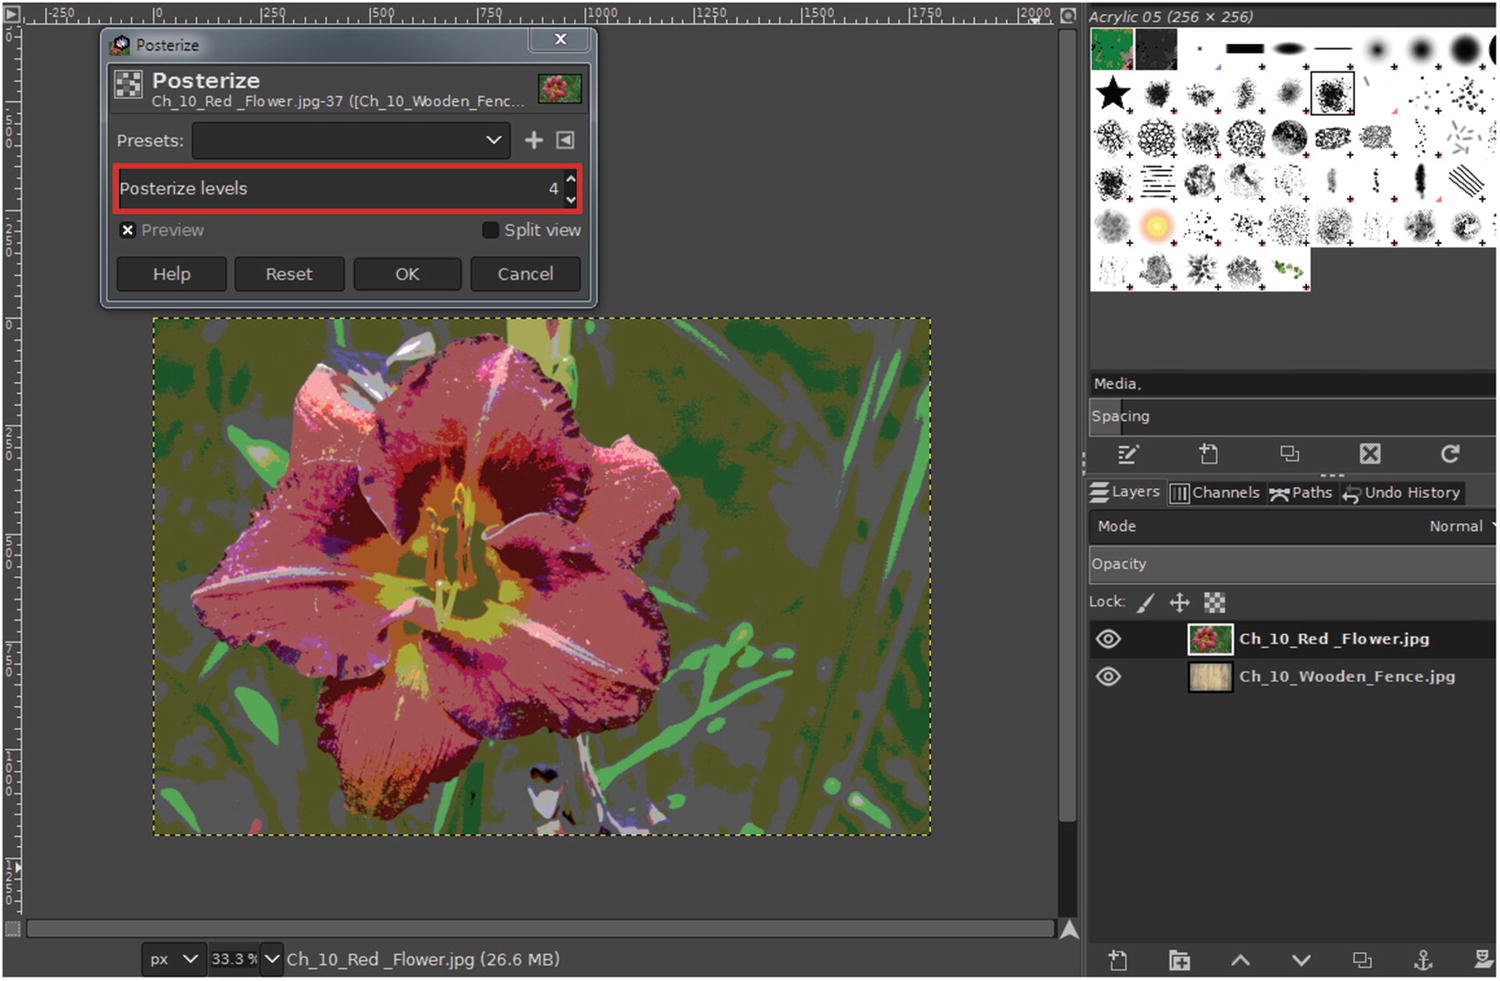
The Posterize levels set to 4
- 4.
Change the layer blend mode to Hard Light (Figure 10-18).
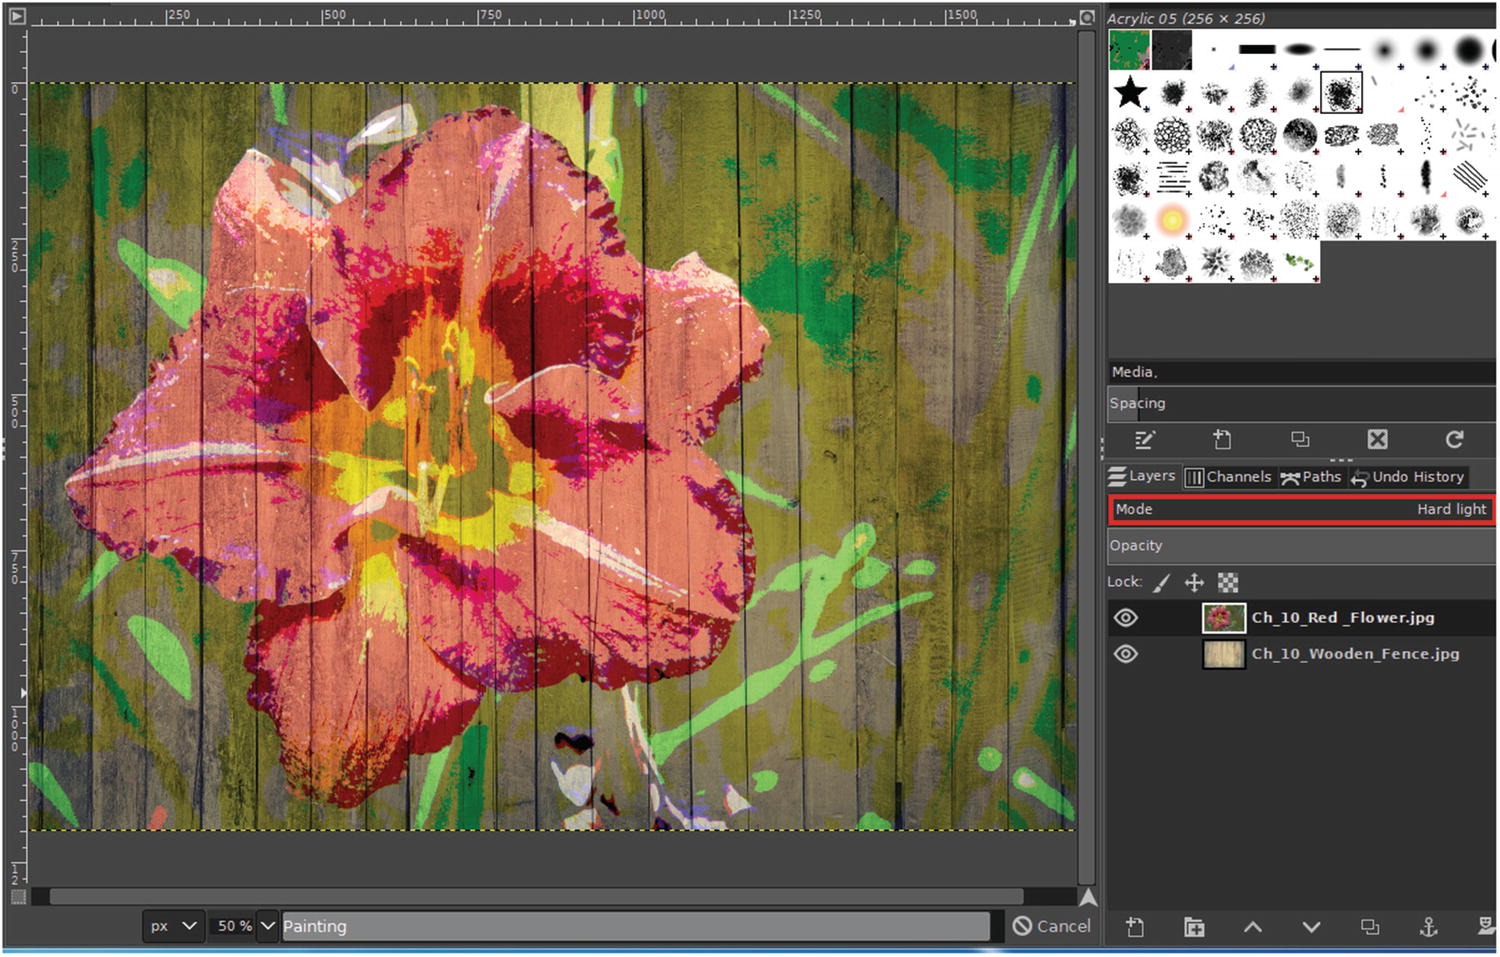
The layer blend mode changed to Hard Light
- 5.
Add a Layer Mask (Right-Click + Add Layer Mask)—when the dialog opens, initialize the Layer Mask to white (Figure 10-19).

A Layer Mask initialized to white added to the layer
- 6.
Click the Paintbrush Tool (P) and select the Acrylic 01 brush tip.
- 7.
Increase the brush size to about 850 pixels (between 800 and 900 is fine)—decrease the opacity to about 25% (Figure 10-20).

The brush tip opacity set to almost 25% and the size changed to almost 870 pixels
- 8.
Click the layer mask thumbnail to make the layer mask active.
- 9.
Place the brush tip in the area shown in Figure 10-21, and click once or twice—this will increase transparency where the brush is applied, and create a slight weatherworn look in that area of the image. You may want to experiment some by applying the effect in other areas or adjusting the brush opacity.

Creating a slight “weatherworn” effect
- 10.
Now, we’ll apply a slight blur to smooth the jagged edges caused by the Posterization effect. Click the layer thumbnail to make the layer active, then open the Gaussian Blur dialog (Filter ➤ Blur ➤ Gaussian Blur); set the X and Y blur values to 1.0, then click OK (Figure 10-22).

Applying a slight blur to smooth out jagged edges
- 11.
Click the layer mask thumbnail to make the layer mask active.
- 12.
Paint between the fence slats (with black) using a small, soft brush (4–7 pixels in diameter) to remove excess color that appears between the slats (Figure 10-23).
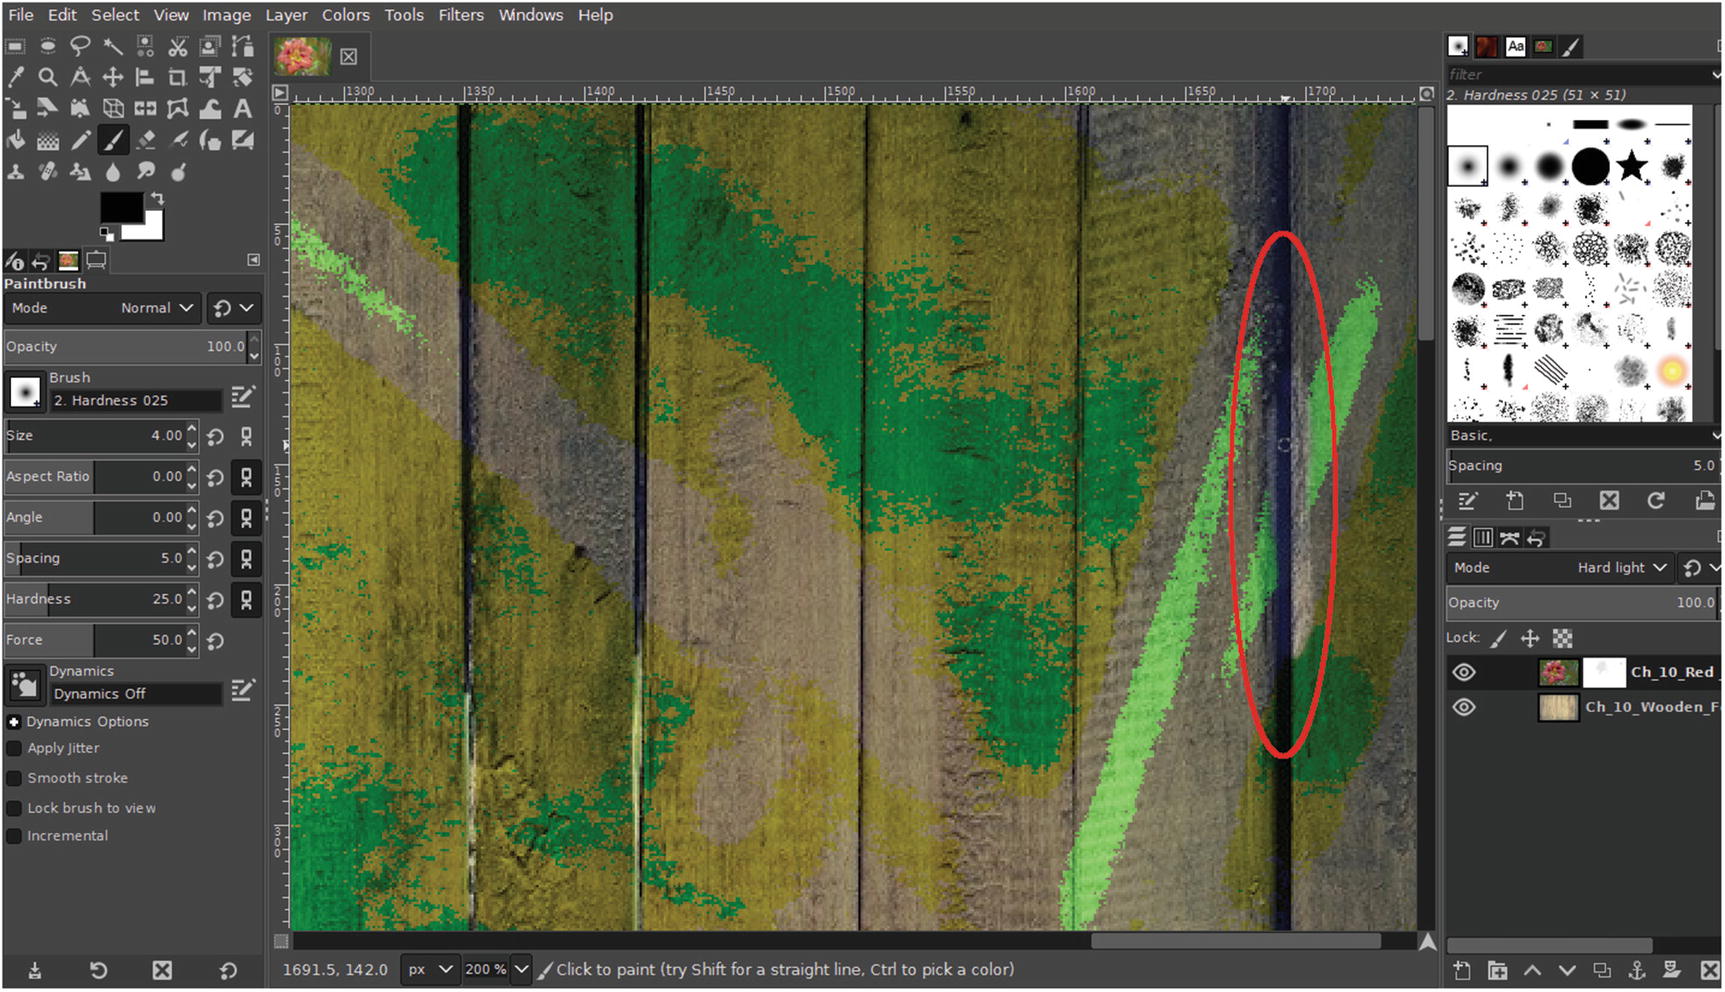
With the layer mask active, paint between the slats to remove excess color
- 13.
Figure 10-24 shows the final result. When done, you can save as an .XCF file if you want to keep the file, or simply close it out.

The final result
Chapter Conclusion
This chapter provided several lessons in which artistic filters (and other functions) were used to turn digital photos into works of art.
Turning a photo into a digital oil painting
Turning a photo into a digital watercolor painting
Turning a photo into a digital pen and ink drawing
Turning a photo into a “Warhol-like” creation
Combining two photos to create a digital mural
Congratulations! We covered a lot of ground in this book, and I hope you learned a lot. Glimpse is a powerful editing tool, and I encourage you to continue learning and growing using this program.