In this chapter, we’ll create some basic digital artwork using mostly selection tools, and filling the selections with various colors, gradients, and patterns. If you have little or no experience in creating graphics, this chapter will serve as an introduction.
Raster vs. vector drawing
Tutorial 23: Creating a sunny sky
Tutorial 24: Creating a scenic sunset
Tutorial 25: Drawing a retro TV set
Chapter conclusion
Raster vs. Vector Drawing
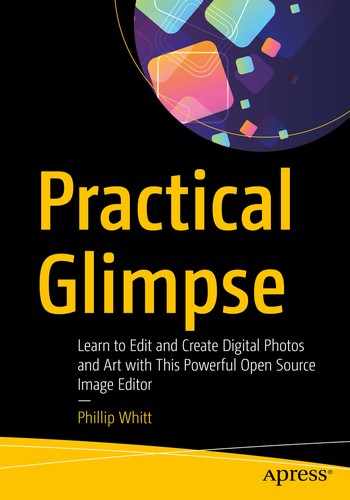
Raster graphics can lose sharpness when enlarged
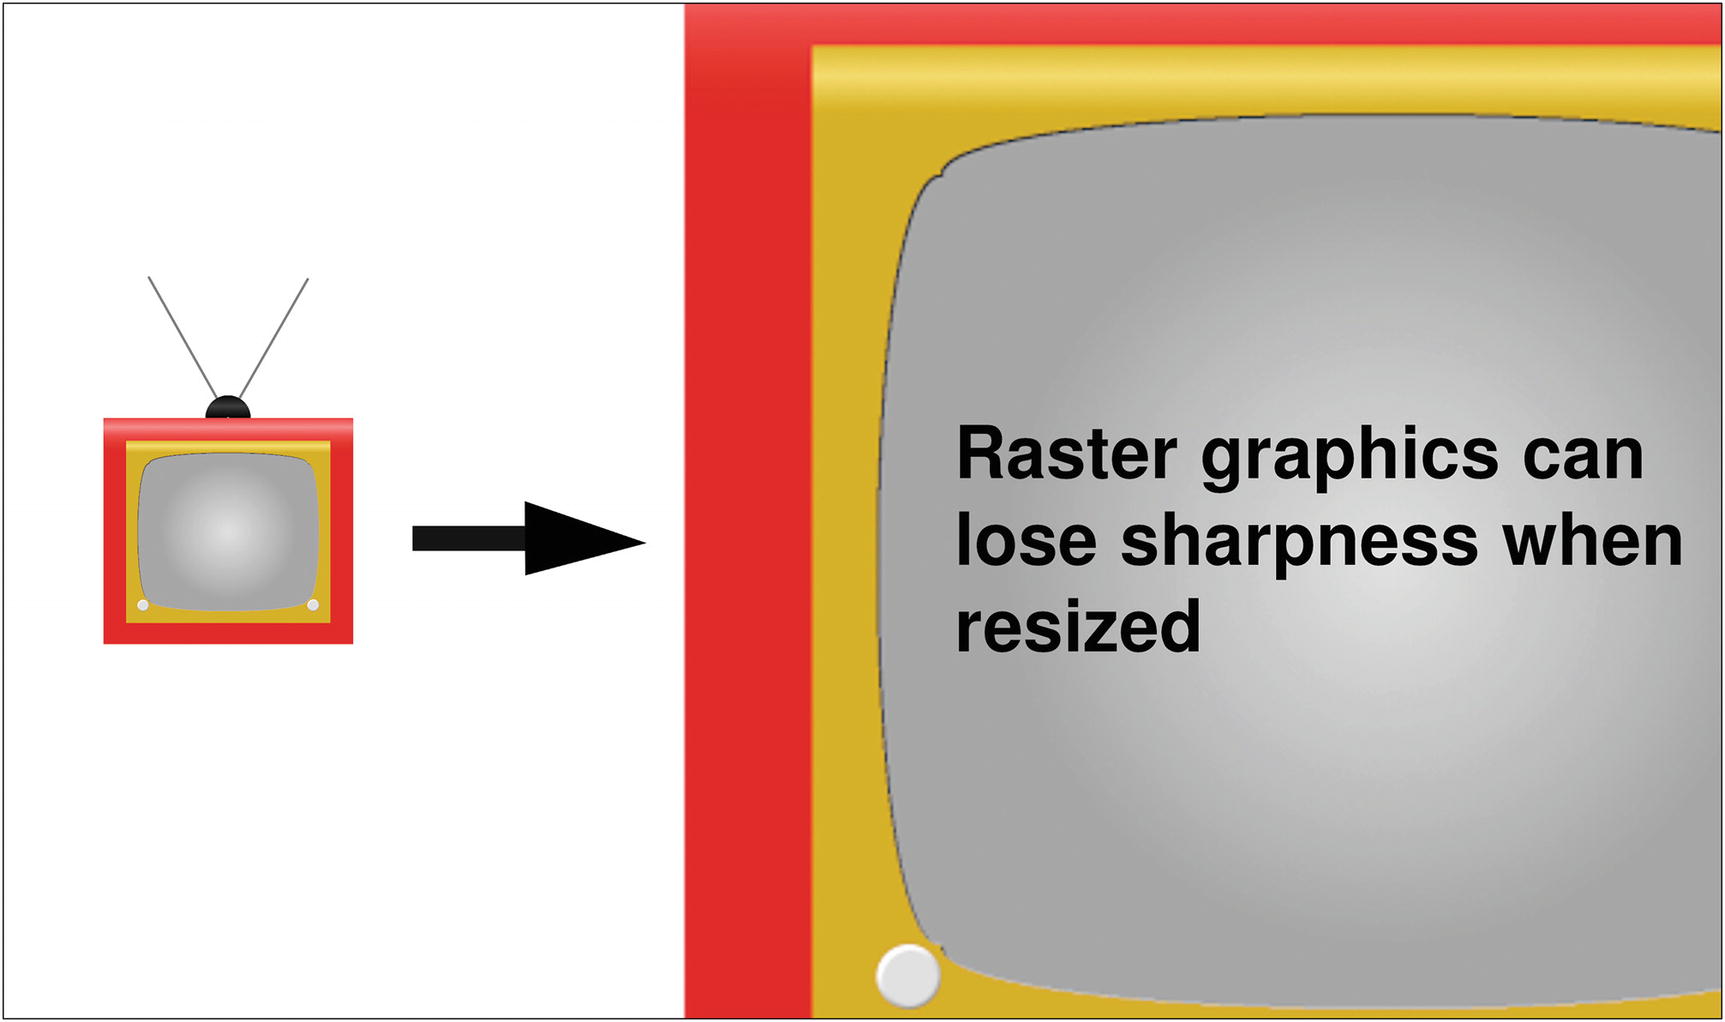
Vector graphics (such as those created by programs like Inkscape, Adobe Illustrator, or Corel Draw) are composed of lines and paths which are scalable; they can be resized without loss of sharpness.
Vector graphics are scalable, meaning they remain sharp no matter how much they are resized
Of course, raster graphics still have practical use, and Glimpse is a great program for beginners to learn drawing basics. It also provides a means for nonprofessional graphic designers to create them on occasion—especially if resizing the graphic isn’t an issue.
For exampsle, even though I’m trained in both photo editing and graphic design, I work with digital photographs (which are raster images) far more often than digital drawings or illustrations. However, there are times I need to create graphics for a specific purpose.
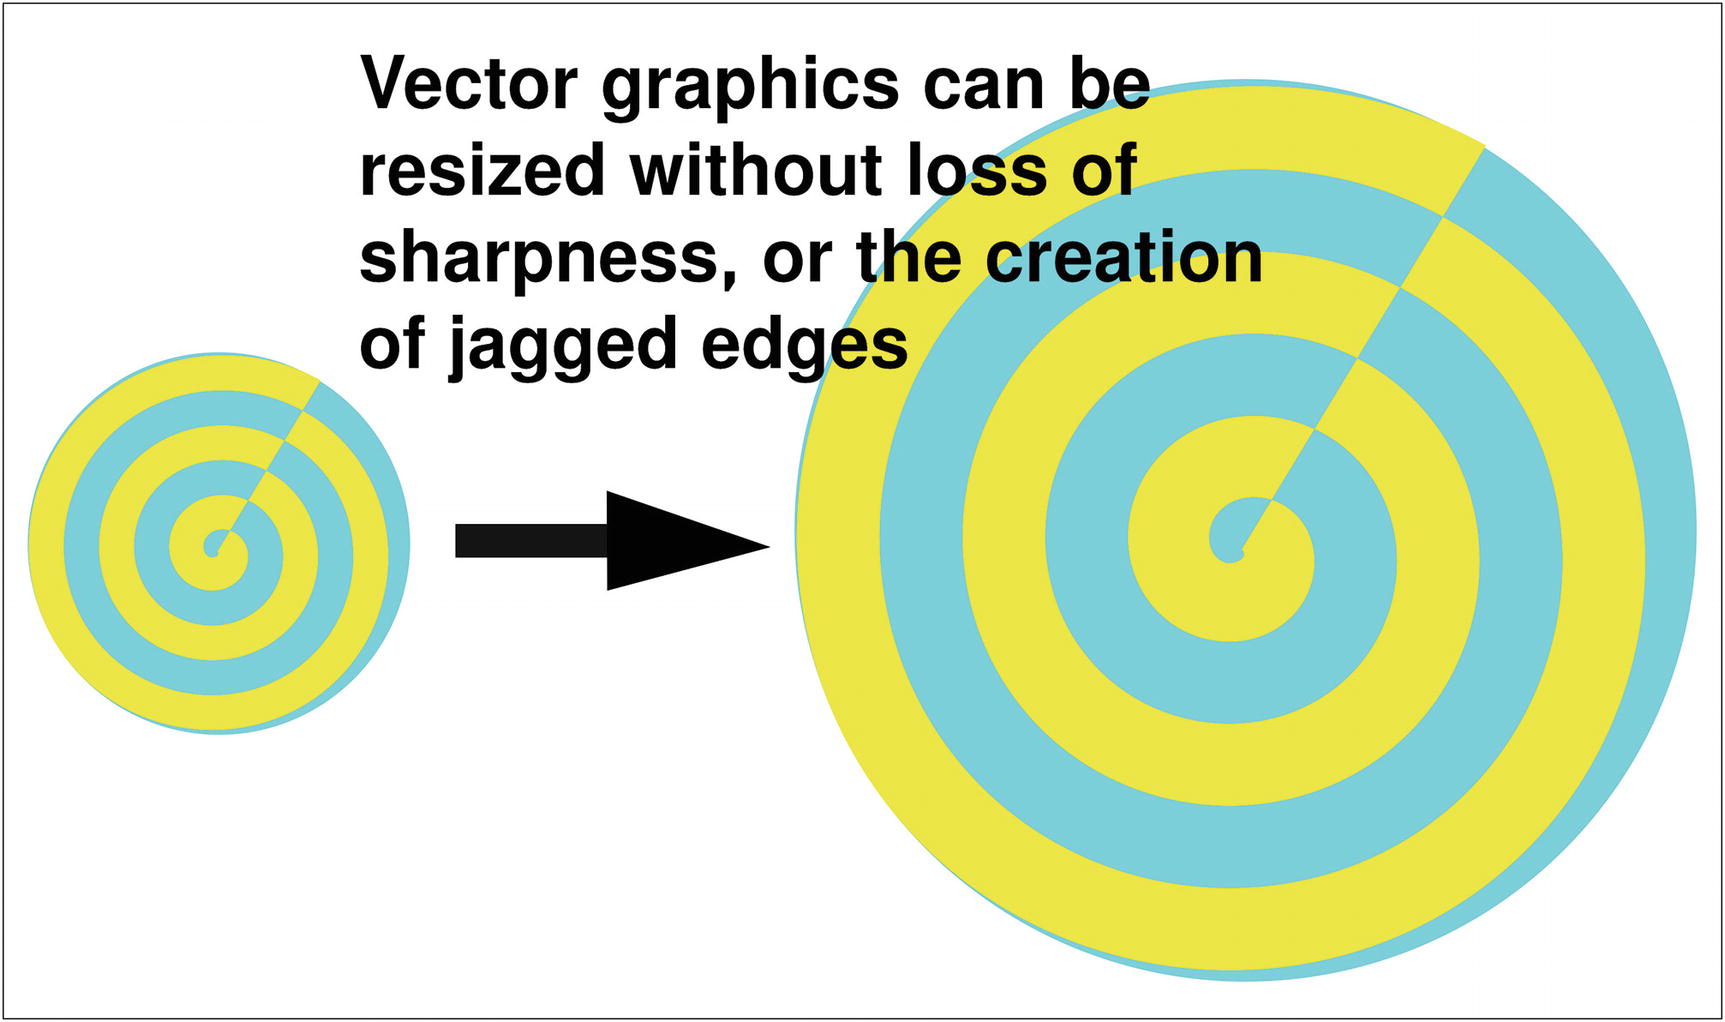
Here’s a case in point; in 2019, I authored a video tutorial for Apress Publishing titled Digitizing and Enhancing Vintage Media with Adobe Photoshop Elements and Premier Elements. As the long title suggests, it’s about digitally preserving and improving vintage media, such as old photographs, slides, and home movies.
Because some of the equipment required for working with old home movies can still be acquired but is no longer manufactured, stock photos aren’t readily available. I had a deadline to meet, so it was necessary for me to create graphics to illustrate several slides used in the production.
This graphic for use in a presentation was created with GNU Image Manipulation Program (on which Glimpse is based)
As mentioned earlier, Glimpse is mainly for editing digital photographs, but it can be used to produce nice raster graphics—ideal for beginners, or those who need to create non-scalable illustrations on occasion.
Tutorial 23: Creating a Sunny Sky
- 1.
First , let’s change the background color to a blue for the sky. Click the active background color to launch the Change Background Color dialog—change red to 24.8%, green to 57.3%, and blue to 100%, then press OK (Figure 9-4).
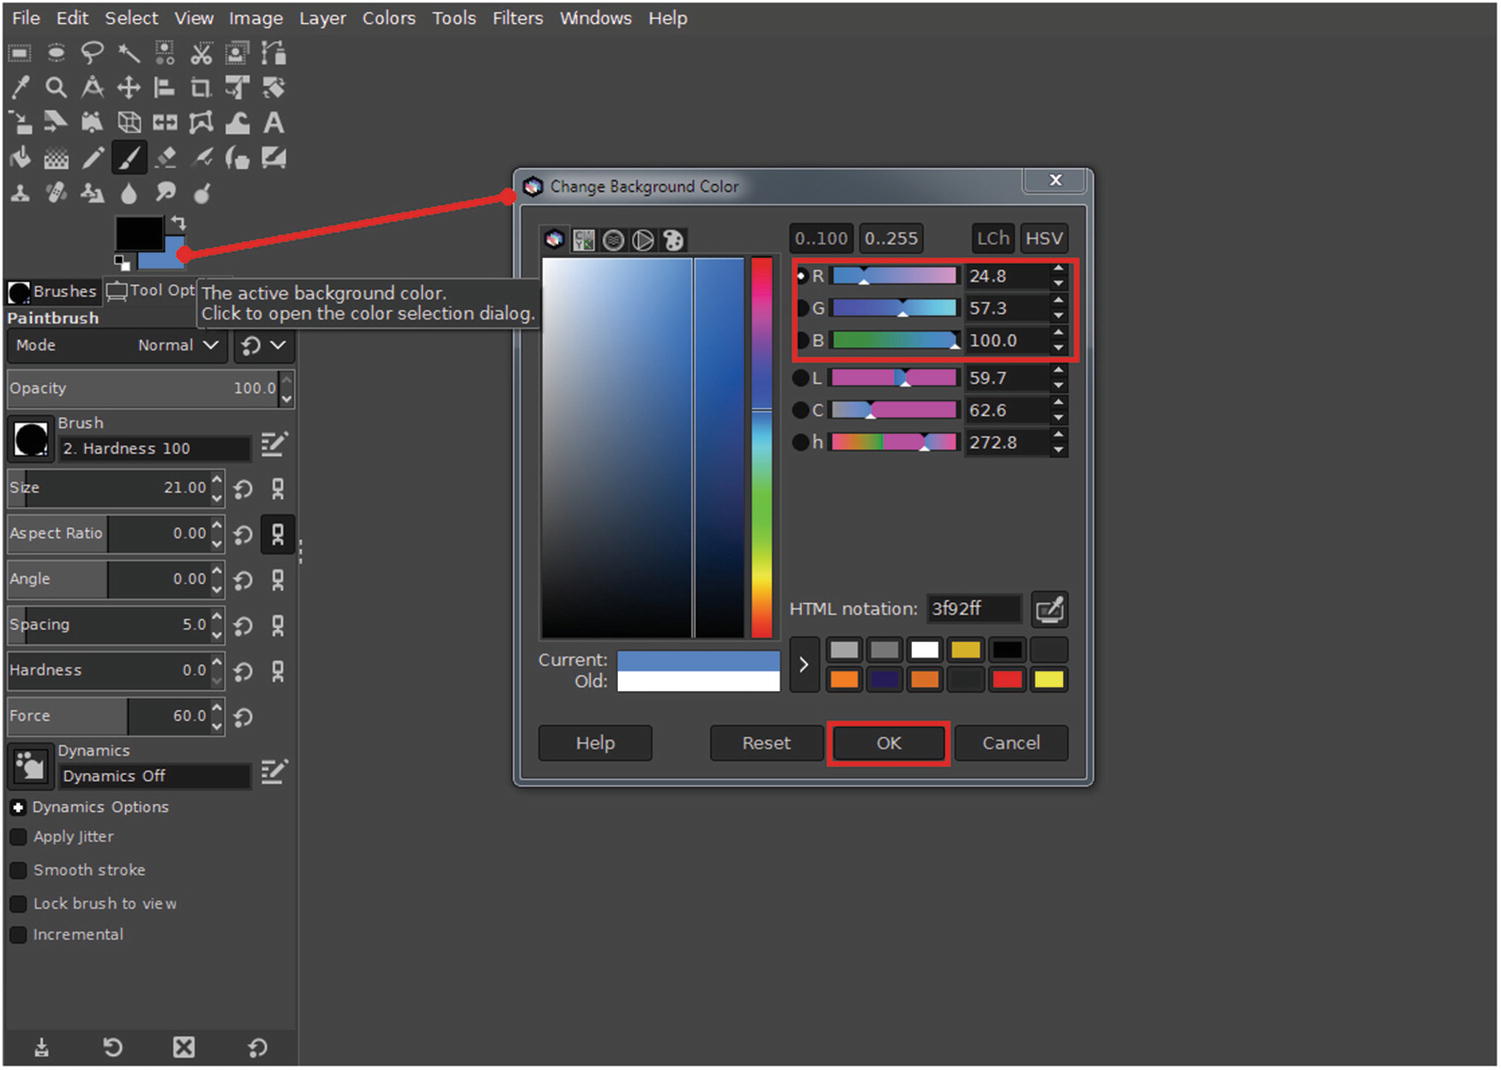
Set the background color as shown
- 2.
You’ll need to create a new blank image (File ➤ New)—when the Create a New Image dialog launches, set the dimensions to 10 inches by 8 inches. Set the x/y resolutions to 300 ppi, then press OK (Figure 9-5).

Set the dimensions and x/y resolutions as shown
- 3.
After the new image is created, place a vertical guide at the 5” mark and a horizontal guide at the 4” mark—they should intersect in the exact center (Figure 9-6).

Place guides in image as shown
- 4.
Create a new layer (Layer ➤ New Layer), and in the New Layer dialog, rename it Rays, then press OK.
- 5.
Change the foreground color to yellow by clicking in the active foreground color to launch the Change Foreground Color dialog—change red to 100%, green to 100%, and blue to 0%, then press OK (Figure 9-7).
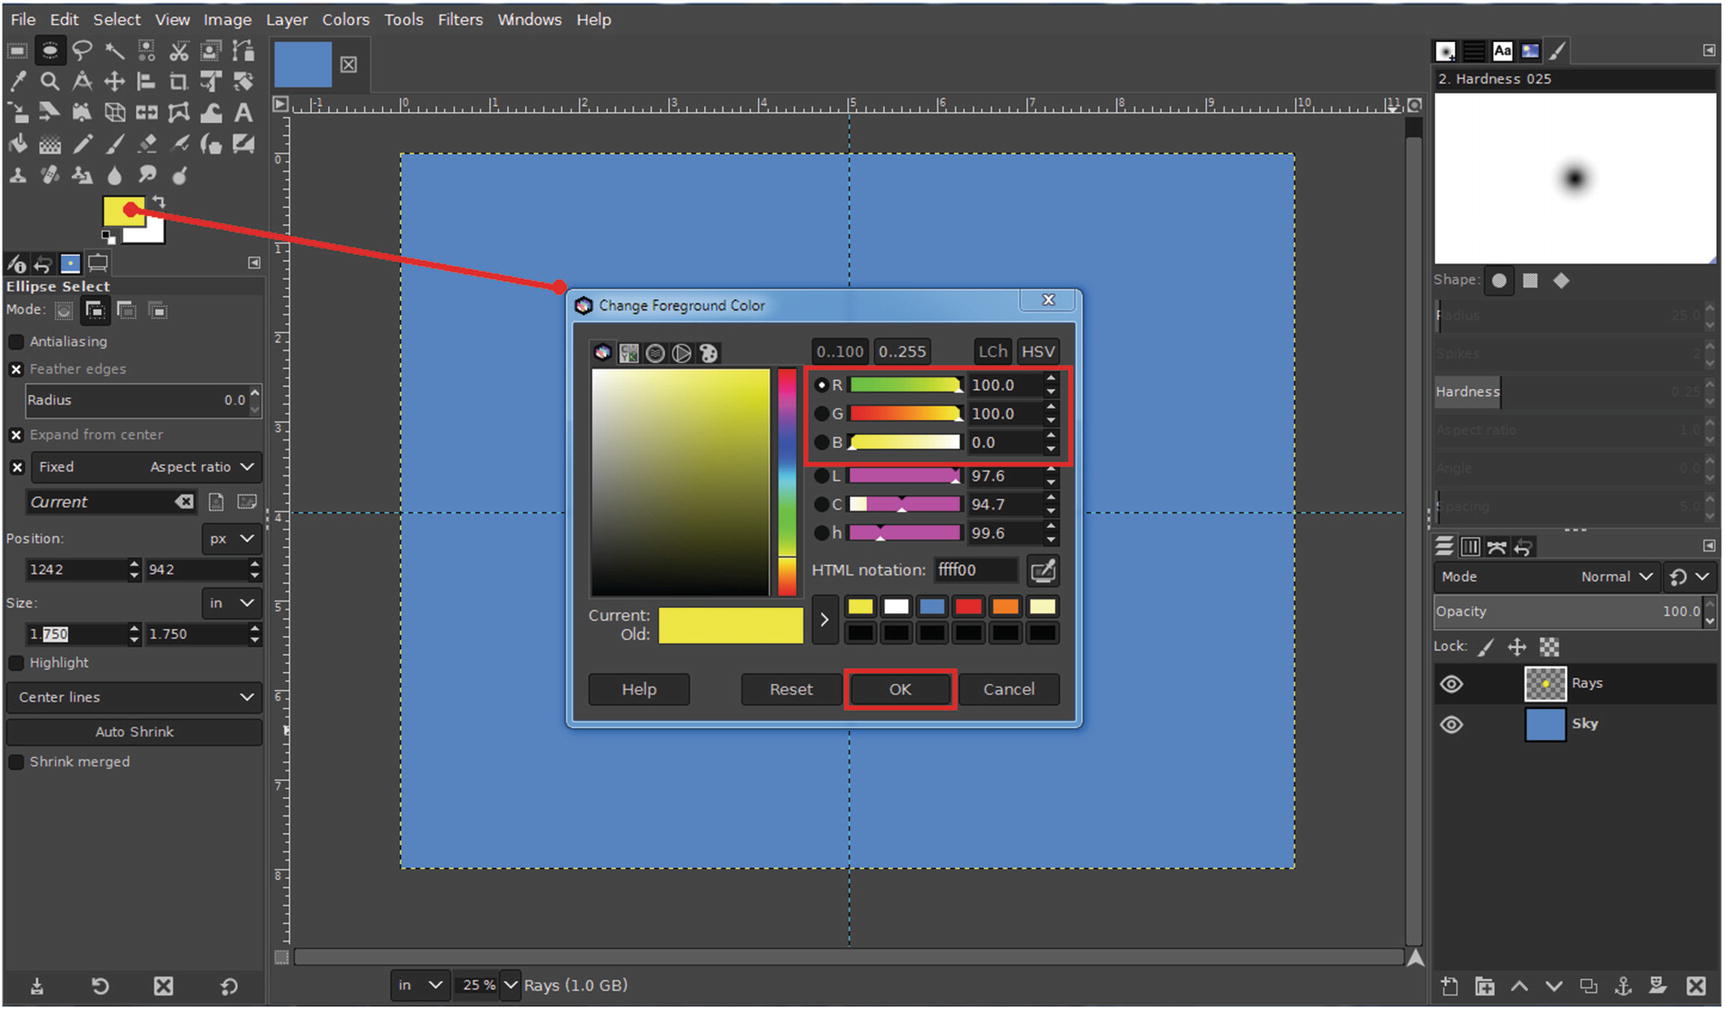
Set the foreground color as shown
- 6.
Using the Ellipse Select Tool (E), we’ll draw a circle in the center of the image on the layer named Rays.
- 7.
With the Antialiasing box ticked, Expand from center, and Fixed (Aspect Ratio) boxes ticked, click and drag from the intersection point of the guides and make a circular selection about 2” in diameter (Figure 9-8).
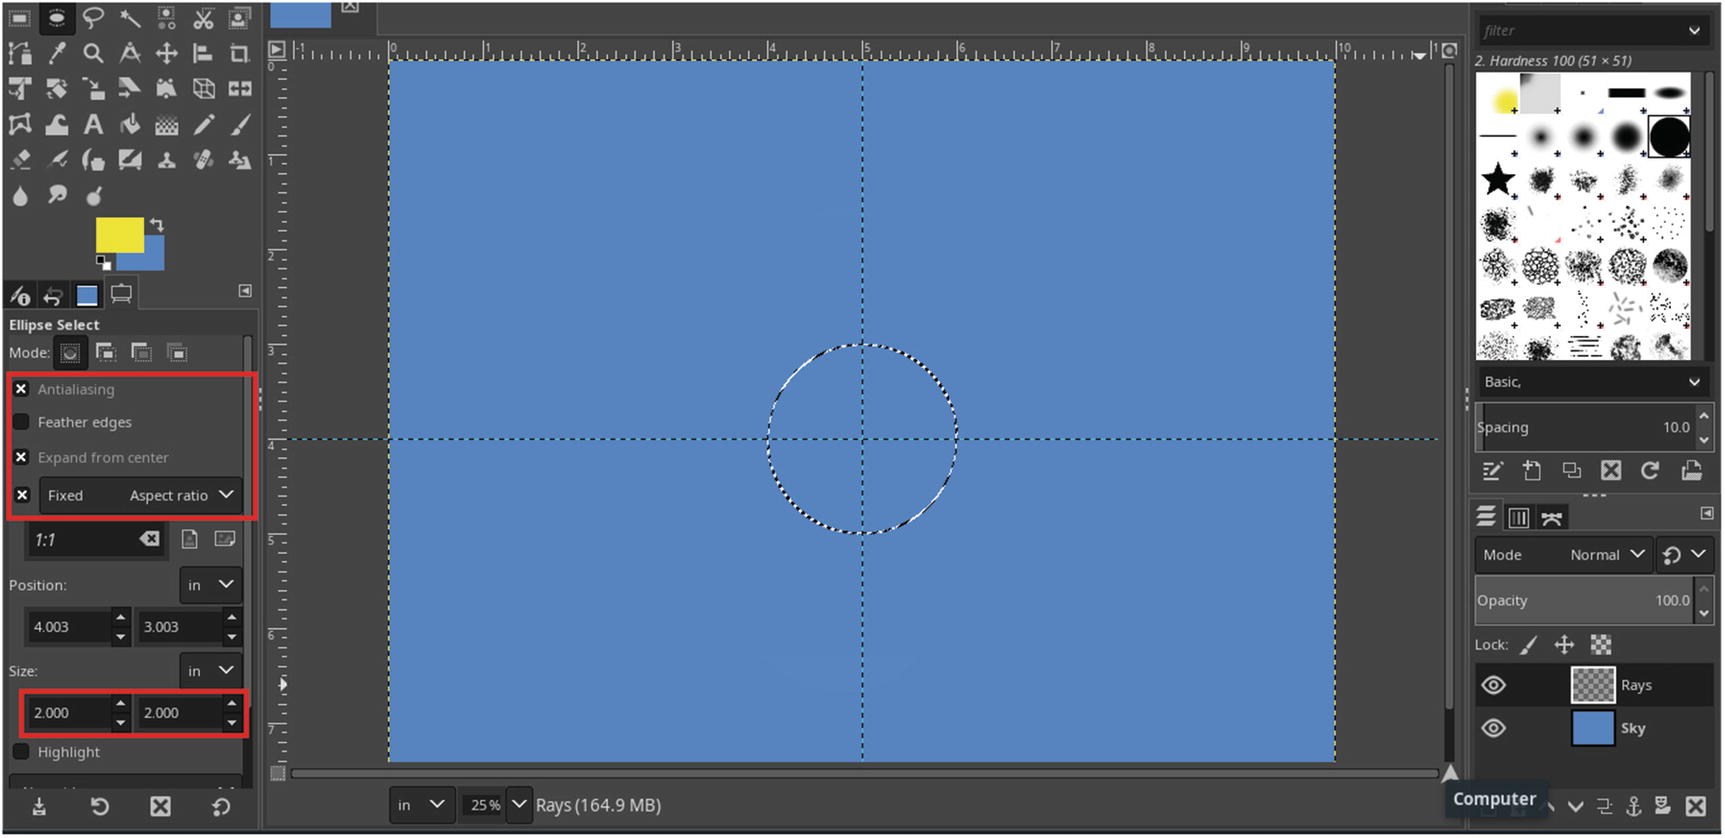
Make a circular selection about 2” in diameter as shown
- 8.
Fill the circular selection with the (yellow) foreground color (Edit ➤ Fill with FG Color).
- 9.
Deactivate the selection (Selection ➤ None).
- 10.
Open the Gaussian Blur dialog (Filters ➤ Blur ➤ Gaussian Blur).
- 11.
Set the x/y sizes to 100, then click OK (Figure 9-9).

Set the Gaussian Blur to 100 on the x/y sizes
- 12.
Select the Pencil Tool (N)—choose the 2. Hardness 100 brush, and make the thickness 5 pixels.
- 13.
While holding the Shift key, draw a total of 8 lines around the blurred circle on the layer named Rays, intersecting in the center as shown in Figure 9-10—imagine cutting a pie into 16 pieces.

While holding down the Shift key, use the Pencil Tool (N) to draw lines as shown
- 14.
Open the Gaussian Blur dialog (Filters ➤ Blur ➤ Gaussian Blur).
- 15.
Set the x/y sizes to 25–27, then click OK—this will blur the lines to create the sun rays (Figure 9-11).

Use the Gaussian Blur dialog to blur the lines, creating the sun rays
- 16.
Create a new layer (Layer ➤ New Layer) and name it Inner Orb.
- 17.
Using the Ellipse Select Tool (E), we’ll draw a circle in the center of the sun illustration on the new layer.
- 18.
With the Feather Edges radius set to 25, click and drag from the center and make a selection about 1” in diameter and fill it with white (Figure 9-12).

Make a white circle as shown
- 19.
Deactivate the selection (Select ➤ None).
- 20.
Open the Gaussian Blur dialog (Filters ➤ Blur ➤ Gaussian Blur).
- 21.
Set the x/y sizes to 50, then click OK.
- 22.
Merge the Inner Orb layer down onto the Rays layer (Right-Click ➤ Merge Down).
- 23.
Use the Move Tool (M) to move the newly merged layer to the center of the upper left quadrant.
- 24.
Merge the layer onto the background (Sky) layer (Right-Click + Merge Down).
- 25.
Select the Paintbrush Tool (P) and choose the Smoke tip—increase the brush size to about 2700 pixels (it can be close).
- 26.
Using white as the active color, click to dab clouds in the areas shown in Figure 9-13.

Use the Smoke brush tip to paint in clouds
- 27.
Finally, we’ll add a lens flare for added effect—open the Lens Flare dialog (Filters ➤ Light and Shadow ➤ Lens Flare) and set the x/y positions at 0.75, then click OK (Figure 9-14).
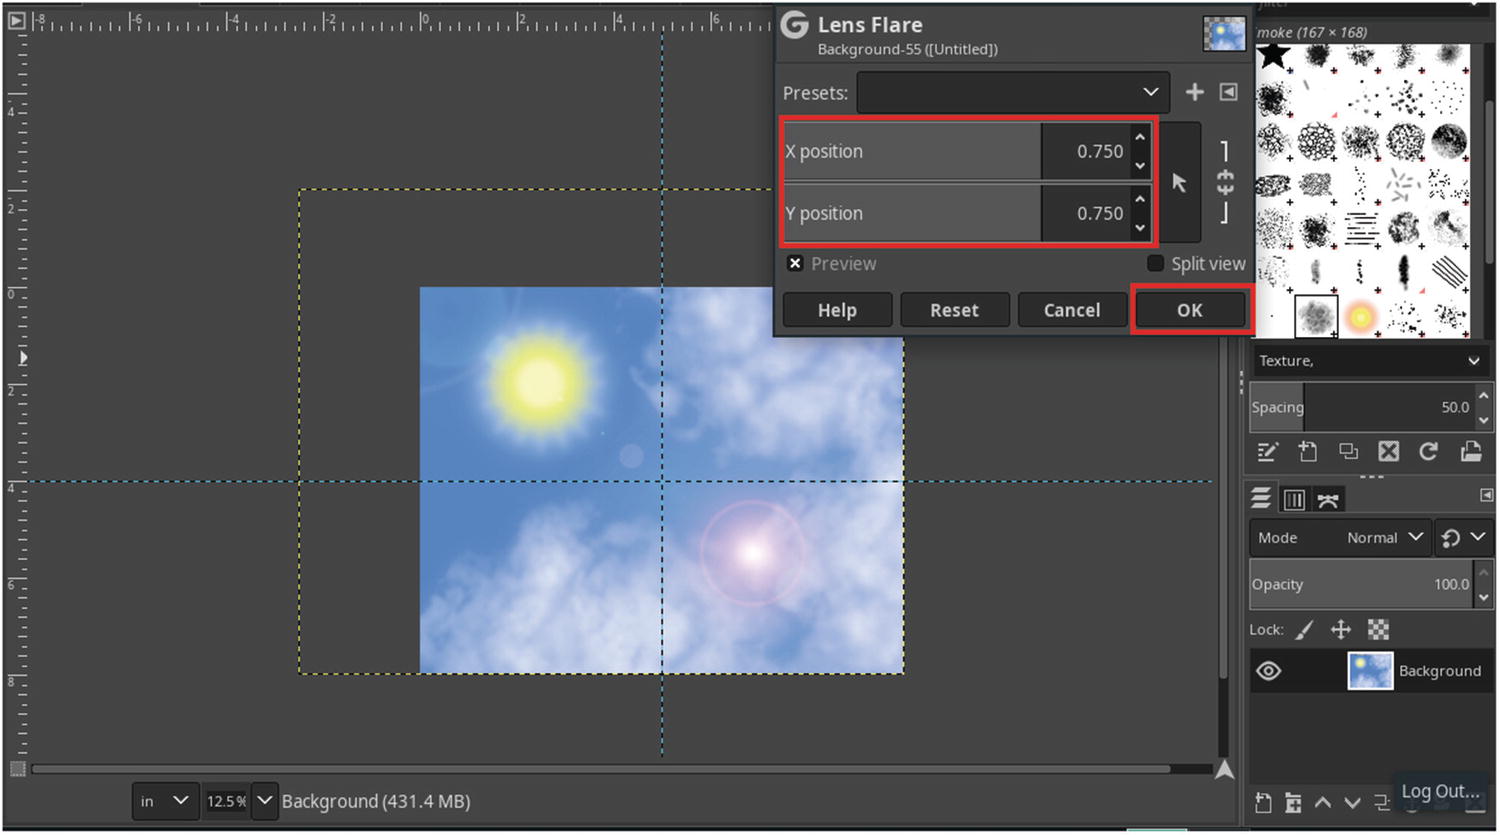
Applying a Lens Flare filter for added effect

The final result
Tutorial 24: Creating a Scenic Sunset
In this tutorial, we’ll create a depiction of a sunset over a mountain range.
- 1.
Create a new image (File ➤ New ➤ Create a New Image)—set the dimensions to 10" × 8" at 300 ppi—rename the background layer Sunset Background.
- 2.
Set the foreground color to an orange hue (R-100, G-50.2, B-0.00) and the background color to a yellow hue (R-89.4, G-89.4, B-0.00).
- 3.
Using the Gradient Tool set to Linear, draw a transition from orange to yellow as shown in Figure 9-16.

Creating a transition from orange to yellow
- 4.
Create a new layer (Layer ➤ New Layer) and name it Sun.
- 5.Using the Ellipse Select Tool, make a circular selection about 5" in diameter placed in the lower portion as shown in Figure 9-17—make sure to use the following settings:
Feather Edges-Radius-25
Expand from center
Aspect ratio-fixed

Make a circular selection as shown
- 6.
Fill the selection with the orange foreground color (Edit ➤ Fill with FG Color), then deactivate the selection (Select ➤ None).
- 7.
Change the foreground color to 50% gray (R-50, G-50, B-50) and the background color to 85% gray (R-15, G-15, B-15).
- 8.
Create a new layer (Layer ➤ New Layer), and name it Mountains 1.
- 9.
Using the Free Select Tool (F) with the Feather Edges radius set to 5, make a jagged selection to represent a mountain range similar to that shown in Figure 9-18.
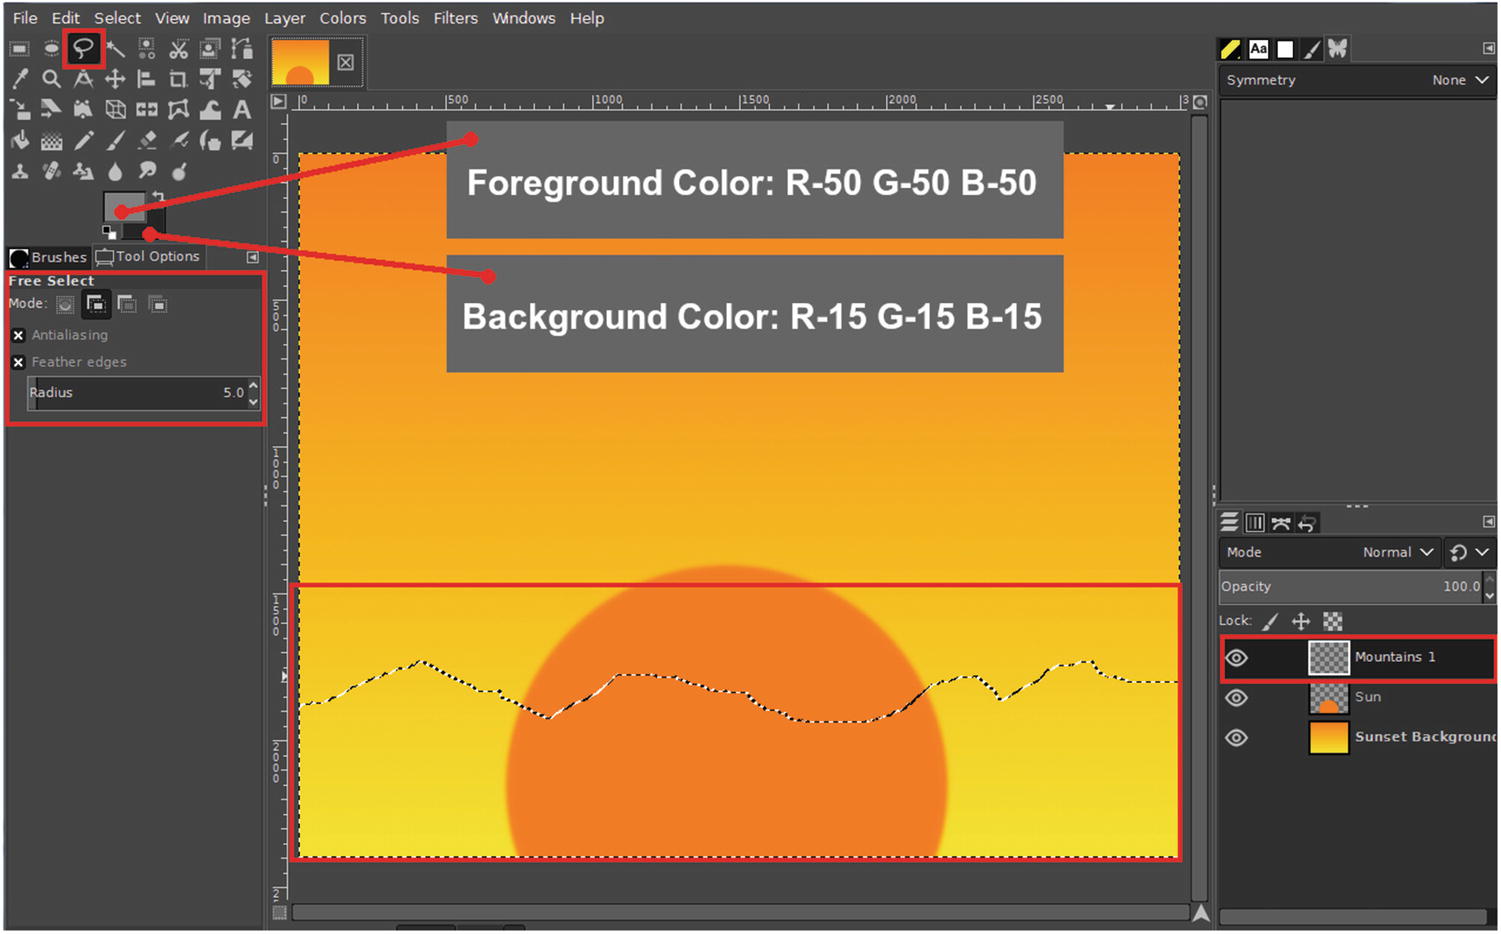
Use the Free Select tool to make a selection to use for mountains
- 10.
Fill with the light gray foreground color (Edit ➤ Fill with FG Color), then deactivate the selection (Selection ➤ None).
- 11.
We’ll repeat steps 9 and 10, naming the new layer Mountains 2 and filling the selection with the dark gray background color (Figure 9-19).
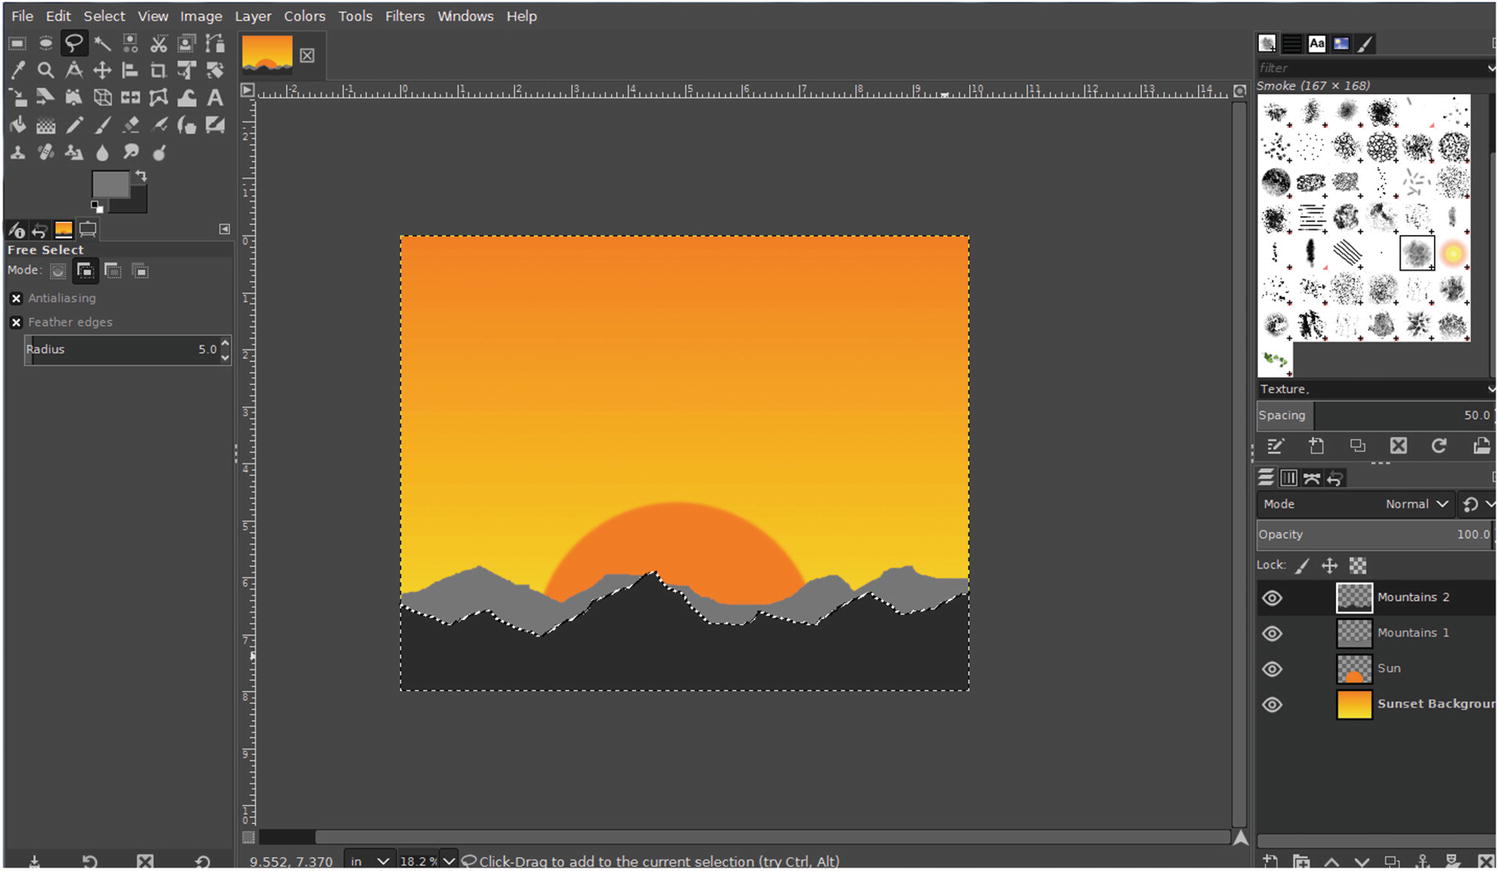
Fill the second selection with the darker gray
- 12.
Deactivate the selection (Selection ➤ None).
- 13.
Create a new layer and name it clouds.
- 14.
Using the Paintbrush Tool (P) and dark gray as the foreground color, click once to paint a cloud with the Smoke brush tip set to 4000 pixels in size (Figure 9-20).

Use the Smoke paintbrush tip for the cloud

The final result
Tutorial 25: Creating a Retro TV Set
- 1.
Open the practice image Ch_9_Dark_Retro_TV in Glimpse.
- 2.
Set the foreground color to a pink hue (R-100, G-55, B-55.2) and the background color to red (R-100, G-0, B-0).
- 3.
Click the layer preview thumbnail named Cabinet to make it active.
- 4.
Using the Rectangle Select Tool (with the Feather Edges option unticked), draw a selection around the outermost vertical and horizontal guides (Figure 9-22). Leave the selection active.
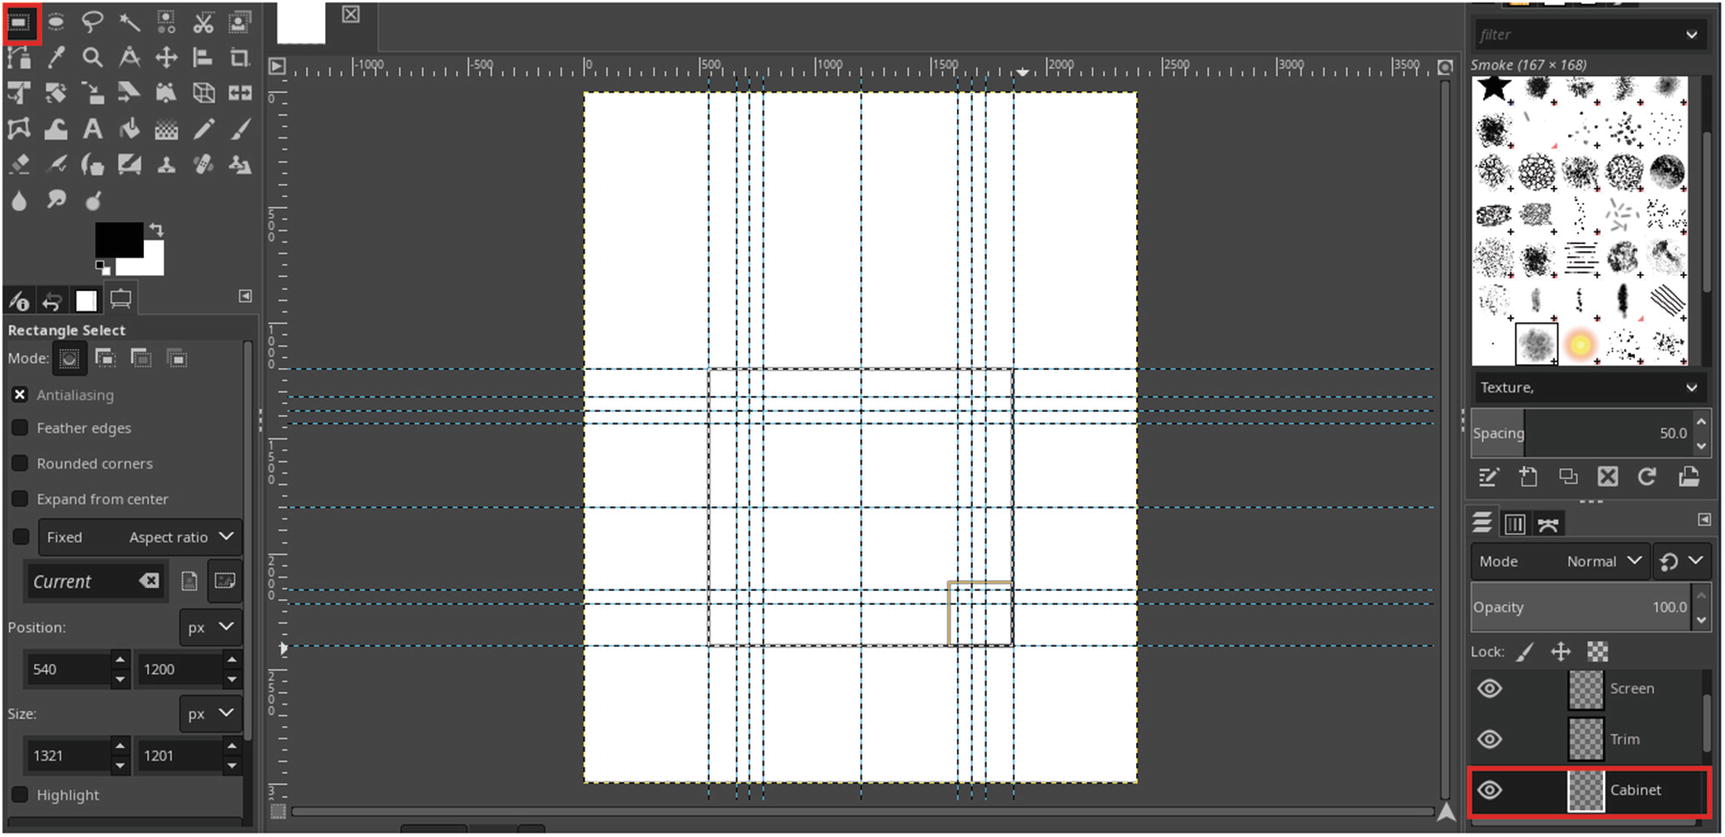
Draw a rectangular selection along the outermost guides
- 5.
Select the Gradient Tool (G) using the FG to BG setting and the Bi-linear shape, make a gradient as shown in Figure 9-23—this will give the cabinet a slight reflection along the top.
- 6.
Deactivate the selection (Selection ➤ None).
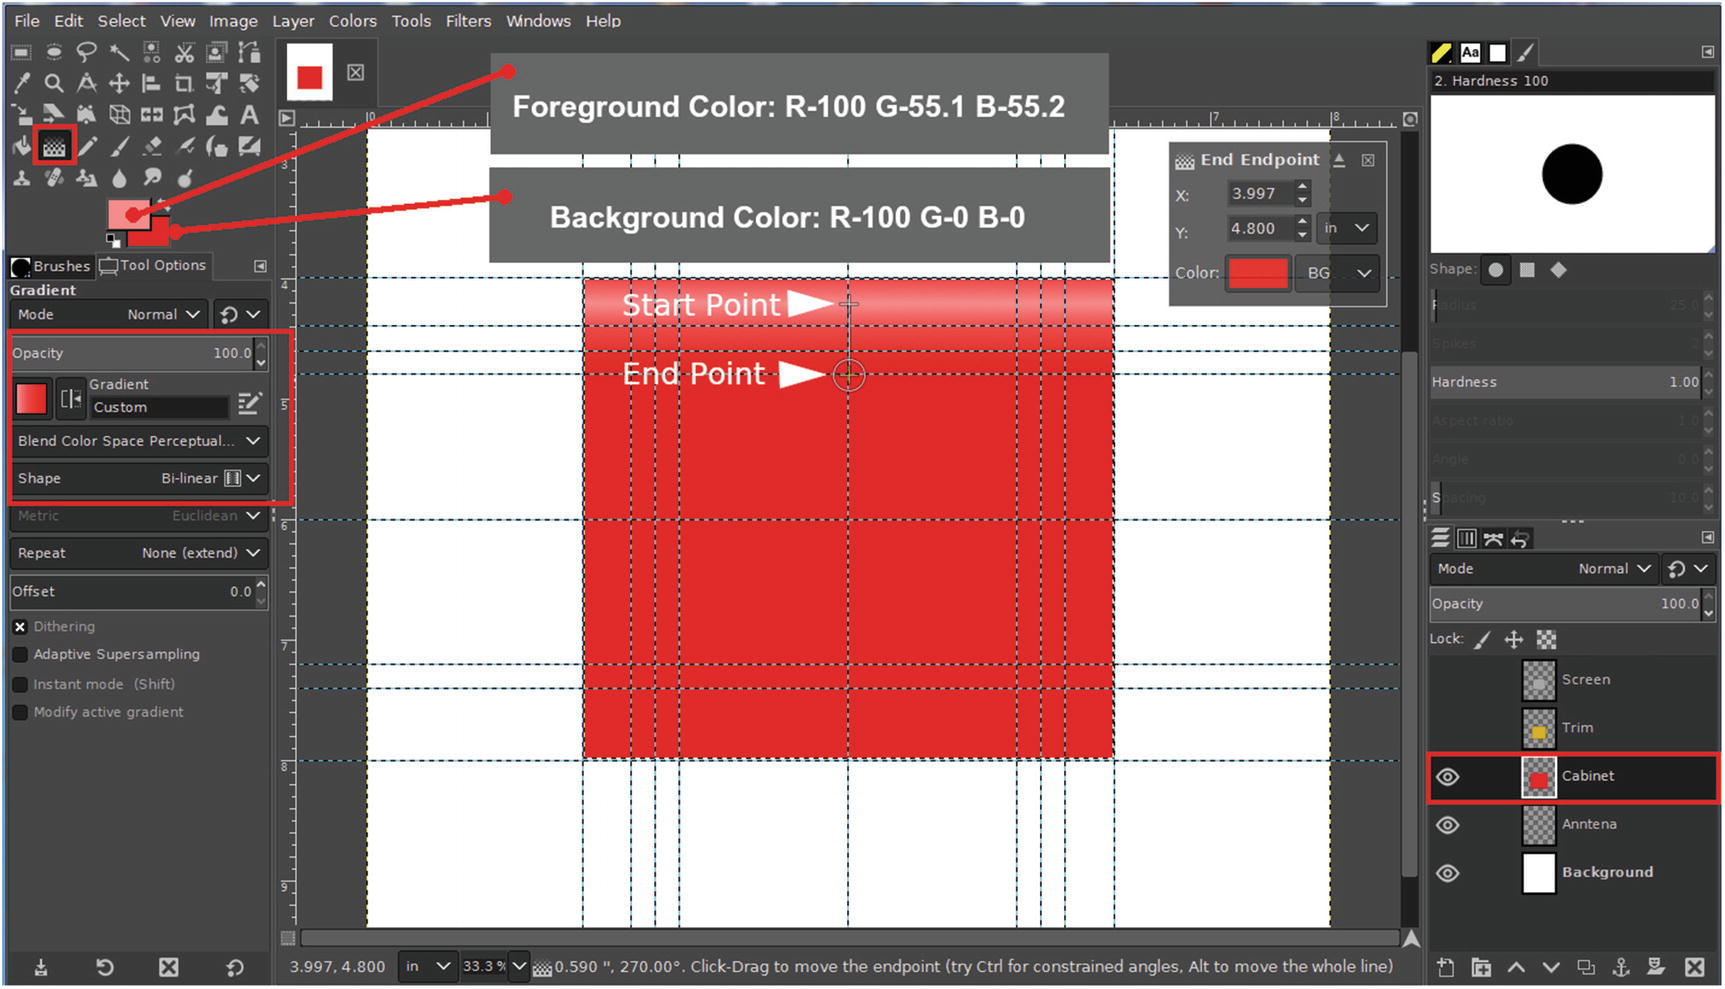
Draw a gradient as shown
- 7.
Click the layer preview thumbnail named Trim to make it active.
- 8.
Set the foreground color to a light yellow hue (R-99.3, G-88.7, B-40.7) and the background color to a darker yellowish-gold (R-86.8, G-88.7, B-5.2).
- 9.
Using the Rectangle Select Tool (with the Feather Edges option unticked), draw a selection around the second outermost vertical and horizontal guides (Figure 9-24)—leave the selection active.
Draw a rectangular selection along the second outermost guides
- 10.
Select the Gradient Tool (G) using the FG to BG setting and the Bi-linear shape, make a gradient as shown in Figure 9-25—this will give the trim a slight reflection along the top.

Draw a gradient to create the trim as shown
- 11.
Click the layer preview thumbnail named Screen to make it active.
- 12.
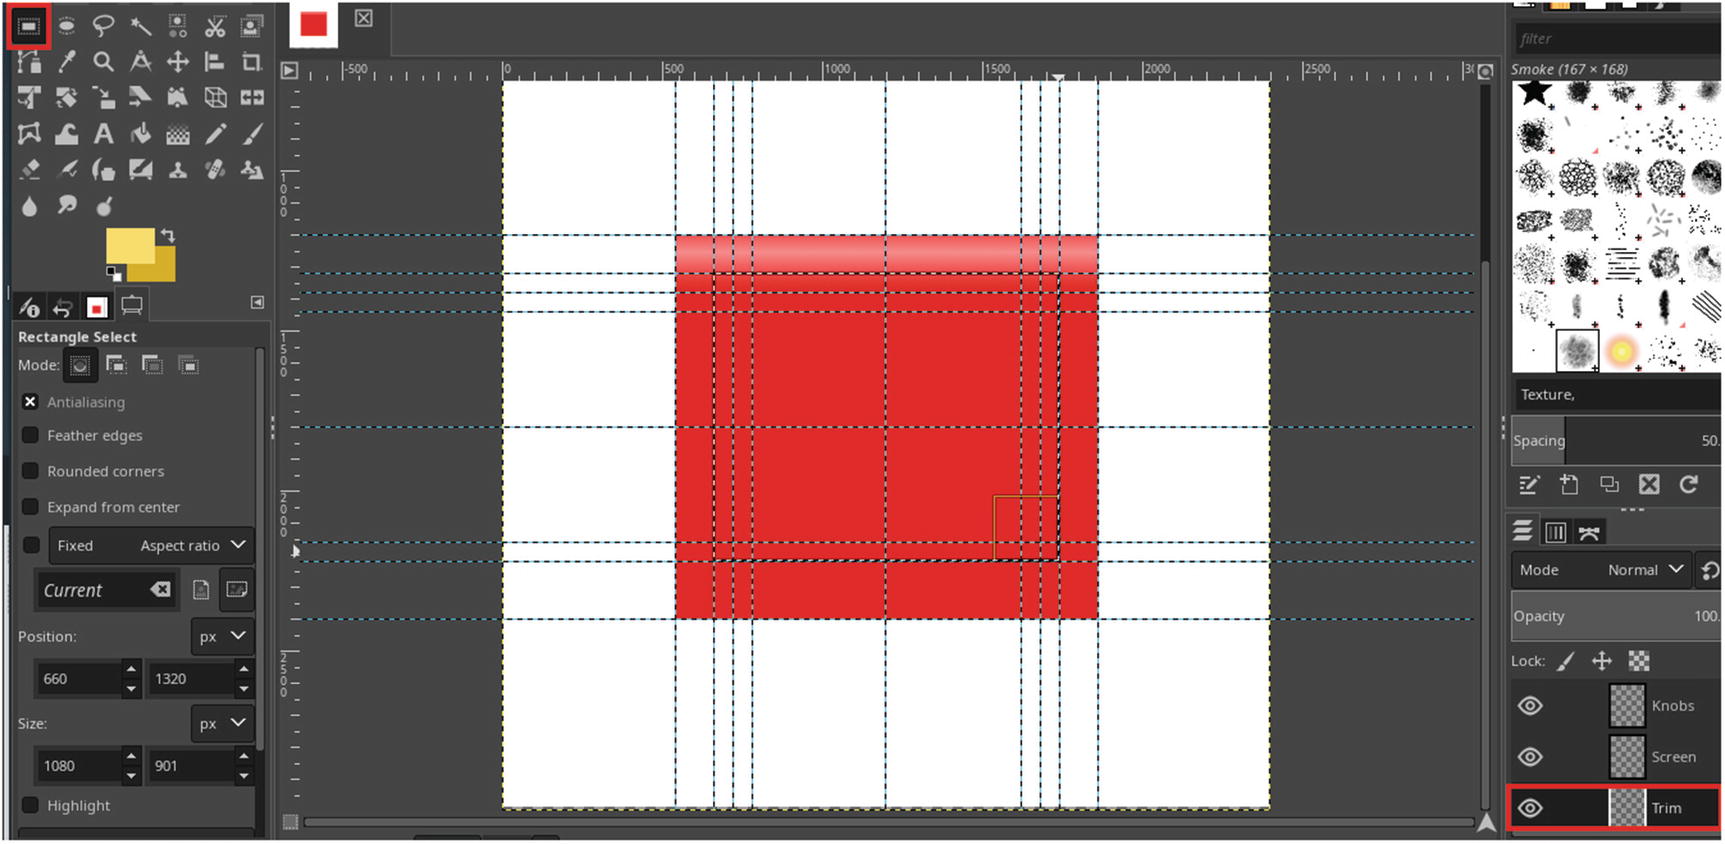
To draw the screen (or picture tube as they were called on older television sets), select the Paths Tool (B) and place nodes along the guides, and in the order shown in Figure 9-26—place the fifth node just under the first one, then click it and drag upward to complete the rectangular path.

Make a rectangle using the Paths Tool as shown
- 13.
Click each side (in the center) and curve outward as shown in Figure 9-27.
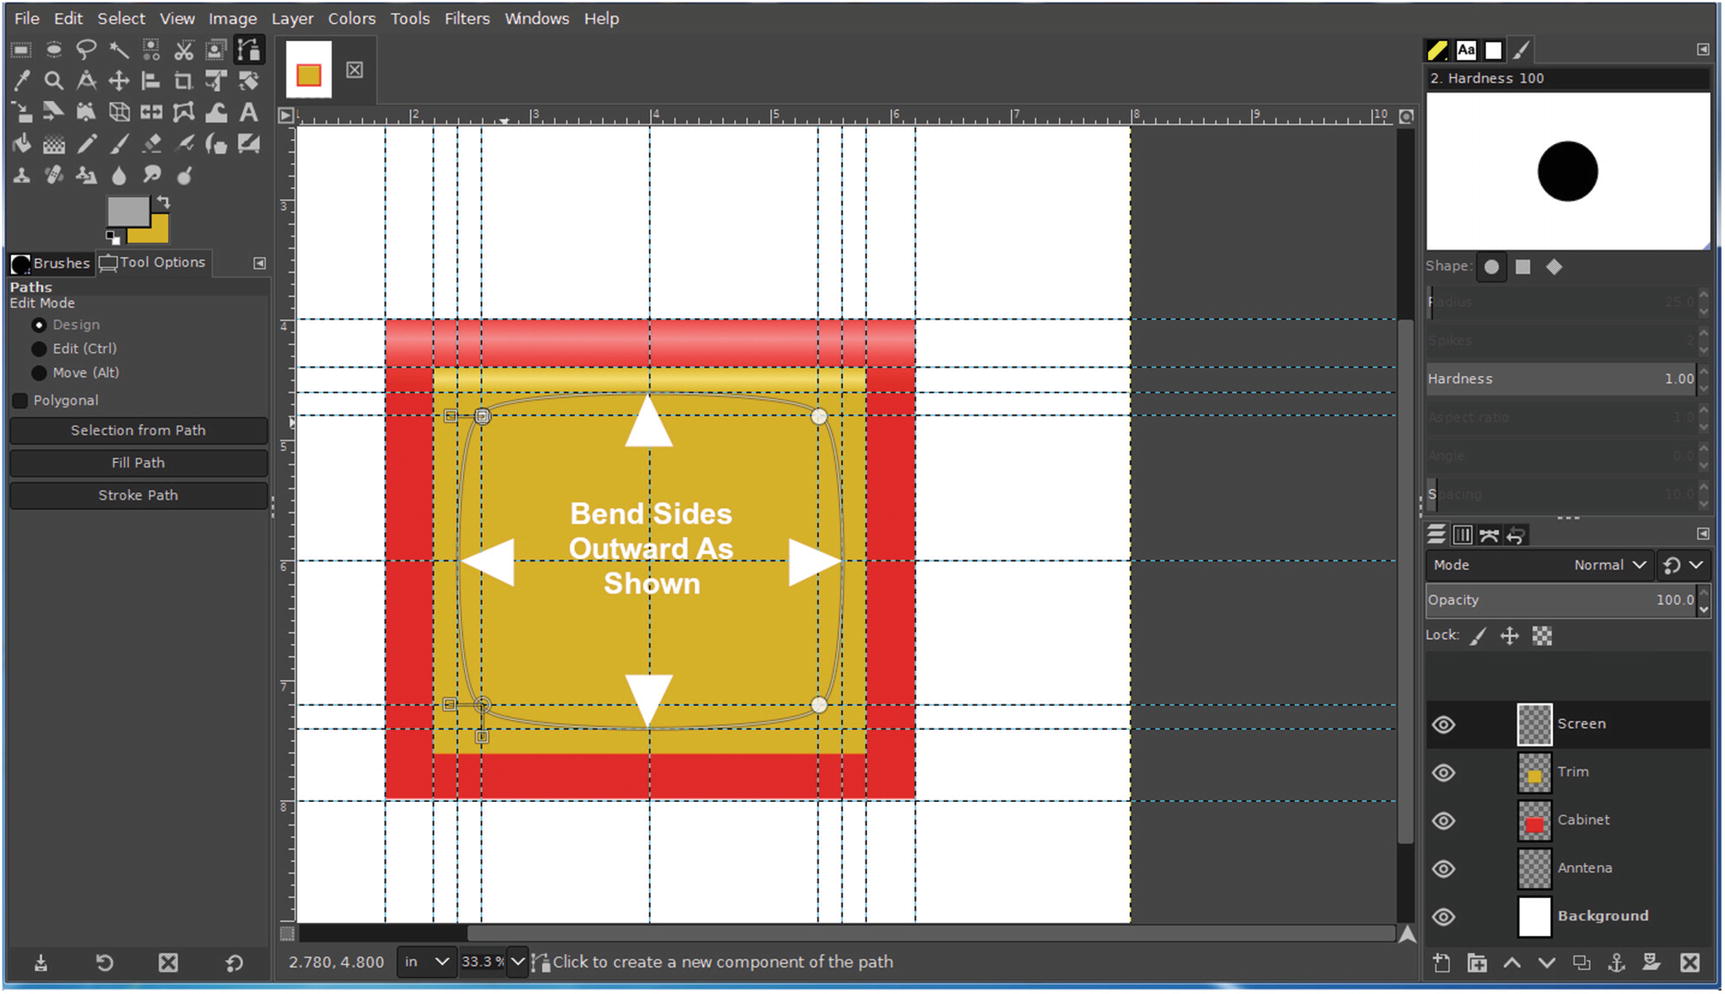
Bend the sides outward as shown
- 14.
Turn the path into a selection (Select ➤ From Path).
- 15.
Set the foreground color to a very light gray (R-92, G-92, B-92) and the background color to a darker gray (R-65, G-65, B-65).
- 16.
To fill in the screen, select the Gradient Tool (G) using the FG to BG setting and the Radial shape, make a gradient (starting from the center) as shown in Figure 9-28.
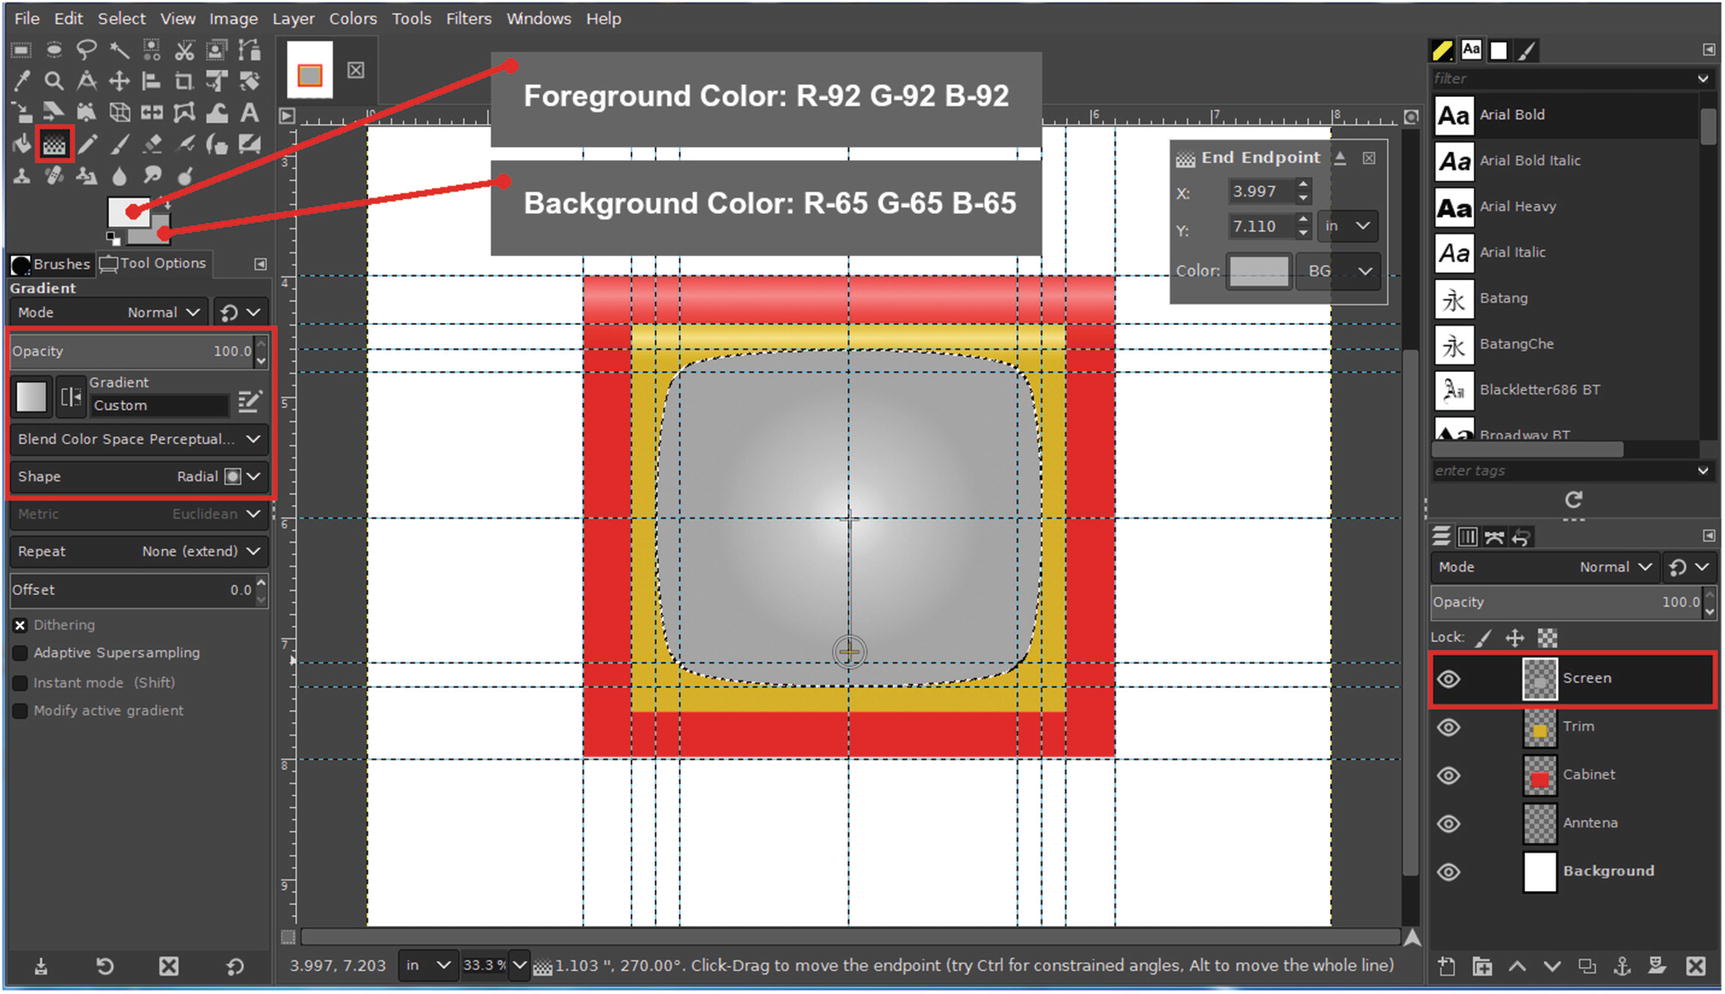
Draw a gradient to fill in the screen as shown
- 17.
Open the Add Bevel dialog (Filters ➤ Decor ➤ Add Bevel).
- 18.
Use the default Thickness setting of 5 and click OK. This gives the image a more 3-D appearance (Figure 9-29).
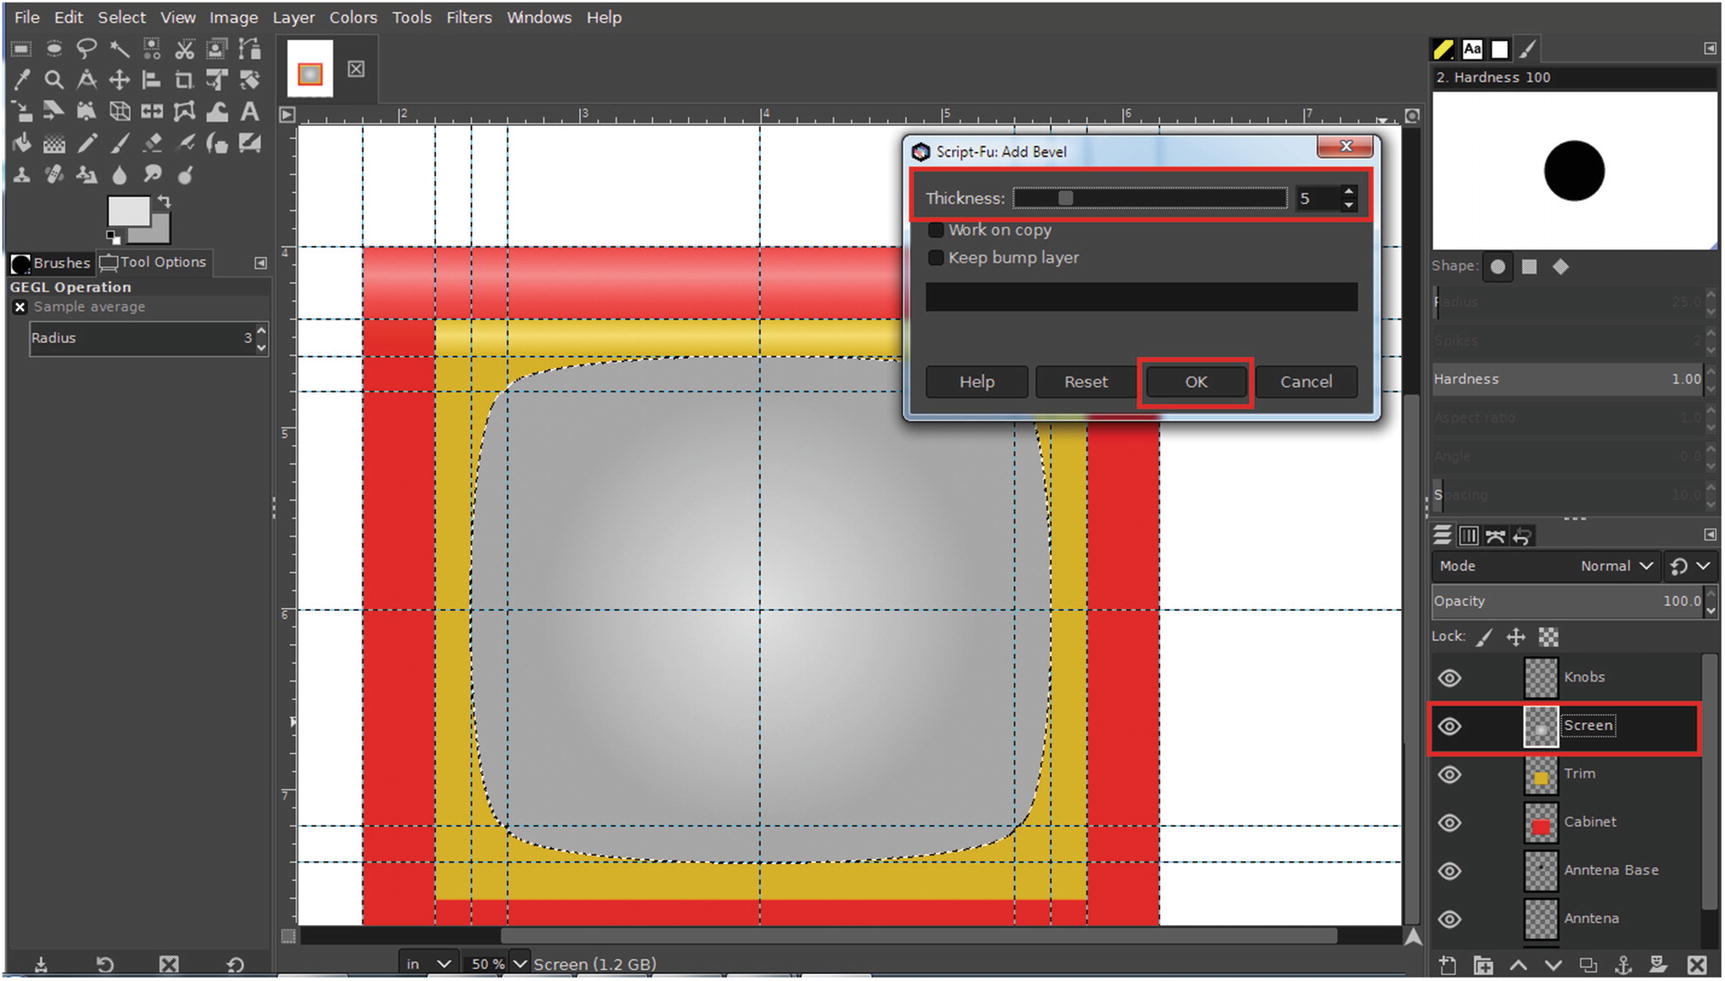
Draw a gradient to fill in the screen as shown
- 19.
Deactivate the selection (Selection ➤ None).
- 20.
Click the layer preview thumbnail named Knobs to make it active.
- 21.Using the Ellipse Select Tool (E), draw a circle on the bottom left corner of the screen within the square formed by the intersecting guides—be sure to use the following settings:
Antialiasing option ticked
Feather Edges option unticked
Expand from center
Aspect ratio-fixed
- 22.
Hold the Shift key down and draw a circle in the lower right-hand area near the screen (look for the square formed by the intersecting lines).
- 23.
Fill the selections using the same light gray that was used in the previous gradient.
- 24.
Open the Add Bevel dialog (Filters ➤ Decor ➤ Add Bevel).
- 25.
Use the default setting of 5 (Thickness) and click OK. This gives the knobs a more 3-D appearance (Figure 9-30).

Adding a bevel to the knobs gives a more 3-D appearance
- 26.
Open the Add Bevel dialog (Filters ➤ Decor ➤ Add Bevel).
- 27.
Use the default Thickness setting of 5 and click OK. This will give the knobs a more 3-D appearance.
- 28.
Click the layer preview thumbnail named Antenna Base to make it active.
- 29.
Using the Ellipse Select Tool (E), draw about .80 inches in diameter with the top half extending from the top of the TV cabinet.
- 30.
Change the foreground color to a dark gray, and use black for the background color.
- 31.
Select the Gradient Tool (G) using the FG to BG setting and the Bi-linear shape, make a gradient as shown in Figure 9-31—this will give the base a slight reflection.

Apply a gradient to the antenna base as shown
- 32.
Click the layer preview thumbnail named Antenna to make it active.
- 33.
Using the Pencil Tool (N) with a hard brush tip 12 pixels in diameter, click and hold the Shift key and draw two straight lines for the antenna as shown in Figure 9-32.

Use the Pencil Tool to draw the antenna as shown

The final result
Chapter Conclusion
This chapter provided three tutorials on creating digital artwork using Glimpse.
Raster vs. vector graphics
Creating a sunny sky
Creating a scenic sunset
Drawing a retro TV set
In the next and final chapter, we’ll look at using filters to turn photos into digital artwork with ease.