Compositing images essentially means borrowing various elements from other images to end up with a composite image. The two lessons that follow are an introduction to basic compositing (inserting the subject of one image into another).
Tutorial 18: Adding a person to an image
Tutorial 19: Replacing backgrounds
Chapter conclusion
You’ll notice that these two lessons are very similar, but they’re approached differently in each case. Glimpse (in all of its complexity) allows the user different ways to achieve similar results—the more familiar the user becomes with different methods of achieving editing tasks, the more proficiency is gained.
Tutorial 18: Adding a Person to an Image
- 1.
Open the practice images Ch7_Teddy_Bear and Ch7_Child in Glimpse.
- 2.
If it isn’t already, make Ch7_Child the active image (click the thumbnail in the Image Menu as shown in Figure 7-1).
Click the thumbnail preview to make the image active
- 3.
Open the Foreground Select Tool (click the tool icon as shown in Figure 7-2).

Open the Foreground Select Tool by clicking the tool icon shown
- 4.
After the tool is launched (it looks like a lasso), draw around the child—it’s a good idea to get as close as you can, but the selection does not have to be precise (Figure 7-3). After you’ve drawn around the child, press enter.

Draw around the child as shown
- 5.
You’ll now see a blue overlay around the selected area, with a lighter blue overlay over the selected area.
- 6.
With the Draw foreground option selected, apply strokes in the image to select the child as shown in Figure 7-4—when the mouse button is released, the light blue overlay is removed.

Paint inside the child as shown
The Foreground Select Tool essentially calculates and differentiates between foreground and background pixels, so great precision isn’t needed when painting in the foreground subject, but the more precise and thorough you can be, the better the selection will be.
- 7.
Next, click the Draw background option, and paint around the subject as shown in Figure 7-5 (this applies the blue overlay a little closer to the subject)—when complete, click the Preview mask option.

Paint area around the child as shown, then tick the Preview mask option
- 8.
You will now see some stray “unknown” pixels that need to be cleaned up before a complete selection is made—tick the Draw foreground option to remove them from the subject, then tick the Draw background option to remove them from the background (Figure 7-6).

Stray pixels that will need to be removed
- 9.
Press the Select button—the subject will be selected (characterized by the boundary of “marching ants”).
- 10.
Toggle the Quick Mask (Select ➤ Toggle Quick Mask)—a red overlay is now applied, which reveals stray pixels that may have been overlooked (Figure 7-7). Paint (using white as the active foreground color) to remove any stray areas.

Use the Quick Mask to reveal any overlooked areas
- 11.
Untick the Toggle Quick Mask option to switch to the “marching ants” selection.
- 12.
Copy the selected area (Edit ➤ Copy).
- 13.
Make the image Ch7_Teddy_Bear active by clicking the thumbnail preview in the Image Menu.
- 14.
Paste as a new layer (Edit ➤ Paste As ➤ New Layer)—rename the layer Child.
- 15.
Click the Scale Tool icon (or press Shift+S)—while holding the Shift key, click and drag the upper-left corner upward slightly to make the image slightly larger (about 1265 × 3617 pixels) as shown in Figure 7-8, then press the Scale button.

Use the Scale tool to enlarge the subject slightly
- 16.
Use the Move Tool (M) to move the child up slightly as shown in Figure 7-9, then deselect.

Move the subject into position as shown
- 17.
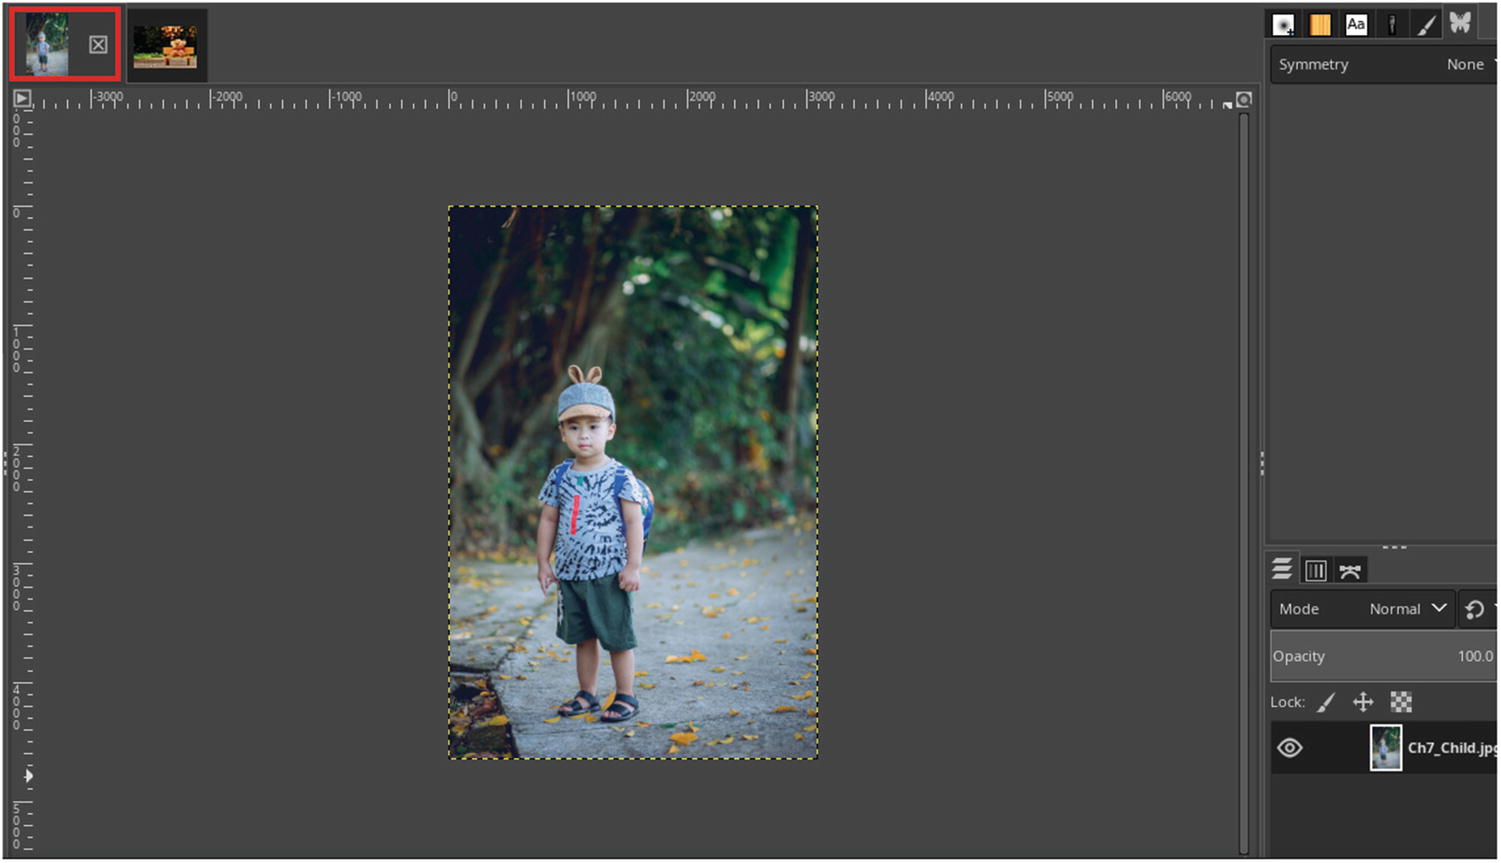
If you’ll notice, the color temperature of the background image with the teddy bear is quite a bit warmer than the image the child was taken from, so we’ll adjust the color temperature to get a better match between both elements.
Note Color Temperature (which is measured in Kelvin degrees) essentially means that lowering the temperature “cools” the tone, making cooler colors (such as bluish hues that might result from an incandescent light source) more prominent—increasing the color temperature “warms” the tone, making warmer colors (such as reddish hues resulting from early evening sunlight) more prominent.
- 18.
Open the Color Temperature dialog (Colors ➤ Color Temperature)—making sure that the bottom layer is active, adjust the Intended temperature setting to 5000, which will make the warmer colors (reds, oranges) a little less prominent. Click OK when done (Figure 7-10).
Adjusting the color temperature of the background image using the Color Temperature dialog makes it slightly cooler
- 19.
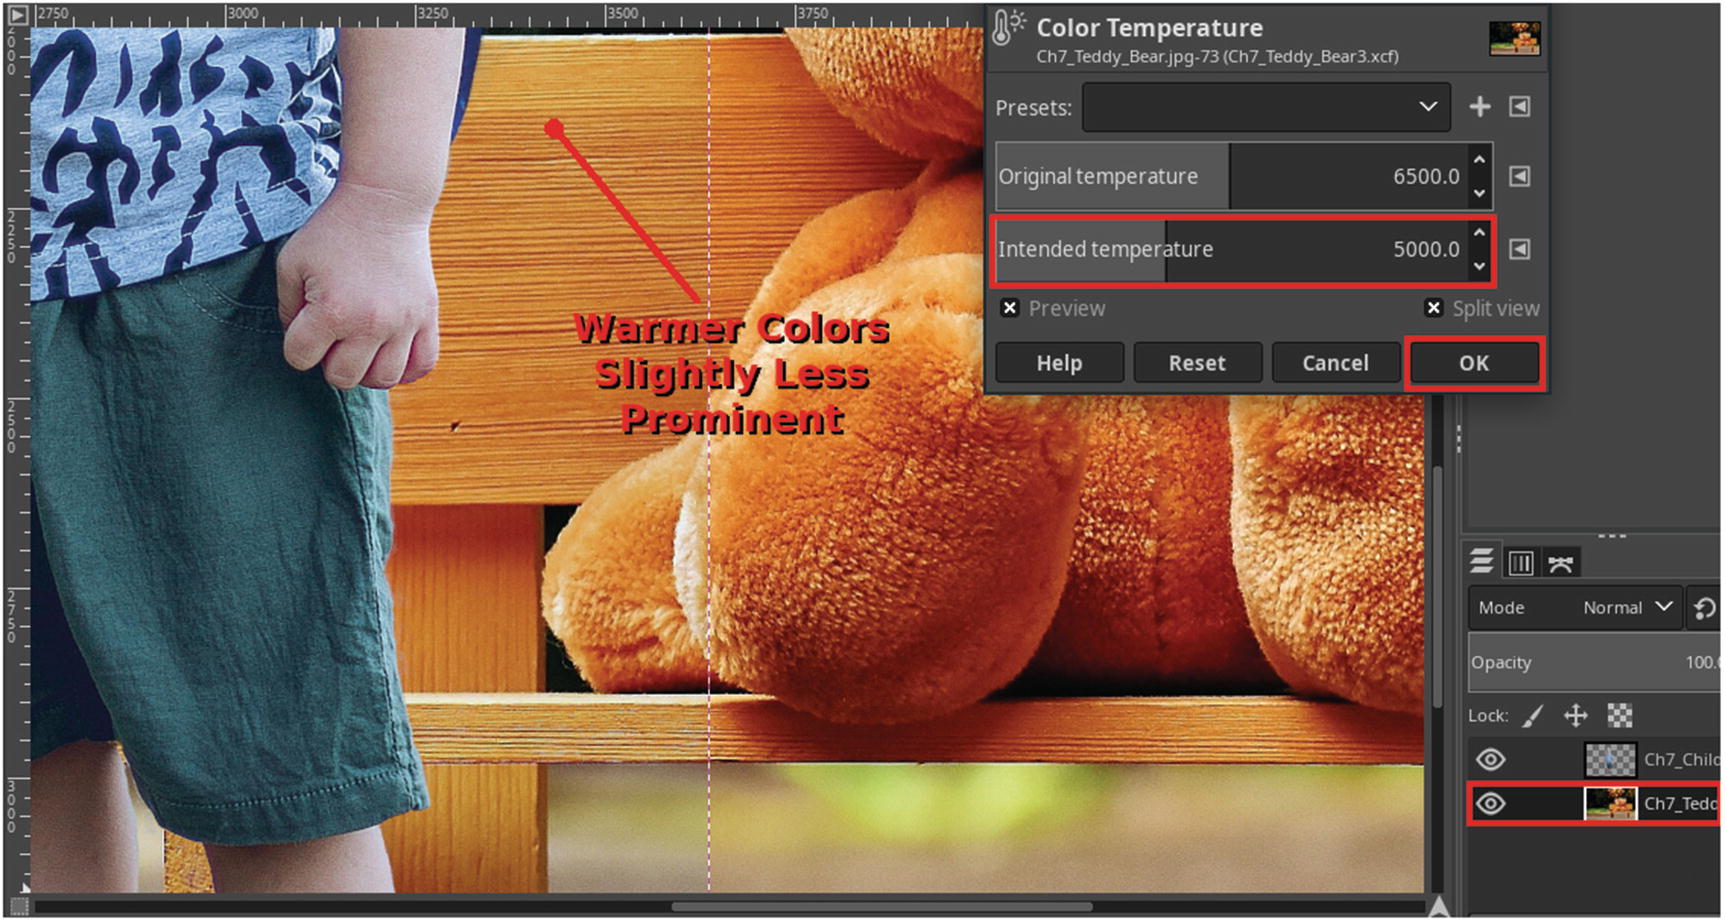
Now, we’ll make a color temperature adjustment on the child. Open the Color Temperature dialog again (Colors ➤ Color Temperature)—making sure the top layer is active, set the Intended temperature slider to 9300, which will make the warmer colors (reds, oranges) more prominent. Click OK when done (Figure 7-11).
Adjusting the color temperature of the layer containing the image of the child using the Color Temperature dialog makes it warmer
- 20.
Finally, select the Clone Tool (C), and remove the leaf (and the slight shadow cast by the leaf)—make sure the layer named Child is active (Figure 7-12).

Remove the leaf and the slight cast shadow using the Clone Tool
- 21.
Figure 7-13 shows the before (the two original images) and after comparison (the final composite). When done, you can save as an .XCF file if you want to keep the file, or simply close it out.

The before and after comparison
Tutorial 19: Replacing Backgrounds
- 1.
Open the practice image Ch7_Tropical_Background in Glimpse.
- 2.
Next, open the practice image Ch7_Background_Change as a layer, which will be placed on top of the previously opened image (File ➤ Open as Layers).
- 3.
Using the Move Tool (M), position the subject to the left as shown in Figure 7-14—this will help compose the image following the rule of thirds.

Position the image as shown to follow the rule of thirds
- 4.
Add a layer mask to the layer initialized to white (full opacity), then press the Add button (Figure 7-15).

Add a layer mask initialized to white
- 5.
Using the Free Select Tool (F), draw around the foliage, getting as close to the bird as possible (Figure 7-16)—press enter after drawing the boundary to activate the selection.

Make a selection around the foliage as shown
- 6.
Click the layer mask preview thumbnail to make the layer mask active.
- 7.
Fill the selection with black—this will reveal the visibility of most of the underlying background layer.
- 8.
Select the Paintbrush Tool (P) and adjust the brush tip diameter to about 15 pixels (2. Hardness 0.50).
- 9.
Paint along the edge of the bird to hide the stray background pixels, revealing the underlying background layer (Figure 7-17).

Paint along using black to hide the stray pixels
- 10.
Zoom in as needed (Z) and check for any overlooked pixels—use the Paintbrush Tool to hide those until complete (Figure 7-18).

Check for any stray pixels
- 11.
The last thing to do is to create a slight depth of field effect by blurring the background just a bit to put more emphasis on the bird.
- 12.
Click the background layer to make it active (it will have the name Ch7_Tropical_Background).
- 13.
Open the Gaussian Blur dialog (Filters ➤ Blur ➤ Gaussian Blur).
- 14.
Set the x/y sizes to 5.00, then press OK (Figure 7-19).

Creating a slight depth of field effect by blurring the background
- 15.
Figure 7-20 shows the before and after comparison. When done, you can save as an .XCF file if you want to keep the file, or simply close it out.

The before and after comparison
Chapter Conclusion
This chapter provided two lessons in creating basic composite images.
Adding a person to an image
Replacing a background
In the next chapter, we’ll explore some basic drawing using Glimpse.