Now that you’ve had a tour of the Glimpse interface, we’ll look closer at some important aspects of Glimpse and how they relate to image editing.
- 1.
An overview of layers
- 2.
An overview of RGB color channels
- 3.
An overview of paths
- 4.
An overview of Undo History
An Overview of Layers
Layers are important in image editing—they make the life of the Glimpse user much easier! Layers allow corrections, revisions, and other edits to be made without scrapping the image and starting over from scratch. Layers also allow more flexibility by utilizing various Blend Modes, which we’ll touch on in a later chapter.
Layer Basics

Layers are comparable to transparent sheets containing graphical elements that, when combined, form a complete image
The stacking order of layers can be changed or graphical elements can be added, removed, repositioned, or modified. This allows the user to exercise a great deal of control over the image being worked with.
In the old days of digital image editing (before the existence of layers), the work was done on a single, base image. If revisions were necessary, it usually required starting over from scratch (or, at the very least, encountering great difficulty when making revisions).
As mentioned a little earlier, layers offer the user much greater control over the editing process—if a mistake is made, the offending layer can be modified or discarded without affecting the rest of the image.

Clicking the eye-shaped icon hides the layer’s visibility

Layers can be repositioned using the Move Tool or the arrow keys
If you’ll notice, the repositioned layer’s border doesn’t line up with the rest of the image. By right-clicking the layer and selecting Layer to Image Size from the menu, the layer will be resized, and its border will match the rest of the image.
Layers can be drawn or painted on using the brush tools, or portions of the layer can be removed using the Eraser Tool.
Organizing Layers
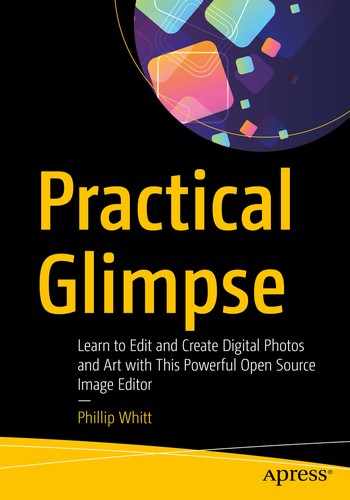
Using Color Tags helps keep organize layers containing related elements
This helps keep track of layers in more complex images and makes it easier to locate a specific layer when necessary.
Color Tags can be added when launching the Create a New Layer dialog, or if the layer has already been created, double-clicking the layer thumbnail launches the Layer Attributes dialog and a Color Tag can be added then.
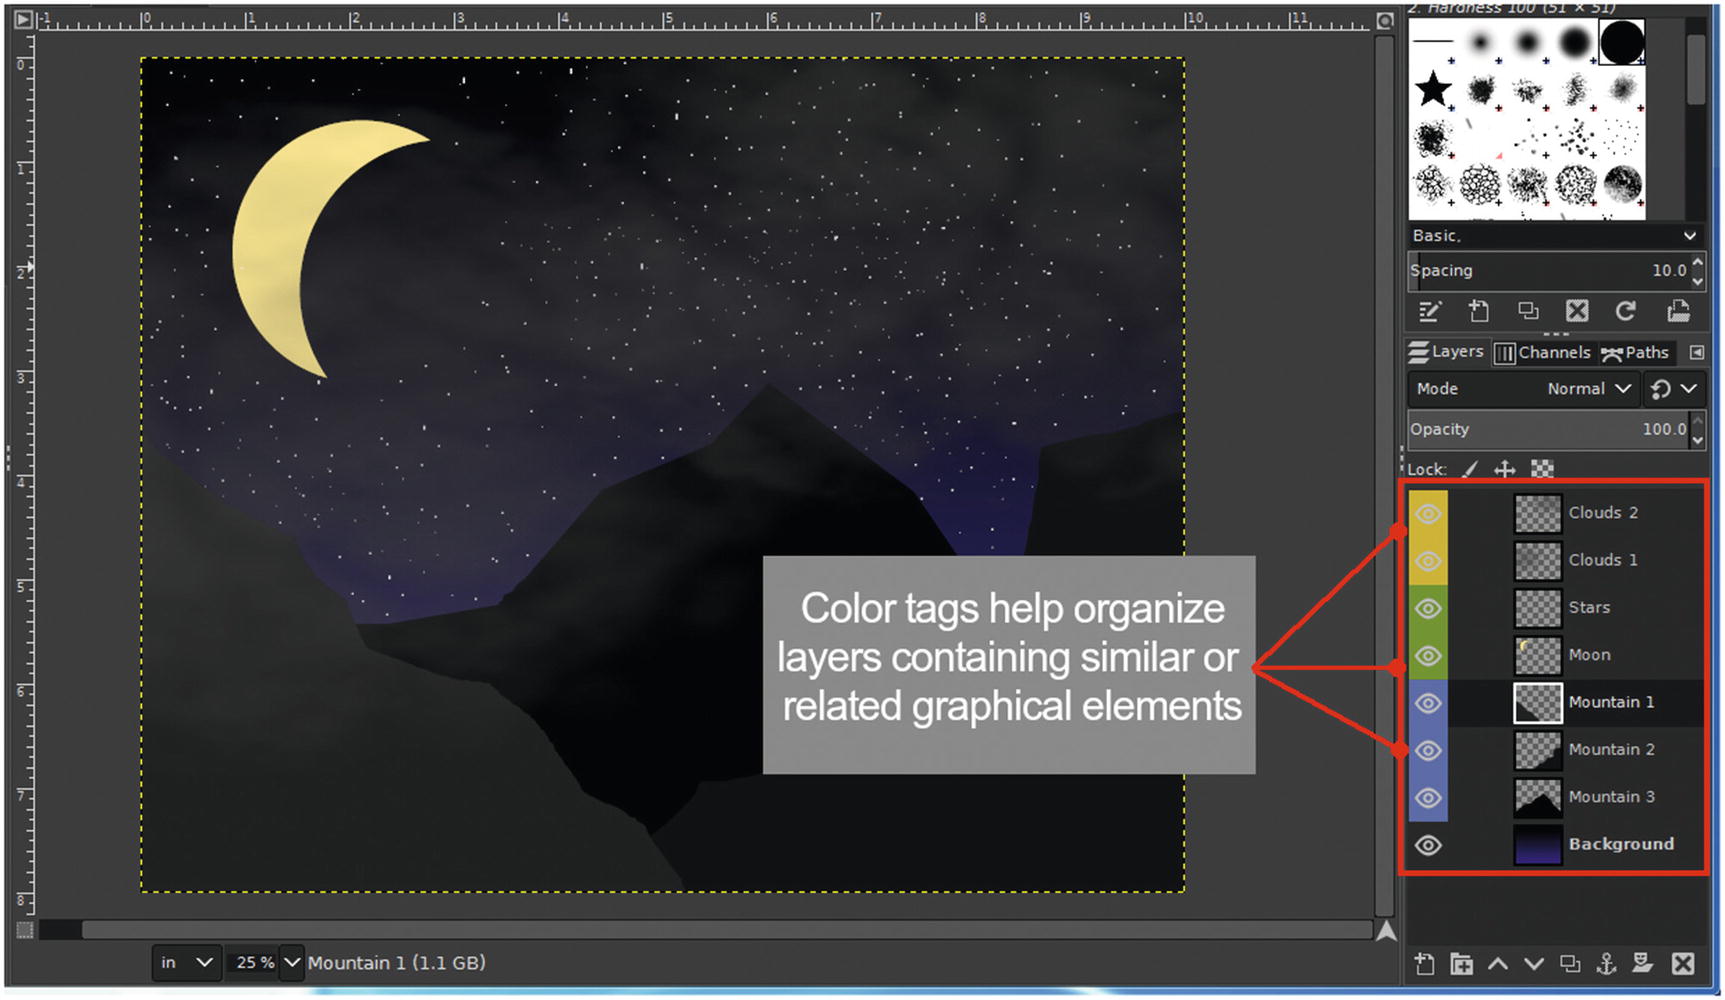
The layers that comprise the TV set are in a layer group

The layer group collapsed and the layers hidden
Layer Masks
A layer mask can be added to an active layer, allowing selective, nondestructive adjustment of the layer’s opacity (or transparency). While a layer’s opacity can be adjusted on a global (overall) level using the Opacity slider in the Layers Dialog, a layer mask allows the user to adjust opacity or transparency on selected areas with precision.

The layer mask properties are set in the Add Layer Mask menu

A layer mask allows selective, nondestructive adjustment of layer transparency
In this example, by adding a layer mask (initialized to white), selected areas can be made transparent by painting with black, revealing the color from the bottom layer. Painting in gray creates semitransparency, allowing some of the color to show through—the lighter the gray, the less color is revealed.
Using a layer mask offers nondestructive editing; opacity can be restored by painting with white if revisions are necessary.
The layer mask must be active to work—to make the layer mask active, click the layer mask thumbnail image in the Layers Dialog.
The Layers Dialog and Layer Menus

The Layers Dialog
The Layers Dialog’s functions are as follows:
- 1.
Layers Tab—Activates the Layers Dialog when clicked.
- 2.
Mode (Blend Mode)—Selects from the 21 blend modes available (blend modes affect the way layers interact, or “blend” with each other).
- 3.
Layer Opacity—Slider that adjusts the layer’s opacity from 0% (completely transparent) through 100% (completely opaque).
- 4.
Lock Pixels—Prevents the use of any brush-based tool on the layer’s content, protecting it from any unwanted changes.
- 5.
Lock Position and Size—When active, prevents the layer from being repositioned, resized, rotated, or otherwise transformed.
- 6.
Toggle Visibility On/Off—Turns the layer visibility on or off; when toggled off, the layer is inactive and can’t be edited.
- 7.
Link to Other Layers—Allows layers to be linked together, allowing them to be moved, resized, rotated, or transformed uniformly; a chain link icon is visible next to each linked layer thumbnail image.
- 8.
Create a New Layer—Launches the New Layer dialog, allowing the user to set the layer parameters before adding it to the image; holding the Shift key while clicking creates a new layer with the previously used values.
- 9.
Create a New Layer Group—Creates a Layer Group, which enables the user to group similar layers in a tree list.
- 10.
Raise/Lower Layer One Level in Stack—Moves the active layer up or down one level each time the up or down arrow is clicked; the layer can also be moved by clicking and dragging the thumbnail image up or down in the layer stack.
- 11.
Create a Duplicate of the Layer—Creates a duplicate of the active layer.
- 12.
Anchor the Floating Layer—Anchors the floating selection to the layer one level below.
- 13.
Add a Mask—Launches the Add Layer Mask menu; the parameters can be set before the mask is added to the active layer.
- 14.
Delete Layer—Discards the active layer.
- 15.
Switch to Another Group of Modes—Switches between the default blend modes and the legacy blend modes (used in older versions of the GNU Image Manipulation Program).
- 16.
Lock Alpha Channel—Prevents pixels from being applied to transparent parts of the layer.
- 17.
Layer Thumbnail—A small preview image of the layer(s) in the Layers Dialog; double-clicking in the thumbnail launches the Layer Attributes menu.

The Layer Menu can be accessed from the Image Menu

Right-clicking a layer thumbnail launches the Layer Menu
An Overview of RGB Color Channels
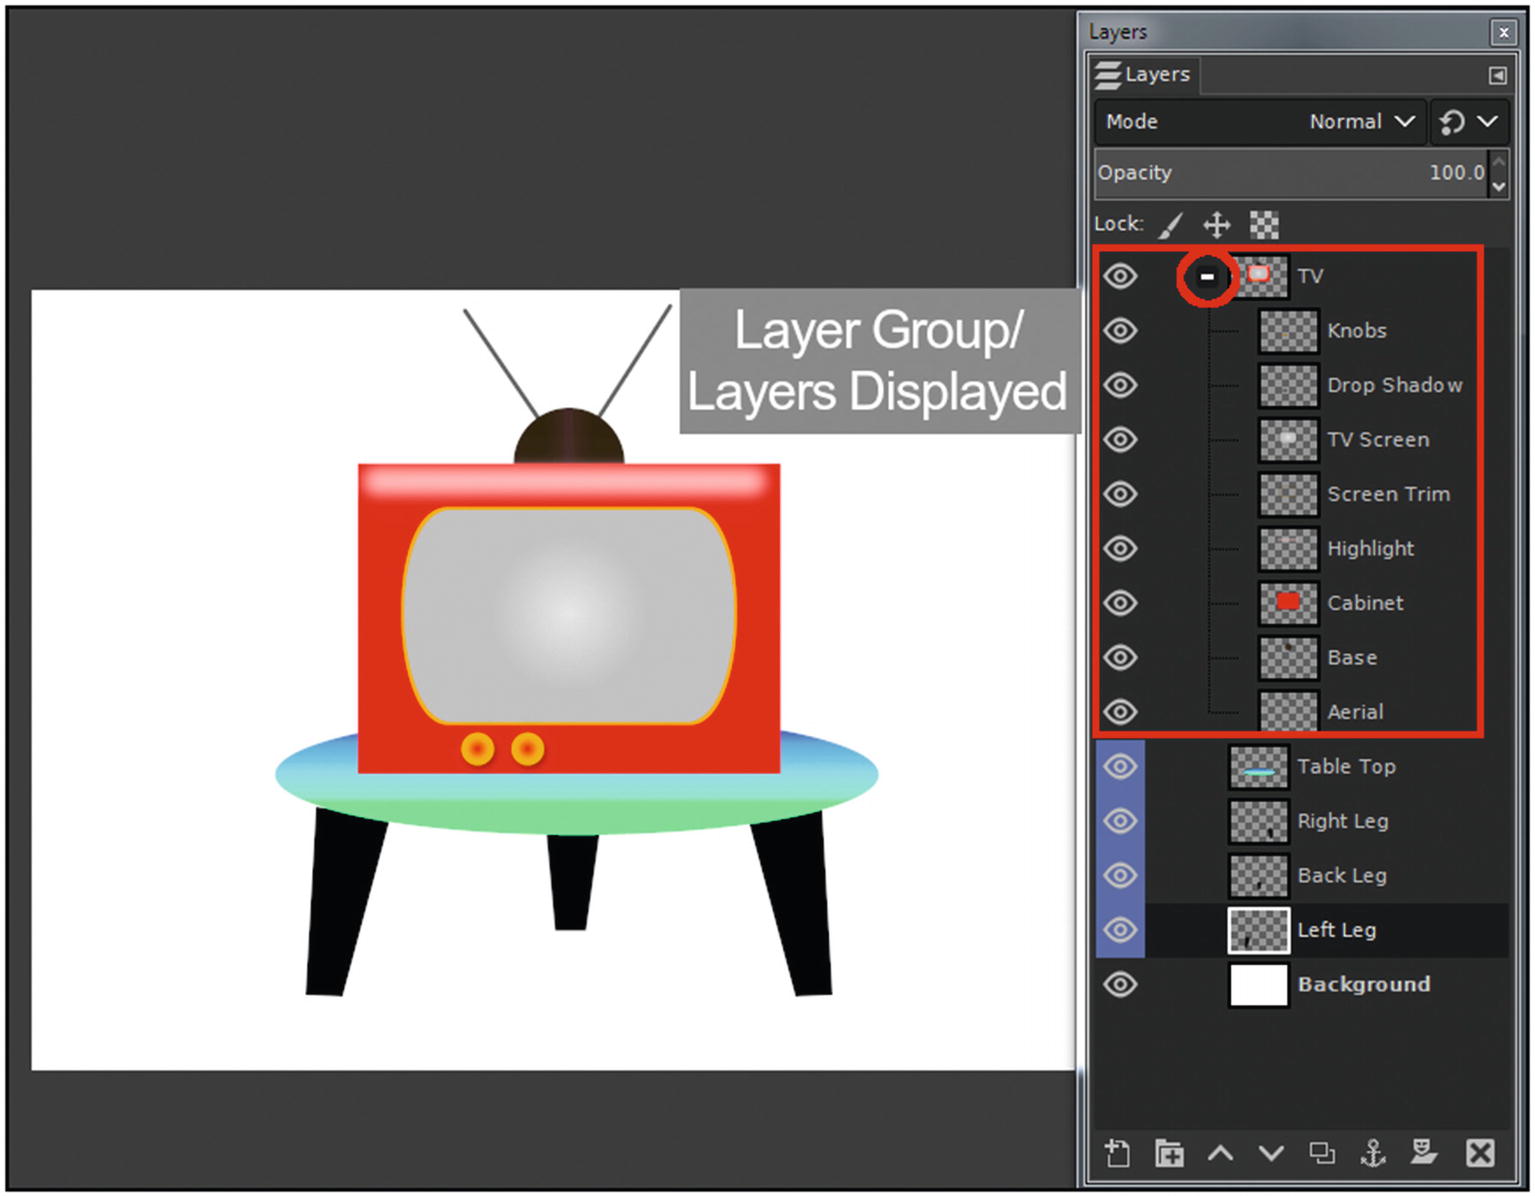
The red, green, and blue color channels combine to make a composite image
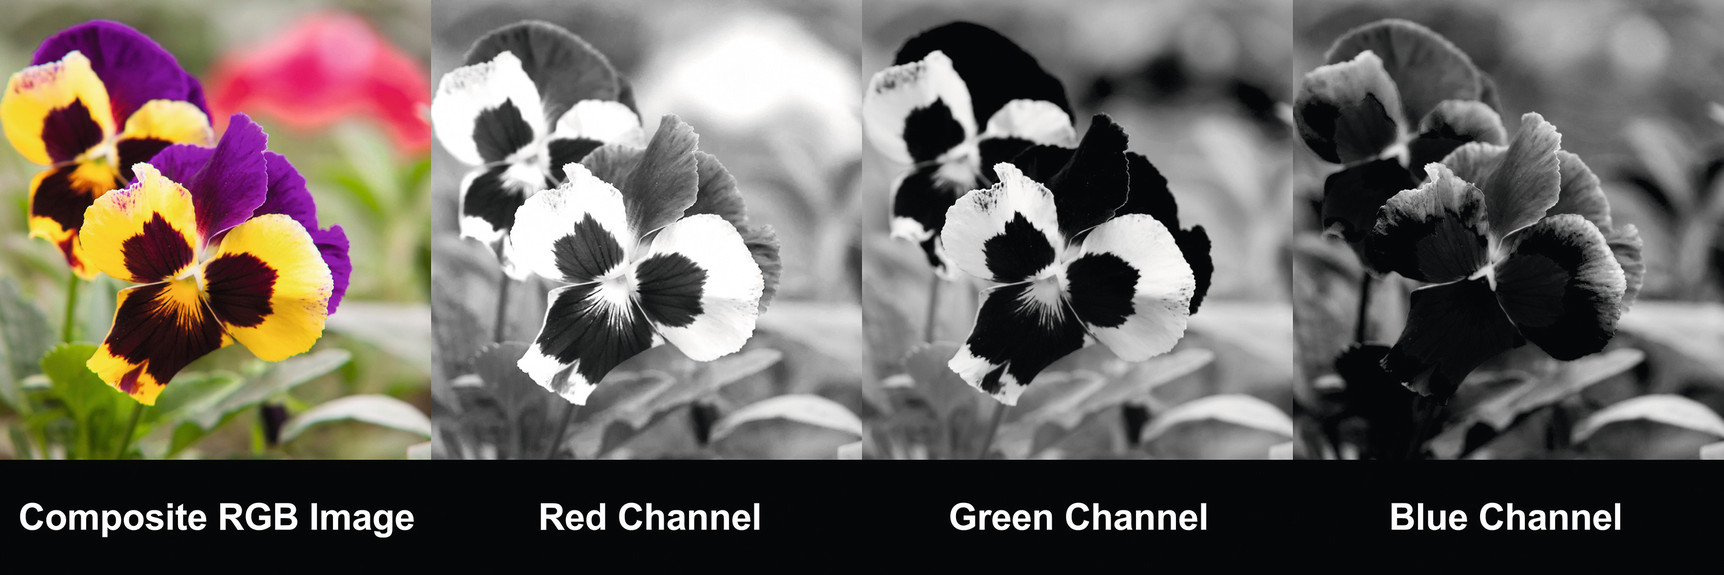
Channels displayed in grayscale make viewing lightness values easier
The image can then be recomposed after the editing is complete. You’ll have the opportunity to do this in a tutorial coming up in a later chapter.

An alpha channel is automatically created in images with more than one layer
Selection Masks
Selections are used to isolate part (or multiple parts) of an image. Selections are characterized by a dashed animated boundary line (sometimes called marching ants) around the part of the image being isolated. We’ll take a closer look at selections and Selection Tools in Chapter 3.

A selection saved to a channel in the lower part of the Channels Dialog
A Selection Mask is similar to a Layer Mask in the way an overlay can be edited to isolate or protect part of an image. This allows the selection to be modified or refined by using a paintbrush tool on the selection mask. By applying black, white, or gray, the degree of transparency is controlled. A major difference is that rather than being attached to a specific layer, a Selection Mask is stored as a channel.
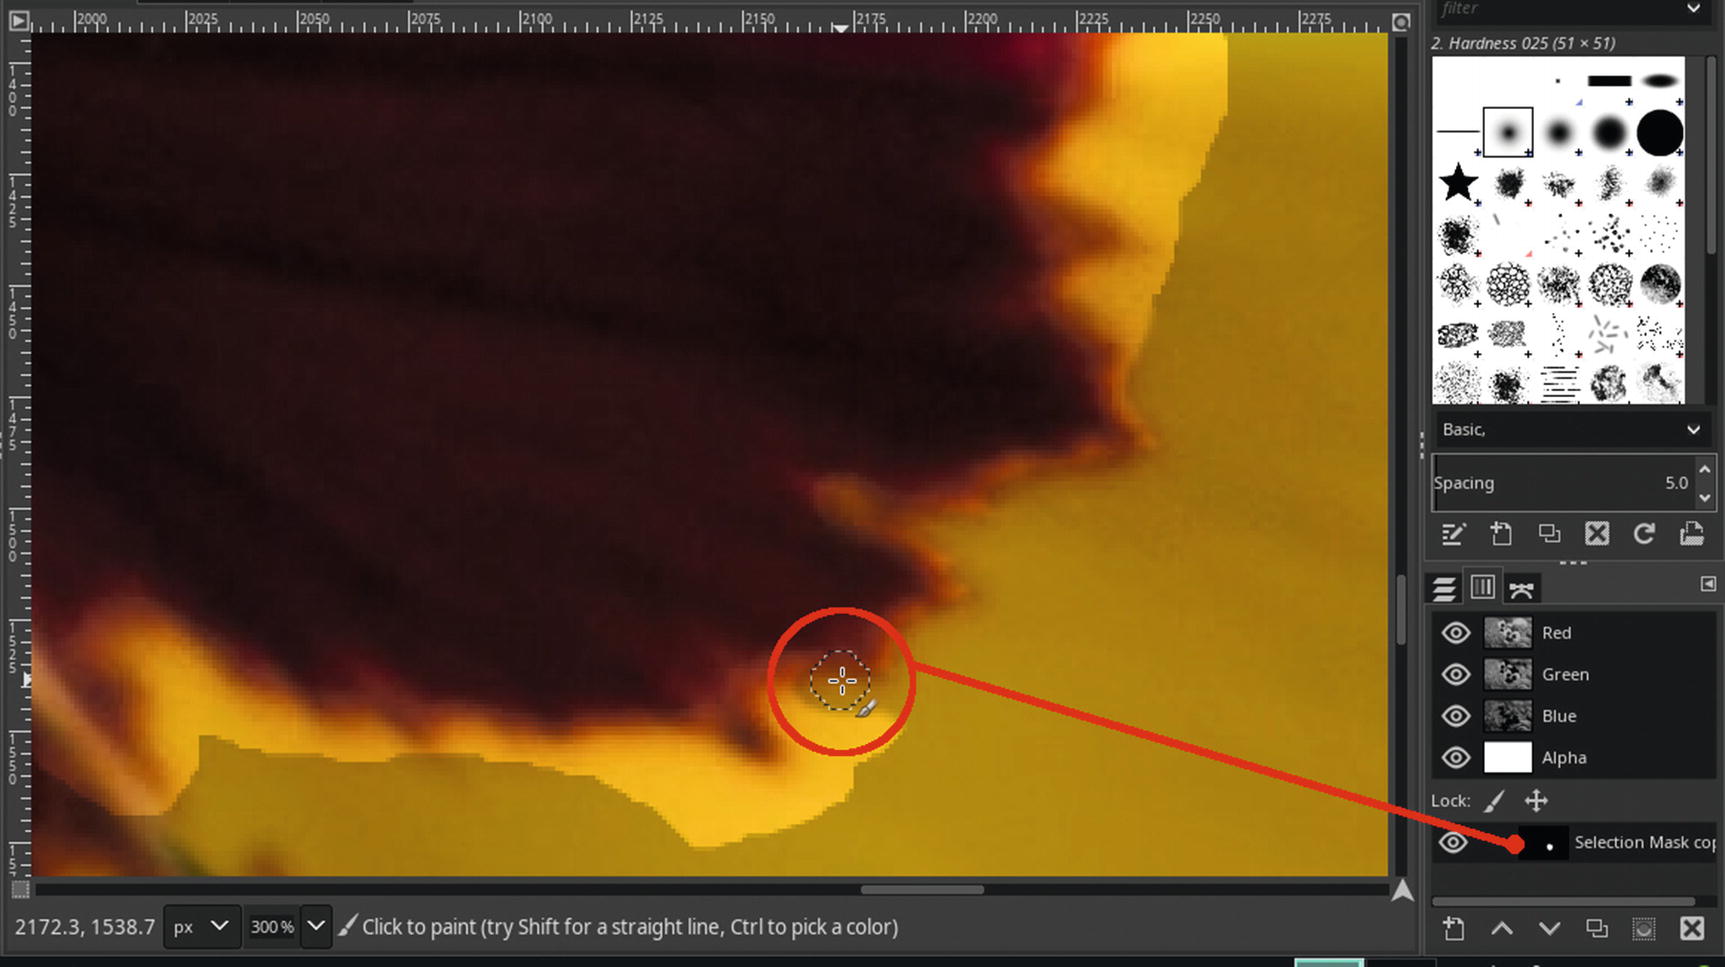
The edge refined by using the Paintbrush Tool
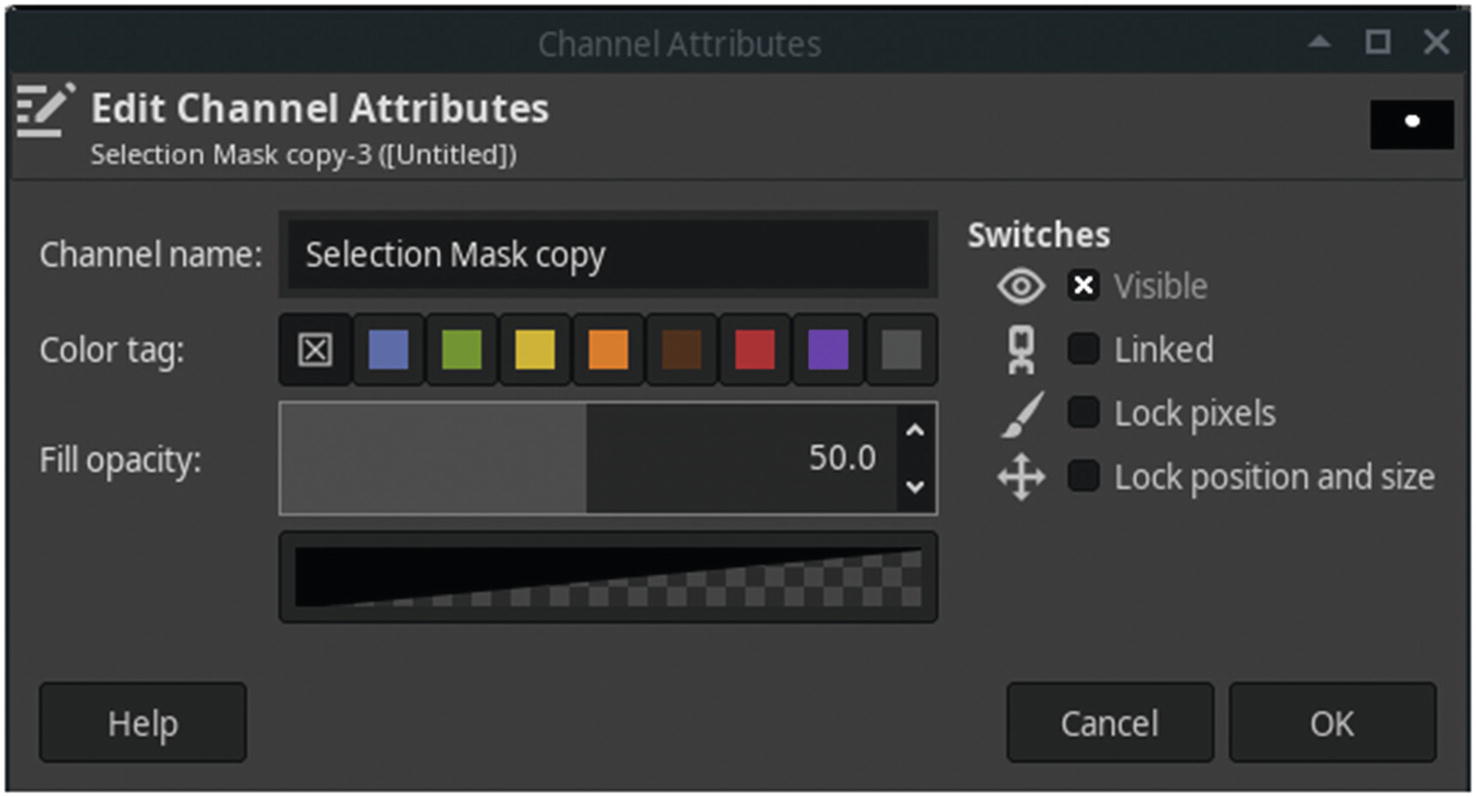
Double-clicking the channel’s thumbnail preview launches the Channel Attributes Dialog
The Channels Dialog
As mentioned earlier in this chapter, Glimpse uses the RGB color model by default, which means that the opened color image is composed of red, green, and blue light in various amounts.
There are times (usually, advanced techniques) when editing a specific color channel is necessary, so they can be easily accessed in the Channels Dialog.
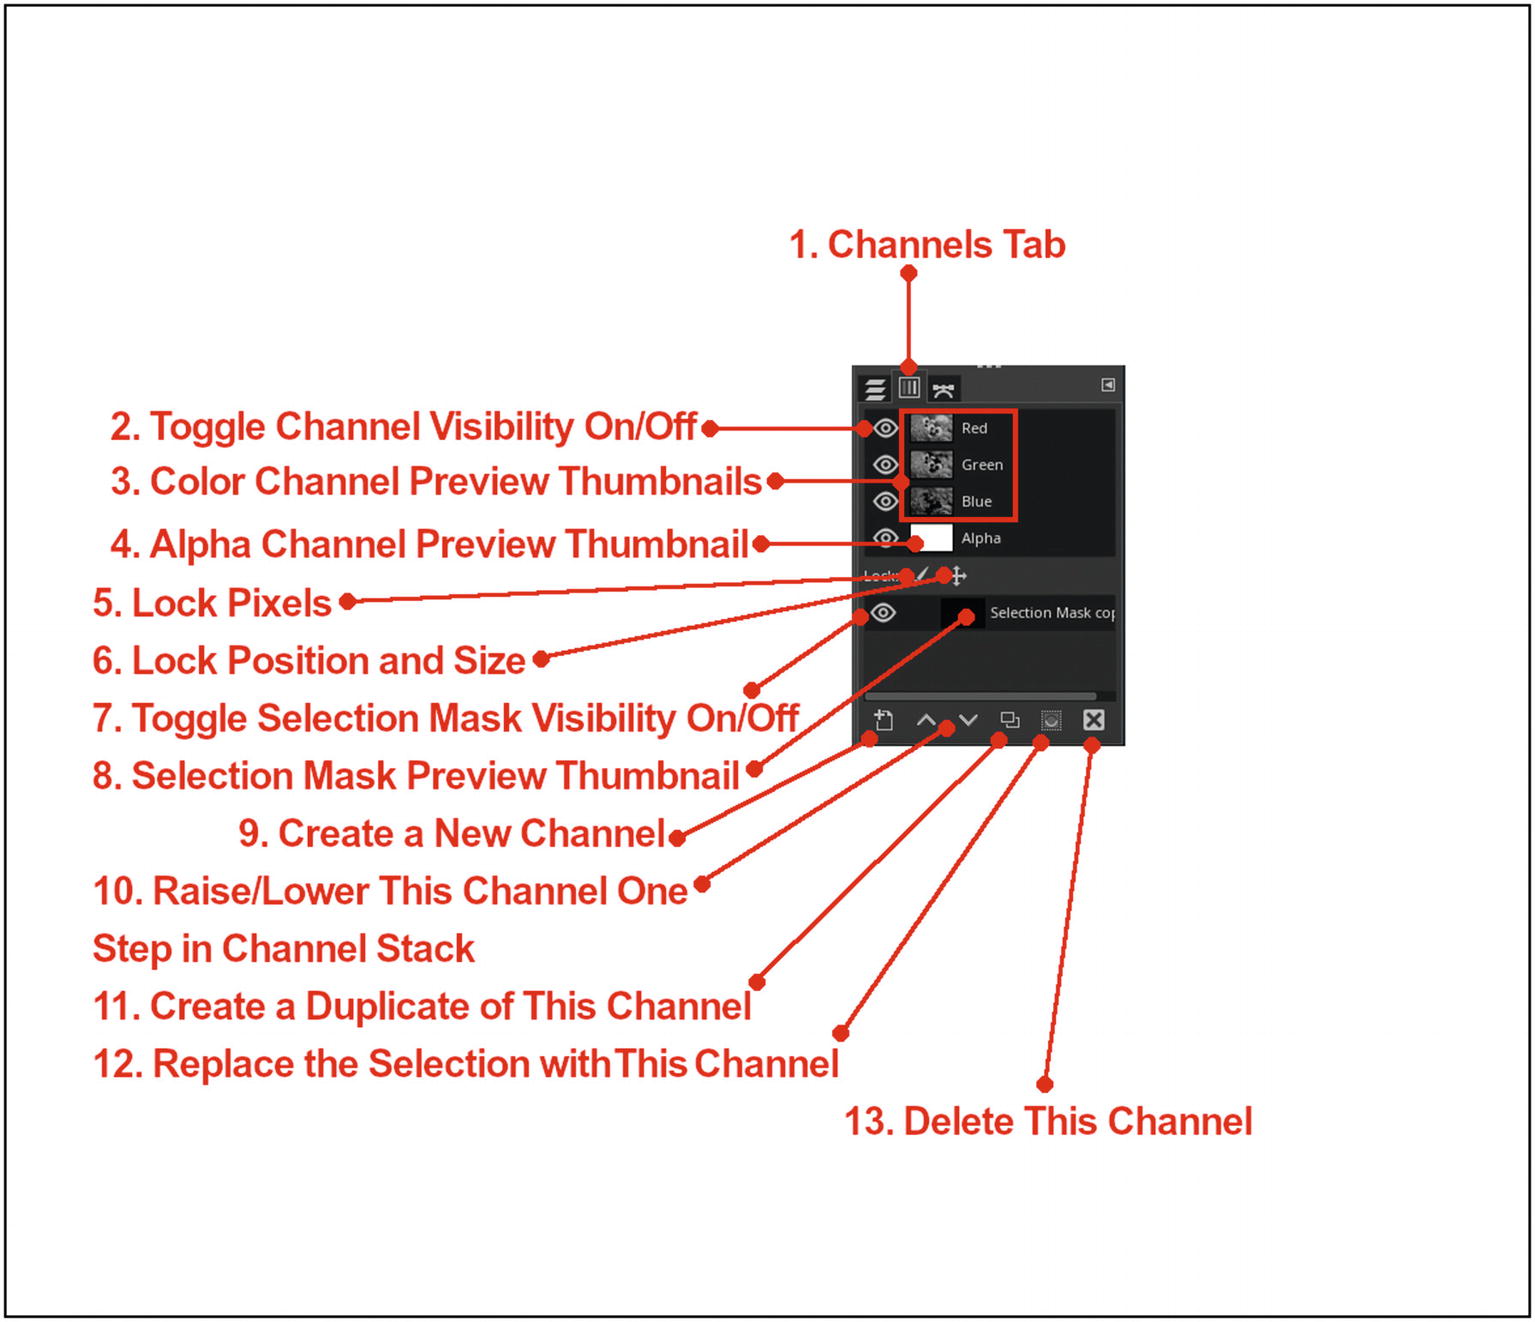
The Channels Dialog
- 1.
Channels Tab—Activates the Channels Dialog when clicked.
- 2.
Toggle Visibility On/Off—Turns the channel visibility on or off; when toggled off, the image only displays the values of the active channels.
- 3.
Color Channel Preview Thumbnails—Displays a small preview image of each color channel.
- 4.
Alpha Channel Preview Thumbnail—Displays a small preview image of the alpha channel (like the RGB channels, the visibility can be toggled on/off).
- 5.
Lock Pixels—Prevents the use of any brush-based tool on the selection mask’s content, protecting it from any unwanted changes.
- 6.
Lock Position and Size—When active, prevents the selection mask from being repositioned or resized.
- 7.
Toggle Selection Mask Visibility On/Off—Turns the Selection Mask visibility on or off.
- 8.
Selection Mask Thumbnail—Displays a small preview image of the Selection Mask (like layers, Selection Masks can be linked together, allowing them to be moved or resized uniformly).
- 9.
Create a New Channel—Creates a new Selection Mask.
- 10.
Raise/Lower This Channel One Level in the Stack—Moves the active Selection Mask up or down one level each time the up or down arrow is clicked; the Selection Mask can also be moved by clicking and dragging the thumbnail image up or down in the layer stack.
- 11.
Create a Duplicate of This Channel—Creates a duplicate of the active channel (selection mask).
- 12.
Replace the Selection with This Channel—Adds a selection to the selection mask.
- 13.
Delete This Channel—Discards the active selection mask.
An Overview of Paths
Glimpse allows the user to draw complex or irregular shapes by creating paths using the Paths Tool. Paths can be used to create illustrations or to make intricate selections (isolating portions of an image).

A path is used to create an editable complex or irregular shape
The path is separate from the image itself, stored away until it’s ready to be converted into a selection, or filled/stroked with a color or pattern to create an illustration.

A bend being made in a line segment by clicking and dragging; anchor points and the Direction Line shown

A selection added to a path
The Paths Dialog

The Paths Dialog looks and functions like the Layers or Channels Dialogs
- 1.
Paths Tab—Activates the Paths Dialog when clicked.
- 2.
Lock Path Position—Prevents the path from accidental movement.
- 3.
Lock Path Strokes—Prevents the path from being reshaped.
- 4.
Toggle Path Visibility On/Off—Turns the path’s visibility on or off.
- 5.
Create a New Path—Enables you to draw a new path independent of others that are already created.
- 6.
Raise/Lower This Path—Moves the active path up or down one level each time the up or down arrow is clicked; the path can also be moved by clicking and dragging the thumbnail image up or down in the layer stack.
- 7.
Duplicate This Path—Creates a duplicate of the active path.
- 8.
Path to Selection—Adds a selection to the active path.
- 9.
Selection to Path—Creates a path from an active selection (the visibility will need to be toggled on to see the path).
- 10.
Paint Along the Path—Applies a color or pattern to the path.
- 11.
Delete This Path—Discards the active path.
- 12.
Path Thumbnail Preview—Displays a small preview image of the path (like layers, paths can be linked together, allowing them to be moved or resized uniformly).
An Overview of Undo History
Undo History provides the means to revert to a previous point in your work. To undo one step, you can simply use the keyboard shortcut Ctrl+Z (to redo one step, use Ctrl+Y). However, it may be necessary to undo a series of operations and start over from an earlier point rather than the very beginning.
If you revert back several operations and then make even a single edit to the image, those steps are gone permanently, and you’ll essentially be working from the point that you reverted to. Examine the operations carefully and make sure you don’t need them before editing.
The Undo History Dialog

The Undo History Dialog is relatively uncomplicated
- 1.
Undo History Tab—Activates the Undo History Dialog when clicked.
- 2.
Previous Operations—Displays “snapshots” of previous operations; clicking a particular thumbnail reverts to that point in history.
- 3.
Last Operation—Thumbnail displaying the most recent operation.
- 4.
Undo Last Operation—Reverts back one step in history.
- 5.
Redo Last Operation—Restores the undone operation.
- 6.
Remove All Operations from Undo History—Removes all of the previous operations from the history.
Chapter Conclusion
A lot of ground was covered in this chapter; we looked at layers and the related topics. We then looked at channels—both the color channels and alpha channels that contain selection masks. Next, we looked at paths and how useful they are in drawing complex or irregular shapes. The last item we looked at was Undo History.
In the next chapter, we’ll look at the tools used in Glimpse.