Chapter 5: Taking Control of the Camera

Introduction
This chapter is about taking greater control of your camera’s operations. Intelligent Auto, Superior Auto, and the SCN modes automatically set the camera’s Focus Mode, shutter speed, and aperture; although this yields a sharp and properly exposed image, it prevents you from adjusting the camera settings and improving the image based on your artistic designs.
You can gain this control by using the Program Auto (P), Aperture Priority (A), and Shutter Priority (S) shooting modes. Essentially, these allow you to control the aperture, shutter speed, or ISO independently while still having automatic exposure provided by the camera. Hence, we consider these shooting modes to be semiautomatic. If used improperly, these controls will result in blurred or out-of-focus pictures, which are inferior to what can be achieved by relying on the camera’s fully automatic settings.
However, when used with care, these semiautomatic modes can create pictures that would be unattainable in any other way, such as recording the night sky or other scenes set in difficult lighting conditions. Unlike the fully Manual Exposure (M) shooting mode, P, A, and S have a degree of automation which speeds up the process of setting exposure. In fact, we tend to use these semiautomatic modes more frequently than the fully manual mode described in the next chapter.
The camera’s ISO value is selected by the automatic modes. When you switch to semiautomatic you can control the ISO setting. The Sony a7/a7R’s ISO command has two option icons, which can be easily confused: [ISO AUTO] and [AUTO]. The Sony’s supplied user guide manual refers to these icons by their descriptive names: [Multi Frame NR] and [ISO AUTO], respectively. In order to prevent confusion, we will reference these options by these descriptive names.
P mode allows the camera to set both its aperture and its shutter speed for proper exposure. Unlike the automatic modes, in P mode you can set the ISO and WB. To use this mode and all the other semiautomatic modes effectively, we recommend taking the camera off of [ISO AUTO] and setting it to a specific value. You will need to monitor your shutter speed to make sure it does not become so prolonged that camera movement softens the image. Although the camera sets both aperture and shutter speed automatically, you have a degree of control because you can choose different combinations of the two with the camera providing a commensurate balance to your setting. For example, the camera may initially set the aperture to f/4.0 and the shutter sped to 1/125 second. You don’t have to use these values. You can change the combination of aperture and shutter speed to another value, such as f/2.8 and 1/250 second or to f/5.6 and 1/60 second. Sony calls these changes Program Shift, and it is accomplished by rotating the front or rear dial.
If you want to take more direct control of the lens opening, turn the mode dial to A. Here, you select the aperture and the camera sets its shutter speed for the recommended exposure. This is called Aperture Priority. In contrast, turning the mode dial to S allows you to select the shutter speed while the camera sets its aperture to obtain the recommended exposure. This is called Shutter Priority. In all three cases, you can override the camera’s recommendations with the exposure compensation dial and apply more or less exposure.
The advantages of using A and S modes is that they allow you to control the depth of field or the appearance of moving objects, respectively. Certain types of subjects require the aperture to be set at a constant value. This is done frequently for macro photography, portraiture, and landscapes. In contrast, to properly render an active subject, you have to have control of the shutter speed. You can attain this control by using S mode. This level of control is not attainable when using either the Intelligent or Superior Auto.
When you carefully evaluate your pictures and decide to exert greater control over the settings, you gain awareness of what you should focus on in the scene. In automatic modes, the camera selects where to establish focus. For example, the factory default for the a7 uses a wide field for focusing. This is suitable for a moving subject when the photographer does not have time to carefully select where focus should be. However, in more leisurely photography, such as capturing a landscape, there is time to identify what region should be in focus. It should be noted that the a7R’s factory default uses a flexible spot for focusing. This allows the photographer to aim the camera at the subject of interest, lock focus on it, and then align the camera to frame the subject properly. The difference between the two default focusing areas reflects Sony’s belief that the a7 is more suited to action photography, and the higher resolution a7R is more suited to landscape photography. In this chapter, we will discuss how to target the automatic focus and how to override it so you can focus manually.
Included in this chapter are detailed descriptions of white balance, ISO, and Focus Area. These functions are now yours to control, and you will have to decide when to choose predefined values for them if you wish to alter their automatic behavior.
Three Semiautomatic Modes: Shutter Priority (S), Aperture Priority (A), and Program Auto (P)
As mentioned earlier, using the P, A, or S shooting modes gives you greater control over your photography. You select these modes with the mode dial.
Program Auto (P)
Program Auto (P) mode sets both the shutter speed and the aperture, and keeps the two in balance. As you turn the front or rear dial, you will see the shutter speed values changing in parallel to the aperture. If you don’t like the aperture or the shutter speed that is set, turn the front or rear dial again to see if you like the results better with a different set of control values.

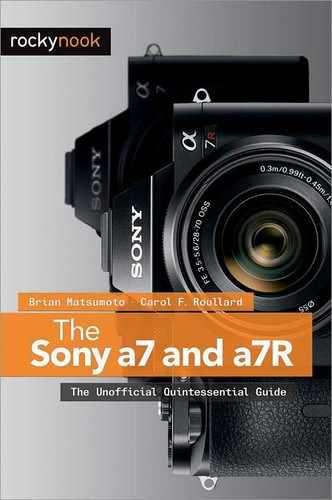
Figure 5-1a: P mode in Live View with an aperture of f/5.0 and shutter speed of 1/100 second
Turn the mode dial to P; you will see the letter P in the upper-left region of the screen along with the camera’s selected aperture and shutter speed combination settings along the bottom of the screen (figure 5-1a). The letter may disappear in certain display options on the LCD screen. If the camera is set to [ISO AUTO], it will allow you a greater range to vary your settings; unfortunately you won’t know what ISO value will be used until you press the shutter button down halfway. At this point, the ISO value will be displayed just prior to taking the picture.
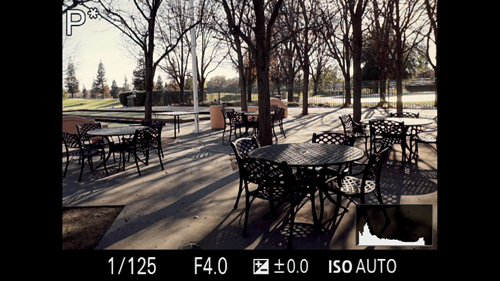
Figure 5-1b: Program Shift by changing the shutter speed or aperture
If you depart from the camera’s recommendation by rotating the front or rear dial, the P is replaced with a P* (figure 5-1b). This is Sony’s symbol for Program Shift. When you apply exposure compensation, two things will occur. The aperture opening and/or the shutter speed value will be altered from the values that the camera had set initially. In either case, turning the exposure compensation dial is shown by a change in the exposure compensation value’s color from white to orange on the display screen (figure 5-1c). This color will turn back to white after a few seconds.
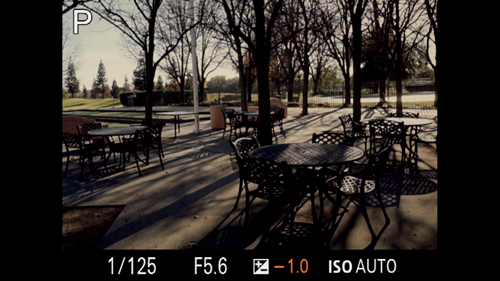
Figure 5-1c: Exposure compensation changed to -1 EV in P mode
The exposure compensation will display differently depending on where you view it. When viewing it on the LCD screen, the exposure compensation is a single ± number on the bottom on the screen. Through the viewfinder, the exposure compensation value is represented by a triangle moving across a scale. Although the scale spans ±5 EV, the exposure compensation dial only lets you adjust by ±3 EV. The larger compensation range can only be set in software. In any case, when you attempt to go beyond the limits of the lens’s maximum and minimum aperture, the f-stop, shutter speed, and the exposure compensation values start flashing.
If you use [ISO AUTO] with P mode, you have the working photographer’s equivalent of Intelligent Auto or Superior Auto. With experience, you can duplicate and improve on the automatic settings with little cost in convenience or speed of operation.
Aperture Priority (A)
Aperture Priority (A) mode allows you to select the aperture, and the shutter speed will be adjusted by the camera for the recommended exposure. This enables you to control the depth of field, which is critical for Extended Depth of Field and HDR (High Dynamic Range) photography. Both of these techniques require that several shots be taken that will be combined in post processing to provide either an increase in depth of field or an increase in the dynamic range of the sensor. For Extended Depth of Field, the focus is changed slightly with each shot, but the depth of focus is kept constant to ensure that sharpness between two adjacent focus settings overlap. Otherwise, there would be blurred regions in the final processed image. In the case of the HDR, you expose the same scene at multiple exposures without changing focus or aperture. The depth of field must be held constant to prevent variations in sharpness between adjacent exposures, causing blurring in those areas.
Additionally, aperture control is important for taking single photographs. By restricting the depth of field, you can force the viewer to concentrate on the subject. In the case of portraiture work, you want the viewer to focus on the model’s face. This is accomplished by focusing sharply on the model’s eyes and using an aperture with a narrow depth of field that blurs the background and foreground.
Turn the mode dial to A to use Aperture Priority. You will see an A in the upper-left corner of the preview screens. Again, the letter may disappear in some display modes. The f-stop value turns orange when you turn the front or rear dial. As its value changes, so does that of the shutter speed. When exposure compensation is applied, the shutter speed varies and the EV numbers for exposure compensation temporarily turn orange.
Two Types of Depth-of-Field Preview
A mode provides a real-time depth of field because it closes the aperture down as you turn the front or rear dial. In essence, the camera measures the decrease of light and uses this value for calculating exposure. This is unlike S and P modes. In these modes, the lens normally stays at its most open aperture, and as you turn the dial, the camera calculates what the exposure should be for the aperture you set. During this change of aperture, the intensity of light does not change and depth of field remains at this narrowest level. When you press the shutter button, the lens closes to set its aperture just before the picture is taken. What this means is that you do not get a real-time depth-of-field preview when composing your subject. To see depth of field, you need to manually close down the lens to its set aperture.
Sony allows you to customize a button (the C1, C2, C3, and center button), and assign it as either the [Aperture Preview] or [Shot. Result Preview] option. Both of these options will narrow the lens aperture when the customized button is pressed. Both show you what the depth of field will be when you take the picture. The one difference between the two commands deals with the appearance of moving objects. Remember that a slow shutter speed will blur a moving object. The [Shot. Result Preview] option provides you an indication of how much blurring will take place when you use the slower shutter speeds. Its effect is imperfect—it will not show the blurring that would result from using a one second or longer exposure, but you may still find it helpful.
Previewing depth of field is an important benefit for the landscape or portrait photographer who uses the lens aperture to focus the person’s interest on the subject. It is critical for macro photography. However, photographers who shoot action shots will eschew this feature.
Shutter Priority (S)
To select Shutter Priority (S), set the mode dial to S. This mode allows you to select the camera’s shutter speed, and the camera will select the aperture for proper exposure. This is advantageous for action shots since a fast shutter speed prevents a moving subject from being rendered as a fuzzy blur. Conversely, for artistic effect, if you want to show a moving subject as a soft blur (a streak across the frame), you can use a slow shutter speed.
Figure 5-2: S mode with shutter speed changed to 1/4000 of a second
Once you select S mode on your mode dial, you will see the letter S prominently displayed on the upper-left corner of your preview screen. Depending on the viewing screen you are using, the letter may disappear after a few seconds. As you turn the front or rear dial, the shutter speed value at the bottom of the display screen turns orange and its number changes (figure 5-2). You will also see the aperture value change in concert, but remain white. When you exceed the maximum or minimum lens aperture, the aperture value will blink to warn you that you’re over (or under) the limit. To override the recommended exposure, rotate the exposure compensation dial and you will see the aperture change from the camera’s set value.

Figure 5-3a: A fast (or short) shutter speed freezes the appearance of moving water
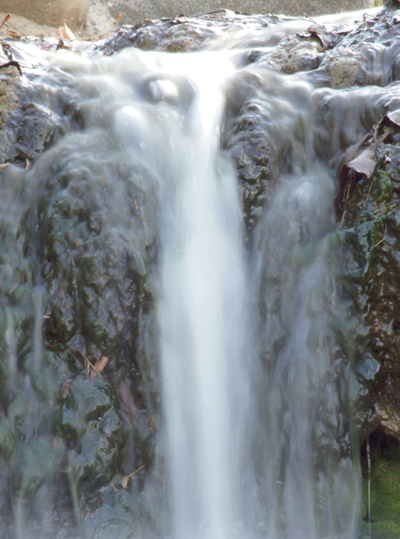
Figure 5-3b: A slow (or long) shutter speed gives moving water a flowing appearance
Setting the shutter speed gives you artistic control over recording a moving subject. You may wish to use a fast shutter speed to freeze the motion (figure 5-3a) or use a slow shutter speed to blur anything that is moving (figure 5-3b).
Aside from creating artistic effects, you may need to use a fast shutter speed to ensure that you get a sharp image. This will prevent blurring when handholding the camera, especially when using a telephoto lens, which magnifies camera movement.
Keep in mind that when you need a faster shutter speed, you must increase the light that falls onto the sensor. This can be accomplished by using a flash or by opening the lens’s aperture. If this is impossible, you may need to increase the ISO. For exposures that require the shutter to be open longer than 1/30 of a second, you should mount your camera on a tripod. This requires that you turn off SteadyShot. Once you are done using a tripod, be sure to set SteadyShot back to [On].
MENU>Camera Settings (6)>SteadyShot>[On], [Off]
Exposure Compensation: Fine-Tuning Automatic Exposure
You can depart from the camera’s recommended exposure only when you use P, A, S, or M mode. If you think the image needs to be brightened or darkened you can rotate the exposure compensation dial at the top of the camera (figure 5-4). This dial provides an exposure range of plus and minus 3 f-stops, in 1/3 f-stop increments. Your electronic viewfinder and LCD monitor will brighten or darken as you depart from the camera’s recommended exposure. The one exception to this rule is if the camera is set using the following command:
MENU>Custom Setting (2)>Live View Display>[Setting Effect ON], [Setting Effect OFF]
In this case, [Setting Effect ON] varies the electronic displays to reflect the change in exposure and the application of color changes. In contrast, [Setting Effect OFF] causes the electronic displays to remain at a constant intensity without variation in brightness.
In our opinion, using [Setting Effect OFF] is counterproductive when you use ambient lighting. The advantages of previewing the effects of light and exposure are lost when you use this option. For example, the color tints that occur when the white balance is set incorrectly are not shown. For us, keeping the default [Setting Effect ON] is most advantageous for our black and white photography. We compose the scene in monochrome, which we can only see if we have set the command to [Setting Effect ON]—viewing it in color is distracting. In short, we find it easier to compose a scene for black and white photography if we can preview the subject in black and white by setting the Creative Style to [Black & White].
Figure 5-4: Exposure compensation dial
You can monitor your exposure whether you are using [Setting Effect ON] or [Setting Effect OFF]. There are quantitative displays with both that show how far you’ve deviated from the camera’s light meter. In the viewfinder, this is done with an EV scale. The O position corresponds to the camera’s recommended exposure and the triangle above the bar shows the extent of exposure compensation being applied. In the case of the LCD monitor when using [Setting Effect OFF], any screen that shows the subject also has an exposure compensation value at the bottom of the screen—a numerical value preceded by a plus or minus sign. The one quantitative feature unavailable for evaluating exposure on the LCD monitor is the histogram. The shape and position of this graphical display does not change as you vary the f-stop or shutter speed because the histogram is collecting the intensity information that will be displayed on the LCD. Since [Setting Effect OFF] keeps the display at a constant brightness, the histogram does not change with varying exposure. This can be regarded as a flaw in the camera design. If the histogram were actually measuring the light intensity directly from the sensor, it would show a change in position and shape as the f-stop and shutter speed varied.
You can also change the exposure without touching the exposure compensation dial. This is accomplished by using either the Fn button or the Quick Navi screen. If the Fn button has been set with [Exposure Comp.] as one of its options, you can select it and vary the exposure by turning either the front dial or the control wheel. You have to exercise a bit more care in the Quick Navi screen. Here, you will find two exposure compensation scales. The top scale is for overriding overall exposure and the bottom scale is for overriding the flash exposure. When adjusting exposure, both scales are highlighted on an orange background. The selected scale to be adjusted turns white while the other scale remains dark (figure 5-5). As with the Fn button, once you highlight the exposure compensation icon, apply your EV offset by turning the front dial or the control wheel. The primary advantage to using these software controls is that you have a greater range to override your exposure with a scale of +5 EV rather than the +3 provided by the exposure compensation dial.
You might be concerned that the camera will become confused when using these controls simultaneously—it won’t. There are only two ways to override exposure: one is the exposure compensation dial, and the other is via the camera’s menu. As mentioned earlier, the Fn button and the Quick Navi screen are gateways to enter the menu quickly through the following command:
Figure 5-5: Exposure compensation scale in the Quick Navi screen
MENU>Camera Settings (3)>Exposure Comp.>[Exposure EV]
This results in the same exposure compensation screen as would have been obtained by using the Quick Navi screen or simply pressing the Fn button.
It turns out that the exposure compensation is the most important control, and its settings are paramount. If the exposure compensation dial is set to a value other than 0, you will find that the menu-based command is disabled and you cannot override the dial setting. Also, if you have set the menu command to alter exposure, the exposure compensation dial, when turned, will reset the menu-based command to a value that is selected by the exposure compensation dial. Basically, the exposure compensation dial trumps the camera-exposure setting.
Consequently, when compensating within ±3 EV, we do not use the Fn button or Quick Navi screen to alter exposure. Using either of these methods is the equivalent of using the menu command to adjust exposure. Moreover, using the Fn button or Quick Navi screen does not allow you to study the changing shape and distribution of the histogram in the live preview mode. This is undesirable because these tools, when used together, are useful for determining the optimum exposure. When using the live preview with the histogram, you can see the extent that you are losing detail in either the shadows or the highlights.
Autofocus
Autofocus Area: Identifying Where to Focus
Most photographers feel the Sony a7 has the more advanced focusing system because it uses a mixture of phase and contrast detection sensors. Phase detectors determine how far and in what direction the subject is out of focus. If the object is far from the camera, phase detectors will direct the motor to bring distant objects into focus. In addition, it can direct the speed with which the motor drives the lens. The further out of focus the subject, the greater the speed the motor will use to obtain focus. Unfortunately, phase detectors can be unreliable with certain lenses. Cameras that rely exclusively on phase detectors, such as the Nikon D800 or the Canon EOS 5D Mark III, have controls that allow the user to fine-tune those phase detectors in case they fail to hit perfect focus. These controls are unnecessary in the a7 because it also uses contrast detection to ensure that the lens achieves perfect focus. In contrast, the Sony a7R has the accuracy of contrast detection, but lacks the speed provided by the phase detectors, which is to say that the a7 should be the superior camera for action photography; especially, for those situations that require keeping the subject focused when firing continuously.
For this reason, many photographers believe the a7 is better suited for shooting sports, while the a7R, with its higher-resolution sensor, is best suited for stationary subjects, such as landscapes. Sony designers appear to feel the same way—they chose the default for the a7’s Focus Area command option to be [Wide]. In other words, it selects its focusing point by using 25 AF focus regions distributed across its viewing screen. When one of these regions is identified as being in focus, its borders turn green. In the case of figure 5-6, six focusing areas were used to establish focus. It is unnecessary to carefully aim your camera to lock focus; instead, you can quickly frame a shot, and the camera will find focus on something within the finder. This is an advantage for quick-grab shots, but there is a chance that the point of focus will not be on the subject of interest.
Figure 5-6: Area used to establish focus (in green brackets)
In contrast, the a7R comes configured to use a single focus area, which is placed centrally on the screen. This is marked by a set of black brackets that are aimed at the subject of interest (figure 5-7). The demarked region is precise enough to ensure that the area enclosed by the brackets will be in focus. When focus is achieved, the brackets turn green. This system works well for stationary objects and objects that are moving slowly. To put this in perspective, if we shoot an active child in play, we would use the a7 default style of focusing. If we were taking the child’s portrait, the a7R’s default style of focus would be preferred.
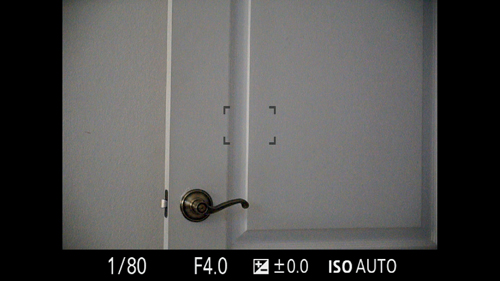
Figure 5-7: Flexible spot focuses in the area of the brackets
Fortunately, you are not locked into any one style of focusing. You have the option to choose what regions to used. This versatility ensures that you do not have to relegate your camera to just one specialized task. To choose your focusing area you can use the menu’s Focus Area command:
MENU>Camera Settings (3)>Focus Area>[Wide], [Zone], [Center], [Flexible Spot]
You can avoid the menu by using the Quick Navi screen, which displays the menu command icons. Select the Focus Area icon to display the menu command. When setting this command, you will see your options on the left side of the screen (figure 5-8, table 5-1). Rotate the control wheel or the front dial to scroll through the options, and press the center button to make your selection.
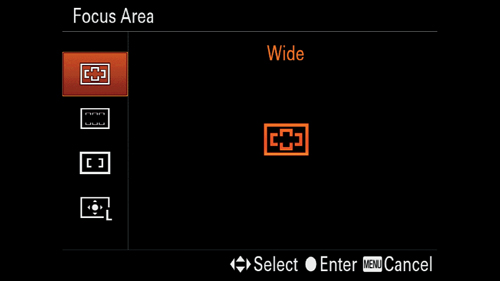
Figure 5-8: Selecting Focus Area command’s [Wide] option
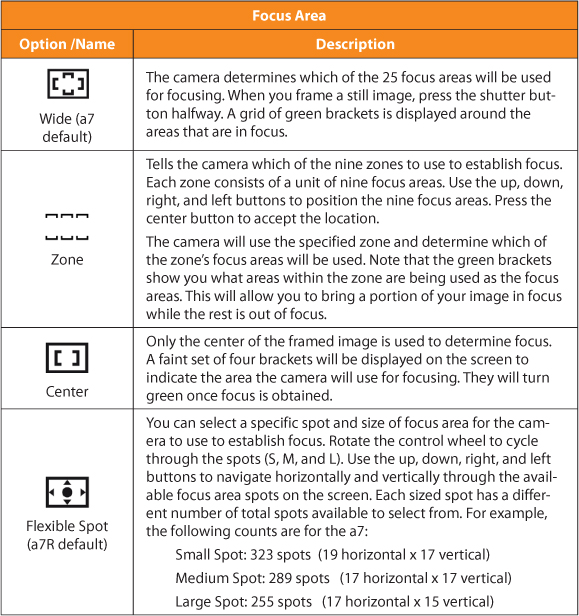
Table 5-1: Focus Area command options. Note that Flexible Spot will have the selected spot size superimposed on the icon’s lower-right corner.
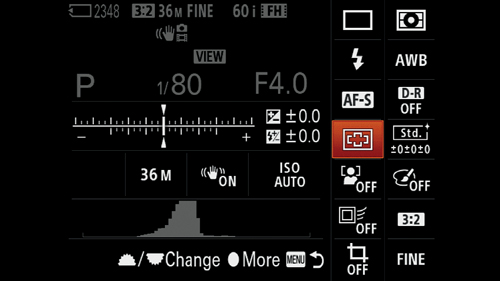
Figure 5-9a: Selecting Focus Area from Quick Navi
The options [Zone] and [Flexible Spot] are more complicated because they control not only the size of the focusing area, but the position. To select these commands from the Quick Navi screen, highlight the Focus Area icon (figure 5-9a) and press the center button. Once the Focus Area command’s options are displayed, highlight the icon for Zone focusing (figure 5-9b) and press the center button. When selected, you will see the focusing brackets. Note that [Zone] uses nine focus rectangles rather than the 25 used in [Wide] (figure 5-9c). The arrows indicate the directions you can position the Zone focus on your screen. After positioning the zone using the directional buttons, press the center button to select the focusing location. When you go to Live View, you will see a set of four brackets when framing your scene. These indicate the zone that will be used for focusing (figure 5-9d).
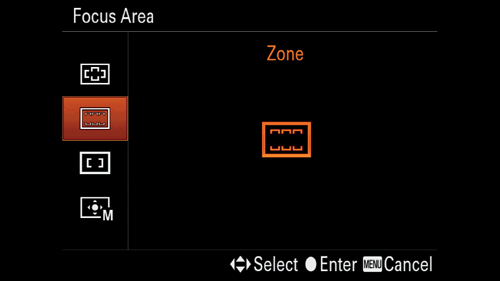
Figure 5-9b: Selecting Zone Focus Area
A more direct way to control the zone focus area is to press the FN button. You will see the selected regions overlaid on your live preview screen. You can decide where you want to position this area while studying its location over the scene. The nine focusing sites display orange borders and can be shifted up, down, to the left, or to the right with the directional buttons. When you select them by either a half press of the shutter button or with the press of the center button, they disappear and are replaced by four brackets that mark the focusing zone (figure 5-9d). When one of the activated areas finds focus, it will show up with green borders.
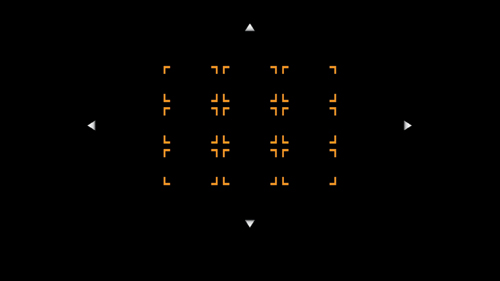
Figure 5-9c: Positioning Zone Focus Area
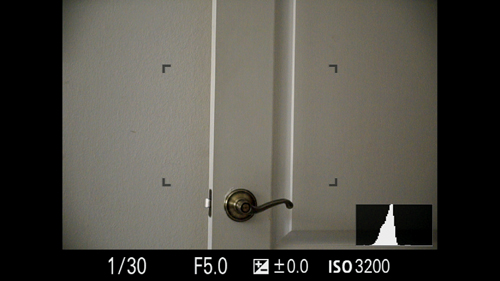
Figure 5-9d: Focus area marked on Live View
Remember that the Focus Area’s icon appearance varies when the Fn button is pressed, reflecting the option that was last selected. When the proper box in the Fn row is highlighted, the words “Focus Area” appear on the screen just above the top row of the Fn command. Press the center button to display the list of options: [Wide], [Zone], [Center], and [Flexible Spot]. When you highlight Flexible Spot (figure 5-10a), you will see an orange letter (S, M, or L) designating the size of the spot on the screen. At this point, the right and left buttons can change the size of the spot. When you are happy with this selection, press the center button and you will see the orange brackets that you can position within the screen (5-10b) using the directional buttons: up, down, left, and right.
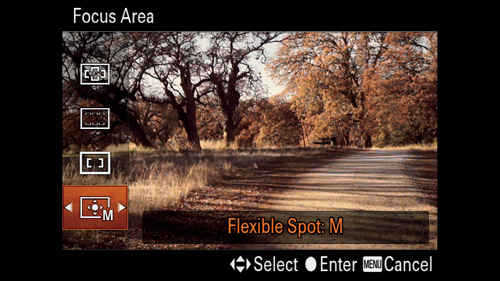
Figure 5-10a: Focus Area command with Flexible Spot M highlighted
The orange color of the brackets indicates you still control the size of the spot. If you turn the control wheel, you can vary the focus bracket from [S]mall, [M]edium to [L]arge and match it for your subject. Once satisfied, press the center button. The orange brackets turn black, become fixed, and cannot be changed. In figure 5-11a, you can see how small this focusing area can become. When in Live View, a half press of the shutter button will start focus. When focus is achieved, the brackets turn green (figure 5-11b). Essentially, you can use the Fn button to quickly activate the Focus Area command without having to use the camera’s menu. An additional advantage is that the selected focusing areas are visible as overlays on your subject, enabling you to select the one that will best identify the subject of interest.

Figure 5-10b: Orange brackets indicate available positioning and sizing
One important point to consider is Face Detection. If you have Face Detection turned on, the camera will detect the face, but it will not focus on it unless it is within the selected focus area. The a7/a7R has, in its default configuration, a feature that selects the eye and uses it as the focus point when you press the center button (Face Detection must be enabled).

Figure 5-11a: Orange small flexible spot positioned in the center of the screen
Choosing a Focus Area
The Focus Area command’s [Wide] option tells the camera to use any of the 25 areas to determine focus. When the shutter is pressed halfway, green brackets mark the area that the camera has used to establish sharp focus. If your subject does not have green brackets around it, it may be out of focus.
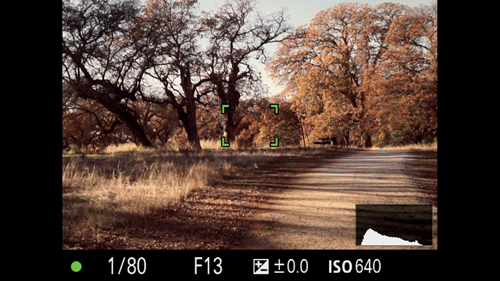
Figure 5-11b: Green medium flexible spot that has obtained focus
To increase your precision for focusing, you can specify a more limited region to be used for that task. The [Zone] option narrows down the available focusing areas from 25 to 9. The [Flexible Spot] option narrows it down even further by letting you choose only one focusing area that can be varied in size from [L] down to [S].
Normally we set the focus area to the default option for the a7R: the medium-sized [Flexible Spot]. Although it is not the default for the a7, we use it on this camera as well since it ensures that the camera focuses on what we deem is important. This selection is a good choice for either stationary or slow-moving subjects. We seldom use [Center]. We feel this command is redundant because [Flexible Spot] has the advantage of changeable size and position. Also, if you have positioned the point of focus in [Flexible Spot] or [Zone] in the periphery of the screen, you can bring it back to center by pressing the C3 button.
When the subject is active, we use the [Zone] option. This option rapidly acquires focus without the need to aim the camera precisely, and provides a narrower field of selection than [Wide]. Unfortunately, it doesn’t always record the best picture. You may want only your subject to be in focus and the rest of the image to be deemphasized by being blurred. When the subject is stationary, we prefer to use a single focus point by selecting either [Center] (the center focus point) or [Flexible Spot], and choosing a focus point that lies outside the center of the screen.
In the case of photographing an animal from a distance, we like the animal’s eyes to be recorded sharply with a reflective glint. We accomplish this by setting the Focus Mode (described next) to [Single-shot AF], and selecting Focus Area’s [Flexible Spot]. By aiming the focusing target at the animal’s eyes, we can lock focus with a half press on the shutter button. While holding the shutter button halfway, we can adjust our framing, knowing that the eyes will stay in focus. When we are satisfied with our composition, we capture the image by fully depressing the shutter button. Sometimes we choose to use the smallest [Flexible Spot] size to accomplish this goal.
Focus Mode
The Focus Mode command specifies to the camera how it will focus: either focus once and shoot or focus continuously and shoot.
MENU>Camera Settings (2)>Focus Mode>[Single-shot AF], [Continuous AF], [DMF], [MF]
By using the Focus Mode command’s [Single-shot AF] option, the camera will identify focus, lock focus, and then shoot. Partially depressing the shutter button will keep the focus locked. In contrast, when you use [Continuous AF], the camera’s focusing motor is kept active so that it will continually refocus. This constant updating of the focus helps maintain a sharp recording of the subjects that are moving away from or toward the camera.
Note: [Single-shot AF] and [Continuous AF] are usually displayed as AF-S and AF-C, respectively.
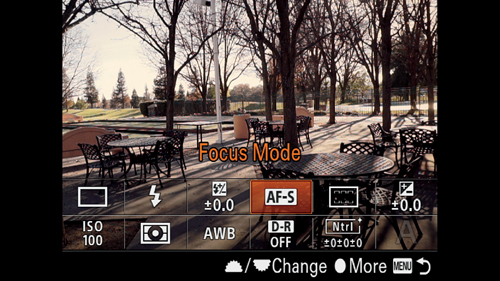
Figure 5-12a: Focus Mode command’s Fn [Single-shot AF] option highlighted
A faster way to select these commands is to press the Fn button and select the Focus Mode icon at the bottom of the screen. The default option is [Single-shot AF] (figure 5-12a), and you can switch it quickly to [Continuous AF] (figure 5-12b) by rotating the control wheel or front dial. Focus Mode command is also on the Quick Navi screen (figure 5-12c).
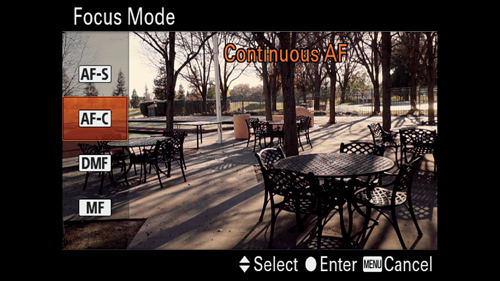
Figure 5-12b: Focus Mode command’s [Continuous AF] option selected
There are two additional options: [DMF] and [MF]. The first is a rapid means to transition to manual focus after autofocus is achieved. The second option, [MF], switches you directly to manual focus. Both of these manual focusing options will be discussed in the next chapter when we cover M mode.
Figure 5-12c: Focus Mode [Single-shot AF] command highlighted in Quick Navi screen
Autofocus in Dim Light
You may find that in a dimly lit scene the camera projects a beam of red light from the front of the camera to illuminate the subject. At short distances, this is enough to aid automatic focusing; however, in some dimly lit environments, like shooting images of performers on stage, a red light can be annoying to the subject. In this case, you may want to disable the AF Illuminator so the red light will not be used. To do so, use the following command:
MENU>Camera Setting (3)>AF Illuminator>[Auto], [Off]
[Auto] is the default value enabling the camera to turn on the AF Illuminator in low-light situations, whereas the [Off] value means the light never turns on. If you turn this option off, you will notice that focusing becomes slower and more hesitant before locking. To counter this effect, you can try a couple of strategies. First, make sure the camera is using the widest aperture lens available. You will have better luck using the prime lenses: the 35mm f/2.8 and the 55mm f/1.8 lens. Both of these will provide more light to the sensor than the zoom lenses and this additional light can make a difference in automatic focusing. Second, regardless of which lens you use, make sure the camera is using its widest (most open aperture). This is especially important if you use M or A mode. In these two modes, the camera is metering and focusing at the set aperture of the lens. If the aperture is slightly closed, this will rob the sensor of light. This is not a factor if you are using the P or S mode because the lens is always maintained at its widest aperture in these modes.
As an informal test, we experimented with autofocusing with our a7R camera with the 24-70mm f/4.0 Zeiss lens under low light conditions. When in Zone focusing mode, we obtained reliable autofocus at an ISO of 6400 at f/4.0 at 1/80 second. At this light level, we found the Flexible Spot Focus Mode functionality to be less reliable than the Zone mode, so we made the Zone mode our standard choice when the light is low.
ISO
The default ISO for the camera is [ISO AUTO], in which the camera sets the sensitivity of its sensor in a default value range from (minimum) 100 to (maximum) 6400. Many photographers, ourselves included, do not care for the maximum limit. We prefer to set the ISO to 3200. If we need a higher ISO, we like to be able to specifically select the ISO value ourselves.
There are three options for adjusting the maximum limit. The first option is to input the following menu command:
MENU>Camera Settings (3)>ISO>[Multi Frame NR], [ISO AUTO], [n]
(Where [n] represents an ISO number from 50 to 25600.)
As mentioned at the beginning of the chapter, rather than referring to the first two ISO command options by option icon, ISO AUTO and AUTO, as we do with other commands, we will refer to them by their descriptive names, Multi Frame NR and ISO AUTO, to remain consistent with the Sony user guide manual.
When you highlight the ISO command icons via the menu and press the center button, you will see a screen like the one in figure 5-13a, which has a series of numbers or letters on its left side. This plate shows that the setting of this command is [ISO AUTO]. The [ISO AUTO] option allows you to set the minimum and maximum limit (range) from which the camera can select an ISO to use. The screen prompts indicate that you can press the right button to reach a screen that gives you the option to select either ISO 100 (AUTO Minimum) or ISO 6400 (AUTO Maximum). In either of these two cases, the up and down buttons allow you to change values. Once you complete your settings, confirm them by pressing the center button.
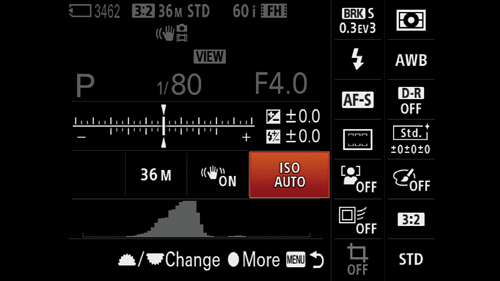
Figure 5-13a: ISO command’s [ISO AUTO] in Quick Navi
The second way to set the ISO value is to use the Quick Navi screen. This is a quick entry into the menu system. Highlight the region labeled ISO (figure 5-13b) and press the center button. Once in the menu system, you will see the screen shown in figure 5-13a.
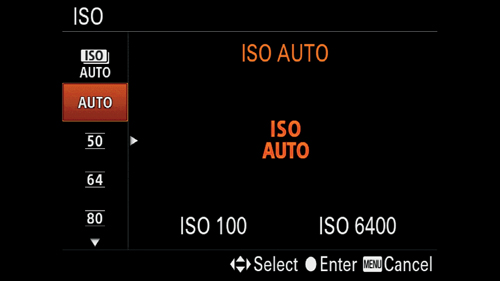
Figure 5-13b: ISO command’s [AUTO Minimum] [AUTO Maximum] options displayed
Another method of changing the ISO is to use the Fn button. This option avoids navigation through the menu. Highlight the ISO icon and press the center button to see the available ISO values (figure 5-14a). Again, when [ISO AUTO] is selected, pressing the right button will display screens for setting the maximum and minimum [ISO AUTO] limits (figure 5-14b).
As mentioned earlier, when you set your own ISO value, you need to keep an eye on the shutter speed. If your shutter speed is too slow (becomes too long), it is more likely that your camera will move during the exposure and blur the image. When shooting handheld, a rule of thumb when using 35mm film is to use a shutter speed that is the reciprocal of the lens’s focal length. If you set the lens to 100mm, then you should set a minimum exposure of 1/100 second. For digital photography, this guideline does not take into account Sony’s SteadyShot feature. This is normally set to [On], and can allow users to use longer shutter speeds.
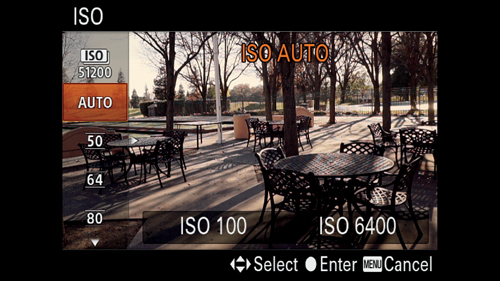
Figure 5-14a: ISO command’s [AUTO Minimum] and [AUTO Maximum]
However, SteadyShot is no guarantee for sharp pictures with handheld photography. If you jerk or move slightly during the point of exposure, SteadyShot may not counteract this, resulting in a blurred photograph. Also, under certain conditions the blur may be the result of the movement of your subject. Keep in mind that when you shoot at the outer limits stated in review articles, or in this book, you will always get some technically unacceptable shots. So do not hesitate to take multiple shots of the same scene and review them afterwards to make sure you have images you are happy with.
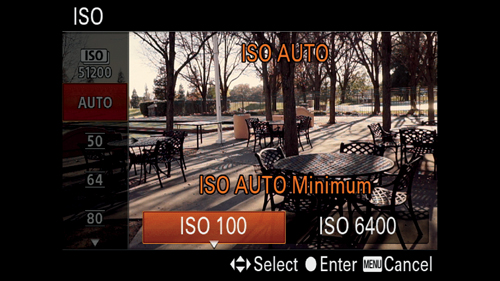
Figure 5-14b: ISO command’s [AUTO Minimum] highlighted
Obviously, there are many variables that affect how slow a shutter speed can be before the images will blur. One of the simplest ways to work with longer shutter speeds is to brace the camera while you take the picture. An advantage in using the viewfinder is that you can press the camera body against your face for increased stability. We hold the camera with two hands (one underneath the lens), and make a point to press our elbows against our body. In contrast, when you use the LCD screen, you are holding the camera out away from you and cannot brace the camera against your body. Using these techniques is especially important when working with the a7R, whose mechanical shutter curtain generates more vibration within the camera body. Although [ISO AUTO] is a convenient feature, we limit its range to ensure we get the quality of pictures we prefer. Since ISO is so critical in determining your working shutter speed, we tend to use the control wheel to manually set the ISO when doing critical work with a telephoto lens, or when we need to follow fast action. Having this control allows us to use an ISO that has the right balance between image quality and sensor sensitivity.
Multi Frame Noise Reduction
This is a special ISO setting for reducing the appearance of noise for stationary subjects. Its icon can be confusing since it uses the words “ISO AUTO.” However, the icon is distinguished from [ISO AUTO] by highlighting ISO with a white flag (figure 5–15a) whose appearance resembles the icon used for Cont. Shooting. The icon, as well as the name “Multi Frame Noise Reduction,” refers to its process of taking four photographs, combining them, and taking an average of the intensity values of each pixel. Because noise is random, treating it as a statistical problem can reduce its appearance within the scene. This is the only ISO setting that restricts you to shooting JPEG files: you cannot use either [RAW] or [RAW & JPEG] with this command.
If you have used either of the SCN modes, [Hand-held Twilight] or [Anti Motion Blur], you may have already used this function. The factory default is for Multi Frame Noise Reduction to set its ISO automatically, so you will not know what value will be used prior to taking the photograph. In P, A, S, or M mode we prefer using this command by setting its ISO manually. With Multi Frame Noise Reduction, you will find that you can set the EV to 51200.
To make this adjustment using the Quick Navi screen, select the ISO icon on the screen and press the center button. (Note that our screen shots are based on using Sony’s default settings.) You will see the ISO settings on the left side of the screen. Select the icon at the top of this list that has ISO on a white flag with AUTO underneath it (figure 5-15a).
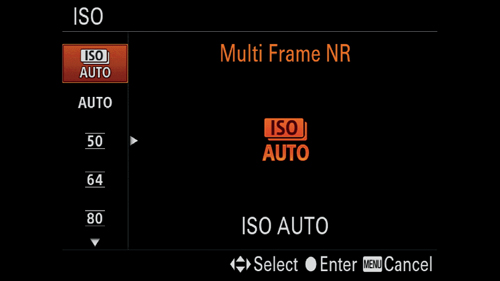
Figure 5-15a: Multi Frame Noise Reduction’s ISO AUTO option selected
The [Multi Frame NR] option also has a submenu. You can let the camera decide the ISO value by selecting ISO AUTO or you can choose a specific value. If you press the right button, you will see ISO AUTO in a red bar (figure 5-15b). Pressing the down button brings up a series of numbers ranging from 100 to 51,200. Choose which of these ISO values you wish to use with Multi Frame Noise Reduction (figure 5-15c) and press the center button to accept your selection. With experience, you can judge how high an ISO you can use in extremely low-light conditions with this feature. We have used an ISO as high as 51,200 with this setting. We generally do not use an ISO higher than ISO 12800; if the subject is motionless, the image will be clean and exhibit little noise.
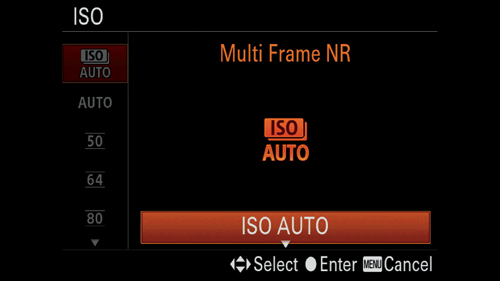
Figure 5-15b: In the Multi Frame Noise Reduction’s submenu to select an ISO value for the function

Figure 5-15c: Multi Frame Noise Reduction’s ISO value of 51,200 selected
Unexpected Changes In ISO
Some users have complained that the ISO values can change unexpectedly on the Sony a7/a7R. Apparently while handling or carrying the camera, the control wheel is inadvertently rotated, thus changing its setting. To avoid this problem, use the following command:
MENU>Custom Settings (6)>Dial/Wheel Lock>[Lock], [Unlock]
Once you have selected [Lock], you will find that your camera will operate as it did before, but with one important modification. If you press the Fn button and hold it down for at least three seconds, you will see a “Locked” message displayed on the camera’s screen. This indicates whether your dials and wheel will be operational. To unlock the dials and wheel, press the Fn button again for three seconds and the “Unlocked” message will be displayed. You can also change the Dial/Wheel Lock command to [Unlock], and the control wheel and dials will be active for changes whenever the camera is turned on. When the camera is locked, a Locked icon will be displayed in the lower-right corner of the screen.
White Balance
The Sony a7/a7R has to be calibrated so that it can record colors accurately. In effect, the camera must be told what type of light is illuminating the subject. This task used to be performed manually; however, the method was inconvenient, and if a mistake in identifying the light source was made, an image with erroneous colors would be created.
To get around this problem, camera designers developed automatic white balance (AWB), which enables the camera to calibrate itself to the light source. In essence, this feature takes a statistical sampling of the light in the image and makes a best guess about what type of light is illuminating the scene. AWB is automatically chosen when using Intelligent or Superior Auto, or when in the SCN modes.
For the most part, it does a good job; many photographers are happy with the results and will only use this setting. But, like all statistical sampling techniques, it is not foolproof. This is most evident when working with indoor lighting, which can give your images a ruddy color cast. Fortunately, you can compensate for this in the Sony a7/a7R by selecting preset white balance (WB) values. To do this, you must use P, A, S, or M shooting modes.
To better control the appearance of your photograph, we recommend that you become accustomed to setting your own WB. Your results will be more consistent and reproducible if you get into this habit. To do so, use the following command:
MENU>Camera Settings (4)>White Balance>multiple options
There is a long list of WB options. Rather than list all the values on the command line, we prepared table 5-2, which contains the available options. For many users, the preset options are sufficient. The remaining WB settings, which require direct user input, such as a customized WB or assigning a color temperature value, will be discussed in Chapter 6 on Manual Exposure.
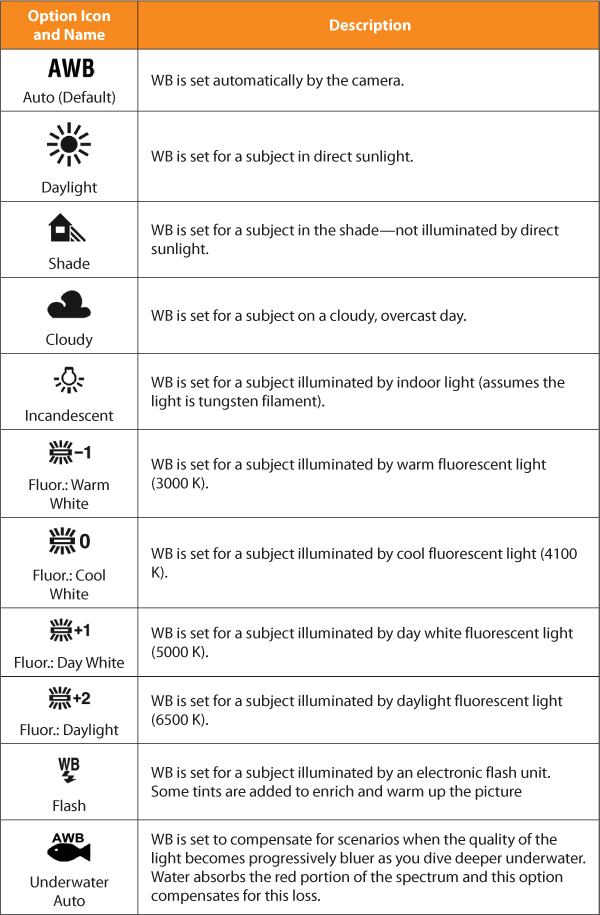
Table 5-2: WB icons and light sources
You can set the WB through the menu, Fn button, Quick Navi screen, or by simply pressing the button labeled WB. When using the Fn button, find and press the WB command among the 12 icons (figure 5-16a). The WB screen displays the WB icons on the left, and the highlighted option’s name will be at the top center (figure 5-16b). As you can see, the list of WB preset options is long. Rotate the control wheel to scroll through the options. You will see the affect of the highlighted WB option applied to the Live View image as you cycle through the different WB presets (figure 5-16b). This gives you a quick appreciation of the effects of different light sources. Highlight the WB preset you want to use and press the center button.
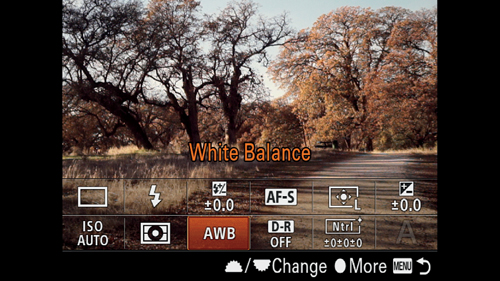
Figure 5-16a: Fn button screen showing WB icon set to AWB
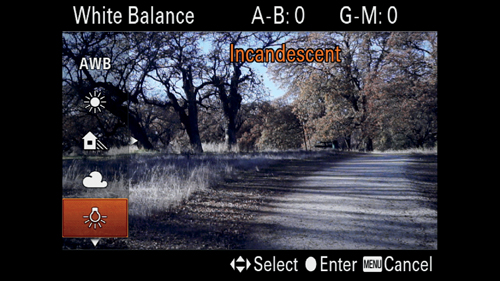
Figure 5-16b: Incandescent WB preset selected
An interesting feature is Underwater Auto. This is for those who have an underwater housing and will be taking pictures while snorkeling or scuba diving. As you submerge into the depths, water absorbs the red light wavelengths, giving a blue tinge to the scene. This tinting is sufficiently enough that the AWB cannot provide a neutral coloration to brightly colored sea creatures. Their natural colors can be recorded by setting the camera to Underwater Auto, which balances out the increased blue coloration.
Remember that WB presets are only an approximation of the illuminant’s color. For example, the [Incandescent] option assumes an ideal bulb emitting a specific color of light. In fact, general-use bulbs for indoor lighting can have a wide range of color values, and only specialized technical bulbs are rated for a specific color. In many homes, the brightness of an incandescent light can be dimmed, which shifts the color from a brilliant white to a ruddy red. Inaccurate WB occurs frequently under fluorescent bulbs. They vary so widely in their color output that the a7/a7R has four presets for them. The easiest way to determine which setting to use is to cycle through them to see which one provides the most neutral color in the display screen. Although Sony characterizes these presets as warm white, cool white, day white, and daylight color, you will find that these settings frequently do not match the manufacturer’s description of the bulb. To deal with such conditions, Chapter 6 offers some techniques for manually adjusting the WB.
Working Outside the Camera
Introduction
There are many ways to view and manage your pictures and movies outside the camera. At the most basic, you can treat your camera as an output device. Its pictures and movies can be played directly from the camera to the TV. Alternately, you can make adjustments to your picture within the camera using applications, and upload the images and movies to social media sites. Eventually, though, you will want to download your pictures to a computer and work with them. While this does add an extra degree of work, it allows you to get the most out of your photography.
The technology you use depends on your equipment and software, as well as your level of knowledge. Rather than go into the details of how to use various technologies, we recommend that you consult your equipment and software manuals, along with their corresponding websites, for specific information on how to accomplish your goals.
Downloading Pictures and Movies to Your Computer
Eventually you will want to download your pictures and movies from your camera’s memory card to another device, most likely your computer, and then delete them from your memory card. Sony supplies Image Data Converter and PlayMemories Home software to help you manage your files on your computer and create lasting files for you to share and view. Of course, you can use third-party software instead, such as Adobe Photoshop Elements or Apple iPhoto for still photographs, or iMovie for movies. Sony does not supply the software on a disc. Instead you have to go to their website and download it.
First, a caveat on Sony software. It has the benefit of being free and you can avoid having to buy a program to work on your RAW files. Having said that, we feel that third-party software, such as Adobe Lightroom and Apple’s Aperture, are easier and faster to work with.
There are two ways to download your files to your computer. The first is to use the supplied USB cable and connect your camera to your computer’s USB port. Typically, if you have installed an image-processing program on your computer, a prompt will pop up on your monitor to direct you in copying the file to the computer. For example, PlayMemories Home program appears automatically and shows the RAW, JPEG, MP4, and MT5 files stored on the camera’s memory card. Select and import your files to your computer’s hard drive. This is a straightforward process, but it does consume camera battery power to move the files. If you deplete your battery during the download, your files may be corrupted and lost. If you use this download method, make sure you have a fully charged battery.
The second way is to download the files directly from the memory card. Remove the card from your camera and insert it into a card reader that is connected to your computer’s USB port. Card readers are devices that have a slot for one or more types of memory cards. In many cases, laptop computers have an SD cardreader built into their chassis. You simply insert the card into the slot and start your download. In essence, you treat your SD card as an external hard drive and transfer files like you would data files for a computer. Again, if you have a PC with Image Data Converter and PlayMemories Home software, you will see prompts to save your files onto your computer. After the files are downloaded, you can organize, edit, and display them.
In the case of Macs, which update the RAW conversion files of new cameras with updates in their OS, you will be able to see the RAW files in preview.
You can treat the card as if it is an external hard drive and use your computer’s OS to physically transfer the files to your hard drive. This strategy works well with still photographs or MP4 files. However, it does not work as well for AVCHD files because they are stored on the memory card in a bewildering array of subdirectories, making it unclear what to download and where to save the associated files. This is especially true if you intend to burn the movies onto a DVD so you can play them on your digital player. In this case, relying on a program such as PlayMemories Home or iMovie facilitates the correct, logical downloading of AVCHD movies to your computer.
Please keep in mind that PlayMemories Home for the Mac is different from that for the PC. In the case of the former (at the time of writing of this book), there was no command for burning AVCHD files to disc for playback. In the case of the latter, there is a prompt for making such discs.
If you want to process your files and use more advanced software than the supplied Sony programs, you can use proprietary software. Apple Aperture ($80) and Adobe Lightroom ($79 upgrade) are two programs that provide a way to organize and manipulate images on your computer. More advanced users might want to try Adobe Photoshop ($9.99 monthly subscription). Other options are Adobe Photoshop Elements ($99.99 MSRP) and Apple iPhoto ’11 ($15). There are even two free choices for either Windows or Macintosh computers: Picasa (picasa.google.com) and GIMP (gimp.org).
Sony a7/a7R Software
Your Sony a7/a7R camera does not come with software on a CD. If you want to use Image Data Converter 4.0 and PlayMemories Home, you will have to download them from the Internet, using the following Sony’s a7/a7R’s url:
http://esupport.sony.com/US/p/model-home.pl?mdl=ILCE7&LOC=3#/manualsTab
We’ve provided the url, but the risk of mistyping the address is fairly high. We noticed in our earlier books that typographical errors can defeat our good intentions, so we have provided url links to the software download, camera manuals, and online user guides on our websites:
If you are not already using third-party image processing programs, try Sony’s free, supplied software. We suspect that you will soon outgrow this software (and most expert photographers will simply ignore it). Apple computers provide updates to their OS that provide RAW translation so that you can view your files in your directory and Preview program. However, we recommend that you download Image Data Converter 4.02—this version can open and process both RAW and JPEG files. Its advantage is that you can mimic some of the effects that you would initiate in your camera. Of particular interest is Sony’s DRO feature. This is the Dynamic Range Optimization, and when used in the camera, it lightens shadows. If you use Image Data Converter 4.02, you will see that it allows you to apply DRO to your images. The effects are not identical to what can be done by using the camera settings for this option; however, it provides a useful learning tool. By opening your RAW files with this program, you can experiment with applying different DRO settings to get a feel for what this option does to your images.
We prefer using Apple’s Aperture or Adobe’s Lightroom for working with still images, since these programs execute image-processing faster than Image Data Converter. However, if you’re shooting in RAW format, Image Data Converter allows you to get the best quality images from your Sony a7/a7R as soon as you receive the camera. With third-party software, you first need to make sure your software is current and capable of translating your Sony RAW files. The latest versions of Aperture and Lightroom will read and work with a7/a7R RAW files.
Image Data Converter
Although Image Data Converter can view JPEG files, its ability to process these files is limited. It is designed for processing Sony RAW files to adjust brightness and WB, and to optimize the dynamic range. You can also apply Creative Style options, experiment with DRO (Dynamic Range Optimization), add shading compensation, sharpness, and noise reduction, along with some other image-processing functions. Figure 5-17 shows a screen shot of an image opened in Image Data Converter. The software also lets you do some minor image processing to JPEG files, such as rotating an image and adjusting its tone curve. Files can be saved as Sony RAW, 16-bit Tiff, or JPEG.
If you do not have an image-processing program, Image Data Converter is definitely worth using. When we obtained the a7/a7R, third-party software RAW converters were unavailable and Image Data Converter was the only way to work with these files. For editing, we would take the Sony ARW file and convert it to a 16-bit tiff. A wide variety of image-processing software packages will handle this file type.

Figure 5-17: RAW image open in Image Data Converter
We used Image Data Converter until the RAW converters came out for Photoshop and Aperture. Now we use these programs because they need less time to process a RAW file. Aperture and Photoshop are not free, but Image Data Converter is included with your camera. We have worked with the software on a Dell computer with a quad-core processor (i7) and a MacBook Pro with a quad-core processor. In both instances, the program was workable, but it took a second or two to execute a function or open a pull-down menu.
PlayMemories Home
You can download your images (pictures and movies) onto your computer using PlayMemories Home. The program lets you organize and maintain files in folders. Not only can you view your files by name, file type, or as thumbnails, but you can also add date information and organize them in a calendar structure. For AVCHD movies, with their complicated file-storing system on the camera’s memory card, this is the most convenient way to transfer files to your computer. If you use a Windows machine, we feel PlayMemories Home is a worthwhile program. You can convert your AVCHD files to playable discs. However, we were unenthusiastic about this program for the Apple computers, and prefer to use iMovies, which can download and transcode AVCHD files to our computer. It provides us with more movie-editing capability than the Sony software package. For professional work with the Apple computer, we would recommend using Final Cut Pro for working with still and movie files.
Playing Pictures and Movies on Your TV Screen
The Sony a7/a7R can be connected directly to your TV, but you will need to purchase an HDMI cable to connect them. We recommend that you consult both the camera and TV manual, as well as the manufacturers’ websites, to get up-to-date information.
After the camera is connected, you can play your slide shows on your TV. One advantage of viewing your slide show on a wide-screen HDTV is its size. It is huge compared to the camera’s LCD screen, making it possible to comfortably show your pictures and movies to several friends at once. You will be able to better appreciate the definition, color, and contrast of your pictures and movies when they are shown on a large screen.
As mentioned in Chapter 3’s Slide Show section, if you have a 4K-compatible TV, an additional Playback option will be displayed:
MENU>Playback (2)>4K Still Image PB>[OK]
This command will allow you to play back your still images in 4K on the attached, compatible TV.
Printing Your Pictures
You can print your images with third-party software or the supplied PlayMemories Home software, or you can utilize Sony a7/a7R’s Specify Printing command and then take your memory card to a print shop that supports digital print order format (DPOF). Make sure the print shop can handle your images properly. Discuss any restraints the shop might have to make sure you can get the desired print results.
There are three controls within the Specify Printing command:
MENU>Playback (2)>Specify Printing>[Multiple Img.], [Cancel All], [Print Setting]
The [Multiple Img.] option displays all of the saved files on the memory card, regardless of their file type, starting with the last one recorded or played back. To select specific images for printing, do the following:
- Select the [Multiple Img.] option. The recorded images are displayed with a check box in the middle-left side of the display screen.
- Scroll through the images to find an image you wish to print.
- Press the center button. An orange check is entered into the check box to indicate the image should be printed. To unselect for printing, uncheck the image by pressing the center button again. Note: even through your movie files will be displayed, they will not be displayed with a print check box.
- Once you have indicated all of the images you wish print, press the MENU button to enter the checked images.
- Select [OK] to save the print indicators and press the center button.
- Once the process is completed, press the center button to exit.
The [Cancel All] option erases all of the existing check marks so no images are selected for print. You will be asked to validate your request by entering [OK] twice via pressing the center button.
The [Print Setting] option allows you to specify if you want to have the recorded date and time stamped on the printed copy.
MENU>Playback (2)>Specify Printing>Print Setting>Date Imprint>[On], [Off]
The Specify Printing command formats your selected images with the common DPOF protocol. Using DPOF is advantageous if you do not have a printer connected to your computer. You can take your memory card to a printing service, and they can use the information directly from the card to generate your selected prints. Some printers can use the DPOF data to generate your selected prints directly from the memory card. They usually have a card slot that does not need to be attached to a computer.
• Like with anything important, back up the contents of your memory card prior to handing it to a printing service.
• The Specify Printing command is available only for JPEG still pictures. You cannot select RAW files. This is another good reason to save your files both in JPEG and RAW formats.
• The Specify Printing command is enabled only if the View Mode is set to [Date View] or [Folder View(Still)], and there is at least one image stored on the memory card. Note the image might be a movie, which cannot be selected for printing.
• Although you can check the boxes for panoramic images, you may not be able to print them. It depends on the capabilities of the printer.
• Images shot in widescreen [16:9] format may have both of the sides cut off when they are printed.
Recommendations
When you use your a7/a7R camera’s P, A, or S modes, you start taking greater control of your camera’s settings. Many controls that were unavailable in the automatic modes are now accessible, and you can develop your own artistic style. You can now adjust the exposure, select the ISO, and lock in the WB.
When we want to use the camera for point-and-shoot work, we set it to P mode and set the ISO to [ISO AUTO]. The camera sets the aperture, shutter speed, and ISO. If we don’t care for the shutter speed, we can rotate the control dial to select a new combination of shutter speed and aperture. If the exposure is not to our liking, we can alter the exposure with exposure compensation. We can also select our WB to fit the scene. This takes some thought: for example, if you photograph a sunset and set the WB preset to [Daylight], the red hues will be recorded with greater saturation than if you set the camera to [AWB], where it will attempt to neutralize the predominant red scene and capture a neutral shade.
When we are concerned about depth of field, we use the A mode because we can select the aperture, and the camera adjusts the shutter speed to provide the proper exposure. A narrow aperture increases the depth of field. A wide aperture reduces it. Most DSLRs, and Sony SLT (Single Lens Translucent) cameras, require the lens to be stopped down manually by pressing a depth of field preview button. This is unnecessary when the a7/a7R is set to A mode. With this setting, the camera provides a real-time depth of field preview. As you close or open the aperture, the display screen shows the depth of field as it is seen by the sensor.
When we deal with moving subjects or a long telephoto lens, we set the camera to S mode and set the shutter speed ourselves. As expected, the camera adjusts the aperture to set the recommended exposure.
In regards to ISO, we like to adjust the sensitivity of the sensor. We use ISO 100 for the highest quality work. We use higher ISOs, such as ISO 400–1600, for rapidly moving subjects in daylight. For dim light work, we use ISO 3200, and on rare occasion, ISO 6400. At this high of an ISO, we will process our saved RAW files with a third-party noise-reduction software, such as Noise Ninja.
Again, we recommend saving files in a RAW format. Virtually all programs that read RAW files have a straightforward command for adjusting WB if it is set incorrectly in the camera.
Most likely you will rely on your computer to manage your photos and movies. This may sound obvious, but get in the habit of downloading your pictures and movies to your computer soon after they are recorded, so you can reformat the memory card and have space to shoot again. Since we download the contents of our memory cards to our computers, we don’t use the DPOF print capabilities. We prefer to do our own printing. But this takes time, and you need to have your own equipment, so an easy solution is to utilize the Specify Printing command and send your files out to be printed by a third party.
Last, but not least, try out the a7/a7R’s Slide Show command. It’s fun and quick, but not lasting. For something more permanent, use your computer to build slide shows with Sony’s Image Data Converter and PlayMemories Home software or with a third-party software. Then store the results on a DVD so you can play back your saved memories on your computer or TV. An added benefit is that you can make copies of your DVDs to share with friends and family.