Chapter 10: Flash Photography

Introduction
As sensitive as the Sony a7/a7R is to light, there are times when additional lighting is required. This situation frequently arises when photographing indoors. Supplemental lighting can be easily and conveniently obtained by adding a shoe-mounted flash. If you anticipate doing much interior work, you should consider getting an external flash unit that fits on the camera’s hot shoe (figure 10-1). External flash units are easy to use and provide automatic exposure.
Sony has several attachable external flash units; however, choosing which flash to buy can be confusing. First, Sony has only recently started using a typical hot shoe attachment. Previously, their flash units had a proprietary mounting system that fitted such cameras as the NEX-7 and a77. This was a fast and convenient mechanism that allowed the photographer to slide the flash onto the camera and have it locked securely. A simple press of the button unlocked the flash from its attachment and it would slide off easily. With the advent of the SLT-a99 camera, Sony started to use a hot shoe type attachment mechanism. This unit has a series of electrical contacts for attaching accessories other than a flash unit. Sony describes their design as the “Multi-Function Accessory Shoe.” While this unit can accept other manufacturer’s flash units, its purpose is to provide a secure mounting system that can serve as an electrical connector for video accessories.
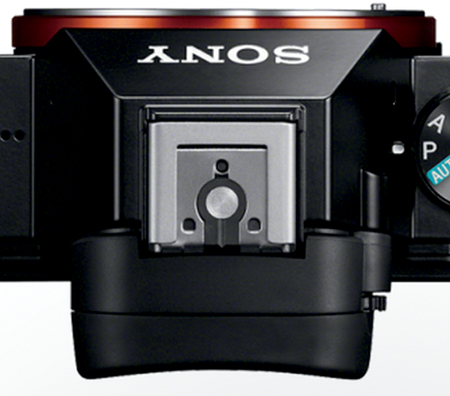
Figure 10-1: Top of the camera showing the hot shoe
If you own the older Sony flash units, you need not run out and purchase a new external flash unit. Instead, you can attach it to the a7/a7R hot shoe with the aid of a simple, inexpensive adapter (described later in the New and Old Sony Flashes side bar).
Principles of Electronic Flash
An electronic flash uses a small tube filled with xenon gas. There are two things to consider when using this light source. First, when the flash fires, it generates a short burst of intense light (1/1000 second or less). It controls exposure not by varying the light intensity, but by varying how long the light lasts. The light’s color approximates daylight; however, its color temperature is a bit cooler. So, if you use the preset WB Daylight value, you will record an image with a slight bluish tinge. Using AWB or presetting WB to an electronic flash value will impart a warmer tone to the picture and produce skin tones of a more pleasing color.
The second thing to consider is that maximum light output is at 1/1000 second and diminished light output is achieved by reducing the duration of the flash. This is important to realize because it is only at relatively slow camera shutter speeds that the entire surface of the sensor is able to receive light. For the a7R this is at 1/160 second and for the a7 this is at 1/250 second. When the shutter speed is shorter than these values, only a fraction of the sensor’s surface is available to receive light. Using the a7 as an example, if you use a 1/500 second shutter speed, only 50% of the sensor can receive light. If you use 1/1000 second, only 25% of the sensor can receive light. Essentially, the shutter can be viewed as a rapidly moving slit passing over the surface of the sensor and the width of the open slit becomes progressively narrow at faster shutter speeds. This works well when light is continuously available during the course of exposure, but this is not the case for an electronic flash where the light duration is, at its longest, 1/1000 second. Using the a7 with a shutter speed of 1/1000 second as an example, only 25% of the sensor can receive the light from the flash—making this the best-case scenario when the flash output is at its (longest) maximum. To record a picture that is wholly lighted, you must use a shutter speed that dispenses with the slit. Again, this occurs at shutter speeds of longer duration than 1/160 second (a7R) or 1/250 second (a7).
Sony engineers are rather conservative in their design, and when you attach a Sony flash to the camera’s shoe, the default shutter speed is set to 1/60 second. If you use the S or M mode, you can use a shutter speed of a shorter duration, but you cannot use a shutter speed faster than 1/160 second for the a7R, or 1/250 second for the a7, because the flash will only illuminate a fraction of the sensor’s surface.
Flash exposure is calculated by having the flash first fire a constant, low-intensity light (pre-flash). When this light is reflected from the subject, the camera sensor reads it to calculate how much light is needed for a correct exposure. From this, the camera calculates the duration of the main flash. This technique is called Pre-flash TTL (Through The Lens). It assures accurate exposure since the exposure is based on measurements taken at the level of the sensor. This takes into account what lens is used, what f-stop is set, and what filter is placed over the lens.
Estimating Exposure Using GN
Because of the popularity of automated electronic flashes, many of today’s photographers are unfamiliar with the term guide number (GN). This describes the power of a flash and can be used to calculate what lens opening should be set when you know the distance between the flash and the subject. For example, take the flash’s GN (provided by the flash manufacturer) and divide it by the distance between the subject and the flash. This gives you the f-stop to use to obtain the correct exposure.
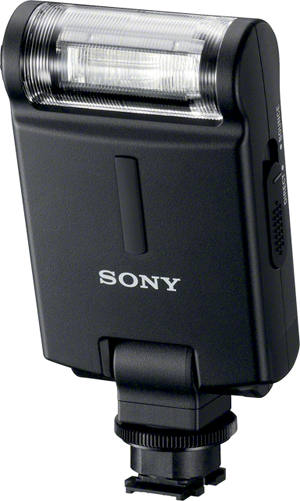
Figure 10-2a: External flash that can be attached to the hot shoe
Two factors should be noted. The first is ISO. If unstated, it is assumed to be 100; a higher ISO will raise the GN. The second is the units used to measure the distance from the camera to the subject. Sony assumes that the distance between flash and camera is measured in meters. For example, the Sony flash rated at GN 60 is based on using an ISO of 100 and a distance expressed in meters.
The GN numbers provide important information on performance abilities of the different flash units. Sony sells a small compact unit, the HVL-F20M with a GN of 20 (figure 10-2a). Sony has two other units that are larger and more expensive, the HVL-F43M with a GN of 43 and the HVL-F60M (figure 10-2b) with a GN of 60.
Flash Artifact: Red Eye
Sometimes when you use a flash attached to the camera to illuminate a face, you may record an unflattering portrait. The person may appear to be demonically possessed because their pupils are glowing bright red. To reduce this red-eye artifact, use the following command:
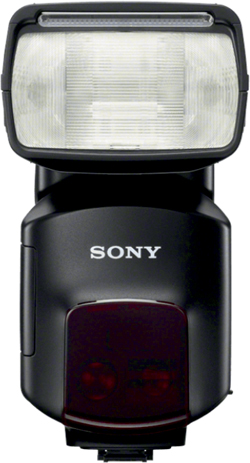
Figure 10-2b: Large external flash that can be attached to the hot shoe
MENU>Camera Settings (2)>Red Eye Reduction>[On], [Off]
This command needs a bit of background explanation. The camera’s flash sends out light, and if a person—or an animal—is looking directly at the lens, the light will enter the eye, pass through the retina, and be reflected back to the camera’s lens, and finally onto the sensor. Since the human retina has a dense vascular network, the blood absorbs green light and the light reflecting from the back of the eye is red. If the camera lens captures this light, the photograph displays the pupils as glowing red orbs. As an aside, cats and dogs have a reflective layer behind their retinas, causing their eyes to glow yellow or green rather than red. This is significant for pet photographers because some post-processing software may fail to take the glow out of pets’ eyes.
When the Red Eye Reduction command is set to [On], the camera’s flash sends out several bursts of light prior to the main flash. Theoretically, this is to make the subject’s pupils constrict, reducing the chance that light from the flash will enter the eyes and be reflected directly back to the camera. This command has three flaws. First, it is not foolproof, and you can still have pictures with glowing red eyes. Second, the bursts of light can annoy subjects so that they blink or squint, ruining the shot. Third, the delay imposed by using these flashes can cause you to miss the image you really wanted to capture. For this reason, we recommend that you keep this command [Off]. Fortunately, this is the default setting for the camera.
Alternate Ways of Reducing Red Eye
If you want to avoid red eye, here are three useful strategies. The first is to position the flash away from the camera’s lens, reducing the chance that light entering the subject’s eye will be reflected back into the lens. You are limited on how far away you can position the flash when using a shoe-mounted flash. The second strategy is to constrict the subject’s pupils by increasing the ambient lighting. If you are indoors, turn up the lights. The third strategy is to have the subject look at a point to the right or left of the camera, thus reducing the chance that reflected light from the eyes will enter the camera lens.
Flash Command
You control the flash through the Flash Mode command, the Quick Navi screen, or the Fn screen. This command has a total of six options and not all of them are available in each of the shooting or drive modes.
MENU>Camera Settings (2)>Flash Mode
![]() Flash Off
Flash Off
This option is disabled in P, A, S, or M mode. An attached flash that is turned on and fully charged will always fire in those modes. If you do not want the flash active, simply remove it from the hot shoe or turn it off. This option to turn an active flash unit off is only available in Intelligent Auto, Superior Auto, and the following SCN predefined modes: Portrait, Landscape, Macro, Sports Action, and Sunset.
![]() Autoflash
Autoflash
This option allows the camera to decide when the flash is needed, and is enabled only in Intelligent Auto, Superior Auto, and the following SCN predefined modes: Portrait, Macro, and Sports Action.
![]() Fill-flash
Fill-flash
When this option is selected, the flash always fires, providing light to the subject. The option is used in P, A, S, and M when the flash unit is switched to on. It is also available in Intelligent Auto, Superior Auto, and the following SCN predefined modes: Portrait, Landscape, Macro, Sports Action, and Sunset.
This sets the shutter speed to be longer (slower) than 1/60 second. The flash goes off and the camera’s shutter is kept open so that the sensor can capture the background that is illuminated by ambient lighting while the flash illuminates subjects close to the camera. This option is only available in P, A, S, and M modes.
![]() Rear Sync.
Rear Sync.
Use this option with a slow shutter speed. The flash fires at the end of the camera’s shutter cycle. If the subject moves during the exposure, the flash records the subject in its latest position. If there is enough ambient light, the subject’s displacement is also captured as a blur while the shutter is open but before the flash is fired. This option is only available in P, A, S, and M modes.
![]() Wireless
Wireless
This option requires two Sony external flash units. One serves as the slave and is the primary light source when it receives a wireless signal for firing. The second flash unit, called the master, attaches to the camera’s hot shoe and generates the signal that fires the slave. This option is only available in P, A, S, and M modes.
Using Flash in Intelligent Auto and Superior Auto
Only the first three Flash Mode options, [Flash Off], [Autoflash], and [Fill-flash], are available in Intelligent Auto and Superior Auto. These commands are pretty straightforward. The [Flash Off] option ensures that the flash will not fire, and [Autoflash] lets the camera decide whether it should use flash. This option introduces a degree of uncertainty in your shooting since you do not know whether or not the flash will fire. The camera makes that decision for you. [Fill-flash] makes the flash fire all the time. All three commands assume that an external flash has been attached to the camera.
What You Can Do With Flash in Intelligent Auto and Superior Auto
The [Autoflash] option is for people who are interested in using the camera as a point-and-shoot recorder. You might expect the camera to fire the flash only if the light is too dim, but this is not the case. The flash can fire during daylight if the camera determines that there is too much variation in the lighting between the subject and the background. For example, it may fire when you are trying to take a picture of a person sitting in front of a window with outdoor light coming through; in other words, it will fire under backlighting conditions where the subject is rendered as a silhouette (figure 10-3a) to illuminate the subject with enough light to balance the light coming through the window. Thus, you can record both the subject and the scene outside the window (figure 10-3b).
The [Flash Off] command is a safety command; it ensures the flash won’t fire even if the flash unit is attached. [Fill-flash] will always fire an attached external flash—even in daylight. It serves to reduce the shadows when shooting at objects that are relatively close to the photographer. We have noticed many outdoor portraits in which the faces are hidden by the shadows cast by the brim of the subjects’ hats. Photographers often pose the face against a bright blue sky, but this causes the camera to underexpose the face. This can be remedied easily by attaching the flash and using [Fill-flash] to illuminate the subject’s face, which balances the sky’s bright illumination.

Figure 10-3a: An imbalance between foreground and background lighting renders the lamp as a silhouette
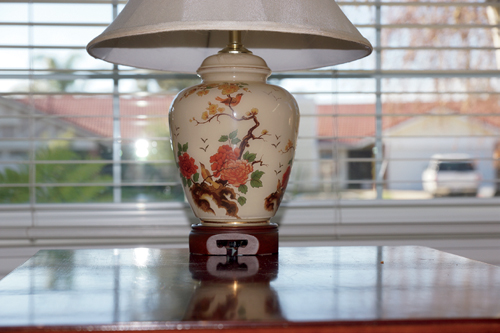
Figure 10-3b: The [Fill-flash] option illuminates the lamp so it does not appear as a silhouette
What You Can’t Do With Flash in Intelligent Auto and Superior Auto
As you take more pictures, you will realize that you are constrained by your lack of exposure control. First, when the flash is used for dim interior shots, the lens will be at its largest aperture. Under these conditions, the camera first tries to brighten the recorded image by opening the lens aperture, raising the ISO, and setting the shutter speed to 1/60 second. This is a disadvantage if you want to capture a detailed view of people scattered throughout a room. Since the lens is wide open, the depth of field is narrow, causing many of the people to be recorded indistinctly. To record all the people sharply, you need to close down the lens aperture; however, this can’t be done in either Intelligent or Superior Auto.
Second, you may notice that when the flash fires in response to high-contrast lighting conditions (such as a subject in front of a window, described earlier), the foreground may not be exposed the way you like. The flash may cause the subject to appear too light; you may decide that reduced flash illumination would be more flattering. Unfortunately, you can’t control the flash intensity in either Intelligent or Superior Auto.
Under these situations, you will have to take greater control by moving away from Intelligent Auto or Superior Auto and use the camera in the P, A, S, or M modes.
Flash Options in P, A, S, or M Modes
When you switch over to P, A, S, or M mode, your flash is under your control. The Flash Mode’s [Autoflash] and [Flash Off] options are grayed out. Operationally, the [Flash Off] option is still available by the simple expedient of turning off the external flash. When you turn on the flash, it will always fire and you will see the icon for [Fill-flash]. In daylight, the flash operates as a fill light and supplements ambient illumination, ensuring that shadows receive additional lighting from the camera. Thus, shadows are recorded not as impenetrable black areas, but as regions that are illuminated to reveal their details. When in dark conditions, the flash serves as the primary light source.
The benefit of using P, A, S, or M modes is that you can adjust the amount of light the flash discharges with the Quick Navi or the Fn screen. You can also adjust it via the menu command below, although it is more inconvenient:
MENU>Camera Settings (2)>Flash Comp.>[n]
The above command allows you to control how dark or how light you want the shadows to appear when using the camera as a fill light. You can use the rim of the control wheel to dial in a flash exposure in a range of –3.0 to +3.0 EV, where the increments are graded in 0.3 EV units (one-third f-stops). No flash compensation is applied when setting the command to 0.0 EV.
This command differs from exposure compensation in that it adjusts the exposure for just the flash. In other words, the Flash Comp. command alters the ratio of light between the flash and the ambient light. This option helps you control how dark you want your shadows to appear in the overall scene. In contrast, exposure compensation keeps the ratio between the light from the flash output and the ambient light constant, so varying this will make the overall picture lighter or darker.
We prefer adjusting the flash compensation using the Fn button. It is a simple matter to dial in your compensation for the flash command using this method. If you need to adjust the overall exposure, you can do so with the exposure compensation dial.
Rear Sync., Slow Sync., and Wireless
There are three additional Flash Mode options available in P, A, S, or M modes: [Rear Sync.], [Slow Sync.], and [Wireless]. The menu command for accessing these options is listed below.
MENU>Camera Settings (2)>Flash Mode>[Rear Sync.], [Slow Sync.], [Wireless]
The [Rear Sync.] option is used for special effects. It coordinates the firing of the flash to the movement of the camera’s internal shutter. Normally the flash is timed to fire at the beginning of the camera’s shutter, but you can synchronize the flash to fire at the end of the shutter movement. You use this feature to enhance the impression of motion. When Flash Mode is set to [Rear Sync.], it is generally used with a slow shutter speed, so a forward-moving car is recorded as an elongated blur. When the flash fires at the end of the exposure, the flash freezes the image of the car. Because the shutter was open while the car was moving forward, the car has a blurred trail behind it. The viewer interprets the car as having moved at such a high velocity that it left a blurred streak behind it. You’ll have the opposite effect if you try a long exposure with the flash firing at the beginning of the exposure. In this case, the car would appear with the streak in front of it, creating the impression it is moving rapidly in reverse.
[Slow Sync.] is used when you want the flash to illuminate a foreground subject, but you also wish to record a background object that is far enough away that the flash cannot illuminate it. Normally, when the camera is set to 1/60 second and you are shooting a subject positioned in front of you, the camera will record the subject and not consider the background. This is why many flash shots have the subject brightly illuminated against a black background. But suppose there is something in the distant background that you also want to record. If you set [Slow Sync.], the camera will try to use a long shutter speed (slow sync.) to capture the dim background scene. The camera may use a shutter speed as long as a couple of seconds. When the camera is fired under these conditions, the flash will illuminate the subject and the available ambient light will illuminate the background object.
The [Wireless] option allows you to fire an external flash unit that is not physically attached to the camera. It gives you access to all kinds of different lighting scenarios that would not be available to you if the flash unit had to be physically tethered to the camera. This option is grayed out unless you have a Sony external flash attached with wireless capability. We will discuss this in more detail later in the chapter.
A very useful trick to adjust your flash quickly without having to dive into the menus is to set the data display format to [For viewfinder]. From here, press the Fn button to enter into the Quick Navi screen and find the Flash Mode icon. Figure 10-4a shows it with the Fill-flash option selected. The orange dot indicates whether the flash is fully or partially charged. Fully charged is indicated by a steadily glowing dot, partially charged is indicated by a blinking orange dot (this means the flash is still charging). Press the center button to display the Flash Mode options.
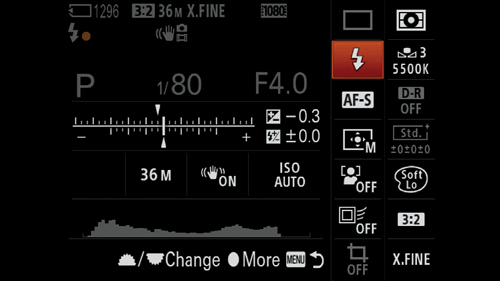
Figure 10-4a: Highlighted Flash Mode command in the [For viewfinder] data display format
The Quick Navi screen has two exposure bars in the middle-left side of the screen. The top is the exposure compensation bar. The bottom is the flash compensation bar. To alter flash exposure, highlight the bottom bar. This allows you to vary the flash output (figure 10-4b). In the camera’s default configuration, you can also adjust the flash exposure compensation by using the FN button. Figure 10-4c shows the adjustment screen with a +1.7 EV compensation being applied.
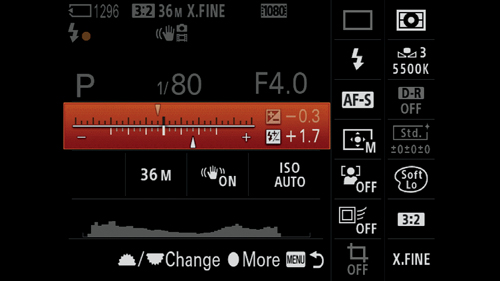
Figure 10-4b: Flash exposure compensation selected
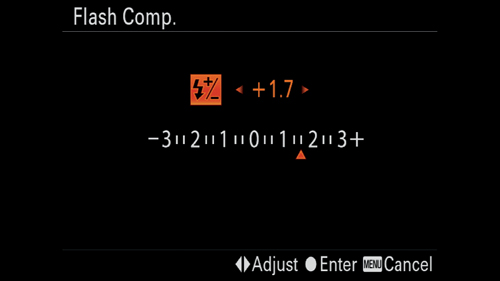
Figure 10-4c: Altering flash exposure for +1.7 EV
Setting up Sony Wireless Flash
To take advantage of the flash mode’s wireless option, you will need a Sony accessory flash capable of generating a wireless signal and another unit to receive the signal. You will then have to use the following command:
MENU>Camera Settings (2)>Flash Mode>[Wireless]
This option enables you to fire a flash remotely. It requires that you attach a flash with wireless capability (master) to signal and fire your external accessory flash (slave). A flash that serves well as a master is the small, lightweight HVL-F20M or the older model, HVL-F20AM. The first step involves pairing the the master and slave flash units so they can communicate with each other. You can do this with the following sequence of steps:
- Take the flash to be used as a slave and mount it on the camera’s accessory shoe.
- Turn both the external flash unit and the camera on.
- Set the mode dial to P, A, S, or M.
- Use the menu to get to the Flash Mode command and select [Wireless]. Press the center button. Note: You can also use the Quick Navi or Fn screen. This tells the slave flash that it will be used as a Wireless unit.
- Remove the slave flash unit. You should see a red light slowly blinking on the unit, indicating that the flash is ready to be used as a slave.
- Attach the master flash to the hot shoe. Turn it on. This gives the a7/a7R wireless capability.
- Press the AEL button. The master flash will emit a small burst of light. In response, the slave flash will fire a burst of light to confirm that the two flash units are communicating.
After you complete this operation, you can reposition your accessory flash (slave) for better flash lighting. Just make sure it can see the light from the master flash. This light can be reflected from a surface, so the slave unit need not be pointed at the camera. It takes surprisingly little light to activate the signal, and it can operate from light reflected off the subject. Once you have placed the slave flash unit, check again to see if the communication link is still active by pressing the AEL button.
Note: if after Step 5 the red light on the slave unit is not slowly blinking, then there was a failure to communicate information from the camera body to the flash unit. Execute a quick check to see if this is due to an incorrect setting on the flash unit by doing a flash reset and restore it to its default values. For example, in the case of the HVL-F43M, this requires removing the flash from the camera and pressing two buttons (Mode and the TTL/M buttons) simultaneously on the back of the flash unit for four seconds. This will reset the flash to its default values. You will then try to reinitiate the settings by returning to step 1.
The advantage of the [Wireless] option is that the external flash does not need to be connected to the camera body so you can position it in a variety of places. For example, you may notice that some photographers have brackets for holding the flash unit away from the camera body. You can use such devices to ensure that the light is flattering and reduce the chances of red eye. Or you can put your Sony external flash unit on a supplied pedestal and position it well away from the camera body.
One trick we use at family gatherings is to mount the slave flash on its pedestal, place it on a strategically located table, and aim it at the ceiling. We then use the wireless option to fire the flash for our group shots. The lighting can be very flattering, and you can move about as you fire the camera. The most convenient flash setup is to use the small, lightweight HVL-F20M as the master flash positioned on your hot shoe. You can then use the heavier HVL-F43M or HVL-F60M as the slave flash, so you can use the power of these units without having to carry their weight on your camera.
Controlling Lens Aperture While Working with Flash
There are two shooting modes for closing down the aperture when using flash: A and M. Table 10-1 lists the active shutter speed and aperture controls when you take the camera out of either the Intelligent or Superior Auto mode.
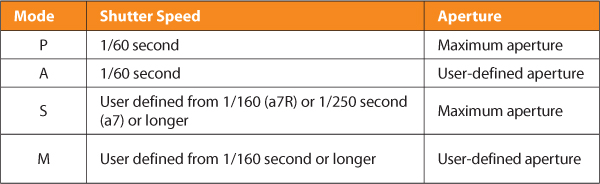
Table 10-1: Shutter speed and aperture in P, A, S, and M modes
When using the different shooting modes, you should be aware that the camera was designed to keep the lens aperture to its maximum opening and attempt to use a shutter speed of 1/60 second. This is most obvious in P mode, where Program Shift does not work and you cannot change the shutter speed. To exert full control over shutter speed and aperture, you should select M mode. M mode allows you to use a camera shutter speed faster than 1/60 second, and you can use smaller lens apertures. This is critical because it increases your ability to use the flash outdoors as a fill light.
Recall that the camera’s normal ISO is 100. For a sunny day, the base exposure is 1/60 second at f/22. But suppose you want less depth of field and an aperture of f/16. You cannot do this in Intelligent Auto, Superior Auto, or P modes because the shutter speed is locked at 1/60 second. Nor can you accomplish this in S mode because while you can get a minimum of 1/160 (a7R) or 1/250 second (a7) shutter speed, you cannot change the aperture. The A mode allows you to vary the aperture but it keeps the shutter speed locked at 1/60 second. The solution is to use M mode and switch the lens aperture to f/16 and the shutter speed to 1/160 second. Remember, this does not prevent you from using slower shutter speeds. Indeed, not only can you still take flash exposures at 1/60 second, but you can also use longer shutter speeds, such as a full second!
This higher flash synchronization speed gives you greater flexibility when you use your flash in daylight as a fill flash; it increases the potential range of your flash unit. As mentioned in the section on GN, the primary determinants for flash exposure are the distance from the camera to the subject and the lens opening for a given ISO. With a higher synchronization speed, you can open your lens aperture by 1 1/3 f-stops for ambient lighting. Using a larger aperture increases the range of your flash.
Viewfinder Brightness: A Note for Studio Photographers
While using the flash, when you close the aperture from its maximum opening, you might notice that the display screen becomes darker. This usually occurs when adjusting the aperture and shutter speed in M mode and working in a dark interior where the flash provides the majority of the light for exposure. This is due to the design of the electronic display, which shows you how the image will be recorded when using ambient light. The camera is not designed to show how the scene will appear when using an electronic flash, whose intensity is much greater than the surrounding light. Under these conditions, the darkening of the display screen can make it difficult to use for composition. This disadvantage is present in all the Sony electronic viewfinder cameras. The remedy is to keep the viewfinder and LCD screen at a constant brightness so that their intensity does not reflect over or underexposure. To accomplish this, use the following menu command:
MENU>Custom Settings (2)>Live View Display>[Setting Effect ON], [Setting Effect OFF]
The default for this command is [Setting Effect ON], which allows you to see the effects of exposure compensation and the colorization imposed by selecting either a Picture Effect or Creative Style option. Conversely, when you turn this to [Setting Effect OFF], the screen will not show the exposure or colorization changes. Instead, the screen will have a constant brightness no matter what exposure compensation is applied; or in the case of M mode, it keeps the screen at a constant brightness no matter what you set your shutter speed or aperture to. This means that in low lighting settings you will still be able to clearly see your subject even though the camera won’t be able to record it unless more light is added. The disadvantage in using this setting is that the altered color recording modes and special enhancement effects of Creative Style and Picture Effect will not be shown. However, if you are using your camera only for flash photography, this is an incredibly useful command—one that studio photographers should have in their repertoire.
Sony Accessory Flash Units
Sony sells accessory (external) flash units for their cameras. The largest and most powerful unit, the HVL-F60M, is a fantastic unit and well matched to Sony’s larger SLT-a99 or SLT-a77 camera; however, its size, weight, and cost are, in our opinion, too much for direct mounting on the a7/a7R camera. A more economical and ergonomic solution is to use the smaller flashes: HVL-F43M and HVL-F20M. The older equivalent units, the HVL-F43AM and HVL-F20AM, are also good; however, they are not sold new and will not fit directly on your a7/a7R. They will require a simple accessory, the ADP-MAA adapter. This accessory is secured to the a7/a7R hot shoe and will accept the discontinued flashes. Table 10-2 summarizes the current models and their pricing.
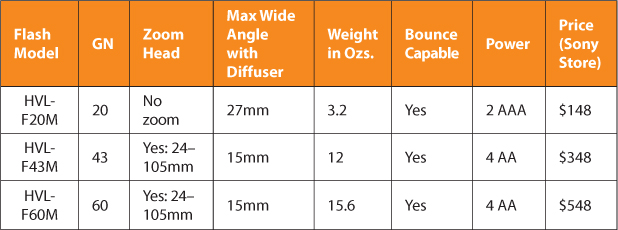
Table 10-2: Sony a7 and a7R external flash units
As you can see, there is a flash for most everyone, ranging from the family photographer who needs a bit more power for interior shots to the professional who needs to work with a unit that provides considerably more light. All of the flash units have their own internal power source—either AA or AAA batteries.
Focal Length and Variations in Flash Head Focal Length
Sony’s HVL-F43M and HVL-F60M flash units have a zoom lens system for focusing their light onto a smaller area when you use a moderate telephoto setting. This elegant system tells the flash head what zoom is set on your lens. As you zoom in or out with your lens, you can hear a motor within the flash unit drive its lens system. This is all done automatically. Essentially, when you use a telephoto setting, it provides a more efficient use of the flash, matching its light distribution to the coverage of the lens.
A nice feature of the Sony accessory flash units is that they use inexpensive batteries that can be purchased at the corner drugstore. However, we would be remiss if we didn’t talk about the charge cycle time of these units. Typically, when the flash is used in an automatic mode for relatively short distances, it fires a very brief burst of light that is much shorter than the maximum duration. Such a short burst doesn’t use much battery power, and the capacitor recharges very rapidly. Rather than fire the flash at full power every time, the flash conserves the unused energy and uses it for the next flash. Instead of having to fully recharge, it only needs to partially recharge to reach full capacity.
When you use the flash in a large room and it fires at maximum duration, you will note that the charge cycle time increases. You can check this on the camera’s display screen, where you will see an orange circle. If it is flashing, it means the flash is recharging and it cannot be fired. As you drain the batteries, the recharge time becomes progressively longer. This is especially noticeable if you use disposable alkaline batteries.
However, there are situations when you need the flash to recycle quickly at all times so that you can fire the next shot as quickly as possible. For this, you might consider using rechargeable nickel metal hydride batteries. These batteries have a lower internal resistance and reduce the recharge time between flashes. Since the batteries can be recharged, they can be an economical choice if you do a lot of flash photography. If they have any disadvantage, it is that they do not hold as much energy as alkaline batteries.
We always carry the HVL-F20AM flash when we use the a7/a7R. It was Sony’s smallest and least expensive external flash. It has been discontinued, but the HVL-F20M model is equivalent. Both are compact and lightweight, balance nicely on the a7/a7R body, and are easy to store in your camera bag. If you get the HVL-F20M, you will not need the flash shoe adaptor because the unit is designed to fit directly on the a7/a7R’s hot shoe. With both the older and newer models, you can aim the flash at the subject or adjust the head so it fires a beam at a 75-degree angle toward the ceiling. This provides bounce lighting, which tends to produce a more flattering portrait because the diffuse lighting hides wrinkles. Both models have the benefit of making your a7/a7R capable of wireless operation. The disadvantage of these units is their low-intensity flash—about one-third to half the power of Sony’s more expensive units.
Although they are huge and look oversized when mounted on the a7/a7R, we also use the two more expensive units—the HVL-F43M and the HVL-F60M. Their larger size is justified by their greater power: they give us more range and are especially appropriate for bounce lighting. If we use the GN as a rough approximation of maximum distance, the HVL-F43M provides a 2.5x range increase, and the HVL-F60M provides a 3x range increase above that provided by the HVL-F20M. By swiveling and turning the head, HVL-F43M and HVL-F60M can aim their light toward the ceiling, whether the camera is held vertically for a portrait or horizontally for a landscape composition. In either case, light reflected down from the ceiling onto the subject creates soft light without deep shadows. Sony’s clever design ensures that their flash units provide the most efficient coverage for bounce lighting if you hold your camera vertically for portrait orientation. Just be aware that depending on how you position the camera and the flash unit, some configurations may create an uncomfortably tight fit for your fingers when you press the shutter button.
Both the HVL-F43M and the HVL-F60M have a motorized lens system to distribute their light so it matches the focal length of your lens. This system works with Sony lenses, however it will not work with most legacy lenses. In this situation, you can set the lens system of the flash manually. The commands for doing so depend on the model of your flash unit, and you will need to check its instruction manual to match its settings to that of the focal length of your lens. This ensures that when you aim the flash directly at your subject, it provides efficient coverage and increases the maximum range of the flash beyond what is expected when using the GN number.
Of the bigger flash units, we found that the HVL-F43M is best suited for our needs. It provides sufficient power for our applications and is not as heavy as the HVL-F60M, nor does it cost as much. If you own the older flash, which has the “A” in its model number, you may wish to upgrade if you do a lot of movie work. The two current models have LED lights to illuminate the subject for movie recording.
Bounce or Indirect Lighting: Flash Accessories
One of the benefits of an accessory flash with a tilting and rotating head is the ability to use bounce flash. When the flash is aimed directly at your subject, the light can be unflattering, displaying facial wrinkles and misplaced strands of hair with distressing clarity (figure 10-5a). One simple strategy for reducing this effect is to swivel the flash head and aim it at a ceiling or an adjacent wall. The light will bounce from these areas and it will become more diffused by the time it reaches the subject. As a result, the light is softer, and masks wrinkles and deemphasizes individual strands of hair to produce a more pleasing image. In figure 10-5b, the diffused light softens the dog’s appearance.

Figure 10-5a: Dog photographed with direct flash

Figure 10-5b: Dog photographed with bounce flash
One reason to use the HVL-F43M instead of the inexpensive Sony HVL-F20M flash unit is that sometimes you need more power output for bounced light. Although the light from the Sony HVL-F20M flash unit can be tilted up at a fixed 75-degree angle, the light will be insufficient when we need to stop down the lens. The higher output of the HVL-F43M flash unit allows considerable flexibility in closing down the aperture if we so desire.
One caveat to using a bounce flash is that if you have the camera set for Red Eye Reduction, the flash will emit small bursts of light prior to the main flash for exposure. This is not needed, so make sure you turn the Red Eye Reduction command to [Off] to make your camera fire quickly so you can record the picture without delay.
If you use external flashes for much of your photography, you will want additional ways of diffusing the light. Although we like to bounce the light, it is not always possible. For example, if the ceiling or walls are heavily colored, they will impart their color to the reflected light and destroy the WB. One helpful accessory is a little plastic diffuser. Sto-Fen makes the Omni-Bounce that attaches directly to the front of the Sony flash head. It is fitted by friction, which is advantageous since you don’t need to tape it onto the flash head. The device is small enough that you can keep it in your camera bag.
There is no substitute for using large reflectors or diffusers, but they can be cumbersome and expensive accessories. If you wish to experiment, you can assemble your own for pennies. The following website has several tutorials for assembling your own flash accessories:
www.digital-photography-school.com/diy-flash-and-lighting-hacks-for-digital-photographers
There are also several books that cover this topic. Check out Low Budget Shooting: Do It Yourself Solutions to Professional Photo Gear by Cyrill Harnischmacher.
On occasion, we tilt our flash head vertically and attach a heavy sheet of white paper to it with tape. By folding the top of the sheet over the top of the flash head and arranging it so it directs the light forward onto the subject, it serves as an inexpensive reflector and diffuser that can be discarded as soon as the session is over.
Recommendations
Although the attached flash can be used in Intelligent Auto, Superior Auto, or SCN mode, we urge you to use it in P, A, S, or M mode. It is especially important to learn how to use the flash with the camera set to M mode. This allows you to adjust both the shutter speed and the aperture. Plus, you can dramatically increase the depth of field if you adopt this strategy. We like using our HVL-F20AM because it is small and light and balances well on the a7/a7R. If you do a lot of flash photography, you may consider getting a larger external flash unit. In our opinion, the HVL-F43M has an excellent set of features for its cost. If you use wireless flashes, a good combination is to use is the HVL-F20AM or the current HVL-F20M for the master flash and the HVL-F43M or HVL-F60M for a slave.