
Documentation is like sex; when it’s good, it’s very, very good, and when it’s bad, it’s better than nothing. | ||
| --Dick Brandon | ||
An important deliverable for most projects, or as simply a good thing to do, is the creation and updating of source code documentation. Properly documented source code can improve the overall maintainability of your project, and shorten the amount of time needed for a new developer, or an existing developer for that matter, to familiarize herself with the source code. The purpose of source code documentation is so a developer can understand a particular component without actually looking at the source code.
Thankfully, Visual Studio .NET has introduced a wonderful build tool for generating source code documentation, and it is built right into the IDE. A properly configured project can be set up to export documentation expressed as XML for the source code each time the build process is run. This exported documentation can be plugged into an excellent open source utility called NDoc, which can take a .NET assembly and the exported XML and build documentation in a variety of formats. NDoc supports pluggable exporters, including the MSDN-style HTML Help (.chm), the Visual Studio .NET format (HTML Help 2), and the MSDN online-style web pages. This tool is very popular within the .NET community and is the most commonly used documentation generator for .NET.
Note
NDoc can be downloaded at http://ndoc.sourceforge.net/.
Additionally, when source code is commented properly in the standard XML format, Visual Studio registers the documentation and makes it available to IntelliSense. Another great feature is that when you reference a .NET assembly which has commenting enabled, the generated XML comment file is copied locally, along with the reference assembly, to make IntelliSense information available across multiple projects.
This chapter shows how to properly configure a .NET project for code commenting, and how to generate MSDN-style documentation using the XML documentation file and standardized commenting techniques.
As discussed earlier, the first step to generating documentation for your source code is configuring your project to export an XML documentation file. This file will be used later by NDoc to produce our documentation files.
Start by bringing up the project properties window; the easiest way to do this is by right-clicking on your project in the solution explorer and selecting Properties. After you navigate to the Build tab, you should see the dialog shown in Figure 11.1.

You will notice that there is a property called XML documentation file under the Output property group; that is the path that must be set for the documentation file to be generated at. This path is relative to the project directory, and standards suggest that the file name match the name of the assembly. For example, NDocExample.dll should have an XML documentation file named NDocExample.xml.
Once a valid file path is specified, when the project is compiled, an XML file will be generated that contains all the XML comment tags that were embedded in the source code.
You may have some projects that will be compiled from the command line, and the way to generate the XML documentation file in such a situation is by using the /doc flag.
csc /doc:NDocExample.xml NDocExample.cs
In either situation, command line or through an IDE, the /doc compiler switch will be ignored in a compilation that uses the /incremental build switch. Therefore, you should use the /incremental- switch to disable the incremental build and ensure that your XML documentation file remains up-to-date.
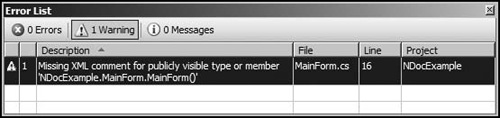
After your project is configured to output an XML documentation file, any comments that are suggested to be included will not prevent compilation, assuming you do not have warnings set to errors, but will instead show up as a warning in the task list. You can simply double-click on the warning in the task list to jump to the location where a comment should be added, much as any other error or warning can be navigated to.
Figure 11.2 shows the source code location where the comment should be inserted.

Figure 11.3 shows a comment missing from the constructor of MainForm, and suggests that it be added for standards compliance.
An extremely useful feature that improves documentation productivity is a macro that inserts basic commenting tags for a particular method or class. Simply place the text insertion pointer on the line above the method or class header in question and press the / (forward slash) key three times. A summary tag block is inserted, along with all the parameter tags for the method, if applicable. Additional tags can be added to the basic blocks that were inserted, but they have to be added manually.
There are quite a few supported XML tags and tag attributes that can be used for different purposes when documenting your code; those tags are described in Table 11.1, along with instructions for when they should be used.
Table 11.1. List of Standard Tags
Tag | Description |
|---|---|
<c> | This tag is used to specify that a certain group of words should be formatted as text. |
<code> | This tag is used to specify multiple lines of code in a block of text. In order to embed XML source, you must specify the tag attribute escaped=“true” on the code tag so that the documentation compiler does not strip out the XML sample. |
<example> | This tag is used to specify how to use a particular method or type. Typically, the code tag is also used with this tag to give implementation details. |
<exception> | This tag is used to specify the exceptions that a particular class can throw. |
<include> | This tag is used to refer to comments in an external file, avoiding the need to embed other comments in your source code. |
<list> | This tag is used to define a heading row of either a table or a definition list. Each item in the list is specified with an <item> tag, and a list or table can have as many <item> tags as desired. |
<item> | This tag is used to define an item in a table or a definition list. |
<newpara> | This tag is used inside text to allow for formatted structuring. |
<param> | This tag is used to specify a parameter for a method declaration. |
<paramref> | This tag allows you to specify that a particular word is a parameter so that it can be formatted distinctly. |
<permission> | This tag allows you to specify the security access to a member. |
<remarks> | This tag allows you to specify overview information about a class or type. You can also use the summary tag to describe a member for a type. |
<returns> | This tag is used to describe the return value for a method declaration. |
<see> | This tag allows you to specify a link to appear within text. You can also use the <seealso> tag to place text that you want to appear in the See Also section. |
<seealso> | This tag allows you to place text that you want to appear in the See Also section. You can use the <see> tag to specify a link to appear within text. |
<summary> | This tag should be used to describe a member for a type. You can also use the <remarks> tag to list information about the type itself. |
<value> | This tag is used to describe a property and is suggested for use on all properties. You will notice that the auto commenting macro for properties only inserts the summary tag, so you will have to add this tag manually to all your properties. |
Keep in mind that in order to generate correct XML, the compiler must be given correct documentation comments. Additionally, the compiler will generate a warning and embed an error message in the documentation file if it is given XML that is not well-formed. By well-formed XML, I mean XML that follows the rules listed in the W3C Recommendation for XML 1.0.
A list of the standard tags available for inline documentation are presented in Table 11.1.
The commenting structure is fairly loose and flexible, but you will notice that any suggested comments to include will appear as warnings in your task list now that your project is configured for commenting.
Keep in mind that since the compiler recognizes /// as a comment line when parsing source code for embedded XML, the following documentation will be rejected by the compiler:
/// <summary>
///
// </summary>
Public void FooBar() {}
Obviously, all documentation comments must be associated with a valid code construct, otherwise they will be ignored. Valid code constructs are a class, struct, enum, property, field, method, delegate, indexer, or event.
Note
Namespaces are not considered code constructs because they are not limited to any one assembly, so they cannot be considered a member of any one particular assembly.
Some documentation tags are further defined through the use of XML attributes. The tag attributes used by inline documentation are presented in Table 11.2.
Table 11.2. List of Standard Tag Attributes
Tag Attribute | Description |
|---|---|
<cref> | This attribute can be attached to any tag to provide a reference to a code element. It is important to note that the compiler will verify that this code element exists, and will issue a warning if the verification fails. The compiler also respects any using statements when looking for a type described in this attribute. |
<name> | This attribute describes the name of a parameter in a <param> or <paramref> tag. |
In order to illustrate the entire process of documenting source code, we will define and discuss a simple example in a linear fashion.
We will start by defining a simple method called SaveApplicationSettings that will accept a string parameter and not return anything. This method won’t do anything in terms of functionality, but it will show how to properly document a code construct.
/// <summary>
/// Saves the application settings to a text file named by
/// the fileName property, and saved in isolated storage.
/// </summary>
/// <param name="fileName">
/// The name of the file to store the application settings in.
/// </param>
/// <example>
/// The following code shows how to properly call this method.
/// <code>
/// SaveApplicationSettings("MyApplication.xml");
/// </code>
/// </example>
/// <permission cref="System.Security.PermissionSet">
/// This method can be accessed by everyone
/// </permission>
public void SaveApplicationSettings(string fileName)
{
MessageBox.Show("This is where the settings would actually be saved");
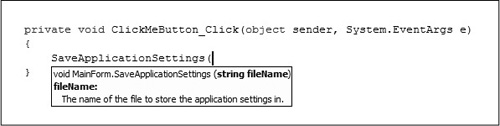
}As you can see in the above code example, we have documented the source code for the SaveApplicationSettings method, and now that we have done so, it is available for IntelliSense. Now whenever you start typing out the name of the method, IntelliSense will fire up and give you information about the method and the parameters it expects. This is illustrated in Figure 11.4.
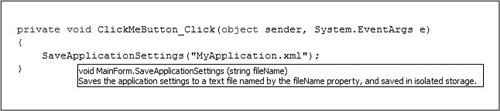
Aside from on-the-fly IntelliSense, you can also mouse over a documented method or type and see the documentation overview for it. This is depicted in Figure 11.5.
IntelliSense information is a handy tool, but using XML documentation for IntelliSense alone is a waste compared to the wonderful documentation that can be generated from the XML documentation file. There are two main ways to generate your documentation, but the NDoc approach will be the evangelized method in this chapter.
The first method, and the one this chapter will not cover, is the built-in documentation tool in Visual Studio .NET. Under the Tools menu is an option titled Build Comment Web Pages..., which will produce help files in the Visual Studio .NET format. While this method works and is convenient because of the IDE integration, NDoc produces much better documentation in a variety of formats.
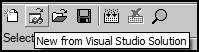
For starters, launch the NDoc application and select the New from Visual Studio Solution option from the toolbar at the top of the window, as shown in Figure 11.6. At this stage, we must let NDoc know which assemblies have commenting enabled and should have corresponding documentation generated for them. This step could be done manually, although referencing the assemblies automatically from your project solution is much easier and faster.
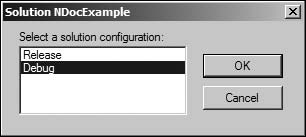
Selecting the toolbar option should bring up a dialog that asks you to select the solution configuration of the project to use. I typically use debug mode, but it generally doesn’t matter when you stick with default solution configurations. This dialog should look like the one shown in Figure 11.7.
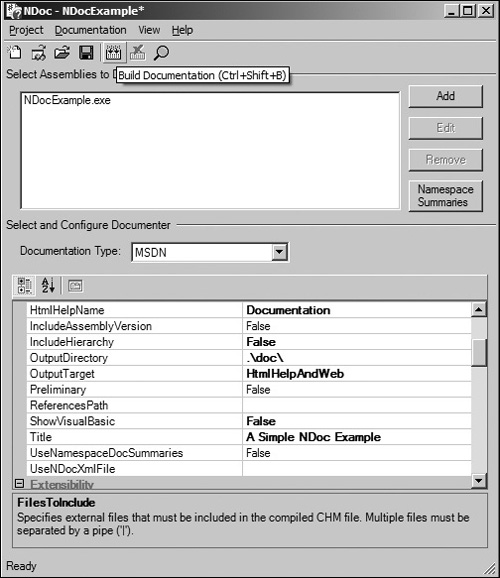
After the appropriate solution configuration to use has been selected, the NDoc window should populate with all the referenced assemblies for the solution. There are a number of formatting and configuration settings that can be modified for an NDoc project, but for the most part, we will use the default values for the purpose of this discussion. You should end up with a dialog similar to the one shown in Figure 11.8. The final step (yes, it is that easy) is to build the documentation by clicking on the Build Documentation button in the toolbar, or by using the Ctrl+Shift+B shortcut.
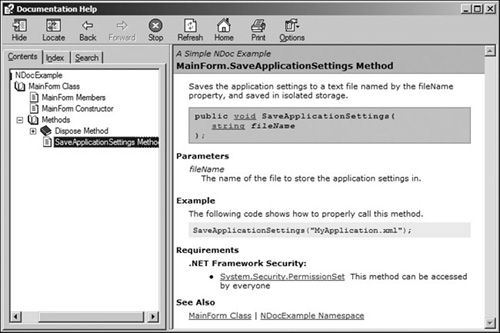
Once the Build Documentation button is clicked, the XML documentation file will be processed and an MSDN-style .chm file will be generated at the location specified by the OutputDirectory property in the NDoc solution. Keep in mind that you can switch the documenter plugin if you do not want MSDN-style documentation and would prefer an alternative format. The MSDN-style .chm documentation will look something like Figure 11.9.
Source code documentation has always been regarded as a hassle to create, yet it is important to promote maintainability. In this chapter, we saw another situation where the .NET platform improved workflow productivity, specifically in terms of generating source code documentation. Developers are generally conscientious about source code commenting, and luckily most organizations have coding standards that enforce a certain level of consistency, but commenting your source code and producing aesthetic documentation are two different challenges in themselves.
This chapter described a great way to transition from commented source code to deployment-quality documentation using a core architecture primitive in the .NET platform.
Note
On the Companion Web site is the code from the simple example discussed throughout this chapter, along with the NDoc project and the generated documentation. The example is extremely simplistic but can serve as a reference point or general overview on how to properly set up a project for code documentation with NDoc.