
The lowest form of thinking is the bare recognition of the object. The highest, the comprehensive intuition of the man who sees all things as part of a system. | ||
| --Plato | ||
Microsoft engineers have devoted a significant amount of work to the Component Object Model (COM) since its inception in 1998. Many software projects invested a lot of time and resources into adopting COM because it made sense at the time. With the introduction of the .NET platform, software projects are starting to build reusable components as strongly named .NET assemblies rather than dealing with COM. Some companies have the available resources to migrate entire projects over to .NET, while most companies only have the resources to migrate individual subsystems to the .NET platform one component at a time.
Thankfully for projects on a tight budget or schedule, the .NET framework provides tools and strategies to promote easy integration with legacy components, and the ability to allow legacy components to interact with .NET components. This chapter covers the interoperability support that allows .NET components to be registered for COM, thus allowing legacy applications to communicate with managed code without being managed themselves.
The Component Object Model is a binary format that represents reusable objects with a model that can be used from any programming language that can interface with COM. When a COM client asks for an instance of an object, the server will instantiate that object and return a reference to the client. COM acts as a binary contract between the caller and callee, defined in a document called a Type library (.tlb). This library document describes the services that are exposed to clients from an object.
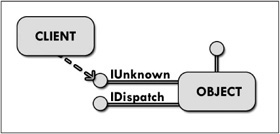
Figure 32.1 describes the communication between a client and a COM component.
Note
Figure 32.1 is meant to provide a high-level overview of communication. Methods specific to the COM mechanism, such as AddRef, QueryInterface, and Release, are not shown because we do not need to directly invoke them in this chapter.
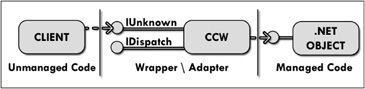
COM components communicate with clients through a set of common interfaces, while .NET communicates with components directly through assembly metadata in the objects. This object-based communication is not understandable by COM applications, so a mechanism known as a COM Callable Wrapper (CCW) can be used to wrap .NET components so that they are accessible by COM and legacy applications. Creating a CCW is covered later in this chapter.
Figure 32.2 shows communication between a client and a .NET object through a COM Callable Wrapper.
An additional layer of overhead is introduced to your application when using COM Interop, but this penalty is typically quite small and often unnoticeable. The biggest performance bottleneck comes from marshaling between wrappers and environments. So if you suspect that your performance problems are coming from COM Interop, verify this by creating a COM worker class to wrap your chatty calls into a single function that can be invoked by your managed application; doing so will decrease the amount of marshaling between the two layers.
Exposing .NET components as COM objects is nearly autonomous, though there are some attributes that must be decorated on exposed classes so that COM can understand them correctly.
COM relies on identifying public components through the Windows registry, so perhaps the most important attribute is decoration of unique identifiers on all exposed classes and interfaces. This is done with the Guid attribute, as shown in the following example.
[Guid("04F08063-8226-4b5d-941C-C2F5E3027126")]
public interface IMyComponent
{
    // ...
}
You can easily create unique identifiers for your types with the Tools->Create GUID->Registry Format menu item in the Visual Studio IDE. Globally unique identifiers (GUID) are the equivalent of CLSIDs. Also good to know, you can set a humanly readable form of the unique identifier using the ProgId attribute, although the accompanying example does not use it.
The next attribute to cover is InterfaceType, which is used to explicitly set how a managed interface is exposed to COM. Managed interfaces are exposed as dual to COM by default, which offers the flexibility of late binding or the performance of early binding. You can explicitly state that a managed interface can only be exposed as IDispatch, only supporting late binding. The following example shows this attribute.
[Guid("50B39BFD-FC05-4f28-AF75-084E0394A55E"),
InterfaceType(ComInterfaceType.InterfaceIsIDispatch)]
public interface IMyComponentEvents
{
    // ...
}
Similar to the InterfaceType attribute, the ClassInterface attribute is used to specify how classes are wrapped for COM. By default, a boilerplate interface is generated for classes exposed to COM, but this can be turned off using this attribute if a custom interface is desired. While the ability to automatically generate interfaces may seem easy, their use is strongly discouraged. The positioning of methods can change to the point where clients think they are calling one method, but are in fact calling a completely different method. Explicitly defining a custom interface for your components is the safe way around this problem. The following example shows how to use this attribute so that no interfaces are generated automatically.
[Guid("9DB1F428-B027-408d-BEDF-6A8398F0AAF8"),
ClassInterface(ClassInterfaceType.None)]
public class MyComponent : IMyComponent
{
    // ...
}
You can explicitly set the COM dispatch identifier (DISPID) for a member, property, or field with the DispId attribute. The constructor for this attribute takes an integer that specifies the identifier to associate with the type. The following example shows this attribute in action.
 [Guid("AB8C32F0-9DA1-4afb-8B91-E8B035412DBD")]
public interface IMyComponent
{
    [DispId(1)]
    void CustomMethod1();
    [DispId(2)]
    int CustomMethod2();
    [DispId(3)]
    string CustomMethod3(string param);
}
Okay, I lied. The most important attribute is ComVisible, which identifies a class or interface within an assembly as a COM object when registered. Adding a ComVisible(true) attribute to a class or interface exposes the type to COM. The following code shows the source code for the.NET-based COM component for the accompanying example. The first code snippet describes the interface that clients can communicate to the object with.
 [Guid("AB8C32F0-9DA1-4afb-8B91-E8B035412DBD"),
ComVisible(true)]
public interface IMyComponent
{
    [DispId(1)]
    void CustomMethod1();
    [DispId(2)]
    int CustomMethod2();
    [DispId(3)]
    string CustomMethod3(string param);
}
The next code snippet describes the event source interface that would serve more of a purpose if the accompanying example used COM events. We cannot use regular .NET event delegates with a regular COM client, so we will not cover COM events aside from showing how to register the event source interface.
[Guid("50B39BFD-FC05-4f28-AF75-084E0394A55E"),
InterfaceType(ComInterfaceType.InterfaceIsIDispatch),
ComVisible(true)]
public interface IMyComponentEvents
{
    // This is where events would be defined.
    // This example does not use them
}
Finally, the following class implements the functionality of our COM component that implements the IMyComponent interface. The ComSourceInterfaces attribute is used to specify all the event source interfaces for our component.
using System.Windows.Forms;
[Guid("9DB1F428-B027-408d-BEDF-6A8398F0AAF8"),
ClassInterface(ClassInterfaceType.None),
ComSourceInterfaces(typeof(IMyComponentEvents)),
ComVisible(true)]
public class MyComponent : IMyComponent
{
    public void CustomMethod1()
    {
        // Do something useful
        MessageBox.Show("This was called from CustomMethod1()!");
    }
    public int CustomMethod2()
    {
        return 1234;
    }
    public string CustomMethod3(string param)
    {
        return String.Format("You entered the string: '{0}'!", param);
    }
}
The type library generator for .NET components does a fine job of wrapping almost every type, though there are some rules to follow in order to ensure interoperability. These rules are:
Avoid using parameterized constructors and static methods.
Define interfaces for event sources in managed code.
Utilize HRESULT for user-defined exceptions.
Understand that differences in inheritance may occur.
Supply unique identifiers for appropriate types.
Following these rules will ensure that type library generation goes smoothly and is utilized seamlessly.
After your .NET component is compiled, you have to generate a type library file (.tlb) so that COM clients can consume and invoke the new functionality. There are a couple of ways to do this.
The first approach is to use the type library exporter utility (tlbexp.exe) to convert the exposed classes and interfaces into a COM type library. This approach creates a type library, but does not register the COM component in the registry. This step must be performed elsewhere.
Another approach is to use the TypeLibConverter class in the System.Runtime. InteropServices namespaces to programmatically generate a type library. This class produces the same output as the type library exporter utility.
A third approach is to use the .NET services installation tool (regsvcs.exe), which can generate, register, and install type libraries into existing COM+ 1.0 applications, in addition to loading and registering assemblies.
One of the easiest ways is to use the assembly registration tool (regasm.exe) which generates a type library using the /tlb switch, but it also places the appropriate entries into the Win32 registry to make COM clients aware of the component. The following line shows how to generate a type library for a .NET component and install it into the Win32 registry.
regasm.exe MyComponent.dll /tlb:MyComponent.tlb
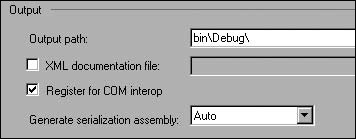
You can automatically perform this step during the build process in the Visual Studio IDE by enabling Register for COM Interop in the Build project page, as shown in Figure 32.3.
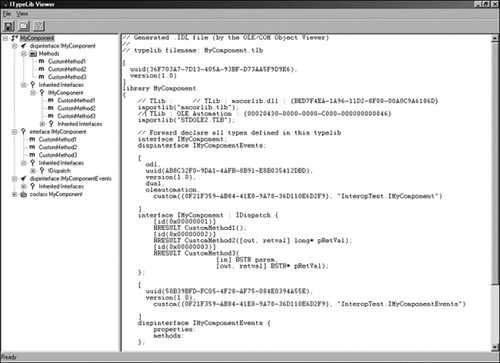
We can use the Microsoft Oleview utility to inspect the generated type library to see what is there. Figure 32.4 shows Oleview inspecting the type library for MyComponent.
Note
Microsoft’s Oleview utility is available for download from their web site (http://www.microsoft.com).
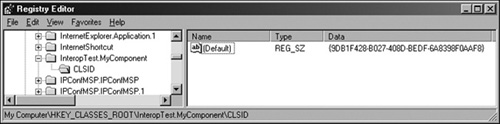
Inspecting the registry, you will notice entries related to the registered component, as shown in Figure 32.5.
The hardest part is over; you can now work with your exposed component and start invoking its methods. As covered in the last section, you are now left with a type library file (.tlb) that you can import into a C++ application (or any other platform or language supporting COM) to recognize your exposed component. The unmanaged ClientTest example located on the Companion Web site shows how to consume the exposed component. The following code describes the source code to the ClientTest executable (standard Win32 project, unmanaged C++). Notice how the type library file (.tlb) is referenced with the import directive. The linker will actually generate a second file from this one called a type library header, which contains some specific C++ wrapper functionality. Both files can be used to get a better understanding of what is going on behind the scenes of COM Interop.
#include <windows.h>
#include <atlbase.h>
#include <atlcom.h>
#include <comutil.h>
#import "MyComponent.tlb" no_namespace
int WINAPI WinMain(HINSTANCE, HINSTANCE, LPSTR, int)
{
    ::CoInitialize(NULL);
    CComPtr<IMyComponent> myComponent;
    // Acquire the unique identifier of the COM server (.NET Component)
    CLSID myComponentClassID = __uuidof(MyComponent);
    // Acquired a reference to the COM server (.NET Component)
    if (SUCCEEDED(myComponent.CoCreateInstance(myComponentClassID,
                                               0, CLSCTX_ALL)))
    {
        char output[64];
        if (SUCCEEDED(myComponent->CustomMethod1()))
        {
            ::MessageBox(0,
                         "Successfully invoked CustomMethod1()!",
                         "Test CustomMethod1()",
                         0);
        }
        long result = myComponent->CustomMethod2();
        sprintf(output, "Result: %d", result);
        ::MessageBox(0, output, "Test CustomMethod2()", 0);
        //Note: System.String is Marshaled into a _bstr_t with COM Interop
        _bstr_t inputMessage = _T("This is a test");
        _bstr_t message = myComponent->CustomMethod3(inputMessage);
        sprintf(output, "Message: %s", (char *)message);
        ::MessageBox(0, output, "Test CustomMethod3()", 0);
    }
    else
    {
        ::MessageBox(0, "Error loading MyComponent COM object!", "Error", 0);
    }
    ::CoUninitialize();
}
As you can see, consuming exposed .NET components is easy once they have been properly configured and registered for COM Interop. The biggest gotcha when consuming exposed components is finding out what complex types in .NET are marshaled, as in the type library (System.String to _bstr_t, for example). This is easy enough to spot by looking at the generated type library file.
Managed .NET assemblies can be deployed as private or shared. Private deployment makes an assembly only available to clients that exist in the same directory as the private assembly, while shared assemblies are installed into the Global Assembly Cache (GAC), making them available to any local client. Ultimately, the choice about whether to deploy your .NET assemblies as private or shared is up to you.
If you choose to use private assemblies, you should also use the /codebase switch with the regasm.exe utility. You must ensure that you deploy all private assemblies alongside the client applications that utilize them.
COM exposed assemblies must be strongly named, so you can use the sn.exe tool to create a strong name key that that you can sign your assembly with. Afterwards, you can install your shared assembly into the GAC by using the gacutil.exe tool.
The following line shows how to install the MyComponent.dll assembly into the Global Assembly Cache.
gacutil.exe /i MyComponent.dll
An important deployment issue to consider is the system requirements for COM Interop. Because COM Interop merely provides a wrapper around a .NET component, you now have a dependency on the minimum system requirements to host the .NET framework. The .NET framework must be installed or the exposed components will not be able to function.
Lastly, there is also a way to support registration-free activation through the use of component and client manifest files that are linked or deployed with the appropriate executables after compiling. Although registration-free activation is not covered in this chapter, it may be worthwhile for you to look into if you want to avoid registering your exposed components in the Win32 registry.
This chapter started off by introducing COM Callable Wrappers and how they can be used to wrap a .NET component so that COM clients can utilize its functionality. Afterwards, the appropriate attributes to expose a .NET component were discussed, and then used in the context of the example on the Companion Web site. Component registration was then addressed, including a number of ways to perform the registration and type library generation. Finally, some deployment considerations were discussed that may not be the most obvious when working with COM Interop.
COM Interop and COM Callable Wrappers offer easy migration from traditional COM to the .NET platform by allowing individual components to be migrated one at a time, rather than trying to migrate an entire application or system in one go. Having such a powerful migration strategy can prove to be extremely advantageous in terms of budget and time constraints, and also makes debugging much easier by decreasing the volume of new code to test at a single time.