
Mankind always sets itself only such tasks as it can solve; since, looking at the matter more closely, we will always find that the task itself arises only when the material conditions necessary for its solution already exist or are at least in the process of formation. | ||
| --Karl Marx | ||
Most developers have myriad tools they have developed over the course of their projects. Command line tools are a common choice because they are effortless to develop, and they are easy to integrate with a scripting process. These tools are moderately easy to operate through the command line, but require a fair amount of typing to specify settings and files to process. These useful tools can be consumed by a Windows Forms application, but an even better approach is to integrate with the Windows shell (Explorer) so that a simple right-click on a particular file could present options specific to the tools.
A shell extension is a COM object that adds additional functionality to the Windows shell. There are many different types of extensions that can be developed, such as a context menu that is presented to the user when she right-clicks on a file with a certain extension. Shell extensions are in-process servers that facilitate the communication with the shell by implementing common interfaces that the shell understands.
Microsoft .NET is a powerful platform to develop on, but unfortunately, it is not yet a native part of Windows. Most applications are still unmanaged, and while interaction between managed and unmanaged application is possible, managed and unmanaged applications remain in their own independent worlds.
Windows Explorer is an unmanaged application that cannot differentiate between a managed application and an unmanaged application. Explorer only understands how to load COM interfaces, so there is no special base class we can inherit from; we have to do things the messy way. Shell extensions can be written in a managed language like C#, but the component must be visible as a COM object and employ a proxy that the shell can understand. Supposedly, Windows Vista (Longhorn) provides a variety of managed mechanisms, but our current operating systems do not work like that.
In this chapter, you will learn how to create a shell extension, and register it with the Windows shell as a standalone assembly, or integrated within an application.
The first step is to import the native structures, interfaces, types, and methods that we require in order to build our shell extension.
Every COM interface is associated with a unique GUID (Globally Unique Identifier), and is a required attribute to specify when importing a COM interface in a .NET application. When importing a COM interface, you must specify the correct GUID for the interface as defined in the Win32 registry. Additionally, you must also specify the interface type to determine how the interface is exposed to COM callers. The different interface types available are described in Table 41.1.
Table 41.1. Enumerated Types for ComInterfaceType
COM Interface Type | Description |
|---|---|
| Exposes an interface as a dual interface, supporting both early and late binding. |
| Exposes an interface that is derived from |
| Exposes an interface that is a |
By default, a COM interface is exposed as dual, but the interfaces needed for shell extensions do not require late binding, so their types are all set to InterfaceIsIUnknown.
The [GuidAttribute] is used to assign a GUID to the interface. This GUID must be the correct one to use for the COM interface you are importing, as defined in the Win32 registry. This is so COM clients can invoke methods of the interface, regardless of how the .NET implementation works.
Note
.NET interfaces and classes do not require an explicit GUID to be set as they are automatically generated.
The [PreserveSig] attribute is used to specify that there is a direct translation between the managed signature and the unmanaged entry point. More specifically, most COM interfaces return method success as an HRESULT, and use a memory buffer pointer to pass this value back to callers. The default behavior of the CLR is to automatically transform the managed signature, but the [PreserveSig] attribute is used to ensure that this transformation does happen.
The IShellExtInit interface is called by the shell, and is used to initialize property sheets, drag-and-drop handlers, and context menu extensions. The parameters for this method vary depending on the type of extension, but we will focus on content menu extensions. The pidlFolder is null when dealing with file objects, or it specifies the folder for which the context menu is being requested. The objectPointer identifies the selected files, and the keyProgID identifies the file class of the object with focus.
[ComImport(), InterfaceType(ComInterfaceType.InterfaceIsIUnknown),
GuidAttribute ("000214e8-0000-0000-c000-000000000046")]
public interface IShellExtInit
{
    [PreserveSig()]
    int Initialize(IntPtr pidlFolder, IntPtr objectPointer, uint keyProgID);
}
Note
IShellExtInit is only used by property sheet, context menu, and drag-and-drop handler extensions. Be sure to use the correct interface when building other types of shell extensions.
The IContentMenu interface is used by the shell when creating or merging a context menu associated with a shell object. This interface can be used to dynamically add items to a shell object’s context menu.
[ComImport(), InterfaceType(ComInterfaceType.InterfaceIsIUnknown),
                            GuidAttribute("000214e4-0000-0000-c000-000000000046")]
public interface IContextMenu
{
    [PreserveSig()]
    int QueryContextMenu(uint menu,
                         uint menuId,
                         int firstCommand,
                         int lastCommand,
                         uint flags);

    [PreserveSig()]
    void InvokeCommand(IntPtr pointer);

    [PreserveSig()]
    void GetCommandString(int command,
                          uint flags,
                          int reserved,
                          StringBuilder commandString,
                          int max);
}
The IDataObject interface provides a mechanism through which data can be transferred; it is also used to handle notifications related to the data, such as changes. The data transfer mechanism specifies the format of the data, along with the medium through which the data is transferred.
The IShellExtInit.Initialize() method is given a pointer to an IDataObject that contains our file objects; we must define the IDataObject interface so that we can cast the pointer to a data object. The only method we need in this interface is GetData(), which is supplied with the data format, along with a storage medium container, and we are given the data itself.
[ComImport(), InterfaceType(ComInterfaceType.InterfaceIsIUnknown),
                            GuidAttribute("0000010e-0000-0000-C000-000000000046")]
public interface IDataObject
{
    [PreserveSig()]
    int GetData(ref ClipFormat a, ref StorageMedium b);
    [PreserveSig()]
    void GetDataHere(int a, ref StorageMedium b);

    [PreserveSig()]
    int QueryGetData(int a);

    [PreserveSig()]
    int GetCanonicalFormatEtc(int a, ref int b);

    [PreserveSig()]
    int SetData(int a, int b, int c);

    [PreserveSig()]
    int EnumFormatEtc(uint a, ref Object b);

    [PreserveSig()]
    int DAdvise(int a, uint b, Object c, ref uint d);

    [PreserveSig()]
    int DUnadvise(uint a);

    [PreserveSig()]
    int EnumDAdvise(ref Object a);
}
There are a number of unmanaged Win32 types that must also be defined so that the unmanaged methods can use them. There are also several unmanaged types within the structures that will be covered later. It is also important to note the use of the [StructLayout] attribute. By default, the CLR automatically chooses a layout for structure members when compiled. This can lead to format problems when interacting with COM callers. By specifying LayoutKind.Sequential, the structure layout is defined in the order in which members appear.
The InvokeCommandInfo structure defined below is known as CMINVOKECOMMANDINFO in the unmanaged world. It contains information needed by IContextMenu.InvokeCommand() to execute a context menu command.
[StructLayout(LayoutKind.Sequential, CharSet = CharSet.Unicode)]
public struct InvokeCommandInfo
{
    public uint Size;
    public uint Mask;
    public uint Window;
    public int Verb;
    [MarshalAs(UnmanagedType.LPStr)]
    public string Parameters;
    [MarshalAs(UnmanagedType.LPStr)]
    public string Directory;
    public int Show;
    public uint HotKey;
    public uint Icon;
}
The MenuItemInfo structure defined below is known as MENUITEMINFO in the unmanaged world. It contains information about a menu item. This structure is used when adding new menu items to the context menu for a file object.
[StructLayout(LayoutKind.Sequential)]
public struct MenuItemInfo
{
    internal uint Size;
    internal uint Mask;
    internal uint Type;
    internal uint State;
    internal int ID;
    internal int SubMenu;
    internal int BitmapChecked;
    internal int BitmapUnchecked;
    internal int ItemData;
    internal string TypeData;
    internal uint Max;
    internal int BitmapItem;
}
The ClipFormat structure defined below is known as FORMATETC in the unmanaged world. It is a generalized clipboard format that describes the format of arbitrary data. This structure is used when calling the IDataObject.GetData() method.
[StructLayout(LayoutKind.Sequential)]
public struct ClipFormat
{
    internal Native.ClipFormatFlags Format;
    internal uint DevicePointer;
    internal Native.DvAspectFlags Aspect;
    internal int Index;
    internal Native.TypeMediumFlags Medium;
}
The StorageMedium structure defined below is known as STGMEDIUM in the unmanaged world. It is a generalized global memory handle used in data transfer operations like IDataObject.GetData().
[StructLayout(LayoutKind.Sequential)]
public struct StorageMedium
{
    public uint Medium;
    public uint Global;
    public uint ReleasePointer;
}
There are some enumerated values that must also be defined in order for the unmanaged interfaces and methods to operate. These types are defined in an internal class called Native so that they are not accessible outside of the assembly.
internal sealed class Native
{
The following flags enumeration is used to determine when a context menu should be shown. There are many more flags that can be used as a filter, but this chapter only focuses on one flag, so the rest have been truncated out. The Explore flag (CMF_EXPLORE) will be set when the context menu is being generated by the shell from an Explorer mode window.
    internal enum QueryContextMenuFlags : uint
    {
        Explore = 0x00000004
    }
When one of the items added by a context menu extension is highlighted, the IContextMenu.GetCommandString() method is called to request a help text string or a verb string assigned to the command (canonical). Both ANSI and Unicode strings can be requested. This functionality is generally used for localization and will not be covered in this chapter. Feel free to consult MSDN for more information.
     internal enum GetCommandStringFlags : uint
     {
         Verb = 0x00000000,         // Canonical verb
         HelpText = 0x00000001    // Help text (for status bar)
}
The following flags enumeration is used when specifying the data format for IDataObject. There are many more format types available, but this chapter only focuses on one type, so the rest have been truncated out. The DropHandle type (CF_HDROP) is used when transferring the location of a group of existing files.
     internal enum ClipFormatFlags : uint
     {
         DropHandle = 15
     }
The following flags enumeration is used when creating menu items. There are many more flags available, but this chapter only focuses on the following flags, so the rest have been truncated out. All menu items have the Type flag set, and all menu items except separators have State and ID, which are standard Win32 menu flags. SubMenu is fairly self-explanatory; the parent menu has it set because it contains submenu items. The rest of the menu items do not set this flag.
    internal enum MaskFlags : uint
    {
        State = 0x00000001,
        ID = 0x00000002,
        SubMenu = 0x00000004,
        Type = 0x00000010
    }
The following flags enumeration is used when accessing data contained in a storage medium (TYEMED). We only define the Global type because that is the only one we use in this chapter. Global represents a global memory handle.
    internal enum TypeMediumFlags : uint
    {
        Global = 1
    }
The following flags enumeration is used when building the data format for IDataObject.GetData(). There are more types available, but this chapter only focuses on one type, so the rest have been truncated out. The Content type (DVASPECT_CONTENT) represents an object that can be displayed as an embedded object inside a container. This type is for compound document objects.
    internal enum DvAspectFlags : uint
    {
         Content = 1
    }
The following flags enumeration is used when specifying the Type or State property of a menu item. Enabled is a state property, which is fairly self-evident. The String type is used to say that the menu item is displayed as text, and the Separator type is used to create a separator line menu item.
    internal enum MenuFlags : uint
    {
        Separator = 0x00000800,
        Enabled = 0x00000000,
        String = 0x00000000
    }
The following method creates a new menu and returns a handle to it if successful.
    [DllImport("user32")]
    internal static extern uint CreatePopupMenu();
The following method adds a menu item to an existing menu created with CreatePopupMenu().
    [DllImport("user32")]
    internal static extern int InsertMenuItem(uint menu,
                                              uint position,
                                              uint flags,
                                              ref MenuItemInfo menuItemInfo);
The following method is used to extract information from a group of files, referenced by a drop handle from IDataObject.GetData(). The file parameter is a zero-based index into the array of files, and the buffer will be set to the full path to the file. The max parameter is set to the maximum string length; set it to zero for no maximum.
    [DllImport("shell32")]
    internal static extern uint DragQueryFile(uint dropHandle,
                                              uint file,
                                              StringBuilder buffer,
                                              int max);
}
You can also use this method to retrieve the number of files referenced by a drop handle. Set the file parameter to 0xffffffff, the buffer to null, and max to zero. The result will be the number of files in the query.
With all of the unmanaged types defined, we can finally jump into the framework class itself. Reusability is an important consideration when building any component. There is a lot of functionality that is common to any context menu extension, so naturally this code will reside in an extendable class. Extensions will inherit from this base class and configure the necessary options and logic. We will call this class ShellExtensionBase, it will implement IShellExtInit and IContextMenu, and it will be abstract so that it cannot be instantiated directly.
public abstract class ShellExtensionBase : IShellExtInit, IContextMenu
{
    ...
}
The first configurable option is the menu title. This property is the text used for the context menu entry that contains all the submenu command items.
protected abstract string MenuTitle
{
    get;
}
The next configurable option is the list of file extensions that will be associated with the extension. This can be one to many entries. For example, having .txt would associate the extension with any text file. If you want to associate the extension with any file, simply use * (an asterisk) as the extension.
protected abstract string[] Extensions
{
    get;
}
Extensions using this framework need a way of registering commands with the underlying system, and that is the purpose of the following method. The file path array is passed into the method so that filtering can be done based on the files selected. This provides a mechanism where dynamic menus can be created.
protected abstract void CommandRegistration(string[] files);
Commands are registered using literal strings. The command strings are used as the display text for the submenu item, as well as the command identifier itself. The following method is called when a submenu item is selected on a group of files.
protected abstract void HandleCommand(string command, string[] files);
When an error occurs, it is the job of the following method to handle the error gracefully.
protected abstract void HandleError(Exception exception);
Even though it’s not necessarily used in our framework, we still need to implement the IContextMenu.GetCommandString() method to a certain extent.
void IContextMenu.GetCommandString(int command,
                                   uint flags,
                                   int reserved,
                                   StringBuilder commandString,
                                   int max)
{
     switch (flags)
     {
         case (uint)Native.GetCommandStringFlags.Verb:
         {
             commandString = new StringBuilder("...");
             break;
         }
         case (uint)Native.GetCommandStringFlags.HelpText:
         {
             commandString = new StringBuilder("...");
             break;
         }
     }
}
When our context menu extension initializes, we need to get a handle to the data in the storage medium through the IDataObject interface. The following code shows how to do this.
int IShellExtInit.Initialize(IntPtr folderPidl, IntPtr pointer, uint keyProgID)
{
    try
    {
          if (pointer != IntPtr.Zero)
          {
              IDataObject dataObject = Marshal.GetObjectForIUnknown(pointer)
                                                                as IDataObject;

              ClipFormat format = new ClipFormat();
              format.Format = Native.ClipFormatFlags.DropHandle;
              format.DevicePointer = 0;
              format.Aspect = Native.DvAspectFlags.Content;
              format.Index = -1;
              format.Medium = Native.TypeMediumFlags.Global;

              StorageMedium medium = new StorageMedium();

              dataObject.GetData(ref format, ref medium);

              _dropHandle = medium.Global;
         }
     }
     catch (Exception exception)
     {
             HandleError(exception);
     }

     return 0;
}
The IContextMenu.QueryContextMenu() method is called whenever the context menu is supposed to be displayed. This is where the menu is created and populated. First, the popup menu is created. Then each file in the query is filtered against the extensions array. Then the commands specific to the extension are registered, and the submenu items are created and added to the parent menu item; finally, the parent menu item is inserted into the Explorer context menu.
int IContextMenu.QueryContextMenu(uint menu,
                                  uint menuId,
                                  int firstCommand,
                                  int lastCommand,
                                  uint flags)
{
    int id = 1;

    try
    {
        if ((flags & 0xf) == 0 ||
            (flags & (uint)Native.QueryContextMenuFlags.Explore) != 0)
        {
            _popupMenu = Native.CreatePopupMenu();
            uint fileCount = Native.DragQueryFile(_dropHandle, 0xffffffff, null, 0);

            List<string> filteredFiles = new List<string>();

            if (fileCount >= 1)
            {
                 for (uint index = 0; index < fileCount; index++)
                 {
                      StringBuilder buffer = new StringBuilder(1024);

                      Native.DragQueryFile(_dropHandle,
                                           index,
                                           buffer,
                                           buffer.Capacity + 1);

                      string fileExtension = Path.GetExtension(buffer.ToString());

                      foreach (string filterExtension in Extensions)
                      {
                          if (fileExtension == filterExtension)
                          {
                              filteredFiles.Add(buffer.ToString());
                              break;
                          }
                     }
                }

                _fileNames = filteredFiles.ToArray();

                _commandIdentifier = (firstCommand + id) - 1;

                CommandRegistration(_fileNames);

                id = (_commandIdentifier++);
          }

          MenuItemInfo menuItemInfo = new MenuItemInfo();

          menuItemInfo.Size = 48;
          menuItemInfo.ID = id++;
          menuItemInfo.SubMenu = (int)_popupMenu;
          menuItemInfo.TypeData = MenuTitle;
          menuItemInfo.Mask = (uint)Native.MaskFlags.Type |
                              (uint)Native.MaskFlags.State |
                              (uint)Native.MaskFlags.SubMenu |
                              (uint)Native.MaskFlags.ID;
          menuItemInfo.Type = (uint)Native.MenuFlags.String;
          menuItemInfo.State = (uint)Native.MenuFlags.Enabled;

          Native.InsertMenuItem(menu, (uint)menuId, 1, ref menuItemInfo);

          AddMenuSeparator(menu, menuId + 1);
       }
    }
    catch (Exception exception)
    {
        HandleError(exception);
    }

    return id;
}
The base class exposes a method that is used to register commands with the underlying framework and create the submenu items for the context menu. The following code shows this method. Specifying – (a hyphen) as the command text will insert a separator entry, which is useful for cleaning up menus with multiple groups of commands.
protected void RegisterCommand(string command)
{
     _commandPosition++;
     _commandIdentifier++;

    if (command == "-")
    {
        AddMenuSeparator(_popupMenu, (uint)(_commandPosition));
    }
    else
    {

        _commands.Add(_commandPosition, command);

        AddMenuItem(_popupMenu,
                    command,
                    _commandIdentifier,
                    (uint)(_commandPosition));
    }
}
The following method is used to add a submenu item to the parent menu item at the specified position.
void AddMenuItem(uint menu, string text, int id, uint position)
{
    MenuItemInfo menuItemInfo = new MenuItemInfo();

    menuItemInfo.Size = 48;
    menuItemInfo.ID = id;
    menuItemInfo.TypeData = text;
    menuItemInfo.Mask = (uint)Native.MaskFlags.ID |
                        (uint)Native.MaskFlags.Type |
                        (uint)Native.MaskFlags.State;
    menuItemInfo.Type = (uint)Native.MenuFlags.String;
    menuItemInfo.State = (uint)Native.MenuFlags.Enabled;

    Native.InsertMenuItem(menu, position, 1, ref menuItemInfo);
}
The following method is very similar to AddMenuItem(), except it inserts a separator into the parent menu item at the specified position.
void AddMenuSeparator(uint menu, uint position)
{
    MenuItemInfo separator = new MenuItemInfo();

    separator.Size = 48;
    separator.Mask = (uint)Native.MaskFlags.Type;
    separator.Type = (uint)Native.MenuFlags.Separator;

    Native.InsertMenuItem(menu, position, 1, ref separator);
}
As mentioned earlier, IContextMenu.InvokeCommand() is called when a submenu item is activated from the context menu. This is where we get the command information and pass it off to the extension to handle.
void IContextMenu.InvokeCommand(IntPtr pointer)
{
    try
    {
         Type type = typeof(InvokeCommandInfo);

         InvokeCommandInfo info = Marshal.PtrToStructure(pointer, type)
                                                            as InvokeCommandInfo;
         HandleCommand(_commands[info.Verb - 1].ToString(), _fileNames);
    }
    catch (Exception exception)
    {
        HandleError(exception);
    }
}
Registration of the extension component is covered later in the chapter, but it is important that the following two methods are discussed.
The RegisterExtension() method is used to place an entry in the approved shell extensions (for WINNT), and to associate the extension component with the file extensions array.
protected static void RegisterExtension(System.Type type,
                                        string[] extensions,
                                        string handlerName)
{
    try
    {
        string guid = InterogateGuid(type);

        if (guid.Length > 0)
        {
            RegistryKey key;

            key = Registry.LocalMachine.OpenSubKey("Software\" +
                                                   "Microsoft\" +
                                                   "Windows\" +
                                                   "CurrentVersion\" +
                                                   "Shell Extensions\" +
                                                   "Approved", true);
           key.SetValue(guid,
                        String.Format("{0} shell extension", handlerName));
           key.Close();

           foreach (string extension in extensions)
           {
               string path = String.Format("{0}\shellex\ContextMenuHandlers\{1}",
                                           extension,
                                           handlerName)
               key = Registry.ClassesRoot.CreateSubKey(path);
               key.SetValue(string.Empty, guid);
               key.Close();
         }
      }
   }
   catch (Exception)
   {
       throw;
   }
}
The UnregisterExtension() method is called to undo the registry changes applied by the RegisterExtension() method.
protected static void UnregisterExtension(System.Type type,
                                          string[] extensions,
                                          string handlerName)
{
    try
    {
        string guid = InterogateGuid(type);

        if (guid.Length > 0)
        {
            RegistryKey key;

            key = Registry.LocalMachine.OpenSubKey("Software\" +
                                                   "Microsoft\" +
                                                   "Windows\" +
                                                   "CurrentVersion\" +
                                                   "Shell Extensions\" +
                                                   "Approved", true);
            key.DeleteValue(guid);
            key.Close();

            foreach (string extension in extensions)
            {
               string path = String.Format(
                                       "{0}\shellex\ContextMenuHandlers\{1}",
                                       extension, handlerName)
               Registry.ClassesRoot.DeleteSubKey();
            }
      }
}
      catch (Exception)
      {
          throw;
      }
}
The importance of explicitly setting a guid for the extension is vital so that the Win32 registry can point to the class. The class must be decorated with a [Guid] attribute so that it can be registered with COM, but the class must also be registered with Windows, as previously discussed. Rather than hardcode the guid in the assembly and in the register and unregister methods, the following method uses reflection to extract the guid value right out of the attribute decoration. This approach is much more maintainable because the guid is only declared in a single location. The type passed to this method is the type of the extension class that is inheriting from ShellExtensionBase; that is where the [Guid] attribute is decorated.
private static string InterogateGuid(Type type)
{
    try
    {
       GuidAttribute[] attributes = type.GetCustomAttributes(typeof(GuidAttribute),
                                                             false)
                                                             as GuidAttribute[];

       if (attributes.Length != 0)
       {
           return "{" + attributes[0].Value + "}";        }
       return string.Empty;
    }
    catch (Exception)
    {
        throw;
    }
}
The base class is now complete, so we can move on to usage. There are two ways that the extension can be built using our framework; both methods are discussed in the next two sections.
Using the framework is very easy, and most of the implementation details for the extension have already been covered. The most notable parts to mention are the RegisterServer() and UnregisterServer() methods. You will notice the ComUnregisterFunctionAttribute and ComRegisterFunctionAttribute decorations on both methods. These attributes specify the methods to call when registering or unregistering an assembly from COM; this allows for the execution of custom code during component registration. More on component registration later in this chapter, but just be aware that these methods are entry points from COM, and they simply call the RegisterExtension() and UnregisterExtension() methods in ShellExtensionBase.
 [Guid("45A92DA6-3559-4d20-88F7-552E10779D5A"), ComVisible(true)]
public class StandAloneExtension : ShellExtensionBase
{
    protected static string[] _extensions = new string[2] { ".nxe", ".nxw" };
    protected static string _handlerName = "SimpleToolStandAlone";

    protected override string MenuTitle
    {
        get { return "SimpleTool - Stand Alone"; }
    }

    protected override string[] Extensions
    {
        get { return _extensions; }
    }

    protected override void CommandRegistration(string[] fileNames)
    {
        RegisterCommand("Do Something");
        RegisterCommand("Do Something Else");
        RegisterCommand("-");
        RegisterCommand("View Stuff");
        RegisterCommand("-");
        RegisterCommand("Simple Command 1");
        RegisterCommand("Simple Command 2");
    }

    protected override void HandleCommand(string command, string[] files)
    {
    StringBuilder buffer = new StringBuilder();

    buffer.AppendFormat("Handle Command '{0}':{1}{1}",
                        command,
                        Environment.NewLine);

    foreach (string file in files)
    {
        string fileName = Path.GetFileName(file);
        buffer.AppendFormat("{0}{1}", fileName, Environment.NewLine);
    }

    MessageBox.Show(buffer.ToString());
}

protected override void HandleError(Exception exception)
{
    MessageBox.Show(exception.ToString());
}

[System.Runtime.InteropServices.ComRegisterFunctionAttribute()]
internal static void RegisterServer(string description)
{
    try
    {
         RegisterExtension(typeof(SimpleToolExtension),
                                  _extensions,
                                  _handlerName);
    }
    catch (Exception e)
    {
        MessageBox.Show(exception.ToString();
    }
}

[System.Runtime.InteropServices.ComUnregisterFunctionAttribute()]
internal static void UnregisterServer(string description)
{
    try
    {
         UnregisterExtension(typeof(SimpleToolExtension),
                                    _extensions,
                                    _handlerName);
     }
     catch (Exception e)
     {
         MessageBox.Show(exception.ToString());
     }
   }
}
Standalone shell extensions exist as separate assemblies. This is ideal for extensions that contain the actual tool logic, or for extensions that cannot be integrated into the source code of an existing tool.
If you are able to modify the source code to your tool and if it is managed code, you can integrate the shell extension right into the code base. There are a number of benefits to this approach, but the most important is ease of deployment.
To start, we generally want to keep the logic called by the extension and the logic called by the tool in the same location for maintainability. The following code implements a simple class that processes a collection of files using a specified command.
public static class SimpleTool
{
    public static void ProcessFiles(string command,
                                    string[] files,
                                    bool fromExtension)
    {
         if (fromExtension)
         {
             StringBuilder buffer = new StringBuilder();

             buffer.AppendLine(String.Format("Handle Command '{0}':", command));
             buffer.AppendLine("—-");

             foreach (string file in files)
             {
                 buffer.AppendLine(file);
             }

             System.Windows.Forms.MessageBox.Show(buffer.ToString());
    }
    else
    {
            Console.WriteLine(String.Format("Handle Command '{0}':", command));
            Console.WriteLine("—-");

            foreach (string file in files)
            {
                Console.WriteLine(file);
            }
        }
    }
}
For the most part, the extension code can stay the same. We will, however, modify the method that handles menu commands so that it points to the static logic class for the tool. The fromExtension parameter for SimpleTool.ProcessFiles() is set to true so that a message box is shown instead of writing the messages to the console. There is no console when executing the standalone extension.
protected override void HandleCommand(string command, string[] files)
{
    SimpleTool.ProcessFiles(command, files, true);
}
As an example, we will create a simple console application. You can pass it several files as command-line arguments, or you can use a switch to register or unregister the shell extension with the operating system. The fromExtension parameter for SimpleTool.ProcessFiles() is set to false so that the messages are written to the console.
class Program
{
    static int Main(string[] args)
    {
        Console.WriteLine("SimpleTool.exe - Simple demo to show " +
                          "how to link a tool to a shell extension.");

        if (args.Length == 1)
        {
            string option
                = args[0].Replace('-', '/').ToLower(CultureInfo.InvariantCulture);

            if (option == "/?" || args[0] == "/help")
            {
            Usage();
            return 0;
   }
   else if (option == "/u")
   {
        try
        {
            Assembly assembly = Assembly.GetExecutingAssembly();

            RegistrationServices registration
                                          = new RegistrationServices();

            registration.UnregisterAssembly(assembly);
            SimpleToolExtension.UnregisterServer("");

            Console.WriteLine("Extension unregistered successfully");
        }
        catch (Exception)
        {
            Console.WriteLine("Extension is not currently registered");
        }
    }
    else if (option == "/r")
    {
       try
       {
             Assembly assembly = Assembly.GetExecutingAssembly();
             RegistrationServices registration = new RegistrationServices();

             registration.RegisterAssembly(assembly,
                                 AssemblyRegistrationFlags.SetCodeBase);
             SimpleToolExtension.RegisterServer("");

             Console.WriteLine("Extension registered successfully");
        }
        catch (Exception exception)
        {
            Console.WriteLine("Extension failed to register: " +
                              exception.ToString());
         }
     }
     else
        {
            Console.WriteLine("Invalid option: " + args[0]);
            Usage();
            return 1;
        }
     }
     else if (args.Length >= 2)
     {
         List<string> files = new List<string>(args);

         string command = files[0];

         files.RemoveAt(0);

         SimpleTool.ProcessFiles(command, files.ToArray(), false);
      }
      else
      {
          Usage();
      }

      return 0;
  }

  private static void Usage()
  {
      Console.WriteLine("/r - Register the shell extension " +
                        "for this tool with Explorer");
      Console.WriteLine("/u - Unregister the shell extension " +
                        "for this tool from Explorer");
   }
}
The simple tool shell extension is now built, but it must be registered before it is functional. The next section covers how to do this.
Before our extension will work, we need to register it with Windows. This involves a few entries into the registry so the shell is aware of the new functionality, and it requires installation of the component into the Global Assembly Cache (GAC).
First, you must register the extension assembly as a COM component. When using a standalone extension assembly, you can do this with the regasm.exe command. Open the Visual Studio command prompt and execute:
Regasm.exe NameOfYourExtension.dll
This tool creates all the necessary entries to configure the assembly as a COM object. With the assembly correctly configured for COM, we now need to register the object as a shell extension. This is done with Win32 registry entries, and the code for this is in the RegisterExtension() method within ShellExtensionBase. Remember the RegisterServer() method that was decorated with ComRegisterFunctionAttribute? Regasm will call this static method automatically when executed, which is where we then call RegisterExtension() to configure the registry appropriately. Conveniently, there is also a method for unregistration that calls UnregisterExtension().
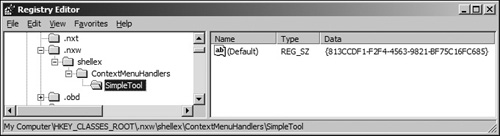
After the object has been successfully configured as a shell extension, the Win32 registry will have new entries for each of the configured file extensions pointing to the extension class. Figure 41.1 shows the extension registered for an .nxw file.
Extensions that have been integrated with an existing managed tool are typically in the form of an executable, which will not be successfully registered with Regasm. To get around this, we simply use the RegistrationServices class of the COM interop layer, which essentially calls the same functionality that Regasm does, except programmatically.
You can register the extension integrated in our test console application by executing:
SimpleTool.exe /r
The /r runs the registration code, which will call the same static method that Regasm does. Conveniently, you can also use /u to unregister the integrated extension from Explorer as well.
Lastly, you must install the extension assembly (exe or dll) into the Global Assembly Cache, including the ShellExtensionBase library so that windows can find them based on the guid specified in the registry.
You can do this by either executing:
Gacutil.exe –i TheAssemblyToInstall
or by dragging the file into the assembly folder in your Windows directory.
Note
You must sign your assemblies with a strong name key in order to install them into the Global Assembly Cache. You can generate a strong name key with the sn.exe utility, or through the Signing property page for the project.
After the extension has been successfully registered, the last step is to restart the explorer.exe process so that your extension can be installed. See the next section for a way to do this.
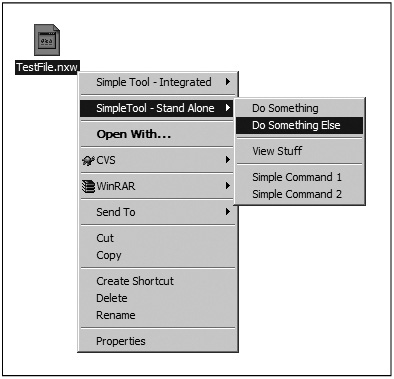
If everything has been done correctly, you should now be able to right-click on any file with a .nxw or .nxe extension (using our example) and be able to see the new context menu. Figure 41.2 shows this context menu with both extension types installed.
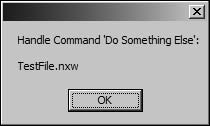
If you select a command from the extension, you will see a message similar to the one shown in Figure 41.3.
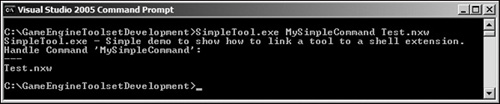
Running the integrated executable as a normal console application will result in a message similar to the one shown in Figure 41.4.
Developing and debugging shell extensions has never been an easy task, especially because the shell holds a copy of the previously loaded DLL. This can lead to problems overwriting the file or a change not being reflected until the shell is restarted because of the local copy in memory.
A useful trick is to build a simple Win32 C++ application using the following code, which will stop and restart the shell, removing the cached copy of the DLL.
#include <windows.h>
int WINAPI WinMain(HINSTANCE hInstance, HINSTANCE hPrevInstance,
                   PSTR szCmdLine, int iCmdShow)
{
    HWND hwnd = FindWindow("Progman", NULL);
    PostMessage(hwnd, WM_QUIT, 0, 0);
    ShellExecute(NULL, NULL, "explorer.exe", NULL, NULL, SW_SHOW);
    return 0;
}
There are some additional steps that must be taken as well. Here is the usual process for reloading a new extension dll.
Remove the existing extension dll and ShellExtension.dll file from the GAC.
Recompile your extension dll.
Place your extension and the ShellExtension.dll file back into the GAC.
Restart the Windows shell using the above technique.
In this chapter, I discussed what a shell extension is, and how to create a context menu extension in C#. Although extensions can be tricky to write and debug at times, they can offer a significant boost to productivity and workflow. There are a number of types of shell extensions that can be created, but covering them all would require a book in itself.
It was the intent of this chapter to discuss shell extensions, and then ramp up into the development of a reusable framework that can be used to quickly develop context menu extensions in the shortest amount of time possible.