
Version 1 of any software is full of bugs. Version 2 fixes all the bugs and is great. Version 3 adds all the things users ask for, but hides all the great stuff in Version 2. | ||
| --Fred Blechman | ||
Configuration management has always been an integral component of the software development life cycle because its main purpose is to efficiently handle the evolving nature of software design. The deployment and support of a product often causes many headaches and problems, especially with regards to updating the user base with the latest software version. It is for this reason that there is such a following around thin-client architectures and web-based solutions. A change is generally only needed in a single location on the server to affect all connected users. Imagine a company with a thousand machines that use a particular software application. If it is deployed as a desktop application, you must rely on the user to perform updates because of the large user base.
There are virtually limitless varieties of machine configurations within the user base of a software product, and the components and code of desktop applications must run on all of them. So many different configurations of software can also lead to the infamous “DLL Hell” that has haunted configuration management for many years. There is also a large assortment of security profiles within any organization of reasonable size, so it is important that software run under a diverse range of security permissions.
There are problems and limitations with web applications, especially when it comes to performance, security, and browser limitations. The biggest limitation with a web application is the lack of offline support. Additionally, user interface functionality is quite poor; things like drag and drop support is very hard or even impossible to do. Web applications also consume a lot of server resources and bandwidth because things have to be done with a round trip to the server, followed by a waiting period. Applications that require print support are limited to “print screen” with hardly any formatting control. There are some plugins and ActiveX controls that help to alleviate these problems, but they tend to suffer from the same deployment problems that a lot of the desktop applications have. The ideal solution would be to find a balance between web and desktop application deployment.
There have been some past attempts to remove these burdens from configuration and deployment managers, but no single solution has presented itself that could solve all the problems. Aside from traditional deployment methods like MSI packages, the initial release of the .NET 1.0 Framework provided the ability to launch applications directly from a web site such as http://localhost/application.exe (also known as href-exes), but this method usually required security policy changes on the client, which meant that an MSI package had to be run first. This method does not support the idea of an offline mode.
Recently, a couple of managed libraries were made available that aided in the updating of application versions. Both the Updater Application Block (UAB) and Jamie Cool’s AppUpdater libraries support the ability to download new versions of a product to the desktop, eliminating the security and performance concerns of href-exes. The downloaded applications are stored on the local disk, so offline mode was supported.
Version 2.0 of the Microsoft Visual Studio .NET and the Microsoft .NET Framework provide a new technology called ClickOnce, which allows us to develop desktop applications that are deployed using a safe, system-controlled and secure installation process, and are updated automatically from a centralized server location. This is all made possible because .NET applications are designed for application isolation and zero-impact deployment (also known as xcopy deployment).
This chapter will cover the creation, deployment, launching, and updating of a ClickOnce application using the Visual Studio 2005 IDE. ClickOnce deployment can be done manually by copying the files, the application manifest, and the deployment manifest to the deployment location, but the manual creation of the two manifest files is beyond the scope of this text.
Note
The .NET Framework SDK includes a tool called MAGE (Manifest Generator and Editor) that provides both a UI and a command line interface that can create and manipulate the manifest files that power ClickOnce.
While ClickOnce solves many deployment problems plaguing the software world right now, it is by no means a “silver bullet” for every deployment scenario. There will be times when ClickOnce deployment will not suffice, and it would be more beneficial to use MSI or xcopy deployment instead. The intent of this section is to educate you on the differences between ClickOnce and MSI deployment so that you can determine which solution will support the needs of your project.
Both ClickOnce and MSI have a dependency on a runtime that must be installed on the user’s machine before installation can begin. ClickOnce requires the .NET 2.0 Framework in order to run. This can be installed with an old-fashioned bootstrapper. MSI files have an MSI runtime that must also be installed, although all current versions of Windows come preinstalled with this runtime. Again, this runtime could be installed with an old-fashioned bootstrapper.
The need for user input is very small with a ClickOnce deployment. Two clicks are needed: one click on the hyperlink to launch the installer, and another click on the confirmation dialog. The remainder of the installation is a progress bar. This can be a good thing, but personalization and customization of the install process are very limited. MSI files generally have wizard pages that can support many different types of user input. MSI files can be run in a BasicUI mode that functions in a fashion quite similar to ClickOnce.
ClickOnce can only install an application per-user. Per-machine installations are impossible, so multiple users will result in multiple copies of the software on the machine. MSI files can install on a per-machine basis. ClickOnce is also very restrictive with the installation directory. Files will always be installed to the My Applications folder within the My Documents folder. MSI files can install to any directory specified. You cannot modify the target computer with a ClickOnce install, whereas an MSI file can access the registry and other parts of the machine.
At this point, you are probably thinking, “What’s so great about ClickOnce if MSI files provide more functionality and features?”
First, ClickOnce deployment takes advantage of application isolation, meaning that the installed applications are isolated from other applications and the operating system itself. This protects the user from the infamous “DLL Hell.” MSI installers replace files and manipulate the registry, which can cause all sorts of problems.
MSI files cannot check for newer versions of the software without the help of additional tools. ClickOnce installers have this functionality built right into the runtime.
Updates are pushed to users when they request the deployment manifest for the application. MSI files do not support this functionality, although they can integrate pretty well with management and deployment tools such as SMS and Active Directory.
Hopefully I did not scare everyone away by pointing out the limitations of ClickOnce. Overall, ClickOnce is an excellent deployment solution, and it solves many problems that MSI installers cannot overcome.
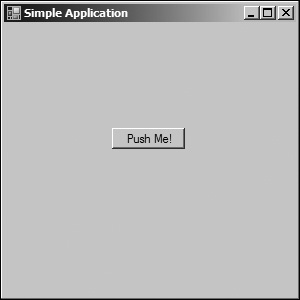
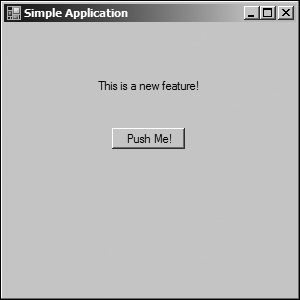
Before we can start discussing ClickOnce deployment, we need to build an application that we can work with. The simplest C# Windows Forms project will do, such as the one shown in Figure 44.1 that has a single button displaying a “Push Me!” message box.
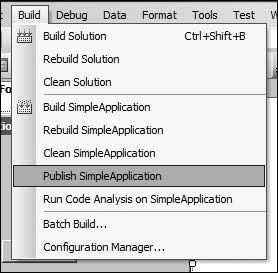
At this stage when we have a completed product ready, a separate MSI project is normally created to deploy the files, while Visual Studio 2005 integrates ClickOnce deployment right into the IDE for the project.
At this stage when we have a completed product ready, a separate MSI project is normally created to deploy the files. Visual Studio 2005 integrates ClickOnce deployment right into the IDE for the project. Build your solution so that all the related binaries are compiled and select the Publish <Application Name> option from the Build menu, as shown in Figure 44.2.
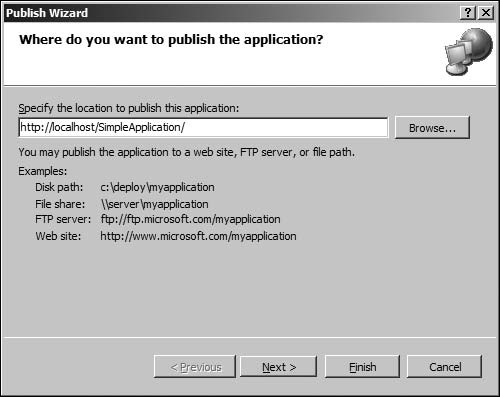
The first screen of the publishing wizard, as shown in Figure 44.3, asks where you would like the application to be deployed. This location can be any HTTP 1.1 web server, ftp server, a file path on the local disk, or a file path on a network drive.
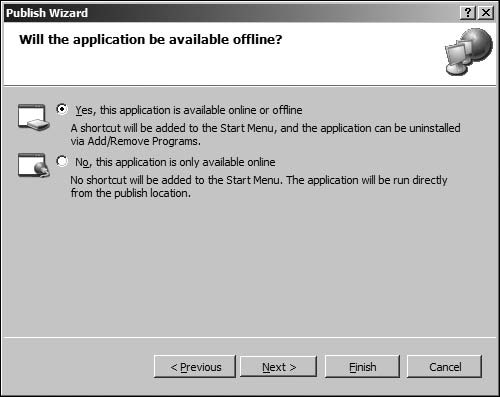
The next wizard screen, as shown in Figure 44.4, asks whether the application will be available offline. If the application is available offline, a local cached copy of it will be installed so that the last version requested from the online data store will be launched. Keep in mind that the cached copy can not be the latest version, but typically this deployment method is used in situations where it is acceptable to have a slightly older version of the application at certain times. The cached copy is launched via the shortcut in the Start Menu if offline mode is available; otherwise, the application is only available by accessing the data store path.
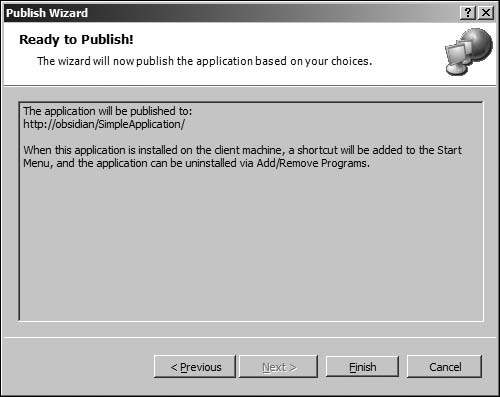
The final screen of the Publishing Wizard, as shown in Figure 44.5, describes where the application will be published. No additional configuration is required at this stage, so you can click the Finish button to complete the publishing process.
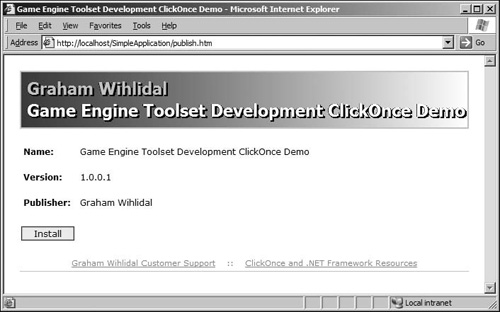
After the publishing process has completed, you will be redirected to a generated web page, as shown in Figure 44.6, which contains a button that can execute the ClickOnce installer. This page has the name of the application, the current version, and the name of the publisher. Notice that the publisher field is blank. This will be addressed later in this chapter.
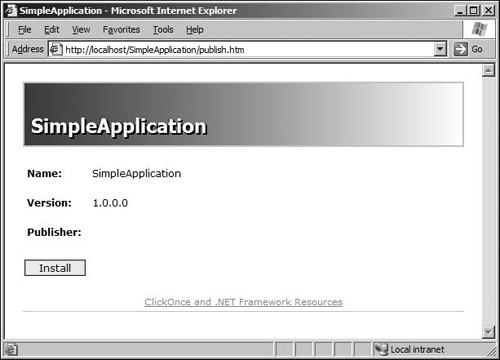
If you mouse over the Install button, you should notice that the link is pointing to an application manifest (http://localhost/SimpleApplication/SimpleApplication.application, in this example). This is really the only link you need to give your users to launch the application. Launching the application will be covered later in this chapter.
The application is now deployable, so we can move on to discussing how to go about launching the application, configuration deployment settings, and pushing updates.
The application can be launched by navigating to the application manifest file in the top-level folder of the deployment location. For this example, the path would be http://localhost/SimpleApplication/SimpleApplication.application.
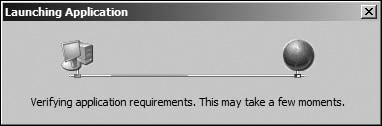
Before the application can launch, the ClickOnce runtime must first determine if the prerequisites are installed, and then determine if the application itself is installed. The application is launched if both checks are successful; otherwise, an installer dialog is presented that will install the application along with the necessary prerequisites. The runtime checks are performed while displaying the progress dialog shown in Figure 44.7.
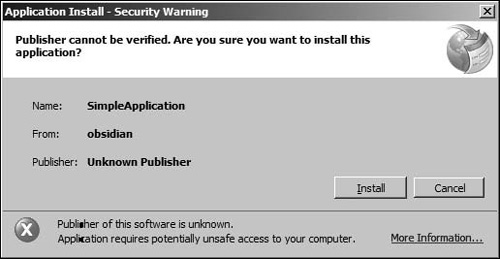
Because this is the first time the application is launched, you will be prompted with an installation dialog like the one shown in Figure 44.8. This trust dialog will describe any warnings that are a result of the security settings for the application and the installer. One warning in particular is that the publisher is unknown, but this warning is very easy to fix and will be covered later on, in the deployment configuration section.
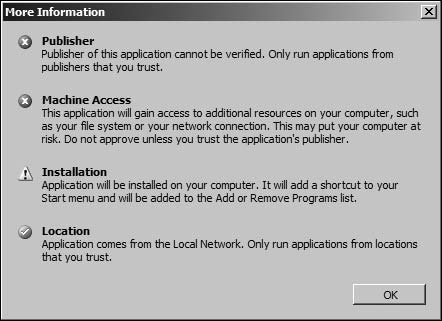
Click on the More Information... link to view additional information about the security settings for the installer. Figure 44.9 shows this.
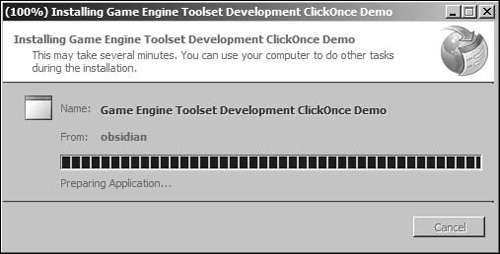
Start the installation process by clicking the Install button on the trust dialog, and the application will start to be deployed. This is shown in Figure 44.10.
The application is now installed, so all subsequent requests for the application manifest will result in the application being launched.
With installation and launching covered, it is time to show how to customize the deployment manifest for your application using the Visual Studio 2005 IDE.
As discussed earlier, the ClickOnce deployment engine is driven by manifest files that are essentially XML documents. These documents contain various properties and settings that ClickOnce uses to deploy your application with a certain degree of intelligence. These files can be created by hand, but the focus of this topic is on using ClickOnce with Visual Studio integration.
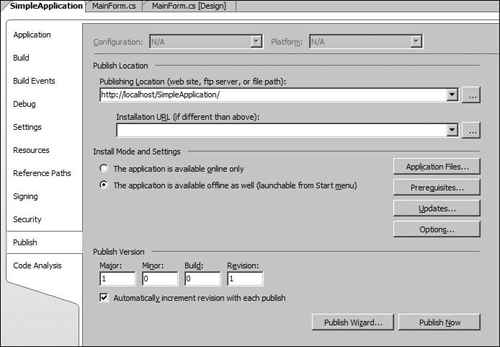
There are a variety of settings that are accessible through the Publish property page under project properties. This property page is shown in Figure 44.11.
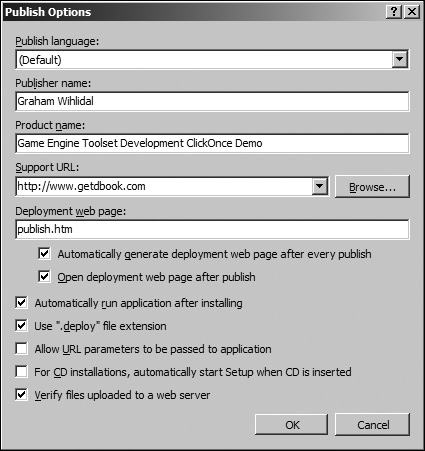
By clicking on the Options... button, you will be able to set publishing settings through the Publish Options dialog. This dialog, as shown in Figure 44.12, lets you specify the publisher, product name, support information, and various deployment settings, depending on your deployment strategy. It is a good thing to set this information so that fewer warnings appear in the trust dialog when a user installs the application.
Large applications typically have external dependencies on libraries or components that must be installed prior to using the application. Most notably, the .NET framework itself is required to run any managed applications. Thankfully, Visual Studio offers an excellent bootstrapper utility that will install the prerequisites before allowing ClickOnce to install the application. All of this happens behind the scenes during an installation and is configured through the dialog that is accessed by clicking on the Prerequisites... button. Figure 44.13 shows the bootstrapper configuration screen.
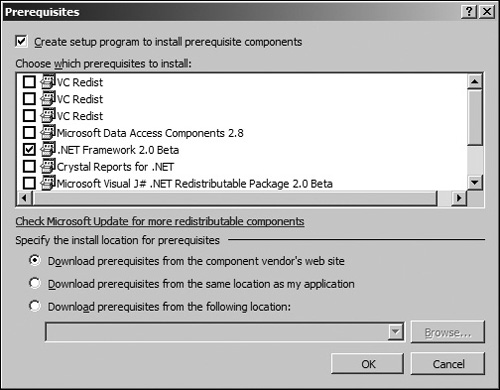
The bootstrapper supports custom prerequisites, but the one downside is that these prerequisites cannot be updated by ClickOnce.
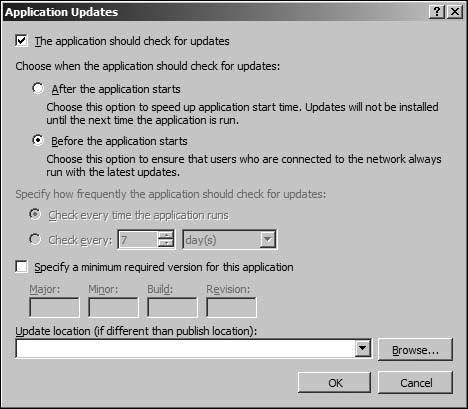
A great feature of ClickOnce deployment is the ability to push new versions of a product to its users from a centralized location. Applying updates using ClickOnce is extremely easy, and there are also a few deployment settings that can be specified, depending on how you want your updates to be given to the users. Some users really dislike having updates installed automatically, so if appropriate, you can tell ClickOnce to prompt the users if they wish to install the new updates. You can also enforce certain minimum versions on the users so that every user has at least a certain version.
Figure 44.14 shows the configuration screen for application updates. This screen is accessed by clicking on the Updates... button, and is used to specify the versioning strategy used by ClickOnce.
After you make changes to the application, all you need to do is republish the application, and the new version will be available to users the next time they request the deployment manifest.
Try making a new noticeable change to our simple application, like the one shown in Figure 44.15, and republish the application.
With the new update available, navigate to the publish.htm page that is automatically generated by ClickOnce. Remember that we specified the publisher information, so there is much more information on this page than before. Figure 44.16 shows the updated web page.
Clicking the Install button will apply the new updates and launch the application.
ClickOnce supports a variety of features that generally meet the requirements of application updating, but times do arise where you want programmatic control over how and when updates occur. ClickOnce exposes a programmatic API that allows you to manually check for updates and apply them. This functionality is available in the System.Deployment.Application namespace and has a variety of features, depending on the need of the custom solution.
The following code shows the easiest way to programmatically check for updates and synchronously deploy them, but keep in mind that there is much more flexibility in the ClickOnce API than what is shown here.
try
{
    ApplicationDeployment updater = ApplicationDeployment.CurrentDeployment;

    UpdateCheckInfo updateInfo = updater.CheckForDetailedUpdate();

    if (updateInfo.UpdateAvailable)
    {
        string message1 = "A newer version of this application is available. ";
        string message2 = "Do you want to update the application now?";

        if (MessageBox.Show(message1 + message2,
                            "ClickOnce Demo Updater",
                            MessageBoxButtons.YesNo)
                            == DialogResult.Yes)
        {
           updater.Update();
           MessageBox.Show("Please shutdown and restart the " +
                           "application to start using the new version.");
        }
    }
}
catch (DeploymentException exception)
{
    MessageBox.Show(exception.Message);
}
When a new version is available and the update is downloaded, the new application files are placed in the appropriate folder named after the version. The shortcut to the application is then pointed at the new folder, which requires shutting down the application and restarting to take advantage of the changes.
A major advantage of ClickOnce deployment is that the application can be kept unaware of ClickOnce because there is no need to inherit from base classes or implement interfaces. However, it is comforting to know that support is there when you need programmatic control over ClickOnce for your deployment strategy.
In this chapter, you learned about ClickOnce deployment, and how it can quickly be used to deploy software on user machines, along with a versioning strategy that can keep the software up to date.
Code access security is beyond the scope of this chapter, so there was not much discussion around security permissions with ClickOnce applications. This functionality does exist in the publishing system, and there are some great tools that you can take advantage of to make your life easier.
As mentioned earlier, ClickOnce deployment is a great deployment solution, but it is not always the method you want for every situation. But for situations where you want application isolation, ease of use, offline mode, and reliable versioning, ClickOnce is a solution you can place your trust in.