Solutions in this chapter:
This book is not about programming. There are already many good resources about programming languages and techniques, and about programming the NXT in particular. However, the nature of robotics (often called mechatronics) is such that it combines the disciplines of mechanics, electronics, and software, meaning you cannot discuss a robot’s mechanics without getting into the software that controls the electronics that drives the machine. Similarly, you cannot write the program without having a general blueprint of the robot itself in your mind. This applies to the robots of this book as well. Even though we are going to talk mainly about building techniques, some projects have such a strong relationship between hardware and software that explaining the first while ignoring the latter will result in a relatively poor description. For these reasons, we cannot simply skip the topic. We need to lay the foundation that will allow you to understand the few code examples contained in the book.
In the previous chapters, we mentioned the NXT many times; this chapter assumes that you are familiar with the documentation included in the MINDSTORMS kit and that you know what the NXT is. The time has come to have a closer look at its features and discover how to get the most from it. We will describe its architecture and then give you a taste of the broad range of languages and programming environments available, from which you can choose your favorite. Our focus will be on two of them in particular: NXT-G Code, the graphics programming system supplied with the kit; and RobotC, the text-based C programming language available from LEGO Education.
The last sections of the chapter provide two complete code examples, both of which are meant to help explain how to write well-organized code that is easy to understand and maintain, and are designed to familiarize you with the programming structures you’ll find later in the book.
The NXT is a powerful computer. You may think of a computer as being merely a PC with a keyboard, mouse, and monitor; devices created to allow human users to interface with the computer, none of which are available on the NXT. However, many commonplace items— Apple’s iPod, cell phones, portable game consoles from Nintendo and Sony, VCRs—have “embedded” computers that provide their functionality. The NXT is more similar to these embedded computer devices.
Instead of the keyboard, mouse, and monitor found on a PC, the NXT has a small liquid crystal display (LCD) and four push buttons. The NXT’s LCD is 100 pixels (i.e., dots) wide by 64 pixels high—large enough to display eight lines of text with 16 characters per line. The LCD can also be used to display icons or graphics—in other words, black-and-white pictures. You could even write a program to plot a graph on the display showing how the value of one of its sensors changes over time.
The NXT has four input ports. These are used to connect the four types of sensors (touch, ultrasonic distance, sound, and light) developed by LEGO for the NXT. Many additional NXT-compatible sensors have subsequently been developed by third-party companies (see Appendix A), including accelerometers, compasses, higher-performance light sensors and distance sensors, pressure detection, and so forth.
There are three output ports on the NXT. Variable-speed motors are connected to these ports. The motors have an integrated position detection capability or “encoder” that is used to keep track of how far the motor has traveled. One complete revolution of a motor will change the motor encoder value by 360 counts. The position detection is similar in function to the odometer on a car that measures how far the car has traveled.
The NXT has both a wired USB port and a wireless communications link. You can use either of these links to connect your NXT to a PC. The wireless link uses the industry-standard Bluetooth protocol and the NXT can connect to other compatible Bluetooth devices. For example, some cell phones come with a Bluetooth link and by loading a special software program in your phone you can then use your phone as a remote control for the NXT. You also can use the Bluetooth link to connect one NXT—the “master”—with up to three other NXTs—the “slaves”—for some interesting multi-NXT applications.
The NXT has 256 KB—in other words, 256,000 bytes—of flash memory, and 64 KB of random access memory (RAM). Flash memory retains its value even when the NXT is powered off; this is the same type of memory used to store songs in an iPod or to store telephone directories in a cell phone. The contents of RAM memory are lost when the NXT is powered off; RAM is used to store transient values created while a program is running. The flash memory is used to implement a small file system of up to 64 files that can be stored on the NXT. One type of file that you want to store on the NXT is the program file you’ve written. Another type of useful file is a sound file that can be played over the NXT’s speaker.
The NXT is just like a PC in that it has an “executive” control program or operating system that provides overall control over the other programs on the NXT. Operating systems for PCs include Windows and Linux. The NXT’s operating system was written specially for the NXT and does not have a name. About half of the 256 KB of flash memory is used to store the NXT’s operating system and the other half is used for the file system.
A total of 256 KB of flash memory may not seem like a lot when you compare it to the disk drive on your PC, which can have 100,000 times this capacity. But the programs written for the NXT are far smaller than the programs on a PC. Typically there’s room on the NXT to store around 20 or more user programs.
The NXT is the second generation of LEGO’s MINDSTORMS product line.
The first generation was introduced in the mid-1990s and centered on the RCX programmable brick. There were several derivatives of the RCX, with slightly different features. They all shared the same Hitachi H8 8-bit computer and had a similar programming language. The Cybermaster brick had two built-in motors and used a wireless link instead of an infrared link. The Scout brick was a lower-functionality subset of the RCX. The NXT is far more capable than the RCX. Some of the improvements include in the following:
The NXT’s computer is 10 to 50 times faster than the computer in an RCX. It has five times as much memory. Internally the computer uses a 32-bit native format instead of 8 bits.
The NXT has four sensor ports versus three on the RCX. Many more types of sensors are available for the NXT than for the RCX.
The NXT motors have integrated odometers/position sensors. The RCX does not.
NXT motors are “smart” with their built-in encoders. On the RCX, you only were able to “apply a specified percentage of the maximum available power” to a motor. If the batteries were weak or there was a lot of resistance to movement— driving up an incline, more friction/binding in the mechanical construction—the motor would operate at different speeds.
Motors on the NXT can be directed to “move at a specified percentage of the maximum speed using feedback from the motor odometers to adjust the applied power up or down to achieve this speed.” The NXT motors will have consistent speed even if the batteries are weak or there is higher friction!
The NXT has both USB and Bluetooth communications links. The RCX had a single infrared communications link that was slower than and not nearly as robust as the NXT’s links.
A large part of the RCX’s program memory was read-only; once programmed in the factory during manufacture, it could not be upgraded. All of the NXT software is stored in flash memory that can be upgraded.
On the RCX, user programs and a significant chunk of firmware were stored in volatile RAM memory whose contents were lost when batteries were exhausted or removed. On the NXT, nonvolatile flash memory is used.
The NXT is not useful without a user-written “program” that describes its behavior on how the outputs—in other words, the motors—should react to changes in the inputs (i.e., the sensor values). Without a program, the NXT is an expensive paperweight! Fortunately, you don’t have to have a college degree in computer science to program the NXT; LEGO has developed three different environments for programming the NXT and they all make it quite easy to write a program for the NXT.
You may already be a computer “programmer” and don’t realize it. For example, when you enter numbers into your cell phone directory you are “programming” your cell phone. When you enter formulas into a spreadsheet, such as “SUM” the values in a column of your spreadsheet, you use a form of computer programming. When you define formatting styles in a word processor—for example, indent paragraphs 1 inch with a line of space before and after the paragraph—you are creating a “program” for your word processor that describes the “behavior” for text entered into a file.
A common theme in these examples is that they are applications written by computer experts to make it very easy for the end user to customize or program how the application behaves and deals with its data/environment. The end user does not have to be an expert.
The NXT is similar to the aforementioned examples. LEGO partnered with industry experts to develop three different applications that allow you to easily enter data that creates a program for the NXT. The data that you enter is a “program” for the NXT. You program the NXT by running one of these three applications on your PC to create the program; once the program is created, you then use the application to download (or transfer) the program to the NXT, where it can be “run” or “executed.” When you run the program on the NXT, the NXT is behaving autonomously—independent of human control—according to the behavior described in your program.
There are three programming environments for the NXT because they are optimized for the needs of different types of users. Table 7.1 summarizes the three programming solutions.
Table 7.1. Programming Environments for the NXT
Programming Environment | Description |
|---|---|
NXT-G | Developed by National Instruments for LEGO. Ships with the retail version of the NXT kit. |
A graphical programming environment. You drag code blocks (represented by icons) that describe different behaviors—turn motor A on at 50 percent of full power—and connect them with lines to describe program behavior. | |
Best for writing short, simple, uncomplicated, basic programs, and for younger (preteen) owners. | |
ROBOLAB | Developed by Tufts University for LEGO’s Education division. |
Available from LEGO’s Education division. | |
Another graphical programming environment. Not quite so intuitive as the NXT-G programming language, but a bit more feature-rich. | |
Originally developed for the RCX. Supports both the NXT and RCX. | |
Best for users (e.g., schools) that have a mixed environment of NXTs and RCXs and want to use a graphical programming solution. If you already have RCXs and are adding some NXTs, you may want to use ROBOLAB. | |
RobotC | Developed by the Robotics Academy at Carnegie Mellon University for LEGO’s Education division. CD version is available from LEGO’s Education division or can be downloaded directly via the Internet. |
A text-based programming language. Uses the popular industry-standard C programming language. | |
Supports both the NXT and RCX brick. | |
Suitable for novice and experienced programmers. |
When you purchase an NXT from a retail supplier, it comes with a CD containing the NXT-G programming environment. An NXT purchased from LEGO’s Education division does not come with programming software; you need to purchase one of the three available environments.
The NXT has its own operating system, just like a PC has a Windows or Linux operating system. The operating system is a powerful “executive” program that manages all of the devices (sensors, motors, buttons, LCD display, timers, memory, etc.) that are part of the NXT.
In an embedded system such as the NXT, the operating system is often called firmware — in other words, software for an embedded system stored in nonvolatile flash memory—and it provides control over the hardware of the embedded system.
An operating system also provides other base capabilities that are found on the NXT. On the NXT, it implements a file system that can store up to 64 files. It provides a menu system for managing files—in other words, execute, run, or delete the files—similar to, but naturally not as powerful as, the functionality found in the Windows desktop and Explorer menus!
You write your program for the NXT using one of the programming environments. Then the PC “compiles” the program into a compact format suitable for execution by a computer and transfers it to the NXT. Once it’s on the NXT, you use the buttons to navigate to the operating system’s “run program” menu item. Pushing the Enter button (the orange button) will “run” the program contained in the selected file.
This compact format of a program is often called bytecode. A byte contains a single character of data. A user program is composed of a series of instructions that describe the desired or programmed behavior. It takes several bytes of data to describe one instruction—hence, the term bytecode. “Set motor power level” is a typical instruction; the first byte is the opcode specifying the instruction type, the second byte indicates which of the three motors to manipulate, and the third byte is the power level to apply.
Bytecode is not instructions that the NXT’s CPU can execute directly. Instead, the operating system contains an “interpreter” application that looks at each bytecode and converts it to the appropriate functionality. Interpretative programming languages are very common— Java is a popular example, where a user’s program is converted into Java bytecode which is then interpreted when the program is run.
NXT-G (NXT Graphical) is the graphical integrated development environment (IDE) provided with the NXT set. NXT-G is targeted at children and adults with no programming experience, and for this reason it is very easy to use.
You write a program simply by dragging and connecting code blocks into a sequence of instructions, more or less like using actual LEGO bricks. Different kinds of code blocks correspond to different functions: You can control motors, watch sensors, introduce delays, play sounds, and direct the flow of your code according to the state of sensors, timers, and so forth. NXT-G also provides a simple way to organize your code into MyBlocks, or groups of code blocks that you can call from your main program as though they were a single code block.
When you think your code is ready to be tested, the NXT-G IDE will compile (translate) your code into bytecode and download it to the NXT through the USB or Bluetooth link as a file on the NXT.
The intuitiveness of NXT code makes it the ideal companion for inexperienced users, but as you become more expert, you may notice some drawbacks:
The NXT-G graphical programming interface is not suitable for large programs. Graphical programming is great for small programs, but it becomes hard to follow when the complete program will not fit on a single screen (say, more than 20 blocks).
User-defined variables are a useful and common programming concept. NXT-G supports variables but they are awkward to use.
NXT-G provides access to the vast majority of the NXT’s operating system functionality. But some useful features can’t be accessed via NXT-G. For example:
Arrays—a list of related variables—are a very useful programming construct that is not available in standard NXT-G programming. (Some advanced NXT users have enhanced NXT-G with additional blocks that provide primitive array support, but using arrays remains awkward and difficult.)
You can use NXT-G to display the value of a variable on the NXT LCD as long as it is a whole number. But other IDEs provide stronger formatting capabilities such as “display a number with two decimal points in the fractional part,” or “center a text line on a screen” instead of always left-aligned. Or you might want to draw a column of nicely aligned numbers on a screen; other IDEs would allow you to “display a numerical value padding with blanks as required to take precisely five characters.”
NXT-G supports only “integer” or whole number variables. It doesn’t provide access to “floating-point” or fractional numbers. There are many times when you’ll want to use fractional values; for example, you might want to keep track of the distance your robot has traveled in inches—the calculation is easy; just multiply the wheel diameter (say, 2.67 inches) by the encoder count, and divide by 360 because there are 360 counts per revolution. Or you might want to use the sine function which ranges from 0.0 to 1.0.
Some other IDEs have much better capabilities for debugging errors in your program. All but the simplest programs are extremely likely to have errors.
Trigonometric functions (sine, cosine, arctangent) are useful in calculating a robot’s position.
The interface is very intuitive but can become somewhat tedious as you become expert and know exactly what you’re doing. It tends to take a lot more keystrokes and mouse clicks to write the same logical code in a graphical environment than it does using a text-based language.
Sooner or later, you may start to want a more powerful language. Fortunately, alternatives such as the RobotC programming environment are still easy to use but provide more power and flexibility.
The NXT-G IDE was optimized for the target market of young children—say, 8 to 14 years of age. It’s a great solution for this market segment. It also is a great fit for any inexperienced user with no previous computer programming knowledge.
But many users will want more. They may want an IDE that uses a standard programming language. Or they may want a solution that offers more power and flexibility. RobotC is a great alternative for this type of user.
The RobotC IDE uses the industry-standard C programming language. The C language, and its “big brother,” C++, is the most popular and most used programming language over the past 20 years. Linux and Windows are both predominantly written in C. When you learn to program in RobotC, you’re really learning how to write programs in C; a useful skill!
The RobotC IDE has been optimized to make it easy to learn. So far, more than 2,000 students have been taught RobotC in the classroom; at the end of the first 90-minute class, they were programming and running their first RobotC programs for the NXT!
RobotC has a “basic” and an “expert” mode; in the “basic” mode a lot of the advanced functionality is hidden, and it is ideal for use by novices. Many other C development environments are targeted at the experienced professional programmer and the inexperienced user is easily overwhelmed.
RobotC’s basic mode is great for the novice user. The expert mode is suitable for the intermediate and advanced user; this mode currently has the most features and programming flexibility of any programming environment for the NXT.
RobotC has a number of extensions that have been added to simplify and facilitate control of robotic controllers such as the NXT.
RobotC was developed by the Robotics Academy (RA) at Carnegie Mellon University (CMU). CMU is one of the top three U.S. colleges for robotics research. The RA is part of the National Robotics Engineering Consortium. The RA is a worldwide leader in developing robotics education and training material for the precollege student. A wealth of training material has been developed for RobotC. A lot of this is Web-based and targeted for individual, self-based instruction and learning (see Appendix A).
Programming in RobotC is conceptually the same as programming in NXT-G. You write your program on the PC. When you think it is complete, you used the RobotC IDE to compile the program into bytecode and transfer (download) it to the NXT file system where it can be run or executed. The difference is that NXT-G is a graphical programming language—you drag and connect blocks on a diagram—whereas RobotC is a text-based programming language—you write the program as a text file.
A neat enhancement in RobotC is the ability to automatically trace, on your PC, the execution of your program. All the internal values (sensors, motors, user-defined variables) are automatically polled by the PC for display on its monitor. You can even temporarily suspend your program and walk through the execution of your program logic one line of code at a time.
Usually only the simplest programs work the first time you try to run them. RobotC has a very powerful interactive debugger which is really terrific in terms of helping you find and correct errors in your programming.
Some of the projects discussed in this book actually require that you go beyond the limits imposed by NXT-G code. This is the main reason we chose RobotC to illustrate the few programming examples we’ve included. RobotC also has the advantage that, being a textual language, it allows for a very compact representation that better suits the format of a book.
Later in this chapter, we’ll discuss a few simple programs and how you can program them in both NXT-G and RobotC.
LEGO made a bold move in releasing the source code for the NXT firmware and providing a detailed software development kit (SDK) for advanced computer programmers to modify or write their own firmware. The vast majority of NXT users will never need to look at or use the SDK. However, a small handful of users are using this SDK to create their own firmware and IDEs for the NXT. Since the release of the SDK in August 2006, several new programming environments for the NXT have been developed and are in various states of readiness, as outlined in Table 7.2.
Table 7.2. Programming Environments for the NXT
All of the programming solutions in Table 7.2 are open source and, unlike the solutions available from LEGO, are free and noncommercial (see Appendix A for references).
All of the alternative and the LEGO-provided solutions are interpretative systems that execute bytecode created from a compiler. NXC and NBC use the NXT-G bytecode. LUA and Java have bytecode that is unique to these languages; LUA and Java are standard programming languages that run on a variety of platforms. NXC is a language unique to the NXT.
The LUA and Java implementations are currently in an early stage of development and are not ready for widespread deployment, although this will change over time.
The NXT Byte Codes (NBC) and NXC (Not Exactly C (NXC) languages use the same firmware as NXT-G. The advantage of this approach is that you can program in either the NXT-G graphical language or in NBC/NXC without having to reload the NXT firmware. The other solutions utilize different firmware interpreters that do not support NXT-G programs. (A dual-version firmware solution is currently in development for RobotC that also supports NXT-G-based programming; it should be available by the time this book is published.)
NBC was developed first; it is a very low-level language requiring detailed knowledge of the individual NXT-G opcodes. It has subsequently been superseded by the higher-level NXC language which is similar to, but different from, C.
NBC is generally similar to the C programming language but has many differences due to the limits and capabilities found in the NXT-G bytecode. For example, it does not support floating-point variables. In addition, it implements arrays, but in a proprietary fashion that is not common to standard programming languages.
NXC and Bricx Command Center (BricxCC) are the most advanced of the alternative programming environments for the NXT. NXC + BricxCC is quite a powerful combination. The drawbacks are that the programming language is unique to the NXT—it is not C—and it is constrained by the limitations and performance of the NXT-G interpreter. For example, it doesn’t support floating-point variables, and array support is different from that found in most other programming languages.
BricxCC is quite a powerful IDE. It was originally developed for the RCX and has been subsequently enhanced to add support for the NXT and NBC/NXC.
The pbLUA language (the name stands for programmable brick LUA) is the result of Ralph Hempel’s experience in designing and programming embedded systems. According to Wikipedia.org, “Lua is a dynamically typed language intended for use as an extension or scripting language, and is compact enough to fit on a variety of host platforms. It supports only a small number of atomic data structures such as boolean values, numbers (double-precision floating point by default), and strings. Typical data structures such as arrays, sets, hash tables, lists, and records can be represented using Lua’s single native data structure, the table, which is essentially a heterogeneous map.”
LeJOS NXJ (the name stands for Lego Java Operating System NXJ) is a subset of the Java language. It was originally developed for the MINDSTORMS RCX and many of the original developers have been involved in a similar port to the NXT. LeJOS is an open source project and is under continuous development. It became available in early 2007 as a limited-feature alpha release, and it is still incomplete for widespread use.
Significant effort is still required to get the full NXT feature set enabled in leJOS. For example, a menu system is not available, so after you have downloaded your program, you can run it only once. If you want to run it a second time you have to download it again.
We didn’t cover all the programming environments for the NXT. There simply isn’t room to cover them in depth. There are two other environments that are worth mentioning, though.
ROBOLAB is a graphical IDE that was originally developed for the RCX. It’s very popular in the educational market; hundreds of thousands of students use ROBOLAB every year. In fact, it is the language of choice for RCX in the education market. ROBOLAB has been significantly enhanced and extended to support the NXT. It has also been upgraded for the RCX version.
We do not cover ROBOLAB in this chapter because, if you don’t already have RCX bricks and ROBOLAB, the NXT-G IDE is the best choice for graphical programming. If you do have RCX bricks, you’re already familiar with ROBOLAB and the transition to ROBOLAB on the NXT is straightforward.
Numerous evolving solutions treat the NXT as a dumb device with all the intelligence provided by programs running in the PC. The PC communicates with the NXT over the wireless Bluetooth link. We do not consider these in this book, for two reasons:
In general, you need to have preexisting skills in writing PC-based programs. This is not the audience for this book.
More fundamentally, the latency—30 milliseconds for a round-trip message—of the Bluetooth link is too slow for acceptable real-time performance of a robot. It takes 10 messages to read the NXT’s motor encoders (three messages) and sensors (four) and update the motors (three). The cumulative time of more than 250 milliseconds is generally not fast enough.
Up to this point, the few programming examples you met were written in a sort of pseudocode that was very close to plain natural language. The use of pseudocode allows the programmer to “play computer” and understand what the program does. But to complete the projects in the book, some of which are a bit complex, you need a real environment with which to run and test the code. We chose to write all the examples using RobotC because it combines power with compactness, it’s easy to install and learn, and it’s available directly from LEGO.
This chapter concludes with two sample programs. One is for a clock, and the other is for a simple line-following robot. These examples describe some of the most important features of RobotC, but we strongly recommend that you read the available online documentation (see Appendix A). Even if you don’t choose RobotC, we’re sure you can easily translate our examples into your favorite programming language.
The logic for implementing a clock is very simple:
Adjust the starting time using the left and right keys to change the hour and minute values.
Every one second increment the “seconds” counter.
Every 60 seconds reset the “seconds” counter to 0 and increment the “minute” counter.
Every 60 minutes reset the “minute” counter to 0 and increment the “hour” counter. If the new value is 12 or greater, reset the “hour” counter to 0.
When the time has changed, display it on the LCD.
We could write this as a single long sequence of instructions. But it is better to break it up into several smaller “modular” units. Each unit of code is a subroutine or function. The highest-level “logic” for our program instructions is show here:
//

// Declare   variables   to hold the time and initialize   them to zero

//

int second    =  O;

int minute    =  0 ;

int hour      =  0 ;


task main()

{

  setTimeBeforeStartingClock() ;

  runClock () ;

  return;
}
This program code is short and easy to understand. It shows a few elements of the C programming language syntax:
Comments begin with the characters “//” and continue to the end of a line. Comments contain informative information only and are ignored by the compiler. Liberal use of comments is highly recommended for ease of understanding your program.
Each RobotC program has at least one task. If you’re a Windows programmer, a task is the same as a thread. A task represents a block of code that should be run. There may be cases where you want to run three tasks simultaneously and you can do that by defining more than one task in your program. The NXT interpreter will then share the computer processing among the multiple tasks. Think of this as cooking breakfast: You’ve got the toast in the toaster, you’re frying the eggs in one pan, and you’re frying the bacon in another pan—three tasks running at once!
The int keyword is used to declare a variable. So int second = 0; declares an integer variable named second and gives it an initial value of 0.
There are two calls to user-defined functions (setTimeBeforeStartingClock and runClock) in the preceding code. A function is a block of code that can be invoked by simply calling the function name. You use functions to split your program into smaller chunks of code.
You can also use functions as a convenient way to test your program in partial steps. You might develop the runClock function first to test the clock operation and just have an empty “stub” for setTimeBeforeStarting Clock. This way, you can test the clock operation function and simply let the time always start at 00:00:00.
The displayTime function that follows nicely formats the time variables into a text string and then displays it on the NXT’s LCD screen. This feature is used in several spots in the program so it’s been defined as a function to make efficient and clean use of code. When you want to display the time you make a call to this display function. displayTime uses advanced formatting techniques to convert the internal format of variables into text strings—for example, the format code %02d will convert a variable into two characters (02) as an integer number (%d) without the fractional part.
void displayTime()
{

  string sTime;

  string sSecond;
  //

  // Build time string in format "hh-mm-ss"

  //

  StringFormat(sTime, "%2d:%02d", hour, minute);

  StringFormat(sSecond, ":%02d", second) ;

  sTime = sTime + sSecond- // concatenate the two strings;

  //

  // Now display it on the LCD

  //

  nxtDisplayBigStringAt(2, 16, sTime) ;

  return;

}
The runClock function is small and easy to understand. It simply updates the time every second. The minute and hour variables are updated appropriately as well, as shown here:
void runClock ( )
{

  while (true)
  {
    //

    // Loop forever incrementing second, minute, hour

    //

          displayTime();

          waitlMsec(1000) ; // Waits one second

          second = second +   I;

          if (second >= 60)
          {

            second = 0;

            minute = minute + I;

            if (minute >=   60)

            {

              minute =  0;

              hour = hour +   I;

              if (hour >=   12)

                hour =  0;

            }
          }
        }
     }
The setTimeBeforeStartingClock function is used to set the start time for the clock. You use the left and right buttons to increase or decrease the minute value. Pressing the Enter button advances the program flow to modify the hour value.
//

// Use right / left / enter keys to adjust minute and hour

//

void setTimeBeforeStartingClock()
{

  nNxtButtonTask = -2;    // Tell NXT OS that your program will use the buttons


  // Display some help info on the LCD    display


  nxtDisplayCenteredTextLine(0,   "Left/Right to");// Text line 0 on LCD

  nxtDisplayCenteredTextLine(l,   "Set  Minute");      // Text line  1

  nxtDisplayCenteredTextLine(3,   "Enter sets hour");// Text line   2

  displayTime () ;

  while (true)      // Repeat a block of code many times
  {
    //

    // Loop until the 'enter' key is pushed.

    //

    if (nNxtButtonPressed == kLeftButton)


  {

    if (minute < 59)

      ++minute; // "++" will increment the minute variable by 'I'

    else

      minute =  0;

    displayTime();
  }

  else if (nNxtButtonPressed == kRightButton)

  {

    if (minute > 0)

      --minute; // decrease minute by one

    else

      minute = 59;

    displayTime();


  }

  waitlMsec(250)  ;

  if (nNxtButtonPressed ==     kEnterButton)

    break; // exit or "break out" of the loop
}
//

// Wait for the 'enter' key to be released.

//

while(nNxtButtonPressed   ==    kEnterButton)
{}

nxtDisplayCenteredTextLine(0,   "Left/Right to") ;

nxtDisplayCenteredTextLine(l,   "Set Hour") ;

nxtDisplayCenteredTextLine(3,   "Enter runs clock");

while (true)
{

  if (nNxtButtonPressed == kLeftButton)
  {

    if (hour < 11)

      ++hour ;

    else

      hour = 0 ;

    displayTime () ;
  }


    else   if (nNxtButtonPressed   == kRightButton)

    {

     if (hour > 0)

      - - hour ;

     else

       hour   = Ii ;

     displayTime    () ;

    }

    waitlMsec(250)    ;

    if (nNxtButtonPressed   ==  kEnterButton)

      break ;

  }

  while(nNxtButtonPressed   ==  kEnterButton)

  {}


  eraseDisplay()    ; // Clear   the LCD screen

}
There’s one thing to watch out for if you copy the preceding program. RobotC will generate an error message if you try to call a function before it is defined. So you have to rearrange the order of the source code to ensure that functions are defined before they are called.
The preceding program is included in the sample programs distributed with RobotC. The filename is NXT Simple Clock.c. You can open this file in RobotC with the Open Sample Program command.
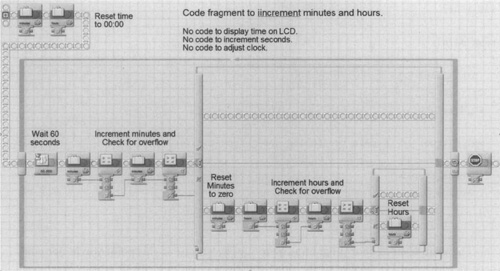
This relatively simple program is more complex to write in NXT-G. Figure 7.1 shows a screenshot of partial implementation in NXT-G. This program updates the time for minutes and hours only (not for seconds) and fills the complete display.
We will use another example to clarify this concept and introduce other tips. Say your robot has been designed to follow a black line, detect small obstacles with a bumper, and remove them from its path by pushing the obstacles away with some kind of arm. As we explained earlier, it’s impossible to write a program without having a precise idea of how the robot is designed and what it is expected to do. For the example we are going to illustrate, we made the following assumptions about the robot and the environment:
The line is darker than the floor.
The robot will follow the left border of the line (e.g., it turns right to go toward the line, left to go away from line).
Motor ports A and C control the left and right drive wheels, respectively.
Motor port B operates the arm.
Port SI is attached to a touch sensor connected to the bumper. It closes (goes from 0 to 1) when the bumper is pressed.
Port S2 is attached to a face-down light sensor that reads the line.
Here is the initial code you should write:
int floor ;

int line;


task main()
{

  Initialize() ;

  Calibrate () ;

  Go_Straight () ;


  while(true)    // repeat the follow code block forever
  {

    Check_Bumper () ;

    Follow Line() ;
  }
}
The main level of your program is quite simple, because at this point you’re not concerned with what Go_Straight or the other functions mean in terms of actions. You’re only concerned with the logic that connects the different situations. You are deciding the rules that affect the general behavior of the robot and you don’t want to get into the details of how it can actually go straight. This result is achieved by encapsulating the instructions that make your robot go straight into a function, a small unit which “knows” what the robot requires in order to go straight. This approach has another important advantage:Your code will be more general because it doesn’t depend on the architecture of the robot. For example, for one specific robot, “go straight” will mean switching motors A and C on in the forward direction, whereas for another it might mean switching on motor B in the reverse direction. When you want to adapt the program to a different architecture, you simply change the implementation details contained in the low-level subroutines, without having to intervene on the logic flow.
Let’s come back to your main task to examine it in deeper detail. The first instruction is actually placed before the beginning of the task: It declares that you are going to use two variables, named floor and line and intended to contain integer numbers. A variable is like a box with a name written on it:You can place something inside; say, a specific number—that is, you can assign a value to the variable. Or you can watch what’s inside the box, reading the variable. At this stage, you are neither assigning nor reading the variables; you are simply declaring that you need two of them. In other words, you are asking RobotC to prepare two boxes with the names just mentioned.
When the user starts the program on the NXT, the main task begins. After it has completed initialization and calibration procedures, the program starts the robot in straight motion, and then enters an endless loop where the program continuously manages its two tasks: removing obstacles and following the line. The while(true) statement repeats all the instructions delimited by the open and close braces forever. In your case, it will execute the Check_Bumper subroutine, then Follow_line, then Check_Bumper again, in a continuous loop, that only the user can interrupt using the Exit button.
Everything is clear and simple, as it should be. Now let’s have a look at what happens at a lower level in our subroutines.
Any program will typically include an initialization section, where you set the motor power, configure the sensors, reset timers and counters, and initialize variables. This is not required when you use NXT code, because it automatically configures the input ports for you. RobotC, like the other textual environments, requires that you explicitly declare what kind of sensor you connect to each port:
void Initialize()
{

  SensorType[Sl]   = sensorTouch;

  SensorType[S2]   = sensorLightActive;
}
The word void is what tells RobotC that you are describing a subroutine, and it’s followed by the name you choose for it. The SensorType statements are used to configure input port SI for a touch sensor and input port S2 for a light sensor.
The calibration routine is designed to inform your robot of the actual light readings it should expect on its path. We discussed this topic briefly in Chapter 4, explaining that keeping your program independent from particular cases is a good general programming practice. In this example, it means you should not write the light sensor thresholds into the code, but rather give your robot the possibility to read them from the environment, and this is what you have declared the floor and line variables for.
void WaitBumperPress()
{

  PlaySound (soundBeepBeep) ;
  while (SensorValue[Sl] ==  0) ;  // wait for bumper press
  while (SensorValue[Sl] ==  i) ;  // wait for bumper release

}


void Calibrate()
{

  WaitBumperPress();
  floor = SensorValue[S2]  ;
  WaitBumperPress();
  line = SensorValue[S2]  ;


  WaitBumperPress ( ) ;
}
This code shows that in some situations you can recycle a sensor and use it for more than a single purpose: During the calibration process, the bumper is used as a trigger to tell the robot that it’s time to read a value. It also shows that subroutines can be nested. In other words, you can make a subroutine call another subroutine. In this particular case, WaitBumperPress is a small service subroutine that produces a beep and then waits until the bumper switch gets pressed and released.
When you run the program, the calibration procedure begins and informs you with a beep that it waits for the first reading. You place your robot with the light sensor on the floor, far from the line, and push the bumper. The program reads the light sensor and stores that value as a typical “floor” value in the floor variable. Then it beeps again while waiting to read the line. You place the robot with the sensor just over the line and push the bumper again, making it detect the “line” light value and store it in the line variable. The robot finally beeps again, meaning the calibration process has finished and that the next push on the bumper will put it in motion.
This sort of prerun phase is quite useful in many other situations, such as when you need to prepare the robot for operations by either reading some environment variable or resetting mechanisms that might have been left in an unknown state by previous executions.
The Check_Bumper procedure is in charge of testing whether the robot has hit an obstacle, and if so, how it should react:
void Check_Bumper ()
{

  if (SensorValue[Sl]   == I)
  {

    Stop () ;
    Remove Obstacle() ;
    Go_Straight () ;
  }
}
It checks the bumper, and, if found closed, stops the robot, calls the Remove_Obstade subroutine to clear the path, and then resumes motion. Testing the bumper is as simple as checking whether Si has become equal to 1, which means that the touch sensor connected to port 1 has been pressed. You notice that we apply here the same concepts used at the main level: encapsulating details into routines at a lower level.
The Follow_Line routine is what keeps your robot close to the line edge—let’s say the left edge. If the light sensor reads too much of the “floor” value, it turns right toward the line. If, on the contrary, it reads too much of the “line” value, it turns left, away from the line (see Chapter 4 for a discussion of this method).
void Follow_Line()
{

  const int SENSITIVITY = 5;


  if (SensorValue[S2]   <= (floor + SENSITIVITY))
    Turn_Right  () ;
  else if (SensorValue[S2]   >= (line - SENSITIVITY))
    Turn_Left() ;
  else
    Go_Straight () ;
}
The method used in this subroutine deserves some explanation. First of all, const int SENSITIVITY = 5; tells RobotC that the variable SENSITIVITY is a constant (const) value that cannot be modified. It is used together with the floor and line variables to decide what the robot should do. An example with actual numbers can make things clearer. Suppose the Calibrate routine placed the value 55 in the floor variable and the value 75 in the line variable. The program tests whether S1 is less than or equal to floor + SENSITIVITY, which results in 55 + 5 = 60, to decide whether the robot has to turn right toward the line. Similarly, it tests whether sensor S2 is greater than or equal to floor - SENSITIVITY, which corresponds to 75 - 5 = 70, and if this is the case, it makes the robot turn left, away from the line. While the readings remain greater than 60 and lower than 70, the robot goes straight. You can change the value of SENSITIVITY to make your robot more or less reactive to readings: An increase will narrow the range of values that allow the robot to go straight; thus, your robot will make more corrections in order to remain close to the edge of the line.
The code you wrote so far is rather general and could work for a broad class of robots. Now the time has come to write the part of the program that depends on the physical architecture of your robot.
The Go_Straight routine will be very straightforward in most cases. You know from the initial assumptions that the robot has two side wheels (or tracks) driven by two independent motors. In Chapter 9, we will explore this configuration, called differential drive, in greater detail. For the moment, let’s stick to the fact that if both motors go forward, the robot goes forward and straight. If one of the motors stops, the robot turns toward the side of the stationary wheel. This knowledge is enough to write the following routines, which control motion:
void Go Straight()

{

  motor[motorA]   =  50;    // Motor forward at 50% of full power
  motor[motorC]   =  50;    // Motor forward at 50% of full power

}

void Stop()
{

   motor  [motorA]  =   0;    // Turn  motor  off

   motor  [motorC]  =   0;    // Turn  motor  off
}


void Turn Left()
{

  motor[motorA]   =   0;    // Turn   motor  off
  motor[motorC]   =  50;     //  Motor  forward at 50% of full power
}


void Turn Right()
{

  motor[motorA]   =  50;     //  Motor  forward at 50% of full power
  motor[motorC]   =   0;    // Turn   motor  off
}
There’s one last routine left: Remove_Obstacle. Let’s say your robot features a very simple arm that works with a single motor and requires only a timed activation:
void Remove_Obstacle()
{
  motor[motorB]   =   50;   // Motor forward at 50% of full power
  waitlMsec(2000) ;         // Wait 2000 milliseconds or 2 seconds.
  motor[motorB]   =  -50;   // Negative value reverse motor at 50% of full power.
  waitlMsec (2000) ;
  motor [motorB] =    0 ;   // Turn motor off
}
The statement waitiMsec(2000) makes the program wait for 2,000 thousands of a second, or two seconds. This parameter depends on the time your mechanism needs to remove the obstacle, and it is once again related to the physical structure of the robot.
Your program is now finished and ready to be tested. We hope this example made you realize the benefits of modular and well-structured code. This program is included with the RobotC distribution as the sample program NXT FollowAndAvoid.c.
All the tools you can choose from to program your NXT support some form of multitasking, that is, they support two or more independent tasks that run at the same time. This is not particularly evident when you use NXT code, but it’s a well-documented feature in all the alternative environments.
Multitasking can be helpful in many situations and it’s often a tempting approach, but you should use it with a lot of care because it will not always make your life easier. Let’s go back for a moment to our previous example: Would multitasking have been a good choice? Didn’t your robot have two different tasks to manage: line following and obstacle detection? Well, it did, but they were mutually exclusive—after all, your robot was not following the line while it removed the obstacle. In cases such as this, and in many others, your robot is asked to perform different activities one at a time more often than it is asked to perform different activities at the same time. Using multitasking, you would have made your code more complex, because of the additional instructions needed to synchronize the tasks. When the Remove_Obstack task stops the robot, it should communicate the Follow_Line task to suspend line following, and communicate again when it can be resumed.
In designing a multitasking application, you are required to move from a sequential, step-by-step flow to an event-driven scheme, which usually requires additional work to keep the processes coordinated. Whereas sequential programming is like following a recipe to cook something, you can compare multitasking to preparing two or more recipes at the same time. This is quite a common practice in any kitchen, but requires some experience to manage the allocation of resources (stoves, oven, mixer, blender...), respond to the events (something’s ready to be taken out of the oven), and coordinate the operations so that the tasks don’t conflict with each other. You have to think in terms of priorities: Which dish should you put in the oven first? Programming independent tasks implies the same concerns:You must handle the situations where two tasks want to control the same motor or play two different sounds. The NXT is well equipped to manage resource allocation and to support event-driven programs, and RobotC gives you full access to these features. However, most of the effort is still on your shoulders: No tool makes up for the disadvantages inherent in a bad design.
In our experience with LEGO robotics, there are few actual situations where multitasking is absolutely necessary, or even useful. Our suggestion is that you approach it only when your robot performs some really independent activities, such as playing background music while navigating a room, or responding to messages while looking for a light source.
In this chapter, you took some first steps on your path to programming LEGO robots. We started describing the NXT, the LEGO programmable unit that’s the core of your robots, to unveil some of its secrets. You discovered how its architecture can be easily understood in terms of layers: your program, its translation into bytecode, the interpreter in the firmware, and the processor which executes the operations.
To create your program on a PC, you can choose from many available tools; we briefly described NXT-G, the LEGO graphics programming environment developed by National Instruments for LEGO; and RobotC, a C programming language for the NXT available from LEGO’s Education division. We also reviewed a few other environments: ROBOLAB, NBC/NXC, pbLUA, and NXT leJOS.
The second part of the chapter did for programming what the previous chapter did for building: It established some guidelines. Oddly enough, the two arenas share a lot, because layered architecture and modularity principles apply just as much to the body of the robot as they do to its brain, with the notable difference that sometimes you have good reason not to follow those principles in the hardware. In other words, there is no excuse for badly organized software! We used two short but complete programs written in RobotC to put these principles into practice, showing how they can improve the readability, reusability, and testability of your code.