When I was first getting into music on the software side of things, I was paying my rent by DJing and serving tables. In both cases I had to use electronic equipment, and my success at that job was greatly influenced by my knowledge of how this equipment worked. As a server, the machine into which I entered orders was a fast-paced touch-screen machine that moved as quickly as I did. As a DJ, the equipment worked only as streamlined as I did, because if I just let it play, the next song would not mix itself in. In both cases I started with each piece of equipment at a novice level. However, the more I used each piece, the better I was able to enter food orders or freely mix in any request by the nearby dancing crowds.
This chapter is all about giving you the knowledge to successfully use the tools of the program. If you learn these tools and use them often, you will become faster and better able to create at your speed. The great thing about FL Studio’s menus is that you can access your needed selection from many points, enabling you to work faster and choose what works best for you. In this section I will focus on what each piece of the interface does, how to access that menu, and why it would be helpful to your workflow and the creation process as a whole.
The menu bar shown in Figure 3.1 is where most of the major functions occur and also where you can access settings and options. Some of these options are also available in different menus, which makes finding your desired selection easier when you’re building a project. Some of these menus will seem familiar and can be reminiscent of other programs that you may have seen or used in the past. In my experience, understanding the menus in a program can greatly increase how quickly the ideas in your head drop into FL Studio. Imagine that you are just beginning a project, and the instruments you have chosen need to be grouped. Next, you need to copy the grouped patterns in order to make some adjustments in the copied version for a slightly different beat. This should be a fairly tall order, considering the time and work involved, but when every menu or quick key is familiar, you really can get those ideas out before they change or fade.
The File menu, shown in Figure 3.2, will be a common one if you have worked with most Windows programs and many Mac programs. It has most of the common functions for the overall project. New will open an empty project based on the template that you last used. For example, if you start with a hip-hop template, construct a song, and then decide to create a new one, when you choose New, that same hip-hop template will be used. Just below it, the New from Template option opens up a side menu containing templates that have effects, instruments, and routing all done for you (see Figure 3.3). Not every setting will be perfect when working on your own project, but the templates are great for achieving a good starting point. Take a moment to look through them to see what each one sets you up with, because you might find that the House template gives you the effects and settings that you are looking for in your hip-hop track and vice versa.


The next option is to open a project, and when selected, it will prompt you to save the current project you are working on. The Explorer will open, and you will be able to navigate to where you saved your project and then open it up.
Save and Save As will both save the project. If you have already named the project, then selecting Save will just save the current project as is with the same name. If you choose Save before assigning a name to the project or you select Save As, then a window will pop up, allowing you to give the project a name. Save New Version essentially works the same as Save As, but it will save the project as the same name with a numerical value, so if it is the third time you have saved your HotBeat.flp project using the Save New Version option, it will be saved as HotBeat_3.flp. It is a good idea to save your projects with different names if you go in different directions with the music, but you don’t want to trash your different versions. For example, if you make a hard house beat and want to try a breakbeat version that is choppier, save your project before changing anything, create the breakbeat version, and then choose Save As and rename it something easy to remember. Now you have a remix, and both versions can be edited separately. Aside from hard drive limitations, I always recommend saving large changes in a project as completely different projects to preserve what could be a masterpiece.
The Import option opens up to MIDI, where you can import MIDI data into your project, or you can import a beat to slice, which allows any WAV file that you have available to be sent into the project (see Figure 3.4). This works best with shorter audio files, because the longer ones have a tendency to act strangely and be cut up in odd places.
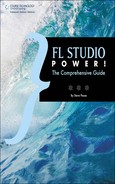
The Export option contains all the choices you would need for sending your song out into the world (see Figure 3.5). We begin with Zipped Loop Package, which allows you to compress the file so that you can send it to a friend who has FL Studio so he can remix, master, or just listen. This option is also great for backing up your music, because it will contain all the audio files used in your project and settings necessary to play the project on a different computer with FL Studio. Just keep in mind that the plug-ins themselves will not be included in the file. Wave, MP3, and OGG are all for exporting your song so you can burn it on a CD or transfer it to your MP3 player.
When you select the export as audio options (Wave, MP3, OGG), another window opens to reveal some saving options for your audio (see Figure 3.6). Under the Info area, make sure it says Song if you are trying to export your whole song! It will say Pattern if you are selecting a pattern to export, and these modes will switch with the overall selection of the project (in other words, if you are listening to it in Song or Pattern mode). Looping mode has to do with the audiosamples that have audio effects that trail after the initial sound. With the default setting of Leave Remainder, the song will end when the effect is through producing sound. Cut Remainder will just end the song on the last bar without any effect trailing, so if there is a reverb, then that sound will die when the song stops. Wrap Remainder can be useful when you have a loop that trails or delays. The effect that happens after the loop itself will be placed on top of the next loop.

The Quality section (below Looping) will determine how good your audio sounds. No need to always wait for the 512-point export, because if you are just listening to a rough cut of a track, then Linear will be fine. However, if this is the final cut, I would use the highest for the final render.
Dithering is like adding noise to the music so that you don’t notice any artifacts in the sound. FL defaults to leaving this off, so I would not select it unless you are finding odd quality with your exports, and it should only be used on the final render of your project. The last three I would leave selected, because Alias-Free TS404 prevents that plug-in from aliasing or creating strange noise, typically in the higher frequencies; HQ for All Plugins certifies that if the plug-in has that option (High-Quality), it will be used; and finally, Disable Max Poly tells the generators to ignore maximum polyphony settings for your channel. So if a piano is used and five keys are played, but the max amount of polyphony (notes that can be simultaneously played) is four, while the project is open, only four notes will play, but on that particular export, the fifth note will be heard.
The Output Format(s) section allows you to select how you want to export your project, and you will notice that the more selections you include, the larger the file size. This is because the file size is cumulative, based on your selections. The Depth selection will really only be changed when you are trying to put the export into a different software program for maximum sound quality. If you are trying to burn a CD or put the music on your phone or MP3 player, then use 16-bit. Bit rate very noticeably affects audible quality. Try exporting a 32-kilobit file, then a 320-kilobit one, and you should notice an impressive difference. This area is only affected when MP3 or OGG is selected as your export. A value of 160 kilobits will sound good for most situations involving the Internet or an MP3 player, but if you need quality, stick with WAV.
Split Mixer Tracks is great if you want each Mixer track in your project to become its own WAV file. This is awesome when you want someone to remix your project and you need to have individual pieces for them ready to go. Save ACIDized will add info to the WAV file for use with Sony Creative Software’s ACID. Save Slice Markers places memory locations where notes are played, so a drum kit will be taken apart to individual sounds, and you will be able to use the individual slices. This is also great for the artist who wants to remix the beat but keep the same drum kit or even the same sounds! Delay Compensation is good for exporting full tracks, but if you are trying to create an exact start or end for your file, turn this off so you can get precise. Background Rendering is nice because it runs slower and allows you to do other things, but when it comes to audio, I say don’t mess around. Render it at normal speed and go give your eyes a break from that computer screen!
The Export MIDI option is the section that you should be using when you’re trying to capture MIDI data on a file. If you choose an audio format to export, you will ultimately have the option to export the MIDI as well, but stick with this way so you can separate the filenames and just call the MIDI data New Project MIDI or something to that effect. Exporting the project bones will take the settings and parameters you have selected for the project and save them but will not retain the actual sound files. Exporting the project data files will allow you to make or select a folder to drop all of the settings of your plug-ins and actual sound samples.
Below all this is a list of recent projects, which is one of my often-used selections. Much of the time I will find myself working on three projects at once, and this lets me hop between them without having to navigate to the proper folder.
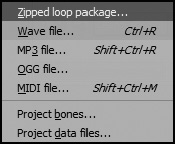
The Edit section is fairly straightforward, but it is probably the most commonly used section in most music making (see Figure 3.7). Undo is the first option and will be used the most for nearly every musician. You will find it much easier to use Ctrl+Z than to navigate to this option every time, but either way this will go back one action that you have done. The amount that you can back up is determined by the settings you have, which were discussed in Chapter 2.
Cut, Copy, and Paste are familiar functions that can be used in many situations. In the Piano roll, you may have a group of notes that you like and want to copy for another section. This is where you would use Copy after selecting the desired notes. Then you can paste them in a different part of the song. Again, I find that using the quick keys for these (Copy: Ctrl+C, Cut: Ctrl+X, Paste: Ctrl+V) is much easier and will keep your workflow moving along.
Shift Left and Shift Right will move the notes in your Stepsequencer one space to the left or right. I love this feature, because when I am building a beat, sometimes the beat is perfect, but it’s not starting at the right point. With the shift over, the beat created will just move one way or another, taking the last note to the beginning or vice versa.
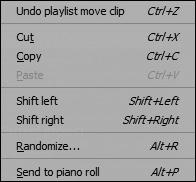
Randomize will help with that writer’s block by playing a random assortment of notes that can be manipulated from the resulting pop-up window (see Figure 3.8). Send to Piano Roll will take the notes that you plugged into the Stepsequencer and place them on the Piano roll. This lets you fine-tune the different notes and their velocity, pitch, and many other parameters. I’ll deliver plenty of information on the Piano roll later in this chapter.
This area, shown in Figure 3.9, is great for adding, changing, and removing channels in your Stepsequencer. Add One will allow you to choose from a variety of options, including automation, audio clips, and even instruments. Beat makers, this is where you choose FPC to build your groove! We will get much more in depth into the different plug-ins and what they do later on in Chapter 6, “Instrument and Generator Plug-Ins.” The remaining options will affect the channels that you have selected in the Stepsequencer, so pay attention when choosing these options, because even if you are working on the notes in the Piano roll of your bass and you have piano selected in the Stepsequencer, the piano is what will be affected by what you select in this menu. Clone Selected and Delete Selected do exactly as they say and can be useful when you have the perfect hook for a chorus, but you want to change a few things in the Piano roll for the ending of your song. Simply clone the channel containing the portion that you want to work with, and you will still have the original, but now you can mess around with the clone without affecting the original. Keep in mind that the notes do not get copied; only the instrument, routing, and settings do, so if you want the same notes, just copy them from the original Piano roll into the Piano roll of the cloned channel. Move Selected Up and Move Selected Down will move the channels around through the Stepsequencer.
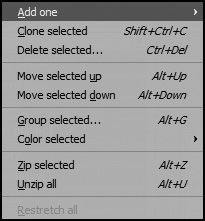
The last set of options is for all of you who like running a tight ship! I have found great headache relief in the form of organization during my years of using different programs. Especially with this program, where channels can become too numerous for even the largest computer monitor, Group Selected allows you to put different channels that have things in common in a group. If you have a hi-hat, kick drum, crash cymbal, and snare hit, you can select them all and group them. A prompt to name them will pop up, and you can name them anything you like, but in the interest of organization I suggest sticking with Drums.
Coloring your channels is next for those who find color coding things easier (or more pleasing to the eye). Gradient will create a flow between two colors based on the tracks selected. Keep in mind that if you select only one track and then select Gradient, all tracks will become selected, and once you change it, you cannot simply undo it. You have to actually go back through and re-color each track as you had it. If you like, you can even add icons to each track as you see fit, so your vocals can have a picture of a mic, and the drums can have a picture of a drum for easy identification.
Zipping the channels will just make them skinny and keep them in view but out of your way. You can click them anytime to bring them back to full size individually or unzip all of the channels. Restretch All allows you to re-stretch your audio when you have tempo changes and it is automated. If you stick to a solid beat without switching up, this will remain grayed out.
Hopefully, as you get better with using FL Studio, the menu shown in Figure 3.10 will not even be needed, because it contains the options for selecting the different windows that FL Studio has to offer. The first five can all be accessed using the F5 through F9 keys, and you will find that pressing these is much easier than going into this menu every time. Channel settings can be accessed here, but clicking on the desired channel will produce the same result and is much quicker.

The Plugin Picker is a great way to choose a needed generator (instrument) or effect, and it is visually stunning! Try it by pressing Ctrl+F8. The Toolbars section will tell you which windows you should be able to see, including the unselected hint bar, which I find can be nice to have when learning the program because it will tell you what everything you hover over does, as well as tell you where your cursor is when hovering over the Playlist.
The Layout portion will affect how the windows look, including the background of the program. The first option should be placed into memory—F12. This will close all windows so you can open the ones that you want to work with. This is nice when there are effects and generators taking up all the space on your screen, and you need to clear the madness. If you are working on one thing and you want everything to close aside from that particular window, then press Ctrl+F12, and it will leave open the window that you have selected and get rid of all of the other clutter.
Arrange Windows gives you the option to place all of your windows back to the default setting (Shift+Ctrl+H) if you have moved windows so much that nothing looks familiar or Alternate, which simply places the windows in different positions. Outside Bottom Taskbar will make FL Studio sit beneath your Windows taskbar, and Save Current Arrangement will remember your window placement the next time you open FL Studio.
The Browser section of the View menu will open up the selected parameters in the Browser menu so you can view your undo history, the automation used, and even the effects and generators that you use.
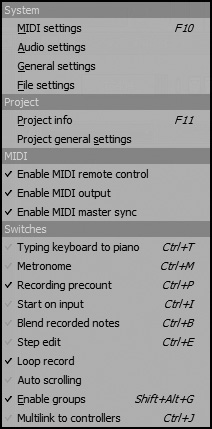
Figure 3.11 shows the Options menu, where you will find the setup for much of your project, and most of these were thoroughly discussed in Chapter 2. To quickly access these you can press F10, and while the option for pressing F11 is there, it is not necessary because F10 will open up the option to get to the same menu as pressing F11. The switches control whether each option is on or off. I will explain these switches a little further in the chapter, in the “Main Controls” section. Because these switches are on the main screen and they are easy to see, you will not typically use this menu.
This menu, shown in Figure 3.12, has an array of helpful options when working with your project. The first that shows up is Browser Smart Find. This is great for when you know part of a sound’s name or an instrument that you can’t quite spell. For example, if you were looking for a glockenspiel (specific bell) sound, you could just type “glock,” and it will navigate through all the files in the Browser that have “glock” in the name. When the Smart Find is active, you can press F3 to cycle through the different items that appear in the Browser. F2 will reverse the direction of the found files in case you pass over the one you were looking for. One-Click Audio Recording will set you up to record into the Playlist or into the Edison recorder when you have Producer Edition or higher. We will look more closely at audio recording in Chapter 4, “Recording Audio.”
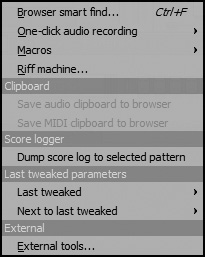
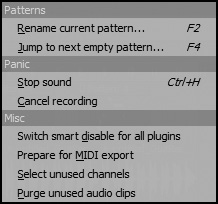
The Macros option (see Figure 3.13) branches out to reveal options for renaming the current pattern and jumping to the next empty pattern, but I think you will find the F2 shortcut for renaming is much quicker. As for jumping to the next pattern, if you are hovering over the pattern with the mouse, just use that, but if you have a ton of windows open, F4 will also jump to the next pattern in the Stepsequencer. Panic can come in handy more often than you think it would, as there are many effects and different clips that like to continue playing after you press Stop. The Panic macro is Ctrl+H, and this will stop all audio, including clips that play past when you choose to press Stop. My take on this, though, is that if you are trying to stop it quickly, a macro is not the way to go. Luckily, pressing the Stop button twice does the same thing. The Cancel Recording option will stop and erase a recording while getting rid of the WAV file that is created as well. This is meant for when you have a bad recording that you know you don’t want, but I would stay away from using this, because piecing together from different takes is a great way to remember different ways something can be sung or played.
Smart Disable for All Plugins is something that I recommend using regardless of your computer’s power, because it turns off plug-ins when they are not in use. This will make everything run much more smoothly. There is also a global option for this in the Options section (F10), which we discussed earlier, and many plug-ins have their own Smart Disable option. Using the global Smart Disable either here in the Tools or in the Options (F10) menu will make everything more responsive, but be aware that issues can arise when using third-party plug-ins, so turn this off if you experience problems.
Prepare for MIDI Export will turn all your channels into MIDI out channels. This is a great, speedy way to have MIDI out ready to go, but it will turn all of your channels into MIDI out and get rid of the channels that you may not want to change. I don’t recommend using this option unless you are familiar with MIDI and that is specifically what you are trying to do with your project. Select Unused Channels can be useful when you want to clean up your project. You can select this, and any channels that do not contain notes will be removed. So when the project is at a good point, and you think you are ready to put it on a CD or send it to a mastering studio, you can clean up the look of the project with this option. Purge Unused Audio Clips works in the same fashion, and any audio clips that are not being used in the project will be removed.
The Riff Machine (Alt+E when inside the Piano roll) is the jackhammer that breaks writer’s block! This awesome little option will give you something new every time (see Figure 3.14). When it opens, the Riff Machine comes to the front, and just behind it is the Piano roll for the notes created. Upon opening, the Riff Machine will start playing a random series of notes from a randomly selected instrument. This is definitely something to explore and utilize, because you can even specify the key of music and the range of notes. In exploring this option for myself, I put together a short house beat using the notes arranged by the Riff Machine. The only thing I did differently was change the instrument that the channel was using, and I got the sound that I didn’t even know I was looking for.
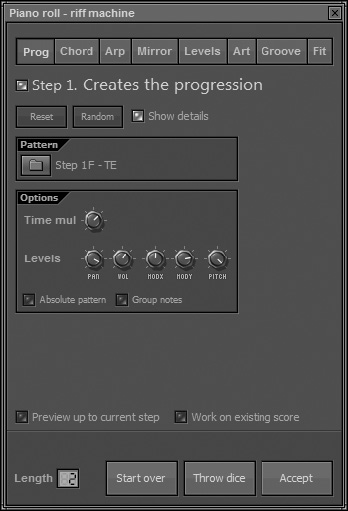
The first thing you see when opening the Riff Machine is Step 1. Ultimately, you could use all eight steps for fine-tuning the exact sound you are looking for without even using the Piano roll! The first step deals with the actual progression of notes as the section goes from start to stop. Remember that if there is no variation in the parameters you select from any of the steps, then there will be no change when turning the knobs for those parameters, because they deal with variation. So if the notes are only dead center with no panning, then when you move the knob for panning variation, nothing will happen because there is no left/right to vary from.
Step 2 deals with turning single notes into chords that play in the Piano roll. This step worked for me when I started with a new Piano roll open and drew a few single notes inside. Then I opened the Riff Machine with the quick key command Alt+E and chose the options Work on Existing Score (located at the bottom of the Riff Machine window) and Preview Up to Current Step so that no other steps were affecting the notes I made. As you go deeper into other steps, different parts of the Riff Machine will change your note placement on the Piano roll.
The third step is the Arpeggiator function and is where you get your stabby-sounding synth leads. This option takes the notes, cuts them up to your liking, and then quantizes them to the grid that you’ve set up for that particular Piano roll. By default, the grid will be the same as your global settings for your project, and this will be fine. Remember that if there is no grid set and it is on None, then the Riff Machine won’t know where to put the notes. This section can be great for turning long, boring notes into chopped-up notes that can add great rhythm to a song.
The fourth step will just take the notes you have and mirror them vertically or horizontally. When some notes that you have laid down are close but not quite there in the Riff Machine, try flipping them!
The fifth step is what will make those notes sound like they were played by a professional keyboard player. Most of us are not robots (although I have doubts about some of my elementary teachers), and we play notes with slight variations in velocity, which in this case will translate to volume. With this step you can add variation to the notes to make them hit slightly harder or softer and produce a range of velocity. The panning is great for giving the synth that “all over the room” sound. Articulation refers to note length and is the sixth step in the Riff Machine. This goes hand in hand with Step 5, because while the strength with which notes are hit and left/right panning will humanize a performance, so will how long a note is played. This option will vary each note length slightly, so that each one is not ending at the exact same time.
The seventh step has to do with how close to the grid the notes stay. Again, this will give that realistic sound to it, because the notes will not play perfectly on each grid value; they will bump slightly over, depending on your settings.
The final step in the Riff Machine is the Fit option and will tell the notes where they are allowed to play. This is helpful when you have an artist playing in a specific key and he needs notes confined to that key. You can also choose starting and ending points for how high and how low you want the range of notes playing to be contained in. So if you only want notes to go from C3 to F#4, then just select that range on the keyboard. If you want a specific scale played, then select that scale from the drop-down menu next to the Key option, where you can choose what key you want the notes to be played in.
As the name would suggest, this is the menu where you can find helpful information about FL Studio and its affiliates (see Figure 3.15). The first area is the Contents section, and in my opinion, it should be one of the most used windows for you when learning or even mastering the program. There are so many capabilities in FL Studio, and this is a great way to pinpoint what you need to find. I never access the Help Contents this way, though, because the quick key (F1) is easy to remember and has a feature that many applications do not—the Help menu opens to the section of FL Studio that you have open. For example, if you are making notes on the Pianoroll, and you’re wondering how to edit something in that window, press F1 while the Piano roll is selected, and the Help menu will automatically open to the Piano roll section! Image-Line’s Scott Fisher did a fantastic job on the FL Studio manual, and using the built-in manual, you can search keywords and browse an index of topics related to the manual.
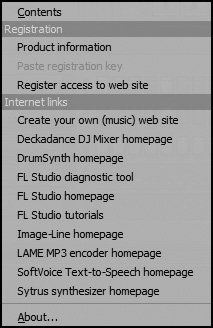
Under the Contents option in the Help menu are your registration options for activating your copy of FL Studio. Here you can paste a key if you have a boxed version or access the Internet to activate a demo version of the software.
The Internet Links section is loaded with plenty of helpful links that can answer questions regarding MP3 encoding and different generators and plug-ins and will even point you to online video tutorials.
Figure 3.16 shows the main panel that you will see without the need to travel through menu lists. All of these buttons or switches can be accessed right away, and when they are open, they can be viewed anytime as long as there are no plug-ins or other windows blocking them. This is similar to your car’s speedometer, tachometer, and oil levels, because in both cases, the dials let you know what is happening with your car/project. We will take an in-depth look at what each knob does so that you have a full understanding of the knobs’ functionality and how they can be used to successfully make music. It is important to note that most of these windows can be moved around to your liking, but we will focus on the default placement so that it is easier to find the sections I reference.
The first things that will catch your eye are the two buttons that cannot be selected or adjusted (see Figure 3.17). The top one is MIDI/Audio Sync Beat and will change color when FL Studio is sending master sync data (located in the MIDI settings of the Options menu, F10), depending on what is happening in the song. This can act like a visual metronome and will blink green at every beat and blink blue at every start of a bar. The problem is that it can also waste CPU power, so unless you are utilizing the Send Master Sync option, it should be disabled, and you will not see the colors change with the tempo of the project.

Just underneath is the MIDI Input Activity indicator that will tell you when MIDI information is being received by FL Studio and will tell you if that MIDI information is connected to anything. If you are playing notes on a keyboard, and an instrument is being triggered by the MIDI keyboard in FL Studio, then you will get a red blink every time you hit a key on the keyboard. On the other hand, if you have a MIDI keyboard that has some slider controls, and you have not mapped those to anything, the light will still blink, but it will blink green, letting you know that the program is getting your MIDI information, but you haven’t assigned that slider to anything. We’ll talk more about MIDI and assigning sliders in Chapter 5, “Recording and Using MIDI.”
To the right of these two light indicators are sliders for the master volume and master pitch of the song. These are global, meaning that everything is affected when you move these sliders. The volume control will quickly adjust the overall volume of your project, but the volume adjustments should be made with the Mixer (F9). The master pitch will bend everything up or down in pitch so it will sound lower or higher, depending on which way you move the slider. The advantage to this is that the speed does not change, so if your song is slightly out of tune in general or with another project that you need it to be tuned to, you can gradually pitch it to match. Remember that this slider affects everything in your project, so if you are looking to change the pitch of just one channel or track, you should not use this control.
Moving along to the right of the master sliders, we come to the transport and time display (see Figure 3.18). The options available in these windows will be among the most common that you will find yourself using in FL Studio. The time display will show you the position of your cursor in the Stepsequencer or the Playlist. The buttons inside the time display on the left of where the numbers are allow you to switch between a bar/beat view, where each number will tick with the beat, a step display that shows each step from the Stepsequencer, or a simple time display that will show you in minutes and seconds where you are in the song. These modes can be toggled by clicking the buttons themselves or simply by clicking the numbers in the time display. Personally, with all of the advantages this program has, I would leave it in the bar/beat display or the step display so the numbers run with the song’s tempo. I would only use the time display if I were planning to score a film or writing music that has no specific tempo to adhere to. This will not change the tempo or any other settings of your song, so viewing it in minutes/seconds will not affect how the song sounds, but it can make it more difficult to work with.
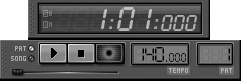
The transport panel lies below the time display and will control many aspects of your project. The Pattern (Pat) and Song buttons are the heart and soul of FL Studio and what really make it stand out as a recording application. These are the switches that will alternate playback of your project between using the Stepsequencer pattern that you have selected in the Stepsequencer (Pat) and the sounds put together in the Playlist (Song). The quick key for this is the L key and will alternate between the two when pressed. This is a fantastic way to jump between what you have in your Playlist and something new you may be putting together in the Stepsequencer. Play and Stop are next to that and are very self explanatory, but it is good to remember that pressing Stop twice will stop all music, and pressing Play again after the song is playing will pause the music. While the spacebar is frequently used for stop and start, if you want the music to pause, the quick key is Ctrl+spacebar. The Record button is a little different, and when you click on it, you will see a new set of options unless you disable the pop-up by choosing Don’t Ask This in the Future.
The menu that comes up from clicking (see Figure 3.19) will allow you to record audio into Edison, into the Playlist, only the automation and score, or everything, or it will show you a window that will give you a little extra help. Keep in mind that you can set a recording filter (what you want to record) by right-clicking on the Record button. However, I recommend using left-click so that you don’t accidentally set a filter incorrectly, record only automation, and miss that perfect vocal take.

Recording into Edison basically means that you are saving the audio into a plug-in and are able to manipulate it within Edison itself. Recording into the Playlist will drop your audio directly into the Playlist for you, and you can edit and adjust it there. Recording automation and score will allow you to record the notes played either on a MIDI keyboard or on your typing keyboard and any automation changes, such as panning or volume. This is great for when you have a vocal take that you want to freehand move around from left to right, and you set the recording to automation and score. Then you will only be recording the panning changes on the vocal. We will look more closely at recording audio in Chapter 4 and recording score and automation in Chapter 5.
Just beneath the Play and Stop buttons is the Song Position button. Although small, this is a great way to quickly navigate through your session. This is useful for those of us who have too much equipment on the computer desk, and we have allocated a space for the mouse that is far too small. This button can quickly get you anywhere in the song regardless of its length, and you won’t have to lift the mouse five times just to get the song position marker all the way to one part of the song.
The Tempo field lies just to the right of the Record button and will tell you the master tempo on which your song is based. Typing in a tempo can change the tempo of everything in your song, but it can also be a headache waiting to happen. Typically, you will want to set the tempo early on and stick with it. If you only have a beat that you made using the Piano roll and sequencer, and you have not yet recorded audio, however, you will be able to change this tempo number, and everything will automatically change with it.
Audio will not automatically stretch with the song unless Stretch Audio is selected (not the default setting), so that great guitar part you recorded will not initially fit with the rest of the song. Fear not! There are ways around this, and you can stretch the audio to fit, which we will get into later in the recording chapters. For now, just know that a good idea is to set a tempo and stick with it. The final area is the pattern selector and allows you to navigate to different patterns in both the Stepsequencer and the Playlist.
In Figure 3.20, you can see the peak and monitor meters in action, and their job is to give you a visual image of the music that is playing. The monitor on the left will give you a basic idea of how the music is responding at different frequencies when in Spectrum mode, so when the bass is heavy, the left side will be jumping. The other option for the monitor is Oscilloscope, which acts in the same way but instead creates waves on one or two lines to represent the frequency response. Although there is an actual button to change between these two modes and off, you can avoid buying the glasses you didn’t know you needed (due to the miniscule size of the buttons) and just click the monitor itself, and it will go through the different modes.
To the right is the peak meter, and you can use your mouse to roll over the jumping meter (going left to right) and see how close to zero it is at. If the peak meter is hitting the far right and turning the line after it yellow with a red top, that means the music is clipping. Clipping is bad in the digital world because it flattens the waveform and makes the sound distorted (see Figure 3.21). If you see this, then you need to turn down some volume levels. When the song is peaking at –5 to –3 dB (in FL Studio) at its loudest, you should have no unintentional distortion.

Figure 3.21. You can see in the digital clip that the waveform flattens, and to us it sounds like distortion.
The memory usage area shown in Figure 3.22 is great for those who need to keep an eye on how hard their computer is working to run FL Studio. If you set up everything properly, and your computer is up to speed, then this section may not interest you, and you can easily remove it. (Right-clicking in an empty area where the toolbars are located will give you the option to choose what you would like displayed.) However, it is nice to have for reference when you have a project working that is using a large number of audio clips. When these clips add up, they start using FL Studio’s available memory, so if you have a large number of takes that make a drum track, you can consolidate the audio clips into one stereo mix to free up some memory. If you find that your computer is struggling and using too much CPU power, Smart Disable Plugins can help, but you could always render the sound coming from the generator into a stereo track—then turning off the plug-in will free up CPU. Keep in mind that doing this adds more audio tracks to the project and will affect your memory usage.
Many of the shortcuts in this section are there for your convenience if you happen to forget the quick keys, and some have extra features aside from single quick key actions. I will deal with both because the first half of the shortcuts have quick keys assigned to them that I suggest learning and using. From left to right, the shortcut panel buttons will open or focus on the Playlist, Stepsequencer, Piano roll, Browser, and Mixer (see Figure 3.23). These are fairly easy to remember because the quick keys are (in respective order) F5 through F9 to access the same windows.
The second half of the shortcuts menu has some familiar and not-so-familiar options. Undo is the first option and will only undo the last action you did. Say, for example, you erase a piece of audio and then change a note in the Piano roll. If you press Ctrl+Z twice, the note you changed in the Piano roll will go back to its original position, so clicking Undo a third time will only place the note back to where you didn’t want it and leave the piece of audio removed. By pressing Ctrl+Alt+Z, you will keep going backwards through your actions, rather than toggling between your latest changes. You can also access this Undo option from the Edit menu. You can go into the undo history using the Browser, too, for a quick overall look that allows you to undo to a certain point with one click.
Next to the Undo option is the Save As button, which will give you the option to name the project. This button also acts as a trainer, and it will train you to save your projects because it flashes every five minutes until 10 minutes have gone by without a save, and then it will flash every 30 seconds. Some may find this annoying at first, but if you get used to saving your project after every recording, you will not notice the flash. Personally, I find it far more frustrating to get a perfect take or an awesome random pattern from the Riff Machine, only to have the computer crash and lose everything up to the last save point (gulp—if there was one!).
Continuing to the right is the Render as Audio File button, which will open the dialog box, allowing you to save your project in many formats.
The next button on the extended shortcut list is very useful and has a few interesting abilities. The Open Audio Editor button, when clicked, will simply open Edison, allowing you to manipulate your audio recordings as needed. It is good to know that the program that opens can be changed using the External Tools dialog box (Tools > External Tools), where you can set the path to the program that you want to open with the Open Audio Editor button or even the program you want to open when FL Studio opens. When you right-click this button, it will open a new instance of Edison for when you have multiple audio recordings that need to be adjusted. A great feature of this button is if you have an audio clip that you would like to adjust specifically, then you can simply drag it over this button, and Edison will open up with the audio clip already loaded!
To the right is another way to record with one button, and if you find yourself in this menu a great deal, then you might find it useful, but using the Record button to record tends to be the most intuitive way to go about things, in my humble opinion.
The next shortcut opens up the project info, where you can change the name and details of your project. The final button opens the Help menu.
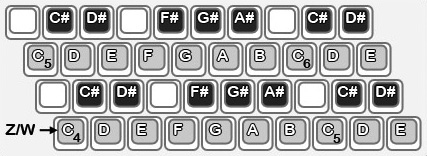
We are always told to not push the shiny red button, but in this case it will allow you to change many things having to do with recording in your project (see Figure 3.24). We will start with the top row, going left to right, and then finish with the bottom row, also moving left to right. The first option is one of my favorites, and I am surprised that many more recording software programs do not adopt this function—Typing Keyboard to Piano Keyboard (Ctrl+T); see Figure 3.25. This is a great option for those of us who do not have a MIDI keyboard handy or are traveling and come up with an idea on the road. When this is selected, your typing keyboard will play notes that can be recorded onto the Piano roll. They will register note pitch and note length, but volume will not change, because most typing keyboards are not pressure sensitive. When you right-click this option, you can set the base octave that you would like your keys to play, and the layout can change between piano and Janko. Unless you own a Janko keyboard, you will leave this on piano.
Next to Typing Keyboard to Piano Keyboard is the Count-In option (Ctrl+P), which will click a designated amount of times before recording begins. This is essential when tracks are perfectly on beat, and you need to get that groove and tempo going in your head before you start recording. Right-clicking this button will allow you to set how many bars you want to click off before recording begins.
Blend Recorded Notes is the next option and will cause newly recorded notes to blend with the ones that are already there, so when you almost have a beat that you are working on and you want to add each part individually, this is a good way to do it.
The next option works in conjunction with blend notes because this button will allow looping of a segment. I am not a good piano player, but I am good enough to play each hand in different recordings. With loop enabled and blend notes, you can play the chords with your left hand and then allow the pattern to loop, and when it comes back around, you can layer the extra notes in to make a full sound, as though a professional pianist is playing.
As we discussed earlier, you can group notes and clips together by using the quick key Alt+G when patterns or notes are selected. Note and Clip Grouping (Shift+Alt+G) is a global command that will turn the groupings on or off. This is handy when you have a group of notes on which you need to lower the volume, but then you want to change the panning of one note in the group and don’t want to affect the rest of the notes in that group.
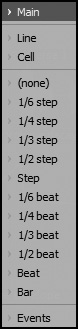
The final button on the top row is the Global Snap selector, and this drop-down menu gives you options for setting how you want your clips and MIDI data to be placed in the project. When you have Main selected in the Piano roll, Playlist, and event editor, then the selection made in the Global Snap selector will dictate where the notes are placed on the grid when moved around. For example, if you have an audio clip on your Playlist, and the Global Snap selector is set to 1/2 beat, then you can only move that audio clip every 1/2 beat, and you cannot move it in between. This is nice when you just need to drop a drum beat into the Playlist, and you don’t want to mess around trying to make sure that you have it exactly on the bar that you want it. Aside from None, Line, and Cell, the selection you make here will also affect the MIDI notes that you play in the Piano roll. If you do not have perfect beat or timing, you can have FL Studio do the work of perfectly hitting those beats by setting the Global Snap, and the notes will automatically fall into place!
The metronome (Ctrl+M) starts off the bottom row and is paramount to the beat makers out there who like to stay on beat but still stay in the tempo. You can change the sound of the metronome by right-clicking the toggle switch (again, the shiny red button) and choosing between hi-hat, tick, and beep. The Wait for Input button (Ctrl+I) will cause FL Studio to pause recording or playing until a note is received from your MIDI keyboard or a key is pressed when Typing Keyboard to Piano Keyboard is active. This is nice when you want to have FL Studio start recording and can be a nice setup to have a quick remote Play button for when you are listening back, but I think it is best to use this for recording, if necessary, and otherwise leave it off.
The Step Recording toggle switch (Ctrl+E) allows you to play at your own speed and will only enter notes into the Piano roll as quickly as you play them. This is great for slowly going through a portion of a song and getting the exact notes that you want without having to wait for the song to loop back to the position you are at. With this option selected, pressing Record is not necessary when adding notes in the Piano roll. Next to this option is the Auto-Scroll, which will keep the scroll bar viewable on your computer screen as the song plays. I find that it is useful to try both and see which option suits you best, because this one comes down to preference and what makes you work faster and more efficiently.
The final button is the Multi-Link Controllers button and will allow you to control multiple parameters of automation, such as panning and volume. It will be further discussed in Chapter 5.
The online section, shown in Figure 3.26, is the news feed and download center for FL Studio. The first button works like a news ticker at the top of your screen to display new products and their availability, and the lighter button to the right opens the online downloader. A web window will open up only when you click on the online window, and the online section itself will not activate until you first click it. This is a great way to get more instruments, plug-ins, and updates and visit websites that have useful tools for your music making. When you are working and have made a few projects, your instruments can get stale or lifeless because you have over-played them to yourself. Many programs lack the ability to instantly update their catalog, as FL Studio can do. I have found many times when making a new track that listening to something fresh and unheard can spark creativity even if I decide not to use it in the final mix.
When creating music inside FL Studio, there are many steps that go into creating your tracks. The Playlist is where you place the different parts of your music and arrange them how you would like the song to sound when played from beginning to end (see Figure 3.27). As you build your song and find parts that you like, you will begin placing the patterns in the pattern block section (lower half) or dropping clips into the clip tracks (upper half). To make life easier, it is best to stick with using the upper section because you can see what is going on inside the patterns when you use pattern clips. Clips in the Playlist can consist of events, MIDI notes, audio, and even automation. Within these sections you can completely rearrange a song and save it as a new version, and while other programs can provide obstacles to efficiently changing what you want, FL Studio provides tools to help you get those changes made as quickly as you think of them.
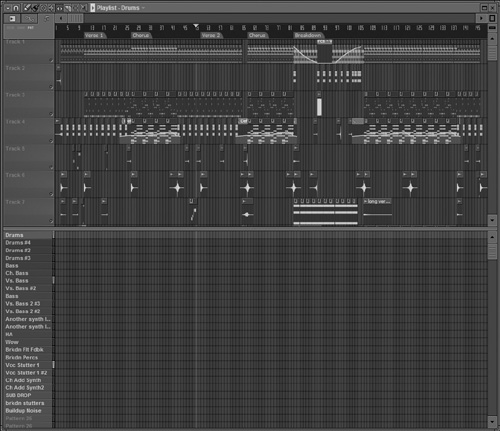
By default, the clip tracks will be laid out on top, and the pattern blocks will be on the bottom. The upper section will consist of many different clips, all the way down to no clips if you are building everything in the Stepsequencer. When recording audio tracks, the sound can be routed to any of the 99 Mixer tracks, which we will discuss in Chapter 4. For now, just know that your audio clips that show up as waveforms will be placed here, and recording to the master track is not a good idea even though it can be done.
Automation can be controlled here, so if you would like a left-to-right pan, you can manually set it here with automation clips. I will discuss more on what automation is and how it is used in Chapter 5. MIDI notes can be dropped in here, and when you have a series of MIDI notes you like, by placing them on the Playlist as MIDI notes you keep them open to editing and are never stuck with what you made. The notes you place in here can also control events, such as changing the pages of the Notebook plug-in or causing the graphic characters in the Fruity Dance plug-in to perform certain dance moves.
The lower section is for placing pattern blocks that are created in the Stepsequencer. A good way to picture this is to consider two different drum beats that are made with the same tempo in two different patterns. Imagine that Pattern 1 is a light drum beat that plays in the beginning of a song, and Pattern 2 is a heavy drum beat that follows the intro and plays through the rest of the song. Blocks are drawn on the first pattern track so that the light drum beat plays for a few bars. Then on the second pattern track in the pattern blocks area, blocks are drawn after Pattern 1 in the timeline so that after the light drum beat plays, the heavy drum beat will follow. The pattern blocks don’t contain any visual information, they just tell FL Studio which individual patterns to play when in Song mode.
Now that you have a general overview of the Playlist, let’s take a closer look at what each of the menus (see Figure 3.28) can do for your music making. As you read over these options, remember that this section is just telling the song which part to play at what time.

The first branch that comes off the Playlist options is the Edit section; it contains familiar shortcuts that are used in many programs (see Figure 3.29). The first four may be burned into your memory from programs such as Microsoft Word, and if they aren’t, I strongly suggest you learn them. These are based on the selection that you have made in the Playlist, and the four options will cut (remove from the Playlist, but you can paste it anywhere without copying), copy, paste, and delete (remove from the Playlist without being able to paste the selection anywhere) any clip or pattern block. Regardless of which option (delete or cut) you choose to use, you can always undo a delete and get your clip back. Delete All will clear everything off the Playlist, but I would suggest saving the current version and renaming unless you want to completely scrap what you have.

The Shift Left and Shift Right options will move the selection the respective ways an amount based on your Snap settings. This means that if your Snap settings are at 1/2 beat, then when you select Shift Right, the selection will slide to the right 1/2 a beat. This is nice when you need to bump a selection a certain amount and can come in handy for small moves, such as 1/32 beats.
Mute and Unmute will prevent audio clips from playing completely, so even if there are effects on a sound, the effects will not play as well. Insert Space (Ctrl+Insert) can be used for making room to add in extra parts or a break in the song. Where you start your selection is where the space will begin, and where the selection ends is where the rest of the song will be moved to. Delete Space (Ctrl+Delete) will cut out a section and push the beginning of the selection to the end of the selection while erasing everything in between. This is fantastic for when you have added too many bars in a song, and you need to erase that extra bar without affecting the rest of your song. By selecting that bar and choosing Delete Space, the bar will go away, there will be no space, and the song will play perfectly through unless you cut off audio—then usually it will create a popping sound.
The Turn Pattern Instances into Clips option will take any pattern block placement and drop it onto the Playlist. Although this can be useful when you want the typical look of a project, where you can see the MIDI notes and audio clips rather than arbitrary blocks, it is not necessary, and an entire project can be built in the Stepsequencer and arranged in the pattern blocks. Merge Pattern Clips will take all of the selected pattern blocks and combine them into one track in the clip track section. When this is done, they act as a collective, and you cannot individually edit the notes without opening the Piano roll.
The Tools menu has Quick Quantize, which sits alone with no other options (see Figure 3.30). This will snap your patterns to the Snap selection you make.
The Patterns menu will open up a series of options (see Figure 3.31) that will allow you to manipulate the pattern tracks in the pattern block section, which in turn causes the pattern clips in the Clips section of the Playlist to adhere to the settings. (For example, renaming a pattern track in the pattern block area will rename the clip of the same pattern in the Clips section of the Playlist.) The first is Rename (F2) and should be easy to remember because it is one of the F keys. You can change the pattern name, which I highly recommend because it will help you to stay organized. The option to change the color will also come up, and you can choose from a wide array of shades and hues.
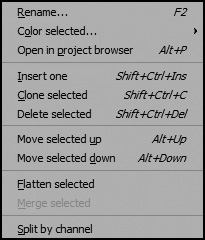
Color Selected will offer two choices, and Gradient will cause the color to blend from one color to the next across the tracks you select. This is nice when you have a drum section that you want to visually stand out, and you select those patterns and choose a red and then a blue so that for just that section, the color will blend from red to blue across those tracks. Random takes the color organization out of the picture and simply livens up the appearance of your patterns by assigning random colors to the selected patterns.
Open in Project Browser (Alt+P) is a great way to navigate and disable any part of your project. If you want to quickly turn off a pattern, sound, or effect, it will show up in the Browser, and clicking on the name will allow you to disable it. Right-clicking the name will bring up another set of options where you can quickly bring up the Piano roll or parameter changes (panning, volume, envelopes, and so on). This is a valuable navigation tool, and familiarizing yourself with it will help you to move quickly through the parts of your song and make rapid changes.
Insert One places an empty pattern before the one you select, while Clone Selected will copy all of the tweaks you have made to a pattern but will not place any blocks in the pattern block window. Use this when you have the perfect pattern, but you want to change one parameter for a different break and then place that block in the section where you want the beat to change (see Figure 3.32).
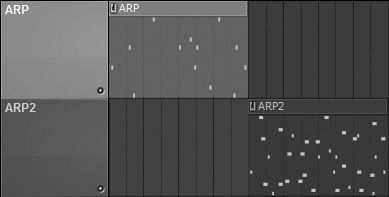
Figure 3.32. Here you can see a cloned pattern with altered notes that is placed after the original to create a different sound.
Delete Selected will remove the selected pattern from the pattern block window. It’s good to know that this cannot be undone, so use caution when deleting patterns.
Move Selected Up will bump the selected pattern(s) up, and Move Selected Down will move them down one space in the pattern block window. Flatten Selected can be used to give your project a clean look and prevent moving of single pattern blocks. When selected, if there are a few blocks in the pattern, they will be consolidated into one block.
Merge Selected will merge two or more patterns into one, and Split by Channel will take the pattern and expand it to include each in-use channel from the Stepsequencer and branch it out in the pattern list. When you use Split by Channel, you can place a specific kick groove in a different part of the song or remove just the hi-hats during a specific section, where you would have to otherwise copy the pattern and make an entirely new one because the original was all of the sounds in one pattern. See Figure 3.33.
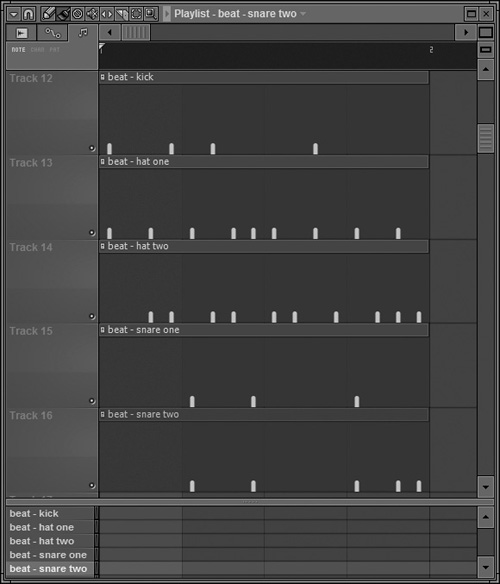
Figure 3.33. A drum beat that has been split by channel, allowing you to place individual sounds in the clips section.
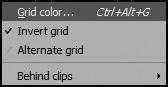
The View menu adjusts the look of the Playlist and will not affect your project musically (see Figure 3.34). This section will come down to personal preference and what helps you best work on your projects. The first option will bring up a window allowing you to change the background grid color. Invert Grid will flip the background grid lines to their opposite color, so if your lines were black, they will turn white. Alternate Grid will make the lines more pronounced, so if the background grid lines are set to black, the grid lines will thicken. Again, this will come down to not just what is easier to use, but in some cases what is easier to see. The view option for behind the clips can be modified to be transparent, be opaque so that no grid lines can be seen behind clips, or have a glass appearance.
By now you have heard me mention Snap settings more than once, and Figure 3.35 shows the menu where you can adjust how closely to the beat you can move clips and pattern blocks. Remember that the settings here are for the Playlist, and unless they are set to Main, they will not automatically adhere to the global settings of your project. The best way to avoid running into this is to leave everything on Main and only adjust the global settings. The smaller the number you choose, the more potential places you can place clips and pattern blocks. If you need to move a drum beat over 1/4 beat and have the Snap setting at one beat, you will not be able to put the drum beat where you need it, because it will pass over the 1/4 beat and skip to the next full beat. When the Snap setting is at None, you can freely move the blocks and clips without any grid to adhere to. When setting the Snap setting to a full bar, you will be able to quickly move parts around without fear that they may not be at the right place.
The Select menu provides some ways to select different parts of your project (see Figure 3.36). Deselect (Ctrl+D) will drop the selection that you have and leave you with no selection. Select All (Ctrl+A) will highlight everything in the Playlist. This becomes very useful when you want to turn your project into a stereo track to put on a CD, and you need to select everything for printing to audio (turning all tracks into one audio track).
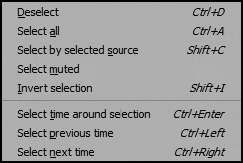
Select by Selected Source means that when you have a clip selected and you choose this option, all associated pattern blocks and clips will also become highlighted. Select Muted will select any channels that have been muted, which can be useful when you want to hear everything, including tracks that you may have turned off, because after selecting them all, you can choose Unmute from the Edit menu.
At first, it took me a minute to figure out the purpose of Invert Selection, but then I reached the point where I wanted to export two halves of a song. After exporting the first half, rather than using the mouse, I used Invert Selection (Shift+I), and it selected everything that I had not selected.
Select Time around Selection (Ctrl+Enter) will place the timeline marker around the selection, so if you have a vocal that lasts 2 1/2 bars, the timeline selection will be for those 2 1/2 bars. This can be great for looping an entire song without having to drag a ton of menus, because all you hit is Ctrl+A to select everything and then Ctrl+Enter to cause the timeline to be highlighted from the project beginning to the end.
Select Previous Time (Ctrl+Left Arrow) and Select Next Time (Ctrl+Right Arrow) are favorite quick key combos of mine for when I am editing and jumping around a project. If you are trying to listen to your song piece by piece, you can select an area on the timeline—say, four bars, for example—and when you choose Select Next Time or use the quick key, the timeline will automatically select the next four bars, and playback will start there.
Group (Shift+G) and Ungroup (Alt+G) will create or remove a grouping based on your selection (see Figure 3.37). When you create a group in the Playlist, hovering over it will cause the group to have a different hue and color than the rest of the clips or blocks, making it easily identifiable. When clips or blocks are grouped, choosing one of the clips or blocks will highlight all in the group automatically. This can be helpful when you’re trying to keep an eye on a section or adjust all pattern blocks at once.
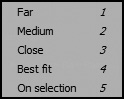
The zoom options are used fairly often by nearly everyone, and it is a good idea to know these quick keys (see Figure 3.38). The numbers used are the ones on the QWERTY keyboard and not the numerical keypad. The farthest zoom out is 1, while a medium view is 2, and the close view can be chosen by pressing 3. Pressing 4 will fill the window with as much of the project as the track count will allow, and pressing 5 will zoom into a selection made in the timeline. A useful combination of these quick keys is to find a section that you want to work on, such as a vocal, and then select the vocal, press Ctrl+Enter to highlight the duration of the vocal in the timeline, and then press 5. This is a two-key combo that can immediately zoom you into the area that you wish to work with.
Another option for getting a bird’s-eye view of all your clips is to mouse over Current Clip Source in the Playlist options list, and it will bring up the entire project collection of clips. Below that option is the Live mode toggle, where you can switch between Regular mode and Live mode, which can be used to audition clips on the fly. I will discuss Live mode further in Chapter 5. Add Timeline Marker (Alt+T) will bring up a small window that allows you to name a marker to place on the timeline. These are great ways to identify breaks in your project or even general song structure, such as chorus, verse, bridge, and so on. They can also be used to jump around the song when in Live mode, which, again, I will further explain in Chapter 5. Center (0 on the QWERTY keypad) will adjust your screen so that the position marker is in the middle of your screen. This is helpful when you have auto scrolling turned off in the recording panel, and you want the screen to jump to the point in time where the timeline is. The final option will detach the Playlist and allow you to move it offscreen and onto another monitor if one is available.
In Figure 3.39, I included the Snap button in the picture, which will bring up a menu (refer to Figure 3.35) to select the Snap setting for the Playlist grid. Aside from that button, the rest are mapped to quick keys, and when Typing Keyboard to Piano Keyboard is not selected, then you will be able to press single keys to change the tool you are using in the Playlist. If you need to play instruments with your typing keyboard, press the Shift button with the tool command keys (for example, Shift+P to draw).
The Draw tool (P) will allow you to place single clips and patterns in the Playlist, and when you click the selection, it will move with the mouse until you release it. The Paint tool (B) is similar in that it places clips and pattern blocks, but as you move the mouse, it places duplicates of your selections as you move horizontally across the grid. Use this tool when you have a beat that you need to repeat for a few bars without worry that a duplicate will be out of place.
Delete (D) will remove any pattern block, clip, or group when it is selected with this tool. Mute (T) is great for toggling the playback of a single clip, so when you need a part or multiple parts muted, hold the left mouse button and drag over what you need to turn off. To unmute, just select the muted part or drag over a muted selection, and it will play and no longer be grayed out.
The Slip tool (S) is for changing the length of clips and pattern blocks, and when selected inside a clip, it will move the clip as far left as you drag the mouse, while leaving the clip shell in its original location. The Slice tool (C) will cut the visual of your clip so you can take out unwanted sound or single out a section in the audio. The tool will split a clip into two pieces, and the size of the pieces will depend on where you make a slice. If you make a slice straight down, then that is where the clip will be cut, and if you make a diagonal line with the tool, the clip will be cut between the upper and lower cutting points of your clip. Right-clicking a selection with the Slice tool will remove the smaller of the two pieces when a selection is sliced into two pieces. I don’t recommend cutting the pattern blocks, because they create a new pattern block track and can create confusion and a general mess in the project.
The Select tool (E) will allow you to select single clips, a rectangular area that will include all clips or pattern blocks in it, and multiple selections by adding the Shift key. Zoom (Z) is incredibly useful for visually navigating your project in the Playlist (see Figure 3.40). When using the Zoom tool, you will be able to highlight a rectangular area that, after you release the mouse, will fill the Playlist with your selection.
The makers of FL Studio created a program that is meant to have options so you can tailor how you use the program to suit your needs. However, I believe that an efficient way of using these tools is to focus on switching between them as little as possible. I suggest using Draw (P) and Paint (B) primarily and holding Ctrl, which will shift the tool into the Selector tool until Ctrl is released. This prevents toggling tools with keystrokes, and usually after selecting something, you don’t want to select something different. If you need to make multiple selections, hold Shift+Ctrl while dragging or selecting, and you can make selections that are not next to each other. The idea is that after making a selection, you can move it around even when the Draw or Paint tool is selected and draw in other patterns quickly.
Zooming can be achieved by using the shortcuts 1 through 5 on your QWERTY keyboard and pressing Shift+Z for a quick zoom into a clip. Slicing is located near all of the keys I prefer to use, and pressing C will allow a quick slice of your clip. This use of the tools may not work for you, but I have found that it saves me time when editing and creating.
In Figure 3.41, Play/Pause and Playlist selection are the buttons located to the right of the tools. Pressing Ctrl+spacebar will play/pause the song in Song mode or a pattern in Pattern mode and is a faster alternative to moving the mouse up to this button, but this button will always trigger Song mode automatically. The Playlist selection, when clicked, will produce a drop-down list that allows you to select a clip that you can place in the Playlist.
Beneath the tools are your clip focus selections, where options will change based on which type of clip you choose to focus on. Right-clicking on any of the focus clip tabs will bring up the list of that type of clip so you can immediately click in the Playlist and drop that clip in. The audio clip focus is first and, when selected, will display the options Zero-Cross and Stretch, as shown in Figure 3.42. The Zero-Cross option means that when you slice or change the length of an audio clip, the break between clips or the clip end will happen at the point where the waveform is at the zero point (see Figure 3.43). Although this option is not perfect and sometimes will still cause pops in the audio, the purpose is to prevent those pops by separating the sound where there is minimal noise.

Stretch will compress or expand the audio clip to fit any resizing you do. This means that when stretch is highlighted and the Channel Settings Time Stretching option is set to Resample, the audio clip will play faster when shortened and play slower when lengthened. This is great for remixing a song and getting it to fit the tempo you want, rather than the one at which the clip was recorded.
The automation focus clips tab brings up Step and Slide as options (see Figure 3.44). Step is a useful feature when Step-Editing mode (Ctrl+E) is turned on. We discussed earlier that step editing means you can slowly edit along piece by piece, but in automation clips the mouse can be dragged across the clip to draw a freehand curve for the selected parameter (see Figure 3.45). This means that if you have a sound being controlled by an automation clip—let’s say volume— you can draw the volume change right over the automation clip. The number of points used to draw the curve depends on your Snap settings. When you hold Shift and draw, the space between points can only be straight lines running horizontally or vertically, which will create literal visual steps on the curve (see Figure 3.46). The Slide option will allow other curve points to retain their relative distance horizontally when moving curve points. When it is disabled, only the curve point you select will move.

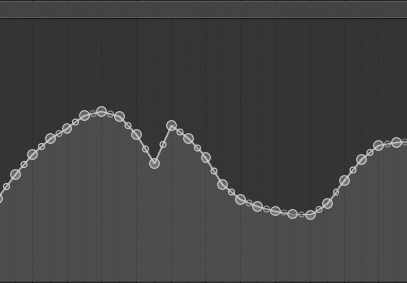
Figure 3.45. An automation curve drawn freehand with step editing active and Step selected in the automation tab.

Figure 3.46. An automation curve drawn with Shift held down to ensure straight vertical and horizontal lines.
The pattern clips focus refers to a visual representation of the blocks that you place in the pattern block tracks (see Figure 3.47). The options for these clips will affect the colors for the patterns when they are placed on the clip tracks. The Note option will cause the clips to be the same color as the main pattern that the clip is from. Chan will use the parent channel’s color, and Pat will use the parent pattern’s color. I enjoy coloring them individually, which can easily be done by right-clicking a pattern and choosing Rename and then clicking the color box next to the name.

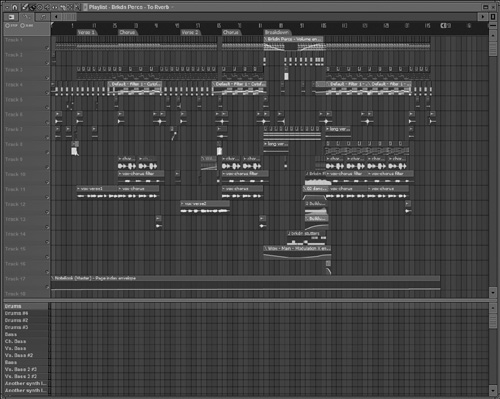
In Figure 3.48 you see the Playlist with many clips and no pattern blocks, because where there would normally be pattern blocks, there are pattern clips for easier editing. On the sides are the usual scroll and zoom functions, but I find myself only using the top scroll button, because when you right-click this button, you can drag the mouse in all directions, and the Playlist view will move in all directions with the mouse. With zoom, use the 1 through 5 shortcuts, and for horizontal zoom, hold Alt and use the scroll wheel to zoom in and out.
Every clip placed in the clip tracks will have its own menu that can be accessed by clicking in the top-left corner of each clip. Some of the options will not be available for every clip type, but the ones that are there will behave the same across the three clip types. Preview will play the clip, and you can press Stop to halt the sound. Select Source Channel will allow you to replace a clip with one that you select from the list. When using the Paint tool, you can place a clip down regardless of what clip it is and select a different one from this list and then paint it however many times you wish, making adding sections incredibly easy. Be careful with this option, because if you have more than one clip selected, it will change all of those clips to that selection!
Edit Pattern will open the Piano roll, allowing you to tweak notes, and Channel Settings will open the settings for that particular channel. So if you open the channel settings for an instrument, you will be able to change the sound and any other parameter available for that instrument.
Rename will allow you to rename the clip so that you can easily see what version or sound you are working with, so you don’t get confused when there are four versions of bass in the Playlist. Make Unique will create a copy of a pattern that you can freely edit without affecting the original. Pay special attention to this because if you make a change to a clip, when you paint that clip, the changed version will be the one that is painted. Select All Similar Clips will highlight all of the clips that are the same as the selected one and can help with editing multiple clips at once.
The Select Region option will bring up any existing regions to select from the side menu so that if your sample has defined regions or markers, such as when it is dragged out of Edison, you can automatically select one, and the clip will collapse to the selected region. This is great for using a series of vocals when you have set markers that identify where the chorus, verse, and other sections are located in the sample, because you can add the whole sample and quickly select a region, such as the chorus, to place in the Playlist. Chop will open another menu (see Figure 3.49), allowing you to slice your audio based on the selection you make in the submenu. This is great for getting pieces of audio to rearrange for creating a new beat, adding emphasis to different parts, or even giving vocals a manual stutter effect—although there is a plug-in that will do it for you, and I will show you how in Chapter 6.

Edit Sample is a quick way to load an audio clip into Edison. Detect Tempo will figure out the tempo of a clip and allow you to set FL Studio to that tempo, which works well when you don’t want to stretch a sample and the project is based around that sample. Fit to Tempo will do the opposite and stretch the sample to the tempo that is already set in FL Studio.
The Automate option will allow you to create volume and panning automation for the audio clip, and if two audio tracks are next to each other, there will be an option to crossfade the two as well. This option is the fastest for getting two audio clips to seamlessly play without sound immediately dropping out or starting.
We have gone over the functionality of the options that show up when clicking the pattern block tracks and contain movement and renaming options.
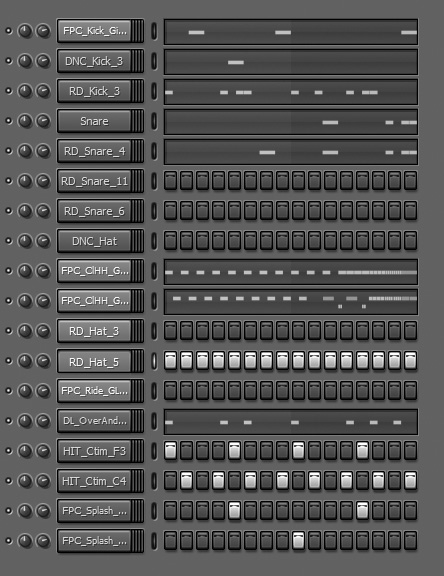
The creation of the Stepsequencer set FL Studio apart from other recording software and drew people in to the original versions when it was known as FruityLoops. At first glance, many will just see buttons in rows that will play sound if they are highlighted when the scrolling light goes past the buttons. The key is to not see a Stepsequencer, but rather to see a window containing channels of individual parts of your song (see Figure 3.50). There are many ways to make sound in the channels, but for now, imagine that every different event (something that makes sound or alters it) is placed horizontally in channels.
In this section we will look at the Channel window in two uses—basic and complex. In basic, we will look at the Stepsequencer and only highlight steps (each button). Most FL Studio users will use the steps to quickly make a repeatable drum beat or play a one-shot sound effect, such as a cowbell…and as world-famous producer Bruce Dickinson notes, “You’re gonna want that cowbell on your track.” The complex side of the Stepsequencer will allow a much wider range of options when building a project. As you become more familiar with FL Studio, this will be the road of choice, because the ideas you have are not always single note.
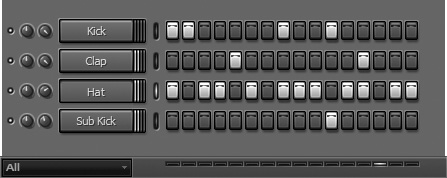
First we will look at the basic side of the Stepsequencer. In Figure 3.51, you can see that as the orange light scrolls across the bottom of the Stepsequencer, the kick, clap, hat, and sub kick will be triggered when passing a highlighted step and will play that sound. This is a quick way to create a beat that will be accurate and can be changed instantly. The steps can be activated or deactivated by left-clicking, while right-clicking will make the space blank. After the audio is loaded in the channel, highlighting the steps is all that needs to be done to trigger sound when in Pattern mode. We will look at loading sounds in the next section; however, right now I want to give you an overview of the basic features to understand what the Channel window can do.
The first section at the top of the Channel window has a series of global options designed to affect all the channels (see Figure 3.52). The first changeable option is the box that by default will have two lines in it. This tells FL Studio how many beats you want in the pattern. This means that if you raise it up to 16, you will get 16 beats per bar (64 steps) to enter in single sound events for that pattern in Pattern mode, but when the pattern is placed in the Playlist as a clip, it can cover more than one bar when played in Song mode. This can be helpful with creating drums that have a few changes in them and would not sound correct repeating every four beats.
Next to that is the Repeat Stepsequencer toggle switch, which will play an important role in your music making using steps and is necessary when certain parts in a pattern play longer than the number of steps assigned to the channels. For example, if you have recorded some piano for a pattern, and it runs for eight bars, but the drum beat on the same pattern plays only four bars, the drums will stop playing after the first four bars, and the piano will continue playing the remaining four bars with no drums. By selecting this switch, the highlighted steps will repeat and play the full eight bars. We will discuss patterns that play longer than the number of steps a little later in “The Deeper Side of the Channel Window” section, but it is good to know the purpose of this option.
The Play button for the pattern is located next to the Repeat Stepsequencer button, but the spacebar works just fine for playing a pattern and is much quicker. Even if you are in Song mode and press Play on this button, it will automatically place you back into Pattern mode.
To the immediate right of the Play button is the pattern selector, which, when clicked, will bring up a menu (see Figure 3.53) that allows you to navigate to different patterns and name each one that has data in it (otherwise it won’t show up in the list). I strongly suggest naming your patterns, because when you start building projects that contain 30 or more patterns, finding anything becomes impossible. There are some other familiar options we have already seen in the Playlist that apply in this menu as well. Keep in mind that the submenu containing options such as Delete, Clone, and Move Up only applies to the channel that you have highlighted to the left of the options.
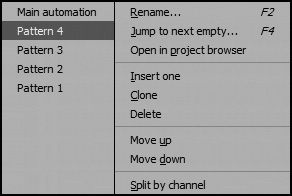
Moving farther along the top menu brings you to the Swing setting. This will add a swing feel to the highlighted buttons as they trigger sound, but it will not affect anything else. Be careful when using this option, because it will affect all patterns in the Stepsequencer, so if you only want one section to have swing to it, then add swing in the Piano roll.
The next button will bring up a graph editor window that will allow you to change the pan, velocity, release, filter cutoff (mod x), resonance (mod y), pitch, and shift of the selected channel. In Figure 3.54, I have adjusted the velocity of the hi-hat channel to give it a more realistic sound of someone playing it. Keep in mind that if you have multiple channels selected, changing these parameters will affect all channels selected. You don’t want everything to accidentally pan left in the song! The pitch option can be used to alter notes but is based on a percentage of pitch change, not actual notes, so stick with the keyboard editor for those changes.
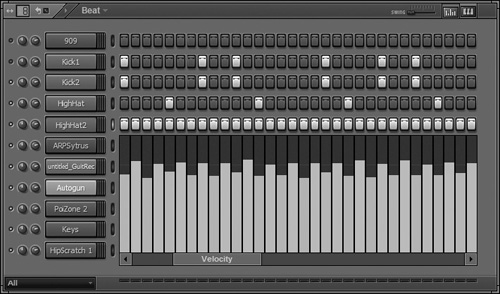
The final button in the Channel window menu is the keyboard editor, and this option allows you to change notes. Suppose you have a piano loaded into the Stepsequencer, and it only needs to play once a beat, but you want to change the notes to create a melody. Opening this window will give you a mini piano with orange marks on it that represent the steps. The light notes are unused steps, and the dark notes are where a sound is being triggered. Moving the note up or down will change the pitch a semitone up or down but still will only play a single note.
At the top of the piano is an option to create a slide so the note slides into the next rather than just changing, but it is important to know that only native FL Studio instruments can do this, so those third-party plug-ins will not support the slide notes.
I did want to mention the drop-down menu in the bottom-left corner of the Channel window because this is your channel groups selector. For the incredibly tidy musician, this will navigate through groups that you have chosen and named for quick access. To really make this helpful, you would want to create a group of channels by highlighting them when All is selected from the Group menu drop-down and then naming that group something appropriate, such as Horns if everything selected is your horn section. This will allow you to choose Horns from this menu so you can easily edit in the Channel window without having the Channel window be crowded.
When I refer to the complex side of the Channel window, I am referencing the use of more than highlighted steps in the sequencer. Anything can be recorded into a pattern and then placed on the Playlist. I wanted to start by explaining the Playlist so that you would see where patterns and sound go, and then break it down to the individual channels of a pattern in the Channel window. Adding a new channel was discussed earlier and can be done by going into the Channels menu at the top left of FL Studio. An alternative that I suggest over using the Channels menu to add a channel is dragging directly from the Browser. This can be easier for navigating through the available sounds, instruments, effects, and presets, but we will look more closely at Browser use in the “Project Browser” section of this chapter. However you add a channel, any sound at any length can be recorded into the Stepsequencer. When you record an instrument into the Piano roll—for example, a piano solo—there will be a visual representation of where the notes lie on the Piano roll instead of the steps (see Figure 3.55).
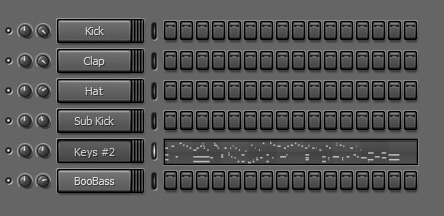
To further tweak individual channel sounds in the Channel window, you can use the Channel Settings menu that will pop up when you left-click on a channel button. If an instrument is loaded into the channel you select, the instrument UI will usually pop up if it has one, but the Channel Settings menu (see Figure 3.56) will still be available. The options will appear different, depending upon what you have loaded into the channel, so if you select a channel containing an audio sample, then you will be given the options shown in Figure 3.56. At the top-left corner of all Channel Settings windows is a menu that will allow you to save the channel state. This can make your life easier because as you create settings that sound flawless, you can save them and apply them to different sounds and even different projects!
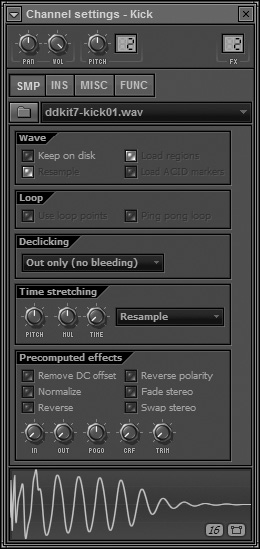
Some menus will have the option for Assign Free Mixer Track, and that will assign the sample to the first available track in the Mixer so you can add effects and automation. The audio sample has a menu where you can reload the sample, rename it, open the audio in Edison, detect the tempo (which is not very effective on longer audio samples with no beat), bring up the Properties window, and change into spectrum view or multichannel waveform view. For quick access, right-click the visual of the audio when the sample (SMP) tab is selected (see Figure 3.57).
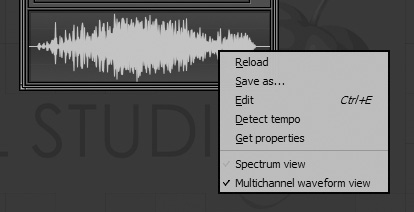
The upper section in audio samples will have a channel pan, volume, pitch adjuster, and a box (marked FX) that will take the audio sample and send it to one of the Mixer tracks (see Figure 3.58). Instruments will have no routing and will display “–” because they are sent through the master track; however, you are able to assign each one to different tracks in the Mixer. Rather than use any of the available volume faders in the Channel Settings menu, it is best to assign channels to Mixer tracks and then stick with the Mixer for your channel volume adjustments. This prevents having to search for a turned-down volume knob when the Mixer track to which the channel is linked is set to full volume.
When the SMP tab is selected in the Channel Settings menu, the first option available is a folder icon that, when clicked, will allow browsing of samples (with favorites) and loading of presets that you had previously created (see Figure 3.59). The Wave portion (see Figure 3.60) gives you the option of Keep on Disk, which will stream more of the audio from disk instead of loading it into RAM while remaining inside the 2-GB (3-GB with extended memory used) limit; this will load sounds faster but can actually hinder performance in the form of pops and clicks in the audio. Resample will raise the quality of the sample but take more disk space because it will create a larger file. Sometimes samples have data in them that determines loop points in a sample, and the Load Regions option will display them. Load ACID Markers will place ACID markers on the sample and is very similar to Determine Loops Points.
Figure 3.59. The folder icon opens an explorer allowing you to navigate to your compatible file of choice while the title displays the name of the loaded sample.
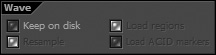
The Loop section, shown in Figure 3.61, is only available for samples with loop points in them, because the first option will allow you to set a loop point so the sound plays only between the loop points, and the second option will create an audible ping-pong effect where the loop is reversed and placed on the end of the original sample.
Declicking (see Figure 3.62) provides a drop-down menu to help with samples that do not start or stop on the zero crossing without changing the length of the sample. The No Bleeding options provide a fade-out, Transient (Bleeding) will add a longer fade, while the Generic and Smooth options will insert a fade-in and fade-out. Remember that these are only for the displayed sample and available when that sample has loop points.
The Time Stretching feature (see Figure 3.63) can be useful for quickly changing the pitch of a sample without affecting the length it plays (Pitch), the amount to stretch the length based on a multiple of the sample (Mul—for example, two times the sample length or four times the sample length), or stretch the length based on beat or time increments (Time). The drop-down list next to these dials will allow you to set a stretching method based on the type of sample you are using. Try out these different options, because the subtle difference may be exactly what you are looking for.
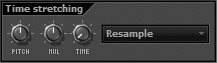
The Precomputed Effects section, shown in Figure 3.64, helps with altering the sample in many different ways. In these options you can remove the DC offset, normalize the sample (which raises the volume to a “normal” level when it is too low), reverse the sample, reverse the polarity of the sample (which literally flips the waveform upside down), fade stereo (which will apply a fade to the sample that can be controlled by the in/out knobs), and swap the stereo (which will switch the left and right sides of the audio sample if it is stereo).
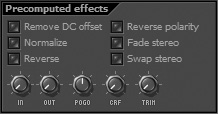
The pitch-bend knob (Pogo) will allow you to add pitch bend to the sample, and the CRF knob will crossfade your samples, which can produce cleaner loops. The final (Trim) knob works like a gate on the sample, and adjusting it will tell FL Studio at what volume it should close the gate and stop playing the sample. By setting the gate continually higher, the point where sound stops playing gets louder, which can be useful with live recordings that have a long tail of ambient room noise on the end.
The Instruments tab (Ins) incorporates LFOs and ADSR envelopes, discussed further in the “What Is an LFO?” section of Chapter 6 and the “What Is an ADSR Envelope?” sidebar following this paragraph. The Miscellaneous (Misc) and Function (Func) tabs both involve generators and will be discussed in Chapter 6. The main thing to understand is that these settings will affect the sample itself in some way and are good tools for manipulating how you would like something to sound.
Now that we have a good understanding of where the patterns are arranged and where the sound is coming from, let’s take a look at where that sound is built—the Piano roll.
The Piano roll is a great feature that some DAWs (digital audio workstations) or recording software programs seem to neglect. While they tout their audio recording capability, when it comes to MIDI recording and sound manipulation, they can sometimes fall short. Modern artists have not just the desire but the need for a tool that reliably captures their music and lets them edit and manipulate it to their heart’s content. That is what the Piano roll is all about (see Figure 3.65).

The Piano roll takes its name from an earlier music-reproduction technology—an actual roll of paper with holes in it. The roll would be loaded into a player piano and scrolled past a pneumatic switching mechanism. The holes would trigger the mechanism to play the correct notes. While originally a mechanical and slightly cumbersome technology, the Piano roll concept provides a useful visual metaphor for modern MIDI sequencers and editors.
While the old Piano roll had a set value (that is, once the holes were created in the paper, they could not be altered), today’s tools are much more dynamic and flexible. Not only can the notes themselves be moved, chopped, re-pitched, and stretched, the instruments can be changed and manipulated. The Piano roll is basically a grid with an X-axis (left to right) and a Y-axis (up and down), where the X-axis represents time (the composition starts on the left and ends on the right) and the Y-axis represents the pitch of the notes to be played (the higher the note is placed on the Y-axis, the higher the note’s pitch will be). Sometimes multiple instruments will be represented within one Piano roll, and the note’s position on the Y-axis will determine which instrument is played—for example, A#3 might represent a drum kick, while C3 would be a snare hit. We’ll talk more about note manipulation later in this section, but right now let’s take a closer look at the Piano roll itself.
The first thing you notice when opening the Piano roll is the keyboard running down its left-hand side (see Figure 3.66). Although this can represent percussive instruments, it’s best to think of it as a typical piano keyboard, with lower-pitched notes at the bottom and higher-pitched notes at the top. Notes that you place on the grid will trigger notes on the virtual keyboard to the left, and you can actually see the animation of the keys responding to these notes.

Below the grid where the notes are placed is the event editor, where you can alter many parameters of the event, such as panning, velocity, and cutoff frequency. I use the term event in reference to the blocks placed on the Piano roll because all blocks do not always represent pitched notes; they sometimes represent notes slides or single instrument sounds, which we will discuss later in this chapter, in the “Note Color and Portamento” section. Similar to the Piano roll grid, the event editor’s horizontal axis represents time, but the function of the vertical axis can vary based on which event parameter you have chosen to control. Figure 3.67 shows the event editor in action, where the highest position on the vertical axis is panning the event to the right, and the lowest position on the vertical axis is panning the event to the left. The tails appearing after notes represent the length of the note, which makes it easier to identify tightly grouped notes.

Note:
A quick way to access these adjustments is to right-click the empty area to the left of the event editor.
The Piano roll has a serious set of menus that allow maximum manipulation and creativity for your generators and samples. It is important to go through these and understand what they do, because the Piano roll is the core of music making in FL Studio, and as I mentioned before, when you know where to find an option, the ideas pour onto your musical canvas without effort. We will start by looking at the corner button of the Piano roll, where you will find the greatest number of options (see Figure 3.68).

Many times when creating a groove in the Piano roll, I imagine the melody in a different song or as the basis of a new project altogether. A great idea can get lost if you like it, but it doesn’t fit the song, and the notes are changed…it’s gone. Open Score and Save Score As address thisproblem by allowing you to save the current Piano roll by itself and then open it in another project (see Figure 3.69). If you have a MIDI file that you need to bring into the project, Import MIDI File will bring up a dialog box that allows you to choose the tracks and channels you wish to import. The Import MIDI dialog box will also give you the option to combine new incoming MIDI with the MIDI notes already on the Piano roll by selecting Blend with Existing Data. I suggest leaving Realign Events highlighted, because it will place your incoming MIDI at the start of the Piano roll. Only turn this off when you need the MIDI to begin at a certain point in the Piano roll. Export as MIDI File will turn that current Piano roll into a MIDI file, and if you need to paste MIDI data from any sequencer, choose Paste from MIDI Clipboard.

The Edit menu, shown in Figure 3.70, begins with the familiar edit functions we typically see; however, the key is to remember that this menu is for the notes (blocks on the Piano roll) and their parameters (velocity, panning, modulation, pitch, and note release). Transpose moves selected notes vertically, while Shift moves notes horizontally on the Piano roll, and the Discard Lengths option (Shift+D) will cut all of your notes to the minimum grid setting, which by default will be set to Main. If you need shorter notes, change the Snap setting for that Piano roll before selecting Discard Lengths. Change Color (Alt+C) will change the selected note(s) to the color that is displayed in the upper-left corner of the Piano roll beneath the Snap to Grid button, and if no note is selected, it will affect all notes. If you have the default green selected, highlight a note that is green and then select Change Color—nothing will happen because the note is changed into the same color.

We are familiar with Mute and Unmute, but Insert Space may not be as common of a function and will literally create a space between points (notes). The distance created will be the timeline selection, and the notes involved will be the highlighted ones. As you can see in Figure 3.72, the notes have had space inserted between them (whereas there is no space between them in Figure 3.71). The space inserted pushes the notes to the right, leaving the notes prior to the selection in place.

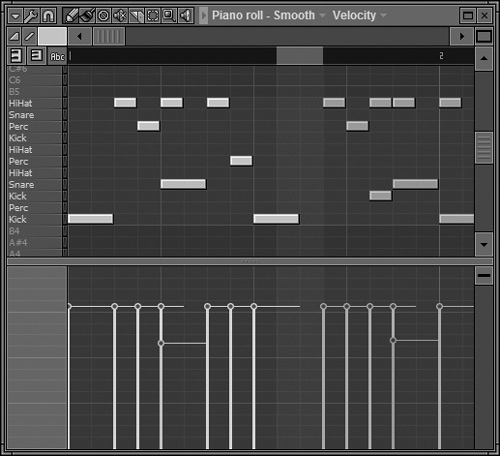
Figure 3.72. Notice that the notes maintain their distance relative to each other horizontally, and both have moved the amount of the timeline selection.
Delete Space, on the other hand, will delete notes in the selection and bring the notes that are to the right of the selection over to the left to match up with the start point of the timeline insertion. Insert Current Controller Value will allow you to paste automation data, as shown in the difference between Figure 3.73 and Figure 3.74, where the current parameter value (panning) in Figure 3.73 was pasted to the beginning of the selection in Figure 3.74. This only happens when a parameter is changed (such as turning the Pan knob to the left) and you want to paste that setting to the event editor in the Piano roll. This will only work with selections that are event editable, such as panning, volume, and pitch. Turn into Automation Clip will create a clip that you can place on the Playlist.
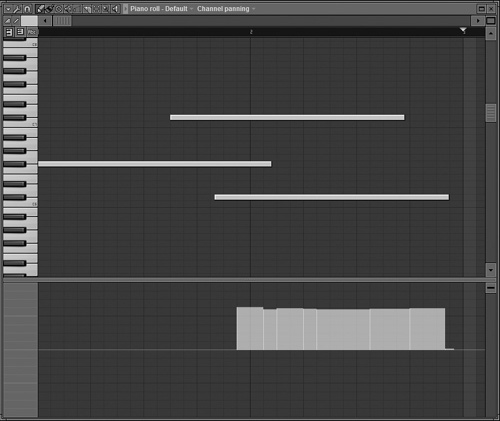

The Tools menu of the Piano roll (see Figure 3.75) gives you instruments for designing and altering your sound. Many of the options here allow you to break free of writer’s block and create chords with no prior musical knowledge!
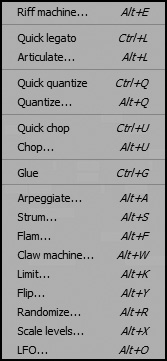
The first option that comes up in the Tools menu is the Riff Machine, which we discussed earlier, followed by Quick Legato, which will perform a short version of Articulate (see Figure 3.76). Articulate is great for changing up note length to create a more human sound to the notes played.

Figure 3.76. You can see the Articulation dialog box, where, from the Option drop-down, you can select from Legato, Portato, and Staccato. This runs from long notes (legato) to short notes (staccato), and the lengths are affected by the Multiply knob, while the Variation knob controls differences of length.
Quick Quantize (Ctrl+Q) will snap your selected notes to the positions closest to the current Snap setting. When open, the Quantize window (Alt+Q) (see Figure 3.77) will allow a wider range of options for aligning your notes.

Figure 3.77. In the Quantize box, you can specify start times, note duration, and end times when performing quantization. The folder icon will allow you to import preset quantization settings.
Quick Chop (Ctrl+U) will cut selected notes on the Piano roll into pieces based on your Snap settings, which can be great if long notes are not creating the sound you want. Select them and chop away to see what you can come up with! Similar to the previous tools, the full Chop window (see Figure 3.78) will open to reveal more options specifying how you want to cut the notes.
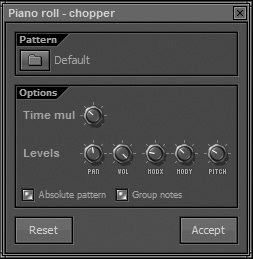
Figure 3.78. The Chopper can have presets loaded from the icon or manually set using the knobs. Absolute Pattern means that the notes will be cut on the grid, but when turned off, it will cause notes to chop based on their own starting points.
The Arpeggiator (see Figure 3.79) is similar to Chop but will allow you to specify a range of notation and can even stretch or compress the selected area.

Figure 3.79. The Arpeggiator gives you options for creating a melody based on certain patterns, note range, and individual note length. Try turning the Gate knob to create notes that stop playing more abruptly.
Strum (see Figure 3.80) is an ingenious tool that can vary the note start point and velocity to create a real strumming sound. When a guitarist plays a chord, the strings do not play at the exact same time, and this tool replicates that. Combining this tool with chord placement of notes when using a guitar generator can yield some impressively realistic results.
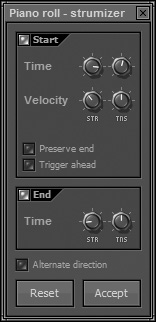
Figure 3.80. The Strum option will allow you to manipulate when the note starts to play, along with how strong that note is played.
Flam (see Figure 3.81) adds a short note that is just before the selected notes in the Piano roll to create a quick double-hit similar to two drum sticks hitting a snare one after the other. The Claw Machine (see Figure 3.82) can turn an otherwise simple beat into a complex or abstract groove that may be exactly what you are looking for.
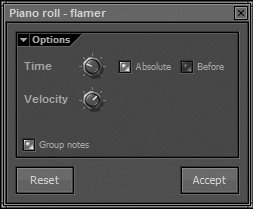
Figure 3.81. The notes placed before the selected notes with the Flam tool are great for creating a snare drum flam.

Figure 3.82. The Claw Machine gives you options for taking out notes when a beat needs to be changed up or may be too busy. Period will determine the period of time that the Claw Machine will perform changes, and Trash Every will determine how often notes are dropped within the chosen period.
The Limiter (see Figure 3.83) will keep the notes within certain pitch boundaries (for example, C#3–D5) set in the Limit options window. Flip is a quick option when you just want to flip the notes on the Piano roll horizontally or vertically. Randomize (see Figure 3.84) will bring up options to scatter your notes based on the settings you plug in.
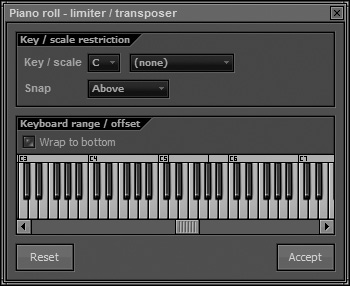
Figure 3.83. Limit keeps the notes in a certain range and can also keep them within a certain key. This can be excellent for keeping your melodies sounding good without fear of sour notes.
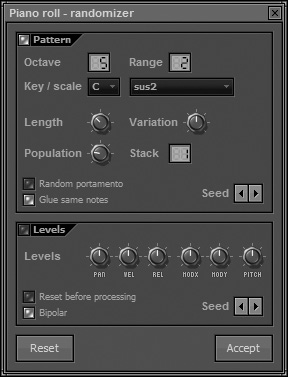
Figure 3.84. Randomize can contain a certain note scale and range, but it goes beyond that by allowing you to increase the number of notes in a section as well as randomize automation parameters, such as volume and panning.
The Scale Levels option will bring up a window allowing you to change the amplitude of your note. This can come in handy when a generator changes sound or response, much like the tone of a piano key differs when pressed firmly versus softly. If the sound you want is not there, try opening this option and adjusting the knobs for more tension on the notes or where the note is played loudest.
The LFO window (see Figure 3.85) will only open when you are working with the event editor (the area beneath the notes in the Piano roll), and the visual wave drawn will affect the parameter chosen. In Figure 3.85, the panning climbs to the right then slopes to the left. By altering the speed, the panning will happen more quickly and can bring needed life to a song.

The View options, shown in Figure 3.86, are fairly simple, and as you might guess, they only affect the appearance of the Piano roll. Grid Color will change the background color of the Piano roll, but there is no quick undo, and you will need to select the default color again to get it back, so use caution. Invert Grid, as discussed before, will reverse dark lines and light lines on the grid, and the Swap Panels option will place the Piano roll notes below the event editor window.

View Note Helpers, shown in Figure 3.87, has been very useful to me when I am placing note by note because I am unable to play the notes that I am thinking of live. In many programs you must first move the mouse and watch what note it is on to tell you where you are about to place a note. With note helpers turned on, the grid will turn light gray for the ivory piano keys and dark gray for the ebony keys all the way across the grid.
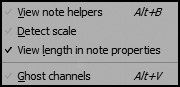
Detect Scale will determine the scale notes you have selected (or the entire Piano roll, if nothing is selected), but a few notes must be placed for this to take effect. The View Length in Note Properties option means that the length of the note will be shown in the event editor. This helps you get an overview of which notes are automated where, because rather than stacked dots, the lines show which note is at each point in the event editor (see Figure 3.88).

Figure 3.88. With View Length in Note Properties checked, you are able to see the tails of the notes in the lower event editor.
Ghost Channels will bring up the Piano rolls of all other channels in the selected pattern and display them in a translucent color for reference. You can’t edit these ghost channels; instead, they are there to show you a visual representation of where other channels are playing in the Piano roll. Let’s say you have two channels using the Piano roll in a pattern. One is a hi-hat, and the other is a kick drum sound, and you want to spice up the timing of your hi-hat. If you have it in your head that you want to have hi-hat notes immediately before and after the drum kick sound, it helps to actually see where the drum kicks are happening rather than using trial and error to move the hi-hat notes around. By selecting ghost channels, these kick notes appear in the Piano roll of the hi-hat. This works in reverse, too, so the hi-hat notes will appear in the drum kick Piano roll.
Moving farther along down the Piano roll Main menu (refer to Figure 3.68), we have already gone over Snap settings, but it is good to take note that these are the Snap settings specifically for the Piano roll unless Main is selected (default). The selection options are familiar, and great quick keys to keep in mind are Ctrl+Enter for Select Time around Selection, which will automatically place a timeline selection around the notes you have selected. This is useful for looping a section to hear it quickly and to go through multiple sections using the same time spacing (moving the timeline but keeping the length of the timeline selection), use the quick keys Ctrl+Right Arrow or Ctrl+Left Arrow to move the timeline in those directions. Group allows you to group specific notes that you select, but it will only be active if global grouping is selected in the recording panel.
The zoom options operate on the same 1 through 5 sequence, and I find myself using 5 the most because it zooms right in to what I am working on. The Chord option will bring up a list of chords that you can draw or paint directly into the Piano roll and is a valuable tool for getting your notation on point. The Target Channel option will allow you to scroll through channels available for Piano roll editing, and Target Control will allow you to scroll through the event editor options, but I suggest selecting the drop-down from the top of the Piano roll and right-clicking the empty area next to the event editor for quicker access.
The Auto Locate option will bring up the first Piano roll with data when navigating through patterns, which is great when you have a ton of channels and the Piano roll you are looking for is located 40 channels down. Auto-Smoothing will take your drawn automation and smooth it out when you release the mouse button from drawing if it was drawn with straight lines.
Center (0 on your QWERTY keyboard) is a great way to create your own scrolling when Auto-Scroll is not turned on. Every time you tap 0, the screen will center on the timeline marker, so as your song plays, you can view a part, let the timeline marker scroll offscreen, and then jump to where it is with one keystroke. Detached is for those of us working with more than one monitor and will allow the Piano roll to be placed on another window and not confine it to the single monitor space.
Although the tools in the Piano roll appear similar to those in the Playlist, they are slightly different because of the tool options available (see Figure 3.89). The first option is another place to conveniently change the Snap setting of the grid. Draw (P), Paint (B), Delete (D), Mute (T), Cut (C), Select (E), and Zoom to Selection (Z) are all familiar options, but in the Piano roll a Scrub tool (Y) is added for precision playback. They all operate in the same way and apply to the notes in the Piano roll. The Scrub feature can be used to hear a short part over and over without having to wait for playback or mess with the timeline selection. With this tool selected, you can click and drag your mouse over a section of the Playlist to play your project at any speed forward or backward for critical mixing.
The Slide (S) feature in the Piano roll allows easy pitch bend manipulation of notes when using FL Studio’s instrument plug-ins (see Figure 3.90). The generator playing the sound must be able to slide notes in order for this to work. The way that you get notes to slide is to first choose a note and place it on the Piano roll and then place a slide note of the same color above or below that note. The note as a whole (slides included) will play the length of the original note, and the slide note will only affect where the original note slides to and how quickly that note slides.
In Figure 3.91, the middle note is the original note, while the notes above and below are both slide notes. There is only one sound that plays, but as it does, it quickly bends up from the first slide note and continues playing at that pitched-up note until it reaches the bend down note, where it will slowly bend to the drawn slide note. To bend back to the original note, a slide note must be placed on the same note position (vertically) as the original note, and it will bend back to the original.
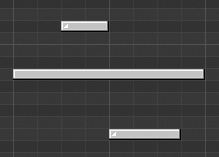
The Portamento button will cause a short slide from a note prior to where the portamento event is set and will only work with generators that are included with FL Studio, not with third-party VST instruments. The color palette offers 16 colors for the notes to be drawn in, and each color represents a MIDI channel associated with the inserted plug-in. This is great for getting different instruments within a plug-in to play, but keep in mind that this MIDI signal stops at the plug-in, so if you want to send MIDI out to an external device, you need to use the MIDI out plug-in. The color will affect the behavior of the notes as well, such as in Figure 3.92, where I have the samesingle note with two slides but have colored only the first slide the same as the single note. In this example, the note will bend up and stay there and will not be affected by the slide down note because it is a different color. This is necessary when you only want certain notes to slide, as opposed to every note parallel to the slide note.
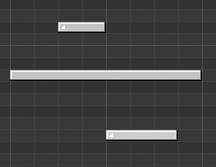
Figure 3.92. A single note that slides up but is unaffected by the slide down note that is a different color.
The Piano roll is easily the most versatile music-making tool in FL Studio, and I believe that most of your creating will be done in this window when using virtual instruments. Always remember that the options you choose from this window will only affect your Piano roll notes and their parameters. This is where even the tone deaf can use the help of Chord and Identify Scale options to create sonically pleasing music. The event editor is where specific parameters can be altered quickly to create volume fluctuation and traveling sound that darts from left to right. However, what if you don’t want to create volume changes, but you want to set volume levels and add effects? That is where the Mixer comes in and will typically be your last stop in the music-making process before exporting a project to audio.
Now that I have given you a look at where sound is created and where it is arranged, we need to focus on where it all goes. You have built channels into patterns, and now the audio clips and pattern clips are properly placed where you want them on the Playlist, but it’s time to get some levels set and effects running. This is the control center where all of your audio, after it is generated, will run through on its way out to the soundcard. The purpose of this section is to inform you of what the Mixer can do, and later we will get into specifics of how the plug-ins work.
The Mixer (see Figure 3.93) gets its name from the function that it performs, because within the Mixer is where all of the different sounds (multiple tracks of audio) are mixed together to become a song (a single stereo output). FL Studio’s Mixer blows past nearly every home recordingsoftware program in available tracks, allowing use of up to 99 insert, 4 send, 1 selected, and 1 master track! Keep in mind that you will only be able to run 105 tracks if your computer can handle it, and if there are effects on the tracks, most computers cannot handle such a workload. Regardless of track count, keep in mind that use of the Mixer is a linking game, and routing your sound properly is key to quickly navigating the program while using it efficiently.

The Mixer menu, as shown in Figure 3.94, houses options for moving tracks, changing audio, and most importantly linking the Mixer tracks to channels!
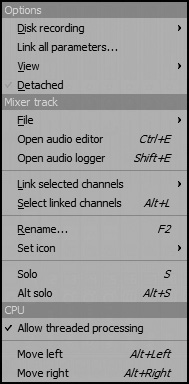
The upper corner of the Mixer, much like every window in FL Studio, has a menu with many helpful options. The first set involves Disk Recording options, and Render to Wave File will convert all tracks that are ready to record into a WAV file. Don’t worry; we will go in depth into audio and MIDI recording in upcoming chapters. It is debatable whether Auto-Unarm is useful, and it comes down to personal preference. On one hand, when you are finished recording, there is no risk of recording onto multiple tracks, erasing takes, or encountering any number of errors, but the argument would be for those of us who like doing multiple takes and don’t want to re-arm every time.
Auto-Create Audio Clips will place your recordings into the Playlist automatically when in Song mode, which gives you an instant visual of the audio. In Pattern mode it will create the audio clip channel. Latency Compensation tells FL Studio to adjust the latency created by the plug-ins before playing out of the master output. 32-Bit Float Recording means that recordings will be saved as 32-bit, which is a higher quality, but remember that CDs only run at 16-bit, and MP3 files are even lower quality, so it is not always necessary to operate at this bit depth. You really only need to select 32-bit when your soundcard is recording at 24-bit (if it has that ability); otherwise, you can leave 32-bit unchecked.
Link All Parameters is essentially a master list of software parameters that can be linked to a hardware controller. When you choose this option, you will be able to select from a list that you can follow up by moving a hardware controller, such as the slider on a MIDI keyboard. So if you choose Master Volume and move the slider, every time you move that slider during the open project, the master volume will move with it. A notable feature of this selection is that it will automatically jump to the next parameter on the master list after a hardware controller is moved. This makes mapping a large number of parameters to your MIDI controller much easier.
The View menu only contains toggle switches and again will not affect anything other than the appearance of the Mixer. The Big Mixer option will place a large version of the selected track’s level meter in between the effects and the tracks themselves. Another way of getting the visual readout is to insert the WaveCandy’s plug-in on the selected track for a large choice of visual metering options. Names at Bottom will move the track names below the level meters and volume controls, while the Tracks on Right Side option switches the tracks and effects list positions.
This portion of the menu pertains specifically to selected Mixer tracks and begins by allowing you to save and open Mixer track states, which are like snapshots of all the settings your Mixer track has. This snapshot saves as a file and, when opened (even in a different project), FL Studio will read the settings and instantly replicate them on the new Mixer track. If you find yourself working with audio such as dialogue-only interviews that need the same treatment (effects, compression, and so on) every time, save your settings and re-import them, then add or subtract to taste rather than always building from scratch.
Browse States will place Mixer track states in the project Browser, which is by default on the left. Open Audio Editor will bring up Edison for that audio clip, while Open Audio Logger will open an instance of Edison that will record the outgoing audio from that track.
Link Selected Channels will take the channels that you have highlighted in the Channel window and send their audio output through the track you have selected. This makes routing fast and easy when compared to manually having to go in through a long list of menus just to get the signal flowing properly. Here you choose channels, then choose the track, then link them, and the audio from the channel(s) will play through that track. A great new feature in FL9 is the ability to drop an instrument preset that automatically links to the channel. For example, drag an instrument preset such as Ogun Bass 2 and place it on an empty Mixer track. The channel created for the instrument will automatically link to the selected Mixer track, and the plug-in will pop up with the selected preset. This feature can greatly improve your workflow, and I highly suggest taking advantage of it. By far the quickest way to assign channels to tracks, though, is to select the channels you want to link to tracks and then choose Link Selected Channels > Starting from This Track. This will separate each channel onto its own track that is automatically named.
Rename (F2) in the Mixer is the same as with other windows and will change the name and color of the selected track. Set Icon will allow you to assign a graphic to the selected track and can help you quickly find a track, especially when there are 50 tracks running, and you have run out of differing colors.
While you are familiar with Solo (S), Alt-Solo (Alt+S) makes finding routing for solos unnecessary. If you have a vocal that is going through a send and possibly an EQ, when you only solo the vocal (provided it is not also going through the master track), you will not hear anything because the sends do not solo as well. Alt-Solo includes the audio of tracks routed to and from the selected track so that the sends (if there are any) do not get left out. I recommend using this unless you are trying to hear a dry sample (audio with no effects).
Allow Threaded Processing will spread out the workload of the Mixer, including the plug-ins being used, across multiple computer processors, provided there is more than one in the computer.
The Mixer is laid out with 99 stereo tracks (100 including the master track) that can be linked to the channels in the Channel window and four send tracks that can receive signal from a track or channel and run that signal through effects on its way to the master output. This shoots way past many programs that only allow 32 or 64 tracks, because if the available outputs are 64, then in many programs that means you get 64 mono tracks or 32 stereo tracks. FL Studio Mixer tracks are all stereo, so you should have no shortage of space! The four sends are not limiting, because any one of the 99 Mixer tracks can act like a send. Let’s start by taking a look at a single track (see Figure 3.95).
Although projects can differ in routing and setup, a good general way to look at these tracks is as individual or groups of audio. That audio is triggered in or routed to these tracks before going through the main output, which is what we hear through our speakers. You can right-click the top of each track for the Mixer track options that we discussed earlier.
Traveling downward, you see the track number, icon, and name, where all aside from the track number can be edited through the Track menu. The moving meter lines are graphic representations of the volume, which can be tracked in decibels (dB) by hovering your mouse over the big meter display of the selected track. The tiny green light below each track meter is basically an on/off switch when left-clicking and a solo switch when right-clicking. A speedy way to toggle Alt-Solo and Solo is to toggle between Alt+right-clicking and just right-clicking the green button.
The single knob is the master panning of that track, and the fader running up and down beneath it is the volume fader. This design closely relates to those big consoles in a professional studio, and the effects processors are off to the side. Beneath the track volume is the send or sidechain switch. Left-clicking the switch creates a send or makes a send active, and right-clicking the switch allows you to choose between a send and a sidechain signal.
The FX switch is versatile, because left-clicking it will disable or enable effects on the track (if there are effects inserted), and right-clicking will bring up or close all effect windows. This is the best way to navigate through what can quickly become piles of plug-ins.
The final button is a Record Arm switch, which means any audio going through the track will be recorded to your computer.
The next section of the Mixer we will take a look at will give us an idea of where plug-ins are inserted and how audio is routed with our hardware inputs and outputs. The top portion is a drop-down of your available inputs, and when record-arming a track, you will be prompted to select one. This is where you would choose Input 2 if you had a mic plugged into the second input on your soundcard.
Below the input selection are eight slots to insert a plug-in (see Figure 3.96), each with a tab that gives you options for these plug-ins. The first option is the immense list that FL Studio has to offer, including any third-party plug-ins that you may have loaded and a few additional options for saving and recalling plug-in settings. These will be addressed in the plug-in section of Chapter 6. For now, remember that this is where they are inserted to have effect on the audio coming through the tracks.
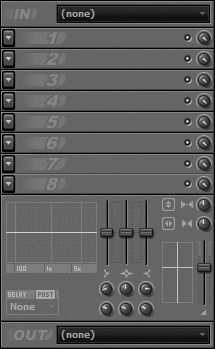
Below the plug-ins is a parametric EQ (see Figure 3.97) that is useful for small changes, but I recommend sticking to a plug-in for maximum tweaking ability. You can manually adjust your curve in the section on the right or use the knobs below the graph to set your values. In the upper-right section are two toggle switches and two rotary knobs. When activated, the switch with the vertical arrows will flip the phase of the incoming signal for when a waveform is out of phase and creating poor audio quality. The switch with the vertical arrows will make the left output of the track play out of the right and vice versa.
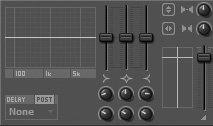
The upper rotary knob will increase stereo separation of the audio when turned counterclockwise when the incoming signal has stereo information, so this knob will have no effect on a mono vocal recording.The knob will also bring audio into the middle until it is completely mono when turned clockwise. The last rotary knob is basically another send knob and will control the send level of an active send track. This can be convenient, but I find staying with the sends in the main Mixer track strips affords me more flexibility and makes getting used to the routing even easier.
The lower-right portion of this section is a master volume and pan that I do not recommend using because using the volume and pan knobs on the main strips prevents having to go through each individual track to change the settings. If you know the specific delay that a plug-in is causing in any value (beats, bars, samples, and so on), then you can choose the option in the lower-left corner and enter the value. This is really only necessary when a plug-in is slowing down audio and causing it to be out of sync with the project tempo.
The final section is the output to your soundcard, and by default the master will be set to your Analog 1 and 2 outputs (left and right stereo outputs). You really only need to change these around when you want to send certain tracks to different outputs. Different tracks going to different outputs can help you tailor a mix for artists when they don’t want to hear the whole song. Many bass players I have worked with prefer only drums, so you can duplicate the drum track and send one to the main mix that you are listening to while sending the duplicate to a different output that is going to the bass player’s headphones. This is only one creative way of output routing, and your imagination is the only limit to what you can do.
The song may be arranged nicely and have great breaks and hooks, but if it is not mixed properly, it will still sound like a garage demo. Taking the time to understand the Mixer and being able to fully utilize it is paramount to your success when dropping a final copy of your music. One key feature of the Mixer is being able to link nearly any software controller (knob or fader in FL Studio) to a hardware controller (MIDI controller or keyboard with faders). Linking the volume controls gives you that hands-on feeling when working on the final cut of your project and allows you to listen and move faders rather than search for a track, point and click, then try to find another track. With the knobs or faders linked, you can immediately juggle multiple parameters, such as volume, and make everything sit nicely in the mix. To get this pleasant “sitting in the mix” sound, taking time to EQ sounds where unneeded frequencies are removed and using compression to give your projects more volume will be key effects used for getting a quality final product.
The project Browser is for easy location of presets, audio samples, and projects (see Figure 3.98). FL Studio has made it easy on you by allowing drag and drop so that you can drop presets on a generator or place audio samples directly on the Playlist. You can also access any project, including the ones you have created, premade projects, and even tutorial projects (which I highly recommend).
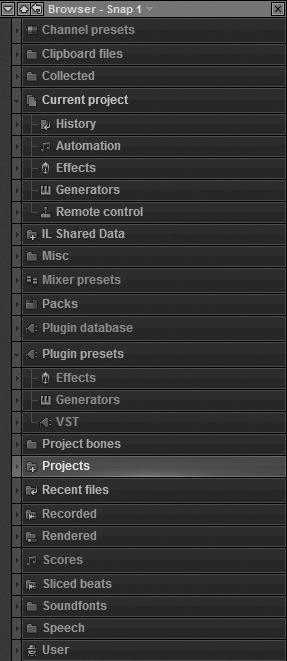
We have discussed many different ways of bringing up sounds and presets in the Browser using shortcuts in menus of other windows so that we can get a bird’s-eye view of all clips and presets related to our selection, but I have not yet explained how to fully navigate the Browser.
The Browser menu, shown in Figure 3.99, can be accessed by clicking the upper-left corner of the Browser window and begins with a set of familiar options. While we have discussed the Find options in the Browser and how to use Smart Find, some quick keys to take note of are F2 and F3, as they will jump one result back and one result forward, respectively, through the current search.

The View portion of the Browser menu is the most important part, because how you set up the appearance will determine how effective you are at finding files you need. The first option will allow you to change the Browser font to your liking (and vision) and display icons next to the folders in the Browser. Show Only One Folder Content is very helpful for not allowing the Browser to get too cluttered, because it will only allow the opening of one folder at a time. Show File Extensions will add the file type, such as .wav or .ogg, to the name in the Browser, and Show Unknown File Types allows files to display in the Browser that FL Studio would not normally recognize.
The Browser allows you to sort by group, but if you know part of the name of your desired file, stay with the Smart Find option.
Structure still relates to the view, and Collapse Structure is a quick way to view all the parent menus quickly. Reread Structure will display any files that were made while you had FL Studio running, so if you downloaded a plug-in preset or an audio file and it is not showing up, try choosing this option.
Configure Extra Folders will allow you to make a directory leading to files that you want to use in FL Studio, but which are outside of the typical FL Studio file locations. I found this handy when working with projects that someone had on a hard drive, where I pointed FL to them, and all the needed files showed up in a folder in the Browser.
Browser snapshots are an easy way to recall a certain look of the Browser when you find yourself using effects from similar folders often. To save a snapshot, select the snapshot number that you want FL Studio to remember and then open the Browser to the folder you want. Now when you press that number with the Browser focused, the Browser will automatically open the folders that you set. The Plugin Picker has been discussed, and like the other files in the Browser, each plug-in can be dragged and dropped to its desired location.
The important detail to keep in mind with the Browser is mainly its appearance, because it is how you use it (if at all) that can create success or headache. As I have professed, knowing where things are (or at least how and where to look for them) can be the difference between the exact sound you want and a mediocre beat that doesn’t stand out. The drag-and-drop ability of the Browser is more powerful than many users take advantage of, and I suggest taking a little time to explore all of the options we have discussed. Now that we have laid out the entire interface of FL Studio, including features and how to use them, it’s time to put this knowledge into action. In the next chapter, we will look at recording audio into the program and weigh the benefits and pitfalls of the different recording options available.