
Chapter 6: Using NLP to Improve Customer Service Efficiency
So far, we have seen a couple of interesting real-world NLP use cases with intelligent document processing solutions for loan applications in Chapter 4, Automating Document Processing Workflows, and built smart search indexes in Chapter 5, Creating NLP Search. NLP-based indexing for content search is becoming very popular because it bridges the gap between traditional keyword-based searches, which can be frustrating unless you know exactly what keyword to use, and natural language, to quickly search for what you are interested in. We also saw how we can use Amazon Textract and Amazon Comprehend with services such as Amazon Elasticsearch (https://aws.amazon.com/elasticsearch-service/), a service that's fully managed by AWS and provides search and analytics capabilities offered by the open source Elasticsearch, but without the need for infrastructure heavy lifting, installation, or maintenance associated with setting up an Elasticsearch cluster, and Amazon Kendra (https://aws.amazon.com/kendra/), a fully managed enterprise search engine powered by ML that provides NLP-based search capabilities, to create an end-to-end smart search solution. In this chapter, we will address a ubiquitous use case that has been around for decades, if not centuries, and yet remains highly important for any business; that is, customer service improvement.
Businesses cannot thrive without customers, and customer satisfaction is a key metric that has a direct correlation to the profitability of an organization. While the touchpoints that organizations have with customers during the sales cycle are important, what is even more important is the effectiveness of their customer service process. Organizations need to respond quickly to customer feedback, understand the emotional undercurrent of a customer conversation, and resolve their issues in the shortest possible time. Happy customers are loyal customers and, of course, this means that the customer churn will be low, which will help keep costs low and improve profitability.
To see improving customer service in action, we will build an AI solution that uses the AWS NLP service known as Amazon Comprehend to analyze historical customer service records to derive key topics using Amazon Comprehend Topic Modeling, train a custom classification model that will predict routing topics for call routing using Amazon Comprehend Custom Classification, and use Amazon Comprehend Detect Sentiments to understand the emotional sentiment of the customer feedback. We will be hands-on throughout this chapter, but we have all the code samples we need to get going.
In this chapter, we will cover the following topics:
- Introducing the customer service use case
- Building an NLP solution to improve customer service
Technical requirements
For this chapter, you will need access to an AWS account. Please make sure that you follow the instructions specified in the Technical requirements section of Chapter 2, Introducing Amazon Textract, to create your AWS account. You will also need to log into the AWS Management Console before trying the steps in the Building an NLP solution to improve customer service section.
The Python code and sample datasets for our solution can be found at https://github.com/PacktPublishing/Natural-Language-Processing-with-AWS-AI-Services/tree/main/Chapter%2006. Please use the instructions in the following sections, along with the code in this repository, to build the solution.
Check out the following video to see the Code in Action at https://bit.ly/2ZpWveN.
Introducing the customer service use case
So, how can NLP help us improve customer service? To illustrate our example, let's go back to our fictitious banking corporation, LiveRight Holdings private limited. LiveRight has contact centers in many states of the US, and they receive more than 100,000 calls every day from customers with queries and issues on various topics, such as credit, accounts, debt, and more. While they have a competent team of agents who are highly experienced in handling customer requests, their first-tier triage teams often struggle with interpreting the nature of the customer's request within the first minute of conversation, which is an important SLA for them. This is required to determine which agents to route the request to. They have a team of specialized agents based on product type and experience levels. Junior agents handle customers who are happy with the products, while the challenge of dealing with irate customers is often the task of more experienced agents.
LiveRight's senior management is unhappy with the first-tier team's performance as they are constantly failing to meet the 1-minute SLA. This is further exacerbated by the fact that in the last 3 months, the first-tier team has been incorrectly routing unhappy customers to junior agents, resulting in an increased customer churn. Therefore, senior management wants to automate the first-tier triage process, which will enable their teams to address these issues. LiveRight has hired you to design a solution architecture that can automatically determine the routing option and the sentiment of the customer conversation. As the enterprise architect for the project, you have decided to use Amazon Comprehend to leverage its pre-trained ML model for sentiment detection, Comprehend's built-in Topic Modeling feature to determine common themes in a training dataset to determine routing option labels, and the Custom Classifier feature of Amazon Comprehend to incrementally create your own classifier for customer request routing, without the need to build complex NLP algorithms. The components of the solution we will build are shown in the following diagram:
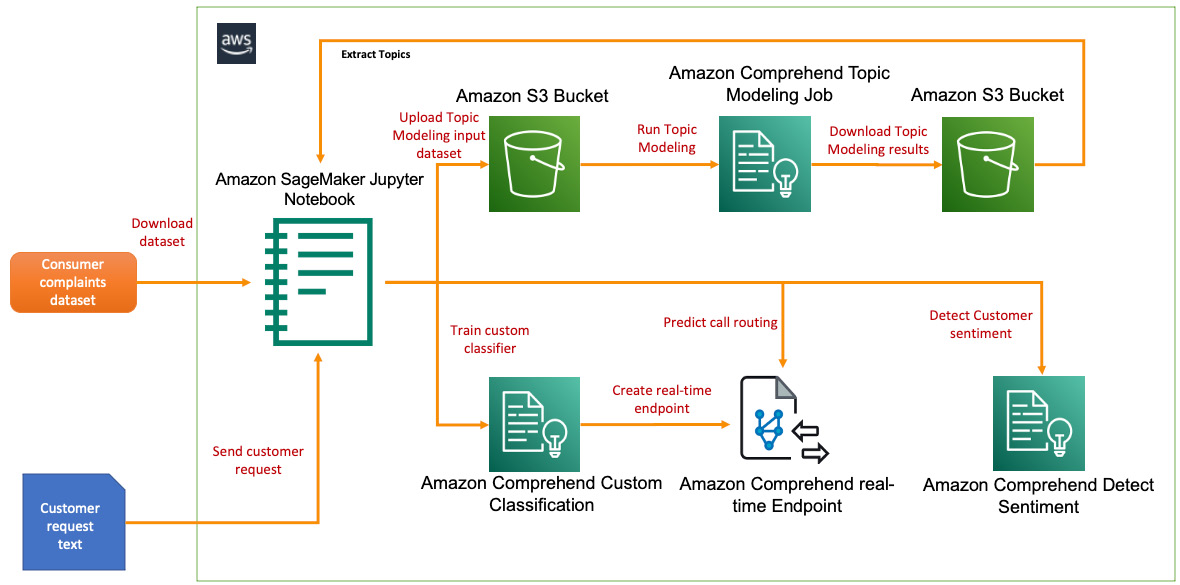
Figure 6.1 – NLP solution build for customer service
We will be walking through this solution using an Amazon SageMaker Jupyter notebook, which will allow us to review the code and results as we execute it step by step. For code samples on how to build this solution as a real-time workflow using AWS Lambda (a serverless, event-driven compute service for running code), please refer to the Further reading section:
- As a first step, we will preprocess our input dataset, which contains consumer complaints available in this book's GitHub repository, load this into an S3 bucket, and run an Amazon Comprehend Topic Modeling job to determine routing option labels.
- We will then create the training dataset with the routing option labels that have been assigned to the consumer complaints from our input dataset, and then upload this into an S3 bucket.
- We will use Amazon Comprehend Custom Classification to train a classifier model using the training dataset we created previously.
- Finally, we will create an Amazon Comprehend real-time endpoint to deploy the trained model and show you how to predict the routing option. We will then show you how to use the Amazon Comprehend Detect Sentiment API to determine the sentiment of the customer conversation in real time.
In this section, we introduced the customer service problem we are trying to solve with our NLP solution, reviewed the challenges faced by LiveRight, and looked at an overview of the solution we will build. In the next section, we will walk through the build of the solution step by step.
Building an NLP solution to improve customer service
In the previous section, we introduced the contact center use case for customer service, covered the architecture of the solution we will be building, and briefly walked through the solution components and workflow steps. In this section, we will start executing the tasks to build our solution. But first, there are some prerequisites that we must take care of.
Setting up to solve the use case
If you have not done so already in the previous chapters, you will have to create an Amazon SageMaker Jupyter notebook, and then set up Identity and Access Management (IAM) permissions for that notebook role to access the AWS services we will use in this notebook. After that, you will need to clone this book's GitHub repository (https://github.com/PacktPublishing/Natural-Language-Processing-with-AWS-AI-Services), create an Amazon S3 (https://aws.amazon.com/s3/) bucket, go to the Chapter 06 folder, open the chapter6-nlp-in-customer-service-github.ipynb notebook, and provide the bucket name in the notebook to start execution.
Note
Please ensure you have completed the tasks mentioned in the Technical requirements section.
If you have already completed the following steps in one of the previous chapters, please go to the Preprocessing the customer service history data section:
- Please refer to the Amazon SageMaker documentation to create a notebook instance: https://docs.aws.amazon.com/sagemaker/latest/dg/gs-setup-working-env.html. To follow these steps, please sign into AWS Management Console and type in and select Amazon SageMaker from the search window. Then, navigate to the Amazon SageMaker console.
- Select Notebook instances and create a Notebook instance by specifying an instance type, storage, and an IAM role.
IAM role permissions while creating Amazon SageMaker Jupyter notebooks
Accept the default for the IAM role at notebook creation time to allow access to any S3 bucket. Select ComprehendFullAccess as a permission policy by clicking on the IAM role and navigating to the Identity and Access Management console for the role being created. You can always go back to the IAM role for your notebook instances and attach other permissions policies as required.
- Once you've created the notebook instance and its status is InService, click on Open Jupyter in the Actions menu heading for the notebook instance:
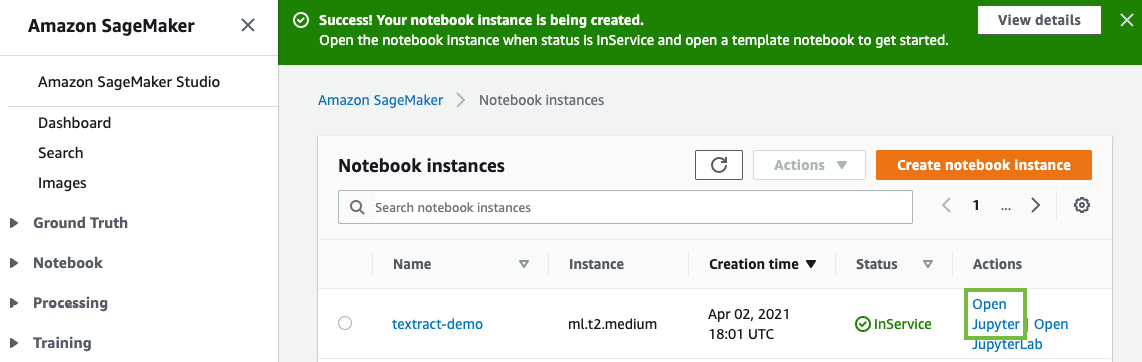
Figure 6.2 – Opening the Jupyter notebook
This will take you to the home folder of your notebook instance.
- Click on New and select Terminal, as shown in the following screenshot:
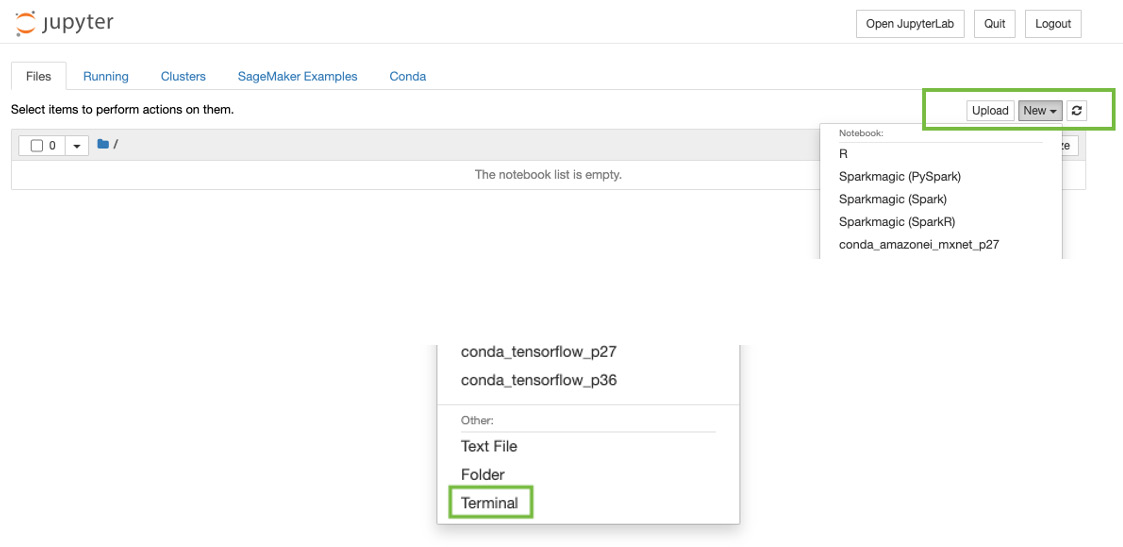
Figure 6.3 – Opening a Terminal in a Jupyter notebook
- In the Terminal window, type cd SageMaker and then git clone https://github.com/PacktPublishing/Natural-Language-Processing-with-AWS-AI-Services, as shown in the following screenshot:

Figure 6.4 – git clone command
- Now, exit the Terminal window and go back to the home folder. You will see a folder called Natural-Language-Processing-with-AWS-AI-Services. Click it; you will see a folder called Chapter 06. Click this folder; you should see a notebook called chapter6-nlp-in-customer-service-github.
- Open this notebook by clicking it.
- Follow the steps in this notebook that correspond to the next few subheadings in this section by executing one cell at a time. Please read the descriptions provided above each notebook cell.
Now that we have set up our notebook and cloned the repository, let's add the permissions policies we need to successfully run our code sample.
Additional IAM prerequisites
To train the Comprehend custom entity recognizer and set up real-time endpoints, we have to enable additional policies and also update the Trust Relationships for our SageMaker notebook role. Please complete the following steps to do this:
- Please attach the ComprehendFullAccess policies to your Amazon SageMaker Notebook IAM role. To execute this step, please refer to the Changing IAM permissions and Trust relationships for the Amazon SageMaker notebook execution role subsection in the Setting up your AWS environment section of Chapter 2, Introducing Amazon Textract.
- Your SageMaker Execution Role should have access to S3 already. If not, add the following JSON statement as an inline policy. For instructions, please refer to the Changing IAM permissions and Trust relationships for the Amazon SageMaker notebook execution role subsection in the Setting up your AWS environment section of Chapter 2, Introducing Amazon Textract:
{ "Version": "2012-10-17", "Statement": [ {
"Action": [
"s3:GetObject",
"s3:ListBucket",
"s3:PutObject"
],
"Resource": ["*"],
"Effect": "Allow"
}
]
}
- Finally, update the Trust relationships for your SageMaker Notebook execution role. For instructions, please refer to the Changing IAM permissions and Trust relationships for the Amazon SageMaker notebook execution role subsection in the Setting up your AWS environment section of Chapter 2, Introducing Amazon Textract:
{ "Version": "2012-10-17", "Statement": [
{ "Effect": "Allow",
"Principal":
{ "Service":
[ "sagemaker.amazonaws.com",
"s3.amazonaws.com",
"comprehend.amazonaws.com" ]
},
"Action": "sts:AssumeRole" }
]
}
Now that we have set up our Notebook and set up an IAM role to run the walkthrough notebook, in the next section, we will start processing the data for topic modeling.
Preprocessing the customer service history data
Let's begin by downloading and reviewing the customer service records we will use for this chapter. We will use the Consumer Complaints data for the State of Ohio from the Consumer Financial Protection Bureau for our solution: https://www.consumerfinance.gov/data-research/consumer-complaints/search/?dataNormalization=None&dateRange=1y&date_received_max=2021-05-17&date_received_min=2020-05-17&searchField=all&state=OH&tab=Map. You can try other datasets from this site, or your own unique customer service data. For your convenience, the complaints data is included as a CSV file in the GitHub repository: https://github.com/PacktPublishing/Natural-Language-Processing-with-AWS-AI-Services/blob/main/Chapter%2006/topic-modeling/initial/complaints_data_initial.csv. This should be available to you when you clone the repository. You can click on the CSV file by going to the folder it is present in inside the notebook to review its contents. Alternatively, you can view it using the code provided in the chapter6-nlp-in-customer-service-github.ipynb notebook.
Open the notebook and perform the following steps:
- Execute the cells under Prerequisites to ensure we have the libraries we need for the notebook. Note that in this cell, you are getting the Amazon SageMaker Execution Role for the notebook. Please ensure that you create an Amazon S3 bucket (https://docs.aws.amazon.com/AmazonS3/latest/userguide/create-bucket-overview.html) and provide the bucket name in the line. Type in a prefix of your choice or accept what is already provided in the notebook:
bucket = '<bucket-name>'
prefix = 'chapter6'
- Execute the cells under Preprocess the Text data.
First, we will load the CSV file containing the consumer complaints data (this is already provided to you in this book's GitHub repository at (https://github.com/PacktPublishing/Natural-Language-Processing-with-AWS-AI-Services/blob/main/Chapter%2006/topic-modeling/initial/complaints_data_initial.csv) into a pandas DataFrame object for easy manipulation:
raw_df = pd.read_csv('topic-modeling/initial/complaints_data_initial.csv')
raw_df.shape
When we execute the preceding cell, we will see that the notebook returns a shape of (11485, 18), which means there are 11,485 rows and 18 columns. We are only interested in the Consumer complaint narrative field, so we will drop the rest of the fields from the dataset. After we execute this cell, the shape should change to (5152, 1):
raw_df = raw_df.dropna(subset=['Consumer complaint narrative'])
raw_df = pd.DataFrame(raw_df['Consumer complaint narrative'].copy())
raw_df.shape
Now, let's convert this back into an updated CSV file:
raw_df.to_csv('topic-modeling/raw/complaints_data_subset.csv', header=False, index=False)
Execute the cells in the notebook to clean up the textual content in our CSV file, including restructuring the text into individual sentences so that each consumer complaint is a separate line. For the source of this code block and a very good discussion on how to use the Python regex function with sentences, please refer to https://stackoverflow.com/questions/4576077/how-can-i-split-a-text-into-sentences. Continue executing the cells to remove unnecessary spaces or punctuation, create a new CSV file with these changes, and upload it to an S3 bucket. We will also create a new pandas DataFrame object with the formatted content so that we can use it in the subsequent steps. Please execute all the remaining cells in the notebook from Preprocess the Text data:
# Write the formatted sentences into a CSV file
import csv
fnfull = "topic-modeling/input/complaints_data_formatted.csv"
with open(fnfull, "w", encoding='utf-8') as ff:
csv_writer = csv.writer(ff, delimiter=',', quotechar = '"')
for infile in all_files:
for num, sentence in enumerate(infile):
csv_writer.writerow([sentence])
# Let's store the formatted CSV into a Pandas DataFrame
# as we will use this to create the training dataset for our custom classifier
columns = ['Text']
form_df = pd.read_csv('topic-modeling/input/complaints_data_formatted.csv', header=None, names = columns)
form_df.shape
# Upload the CSV file to the input prefix in S3 to be used in the topic modeling job
s3 = boto3.client('s3')
s3.upload_file('topic-modeling/input/complaints_data_formatted.csv', bucket, prefix+'/topic_modeling/input/topic_input.csv')
- Next, we will run an Amazon Comprehend Topic Modeling job on this formatted CSV file to extract a set of topics that can be applied to our list of consumer complaints. These topics represent and help us identify the subject area or the theme for the related text, as well as represent the common set of words with the same contextual reference throughout the document. For more details, please refer to Amazon Comprehend Topic Modeling at https://docs.aws.amazon.com/comprehend/latest/dg/topic-modeling.html.
To get started, go to the AWS Console (please refer to the Technical requirements section if you don't have access to the AWS Console) and type Amazon Comprehend in the services search window at the top of the console. Then, navigate to the Amazon Comprehend Console.
Click the Launch Amazon Comprehend button.
Click on Analysis jobs in the left pane and click on Create job on the right, as shown in the following screenshot:

Figure 6.5 – Creating an analysis job
Type in a name for your analysis job and select Topic modeling as the analysis type from the built-in jobs list. Provide the location of the CSV file in your S3 bucket in the Input data section, with Data source set to My documents and Number of topics set to 8, as shown in the following screenshot:
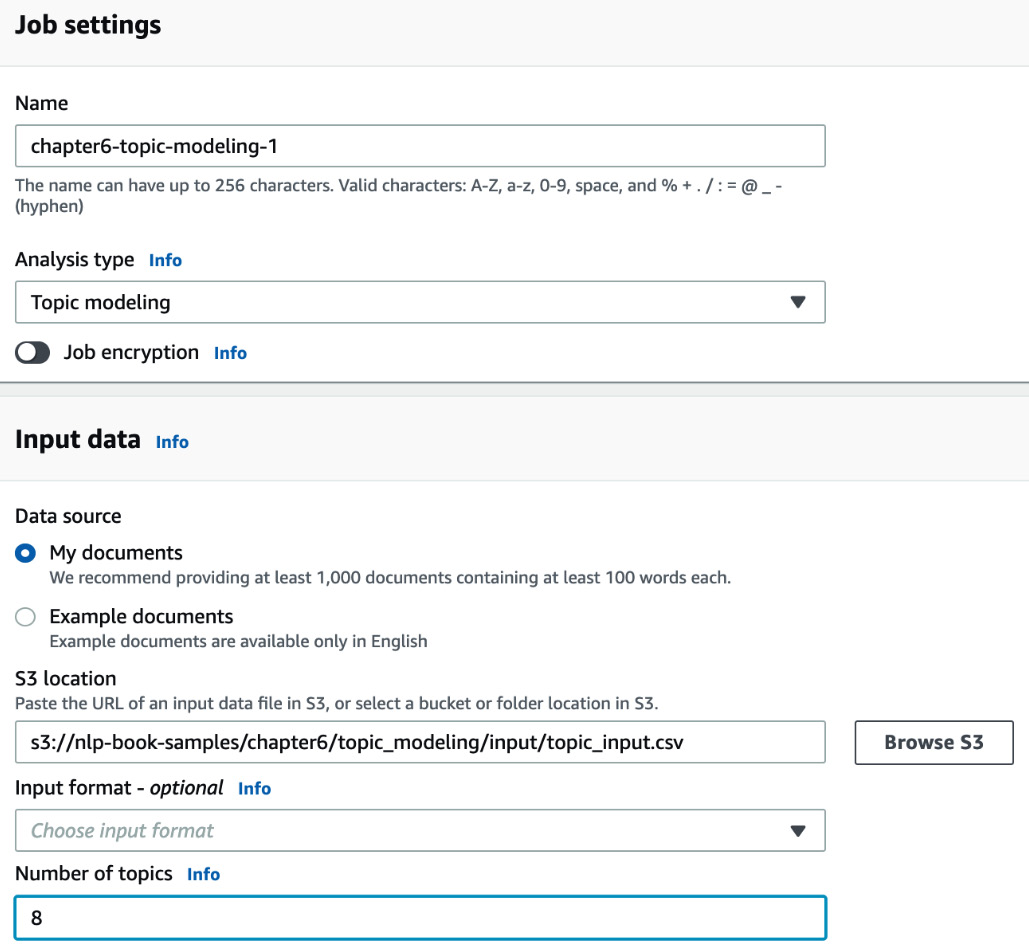
Figure 6.6 – Creating topic modeling job inputs – part1
Provide the details for the rest of the fields and click on Create job, as shown in the following screenshot:
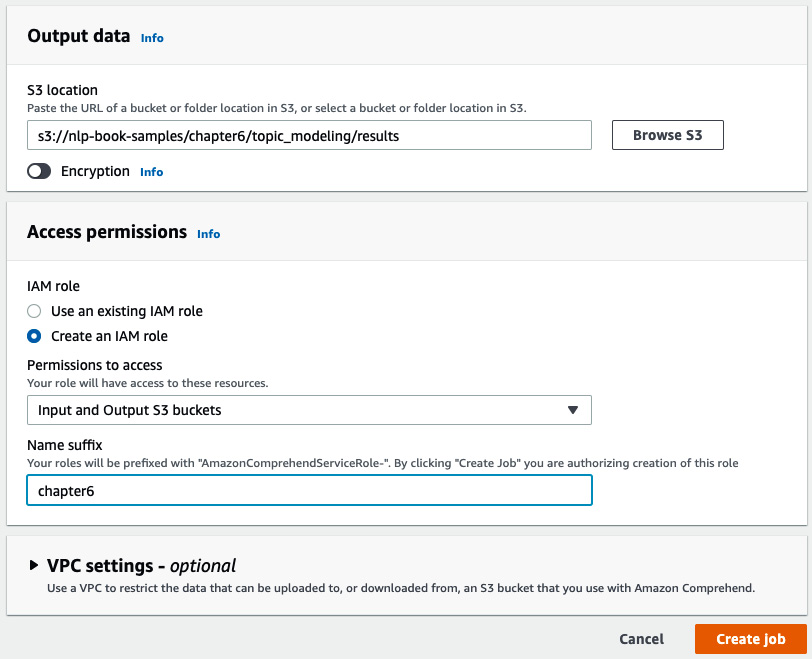
Figure 6.7 – Creating topic modeling job inputs – part 2
You should see a job submitted status after the IAM role propagation is completed, as shown in the following screenshot. The job should take about 30 minutes to complete, which gives you time to have a quick snack or a coffee/tea. Now, click on the job's name, copy the S3 link provided in the Output data location field, and go back to your notebook. We will continue the steps in the notebook:
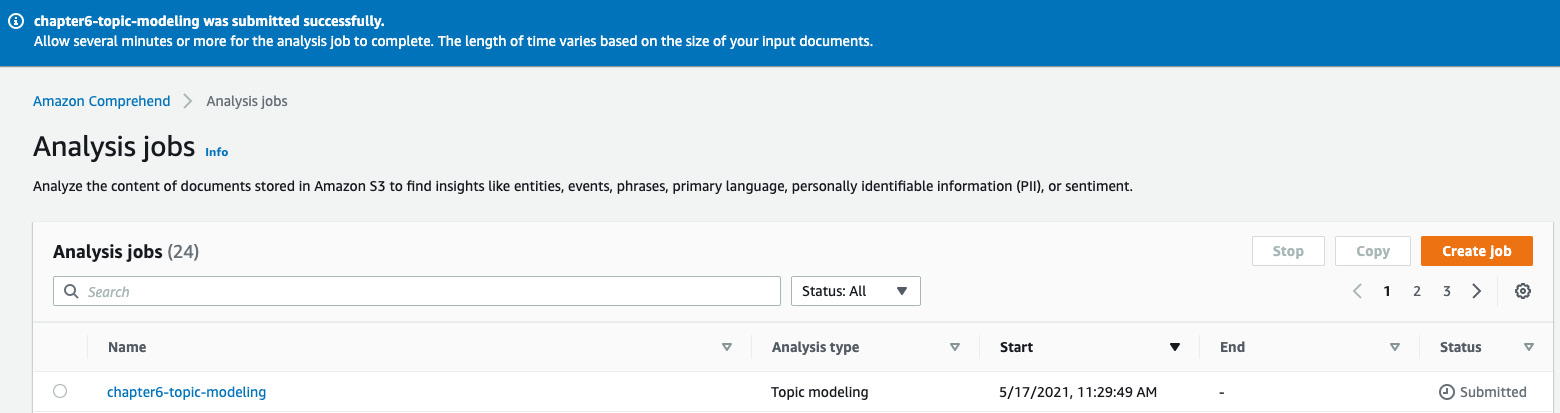
Figure 6.8 – Topic modeling job submitted
- We will now execute the cells in the Process Topic Modeling Results section.
To download the results of the Topic Modeling job, we need the Output data location S3 URI that you copied in the previous step. In the first cell in this section of the notebook, replace the contents of the tpprefix variable – specifically <name-of-your-output-data-s3-prefix> – with the results prefix from the S3 URI, as shown in the following code block. This is the string after the results prefix and before the output prefix in your S3 URI:
# Output data location S3 URI
https://s3.console.aws.amazon.com/s3/object/<bucket>/chapter6/topic_modeling/results/123456789-TOPICS-long-hash-code/output/output.tar.gz?region=us-east-1
tpprefix = prefix+'/topic_modeling/results/<name-of-your-comprehend-topic-modeling-job>/output/output.tar.gz'
The revised code should look as follows. When executed, it will download the output.tar.gz file locally and extract it:
# Let's first download the results of the topic modeling job.
# Please copy the output data location from your topic modeling job for this step and use it below
directory = "results"
parent_dir = os.getcwd()+'/topic-modeling'
# Path
path = os.path.join(parent_dir, directory)
os.makedirs(path, exist_ok = True)
print("Directory '%s' created successfully" %directory)
tpprefix = prefix+'/topic_modeling/results/123456789-TOPICS-long-hash-code/output/output.tar.gz'
s3.download_file(bucket, tpprefix, 'topic-modeling/results/output.tar.gz')
!tar -xzvf topic-modeling/results/output.tar.gz
Now, load each of the resulting CSV files into their own pandas DataFrames:
tt_df = pd.read_csv('topic-terms.csv')
dt_df = pd.read_csv('doc-topics.csv')
The topic terms DataFrame contains the topic number, what term corresponds to the topic, and how much weight this term contributes to the topic. Execute the code shown in the following code block to review the contents of the topic terms DataFrame:
for i,x in tt_df.iterrows():
print(str(x['topic'])+":"+x['term']+":"+str (x['weight']))
We may have multiple topics in the same line, but for this solution, we are not interested in these duplicates, so we will drop them:
dt_df = dt_df.drop_duplicates(subset=['docname'])
Now, let's filter the topics so that we select the topic with the maximum weight distribution for text it refers to:
ttdf_max = tt_df.groupby(['topic'], sort=False)['weight'].max()
Load these into their own DataFrame and display them:
newtt_df = pd.DataFrame()
for x in ttdf_max:
newtt_df = newtt_df.append(tt_df.query('weight == @x'))
newtt_df = newtt_df.reset_index(drop=True)
newtt_df
Having reviewed the consumer complaints input text data, the masked characters that are displayed mainly correspond to debt-related complaints from customers, so we will replace the masked terms with debt and replace the word Husband with family. These terms will become the training labels for our Amazon Comprehend Custom Classification model, which we will then use to automate request routing in the next section. Please execute the following code in the notebook:
form_df.assign(Label='')
for i, r in dt_df.iterrows():
line = int(r['docname'].split(':')[1])
top = r['topic']
tdf = newtt_df.query('topic == @top')
term = tdf['term'].values[0]
if term == 'xxxx':
term = 'debt'
if term == 'husband':
term = 'family'
form_df.at[line, 'Label'] = term
Create the custom-classification and train folders, which we need in the notebook to execute the next step, as shown in the following code block:
directory = "custom-classification"
parent_dir = os.getcwd()
path = os.path.join(parent_dir, directory)
os.makedirs(path, exist_ok = True)
print("Directory '%s' created successfully" %directory)
directory = "train"
parent_dir = os.getcwd()+'/custom-classification'
path = os.path.join(parent_dir, directory)
os.makedirs(path, exist_ok = True)
print("Directory '%s' created successfully" %directory)
Now, let's rearrange the columns so that we have the label as the first column. We will convert this into a CSV file and upload it into our S3 bucket. This CSV file will be the training dataset for our Amazon Comprehend Custom Classification model:
form_df = form_df[['Label','Text']]
form_df.to_csv('custom-classification/train/train.csv', header=None, index=False)
s3.upload_file('custom-classification/train/train.csv', bucket, prefix+'/custom_classification/train/train.csv')
- Now, we will go back to the Amazon Comprehend AWS Console to train our Custom Classification model, which can predict a label for a given text. These labels are the topics we modeled in the previous section. With Amazon Comprehend Custom, you can train models that are unique to your business incrementally on top of the pre-trained, highly powerful Comprehend models. So, these custom models leverage what the default Comprehend model already knows, thereby training quickly, They are also more accurate than if you were to build a custom classification model from the ground up. You can run this training process without any ML skills with just a few clicks in the Amazon Comprehend console. For more details, please refer to https://docs.aws.amazon.com/comprehend/latest/dg/how-document-classification.html.
To get started, go to the AWS Console (please refer to the Technical requirements section at the beginning of this chapter if you don't have access to the AWS Console) and type Amazon Comprehend in the services search window at the top of the console. Then, navigate to the Amazon Comprehend Console.
Click the Launch Amazon Comprehend button.
Click on Custom classification under the Customization title in the left pane.
Click on Train classifier, as shown in the following screenshot:
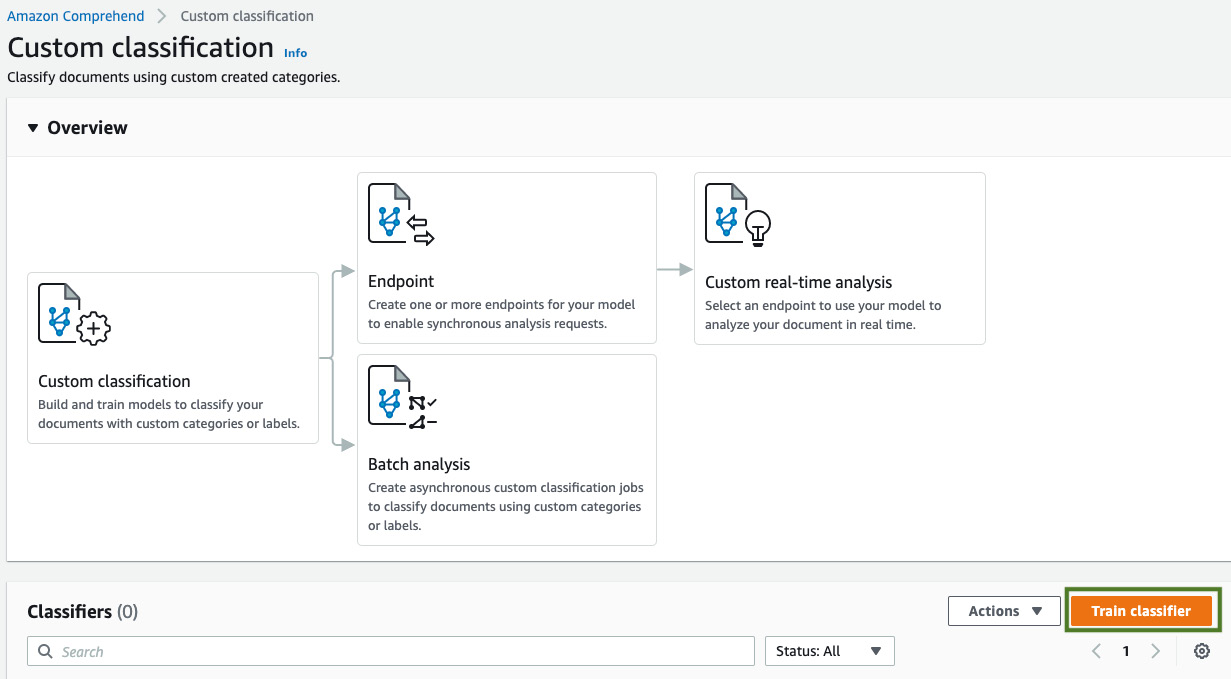
Figure 6.9 – Train classifier button
Enter a name for your classifier, leave the language as English, and set Classifier mode to Multi-class. (For our solution, we predict one label per document. If you need to predict multiple labels per document, you can use the Multi-label mode.) Select CSV file under Training data format, as shown in the following screenshot:
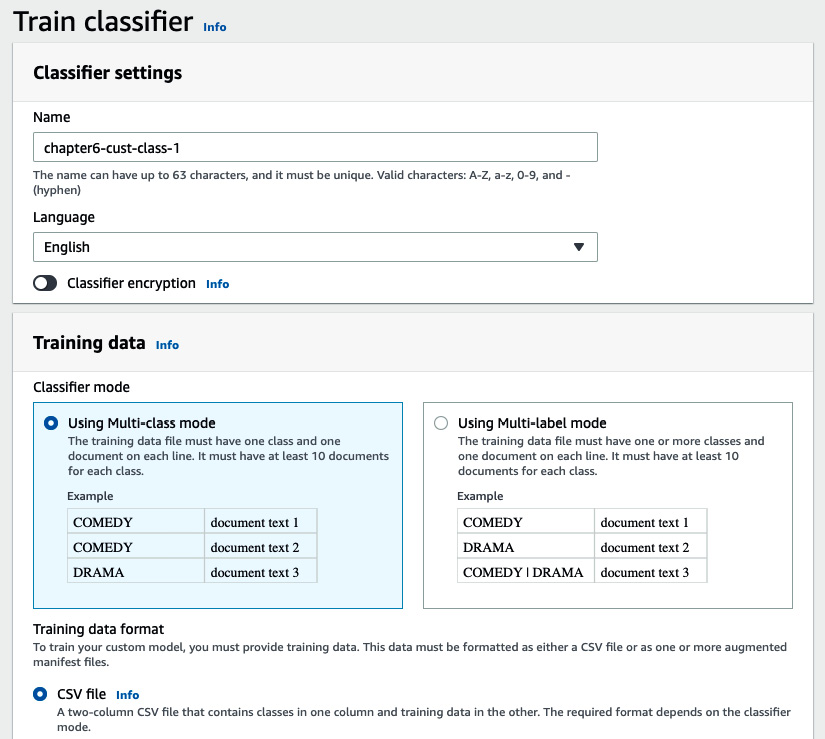
Figure 6.10 – Custom classifier inputs – part 1
Provide our training dataset's S3 location; that is, the one we created in the previous section. For IAM role, if you created an AmazonComprehendServiceRole in the previous chapters, use that, or select Create an IAM role and choose Any S3 Bucket from the list. Click the Train classifier button, as shown in the following screenshot:
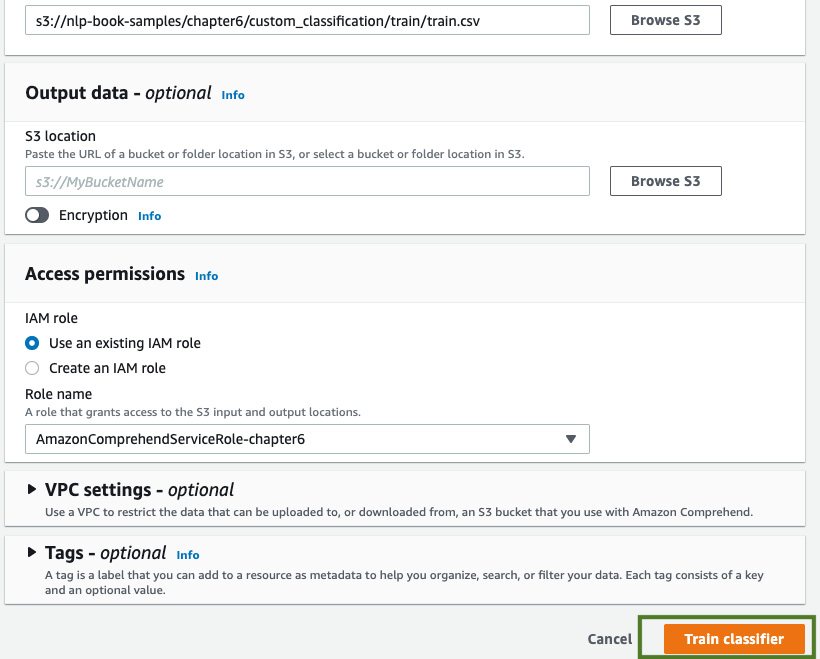
Figure 6.11 – Custom classifier inputs – part 2
The training job will be submitted. Shortly after, the training job's status will change to Training, as shown in the following screenshot:
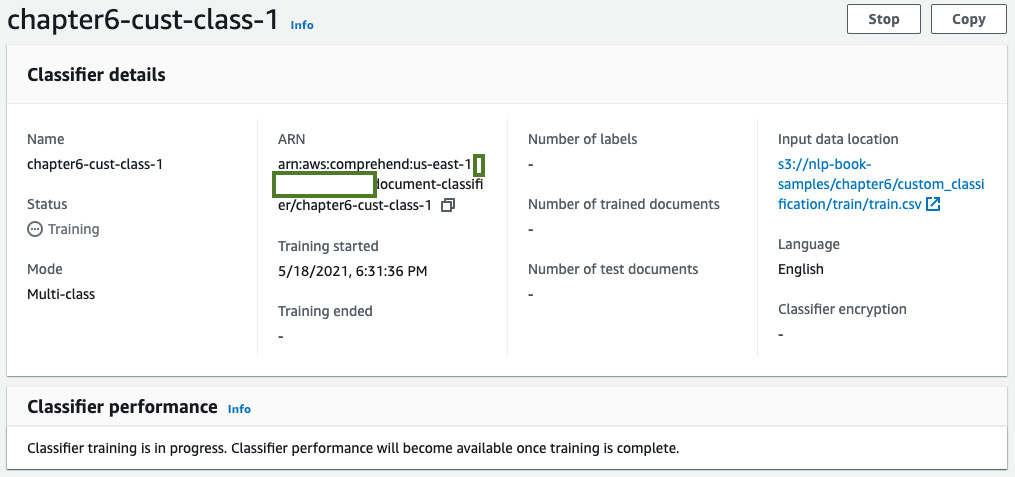
Figure 6.12 – Custom classifier training
Training will take approximately 1 hour to complete. The status will change to Trained when the job completes, as shown in the following screenshot:
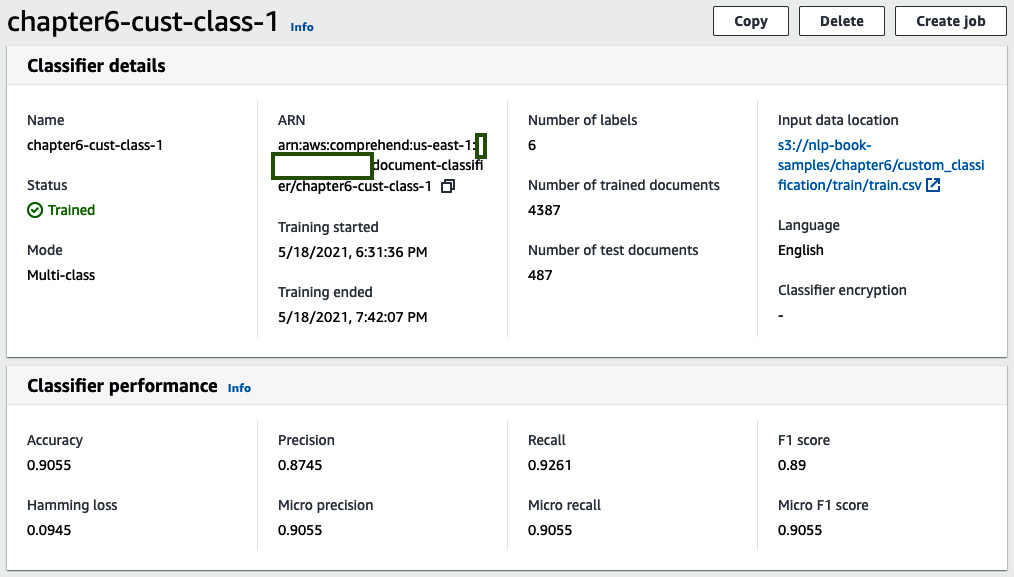
Figure 6.13 – Custom classifier training complete
- Now that we have finished training our classifier, we will create a real-time endpoint to deploy the model. We will use this endpoint in our solution to run predictions for routing requests.
Click on the name of your classifier in the Amazon Comprehend console. Then, scroll down to the Endpoints section and click Create endpoint, as shown in the following screenshot:
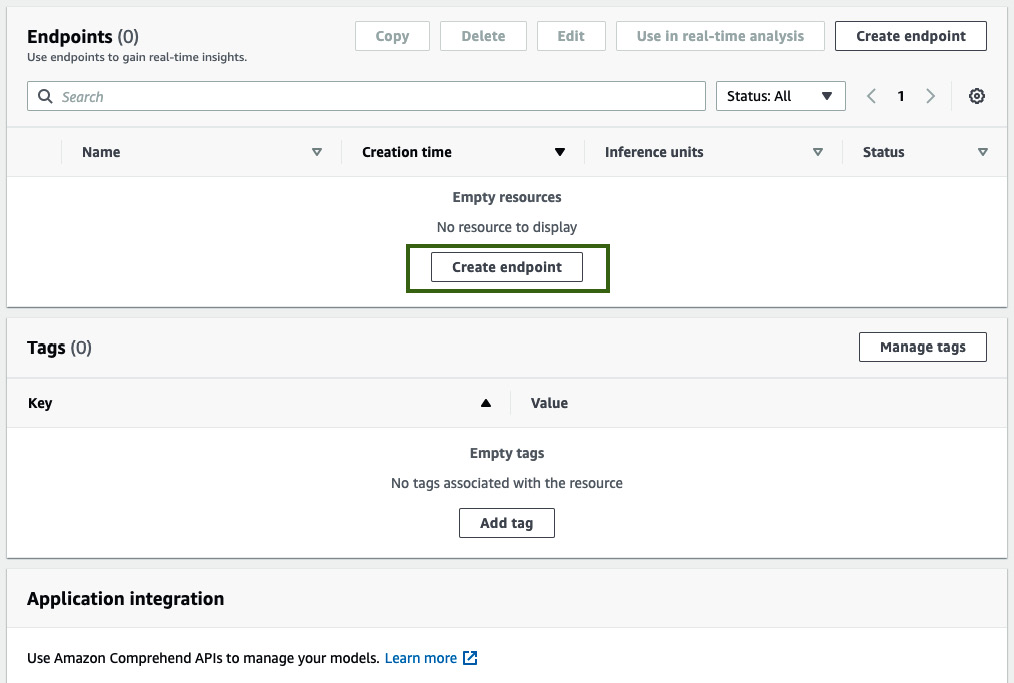
Figure 6.14 – Creating a Comprehend endpoint
Type in a name for your endpoint, provide an inference unit value of 1, and click on Create endpoint, as shown in the following screenshot. Inference units determine the price and capacity of the provisioned endpoint. An inference unit provides a prediction throughput of 100 characters every second. For more details, please refer to Amazon Comprehend's pricing guide at https://aws.amazon.com/comprehend/pricing/:
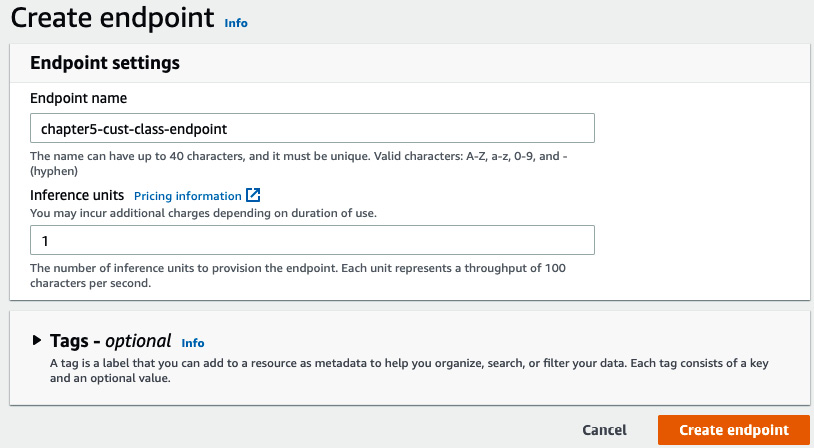
Figure 6.15 – Creating Comprehend endpoint inputs
Once the endpoint has been created, please make a note of the endpoint's ARN by clicking on the name of the endpoint, as shown in the following screenshot. This will be required for running inference in the notebook:
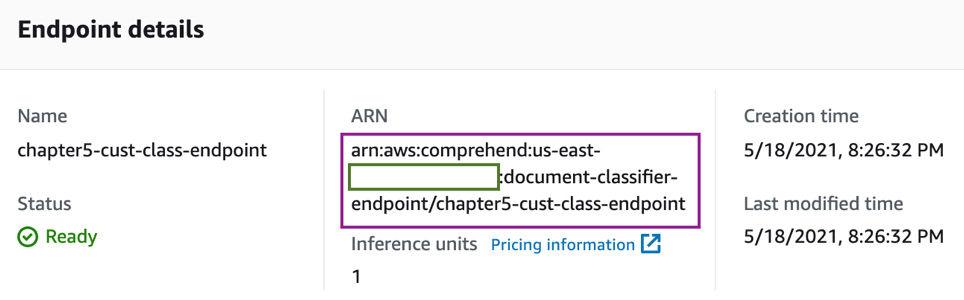
Figure 6.16 – Comprehend endpoint ARN
- As a next step, we will navigate back to our notebook and execute the steps in the Automate Request Routing section.
Provide the endpoint ARN you took note of in the previous step in the notebook cell:
endpoint_arn = '<comprehend-custom-classifier-endpoint-arn>'
Now, let's execute the next cell, which shows us how to run the real-time analysis with our endpoint. For input, we will use a sample text message that's been assigned to the test_text variable, as shown in the following code:
test_text = 'because of your inability to accept my payments on time I now have a really bad credit score, you need to fix this now'
comprehend = boto3.client('comprehend')
response = comprehend.classify_document(Text=test_text, EndpointArn=endpoint_arn)
print(response)
Our custom classifier returns a response, as shown in the following code block:
{'Classes': [{'Name': 'account', 'Score': 0.9856781363487244}, {'Name': 'credit', 'Score': 0.013113172724843025}, {'Name': 'debt', 'Score': 0.0005924980505369604}], 'ResponseMetadata': {'RequestId': 'c26c226c-3878-447e-95f5-60b4d91bb536', 'HTTPStatusCode': 200, 'HTTPHeaders': {'x-amzn-requestid': 'c26c226c-3878-447e-95f5-60b4d91bb536', 'content-type': 'application/x-amz-json-1.1', 'content-length': '151', 'date': 'Wed, 19 May 2021 17:35:38 GMT'}, 'RetryAttempts': 0}}
Run the code given in the following code block to select the Name property with the highest confidence score from the response. This will be the department or the option that the customer request will be routed to in the contact center:
cls_df = pd.DataFrame(response['Classes'])
max_score = cls_df['Score'].max()
routing_type = cls_df.query('Score == @max_score')['Name'].values[0]
print("This request should be routed to: " + routing_type)
This code will return the following response:
This request should be routed to: account
- As a next step, we will execute the steps in the Automate Feedback Analysis section.
To analyze the sentiment of the customer conversation, we will use the Amazon Comprehend Detect Sentiment API. This is a built-in feature in Amazon Comprehend and does not require us to train any models. We can directly call the API with input. It will return the sentiment of the text, as follows:
sent_response = comprehend.detect_sentiment(
Text=test_text,
LanguageCode='en'
)
print("The customer's feedback sentiment is: " + sent_response['Sentiment'])
The customer's feedback sentiment is: NEGATIVE
That concludes the solution build for this chapter. Please refer to the Further reading section for examples that are similar to this use case. In the case of LiveRight, you can integrate this build into the existing contact center workflow and scale the solution using Amazon Transcribe, AWS StepFunctions, and AWS Lambda. An example of how to do this is shown in the following diagram:
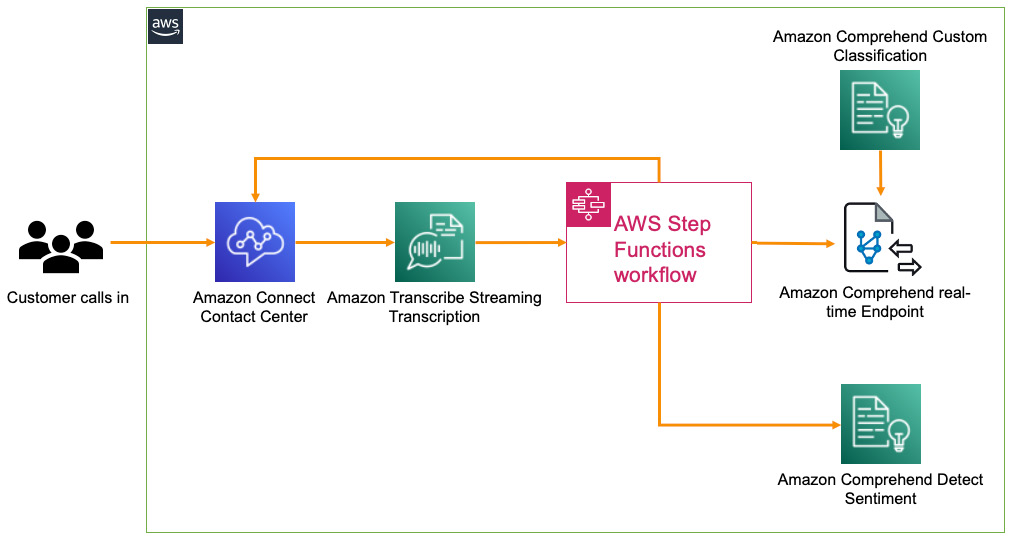
Figure 6.17 – NLP in customer service with a real-time transcription
Amazon Transcribe provides real-time streaming transcription capabilities to convert a customer call from speech into text. Please refer to https://aws.amazon.com/transcribe/ for more details. An AWS Step Functions (https://aws.amazon.com/step-functions/) workflow that enables orchestration of a complete process flow with AWS Lambda (a fully managed serverless compute service that can run code without the need to provision servers (https://aws.amazon.com/lambda/)) and multiple AWS services can be set up to be triggered on receipt of a transcription of a specified length. The Step Functions workflow will call an AWS Lambda function to detect the routing option for the customer request, and the call can be automatically routed to that option, or/and the customer request/feedback sentiment can be analyzed by calling the Detect Sentiment API, as we saw in the Automate feedback analysis section. The outcome is that while the call is in progress, the contact center agent will have an automated response with a predicted routing option and sentiment, which, in turn, helps resolve the customer's request quickly and efficiently.
Summary
In this chapter, we learned how to build an NLP solution to accelerate customer service efficiencies using Amazon Comprehend's Topic Modeling feature, Detect Sentiment feature, and by training our own custom classifier to predict routing options using Comprehend Custom Classification before hosting it using Comprehend real-time endpoints. We also saw how we can leverage the flexibility of powerful and accurate NLP models without the need for any ML skills. For your enterprise needs, Amazon Comprehend scales seamlessly to process millions of documents, provides usage-based pricing, supports batch inference, and with autoscaling support for real-time endpoints, you can manage your inference request volumes and control your inference costs effectively.
For our solution, we started by introducing the customer service use case, the inherent challenges with the way things are set up currently, and the need to perform automated routing and sentiment detection to control the high customer churn caused by current inefficient processes. We then designed an architecture to use Amazon Comprehend to identify common themes or topics, create a training dataset, train a custom classifier to predict routing options, and to run sentiment analysis on the customer request. We assumed that you were the solution architect that had been assigned to this project, and we provided an overview of the solution components, along with a diagram of the architecture in Figure 6.1.
We then went through the prerequisites for the solution build, set up an Amazon SageMaker notebook instance, cloned our GitHub repository, and started executing the code in the notebook based on the instructions provided in this chapter.
In the next chapter, we will look at a slightly related use case on using NLP to run the voice of the customer analytics process. We will introduce the use case, discuss how to design the architecture, establish the prerequisites, and walk through the various steps required to build the solution.
Further reading
- Announcing the launch of Amazon Comprehend custom entity recognition real-time endpoints, by Mona Mona and Prem Ranga (https://aws.amazon.com/blogs/machine-learning/announcing-the-launch-of-amazon-comprehend-custom-entity-recognition-real-time-endpoints/).
- Active learning workflow for Amazon Comprehend custom classification models –Part 2, by Shanthan Kesharaju, Joyson Neville Lewis, and Mona Mona (https://aws.amazon.com/blogs/machine-learning/active-learning-workflow-for-amazon-comprehend-custom-classification-part-2/).