
Chapter 7: Understanding the Voice of Your Customer Analytics
In the previous chapters, to see improving customer service in action, we built an AI solution that uses the AWS NLP service Amazon Comprehend to first analyze historical customer service records to derive key topics using Amazon Comprehend Topic Modeling and train a custom classification model that will predict routing topics for call routing using Amazon Comprehend Custom Classification. Finally, we used Amazon Comprehend detect sentiment to understand the emotional aspect of the customer feedback.
In this chapter, we are going to focus more on the emotional aspect of the customer feedback, which could be an Instagrammer, Yelp reviewer, or your aunt posting comments about your business on Facebook, and so on and so forth.
Twenty years back, it was extremely tough to find out as soon as possible what people felt about your products and get meaningful feedback to improve them. With globalization and the invention of social media, nowadays, everyone has social media apps and people express their emotions more freely than ever before. We all love tweeting about Twitter posts and expressing our opinions in happy, sad, angry, and neutral modes. If you are a very popular person such as a movie star or a business getting millions of such comments, the challenges become going through large volumes of tweets posted by your fans and then quickly finding out whether your movie did well or it was a flop. In the case of a business, a company, or a start-up, people quickly know by reading comments whether your customer service and product support are good or not.
Social media analytics is a really popular and challenging use case. In this chapter, we will focus on text analytics use cases. We will talk about some of the very common use cases where the power of NLP will be combined with analytics to analyze unstructured data from chats, social media comments, emails, or PDFs. We will show you how you can quickly set up powerful analytics for social media reviews.
We will navigate through the following sections:
- Challenges of setting up a text analytics solution
- Setting up a Yelp review text analytics workflow
Technical requirements
For this chapter, you will need access to an AWS account. Before getting started, we recommend that you create an AWS account, and if you have not created one, please refer to the previous chapter for sign-up details. You can skip signup if you already have an existing AWS account and are following instructions from past chapters for creating the AWS account. The Python code and sample datasets for Amazon Textract examples are at the repository link here: https://github.com/PacktPublishing/Natural-Language-Processing-with-AWS-AI-Services/tree/main/Chapter%2007.
We will walk you through the setup steps on how you can set up the preceding code repository on a Jupyter notebook with the correct IAM permissions in the Setting up to solve the use case section.
Check out the following video to see the Code in Action at https://bit.ly/3mfioWX.
Challenges of setting up a text analytics solution
One of the challenges most organizations face is getting business insights from unstructured data.
This data can be in various formats, such as chats, PDF documents, emails, tweets, and so on. Since this data does not have a structure, it's really challenging for the traditional data analytics tool to perform analytics on it. This is where Amazon Textract and Amazon Comprehend can help.
Amazon Textract can make this unstructured data structured by extracting text and then Amazon Comprehend can extract insights. Once we have the data in text, you can perform serverless Extract, Transform, Load (ETL) by using Amazon Glue and convert it into a structured format. Moreover, you can use Amazon Athena to perform serverless ad hoc SQL analytics on the unstructured text you just extracted and transformed using Glue ETL. Amazon Glue can also crawl your unstructured data or text extracted from Amazon Textract in Amazon S3 and store it in a Hive metadata store.
Lastly, you can also analyze and visualize this data using Amazon QuickSight to gain business insight.
Amazon QuickSight helps you create quick visualizations and dashboards to be shared with your business or integrated into an application for your end users. For example, you are using Instagram for business and want to analyze the comments posted on your product pictures and create a real-time dashboard to know whether people are posting positive or negative comments about them. You can use the components mentioned to create a real-time social media analytics dashboard.
We all love eating out in a restaurant. The challenge is picking the best restaurant based just on reviews.
We are going to show you how you can analyze Yelp reviews by using the succeeding architecture:

Figure 7.1 – Social media analytics serverless architecture
The architecture in Figure 7.1 walks you through how you take raw data and transform it to provide new insights, optimize datasets in your data lake, and visualize the serverless results. We will start by doing the following:
- Getting the Yelp review dataset and uploading it to an Amazon S3 bucket using the Jupyter notebook.
- Registering the raw data in the AWS Glue Data Catalog by crawling it.
- Performing AWS Glue ETL on this raw data cataloged in the AWS Glue Data Catalog. Once registered in the AWS Glue Data Catalog, after crawling the Yelp reviews data in AWS S3, this ETL will transform the raw data into Parquet format and enrich it with Amazon Comprehend insights.
- Now we can crawl and catalog this data again in the AWS Glue Data Catalog. Cataloging adds the tables and metadata for Amazon Athena for ad hoc SQL analytics.
- Lastly, you can quickly create visualizations on this transformed Parquet data crawled in Amazon Athena using Amazon QuickSight. Amazon QuickSight integrates directly with Amazon Athena as well as Amazon S3 as a data source for visualization.
You can also convert this solution into a real-time streaming solution by using Amazon Kinesis Data Firehose, which will call these Yelp reviews and Twitter APIs, and directly store near real-time streaming data in Amazon S3, and from there you can use AWS Glue ETL and cataloging with Amazon Comprehend to transform and enrich with NLP. Then this transformed data can be directly visualized in QuickSight and Athena. Moreover, you can use AWS Lambda functions and step functions to set up a completely serverless architecture and automate these steps.
In this section, we covered the challenges of setting up a text analytics workflow with unstructured data and proposed architecture. In the next section, we will walk you through how you can build this out for a Yelp reviews dataset or any social media analytics dataset using a few lines of code through a Jupyter notebook.
Setting up a Yelp review text analytics workflow
In this section, we will walk you through how you can build this out for a Yelp reviews dataset or any social media analytics dataset by following the steps using a Jupyter notebook and Python APIs:
- Setting up to solve the use case
- Walking through the solution using a Jupyter notebook
The setup steps will involve the steps to configure Identity and Access Management (IAM) roles and the walkthrough notebook will walk you through the architecture. So, let's get started.
Setting up to solve the use case
If you have not done so in the previous chapters, you will first have to create an Amazon SageMaker Jupyter notebook and set up IAM permissions for that notebook role to access the AWS services we will use in this notebook. After that, you will need to clone the GitHub repository (https://github.com/PacktPublishing/Natural-Language-Processing-with-AWS-AI-Services), go to the Chapter 07 folder, and open the chapter07 social media text analytics.ipynb notebook:
- You can refer to the Amazon SageMaker documentation to create a notebook instance: https://docs.aws.amazon.com/sagemaker/latest/dg/gs-setup-working-env.html. To follow these steps, please sign in to the AWS Management Console, type Amazon SageMaker in the search window, select it, and navigate to the Amazon SageMaker console.
- Select Notebook instances and create a notebook instance by specifying an instance type, storage, and an IAM role.
- When creating a SageMaker notebook for this setup, you will need IAM access to the services that follow:
- AWS Glue to run ETL jobs and crawl the data
- AWS Athena to call Athena APIs through the notebook
- AWS Comprehend to perform sentiment analysis
- AWS QuickSight for visualization
- AWS S3 access
Make sure your IAM for the notebook has the following roles:

Figure 7.2 – Important IAM roles to run the notebook
You can modify an existing notebook role you are using to add these permissions. In Figure 7.2 is the SageMaker IAM role that you used to create your notebook instance. You can navigate to that role and click Attach policies to make sure you have the necessary roles for your notebook to execute the service APIs we are going to use.
Follow through the steps in this notebook that correspond to the next few subheadings in this section, by executing one cell at a time. Please do read the descriptions provided in each notebook cell.
Additional IAM pre-requisites for invoking AWS Glue from this notebook
In the previous section, we walked you through how to set up the notebook and important IAM roles to run this notebook. In this section, we assume that you are already in the notebook and we have added instructions in the notebook on how you can get the execution role of the notebook and enable it to invoke AWS Glue jobs from this notebook.
Go to the notebook and follow the Finding out the current execution role of the notebook section by running the following code:
import sagemaker
from sagemaker import get_execution_role
sess = sagemaker.Session()
role = get_execution_role()
role_name = role[role.rfind('/') + 1:]
print(role_name)
You will get the role associated with this notebook. Now, in the next section, we will walk you through how you can add AWS Glue as an additional trusted entity to this role.
Adding AWS Glue and Amazon Comprehend as an additional trusted entity to this role
This step is needed if you want to pass the execution role of this notebook while calling Glue APIs as well, without creating an additional role. If you have not used AWS Glue before, then this step is mandatory. If you have used AWS Glue previously, then you should have an already existing role that can be used to invoke Glue APIs. In that case, you can pass that role while calling Glue (later in this notebook) and skip this next step:
- On the IAM dashboard, click on Roles on the left-side navigation and search for the role. Once the role appears, click on Role to go to its Summary page.
- Click on the Trust relationships tab on the Summary page to add AWS Glue as an additional trusted entity.
- Click on Edit trust relationship and replace the JSON with this JSON:
{
"Version": "2012-10-17",
"Statement": [
{
"Effect": "Allow",
"Principal": {
"Service": [
"sagemaker.amazonaws.com",
"glue.amazonaws.com"
]
},
"Action": "sts:AssumeRole"
}
]
}
- Once this is complete, click on Update Trust Policy and you are done.
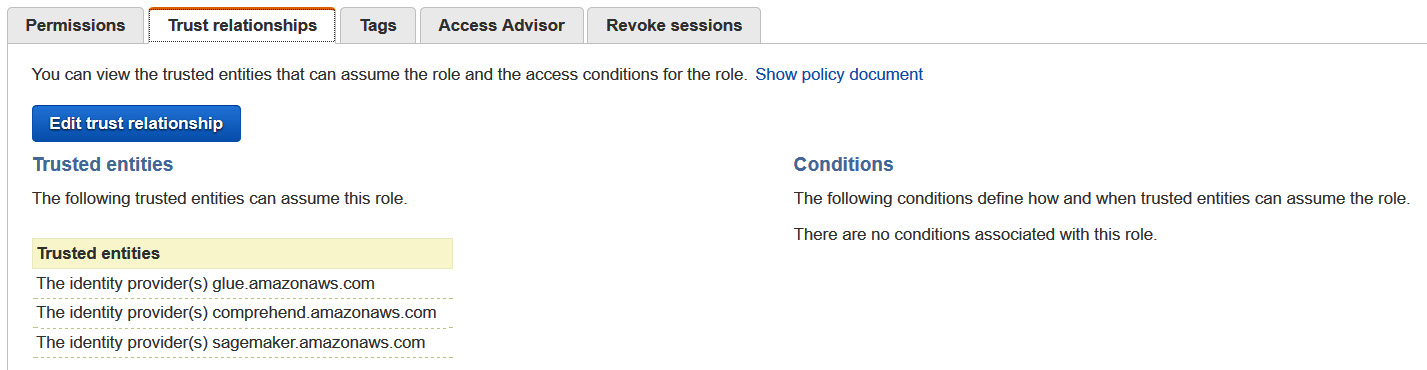
Figure 7.3 – Setting up trust with Glue in an IAM role
In this section, we covered how you can set up the Jupyter notebook and the necessary IAM permissions to run the Jupyter notebook. In the next section, we will walk you through the solution by the notebook setup you did.
Walking through the solution using Jupyter Notebook
In this section, we will walk you through how you can build this out for a Yelp review dataset or any social media analytics dataset by following the given steps using a Jupyter notebook and Python APIs:
- Download the review dataset from Yelp Reviews NLP Fast.ai, which we have already done for you in the notebook.
- Register the raw dataset as a table with the AWS Glue Data Catalog.
- Run PySpark (AWS Glue job) to convert the dataset into Parquet and get the review sentiment with Amazon Comprehend.
- Store the transformed results in a newly curated dataset.
- Run a serverless query for the optimized dataset with Amazon Athena.
- Provide visual insights of the results with Amazon QuickSight or Bokeh AWS Glue Data Catalog.
- Go to this notebook and run the following steps in the code block to set up the libraries:
import boto3
import botocore
import json
import time
import os
import project_path
from lib import workshop
glue = boto3.client('glue')
s3 = boto3.resource('s3')
s3_client = boto3.client('s3')
session = boto3.session.Session()
region = session.region_name
account_id = boto3.client('sts').get_caller_identity().get('Account')
database_name = 'yelp' # AWS Glue Data Catalog Database Name
raw_table_name = 'raw_reviews' # AWS Glue Data Catalog raw table name
parquet_table_name = 'parq_reviews' # AWS Glue Data Catalog parquet table name
open_data_bucket = 'fast-ai-nlp'
- We have imported the necessary libraries for notebook setup and defined the database name and table names for the AWS Glue Data Catalog. In the next step, we will download the Yelp reviews dataset by running the following code:
try:
s3.Bucket(open_data_bucket).download_file('yelp_review_full_csv.tgz', 'yelp_review_full_csv.tgz')
except botocore.exceptions.ClientError as e:
if e.response['Error']['Code'] == "404":
print("The object does not exist.")
else:
raise
- Now, we will run the following code to untar or unzip this review dataset:
!tar -xvzf yelp_review_full_csv.tgz
- There are two CSV files in the tarball. One is called train.csv, the other is test.csv. For those interested, the readme.txt file describes the dataset in more detail.
- We will use Python pandas to read the CSV files and view the dataset. You will notice the data contains two unnamed columns for the rating and review. The rating is between 1 and 5 and the review is a free-form text field:
import pandas as pd
pd.set_option('display.max_colwidth', -1)
df = pd.read_csv('yelp_review_full_csv/train.csv', header=None)
df.head(5)
- You get the following output:

Figure 7.4 – Raw Yelp review data
- Now, we will upload the file created previously to S3 to be used later by executing the following notebook code:
file_name = 'train.csv'
session.resource('s3').Bucket(bucket).Object(os.path.join('yelp', 'raw', file_name)).upload_file('yelp_review_full_csv/'+file_name)
We downloaded the Yelp dataset and stored it in a raw S3 bucket. In the next section, we will create the AWS Glue Data Catalog database.
Creating the AWS Glue Catalog database
In this section, we will walk you through how you can define a table and add it to the Glue Data Catalog database. Glue crawlers automatically crawl your data from Amazon S3 or from any on-premises database as it supports multiple data stores. You can also bring your own Hive metadata store and get started with crawlers. Once you have created a crawler, you can perform Glue ETL jobs as these jobs use these Data Catalog tables as source data and target data. Moreover, the Glue ETL job will read and write to the data stores that are specified in the source and target Data Catalog tables in Glue crawlers. There is a central Glue Data Catalog for each AWS account:
- We are going to use the glue.create_database API (https://boto3.amazonaws.com/v1/documentation/api/latest/reference/services/glue.html#Glue.Client.create_database) to create a Glue database:
workshop.create_db(glue, account_id, database_name, 'Database for Yelp Reviews')
- Now we will create the raw table in Glue (https://docs.aws.amazon.com/glue/latest/dg/tables-described.html). There is more than one way to create a table in Glue:
- Using an AWS Glue crawler: We have classifiers that automatically determine the schema of the dataset while crawling using a built-in classifier. You can also use a custom classifier if your data schema has a complicated nested JSON structure.
- Creating a table manually or using the APIs: You create a table manually in the console or by using an API. You specify the schema to be classified when you define the table.
Note:
For more information about creating a table using the AWS Glue console, see Working with Tables on the AWS Glue Console: https://docs.aws.amazon.com/glue/latest/dg/console-tables.html.
- We are using the glue.create_table API to create tables:
location = 's3://{0}/yelp/raw'.format(bucket)
response = glue.create_table(
CatalogId=account_id,
DatabaseName=database_name,
TableInput={
'Name': raw_table_name,
'Description': 'Raw Yelp reviews dataset',
'StorageDescriptor': {
'Columns': [
{
'Name': 'rating',
'Type': 'tinyint',
'Comment': 'Rating of from the Yelp review'
},
{
'Name': 'review',
'Type': 'string',
'Comment': 'Review text of from the Yelp review'
}
],
'Location': location,
'InputFormat': 'org.apache.hadoop.mapred.TextInputFormat',
'OutputFormat': 'org.apache.hadoop.hive.ql.io.HiveIgnoreKeyTextOutputFormat',
'SerdeInfo': {
'SerializationLibrary': 'org.apache.hadoop.hive.serde2.OpenCSVSerde',
'Parameters': {
'escapeChar': '',
'separatorChar': ',',
'serialization.format': '1'
}
},
},
'TableType': 'EXTERNAL_TABLE',
'Parameters': {
'classification': 'csv'
}
}
)
The preceding code will create tables in the AWS Glue Data Catalog.
- Now we will visualize this data using the Amazon Athena pyAthena API. To see the raw Yelp reviews, we will be installing this Python library for querying the data in the Glue Data Catalog with Athena:
!pip install PyAthena
- The following code will help us visualize the database and tables in Glue for the raw dataset:
from pyathena import connect
from pyathena.pandas.util import as_pandas
cursor = connect(region_name=region, s3_staging_dir='s3://'+bucket+'/yelp/temp').cursor()
cursor.execute('select * from ' + database_name + '.' + raw_table_name + ' limit 10')
df = as_pandas(cursor)
df.head(5)
- You will see the following table in the output:

Figure 7.5 – Athena output for the raw dataset in Glue Data Catalog
So, we covered how you can create a Glue Data Catalog and crawl the raw Yelp data we downloaded in Amazon S3. Then we showed you how you can visualize this data in Amazon Athena using pyAthena libraries. In the next section, we will walk you through how you can transform this data.
Transforming raw data to provide insights and visualization
Now we will walk you through how you can transform the raw data using PySpark in an AWS Glue job to call Amazon Comprehend APIs to get sentiment analysis on the review, convert the data into Parquet, and partition by sentiment. This will allow us to optimize analytics queries when viewing data by sentiment and return just the values we need, leveraging the columnar format of Parquet.
We covered Comprehend's detect sentiment real-time API in Chapter 3, Introducing Amazon Comprehend. In this job, we will use the real-time batch detect sentiment APIs.
We will create a PySpark job to add a primary key and run a batch of reviews through Amazon Comprehend to get a sentiment analysis of the reviews. The job will limit the number of rows it converts, but this code could be modified to run the entire dataset:
- In order to run your code in AWS Glue, we will upload the code and dependencies directly to S3 and pass those locations while invoking the Glue job. We will write the ETL job using Jupyter Notebook's cell magic %%writefile. We are using the AWS Glue script next to transform or perform ETL on the Yelp reviews dataset by using Glue transform and adding a sentiment column to the DataFrame by analyzing sentiment using Amazon Comprehend:
%%writefile yelp_etl.py
import os
import sys
import boto3
from awsglue.transforms import *
from awsglue.utils import getResolvedOptions
from pyspark.context import SparkContext
from awsglue.context import GlueContext
from awsglue.job import Job
from awsglue.dynamicframe import DynamicFrame
import pyspark.sql.functions as F
from pyspark.sql import Row, Window, SparkSession
from pyspark.sql.types import *
from pyspark.conf import SparkConf
from pyspark.context import SparkContext
from pyspark.sql.functions import *
args = getResolvedOptions(sys.argv, ['JOB_NAME', 'S3_OUTPUT_BUCKET', 'S3_OUTPUT_KEY_PREFIX', 'DATABASE_NAME', 'TABLE_NAME', 'REGION'])
sc = SparkContext()
glueContext = GlueContext(sc)
spark = glueContext.spark_session
job = Job(glueContext)
job.init(args['JOB_NAME'], args)
- We have imported the necessary APIs and now we will convert the Glue DynamicFrame to a Spark DataFrame to read the data from our Glue Data Catalog. We will select the review and rating columns from the database and the table we created in the Glue Data Catalog:
yelp = glueContext.create_dynamic_frame.from_catalog(database=args['DATABASE_NAME'], table_name=args['TABLE_NAME'], transformation_ctx = "datasource0")
yelpDF = yelp.toDF().select('rating', 'review')
We are defining some limits such as how many characters are to be sent for batch detect sentiment – MAX_SENTENCE_LENGTH_IN_CHARS – what the batch size of reviews sent for getting sentiment should be – COMPREHEND_BATCH_SIZE – and how many batches are to be sent:
MIN_SENTENCE_LENGTH_IN_CHARS = 10
MAX_SENTENCE_LENGTH_IN_CHARS = 4500
COMPREHEND_BATCH_SIZE = 5
NUMBER_OF_BATCHES = 10
ROW_LIMIT = 1000 #Number of reviews we will process for this workshop
- Each task handles 5*10 records and we are calling the Comprehend batch detect sentiment API to get the sentiment and add that sentiment after the transformation with AWS Glue. Creating a function where we are passing the text list and calling the batch detect sentiment API was covered in Chapter 3, Introducing Amazon Comprehend:
ComprehendRow = Row("review", "rating", "sentiment")
def getBatchComprehend(input_list):
arr = []
bodies = [i[0] for i in input_list]
client = boto3.client('comprehend',region_name=args['REGION'])
def callApi(text_list):
response = client.batch_detect_sentiment(TextList = text_list, LanguageCode = 'en')
return response
for i in range(NUMBER_OF_BATCHES):
text_list = bodies[COMPREHEND_BATCH_SIZE * i : COMPREHEND_BATCH_SIZE * (i+1)]
#response = client.batch_detect_sentiment(TextList = text_list, LanguageCode = 'en')
response = callApi(text_list)
for r in response['ResultList']:
idx = COMPREHEND_BATCH_SIZE * i + r['Index']
arr.append(ComprehendRow(input_list[idx][0], input_list[idx][1], r['Sentiment']))
return arr
- The following code will grab a sample set of records with a review size under the Comprehend limits:
yelpDF = yelpDF
.withColumn('review_len', F.length('review'))
.filter(F.col('review_len') > MIN_SENTENCE_LENGTH_IN_CHARS)
.filter(F.col('review_len') < MAX_SENTENCE_LENGTH_IN_CHARS)
.limit(ROW_LIMIT)
record_count = yelpDF.count()
print('record count=' + str(record_count))
yelpDF = yelpDF.repartition(record_count/(NUMBER_OF_BATCHES*COMPREHEND_BATCH_SIZE))
- We are using the Glue DataFrame to concatenate the submission ID and body tuples into arrays of a similar size and transforming the results:
group_rdd = yelpDF.rdd.map(lambda l: (l.review.encode("utf-8"), l.rating)).glom()
transformed = group_rdd
.map(lambda l: getBatchComprehend(l))
.flatMap(lambda x: x)
.toDF()
print("transformed count=" + str(transformed.count()))
We are converting the transformed DataFrame with sentiments into Parquet format and saving it in our transformed Amazon S3 bucket:
transformedsink = DynamicFrame.fromDF(transformed, glueContext, "joined")
parquet_output_path = 's3://' + os.path.join(args['S3_OUTPUT_BUCKET'], args['S3_OUTPUT_KEY_PREFIX'])
print(parquet_output_path)
datasink5 = glueContext.write_dynamic_frame.from_options(frame = transformedsink, connection_type = "s3", connection_options = {"path": parquet_output_path, "partitionKeys": ["sentiment"]}, format="parquet", transformation_ctx="datasink5")
job.commit()
- The key point in this code is how easy it is to get access to the AWS Glue Data Catalog leveraging the Glue libraries:
glueContext.create_dynamic_frame.from_catalog- Read table metadata from the Glue Data Catalog using Glue libs to load tables into the job.
yelpDF = yelp.toDF() - Easy conversion from Glue DynamicFrame to Spark DataFrame and vice-versa joinedsink= DynamicFrame.fromDF(joinedDF, glueContext, "joined").
- Write S3 using glueContext.write_dynamic_frame. from_options with the following options:
- Partition the data based on columns – connection_options = {"path": parquet_output_path, "partitionKeys": ["sentiment"]}.
Convert data to a columnar format – format="parquet".
- Partition the data based on columns – connection_options = {"path": parquet_output_path, "partitionKeys": ["sentiment"]}.
- We will be uploading the github_etl.py script to S3 now so that Glue can use it to run the PySpark job. You can replace it with your own script if needed. If your code has multiple files, you need to zip those files and upload them to S3 instead of uploading a single file like is being done here:
script_location = sess.upload_data(path='yelp_etl.py', bucket=bucket, key_prefix='yelp/codes')
s3_output_key_prefix = 'yelp/parquet/'
- Next, we'll be creating a Glue client via Boto3 so that we can invoke the create_job API of Glue. The create_job API will create a job definition that can be used to execute your jobs in Glue. The job definition created here is mutable. While creating the job, we are also passing the code location as well as the dependencies' locations to Glue. The AllocatedCapacity parameter controls the hardware resources that Glue will use to execute this job. It is measured in units of DPU. For more information on DPU, please see https://docs.aws.amazon.com/glue/latest/dg/add-job.html:
from time import gmtime, strftime
import time
timestamp_prefix = strftime("%Y-%m-%d-%H-%M-%S", gmtime())
job_name = 'yelp-etl-' + timestamp_prefix
response = glue.create_job(
Name=job_name,
Description='PySpark job to extract Yelp review sentiment analysis',
Role=role, # you can pass your existing AWS Glue role here if you have used Glue before
ExecutionProperty={
'MaxConcurrentRuns': 1
},
Command={
'Name': 'glueetl',
'ScriptLocation': script_location
},
DefaultArguments={
'--job-language': 'python',
'--job-bookmark-option': 'job-bookmark-disable'
},
AllocatedCapacity=5,
Timeout=60,
)
glue_job_name = response['Name']
print(glue_job_name)
- The aforementioned job will be executed now by calling the start_job_run API. This API creates an immutable run/execution corresponding to the job definition created previously. We will require the job_run_id value for the particular job execution to check the status. We'll pass the data and model locations as part of the job execution parameters:
job_run_id = glue.start_job_run(JobName=job_name,
Arguments = {
'--S3_OUTPUT_BUCKET': bucket,
'--S3_OUTPUT_KEY_PREFIX': s3_output_key_prefix,
'--DATABASE_NAME': database_name,
'--TABLE_NAME': raw_table_name,
'--REGION': region
})['JobRunId']
print(job_run_id)
Note:
This job will take approximately 2 minutes to run.
- Now we will check the job status to see whether it is SUCCEEDED, FAILED, or STOPPED. Once the job has succeeded, we have the transformed data in S3 in Parquet format, which we will use to query with Athena and visualize with QuickSight. If the job fails, you can go to the AWS Glue console, click on the Jobs tab on the left, and from the page, click on this particular job and you will be able to find the CloudWatch Logs link (the link under Logs) for these jobs, which can help you to see what exactly went wrong in the job execution:
job_run_status = glue.get_job_run(JobName=job_name,RunId=job_run_id)['JobRun']['JobRunState']
while job_run_status not in ('FAILED', 'SUCCEEDED', 'STOPPED'):
job_run_status = glue.get_job_run(JobName=job_name,RunId=job_run_id)['JobRun']['JobRunState']
print (job_run_status)
time.sleep(60)
print(job_run_status)
In the next section, we will walk you through how to use a Glue crawler to discover the transformed data.
Using a Glue crawler to discover the transformed data
Most AWS Glue users use a crawler to populate the AWS Glue Data Catalog with tables as a primary method. To do this, what you have to do is add a crawler within your Data Catalog to traverse your data stores. The output of the crawler consists of one or more metadata tables that are defined in your Data Catalog. ETL jobs that you define in AWS Glue use these metadata tables as sources and targets:
- A crawler can crawl both file-based and table-based data stores. Crawlers can crawl the data from various types of data stores, such as Amazon S3, RDS, Redshift, DynamoDB, or on-premises databases:
parq_crawler_name = 'YelpCuratedCrawler'
parq_crawler_path = 's3://{0}/yelp/parquet/'.format(bucket)
response = glue.create_crawler(
Name=parq_crawler_name,
Role=role,
DatabaseName=database_name,
Description='Crawler for the Parquet Yelp Reviews with Sentiment',
Targets={
'S3Targets': [
{
'Path': parq_crawler_path
}
]
},
SchemaChangePolicy={
'UpdateBehavior': 'UPDATE_IN_DATABASE',
'DeleteBehavior': 'DEPRECATE_IN_DATABASE'
},
TablePrefix='reviews_'
)
- Start the Glue Crawler: You can use the Glue crawler to populate the AWS Glue Data Catalog with tables. The crawler will automatically crawl your data source, which can be an on-premises database or raw CSV files in Amazon S3, and create a metadata table in the Glue Data Catalog, as well as inferring the schema. Glue ETL jobs use these metadata tables in the Glue Data Catalog as sources and targets. You can also bring your existing Hive data catalog to run Glue ETL:
response = glue.start_crawler(
Name=parq_crawler_name
)
print ("Parquet Crawler: https://{0}.console.aws.amazon.com/glue/home?region={0}#crawler:name={1}".format(region, parq_crawler_name))
- Go to the link in the output to visualize your crawler in Amazon Athena:

Figure 7.6 – Yelp curated crawler
- Checking the Glue crawler status: We will now monitor the crawler status, waiting for it to get back into the READY state, meaning the crawler completed its crawl. You can also look at the CloudWatch logs for the crawler for more details:
crawler_status = glue.get_crawler(Name=parq_crawler_name)['Crawler']['State']
while crawler_status not in ('READY'):
crawler_status = glue.get_crawler(Name=parq_crawler_name)['Crawler']['State']
print(crawler_status)
time.sleep(30)
Once you get an output of READY, move on to the next step. In this section, we showed you how you can crawl the transformed Parquet data for Yelp reviews, which has sentiment scores from Amazon Comprehend in the AWS Glue Data Catalog. In the next section, we will cover how you can visualize this data to gain meaningful insights into the voice of customer analytics.
Viewing the transformed results
We will again use the PyAthena library to run queries against the newly created dataset with sentiment results and in the Parquet format. In the interest of time, we will be using the Bokeh AWS Glue Data Catalog within the notebook to visualize the results instead of Amazon QuickSight:
- QuickSight is able to use the same Athena queries to visualize the results as well as numerous built-in connectors to many data sources:
cursor.execute('select rating, review, sentiment from yelp.reviews_parquet')
df = as_pandas(cursor)
df.head(10)
- Here's the output of querying the Glue Data Catalog via Amazon Athena to get the rating, review, and sentiment from the Yelp reviews table:

Figure 7.7 – Athena query to select rating and sentiment from the Yelp transformed table in the Glue Data Catalog
- Group the data in the DataFrame by sentiment: Using the pandas DataFrame functionality, we will do groupby locally. Alternatively, we could have used the built-in SQL and aggregate functions in Athena to achieve the same result:
group = df.groupby(('sentiment'))
group.describe()
Next, you will find the output of the groupby sentiment query:

Figure 7.8 – Output of the groupby sentiment query
We can see from the preceding output that we have more positive reviews than negative ones for the Yelp reviews dataset.
- The Bokeh framework has a number of built-in visualizations. We will use Bokeh to visualize reviews by sentiment and rating in subsequent code.
- Visualize by rating: We will now compare what the Comprehend API came up with compared to the user rating in the dataset. We are changing groupby in the DataFrame to change the dataset:
group = df.groupby(('rating'))
group.describe()
You will find the output of the query result grouped by rating in the following screenshot:

Figure 7.9 – Output of the query result grouped by rating
- Now, we will show you how you can plot this in Bokeh:
source = ColumnDataSource(group)
",".join(source.column_names)
rating_cmap = factor_cmap('rating', palette=Spectral5, factors=sorted(df.rating.unique()))
p = figure(plot_height=350, x_range=group)
p.vbar(x='rating', top='review_count', width=1, line_color="white",
fill_color=rating_cmap, source=source)
p.xgrid.grid_line_color = None
p.xaxis.axis_label = "Rating"
p.yaxis.axis_label = "Count"
p.y_range.start = 0
You will find the bar graph showing the count of users with their ratings.

Figure 7.10 – User rating by count
We can see that the most popular rating given is 1 and the least popular is 2. We covered in this section how you can use simple queries in Amazon Athena and visualization tools such as Bokeh to perform quick visualization and SQL analytics on the Yelp reviews dataset enriched with the sentiment from Amazon Comprehend. We got some cool insights, such as most of the reviews are positive, and also the most popular rating given by users is 1. You can further drill down and get very specific insights into particular comments by using simple SQL. This helps drive business outcomes very quickly. In the next section, we will walk you through how you can easily create a QuickSight dashboard to gain some cool insights for your business users.
Amazon QuickSight visualization
In this section, we will walk you through how you can set up or get started with Amazon QuickSight and visualize the tables in Athena, which was transformed with sentiments using AWS Glue and Comprehend:
- You can follow along with the Getting Started guide for QuickSight at https://docs.aws.amazon.com/quicksight/latest/user/getting-started.html to set up your account and then follow the code block to navigate to the QuickSight console:
print('https://{0}.quicksight.aws.amazon.com/sn/start?#'.format(region))
- Manage S3 Access in QuickSight: We need to do this mandatory step to make sure we do not get an access denied exception while accessing Amazon Athena with Amazon QuickSight.
- Go to Manage QuickSight | Security and permission | Add or remove | In S3. Click on details | select the bucket you want to query | update.

Figure 7.11 – Manage QuickSight access for the S3 data lake
- Click on the Create Dataset option and you will see the following options:

Figure 7.12 – Amazon QuickSight setup with the Create a Dataset option
- Choose Athena from the preceding options. Click the New data set button and select Athena data source. Name the data source and choose the Yelp Glue database and reviews_parquet table. Finish the creation by clicking the Create data source button. QuickSight supports a number of data connectors.
- In the Data source name textbox, enter the name yelp_reviews and click Create data source. Also, click on validated.

Figure 7.13 – Creating an Athena data source in QuickSight
- Next, you will be selecting the Yelp database we created in the Glue Data Catalog and the reviews_parquet table.
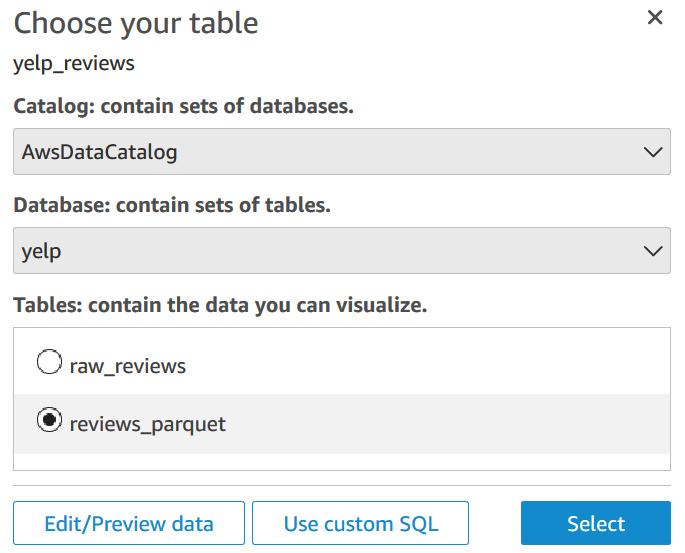
Figure 7.14 – Select the table to visualize in QuickSight
- Click on Save and Visualize.
In this section, we covered how you can create a QuickSight dashboard to analyze Yelp reviews. In the next section, we will talk about deleting the resources you created during this exercise to avoid incurring charges.
Cleaning up
In this section, we will walk you through code samples in the notebook to clean up AWS resources created while going through the Yelp sentiment analysis solution to avoid incurring a cost.
Run the cleanup steps to delete the resources you have created for this notebook by running the following code:
response = glue.delete_crawler(Name=parq_crawler_name)
response = glue.delete_job(JobName=glue_job_name)
response = glue.delete_database(
CatalogId = account_id,
Name = database_name
)
workshop.delete_bucket_completely(bucket)
We deleted the Glue crawlers, Glue ETL jobs, and the database we created using the notebook here. Let's move on to the next section to wrap it up.
Summary
In this chapter, we covered how you can set up a text analytics solution with your existing social media analytics workflow. We gave a specific example of using the Yelp reviews dataset and using serverless ETL with NLP using Amazon Comprehend to set up a quick visual dashboard using Amazon QuickSight. We also covered ad hoc SQL analytics using Amazon Athena to understand the voice or sentiment of the majority of your users using some easy SQL queries. This solution can be implemented with any social media integration, such as Twitter, Reddit, and Facebook, in batch or real-time mode.
In the case of a real-time setup, you would integrate Kinesis Data Firehose to have near real-time streaming tweets or social media feeds in this proposed workflow or architecture. Check out the Further reading section for a really cool AI-driven social media dashboard to implement this architecture at scale.
Another approach you can take in terms of document automation is to have Amazon Textract extract data from your PDFs in the case of RFPs or agreements, and this pipeline can be used to gather sentiment quickly paragraph-wise after performing Glue ETL on the extracted text.
In the next chapter, we will talk about how you can use AI to automate media workflows to reduce costs and monetize content.
Further reading
- How to scale sentiment analysis using Amazon Comprehend, AWS Glue and Amazon Athena by Roy Hasson (https://aws.amazon.com/blogs/machine-learning/how-to-scale-sentiment-analysis-using-amazon-comprehend-aws-glue-and-amazon-athena/)
- AI-Driven Social Media Dashboard (https://aws.amazon.com/solutions/implementations/ai-driven-social-media-dashboard/)
- Harmonize, Query, and Visualize Data from Various Providers using AWS Glue, Amazon Athena, and Amazon QuickSight by Ben Snively (https://aws.amazon.com/blogs/big-data/harmonize-query-and-visualize-data-from-various-providers-using-aws-glue-amazon-athena-and-amazon-quicksight/)