Chapter 11: Using Chatbots for Querying Documents
Imagine if you could have a two-way conversation with the text data in your documents. Let's suppose you subscribe to a number of journals that send you research articles on technology trends. These articles may cover multiple industries and technologies, but you are interested in insights about a specific industry and technology. Traditionally, you would have a team of people combing through these documents to interpret, understand, and recommend the direction you need to take. What if you could get all the data and answers you need just by flipping open your phone and talking to a chatbot that gives you the answers from your document corpus? Wouldn't that be awesome? That's the power of combining natural language processing (NLP) technology with chatbots. You can literally talk to your documents, and get a response too.
In the previous chapter, we discussed how businesses were relying on technology to help them expand internationally, but traditional manual translation to localize customer-facing websites was both time- and cost-prohibitive. We then built a solution that utilized the potential of machine learning (ML) based translation capabilities with Amazon Translate to tackle website localization challenges efficiently.
In this chapter, as before, we will go back to our favorite banking corporation, LiveRight Holdings, and help them solve a unique use case with NLP and chatbots. But before we get to the challenge and the solution, let's discuss the philosophy behind combining a conversational interface (aka the chatbot) with a text-based search for documents (more on this soon). Remember how we said the patterns that NLP can help uncover in seemingly unrelated documents is like the treasure in Ali Baba's cave (Chapter 1, NLP in the Business Context and Introduction to AWS AI Services – we know, it feels like eons ago)? What if you had your own personal genie (as in the story of Aladdin) that could give you the insights you needed based on your questions? When we combine NLP and chatbots, it is like asking the genie to dole out treasures from Ali Baba's cave, on-demand, at your convenience. If you recollect, we did cover how to create smart search indexing with NLP before, but the solution we will discuss in this chapter takes it one step further to make searching even more user-friendly. To learn how to build a chatbot for querying documents, we will navigate through the following sections:
- Introducing the chatbot use case
- Creating an Amazon Kendra index with Amazon S3 as a data source
- Building an Amazon Lex chatbot
- Deploying the solution with AWS CloudFormation
Technical requirements
For this chapter, you will need access to an AWS Account. Please make sure to follow the instructions specified in the Technical requirements section in Chapter 2, Introducing Amazon Textract, to create your AWS Account, and log in to the AWS Management Console. If you need to understand how to upload objects to Amazon S3 buckets, please refer to the Creating an Amazon S3 bucket, a folder, and uploading objects section. Please complete these tasks before trying the steps in Building a chatbot for querying documents.
For this chapter, we will be performing all of our tasks using the AWS Management Console. The GitHub repository provides the input documents and the FAQ list we need for our solution, available here: https://github.com/PacktPublishing/Natural-Language-Processing-with-AWS-AI-Services/tree/main/Chapter%2011.
Please use the instructions in the following sections to build the solution.
Introducing the chatbot use case
Let's now discuss how using a chatbot with NLP can benefit businesses. Using an example is always helpful, so let's go back to our fictitious banking corporation LiveRight Holdings Private Limited. The Mortgage Product Research (MPR) department for LiveRight's mortgages business is an important entity within the organization, as their recommendations directly influence what mortgage products, features, and choices are offered to LiveRight's customers. This has a direct impact on LiveRight's revenues and profitability, as mortgage products are responsible for more than 40% of LiveRight's annual revenues. The MPR team receives hundreds of research documents incrementally on a monthly basis, both from mass subscription-based industry analysts and specialized independent researchers. Typically, the documents provide insights, trend reports, and detailed perspectives on what buyers look for in a home, the role of real estate agents, how home prices impact the sellers, and so on. These documents go to an Amazon S3 bucket that already has thousands of documents and is growing.
A "day in the life of" scenario for the MPR team is to read these copious documents, analyze their content, identify areas, trends, and metrics of interest and categorize these facts, and eventually, these are collected, assessed together by the team as a whole in a day-long group meeting activity, compared with statistics from the past months, and finally, the recommendations are written down to be sent to executives, as well as fed into ML models for determining mortgage product features. Documents are received either at the end of the previous month or at the beginning of the month, and the team takes the whole month to read, analyze, categorize, discuss, and make recommendations. LiveRight's senior management has long suspected this, rightly, to be a very time-consuming and cost-prohibitive process, and as an organization that prides itself in being economical, wanted to automate the process to save time and reduce costs. Having seen how using NLP with AWS AI services has helped them in some of their other use cases, they reach out to you, the ML Enterprise Architect, to help them re-design this process and build an efficient solution. Additionally, senior management wanted to harness the potential of the very talented researchers in the MPR for new innovations rather than wasting their time on menial and repetitive tasks.
You find this request from LiveRight both challenging and exciting, as it's a use case that's tailor-made for NLP and AI. You immediately decide that the best way to help the MPR team discuss and decide on their recommendations would be an intelligent AI assistant that participates in their meetings – listening to their questions and answering them for them. After some analysis, you decide to go with Amazon Lex (https://aws.amazon.com/lex/), a fully managed AI service powered by ML models to build intelligent chatbots that can interact in both voice and text with continuous learning capabilities, and Amazon Kendra (https://aws.amazon.com/kendra/), a fully managed ML-powered enterprise search service that uses NLP to create intelligent indexes for your documents, accepts your queries in natural language, and returns responses which match the context accurately. You check the Amazon Lex pricing (https://aws.amazon.com/lex/pricing/) and realize that, for 8,000 speech requests and 2,000 text request interactions with the chatbot in the US East (N. Virginia) region, it will cost you only $33.50 a month. You check the Amazon Kendra pricing (https://aws.amazon.com/kendra/pricing/) and see that the Developer Edition supports 10,000 documents and 4,000 queries per day, at a price of $1.125 per hour or $810 per month. You decide to use the Developer Edition for the pilot phase and move to the Enterprise Edition after user acceptance.
Note
These prices are correct at the time of writing. Please check the links for an up-to-date figure.
You are now ready to build the solution. As mentioned before, we will be walking through this solution entirely using the AWS Management Console (https://aws.amazon.com/console/). If you do not have access to the AWS Management Console, please follow the detailed instructions in the Technical requirements section in Chapter 2, Introducing Amazon Textract of this book.
First, let's complete the pre-requisites before we move on to the solution build:
- Download the sample home buyer research documents from our GitHub repository. From your local computer, open an internet browser (preferably Google Chrome version 9.1 and above) and go to https://github.com/PacktPublishing/Natural-Language-Processing-with-AWS-AI-Services/tree/main/Chapter%2011.
- Download each of the four documents present by clicking the document name, one document at a time.
- On the document page, click the Download button on the right to download the document to your computer.
- Upload these downloaded documents to an Amazon S3 bucket, as per the instructions provided in the Creating an Amazon S3 bucket, a folder, and uploading objects section in Chapter 2, Introducing Amazon Textract, of this book. When creating the Amazon S3 folder in the bucket, please use the following folder/prefix paths – chapter11/kendra-faq/faqs.csv, chapter11/kendra/2019-NAR-HBS.pdf, chapter11/kendra/2020-generational-trends-report-03-05-2020.pdf, chapter11/kendra/ Zillow-home-buyers-report.pdf.
- Now, you are ready to start building the solution.
In this section, we introduced the need for chatbots with NLP and the business benefits associated with this solution. In the next section, we will walk through the building of the solution step-by-step.
Creating an Amazon Kendra index with Amazon S3 as a data source
In this section, we will first create an Amazon Kendra index and add the S3 bucket to which we uploaded our sample research documents in the previous section, as an Amazon S3 data source.
Note
Before you continue, please ensure you have executed the steps in the Technical requirements section and the pre-requisites mentioned in the Introducing the chatbot use case section.
Please execute the following steps to create your Amazon Kendra index:
- If not already done, log in to your AWS Management Console as per the instructions in the Technical requirements section in Chapter 2, Introducing Amazon Textract.
- Type kendra in the Services search bar in the top center of the page and select Amazon Kendra from the list. When the Amazon Kendra console opens up, click Create an Index, as shown here:

Figure 11.1 – Creating an Amazon Kendra index
- In the Specify index details page, type a name for your index, add an optional description, select Create a new role (Recommended) from the IAM role list box, and type a Role name, as shown in the following screenshot. Then, click Next to continue:

Figure 11.2 – Specify index details
- Leave the default selections in the Configure user access control page and click Next to continue.
- Leave the default selection to point to Developer edition in the Specify provisioning page and click Create. Amazon Kendra will start the index creation job. It may take about 15 to 30 minutes, so feel free to grab some snacks and coffee/tea in the meantime.
- When the index has been successfully created, click the Add data sources button to proceed.
- In the Add a data source connector to your Amazon Kendra index page, scroll down and click Add connector in the Amazon S3 card under Select data source connector type.
- In the Specify data source details page, type the Data source name and click Next.
- In the Configure sync settings page, provide the name of the Amazon S3 bucket to which you uploaded your research documents as part of the pre-requisite steps in the Introducing the chatbot use case section. Scroll down and expand the Additional configuration – optional section, and in the Include patterns tab, select Prefix in the Type list box, type chapter11/kendra, and click the Add button:

Figure 11.3 – Configure sync settings
- Now, scroll down a little in the page to the IAM role info and select Create a new role (Recommended) in the IAM role list box and type a Role name of your choice. In the Sync Run Schedule info, select Run on demand for Frequency. Click Next to continue.

Figure 11.4 – Data source sync settings IAM role and run schedule
- Review your inputs and click Add data source. Amazon Kendra will first propagate the IAM role and then create the data source.
- After the data source has been created, click the Sync now button to index our documents for searching.
- The sync will take about 30 minutes (time for your next break). After it completes, you can review the Sync run history.
- Now, we will add a few FAQs to the index to enable adding more context to the search. Select the FAQs option from the left pane under the Data management heading for your index and click Add FAQ.
- Type a FAQ name of your choice. Select .csv file – Basic in the FAQ file format list box. Scroll down to S3 and type the S3 bucket and prefix location of where you uploaded the faqs.csv file in the pre-requisite steps of the Introducing the chatbot use case section. In the IAM role, select Create a new role (Recommended) and type a Role name of your choice. Scroll down and click Add.
- Amazon Kendra will start the FAQ job which should complete in a few minutes.
We have now completed the steps required to set up an intelligent search for our sample research documents using Amazon Kendra. In the next section, we will build the steps needed to create an Amazon Lex chatbot.
Building an Amazon Lex chatbot
In this section, we will execute the steps needed to build an Amazon Lex chatbot and use a built-in intent (which is a task performed by the bot based on a user request) to integrate our chatbot with the Amazon Kendra index we created in the preceding section. Please execute the steps as follows:
- In the AWS Management Console, type lex in the Services search bar at the top center of the page and select Amazon Lex from the list to go to the Amazon Lex console. On the left pane of the Amazon Lex console, click the Switch to the new Lex V2 console link, as shown in the next screenshot:

Figure 11.5 – Switch to the new Lex V2 console
- On the Lex V2 console page, click Create bot on the right, as shown here:
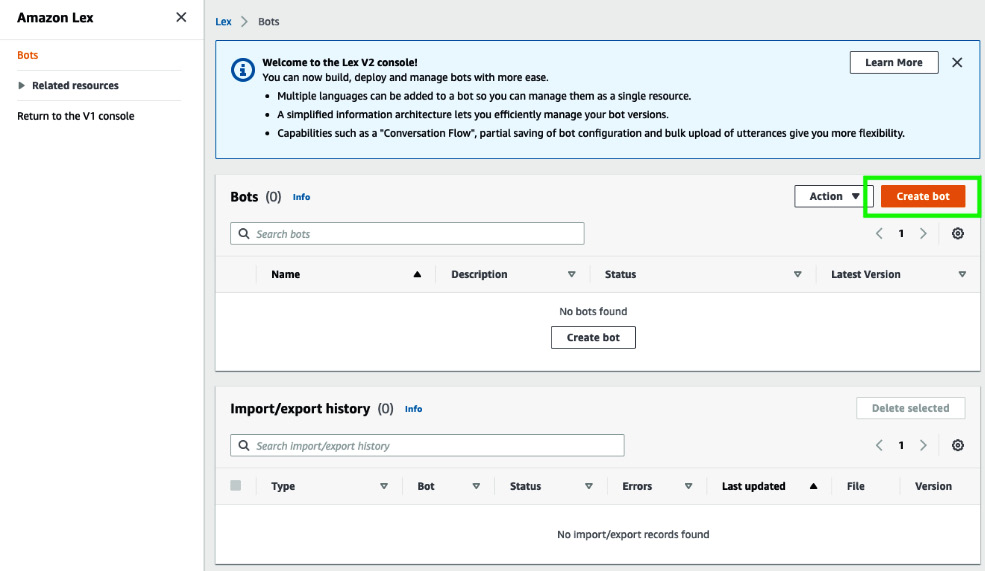
Figure 11.6 – Create bot
- In the Configure bot settings page, select Create for the Creation method. Under Bot configuration, type HomeBuyerResearch for the Bot name. In the IAM permissions section, select Create a role with basic Amazon Lex permissions for the Runtime role.

Figure 11.7 – Configure bot settings
- Scroll down to Children's Online Privacy Protection Act (COPPA) and select No. Type 5 and select minute(s) for the Idle session timeout, and click Next on the bottom right of the page.
- In the Add language to bot page, leave the Select language as English (US), and select Joanna in the Voice interaction list box. Click Done on the bottom right of the page.
- When the bot is created, Amazon Lex will automatically add an intent called NewIntent to start the bot building process.

Figure 11.8 – "NewIntent" added by Lex
- Scroll down to the Sample utterances section, type utterance for new intent at the bottom, and click Add utterance.
Note
Amazon Lex requires one custom intent by default. For our solution, we only need the Kendra built-in intent. So, we will make the NewIntent a custom intent (that's mandatory for building the bot) unresolvable by providing an utterance that will not be used during our interaction with the bot. This will force the resolution to our Amazon Kendra built-in intent.
- Scroll down and click Save Intent at the bottom right of the page.
- Now, let's go back to the intents list. Click Back to intents list on the top left pane under the Amazon Lex heading.
- In the Intents page, click Add intent on the right, and select Use built-in intent, as shown in the following screenshot:

Figure 11.9 – Add built-in intent
- In the Use built-in intent popup, type kendra in the list box, and select AMAZON.KendraSearchIntent.

Figure 11.10 – Amazon Kendra built-in intent for Lex
- In the Intent name field that appears, type ResearchBuyers, and in the Amazon Kendra index field that appears, select the index name you created in the preceding section (which is chapter11-houses-index if you used the same name mentioned in the book), and click Add.
- Scroll down to the Closing responses section and type Here is what I found for your query:((x-amz-lex:kendra-search-response-answer-1)) in the Message field, and click on Save Intent. After the intent is saved, click on More response options.
- In the Closing responses editor window that appears, click on Add, select Add text message group, and in the Message group card that appears, type I found a FAQ question for you: ((x-amz-lex:kendra-search-response-question_answer-question-1)) and the answer is ((x-amz-lex:kendra-search-response-question_answer-answer-1)) in the Message field, and click Update responses. Click Save Intent once again.

Figure 11.11 – Adding text message group
- Now, scroll to the top of the page and click Language: English (US) from the blue navigation links at the top of the page.
- Scroll down and click Build at the bottom right of the page. This should take about a couple of minutes, but not more.
- When the bot has been completely built, click the Test button next to the Build button at the bottom of the page.
- The Test Draft version popup appears at the right of the page. Type Who is a first-time buyer? in the input widget at the bottom and press Enter.
- The bot responds with an answer from the documents we added to our Amazon Kendra index:

Figure 11.12 – Bot responding to the query with content from the sample research documents
- Now, scroll to the top of the page and click Versions on the blue navigation links.
- On the Versions page, click the Create version button on the right.
- Scroll down to the bottom of the page and click the Create button.
- The new version is successfully created for our bot. Make a note of the version number created, as we will need this in the next few steps.
- Now, in the left pane under the Deployment heading, click on Aliases,
- Click on Create Alias at the right of the page. In the Create alias page, type an Alias name of your choice, or type hbr-web-ui. Scroll down and choose the bot version you created in the preceding step by clicking Choose an existing version under Associate with a version, and click the Create button at the bottom right of the page.
Note
If you are creating a version for the first time, please select the Version 1 that will be displayed for you
- When the alias is created, please make a note of the Alias ID for our bot. This is required in the next section when we deploy the bot.
- Also, click your bot's name using the blue navigation links at the top of the page and make a note of your Bot ID – we will also need this for deployment.
And that is a wrap for building our Amazon Lex chatbot. In the next section, we will use AWS CloudFormation (https://aws.amazon.com/cloudformation/), a managed service that provides the ability to write infrastructure-provisioning tasks as JSON or YAML template code, and thus automate the deployment of resources we need for building solutions in AWS. The Amazon Lex blog post, Deploy a Web UI for Your Chatbot, by Oliver Atoa and Bob Strahan, provides an AWS CloudFormation template example for integrating an Amazon Lex chatbot into a website: https://aws.amazon.com/blogs/machine-learning/deploy-a-web-ui-for-your-chatbot/.
We will use this template to create a website in which we will embed our chatbot as a widget.
Deploying the solution with AWS CloudFormation
In the preceding two sections, we saw a step-by-step account of how to create an index and associate documents from an Amazon S3 bucket as a data source using Amazon Kendra, and how to build an Amazon Lex chatbot and integrate that with our Amazon Kendra index using a built-in intent. This completes the majority of our solution build. In this section, we will use an AWS CloudFormation template sample from the accompanying repository for the blog post we mentioned in the previous section: https://github.com/aws-samples/aws-lex-web-ui/tree/master/templates.
Let's get started:
- Click https://github.com/aws-samples/aws-lex-web-ui/tree/master/templates and scroll down to the Launch section on the web page and click the first Launch Stack button for the CodeBuild mode.
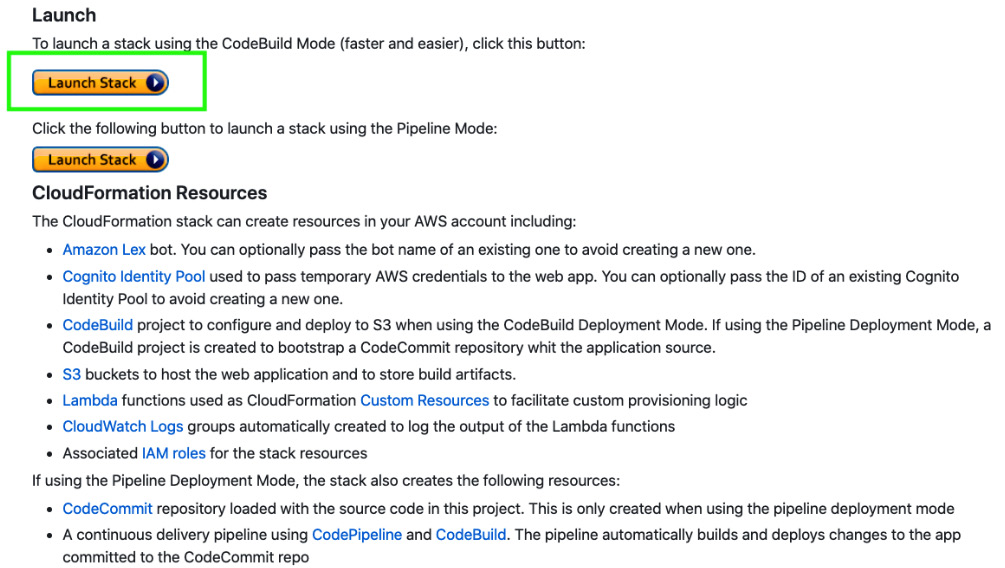
Figure 11.13 – Launching AWS CloudFormation stack
- This action will open the AWS CloudFormation service in your AWS Management Console and take you to the Create Stack page. Click Next.
- Type a name of your choice for the Stack name and the CodeBuildName. Or you can use the examples provided.
- Scroll down to the section named Lex V2 Bot Configuration Parameters. Type or paste the Bot ID that you copied from the preceding section in the LexV2BotId field. Type or paste the Alias ID you copied from the preceding section in the LexV2BotAliasId field. Leave the LexV2BotLocaleId field as en_US.

Figure 11.14 – Creating stack, Lex V2 Bot Configuration Parameters
- Scroll down to Bot Behavior Parameters and change the ForceCognitoLogin to true. This will force the users to sign up to Amazon Cognito (https://aws.amazon.com/cognito/), a fully managed user authentication and authorization service for web and mobile applications. Once they have signed up, they can use their credentials to log in to the website to access the chatbot.
- Scroll down a little and provide a name for the CognitoIdentityPoolName.
- Scroll down to the Web Application Parameters section and type You can ask me questions on home buyers. For example – what is important for home buyers? in the WebAppConfBotInitialText field. The chatbot will display this message when it is launched. Type Say 'what is important for home buyers' to get started in the WebAppConfBotInitialSpeech field. The bot will voice prompt the user with this message when the microphone icon is clicked.
- Scroll down a little to the WebAppConfToolbarTitle field and type ResearchHomeBuyers. Then, click Next.
- On this page, leave the defaults as they are and click Next at the bottom of the page.
- Scroll down to the Capabilities section and select both the checkboxes to acknowledge the creation of IAM resources and that it may need the capability to auto expand. Click Create Stack.
- It may take about 15 minutes to create all the resources we need for the solution. For details on the resources that will be created, please refer to the following: https://github.com/aws-samples/aws-lex-web-ui/blob/master/templates/README.md#cloudformation-resources.
- When the status of the CloudFormation stack changes to Create_Complete, the resources we need have been provisioned. Before we bring up our website, we need to make a change to our parent website to ensure it is sending the right utterance to our chatbot. Click the Outputs tab of your CloudFormation stack to bring up the list of resources that were provisioned. Copy the value for the key called WebAppBucket. This is the name of the Amazon S3 bucket created to host your website:

Figure 11.15 – S3 bucket hosting our website
- Now, go to your Services search bar at the top center of your page, type S3, and click Amazon S3 from the list. In the Amazon S3 console, under Buckets, type the value you copied in the previous step. This should bring up the S3 bucket. Click the bucket name to display its object list, and click parent.html from the list.
- In the Object overview page for parent.html, click the Download button in the top-right corner. This will download parent.html to your computer:

Figure 11.16 – Downloading parent.html
- Open parent.html in your favorite text editor and change the value of the panel-heading tag to Send "what is important for buyers" utterance to iframe, as shown in the following screenshot. To bring this entry up, search for Buy Flowers.

Figure 11.17 – Changing the panel-heading tag in parent.html
- Continue to search for Buy Flowers and change the parameter for the sendUtterance function to 'what is important for buyers?', as shown in the following screenshot:

Figure 11.18 – Changing the send utterance function input
- Now, go back to your Amazon S3 console, open the WebAppBucket that you downloaded the parent.html from, click Upload, and click on Add files.
- Select the modified parent.html from your local computer, scroll down, and click Upload.
- One of the resources that were provisioned by the CloudFormation stack was a CloudFront distribution. Amazon CloudFront (https://aws.amazon.com/cloudfront/) is a fully managed content delivery network that enables the delivery of websites, applications, data, and media globally in minutes in a highly secure manner. Since we modified one of the web application HTML files in the previous steps, we need to invalidate the cache of our CloudFront distribution so that the changes are reflected in our website. In the Services search bar, type CloudFront, and click CloudFront in the list to go to the Amazon CloudFront console:

Figure 11.19 – Navigating to the Amazon CloudFront console
- In the CloudFront distributions page, check the Origin field. You should see an entry here that matches the name of the WebAppBucket value you copied from the Outputs tab of your CloudFormation stack. Click the ID for this entry.
- In the details page for your CloudFront distribution, click the Invalidations tab to open it. Then, click the Create Invalidation button.

Figure 11.20 – Creating invalidation for your CloudFront distribution
- In the Create Invalidation popup that appears, type a forward slash symbol (/) in the Object Paths field and click Invalidate, as shown in the following screenshot. This should take about 5 minutes or so:

Figure 11.21 – Invalidating CloudFront distribution
- Once the invalidation is completed, go back to the Outputs tab of your stack in the Amazon CloudFormation console and click the ParentPageUrl value:

Figure 11.22 – Clicking ParentPageUrl value
- This will launch the website you provisioned, along with your chatbot. But before you can use your chatbot, Amazon Cognito will force you to sign into your website, as shown. If this is the first time you are accessing the website, click on the Sign up button and follow the instructions to sign up:

Figure 11.23 – Signing up or signing in to your website
- You will receive a verification code in your email after you complete the sign-up process. Enter the verification code to be signed in:
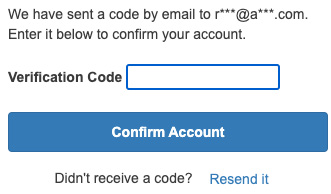
Figure 11.24 – Entering the verification code
- Now that you have signed in, your website along with your chatbot as a widget will be displayed. Click the Send button to send the first utterance to the bot. You can type subsequent questions:

Figure 11.25 – Text interaction with your Amazon Lex chatbot widget embedded in parent website
- Click the microphone button in the chat widget to talk to your bot. The bot will respond back in the voice, as shown in the next screenshot. Accept the notification from your browser to allow it to use the microphone to proceed.

Figure 11.26 – Voice interaction with your chatbot
And that concludes the solution build for this chapter. Feel free to try out the solution and leave us your feedback. You can customize what we built in this chapter for your own needs very easily. For additional ideas on how you can use Amazon Kendra and Amazon Lex for your needs, please refer to the Further reading section.
Summary
In this chapter, we built a solution using Amazon Kendra to automate searching for and deriving insights from document corpuses without having to manually read through the documents, understand the context, interpret the meaning, identify content across documents relevant to a common topic, and so on. We also saw how to set up an intelligent AI-based chat assistant using Amazon Lex that implicitly integrated with the Amazon Kendra intelligent search feature to provide a seamless chat and voice interface for (literally) "talking" to the document. Finally, we used a best practices approach with AWS CloudFormation to deploy our chatbot to a parent website as an embedded widget and distributed it using the Amazon CloudFront content delivery network.
Interestingly, NLP has diverse uses in the field of medicine, as we will see in the next chapter, where we will review how NLP and AI technologies have helped transform modern-day medical claims processing. We will start by discussing how to automatically extract data from medical intake forms, how to understand the clinical data using Amazon Comprehend Medical (https://aws.amazon.com/comprehend/medical/), and how to set up a serverless real-time pipeline for the adjudication of medical claims. As before, we will introduce the use case, discuss how to design the architecture, establish the pre-requisites, and walk through in detail the various steps required to build the solution.
Further reading
- Enhancing enterprise search with Amazon Kendra by Leonardo Gomez: https://aws.amazon.com/blogs/machine-learning/enhancing-enterprise-search-with-amazon-kendra/
- How Citibot's chatbot search engine uses AI to find more answers by Francisco Zamora, Bratton Riley, and Nicholas Burden: https://aws.amazon.com/blogs/machine-learning/how-citibots-chatbot-search-engine-uses-ai-to-find-more-answers/
- Building an omnichannel Q and A chatbot with Amazon Connect, Amazon Lex, Amazon Kendra, and the open-source QnABot project by Bob Strahan and Michael Widell: https://aws.amazon.com/blogs/machine-learning/building-a-multi-channel-qa-chatbot-with-amazon-connect-amazon-lex-amazon-kendra-and-the-open-source-qnabot-project/?nc1=b_rp