
Chapter 4: Automating Document Processing Workflows
In the previous chapter, we were introduced to Amazon Comprehend and Amazon Comprehend Medical, and we covered how to use these services to derive insights from text. We also spent some time understanding how Natural Language Processing algorithms work, the different types of insights you can uncover, and we also ran code samples trying out the Amazon Comprehend APIs.
In this chapter, we will walk through our first real-world use case of automating a document management workflow that many organizations struggle with today. We put together this solution based on our collective experience and the usage trends we have observed in our careers. Fasten your seat belts and get ready to experience architecting an end-to-end AI solution one building block at a time and watch it taking shape in front of you. We expect to be hands-on throughout the course of this chapter, but we have all the code samples we need to get going.
We will dive deep into how you can automate document processing with Amazon Textract and then we will cover how you can set up compliance and control in the documents using Amazon Comprehend. Lastly, we will talk about architecture best practices while designing real-time document processing workflows versus batch processing. We will provide detailed code samples, designs, and development approaches, and a step-by-step guide on how to set up and run these examples along with access to GitHub repositories.
In this chapter, we will cover the following topics:
- Automating document processing workflows
- Setting up compliance and control
- Processing real-time document workflows versus batch document workflows
Technical requirements
For this chapter, you will need access to an AWS account. Please make sure to follow the instructions specified in the Technical requirements section in Chapter 2, Introducing Amazon Textract, to create your AWS account, and log in to the AWS Management Console before trying the steps in this chapter.
The Python code and sample datasets for a walk-through of this chapter's code are provided at the following link: https://github.com/PacktPublishing/Natural-Language-Processing-with-AWS-AI-Services/tree/main/Chapter%2004. Please use the instructions in the following sections along with the code in the repository to build the solution.
Check out the following video to see the Code in Action at https://bit.ly/3GlcCet.
Automating document processing workflows
We have discussed in the previous chapter how Amazon Textract can help us digitize scanned documents such as PDF and images by extracting text from any document. We also covered how Amazon Comprehend can help us extract insights from these documents, including entities, Personal Identifiable Information (PII), and sentiments.
Now, these services can be used together in an architecture to automate the document processing workflows for most organizations, be it a financial organization or healthcare, which we will cover in Chapter 12, AI and NLP in Healthcare.
Let's start with a fictitious bank, LiveRight Pvt Ltd., whose customers are applying for home loans. We all know this loan origination process involves more than 400 documents to be submitted and reviewed by the bank before approval is forthcoming for your home loan. Automating this process will make it easier for banks as well as customers to get loans. The challenge with automating these workflows is that there are more than 1,000 templates for the loan origination process and going with any Optical Character Recognition (OCR) system will require managing these templates. Moreover, these OCR template-based approaches are not scalable and break with format changes. That's why we have Amazon Textract to extract text from any documents, enabling these documents to be automated and processed in hours rather than months or weeks.
You have extracted the data from these forms or semi-structured documents. You will now want to set up compliance and control on the data extracted from these documents; for example, making sure that if the data is PII, you can mask it for further processing. You will also want to extract the entities if you want to focus on the loan approval process, for example, the loan amount or the details of the requester. This is where Amazon Comprehend can help. In fact, you can perform custom classification of the documents submitted and the custom entities based on your requirements with Amazon Comprehend; for example, documents extracted by Textract and sent to Amazon Comprehend for custom classification to classify whether the document submitted is a driving license or W2 form.
The following is the architecture of how you can use Amazon Textract and Amazon Comprehend together to automate your existing document flow:

Figure 4.1 – Automating document processing workflows
In this architecture, you have documents coming in, and these documents may be financial documents, legal documents, mortgage applications, and so on. You send these documents to Amazon Textract to extract text from these documents. Once you have extracted text from these documents, you can send this text to Amazon Comprehend to extract insights. These insights can classify these documents based on document type, it can identify PII from these documents, or it can be named entity recognition (NER) using custom entity recognition. We cover custom entities in Chapter 14, Auditing Named Entity Recognition Workflows, and document classification in Chapter 15, Classifying Documents and Setting up Human in the Loop for Active Learning.
In this section, we covered how you can easily and quickly set up an automated document processing workflow with Amazon Textract and Amazon Comprehend by using these services together. In the next section, we will talk about how you can use these services together to set up compliance and control for LiveRight Pvt Ltd., especially by means of masking or redacting the PII data in their forms.
Setting up compliance and control
In this section, we will talk about how LiveRight Pvt Ltd. can set up compliance and control as well as automate their loan origination process using Amazon Textract and Amazon Comprehend. We will walk you through the following architecture using code samples in a Jupyter notebook:

Figure 4.2 – Setting up compliance and control
We will walk you through this architecture using a single document and sample code. However, this architecture can be automated to process a large number of documents using the step function and lambda functions in a serverless manner. In this architecture, we will show you the following:
- How you can upload a sample document and extract the text using Amazon Textract and save the extracted data as .txt or .csv files back to an Amazon S3 bucket.
- Then, we will show you how you can use Amazon Comprehend's real-time or sync API to detect PII.
- We will then cover how you can use the Amazon Comprehend PII detection job to mask and redact the PII in the extracted text/CSV file in Amazon S3.
- How you can find the redacted document text in Amazon S3 as an output of the Comprehend PII detection job.
So, let's get started with setting up the notebook.
Setting up to solve the use case
If you have not done so in the previous chapters, you will first have to create an Amazon SageMaker Jupyter notebook and set up Identity and Access Management (IAM) permissions for that notebook role to access the AWS services we will use in this notebook. After that, you will need to clone the GitHub repository (https://github.com/PacktPublishing/Natural-Language-Processing-with-AWS-AI-Services). Please perform the following steps to complete these tasks before we can execute the cells from our notebook:
- Follow the instructions documented in the Create an Amazon SageMaker Jupyter notebook instance section within the Setting up your AWS environment section in Chapter 2, Introducing Amazon Textract, to create your Jupyter notebook instance.
IAM Role Permission while Creating Amazon SageMaker Jupyter Notebooks
Accept the default option for the IAM role at notebook creation time to allow access to any S3 bucket.
- Once you have created the notebook instance and its status is InService, click on Open Jupyter in the Actions menu heading for the notebook instance.
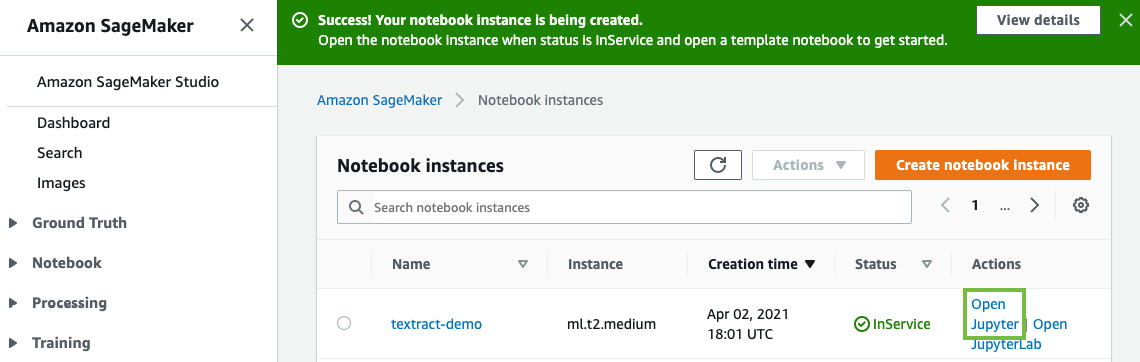
Figure 4.3 – Opening the Jupyter notebook
This will take you to the home folder of your notebook instance.
- Click on New and then select Terminal, as shown in the following screenshot:

Figure 4.4 – Opening Terminal in a Jupyter notebook
- In the terminal window, first, type cd SageMaker and then type git clone https://github.com/PacktPublishing/Natural-Language-Processing-with-AWS-AI-Services, as shown in the following screenshot:

Figure 4.5 – git clone command
- Now, exit the terminal window, go back to the home folder, and you will see a folder called Chapter 04. Click the folder and you should see a notebook called Chapter 4 Compliance and control.ipynb.
- Open this notebook by clicking it.
Next, we will cover the additional IAM prerequisites.
Additional IAM prerequisites
To train the Comprehend custom entity recognizer and to set up real-time endpoints, we have to enable additional policies and update the trust relationships for our SageMaker notebook role. To do this, attach AmazonS3FullAccess, TextractFullAccess, and ComprehendFullAccess policies to your Amazon SageMaker Notebook IAM Role. To execute this step, please refer to Changing IAM permissions and trust relationships for the Amazon SageMaker notebook execution role in the Setting up your AWS environment section in Chapter 2, Introducing Amazon Textract.
Now that we have the necessary IAM roles and notebook set up in the Amazon SageMaker notebook instance, let's jump to the code walk-through.
Automating documents for control and compliance
In this section, we will give a code walk-through of the architecture we discussed for automating documents using Amazon Textract and setting compliance and control with PII masking using Amazon Comprehend in Figure 14.2 using this notebook:
- Execute the cell under Step 1 – Setup and install libraries in the Jupyter notebook you just set up at the following link, https://github.com/PacktPublishing/Natural-Language-Processing-with-AWS-AI-Services/blob/main/Chapter%2004/Chapter%204%20Compliance%20and%20control.ipynb, to ensure that you have the libraries needed for the notebook. Note that in this cell, you are getting the Amazon SageMaker execution role for the notebook along with the SageMaker session. You are setting up boto3 libraries to call Amazon Textract, Amazon Comprehend, and Amazon S3 APIs. You are also using the SageMaker session to access the default SageMaker S3 bucket where you will be storing the data for this lab using a prefix or folder.
- Now, we will start with the sample bank statement. Execute the cells under Step 2, Extracting text from a sample document in the Jupyter notebook, to display the sample document to extract text and redact the PII:
documentName = "bankstatement.png"
display(Image(filename=documentName))
You will get the following response:
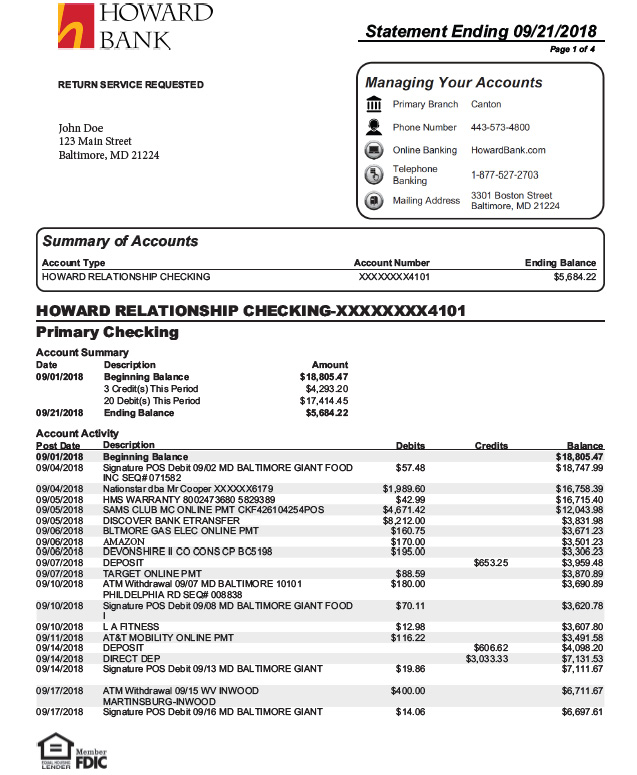
Figure 4.6 – Sample bank statement
- Now we will invoke Amazon Textract's Detect Document Text Sync API, https://boto3.amazonaws.com/v1/documentation/api/latest/reference/services/textract.html#Textract.Client.detect_document_text, which extracts only text from documents in near-real time to extract data from the sample bank statement using the following code:
client = boto3.client(service_name='textract',
region_name= 'us-east-1',
endpoint_url='https://textract.us-east-1.amazonaws.com')
with open(documentName, 'rb') as file:
img_test = file.read()
bytes_test = bytearray(img_test)
print('Image loaded', documentName)
response = client.detect_document_text(Document={'Bytes': bytes_test})
print(response)
You get a JSON response from Amazon Textract using the Detect Document Text Sync API.
- Now we will extract text from this JSON response using the Amazon Textract parser library we installed in Step 1. Run the following code to parse the Textract JSON response to text:
doc = Document(response)
page_string = ''
for page in doc.pages:
for line in page.lines:
page_string += str(line.text)
print(page_string)
Now that we have the extracted text from the Textract JSON response, let's move on to the next step.
- In this step, we will save the extracted text from the bank statement to a text/CSV file and upload it to Amazon S3 for processing with the Amazon Comprehend batch job. Run the notebook cell Step 3, Save the extracted text to a text/CSV file and upload it to an Amazon S3 bucket, to save the data in a text file and then upload it to Amazon S3.
- Now that we have extracted the text from bank statements, converted it into a text file, and uploaded it to Amazon S3, in this step, we will detect PII from the text using Amazon Comprehend Detect PII Sync APIs. Run the notebook cell Step 4, Check for PII using the Amazon Comprehend Detect PII Sync API, to call the Comprehend APIs by passing the extracted text from Amazon Textract:
a) First, initialize the boto3 handle for Amazon Comprehend:
`comprehend = boto3.client('comprehend')
b) Then, call Amazon Comprehend and pass it the aggregated text from our sample bank statement image to Comprehend detect PII entities: https://boto3.amazonaws.com/v1/documentation/api/latest/reference/services/comprehend.html#Comprehend.Client.detect_pii_entities:
piilist=comprehend.detect_pii_entities(Text = page_string, LanguageCode='en')
redacted_box_color='red'
dpi = 72
pii_detection_threshold = 0.00
print ('Finding PII text...')
not_redacted=0
redacted=0
for pii in piilist['Entities']:
print(pii['Type'])
if pii['Score'] > pii_detection_threshold:
print ("detected as type '"+pii['Type']+"' and will be redacted.")
redacted+=1
else:
print (" was detected as type '"+pii['Type']+"', but did not meet the confidence score threshold and will not be redacted.")
not_redacted+=1
print ("Found", redacted, "text boxes to redact.")
print (not_redacted, "additional text boxes were detected, but did not meet the confidence score threshold.")s3_entity_key = prefix + "/train/entitylist.csv"
You will get a response with identifying PII from the text, which will be redacted in the next step using the Amazon Comprehend PII analysis job.

Figure 4.7 – PII detection using Amazon Comprehend in a bank statement
We will mask/redact these 15 PII entities we found in the sample bank statement.
- Next, we will call the StartPiiEntitiesDetectionJob API to start an asynchronous PII entity detection job for a collection of documents. For this example, we are just using one document sample. You can redact a large number of documents using this job. Run the notebook cell Step 5, Mask PII using the Amazon Comprehend PII Analysis Job, to set up and start the PII redaction analysis job with Amazon Comprehend:
a) Then job requires the S3 location of documents to be redacted and the S3 location of where you want the redacted output. Run the following cell to specify the location of the S3 text file we want to be redacted:
import uuid
InputS3URI= "s3://"+bucket+ "/pii-detection-redaction/pii_data.txt"
print(InputS3URI)
OutputS3URI="s3://"+bucket+"/pii-detection-redaction"
print(OutputS3URI)
b) Now we will call comprehend.start_pii_entities_detection_job by setting parameters for redaction and passing the input S3 location where data is stored by running the following notebook cell:
response = comprehend.start_pii_entities_detection_job(
InputDataConfig={
'S3Uri': InputS3URI,
'InputFormat': 'ONE_DOC_PER_FILE'
},
OutputDataConfig={
'S3Uri': OutputS3URI
},
Mode='ONLY_REDACTION',
RedactionConfig={
'PiiEntityTypes': [
'ALL',
],
'MaskMode': 'MASK',
'MaskCharacter': '*'
},
DataAccessRoleArn = role,
JobName=job_name,
LanguageCode='en',
)
Note
Using this API or batch job, you have the choice to specify the mode, redaction config, and language.
Here are the parameters that can be modified as shown in the following code block:
Mode='ONLY_REDACTION'|'ONLY_OFFSETS',
RedactionConfig={
'PiiEntityTypes': [
'BANK_ACCOUNT_NUMBER'|'BANK_ROUTING'|'CREDIT_DEBIT_NUMBER'|'CREDIT_DEBIT_CVV'|'CREDIT_DEBIT_EXPIRY'|'PIN'|'EMAIL'|'ADDRESS'|'NAME'|'PHONE'|'SSN'|'DATE_TIME'|'PASSPORT_NUMBER'|'DRIVER_ID'|'URL'|'AGE'|'USERNAME'|'PASSWORD'|'AWS_ACCESS_KEY'|'AWS_SECRET_KEY'|'IP_ADDRESS'|'MAC_ADDRESS'|'ALL',
],
'MaskMode': 'MASK'|'REPLACE_WITH_PII_ENTITY_TYPE',
'MaskCharacter': 'string'
Refer to the API documentation for more details: https://docs.aws.amazon.com/comprehend/latest/dg/API_StartPiiEntitiesDetectionJob.html.
c) The job will take roughly 6-7 minutes. The following code is to check the status of the job. The cell execution will be completed once the job is complete:
from time import sleep
job = comprehend.describe_pii_entities_detection_job(JobId=events_job_id)
print(job)
waited = 0
timeout_minutes = 10
while job['PiiEntitiesDetectionJobProperties']['JobStatus'] != 'COMPLETED':
sleep(60)
waited += 60
assert waited//60 < timeout_minutes, "Job timed out after %d seconds." % waited
job = comprehend.describe_pii_entities_detection_job(JobId=events_job_id)
You will get a JSON response, and this job will take 5-6 minutes. You can go and grab a coffee until the notebook cell is running and you have a response.
- Once the job is successful, we will now show you the extracted, redacted document output in this step. Run the notebook cell Step 6, View the redacted/masked output in the Amazon S3 bucket, to extract the output from the Amazon S3 bucket:
filename="pii_data.txt"
s3_client = boto3.client(service_name='s3')
output_data_s3_file = job['PiiEntitiesDetectionJobProperties']['OutputDataConfig']['S3Uri'] + filename + '.out'
print(output_data_s3_file)
output_data_s3_filepath=output_data_s3_file.split("//")[1].split("/")[1]+"/"+output_data_s3_file.split("//")[1].split("/")[2]+"/"+output_data_s3_file.split("//")[1].split("/")[3]+"/"+output_data_s3_file.split("//")[1].split("/")[4]
print(output_data_s3_filepath)
f = BytesIO()
s3_client.download_fileobj(bucket, output_data_s3_filepath, f)
f.seek(0)
print(f.getvalue())

Figure 4.8 – Redacted bank statement using the Amazon Comprehend PII Redaction job
In the output, you can see that the Amazon Comprehend PII job has masked the PII data, such as an address, name, SSN, and bank account number identified using the Amazon Comprehend Detect PII entity.
In this section, we walked you through an end-to-end conceptual architecture for automating documents for compliance and control. In the next section, we will talk about best practices for real-time document processing workflows versus batch processing workflows.
Processing real-time document workflows versus batch document workflows
In this section, we will talk about some best practices while architecting solutions using Amazon Textract for real-time workflows versus batch processing document workflows.
Let's compare the Textract real-time APIs against the batch APIs we discussed in Chapter 2, Introducing Amazon Textract, with the help of the following table:
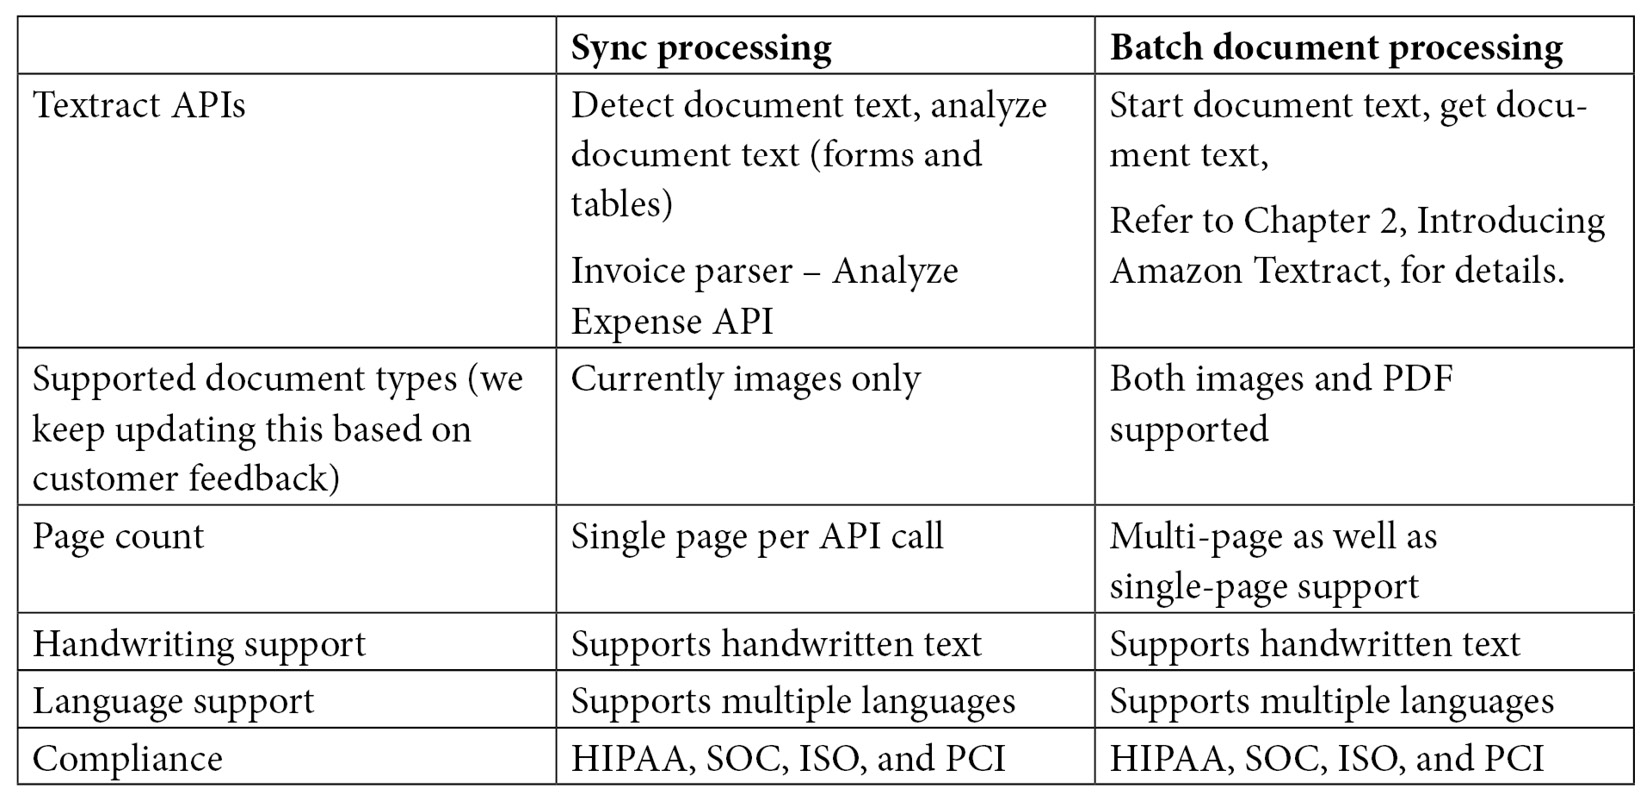
Figure 4.9 – Textract sync APIs versus batch APIs
Note
The pricing of Textract is based on which of the three different APIs you are going to use out of Analyze Document (forms, table), Detect Text (text extraction), and Analyze Expense (invoices and receipts). You will not be charged irrespective of whether you use the sync or async (batch) implementation of these, so, feel free to design your architecture based on your need for real-time processing versus batch processing as pricing is based on the number of documents processed with one of the three APIs, irrespective of batch or real-time mode. Check prices here: https://aws.amazon.com/textract/pricing/.
For example, LiveRight pvt Ltd. can use the batch or real-time implementation of the detect text API to detect text from their bank statements to process millions of documents.
We covered architecture in Figure 14.2. This architecture implemented the Amazon Textract Detect Text Sync API in the code walk-through. Now, let's see how we can automate the architecture through Lambda functions for scale to process multiple documents:
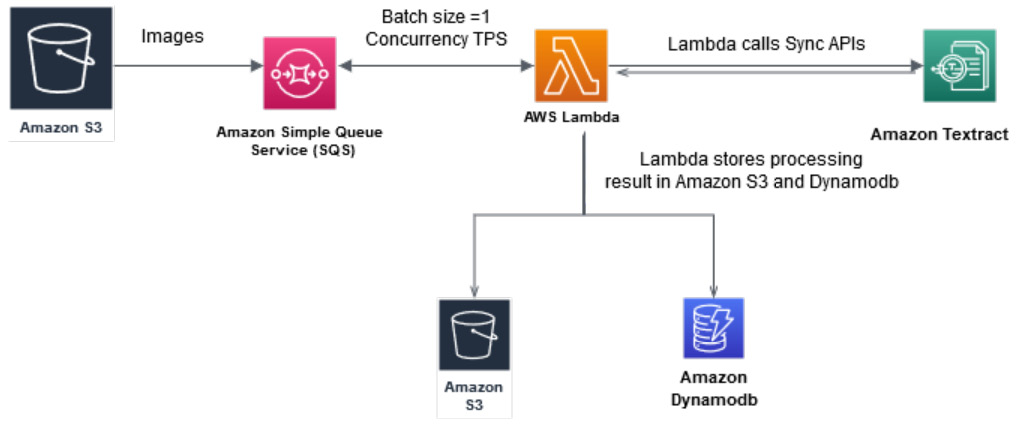
Figure 4.10 – Synchronous document processing workflow
In the preceding architecture, we walked you through how you can process scanned images using the proposed synchronous document processing workflow using the sync APIs of Amazon Textract. Here are the steps for this architecture:
- Documents uploaded to Amazon S3 will send a message to an Amazon SQS queue to analyze a document. Amazon SQS is a serverless managed queuing service that polls the documents into the queue.
- A Lambda function is invoked synchronously with an event that contains a queue message.
- The Lambda function then calls Amazon Textract sync APIs and stores the Textract output or response in either Amazon S3 or response metadata in the Amazon DynamoDB table. Amazon DynamoDB is a NoSQL database managed by AWS that is like a key/value store.
You control the throughput of your pipeline by controlling the batch size and Lambda concurrency.
Now we will walk you through the following architecture best practices for scaling multi-page scanned documents, which can be PDF or images using batch APIs of Amazon Textract:

Figure 4.11 – Batch document processing workflow
In the preceding diagram, we have an architecture to walk through how batch processing workflow works with Amazon Textract batch jobs:
- Multipage PDFs and images are uploaded in Amazon S3. These documents are sent to the Amazon Simple Queue Service (SQS) queue.
- A job scheduler Lambda function runs at a certain frequency, for example, every 5 minutes, and polls for messages in the SQS queue.
- For each message in the queue, it submits an Amazon Textract job to process the document and continues submitting these jobs until it reaches the maximum limit of concurrent jobs in your AWS account.
- As Amazon Textract finishes processing a document, it sends a completion notification to an Amazon Simple Notification Service (SNS) topic.
- SNS then triggers the job scheduler Lambda function to start the next set of Amazon Textract jobs.
- SNS also sends a message to an SQS queue, which is then processed by a Lambda function to get results from Amazon Textract. The results are then stored in a relevant dataset, for example, DynamoDB or Amazon S3.
This GitHub link, https://github.com/aws-samples/amazon-textract-serverless-large-scale-document-processing, has code samples to implement both the suggested architecture and it also has some additional components to backfill in case the documents already exist in the Amazon S3 bucket. Please feel free to set up and use this if you have large documents to experiment with.
You can also use the following GitHub solution, https://github.com/aws-samples/amazon-textract-textractor, to implement large-scale document processing with Amazon Comprehend insights.
In this section, we covered architecture best practices for using real-time processing or batch processing with Amazon Textract. We also presented some already-existing GitHub implementations for large-scale document processing with Amazon Textract. Now, let's summarize what we have covered in this chapter.
Summary
In this chapter, we covered how you can use Amazon Textract to automate your existing documents. We introduced a fictional bank use case with the help of LiveRight Pvt Ltd. We showed you how using an architecture can help banks automate their loan origination process and set up compliance and control with Amazon Comprehend. We also covered code samples using a sample bank statement, and how you can extract data from the scanned bank statement and save it into a CSV.text file in Amazon S3 for further analysis. Then, we showed you how you can use Amazon Comprehend to detect PII using a sync API and how you can redact that sample bank data text/CSV in Amazon S3 using an Amazon Comprehend batch PII redaction job.
We then covered some architecture patterns for using real-time processing document workflows versus batch processing workflows. We also provided some GitHub implementations that can be used to process large-scale documents.
In this chapter, you learned the differences between when to use and how to use real-time APIs versus batch APIs for document automation. You also learned how you can set up PII redaction with Amazon Comprehend PII jobs.
In the next chapter, we will look at a different use case, but one that's equally popular among enterprises looking to leverage NLP to maximize their business value by building smart search indexes. We will cover how you can use Amazon Textract and Amazon Comprehend along with Amazon Elasticsearch and Amazon Kendra to create a quick NLP-based search. We will introduce the use case, discuss how to design the architecture, establish the prerequisites, and walk through in detail the various steps required to build the solution.
Further reading
- Building a serverless document scanner using Amazon Textract and AWS Amplify, by Moheeb Zara (https://aws.amazon.com/blogs/compute/building-a-serverless-document-scanner-using-amazon-textract-and-aws-amplify/)
- Automatically extract text and structured data from documents with Amazon Textract, by Kashif Imran and Martin Schade (https://aws.amazon.com/blogs/machine-learning/automatically-extract-text-and-structured-data-from-documents-with-amazon-textract/)