
Chapter 2: Introducing Amazon Textract
In the previous chapter, you read how businesses can harness the benefits of applying NLP to derive insights from text, and you were briefly introduced to the AWS ML stack. We will now provide a detailed introduction to Amazon Textract, along with do-it-yourself code samples and instructions. Amazon Textract is an AWS AI service that can be used to extract text from documents and images with little to no prior ML skills. But before we get to what Textract can do, we will first cover some of the challenges with document processing. Then we will cover how Textract can help in overcoming the challenges. We will also talk about the benefits of using Amazon Textract, along with its product features. Lastly, we will cover how you can integrate Amazon Textract quickly into your applications.
We will navigate through the following sections in this chapter:
- Setting up your AWS environment
- Overcoming challenges with document processing
- Understanding how Amazon Textract can help
- Presenting Amazon Textract's product features
- Using Amazon Textract with your applications
Technical requirements
For this chapter, you will need access to an AWS account at https://aws.amazon.com/console/. Please refer to the Signing up for an AWS account sub-section within the Setting up your AWS environment section for detailed instructions on how you can sign up for an AWS account and sign in to the AWS Management Console.
The Python code and sample datasets for the solution discussed in this chapter are available at https://github.com/PacktPublishing/Natural-Language-Processing-with-AWS-AI-Services/tree/main/Chapter%2002.
Check out the following video to see the Code in Action at https://bit.ly/3be9eUh.
Setting up your AWS environment
Important Note
Please do not execute the instructions in this section on their own. This section is a reference for all the basic setup tasks needed throughout the book. You will be guided to this section when building your solution in this chapter and the rest of the chapters in this book. Only execute these tasks when so guided.
Depending on the chapter you are in, you will be running tasks using the AWS Management Console, an Amazon SageMaker Jupyter notebook, from your command line, or a combination of any of these. Either way, you need the right AWS Identity and Access Management (IAM) permissions, resources, and, in most cases, one or more Amazon Simple Storage Service (S3) buckets, as prerequisites for your solution builds. This section provides instructions for setting up these basic tasks. We will be referring to this section throughout the rest of the chapters in the book as needed.
Signing up for an AWS account
In this chapter and all subsequent chapters in which we run code examples, you will need access to an AWS account. Before getting started, we recommend that you create an AWS account by going through the following steps:
Note
Please use the AWS Free Tier, which enables you to try services free of charge based on certain time limits or service usage limits. For more details, please see https://aws.amazon.com/free.
- Open https://portal.aws.amazon.com/billing/signup.
- Click on the Create a new AWS account button at the bottom left of the page
- Enter your email address and a password, confirm the password, and provide an AWS account name (this can be a reference for how you will use this account, such as sandbox, for example).
- Select the usage type (Business or Personal), provide your contact information, read and agree to the terms of the AWS Customer Agreement, and click Continue.
- Provide credit card information and a billing address and click Continue.
- Go through the rest of the steps to complete your AWS account signup process. Please make a note of your user ID and password; this is your root access to your AWS account.
- Once the AWS account is created, go to the AWS Management Console – console.aws.amazon.com – and sign in using the root credentials you created in the previous steps.
- Type IAM in the services search bar at the top of the console and select IAM to navigate to the IAM console. Select Users from the left pane in the IAM console and click on Add User.
- Provide a username, then select Programmatic access and AWS Management Console access for Access Type. Keep the password as Autogenerated and keep Required Password reset as selected.
- Click Next: Permissions. On the Set Permissions page, click on Attach existing policies directly and select the checkbox to the left of AdministratorAccess. Click Next twice to go to the Review page. Click Create user.
- Now go back to the AWS Management Console (console.aws.amazon.com) and click Sign In. Provide the IAM username you created in the previous step, the temporary password, and enter a new password to log in to the console.
- Log in to your AWS account when prompted in the various chapters and sections.
You now have access to the AWS Management Console (https://aws.amazon.com/console/). In the next section, we will show how to create an S3 bucket and upload your documents.
Creating an Amazon S3 bucket and a folder and uploading objects
In this book, we will use Amazon S3 as the storage option for our solutions. So, we will need to create an S3 bucket, create folders within the bucket, and upload documents for use within the solution. Please follow these instructions to learn how to do this:
- Log in to the AWS Management Console (https://aws.amazon.com/console/) and, in the search bar at the top, type S3.
- Select S3 from the results and navigate to the Amazon S3 console. Click on Create Bucket.
- On the Create Bucket page, provide a bucket name (it cannot contain spaces or uppercase characters; for more details, see https://docs.aws.amazon.com/console/s3/bucket-naming), and select an AWS Region from the list (for more details on AWS Regions, please see https://docs.aws.amazon.com/AmazonRDS/latest/UserGuide/Concepts.RegionsAndAvailabilityZones.html).
- Accept the defaults for the rest of the options and click on Create Bucket. For more details on what these options mean, please see https://docs.aws.amazon.com/AmazonS3/latest/userguide/UsingBucket.html.
- Now that our S3 bucket is successfully created, either search using your bucket name on the Buckets pane or click the bucket name if it is displayed in the list of buckets on the Buckets pane. On the bucket page, click the Create folder button on the right of the page.
- On the Create folder page, provide a name for the folder, accept the defaults for the rest of the fields, and click Create folder at the bottom right of the page.
- On the Objects page, either search for the folder you created in the search bar underneath the Objects heading or click on the folder name.
- Now you can select either the Add files or Add folder button on the right to bring up an option to select files or folders from your computer to add to the S3 bucket in the folder we created.
Please note that the AWS Management Console is not the only option to upload objects to S3. You can do it using the AWS Command-Line Interface (CLI) (for more details, see https://docs.aws.amazon.com/cli/latest/reference/s3/) or you can also upload files programmatically using the Python SDK, for example (https://boto3.amazonaws.com/v1/documentation/api/latest/reference/services/s3.html). AWS provides SDKs for programming in several languages (https://aws.amazon.com/tools/).
And that concludes the instructions for creating an S3 bucket, creating a folder, and uploading objects to the bucket. In the next section, let's see how we can add IAM permissions policies for our Amazon SageMaker Jupyter notebook role.
Creating an Amazon SageMaker Jupyter notebook instance
In this section, we will see how to create a notebook instance in Amazon SageMaker. This is an important step, as most of our solution examples are run using notebooks. After the notebook is created, please follow the instructions to use the notebook in the specific chapters based on the solution being built. Please follow these steps to create an Amazon SageMaker Jupyter notebook instance:
- Log in to the AWS Management Console if you haven't already. Type SageMaker in the services search bar at the top of the page, select SageMaker from the list, and click on it to go to the Amazon SageMaker management console.
- In the SageMaker console, on the left pane, click on Notebook to expand the option, and click Notebook instances.
- On the Notebook instances page, click the Create notebook instance button at the top right.
- Type a name for the notebook instance and select a suitable notebook instance type. For most of the solution builds in this book, an AWS Free Tier (https://aws.amazon.com/free) instance such as ml.t2.medium should suffice.
- In the Permissions and encryption section, click the IAM role list and choose Create a new role, and then choose Any S3 bucket.
- Accept defaults for the rest of the fields and click Create notebook instance.
Note
By default, each notebook instance is provided internet access by SageMaker. If you want to disable internet access for this notebook instance, you can attach it to your Virtual Private Cloud (VPC), a highly secure virtual network in the cloud for launching AWS resources (https://docs.aws.amazon.com/sagemaker/latest/dg/appendix-notebook-and-internet-access.html), and select to disable internet access. We need internet access for this notebook instance, so if you are planning to attach a VPC and disable internet access through SageMaker, please either configure a Network Address Translation (NAT) gateway, which allows instances in a subnet within the VPC to communicate with resources outside the VPC but not the other way around (https://docs.aws.amazon.com/vpc/latest/userguide/vpc-nat-gateway.html), or an interface VPC endpoint (https://docs.aws.amazon.com/sagemaker/latest/dg/interface-vpc-endpoint.html), which allows a private connection through the AWS backbone between the notebook instance and your VPC. This allows you to manage access to the internet for your notebook instance through the controls you have implemented within your VPC.
Your notebook instance will take a few minutes to be provisioned; once it's ready, the status will change to InService. Please follow the instructions in the Using Amazon Textract with your applications section to find out how you can use your notebook instance. In the next few sections, we will walk through the steps required to modify the IAM role we attached to the notebook.
Changing IAM permissions and trust relationships for the Amazon SageMaker notebook execution role
Note
You cannot attach more than 10 managed policies to an IAM role. If your IAM role already has a managed policy from a previous chapter, please detach this policy before adding a new policy as per the requirements of your current chapter.
When we create an Amazon SageMaker Jupyter notebook instance (like we did in the previous section), the default role creation step includes permissions to either an S3 bucket you specify or any S3 bucket in your AWS account. But often, we need the notebook to have more permissions that that. For example, we may need permission to use Amazon Textract or Amazon Comprehend APIs, and/or other services as required.
In this section, we will walk through the steps needed to add additional permissions policies to our Amazon SageMaker Jupyter notebook role:
- Open the Amazon SageMaker console by typing sagemaker in the services search bar at the top of the page in your AWS Management Console, and select Amazon SageMaker from the list.
- In the Amazon SageMaker console, on the left pane, expand Notebook and click Notebook instances.
- Click the name of the notebook instance you need to change permissions for.
- On the Notebook instance settings page, scroll down to Permissions and encryption, and click IAM role ARN.
- This will open the IAM management console and your role summary will be displayed along with the permissions and other details for your role. Click Attach policies.
- On the Add permissions to <your execution role name> page, type textract in the search bar, select the checkbox next to the policy you are interested in, and click Attach policy at the bottom right. You should now see the policy attached to your role.
- In some cases, we may need a custom policy for our requirement rather than a managed policy provided by AWS. Specifically, we add an inline policy (https://docs.aws.amazon.com/IAM/latest/UserGuide/id_roles_use_passrole.html) to allow PassRole of our SageMaker notebook execution role to services that can assume this role (added in Trust relationships) for actions needed to be performed from the notebook. Click Add inline policy on the right of your SageMaker notebook execution role summary page.
- Now click the JSON tab and paste the following JSON statement in the input area:
{ "Version": "2012-10-17", "Statement": [ {
"Action": [
"iam:PassRole"
],
"Effect": "Allow",
"Resource": "<IAM ARN of your current SageMaker notebook execution role>"
}
]
}
- Click Review policy.
- On the Review policy page, type a name for your policy and click Create policy at the bottom right of the page.
- Now that you know how to attach permissions and an inline policy to your role, let's go to the last step of this section, updating trust relationships (https://docs.aws.amazon.com/directoryservice/latest/admin-guide/edit_trust.html) for your role. On the Summary page for your SageMaker notebook execution role, click the Trust relationships tab, and click Edit trust relationship.
- Copy the following JSON snippet and paste it in the Policy Document input field. This statement allows Amazon SageMaker, Amazon S3, and Amazon Comprehend the ability to assume the SageMaker notebook execution role permissions. Depending on the chapter and the use case we are building, the services that will need to assume the role will vary and you will be instructed accordingly. For now, please consider the following JSON snippet as an example to understand how to edit trust relationships:
{ "Version": "2012-10-17", "Statement": [
{ "Effect": "Allow",
"Principal":
{ "Service":
[ "sagemaker.amazonaws.com",
"s3.amazonaws.com",
"comprehend.amazonaws.com" ]
},
"Action": "sts:AssumeRole" }
]
}
- Click the Update Trust Policy button at the bottom right of the page.
- You should see the trusted entities updated for your role.
And you are all set. In this section, you learned how to update the IAM role for your Amazon SageMaker notebook instances to add permissions policies, add a custom inline policy, and, finally, edit the trust relationships to add the trusted entities you needed for your solution build. You may now go back to the chapter you navigated to here from and continue your solution build task.
Overcoming challenges with document processing
Automating operational activities is very important for organizations looking to minimize costs, increase productivity, and enable faster go-to-market cycles. Typically, operations that are at the core of these businesses are prioritized for automation. Back-office support processes, including administrative tasks, are often relegated to the bottom of the priority list because they may not be deemed mission critical. According to this Industry Analysts report (https://www.industryanalysts.com/111015_konica/, written in 2015, with data collected from sources such as Gartner Group, AIIM, the US Department of Labor, Imaging Magazine, and Coopers and Lybrand, and accessed on March 30, 2021), organizations continue to be reliant on paper-based documents, and the effort required to maintain these documents poses significant challenges due to the lack of automation and inefficiencies in the document workflow.
Many organizations, such as financial institutions, healthcare, manufacturing, and other small-to-medium-sized enterprises, have a large number of scanned and handwritten documents. These documents can be in various formats, such as invoices, receipts, resumes, application forms, and so on. Moreover, these documents are not kept in one place; instead, they are in silos, which makes it really difficult to uncover useful insights from these documents. Suppose that you have an archive of documents that you would like to extract data from. And let's say we build an application that makes it easy for you to search across the vast collection of documents in these archives. Extracting data from these documents is really important for you as they contain a lot of useful information that is relevant for your organization. Once you extract the information you need (of course, we first have to determine what is useful and what is not), you can do so many things, such as discover business context, set up compliance, design search and discovery for important keywords, and automate your existing business processes.
As time progresses, we see more organizations embracing digital media for their business processes due to the ease of integration with their operational systems, but paper-based documents are not going away anytime soon. According to this article (https://medium.com/high-peak-ai/real-time-applications-of-intelligent-document-processing-993e314360f9, accessed on March 30, 2021), there is in fact an increase in the usage of paper documents in organizations. And that's why it's really important to automate document processing workflows.
So, what is the problem with paper documents? The problem is the cost and time required to extract the data from documents using traditional approaches. One of the most common approaches is manual processing of these documents. What is manual processing? A human will read the documents and then key all the values into an application or copy and paste them into another document. This approach is highly inefficient and expensive: not only do you need to invest time and effort to train the human workforce to understand the data domain they are working with, but also there may be errors in data entry due to human nature. For example, when working with tax forms and financial forms, you would need an experienced Certified Public Accountant (CPA) to do that manual entry, as this would require accounting knowledge to extract the details needed. So, we can see that a traditional approach with manual processing of documents is time consuming, error prone, and expensive.
Another approach that we have seen organizations use is rule-based formatting templates along with Optical Character Recognition (OCR) systems to extract data from these documents. The challenge with this method is that these rule-based systems are not intelligent enough to adapt to evolving document formats, and often break with even minor template changes. As businesses grow and expand, their underlying processes need the flexibility to adapt, and this often leads to working with multiple document structures, often running to hundreds or even thousands of formats. Trying to set up and manage these formats for each document type can turn into a huge maintenance overhead pretty quickly and it can become challenging to update these formats in rule-based systems once the document format changes. Another challenge to consider is the provisioning of infrastructure and the scaling required to handle millions of such documents and the associated costs.
That's why we have Amazon Textract, a fully managed ML and AI service, built with out-of-the-box features to extract handwritten and printed text in forms, tables, and pages from images and PDF documents. Textract provides Application Programming Interfaces (APIs) behind which run powerful ML models trained on millions of documents to provide a highly effective solution for intelligent text extraction.
So, we covered the challenges with processing documents in this section and why we need Amazon Textract. In the next section, we will talk about how Amazon Textract can quickly help organizations solve this pain point.
Understanding how Amazon Textract can help
We covered AWS AI Services briefly in Chapter 1, NLP in the Business Context and Introduction to AWS AI Services, when introducing the business context for NLP. Amazon Textract is an OCR-based service in the AWS AI Services stack that comes with ready-made intelligence, enabling you to use it without any prior ML experience for your document processing workflows. It is interesting to note that Amazon Textract has its origins in the deep learning ML models built for Amazon.com. It comes with a pre-trained model and provides APIs where you can send your documents in PDF or image format and get a response as text/tables and key/value pairs along with a confidence score.
Note
Amazon Textract currently supports PNG, JPEG, and PDF formats.
Amazon Textract provides serverless APIs without you needing to manage any kind of infrastructure, enabling you to quickly automate document management and scale to process millions of documents. Once the document content is extracted, you can leverage it within your business applications for a variety of document processing use cases for your industry and operational requirements. Amazon Textract models learn as they go, so they become more intelligent in understanding your documents as you continue to use them. Please refer to the following list for a subset of Amazon Textract usage examples we will be covering in the upcoming chapters:
- Natural language processing (NLP) for text extraction – This use case will show an end-to-end example of how to use Textract to get text from documents and then perform NLP techniques on the text to derive insights. We will cover some of these key concepts with an example in Chapter 3, Introduction to Amazon Comprehend.
- Quickly set up automated document processing workflows – In this use case we will see how to build a solution using Textract and other AWS services to automate common document management tasks, such as a loan application approval workflow, resulting in cost and time savings. This use case will be covered as part of Chapter 4, Automating Document Processing Workflows.
- Building a scalable intelligent centralized search index – Amazon Textract enables you to extract data from scanned documents and store it in Amazon S3. Amazon S3 is a cost-effective and scalable object storage solution. The data in Amazon S3 can be indexed using Amazon Elasticsearch and you can make your archives searchable. You can also create a centralized search solution for your data sitting in silos by moving them into Amazon S3. We will cover this use case in Chapter 5, Creating NLP Search.
- Implementing compliance in archival documents – Because of Textract's inherent ML capabilities, it can identify text in pages, tables, and forms automatically. This feature is especially helpful when you want to build intelligent systems that depend on document metadata for determining compliance with business processes. We will look at an example of this use case in Chapter 6, Using NLP to Improve Customer Service Efficiency.
- Building automated data capture from forms into existing apps/chatbots – Amazon Textract provides APIs that you can use within your applications with a diverse collection of document types. For example, you may need to query receipts from your vendors and use that to make decisions as part of your operations. In this use case we will see how to use a chatbot with your document processing application using Amazon Lex (https://aws.amazon.com/lex/). This will be covered in detail in Chapter 8, Leveraging NLP to Monetize Your Media Content.
As you can see, Amazon Textract can be used for various types of document processing use cases and provides several advanced benefits that you would not find in traditional rule-based systems or OCR solutions. You can read some of these benefits here:
- Text? Structured? Unstructured? Textract to the rescue: Amazon Textract uses AI and ML to detect structured text in tables and unstructured text such as textual data from documents in pages, lines, and words. Amazon Textract first determines the layout of the document, then detects the types of content in the document, along with their relationships and context, prior to extraction. It also provides a confidence score with each detected text, table, and key/value pair. We will see some examples in the next section.
- Amazon Textract overcomes the limitations of OCR: While Amazon Textract uses OCR implicitly, that is not the only benefit. You do not have to worry about maintaining various templates and formats as it uses ML rather than a template-based approach. So, it works for all kinds of document templates used across industries, for example invoices, receipts, employment forms, resumes, tax preparation docs, medical claim forms, technical specifications, and more.
- Security and compliance: Security is the highest priority at AWS. Amazon Textract conforms to the Shared Responsibility Model (https://aws.amazon.com/compliance/shared-responsibility-model/).
To understand the security and compliance features of Amazon Textract, please refer to https://docs.aws.amazon.com/textract/latest/dg/security.html. Amazon Textract is covered in multiple AWS compliance programs, including System and Organizational Control (SOC), International Organization for Standardization (ISO), as well as PCI and HIPAA. For more details, please refer to https://docs.aws.amazon.com/textract/latest/dg/SERVICENAME-compliance.html.
- APIs for easy integration with your applications: Amazon Textract provides APIs in Java, Python, and other languages. Behind these APIs run powerful ML models to easily extract text from your documents. For a detailed walk-through of the APIs, please refer to the section titled Using Amazon Textract with your applications.
- Amazon Textract is serverless and scalable: Amazon Textract is a fully managed and serverless service that will automatically scale based on the volumes of documents you need to process. It will scale up to handle additional demand and will scale down once the demand subsides.
- Cost effective: Amazon Textract pricing is similar to other fully managed AWS services. Customers pay only for what they use. For example, the cost to process one page of a document in the us-east-1 region is $0.0015. There is a free tier available for you to get started quickly. For more details, please refer to https://aws.amazon.com/textract/pricing/.
In this section, we briefly listed some interesting document-processing use cases that Amazon Textract can help solve and reviewed some of the key benefits of Amazon Textract, such as pre-built intelligence, cost effectiveness, scalability, and ease of use. In the next section, we will use the AWS Management Console (https://console.aws.amazon.com/) to walk through Amazon Textract's product features, such as table detection, form detection, handwriting detection, text detection, and multi-language support.
Presenting Amazon Textract's product features
Alright, it's time to start exploring the cool features we have been talking about so far. We will start by seeing how you can quickly upload the sample documents provided in our GitHub repository (https://github.com/PacktPublishing/Natural-Language-Processing-with-AWS-AI-Services) to your Amazon Textract AWS console. Then, we will walk through the key features of Amazon Textract, along with multi-language support by using a French COVID-19 form. We will also cover Amazon Textract's integration with Amazon A2I, which will quickly help set up a human review workflow for the text, which needs to be highly accurate, such as an invoice amount (https://aws.amazon.com/augmented-ai/) at a high level. We will cover the following:
- Sign in to your AWS Management Console.
- Upload sample document(s).
- Raw text or text extraction.
- Key value extraction or form values.
- Table extraction.
- Multiple language support.
- Handwriting extraction.
- Amazon Augmented AI or A2I support for human in the loop.
As a first step, please refer to the Technical requirements section to sign up for an AWS account and sign in to get started.
Uploading sample document(s)
Now, let's see how to upload a document to Textract:
- Download the sample documents from the GitHub repository (https://github.com/PacktPublishing/Natural-Language-Processing-with-AWS-AI-Services/blob/main/Chapter%2002/employment_history.png).
- In your AWS Management Console, in the Services search window, start typing Textract, and select Amazon Textract.
- Now click on Try Amazon Textract and click the Upload Document button to select the document you downloaded in step 1:

Figure 2.1 – Click the Upload document button on Amazon Textract console
This will upload the document to Amazon Textract:

Figure 2.2 – Employment application.png
Raw text or text extraction
The following analysis is displayed in the Amazon Textract console:
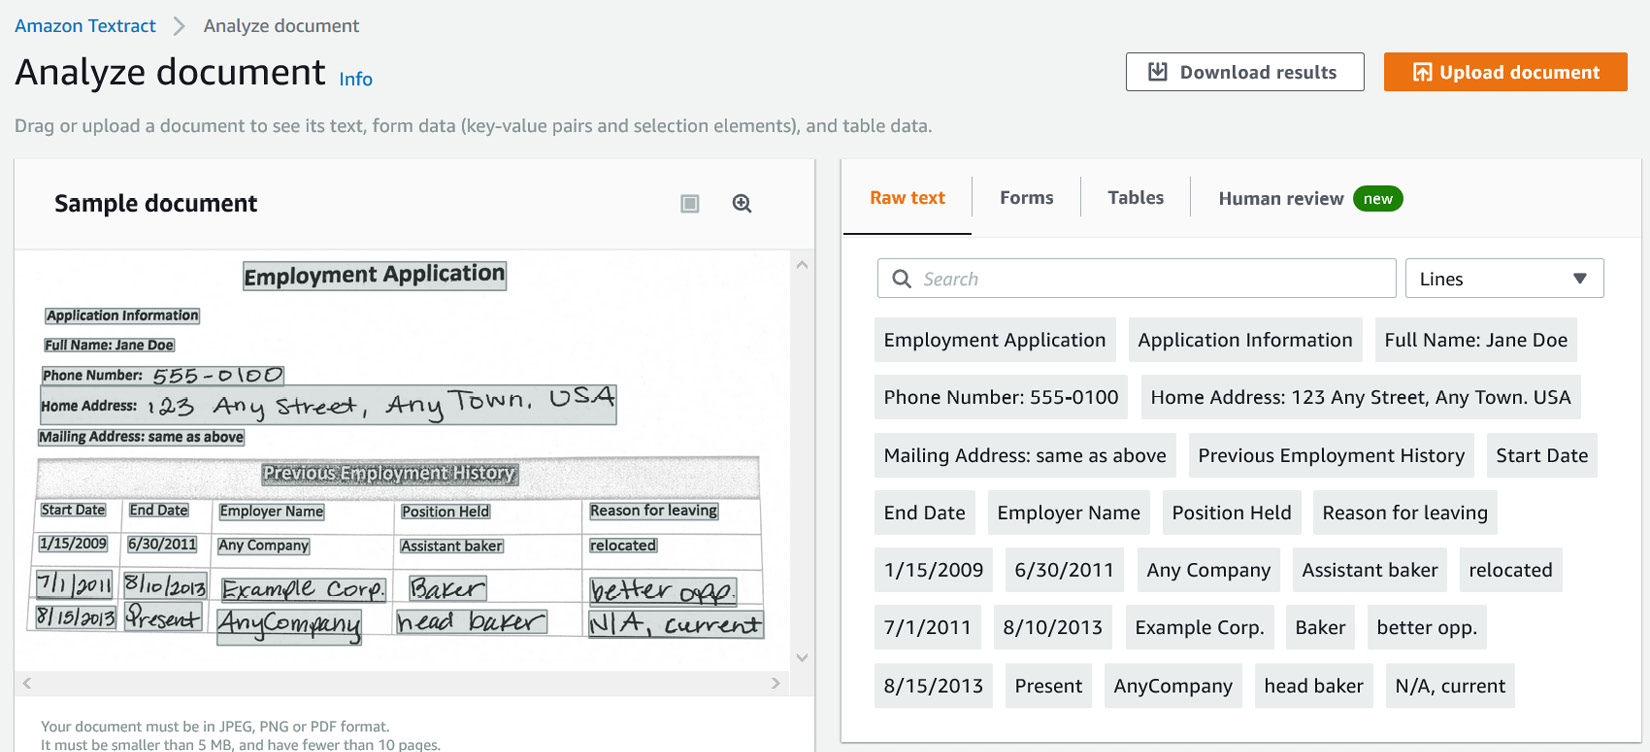
Figure 2.3 – Amazon Textract console for text extraction
Click on the Raw text tab to see the extracted text:

Figure 2.4 – Amazon Textract text response as lines and words
Note
Amazon Textract provides support for rotated documents. Please refer to https://docs.aws.amazon.com/textract/latest/dg/limits.html for more details on Textract service limits.
Working with multi-page documents
Amazon Textract has the intelligence to recognize that some documents have multiple formats in them and is able to extract content accordingly. For example, you may be working with reports or a request for proposal document with multiple segments. Please download the image shown in Figure 2.4 (https://github.com/PacktPublishing/Natural-Language-Processing-with-AWS-AI-Services/blob/main/Chapter%2002/two-column-image.jpeg) and upload it to the Amazon Textract console to try this out:

Figure 2.5 – Multi-page scanned image sample
Amazon Textract will extract the pages and the paragraphs, along with the lines and the words. Also, it will give you the exact positions of these words and paragraphs in the document, which is very important for context. See the following screenshot to understand the bounding box or geometry derived using Textract:
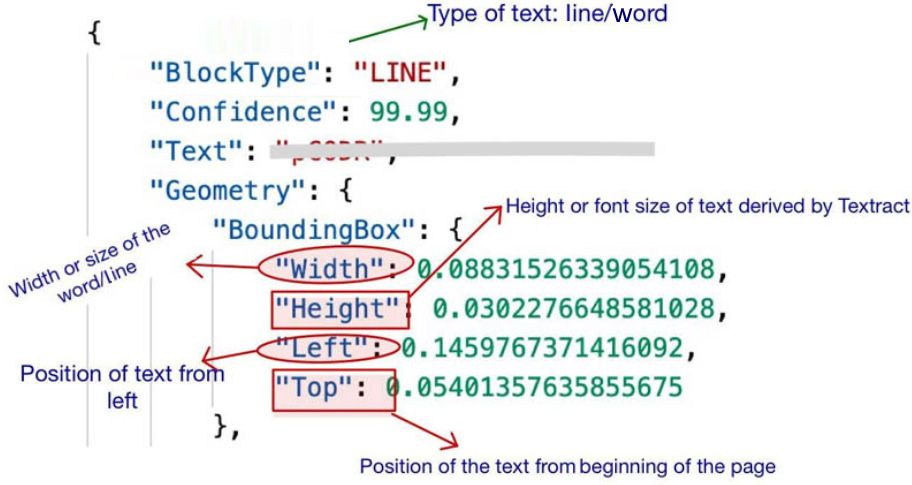
Figure 2.6 – Textract bounding box response for detected text
Here is a screenshot of this document in the AWS console:

Figure 2.7 – Multi-page scanned image Amazon Textract text response in the AWS console
Form data and key/value pairs
Amazon Textract segments documents to identify forms so it can return your key/value pairs from these forms. We will use the employment application sample document template (https://github.com/PacktPublishing/Natural-Language-Processing-with-AWS-AI-Services/blob/main/Chapter%2002/emp_app_printed.png), which you downloaded from the GitHub repository:
- Click on the Upload document button in the Amazon Textract console:

Figure 2.8 – Upload document button in the Textract console
- Click on the Forms tab. You will see the extracted key/value pairs, as shown:

Figure 2.9 – Sample document form and key/value pair extraction in the Amazon Textract console
Table extraction
Amazon Textract can recognize if your document has content structured in tables, for example, receipts, or a listing of technical specifications, pharmacy prescription data, and so on. Textract provides you with the ability to specify whether it should look for tables in your documents when using the API. Along with the table and its contents, Textract returns metadata and indexing information of the table contents, which you can find out more about in the API walk-through later. For this demo, you can download this sample receipt (https://github.com/PacktPublishing/Natural-Language-Processing-with-AWS-AI-Services/blob/main/Chapter%2002/receipt-image.png) and upload it into the Amazon Textract console. You will get the extracted table shown in the following screenshot:

Figure 2.10 – Table extraction of sample receipt in the Amazon Textract console.
Multiple language support
Amazon Textract provides support for extracting text in multiple languages. For the latest list of languages supported, please refer to this link: https://aws.amazon.com/textract/faqs/.
Note
Handwriting support is available only in English at the time of writing (April 2021).
During the COVID lockdown in France, anyone wishing to leave their house had to fill in a declaration form to explain why they were outside. We will use this sample form to demo the Amazon Textract language detection feature for the French language. The form is available at https://www.connexionfrance.com/French-news/Covid-19-in-France-Your-questions-on-declaration-form-needed-to-leave-the-house.
You can also download this form from https://github.com/PacktPublishing/Natural-Language-Processing-with-AWS-AI-Services/blob/main/Chapter%2002/form-derogatoire.jpg and upload it to the Amazon Textract console. Click on the Raw text tab, then Forms:

Figure 2.11 – French data extraction from a sample scanned COVID form in French
Amazon Textract is able to detect both key/value pairs and raw text from this form in French.
Handwriting detection
Another very common challenge customers face with data extraction is when you have mixed content documents, such as handwritten text along with printed text. This could be, for example, a prescription form that doctors write for their patients on paper printed with the doctor's name and address. This brings us to another key feature of Amazon Textract: detecting handwritten content from documents:
- Download the sample handwritten invoice from the GitHub repository (https://github.com/PacktPublishing/Natural-Language-Processing-with-AWS-AI-Services/blob/main/Chapter%2002/sample-invoice.png).
- Upload the sample into the Amazon Textract console, as shown in Figure 2.12. Amazon Textract is able to extract handwritten as well as printed key/value pairs (form data), tables, and text from the sample document:
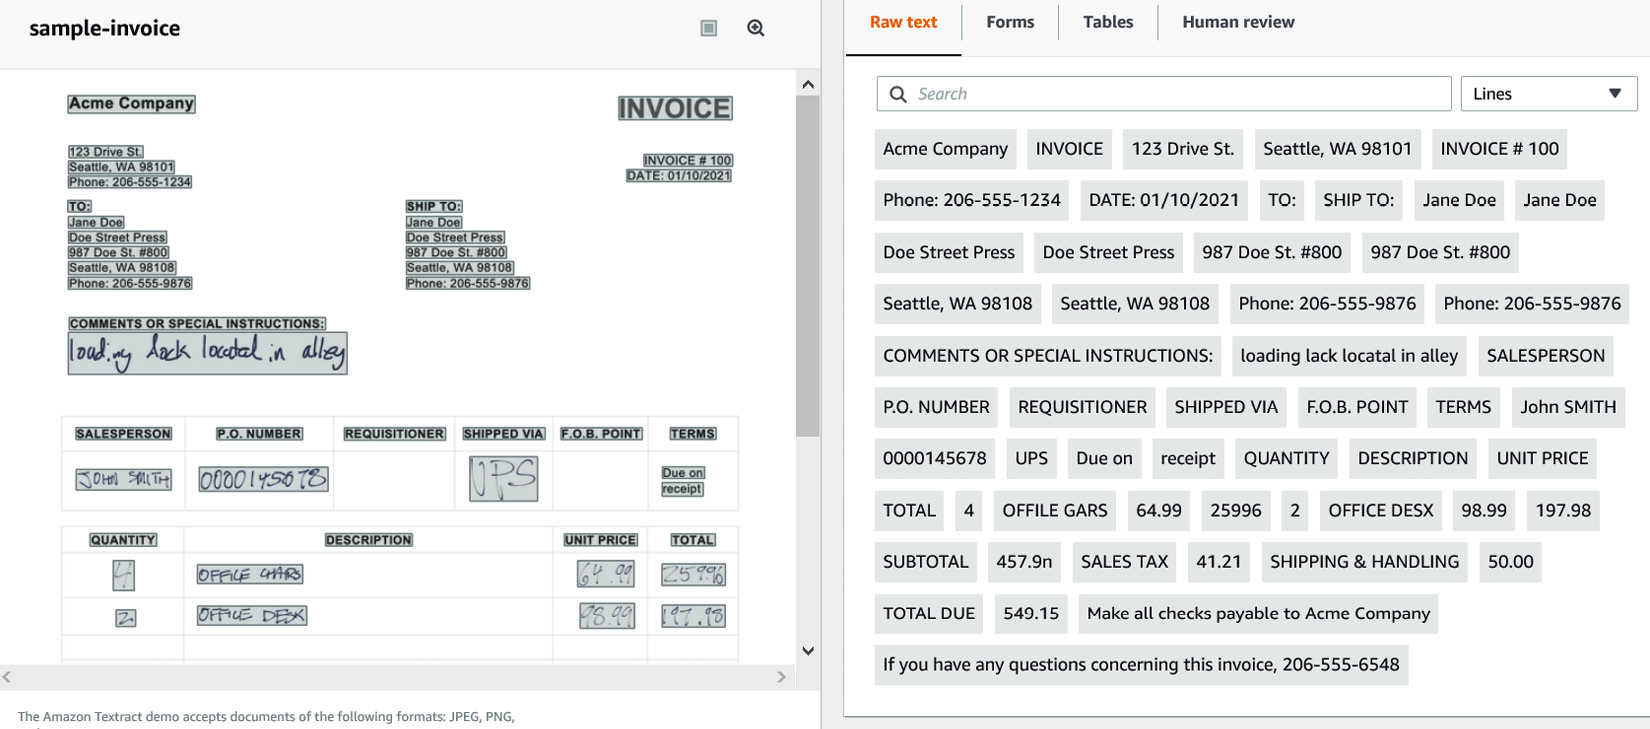
Figure 2.12 – Handwritten as well as printed text extracted from a sample invoice
- You can change tabs to Forms and Tables to see how Amazon Textract is able to quickly extract this handwritten and printed content from this sample document.
Human in the loop
Amazon Textract provides in-built integration with Amazon A2I (https://aws.amazon.com/augmented-ai/). Using Amazon A2I, you can build human workflows to manage certain documents that require further review by a human for auditing purposes, or just to review the ML predictions. For example, social security numbers or monetary amounts may need to be highly accurate. It is similar to having a first pass of getting text from AI and then using human teams to double-check what the AI has predicted for you.
We will cover handwriting and human in the loop in detail when we get to Chapter 17, Visualizing Insights from Handwritten Content.
Lastly, the Textract console provides you the option to download and review the JSON documents that are the result of the API responses that were invoked for the various Textract features we walked through:

Figure 2.13 – Download Textract results from console
In this section, we walked through Amazon Textract's key product features to extract text, forms, tables, and handwritten content from PDF and image documents, including support for documents in multiple languages. In the next section, we will review how to use Amazon Textract APIs, walk through the JSON responses in detail, and understand how to use Textract with your applications.
Using Amazon Textract with your applications
In this section, we will introduce and walk through the Amazon Textract APIs for real-time analysis and batch processing of documents. We will show these APIs in action using Amazon SageMaker Jupyter notebooks. For this section, you will need to create an Amazon SageMaker Jupyter notebook and set up IAM permissions for that notebook role to access Amazon Textract. After that you will need to clone the notebook from our GitHub repository (https://github.com/PacktPublishing/Natural-Language-Processing-with-AWS-AI-Services), download the sample images, create an Amazon S3 (https://aws.amazon.com/s3/) bucket, upload these images to the S3 bucket, and then refer to this location in the notebook for processing.
Let's get started:
- For instructions to create an Amazon SageMaker notebook instance, please refer to the Creating an Amazon SageMaker Jupyter notebook instance sub-section in the Setting up your AWS environment section at the beginning of this chapter. Alternatively, you can refer to the Amazon SageMaker documentation to create a notebook instance: https://docs.aws.amazon.com/sagemaker/latest/dg/gs-setup-working-env.html.
IAM role permissions while creating Amazon SageMaker Jupyter notebooks
First, accept the default for the IAM role at notebook creation time to allow access to any S3 bucket. After the notebook instance is created, follow the instructions in the sub-section Changing IAM permissions and trust relationships for the Amazon SageMaker notebook execution role under the section, Setting up your AWS environment at the beginning of this chapter to add AmazonTextractFullAccess as a permissions policy to the notebook's IAM role.
- Once you have created the notebook instance and its status is InService, click on Open Jupyter in the Actions menu heading for the notebook instance:

Figure 2.14 – Open the Jupyter notebook
This will take you to the home folder of your notebook instance.
- Click on New and select Terminal, as shown in the following screenshot:

Figure 2.15 – Open Terminal in a Jupyter notebook
- In the terminal window, first type cd SageMaker and then type git clone https://github.com/PacktPublishing/Natural-Language-Processing-with-AWS-AI-Services, as shown in the following screenshot:

Figure 2.16 – git clone command
- Now, exit the terminal window, go back to the home folder, and you will see a folder called Chapter 02. Open the folder and you should see a notebook called Amazon Textract API Sample.ipynb. Open this notebook by clicking it.
- Follow through the steps in this notebook that correspond to the next few subheadings in this section by executing one cell at a time. Please read the descriptions provided above each notebook cell.
Textract APIs
Before jumping into a notebook demo of how you can use the Textract APIs, we will explore the APIs and their features. Amazon Textract APIs can be classified into synchronous APIs for real-time processing and asynchronous APIs for batch processing. Let's now examine the functions of these APIs.
Synchronous APIs for real-time processing
These APIs take single-page scanned images (JPG or PNG) from your existing filesystem, which is local to your computer, or in an Amazon S3 bucket. There are two APIs for real-time analysis:
- Detect Document Text API: This API will extract words and lines from scanned images. You can use this API for use cases where you just want the text content from the scans, and your data does not have forms or tables, such as story books, student exam papers, and scanned news articles. You can use this API in web or mobile applications to quickly scan text from documents in real time. Another way to use this API is to extract the text data and perform further NLP on this data, such as to identify paragraphs and headers, perform further data labeling for key/value pairs, or use it for downstream processing.
Key/value pairs
Key/value pairs in the case of a form means the key will be the name and the value will be "Jane Doe."
- Analyze Document API: This API is much more comprehensive in its function and can help you extract text from scanned images and identify forms (key/value pairs) and tables from documents. You can use this API with various types of documents, such as invoices, receipts, medical intake forms, resumes, tax forms, and all types of financial forms. You can create an application where a user can take pictures of receipts and use this API to do a quick analysis of the invoice to retrieve the amount or the invoice ID.
Asynchronous APIs for batch processing
These APIs accept single-page or multi-page images (JPG/PNG) and PDFs that are uploaded to an Amazon S3 bucket. It runs a batch analysis to extract content from these images and documents:
- StartDocumentAnalysis: This API is similar to the AnalyzeDocument synchronous API in function, as it will extract text, tables, and form data from the input documents. The difference is this API also supports PDF documents. Input documents should be stored in an Amazon S3 bucket, and its S3 URL should be provided to this API. This API will start the batch job for document analysis.
- GetDocumentAnalysis: This API will receive the results for an Amazon Textract StartDocumentAnalysis operation in the form of key/value pairs, tables, and text. This also returns the job ID and their success or failure status.
- StartDocumentTextDetection: This API is similar to the real-time DetectDocumentText API in functionality as it detects text from documents in batches that have been uploaded to an Amazon S3 bucket. We will see this API demo in the Python notebook example.
- GetDocumentTextDetection: This API is used to retrieve the results of an Amazon Textract StartDocumentTextDetection operation in the form of lines and words. This also returns the job ID and its success or failure status.
Note
Batch APIs can be used with JPEG, PNG, and PDF documents stored in an Amazon S3 bucket.
In this section, we covered batch and real-time APIs of Amazon Textract. In the next section, we will see the implementation of these APIs through the Jupyter notebook you set up in the previous section.
Textract API demo with a Jupyter notebook
In this section, we will provide Textract APIs' implementation through a Jupyter notebook. We will execute the code cells in the Jupyter notebook you set up at https://github.com/PacktPublishing/Natural-Language-Processing-with-AWS-AI-Services/blob/main/Chapter%2002/Amazon%20Textract%20API%20Sample.ipynb, which you cloned in a previous step in a Jupyter notebook environment. The notebook contains the prerequisite steps, and we will walk through the complete code for all the APIs here. We provide only important code snippets in the book, as follows:
- DetectText API with a document passed from a local filesystem in the form of image bytes
- AnalyzeText API with a document passed from S3 to detect text, forms, and tables from invoices
- Batch processing with an employment application form using the StartDocumentText and GetDocumentText APIs
DetectText API
Let's begin:
- Open the notebook and execute the first cell to import the boto3 libraries to set up the Amazon Textract boto3 Python SDK.
- Refer to the notebook to set up and install boto3:
- Setting up an Amazon S3 Python SDK boto3 client: https://boto3.amazonaws.com/v1/documentation/api/latest/reference/services/s3.html:
s3 = boto3.client('s3')
- Setting up an Amazon Textract Python SDK boto3 client: https://boto3.amazonaws.com/v1/documentation/api/latest/reference/services/textract.html:
textract = boto3.client('textract')
- Setting up an Amazon S3 Python SDK boto3 client: https://boto3.amazonaws.com/v1/documentation/api/latest/reference/services/s3.html:
- Download the sample documents from https://github.com/PacktPublishing/Natural-Language-Processing-with-AWS-AI-Services/blob/main/Chapter%2002/sample-invoice.png. If you have already cloned this GitHub repository, you don't have to download the sample again, you can directly refer to them from your notebook under Chapter 02.
- Follow the instructions in the Creating an Amazon S3 bucket and a folder and uploading objects sub-section in the Setting up your AWS environment section to create an S3 bucket and upload your sample documents.
- Copy the name of the Amazon S3 bucket you created and to which you uploaded the sample documents and paste it in the notebook:
s3BucketName = "<your amazon s3 bucket>"
- Here is the image we are going to use in this notebook:
documentName = "sample-invoice.png"
display(Image(filename=documentName))
That displays the following image:

Figure 2.17 – A sample receipt
- Let's get back to the notebook and run the following code to see how Amazon Textract's DetectText API works.
The following code will read the document's content in the form of image bytes:
with open(documentName, 'rb') as document:
imageBytes = bytearray(document.read())
- The following code will call Amazon Textract by passing image bytes from your local file in your filesystem:
response = textract.detect_document_text(Document={'Bytes': imageBytes})
You are passing the image bytes directly to this API and getting a JSON response. This JSON response has a structure that contains blocks of identified text, pages, lines, a bounding box, form key values, and tables. In order to understand the Amazon Textract JSON structure and data types, refer to this link: https://docs.aws.amazon.com/textract/latest/dg/API_Block.html.
- Now we will import the JSON Python package so we can print our API responses:
import json
print (json.dumps(response, indent=4, sort_keys=True))
- The following shows a sample JSON response for a line from the document. It consists of blocks, the block type, the confidence score of detecting this block type line, and the geometrical location of the line using bounding boxes, along with the identified text:
{
"BlockType": "LINE",
"Confidence": 99.96764373779297,
"Geometry": {
"BoundingBox": {
"Height": 0.013190358877182007,
"Left": 0.5149770379066467,
"Top": 0.16227620840072632,
"Width": 0.06892169266939163
},
Note
This API will not give you forms and tables. It gives only lines, words, and corresponding bounding boxes. This API will be helpful for use cases such as paragraph detection in audit documents and extracting text from scanned books.
Execute the rest of the cells in the notebook to explore the JSON response in detail.
DetectDocument API
Now, we will show you how you can use the DetectDocument API to detect text in two-column documents in a reading order, with your data in stored in an Amazon S3 bucket:
- Download the sample documents from https://github.com/PacktPublishing/Natural-Language-Processing-with-AWS-AI-Services/blob/main/Chapter%2002/two-column-image.jpeg. If you have already cloned this GitHub repository, you don't have to download the sample again, you can directly refer to it under Chapter 02.
- Upload these documents to your Amazon S3 bucket under the textract-samples prefix using the instructions here: https://docs.aws.amazon.com/AmazonS3/latest/user-guide/upload-objects.html.
- Display the input document from the Amazon S3 bucket:
documentName = "textract-samples/two-column-image.jpg"
display(Image(url=s3.generate_presigned_url('get_object', Params={'Bucket': s3BucketName, 'Key': documentName})))
- Invoke the DetectDocumentText API by specifying the Amazon S3 bucket and the filename, as shown in the following code snippet. Let's also print the response to review the results:
Response = textract.detect_document_text(
Document={
'S3Object': {
'Bucket': s3BucketName,
'Name': documentName
}
})
print(response)
Note
For more details about the DetectDocumentText API, refer to this link: https://boto3.amazonaws.com/v1/documentation/api/latest/reference/services/textract.html#Textract.Client.detect_document_text.
- Once we have the response, we will use the following code to parse documents in reading order for multi-page documents. We will use the Amazon Textract JSON response parser to get the lines in reading order. Please run this command to install this library:
python -m pip install amazon-textract-response-parser
- Now, run the following code to see the results printed line by line for multi-column format documents:
doc = Document(response)
for page in doc.pages:
for line in page.getLinesInReadingOrder():
print(line[1])
You get the following response:

Figure 2.18 – Textract response for lines in reading order
AnalyzeDocument API
Now we will analyze invoices with the AnalyzeDocument API to extract forms and tables:
- Call the Amazon Textract AnalyzeDocument API:
response = textract.analyze_document(
Document={
'S3Object': {
'Bucket': s3BucketName,
'Name': documentName
}
},
FeatureTypes=["FORMS","TABLES"])
- Run the following code to parse the key/value pairs and search for keys. To make it easy to parse the Textract response, you can use the Amazon Textract Response Parser library. We will use this to extract the data and search for some keys:
doc = Document(response)
for page in doc.pages:
print("Fields:")
for field in page.form.fields:
print("Key: {}, Value: {}".format(field.key, field.value))
- In the following code, we are looking for the Phone Number ikey n the document:
print(" Get Field by Key:")
key = "Phone Number:"
field = page.form.getFieldByKey(key)
if(field):
print("Key: {}, Value: {}".format(field.key, field.value))
- In the following code, we are looking for the Address key in the document:
print(" Search Fields:")
key = "address"
fields = page.form.searchFieldsByKey(key)
for field in fields:
print("Key: {}, Value: {}".format(field.key, field.value))
You will get the following output:
Fields:
Key: Phone:, Value: 206-555-1234
Key: Phone:, Value: None
Key: Phone:, Value: None
Key: COMMENTS OR SPECIAL INSTRUCTIONS:, Value: loading lack locatal in alley
Key: SALES TAX, Value: 41.21
Key: SHIPPING and HANDLING, Value: 50.00
Key: REQUISITIONER, Value: None
Key: SUBTOTAL, Value: 457.9n
Key: TOTAL DUE, Value: 549.15
Key: SALESPERSON, Value: John SMITH
Key: SHIP TO:, Value: Jane Doe Doe Street Press 987 Doe St. #800 Seattle, WA 98108 206-555-9876
Key: P.O. NUMBER, Value: 0000145678
Key: TO:, Value: Jane Doe Doe Street Press 987 Doe St. #800 Seattle, WA 98108 206-555-9876
Key: DATE:, Value: 01/10/2021
- To parse tables from the JSON response, please refer to the following code snippet:
doc = Document(response)
for page in doc.pages:
# Print tables
for table in page.tables:
for r, row in enumerate(table.rows):
for c, cell in enumerate(row.cells):
print("Table[{}][{}] = {}".format(r, c, cell.text))
- You will see the following response:
Table[0][0] = QUANTITY
Table[0][1] = DESCRIPTION
Table[0][2] = UNIT PRICE
Table[0][3] = TOTAL
Table[1][0] = 4
Table[1][1] = OFFILE GARS
Table[1][2] = 64.99
Table[1][3] = 25996
Table[2][0] = 2
Table[2][1] = OFFICE DESX
Table[2][2] = 98.99
Table[2][3] = 197.98
Note
You can convert these values into a pandas DataFrame, which we will cover in Chapter 16, Improving the Accuracy of PDF Batch Processing.
To find out more about the API JSON responses, refer to this link: https://docs.aws.amazon.com/textract/latest/dg/how-it-works-tables.html.
Processing PDF documents using Textract Asynchronous APIs
In this section, you will see how to analyze PDF documents using Textract async APIs for a sample job application form:

Figure 2.19 – A sample job application file
- The following code will help you get started with the StartDocumentText API and the GetDocumentText API:
jobID = startTextAnalysis(s3Bucket, docName)
print("Started text analysis for: {}".format(jobID))
if(isAnalysisComplete(jobID)):
response = getAnalysisResults(jobID)
- In this startTextAnalysis method, you call the StartDocumentTextDetection API to start the text analysis job:
def startTextAnalysis(s3Bucket, doc):
response = None
response = textract.start_document_text_detection(
DocumentLocation={
'S3Object': {
'Bucket': s3Bucket,
'Name': doc
}
})
return response["JobID"]
- Once you start the analysis, you use the following method to check whether the analysis is complete:
def isAnalysisComplete(jobID):
response = textract.get_document_text_detection(JobId=jobID)
status = response["JobStatus"]
print("Text Analysis status: {}".format(status))
while(status == "IN_PROGRESS"):
time.sleep(2)
response = textract.get_document_text_detection(JobId=jobID)
status = response["JobStatus"]
print("Status of Text Analysis is: {}".format(status))
return status
- Once the job is completed, you can use the GetDocumentTextDetection API to get the results:
def getAnalysisResults(jobID):
pages = []
response = textract.get_document_text_detection(JobId=jobID)
pages.append(response)
print("We received results for: {}".format(len(pages)))
nextToken = None
if('NextToken' in response):
nextToken = response['NextToken']
while(nextToken):
response = textract.get_document_text_detection(JobId=jobId, NextToken=nextToken)
pages.append(response)
print("We got the results for: {}".format(len(pages)))
nextToken = None
if('NextToken' in response):
nextToken = response['NextToken']
return pages
And we are done with the demo. Hopefully, you have had an opportunity to review and work with the different Textract APIs for real-time and batch processing and have successfully completed your notebook. In the next section, we will see how you can use these APIs to build serverless applications.
Building applications using Amazon Textract APIs
We have spoken about both synchronous (or real-time) APIs and asynchronous (or batch) APIs. Now, the question is how to integrate these APIs into an application. You can quickly integrate these APIs into a web application or any batch processing systems by using AWS Lambda. AWS Lambda runs any code in a serverless manner, be it Java or Python. It's an event-based trigger or programming technique in which you trigger a Lambda function based on an event. For example, you upload your documents to Amazon S3, which can trigger a Lambda function. In that Lambda function, you can call the Amazon Textract APIs and save the results in Amazon S3:

Figure 2.20 – Building serverless architecture with Amazon Textract to use with your apps
We will cover the architecture in detail in upcoming chapters, where we will talk about how you can build applications using the synchronous versus asynchronous APIs of Amazon Textract. We will also talk about using AWS API Gateway to create RESTful APIs to integrate into your web applications or mobile applications.
Summary
In this chapter, we saw a detailed introduction to Amazon Textract and its product features, along with a console walk-through, as well as running code samples using Textract APIs for different types of documents using both real-time and batch analysis.
We started by introducing the ready-made intelligence that Amazon Textract offers with powerful pre-trained ML models, and the ability to use its capabilities in your applications with just an API call. We also read about some popular use cases that Textract can be used for, along with references to some of the following chapters, where we will review those use cases in greater detail. We also read about Textract's benefits as compared to traditional OCR applications and rule-based document processing.
We covered various examples on how you can use Amazon Textract with different types of scanned images and forms. We reviewed different functions of Textract, such as detecting raw text, detecting form values that are stored as key/value pairs, detecting text in tables, detecting pages of text, detecting lines and words, detecting handwritten text and printed text, and detecting text in multiple languages, as well as detecting text that is written in two-column styles in documents. We covered both synchronous processing and asynchronous processing using Textract APIs. We also saw how to set up an Amazon SageMaker Jupyter notebook, clone the GitHub repository, and get started with running a Jupyter notebook. We were able to use an Amazon S3 bucket to store input documents and use them with Textract, and we were able to extract data from unstructured documents and store them in an Amazon S3 bucket.
In this chapter, we also covered Amazon Textract real-time APIs such as the AnalyzeDocument API and the DetectDocumentText API. We discussed the expected input document formats for these APIs and their limitations. We then spoke about how you can scale document processing for use cases where you need to extract data in batches. We read about batch processing APIs along with a Python SDK demo. Finally, we introduced an architecture to integrate Textract into your applications using AWS Lambda.
In the next chapter, you will be introduced to Amazon Comprehend, an AI service that uses ML to uncover insights in text. You will learn about different NLP techniques, review the features for Amazon Comprehend, read about its APIs, learn how you can set up a custom NLP model using Comprehend to detect entities unique to your business, and, like we did in this chapter, you will see Comprehend in action for different use cases.