
Chapter 13: Improving the Accuracy of Document Processing Workflows
In the last chapter, we covered how AWS AI services such as Amazon Textract and Amazon Comprehend Medical can help automate healthcare workflows quickly. In this chapter, we will talk about why we need humans in the loop in document processing workflows, and how setting up human-in-the-loop (HITL) processes with Amazon Augmented AI (Amazon A2I) can help improve accuracy in your existing document processing workflows with Amazon Textract.
Amazon A2I is a managed service that makes it easy to build the workflows required for the human review of machine learning (ML) predictions. In this chapter, we will cover the following topics:
- The need for setting up HITL processes with document processing
- Seeing the benefits of using Amazon A2I for HITL workflows
- Adding human reviews to your document processing pipelines
Technical requirements
For this chapter, you will need access to an AWS Account. Please make sure to follow the instructions specified in the Technical requirements section in Chapter 2, Introducing Amazon Textract, to create your AWS Account, and log in to the AWS Management Console before trying the steps in Improving the accuracy of document processing workflows.
The Python code and sample datasets for our solution can be found at the following link: https://github.com/PacktPublishing/Natural-Language-Processing-with-AWS-AI-Services/tree/main/Chapter%2013 .
Check out the following video to see the Code in Action at https://bit.ly/3jBxBQq.
Please use the instructions in the following sections along with the code in the repository to build the solution.
The need for setting up HITL processes with document processing
In the previous chapters, we have discussed how you can use Amazon Textract and Amazon Comprehend to automate your existing document processing workflows with AWS AI services. We covered some of the key use cases such as using Comprehend to analyze SEC filing reports and using Textract to extract text from any document or quickly digitize any document. We also spoke about how these AI services provide a confidence score with each predicted text, word, line, or entity. Now, the questions that customers often ask are about how to improve these predictions and to make sure they are highly accurate. In most AI systems, it's either AI doing the automation process or it's only humans or manual processes.
The ideal scenario would be both humans and AI working together so that the results predicted by these AI systems can be reviewed by humans to make sure they are highly accurate. This applies to scenarios where we are processing highly critical information in our document processing workflows, for example, processing loan applications, invoice processing, mortgage processing, or legal documents reviews, and so on. In all of these scenarios, you would want a human to validate or review whether the loan amount or invoice amount predicted by the ML or AI systems was accurate because if it was not, one zero could change your life! It could lead to millions in losses for the organization. Also, in the case of low-confidence predictions, you would also want to have the AI-predicted information checked over by a human reviewer. For example, in the case of claims processing, if your ML system has predicted a low confidence score for a claim, you would want to reject or approve the claim based on a human review. This working of humans and AI/ML together builds trust with the process and it also reduces the time to market for the overall document processing solution.
In this section, we covered why you would need to set up a human review loop with your existing document processing workflows – that is, it helps to improve accuracy and build trust with AI systems. In the next section, we will talk about some of the key benefits of using Amazon A2I when setting up HITL workflows.
Seeing the benefits of using Amazon A2I for HITL workflows
Amazon A2I is a managed service that makes it easy to build and manage human reviews with any ML application. It integrates directly with Amazon Textract and Amazon Rekognition to set up human workflows for use cases such as content moderation or document processing. You can also create custom workflows with any Sagemaker model. Some of the benefits of using Amazon A2I are as follows:
- It comes with 70+ UI templates to get started quickly with setting up UIs for human reviews. Check them out here: https://github.com/aws-samples/amazon-a2i-sample-task-uis.
- It reduces the time to market for your AI systems, as you know that there is a human backstop to catch low confidence scores.
- It provides you with options to choose a workforce. By workforce, we mean who is going to review the human loop tasks created. There are three choices with A2I – a private workforce, Amazon Mechanical Turk, and third-party vendors. Amazon Mechanical Turk is a globally districted workforce option available for you to use. In case you have sensitive data, you can onboard your own employees and use the private workforce option. In this chapter, we will show you how you can create a private workforce and use it in Amazon A2I.
We have discussed some of the benefits, now, let's deep dive into how Amazon A2I works with any AWS AI service, your custom model, or Sagemaker-deployed models through the following architecture:

Figure 13.1 – Amazon A2I architecture
Let's understand the diagram by going through each step:
- Your client application sends the data or documents to your AWS AI service or any custom model.
- The AWS AI service, such as Amazon Textract, or any custom ML model, makes a prediction.
- You create criteria or threshold conditions with your ML models to trigger an Amazon A2I human loop. In the previous architecture, the threshold is a high-confidence prediction, which is returned immediately to a client application. This threshold can be set by your business needs and use case, for example, invoices amount detected at 99% and above can be considered high confidence since it's highly critical and needs to be highly accurate. In cases where you are extracting some entity such as the location you may consider 90% as the high confidence level, below which to trigger a human review loop.
- Low confidence predictions, which are anything below your defined threshold limit, can be sent for human review, where a human or your workforce will be presented with a UI managed by Amazon A2I. The low confidence data will be presented in that UI to the human reviewers where they review the low confidence prediction and augment, correct, or validate it.
- The human-reviewed results are saved in Amazon S3, consisting of both what the AI predicted and what the humans augmented or modified. This data can be considered the ground truth and can be used to retrain the model if you are using a custom model. You can improve the accuracy of your custom models by retraining them from an augmented dataset. See the Further reading section for a blog reference on how you can achieve this.
From Amazon S3, your corrected or human augmented/validated AI/ML predictions can be sent to client applications.
Note
With Amazon Textract, you can only augment or validate your predictions. The model retraining feature is not supported yet, as Amazon Textract does not support custom models. However, with Amazon Comprehend's custom classification and the custom entity you can use Amazon A2I to retrain your custom models and improve accuracy.
In this section, we covered the benefits of using Amazon A2I and saw how it works to improve the accuracy of your AI/ML system. In the next section, we will walk you through how you can set up HITL workflows with document processing workflows using Amazon Textract and Amazon A2I.
Adding human reviews to your document processing pipelines
We covered how A2I works in general with any AWS AI service using an architecture. In this section, we will talk specifically about how Amazon A2I integrates with Amazon Textract so that you can automate your existing document workflows with a HITL. We will also show you a walkthrough on how to set up a human review workflow using the AWS Console.
Let's start by walking through how Amazon A2I works with Amazon Textract:
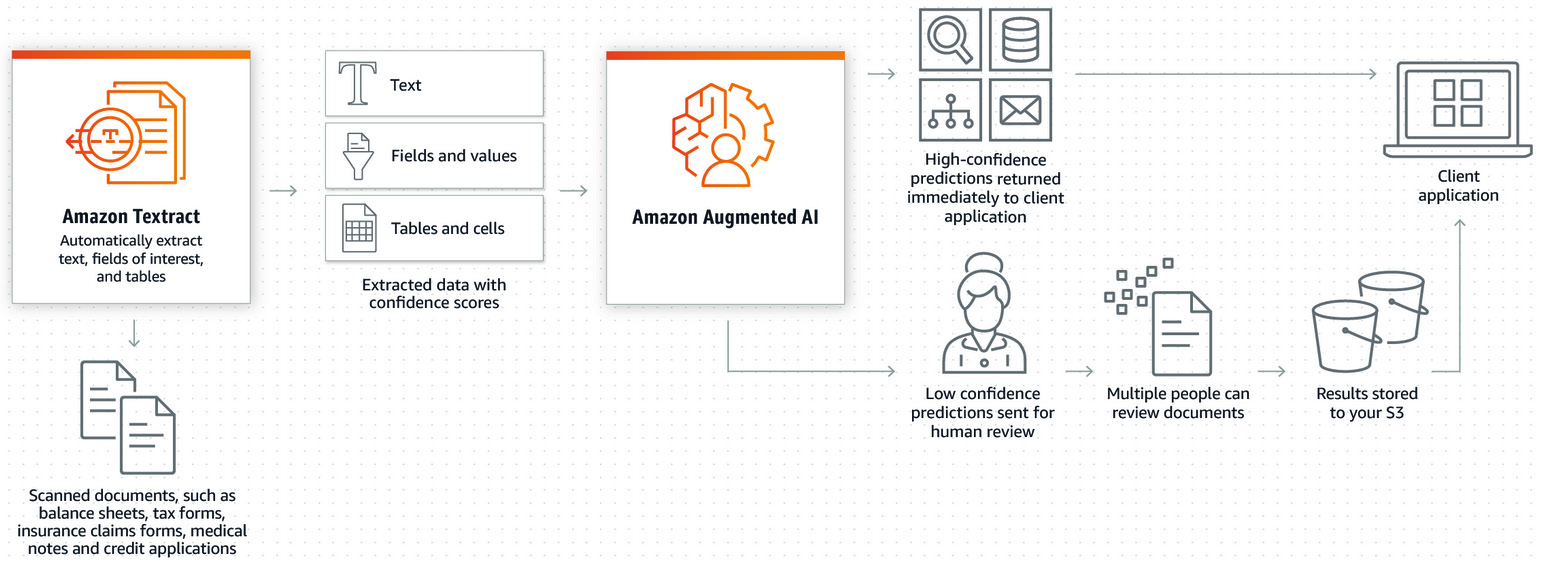
Figure 13.2 – Amazon A2I with Amazon Textract
Your scanned documents are sent to Amazon Textract. Amazon Textract extracts text, key-value pairs, and tables from the document. Now for this extracted text, key-value pairs, and tables, you also get confidence scores. You can set up a threshold that Amazon A2I triggers to create human review loops. You can set up a threshold with Amazon Textract for three things:
- For any missing keys in case of key-value pair detection, for example, the mailing address is an important key in a form you are reviewing and it's missing in what the AI predicted.
- You can define a threshold for predictions that can be considered high-confidence.
- You can send predictions for Quality Assurance (QA) auditing.
Note
Amazon Textract and Amazon A2I have a native integration in the API only for the key-value or form data extraction should you want to set up human reviews for text or tabular data detected by Amazon Textract.
You can use a custom A2I UI template and set up a loop using the starthumanloop A2I API rather than the Textract API. We will add examples on how you can set up a custom loop (in the Further reading section) when Amazon A2I starts a human loop API: https://docs.aws.amazon.com/sagemaker/latest/dg/a2i-start-human-loop.html#a2i-instructions-starthumanloop.
Let's go back to our fictitious company use case. This bank, LiveRight, wants to digitize its check processing system. The current system is a manual review of the check amount and date, which is time-consuming and error-prone. We will show you how LiveRight can use Amazon Textract and Amazon A2I to automate their current check processing system. We will use this sample check document:
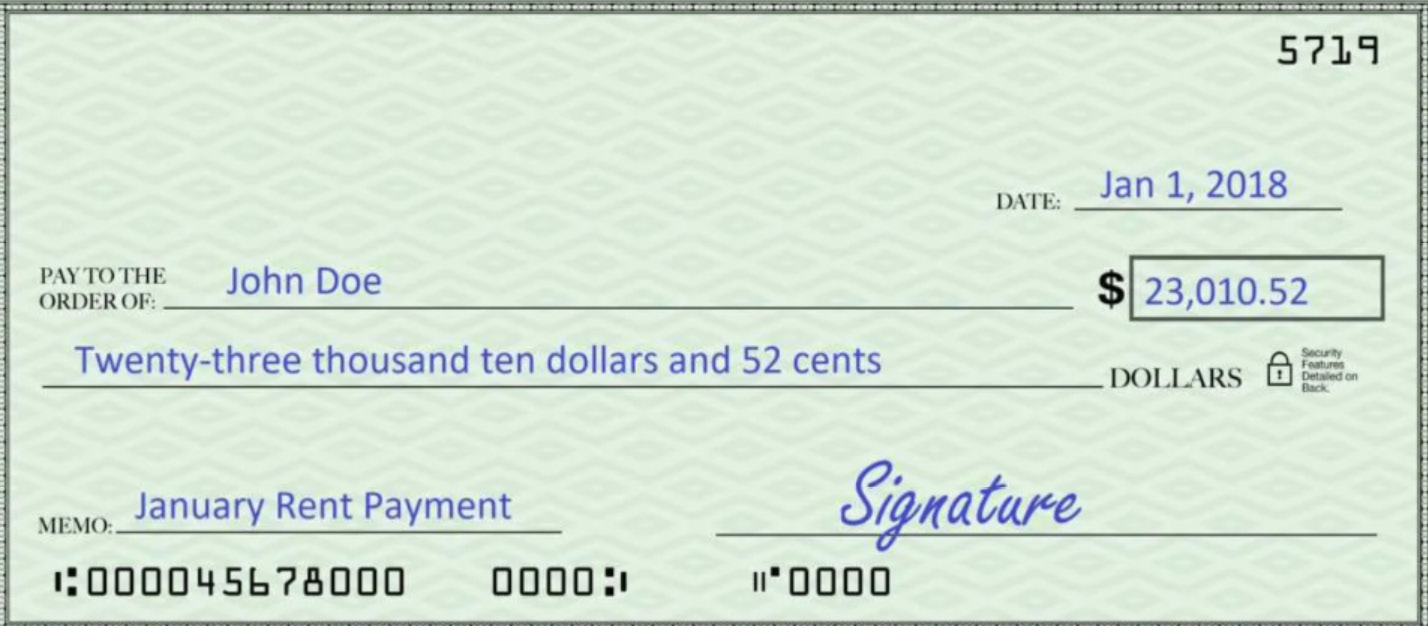
Figure 13.3 – Sample check
We will use the check to validate the dollar value and date to make sure it's accurate before we issue it to the payee. To do this, we will walk through the following steps:
- Creating an Amazon S3 bucket
- Creating a private work team in the AWS Console
- Creating a human review workflow in the AWS Console
- Sending the document to Amazon Textract and Amazon A2I by calling the Amazon Textract API
- Completing a human review of your document in the A2I Console
- Seeing the results in your S3 bucket
So, let's get started!
Creating an Amazon S3 bucket
First, we will talk about how you can create an Amazon S3 bucket and upload the sample document for Textract A2I processing. Amazon A2I needs an Amazon S3 bucket to store the human-annotated results, as we covered in the architecture in Figure 13.1. We will also enable the Cross-Origin Resource Sharing (CORS) configuration needed to set up the A2I loop in this S3 bucket.
This configuration allows the A2I browser permission to download resources from this S3 bucket. To do this, follow the next steps:
- Go to the Amazon S3 link: https://s3.console.aws.amazon.com/s3/bucket/create?region=us-east-1.
Then, create a bucket with a2i-demos as the bucket name, using the instructions in Chapter 2, Introducing Amazon Textract.
- After creating the bucket, upload the sample check from the following link to the bucket: https://github.com/PacktPublishing/Natural-Language-Processing-with-AWS-AI-Services/blob/main/Chapter%2013/samplecheck.PNG.
- After uploading the sample check, go to Amazon S3 bucket | Permissions and scroll down to CORS, then copy and paste the following CORS configuration:
[
{
"AllowedHeaders": [],
"AllowedMethods": [
"GET"
],
"AllowedOrigins": [
"*"
],
"ExposeHeaders": []
}
]

Figure 13.4 – CORS configuration for our S3 A2I output bucket
In this section, we covered creating an S3 bucket, uploading the sample check, and setting up the CORS configuration. Now, we will set up a private work team.
Creating a private work team in the AWS Console
In this section, we will walk you through how to create a private work team and add yourself as a worker using your email:
- Go to the following link and choose private: https://console.aws.amazon.com/sagemaker/groundtruth?region=us-east-1#/labeling-workforces.
- Click on Create private team, enter demo-team as team name, scroll down to Add workers, enter your own valid email address as the email address and your own organization in the Organization name field:
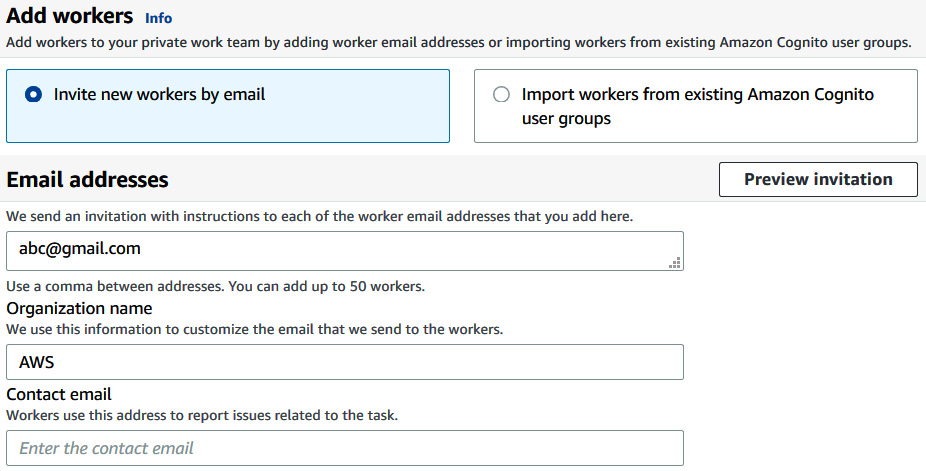
Figure 13.5 – Creating private team and adding workers
- Scroll down and click Create private team.
You will receive an email after adding a worker to the private team you created. This email will have a link to sign in to your A2I task UI portal, along with your username and password.
In this section, we covered how you can create a private workforce. Now, let's move on to the next section to set up a human review workflow.
Creating a human review workflow in the AWS Console
In this section, we will show you how you can create a human review workflow with Amazon Textract. You need the Amazon S3 bucket and private workforce created in previous sections, and a UI where the reviews and options ot set the threshold conditions for triggering the human review loop will appear:
- Go to this link to create a human review workflow: https://console.aws.amazon.com/a2i/home?region=us-east-1#/create-human-review-workflows.
In the Workflow settings screen, enter Textract-check in the Name field. In S3 bucket enter the name of the bucket you created: <s3://a2i-demos/> . For IAM role, click Create new role and choose any S3 bucket. Your settings should look like following:

Figure 13.6 – Creating flow definition with A2I
- Scroll down and choose Textract-key-value pair extraction in Task type.
- For triggers to invoke the human review, you can choose at least one condition or all three. In missing form key, enter $ and add key and enter Date. Enter the range 0 to 90 for the confidence threshold, as shown in the following screenshot:

Figure 13.7 – Setting the threshold to trigger the A2I loop with Textract
- Now, click the checkmark the second condition to review all form keys with confidence scores in a specified range and enter 0 to 90.
We set up two out of three trigger conditions for Textract A2I to trigger a review. The human loops will only be created when the preceding conditions are met – that is, if any key is missing, such as dollar amount and date, or any form key has a confidence score less than 90%.
- In Worker task template creation, enter textract-check-ui. This is the default UI for Textract forms with A2I integration. You can bring your own custom UI and add it with APIs, which we will cover in the next chapter.
- In Worker task template design, enter label the data.
- Scroll down to Workers and choose Private, then click on the Private team you just created:
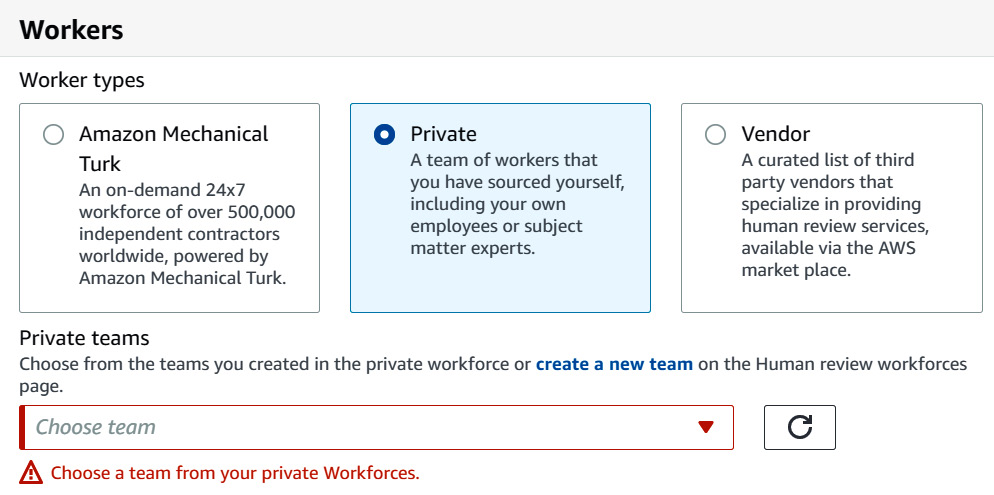
Figure 13.8 – Choosing your private team in the human review workflow setup
- Click Create. This will create a human flow definition. Copy the ARN of this flow definition, which we will use to invoke the human loop in the Textract API when the conditions defined in this flow definition are met.
In this section, we showed how you can create a flow definition for the human review loop. In the next section, we will show you how you can trigger this flow definition in the Textract Analyze document API while passing documents.
Sending the document to Amazon Textract and Amazon A2I by calling the Amazon Textract API
In this section, we will show you how you can trigger the A2I flow definition you just created in the Textract Analyze document API with forms.
If you have not done so in the previous chapters, you will first have to create an Amazon SageMaker Jupyter Notebook and set up Identity and Access Management (IAM) permissions for that notebook role to access the AWS services we will use in this notebook. After that, you will need to clone the GitHub repository (https://github.com/PacktPublishing/Natural-Language-Processing-with-AWS-AI-Services), go to the Chapter 13 folder, and open the chapter13 Improving accuracy of document processing .ipynb notebook:
Note
Make sure the IAM role in the notebook has permissions for AmazonTextractFullAccess (https://console.aws.amazon.com/iam/home?#/policies/arn:aws:iam::aws:policy/AmazonTextractFullAccess$jsonEditor) and AmazonAugmentedAIFullAccess (https://console.aws.amazon.com/iam/home?#/policies/arn%3Aaws%3Aiam%3A%3Aaws%3Apolicy%2FAmazonAugmentedAIFullAccess).
- To get started, go to this notebook and enter the S3 bucket name you created in the following notebook cell:
bucket="<your s3 bucket name>"
- In humanLoopConfig, paste the flow definition ARN copied from the previous setup:
humanLoopConfig = {
'FlowDefinitionArn':"<enter flow definition arn created> ",
'HumanLoopName':"textract-10",
'DataAttributes': { 'ContentClassifiers': [ 'FreeOfPersonallyIdentifiableInformation' ]}
}
- Run the following notebook cell to start the HITL configuration with the A2I Analyze document API by passing the humanloopconfig json, which has the flow definition we created in the console:
response = textract.analyze_document(
Document={'S3Object': {'Bucket': bucket,'Name': "samplecheck.PNG"}},
FeatureTypes=["FORMS"],
HumanLoopConfig=humanLoopConfig
)
- After running this command, you will get a response that has HumanLoopActivationConditionsEvaluationResults in the Textract response, as shown in the following screenshot:
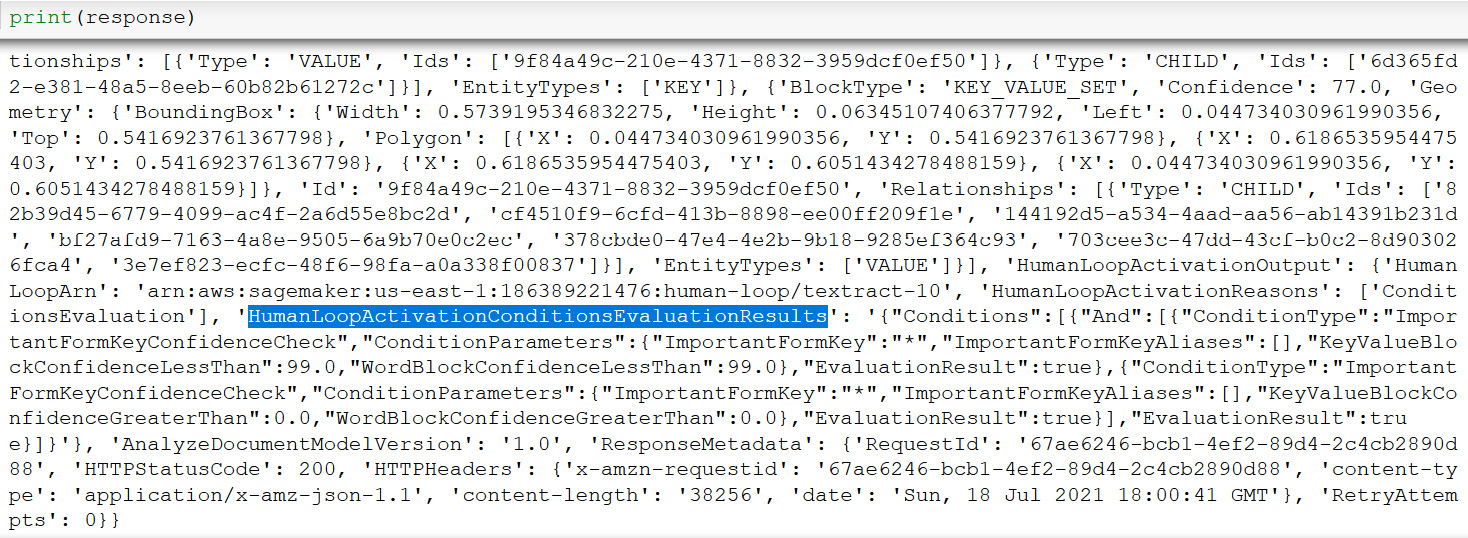
Figure 13.9 – Output of the JSON response of Textract Analyze document API with A2I settings
- Go to the private workteam you created: https://console.aws.amazon.com/sagemaker/groundtruth?region=us-east-1#/labeling-workforces
Copy the workteam ARN and paste it in the notebook cell as follows:
WORKTEAM_ARN= "enter your private workteam arn"
- Run the following code block to navigate to your workteam or A2I Console:
workteamName = WORKTEAM_ARN[WORKTEAM_ARN.rfind('/') + 1:]
- You will get a link. Click on the link and sign in with the username and password you received when creating a worker team with your email ID. You will see your A2I tasks, as shown in the following screenshot. Click on Start working:

Figure 13.10 – Amazon A2I Console screen with worker tasks
- You will be redirected to the task created when the Textract A2I loop was invoked:

Figure 13.11 – A2I Console with Textract-detected key-values from sample check
- You are shown the original sample check on the left side of this UI portal and the extracted key-value pair on the right. Feel free to validate the data and enter the changes if needed. Make sure the $ amount and date are correct and click Submit. You can see that the Textract-detected output is mapped to the original document (bounding box mapping) when you click on a specific key-value:
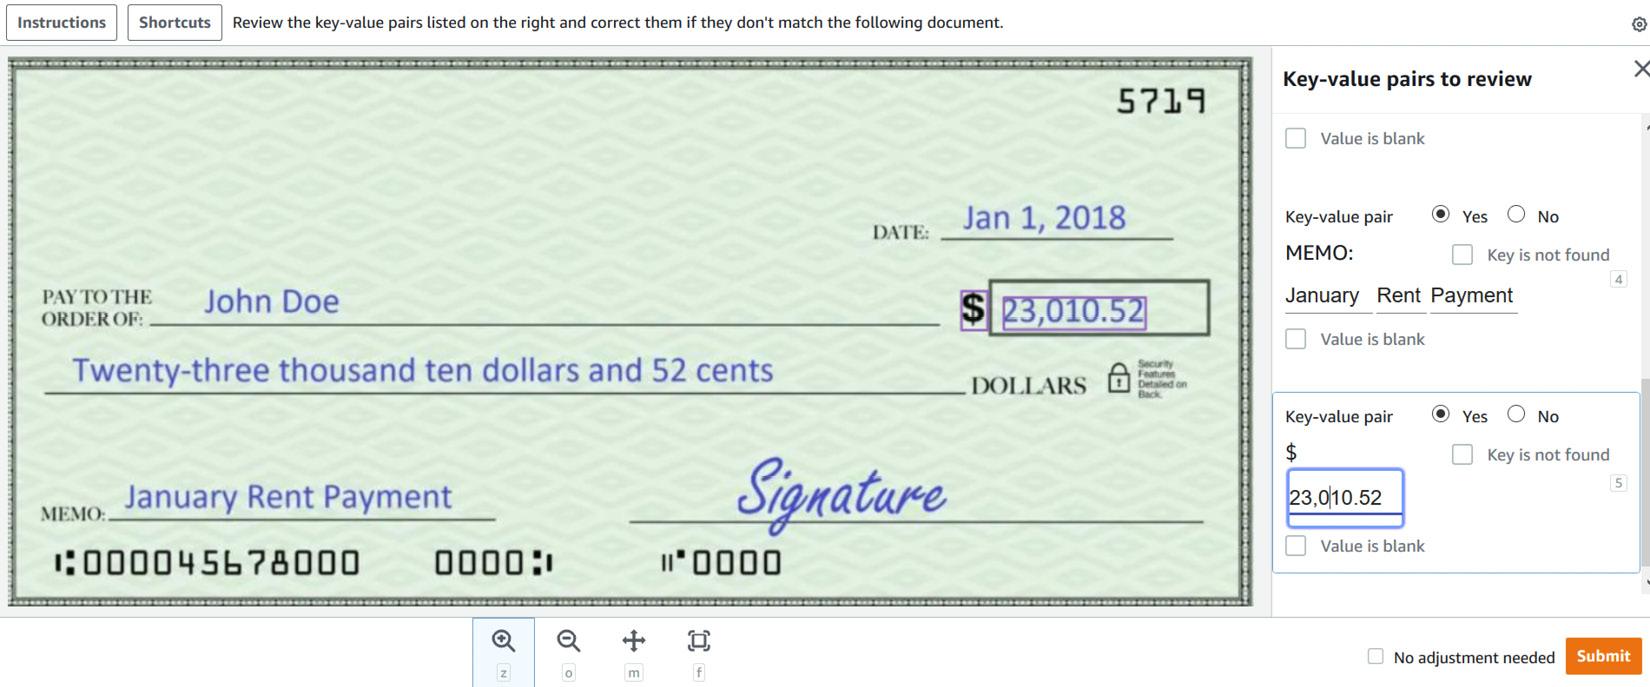
Figure 13.12 – Reviewing and correcting the Textract response in the A2I Console
- After augmenting and validating the values and clicking Submit, your output is saved in the same S3 bucket you created. Run the following notebook cell to get the JSON results from S3 and see the annotated results:
for resp in completed_human_loops:
splitted_string = re.split('s3://' + bucket + '/', resp['HumanLoopOutput']['OutputS3Uri'])
output_bucket_key = splitted_string[1]
print(output_bucket_key)
response = s3.get_object(Bucket= bucket, Key=output_bucket_key)
content = response["Body"].read()
json_output = json.loads(content)
pp.pprint(json_output)
print(' ')
You will get the output with the human-annotated answers in the following screenshot:

Figure 13.13 – Human-corrected A2I JSON output
In this section, we gave you a notebook walkthrough of invoking the Textract Analyze document API with a HITL following definition configuration for key-value pair or Forms detection.
Summary
In this chapter, we covered how you can improve the accuracy of your current document processing workflows when using Amazon Textract for automating these document workflows. We introduced Amazon A2I and how it can help improve the accuracy of your text predictions and can be integrated with Amazon Textract to set up a human review workflow. We also discussed how A2I can be used for model retraining with custom models to improve accuracy, which we will cover in the next chapter.
To further demonstrate how A2I works in action, we have also provided a 10-minute YouTube video tutorial by one of the authors cited in the Further reading section.
Further reading
- Using Amazon Textract with Amazon A2I for processing critical documents by Anuj Gupta, Talia Chopra, and Pranav Sachdeva: https://aws.amazon.com/blogs/machine-learning/using-amazon-textract-with-amazon-augmented-ai-for-processing-critical-documents//
- Learn how to add human reviews to your document processing pipelines by Mona Mona: https://www.youtube.com/watch?v=U2J_pq17POA