
Chapter 8: Leveraging NLP to Monetize Your Media Content
As we have seen in this book so far, AI, and specifically NLP, has a wide range of uses in areas hitherto considered traditional IT spurred on by the rapid proliferation of data and the democratization of machine learning (ML) with cloud computing. In the previous chapter, we saw a cool example of how you can bring color to social media reviews and other forms of textual data by running voice of the customer analytics with sentiment detection. We saw how you can use AWS Glue to crawl raw data from Amazon S3, use Amazon Athena to interactively query this data, transform the raw data using PySpark (http://spark.apache.org/docs/latest/api/python/index.html) in an AWS Glue job to call Amazon Comprehend APIs (which provide ready-made intelligence with pre-trained NLP models) to get sentiment analysis on the review, convert the data into Parquet, and partition it (https://docs.aws.amazon.com/athena/latest/ug/partitions.html) by sentiment to optimize analytics queries. In this chapter, we will change gears and look at a use case that has gained tremendous popularity in recent times due to the increased adoption of streaming media content, specifically how to monetize content.
The gap between online advertising and print media advertising is ever widening. According to this article, https://www.marketingcharts.com/advertising-trends-114887, quoting a PwC outlook report on global entertainment and media (https://www.pwc.com/outlook), online advertising spend was estimated to be approximately $58 billion higher than TV advertising, and $100 billion higher than magazine and newspaper advertising in 2020 even with the COVID-19 pandemic considered.
This, of course, is also driven by the increased usage of smart consumer devices and the explosion of the internet age consumer trends. Google Ads is one of the most popular ad-serving platforms today, accounting for 80% of Alphabet's (the public holding company that owns Google) revenues, raking in $147 billion in 2020 according to this article: https://www.cnbc.com/2021/05/18/how-does-google-make-money-advertising-business-breakdown-.html. You read that right: online advertisements are indeed a big deal. So, when you are next thinking of posting that cool travel video or your recipe for an awesome chili con carne, you could actually be making money out of your content. You may ask, this is all great but how does NLP help in this case? Read on to find out!
The answer, as you probably already guessed, is context-based ad serving. Suppose you have an intelligent solution that could listen to the audio/text in your content, understand what is being discussed, identify topics that represent the context of the content, look up ads related to the topic, and stitch these ads back into your content seamlessly without having to train any ML models: wouldn't that be swell? Yes, that's exactly what we will be building now.
We will navigate through the following sections:
- Introducing the content monetization use case
- Building the NLP solution for content monetization
Technical requirements
For this chapter, you will need access to an AWS account. Please make sure to follow the instructions specified in the Technical requirements section in Chapter 2, Introducing Amazon Textract, to create your AWS account, and log in to the AWS Management Console before trying the steps in the Building the NLP solution for content monetization section.
The Python code and sample datasets for our solution can be found here: https://github.com/PacktPublishing/Natural-Language-Processing-with-AWS-AI-Services/tree/main/Chapter%2008. Please use the instructions in the following sections along with the code in the repository to build the solution.
Check out the following video to see the Code in Action at https://bit.ly/317mcSh.
Introducing the content monetization use case
We know NLP can help enhance the customer service experience and understand better what our customers are telling us. We will now use NLP to determine the context of our media content and stitch ads into the content relevant to that context. To illustrate our example, let's go back to our fictitious banking corporation called LiveRight Holdings Private Limited. LiveRight's management has decided they now need to expand to more geographies as they are seeing a lot of demand for their model of no-frills banking that cuts their operational costs and transfers the savings back to their customers. They have decided to hire you as their marketing technology architect, putting you in charge of all their content creation, but challenge you to devise a way for the content to pay for itself due to their low-cost policies. You come up with the idea of creating fun educational videos that show the latest trends in the intersection of banking and technology. There is a lot of demand for such videos since they are free to watch, you can intersperse them with ads to get monetary returns, and they serve to raise awareness of the bank in the process.
You have thought through the solution design and decide to use the following:
- AWS Elemental MediaConvert (https://aws.amazon.com/mediaconvert/), a managed video transcoding service that can convert and enhance your video content to multiple versions for broadcasting
- Amazon Transcribe (https://aws.amazon.com/transcribe/) to get a transcript of the video content
- Amazon Comprehend (https://aws.amazon.com/comprehend/) to leverage its pre-trained ML model for topic modeling to determine common themes in the textual content of the video that will, in turn, drive the ad selection process
- AWS Elemental MediaTailor (https://aws.amazon.com/mediatailor/), a managed service that can take as input media content, assemble this into an online channel delivery, and stitch ads onto the video content
The components of the solution we will build are as shown in the following figure:
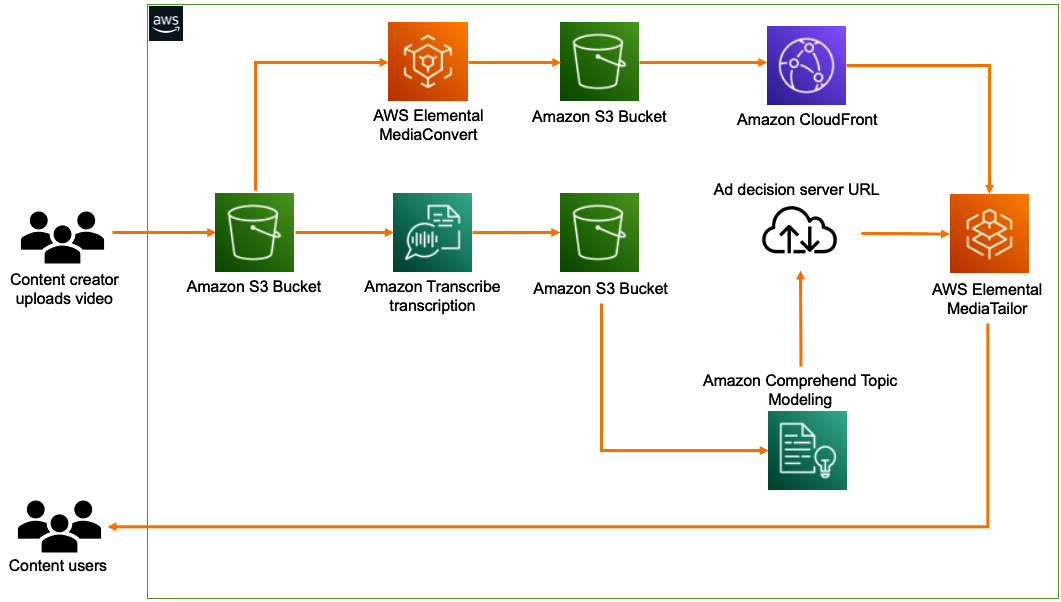
Figure 8.1 – NLP solution build for content monetization
We will be walking through this solution using the AWS Management Console (https://aws.amazon.com/console/) and an Amazon SageMaker Jupyter notebook (https://docs.aws.amazon.com/sagemaker/latest/dg/nbi.html), which will allow us to review the code and results as we execute it step by step. If you do not have access to the AWS Management Console, please follow the detailed instructions in the Technical requirements section in Chapter 2, Introducing Amazon Textract, of this book.
As a first step, we will look at the sample video file provided in the GitHub repository (https://github.com/PacktPublishing/Natural-Language-Processing-with-AWS-AI-Services/blob/main/Chapter%2008/media-content/bank-demo-prem-ranga.mp4). The sample video is from a demonstration of AWS AI services for document processing. For a full version of this video, please refer to https://www.youtube.com/watch?v=vBtxjXjr_HA. We will upload this sample video to an S3 bucket:
- After the video is loaded to the S3 bucket, we will use AWS Elemental MediaConvert to create the broadcast versions of our sample video content.
- In parallel, we will open our Amazon SageMaker Jupyter notebook to run the code to create an Amazon Transcribe transcription job to convert the audio track from our sample video to text.
- We will use Amazon Comprehend Topic Modeling to detect the topics from this text.
- We will then use the sample URL from the Google Ad Decision server (https://support.google.com/admanager/table/9749596), a Video Ad Serving Template (VAST) tag URL that is generated by an ad server containing placeholders for the following.
a) Durations in the video content to play the ads
b) A content source ID referred by the tag 'cmsid' and a video content ID referred by the tag 'vid', which we will populate to stitch in the ads specific to the topic we detected from the transcribed text in the previous step
- We will then create an Amazon CloudFront distribution for the output video files from the AWS Elemental MediaConvert job.
- Finally, we will use AWS Elemental MediaTailor to create a new configuration for broadcast-grade streaming content, which will take our MediaConvert output files available via the CloudFront distribution and the ad decision server URL we modified in the previous step to create a new video file with the ads inserted.
In this section, we introduced the content monetization requirement we are trying to build with our NLP solution, reviewed the challenges faced by LiveRight, and looked at an overview of the solution we will build. In the next section, we will walk through the building of a solution step by step.
Building the NLP solution for content monetization
In the previous section, we introduced a requirement for content monetization, covered the architecture of the solution we will be building, and briefly walked through the solution components and workflow steps. In this section, we will start executing the tasks to build our solution. But first, there are prerequisites we will have to take care of.
Setting up to solve the use case
If you have not done so in the previous chapters, you will as a prerequisite have to create an Amazon SageMaker Jupyter notebook instance and set up Identity and Access Management (IAM) permissions for that notebook role to access the AWS services we will use in this notebook. After that, you will need to clone the GitHub repository (https://github.com/PacktPublishing/Natural-Language-Processing-with-AWS-AI-Services), create an Amazon S3 (https://aws.amazon.com/s3/) bucket, and provide the bucket name in the notebook to start execution. Please follow the next steps to complete these tasks before we can execute the cells from our notebook:
Note
Please ensure you have completed the tasks mentioned in the Technical requirements section. If you have already created an Amazon SageMaker notebook instance and cloned the GitHub repository for the book in a previous chapter, you can skip some of these steps. Please go directly to the step where you open the notebook folder corresponding to this chapter.
- If not already done, follow the instructions documented in the Creating an Amazon SageMaker Jupyter notebook instance section in the Setting up your AWS environment section in Chapter 2, Introducing Amazon Textract, to create your Jupyter notebook instance.
IAM role permissions while creating Amazon SageMaker Jupyter notebooks
Accept the default option for the IAM role at notebook creation time to allow access to any S3 bucket.
- Once you create the notebook instance and its status is InService, click on Open Jupyter in the Actions menu for the notebook instance.
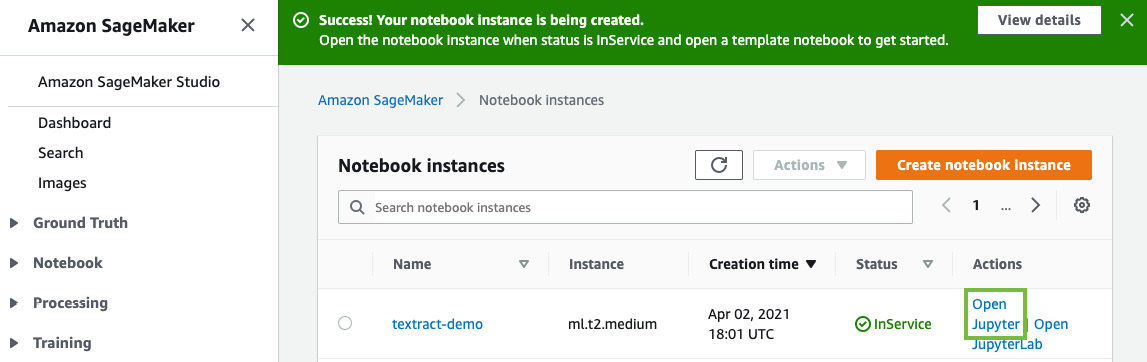
Figure 8.2 – Opening the Jupyter notebook
This will take you to the home folder of your notebook instance.
- Click on New as shown in the following figure and select Terminal:
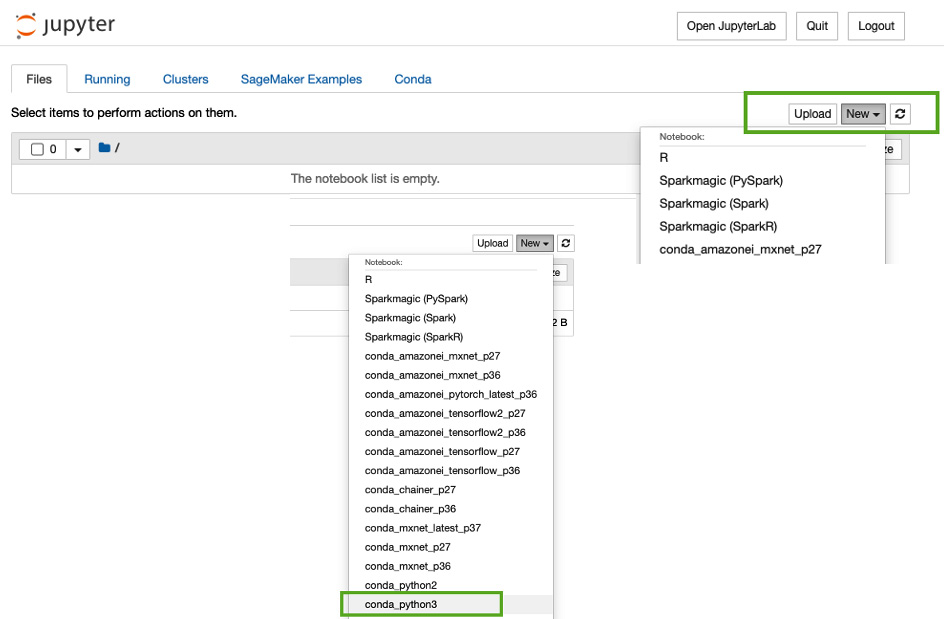
Figure 8.3 – Opening the terminal in the Jupyter notebook
- In the terminal window, first type cd SageMaker and then type git clone https://github.com/PacktPublishing/Natural-Language-Processing-with-AWS-AI-Services, as shown in the following screenshot. If you have already done this in the previous chapters, you don't have to clone the repository again.

Figure 8.4 – The git clone command
- Now, exit the terminal window and go back to the home folder and you will see a folder called Chapter 08. Click the folder and you should see a notebook called contextual-ad-marking-for-content-monetization-with-nlp-github.ipynb.
- Open this notebook by clicking it.
- Leave the notebook open for now. We will first execute the steps in the Uploading the sample video and converting it for broadcast section before executing the steps in the notebook.
Now that we have set up our notebook and cloned the repository, let's now add the permissions policies we need to successfully run our code sample.
Additional IAM prerequisites
To run the notebook, we have to enable additional policies and also update the trust relationships for our SageMaker notebook role. Please complete the following steps to do this:
- If not already done, please attach ComprehendFullAccess and AmazonTranscribeFullAccess policies to your Amazon SageMaker notebook IAM role. To execute this step, please refer to the Changing IAM permissions and trust relationships for the Amazon SageMaker notebook execution role in the Setting up your AWS environment section in Chapter 2, Introducing Amazon Textract.
- Your SageMaker execution role should have access to S3 already. If not, add the following JSON statement as an inline policy. For instructions, please refer to the Changing IAM permissions and trust relationships for the Amazon SageMaker notebook execution role section in the Setting up your AWS environment section in Chapter 2, Introducing Amazon Textract:
{ "Version": "2012-10-17", "Statement": [ {
"Action": [
"s3:GetObject",
"s3:ListBucket",
"s3:PutObject"
],
"Resource": ["*"],
"Effect": "Allow"
}
]
}
- Finally, update the trust relationships. For instructions, please refer to the Changing IAM permissions and trust relationships for the Amazon SageMaker notebook execution role section in the Setting up your AWS environment section in Chapter 2, Introducing Amazon Textract:
{ "Version": "2012-10-17", "Statement": [
{ "Effect": "Allow",
"Principal":
{ "Service":
[ "sagemaker.amazonaws.com",
"s3.amazonaws.com",
"transcribe.amazonaws.com",
"comprehend.amazonaws.com" ]
},
"Action": "sts:AssumeRole" }
]
}
Now that we have set up our notebook and set up the IAM role to run the walk-through notebook, in the next section, we will start with creating broadcast versions of our sample video.
Uploading the sample video and converting it for broadcast
In this section we will create two S3 buckets and get the sample video uploaded for processing. Please execute the following steps:
- Navigate to our GitHub url - https://github.com/PacktPublishing/Natural-Language-Processing-with-AWS-AI-Services/blob/main/Chapter%2008/media-content/bank-demo-prem-ranga.mp4 and click on the Download button at the right middle of the page to download the video file to your computer.
- Now create two Amazon S3 buckets, one for our media input and the other for media output. Follow the instructions detailed in the Creating an Amazon S3 bucket, a folder, and uploading objects section in the Setting up your AWS environment section in Chapter 2, Introducing Amazon Textract, of this book. Ensure that the block public access is on for both the buckets.
- In the Amazon S3 media input bucket, create a folder or prefix called chapter8. Within this folder, create a folder called rawvideo. Follow the instructions detailed in the Creating an Amazon S3 bucket, a folder, and uploading objects section in the Setting up your AWS environment section in Chapter 2, Introducing Amazon Textract, of this book.
- Now upload the bank-demo-prem-ranga.mp4 file into the rawvideo folder. So, within the S3 bucket, the video file should be present in the path chapter8/rawvideo/bank-demo-prem-ranga.mp4.
- Now, we will pivot to creating the broadcast version of the video using AWS Elemental MediaConvert. In the AWS Management Console, in the search bar at the top, type Media, select AWS Elemental MediaConvert, and in the console, click on Get started.
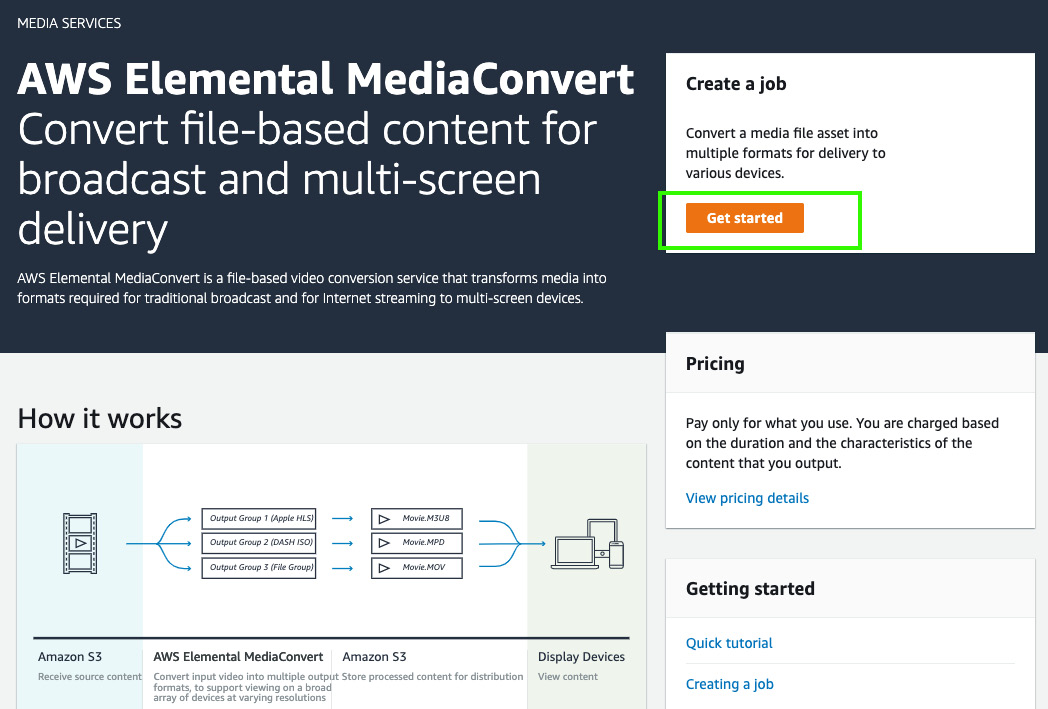
Figure 8.5 – AWS Elemental MediaConvert
- In the Create job UI, under Input 1, for Input file URL, please provide the full S3 path of where you uploaded the sample video file in Step 4. This should be s3://<media-input-bucket>/chapter8/rawvideo/bank-demo-prem-ranga.mp4.
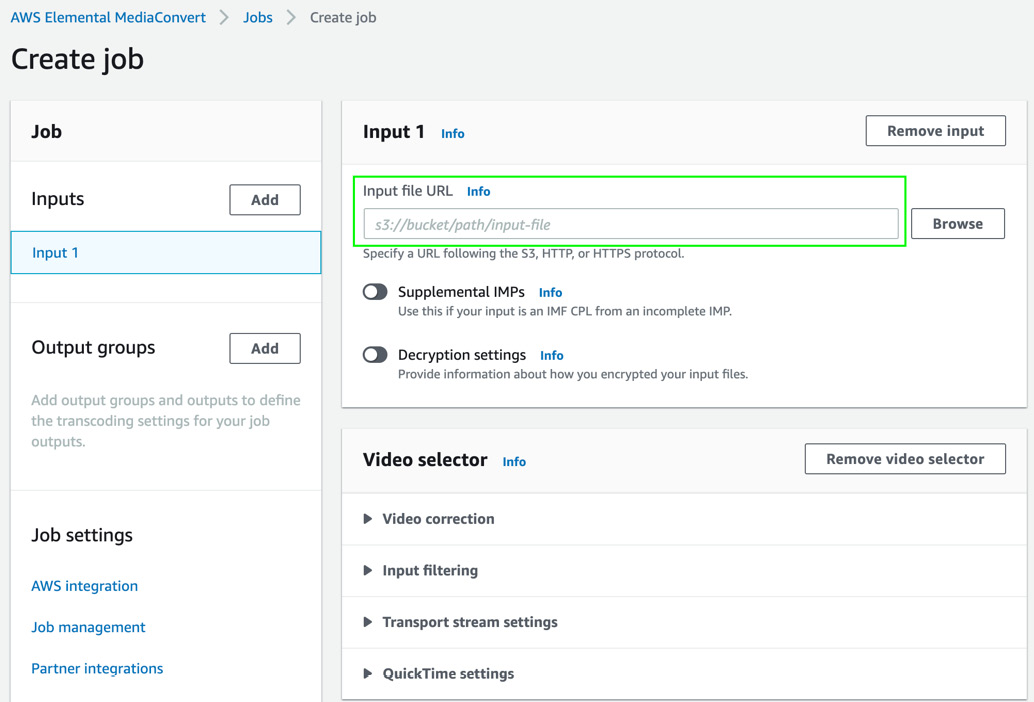
Figure 8.6 – Providing a job input file URL
- Now, click the Add button in Output groups in the left panel of the screen, select Apple HLS as the option in Add output group, and click Select. Output groups determine the types of content artifacts produced and on what devices they can be played.
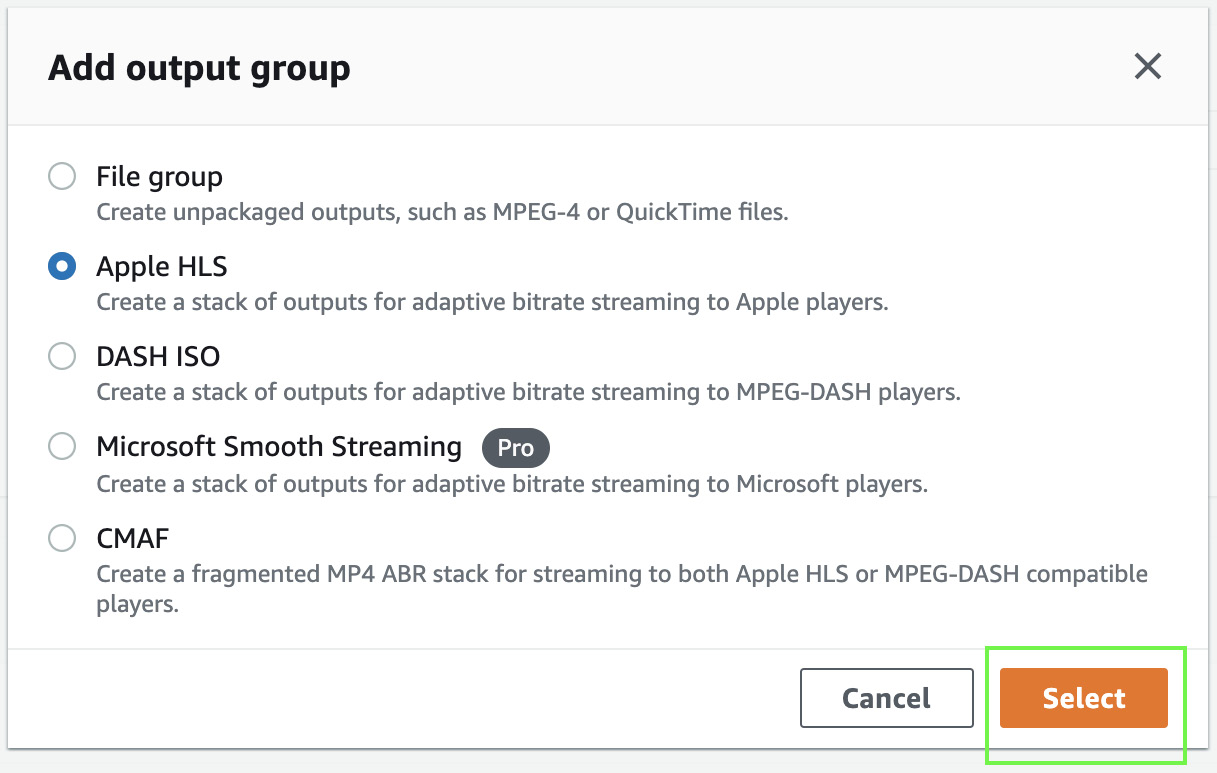
Figure 8.7 – Adding an output group for the MediaConvert job
- Now, let's fill in the Apple HLS group settings. Provide the custom group name as HLS. In Destination, provide the name of the media output bucket you created in Step 3 along with a prefix in the format s3://<media-output-bucket>/bankdemo. The AWS Elemental MediaConvert service will process the sample video file into Apple HLS content files for broadcasting. In Segment control, choose Segmented files. Choose 10 for Segment length (sec) and 3 for Minimum segment length (sec).
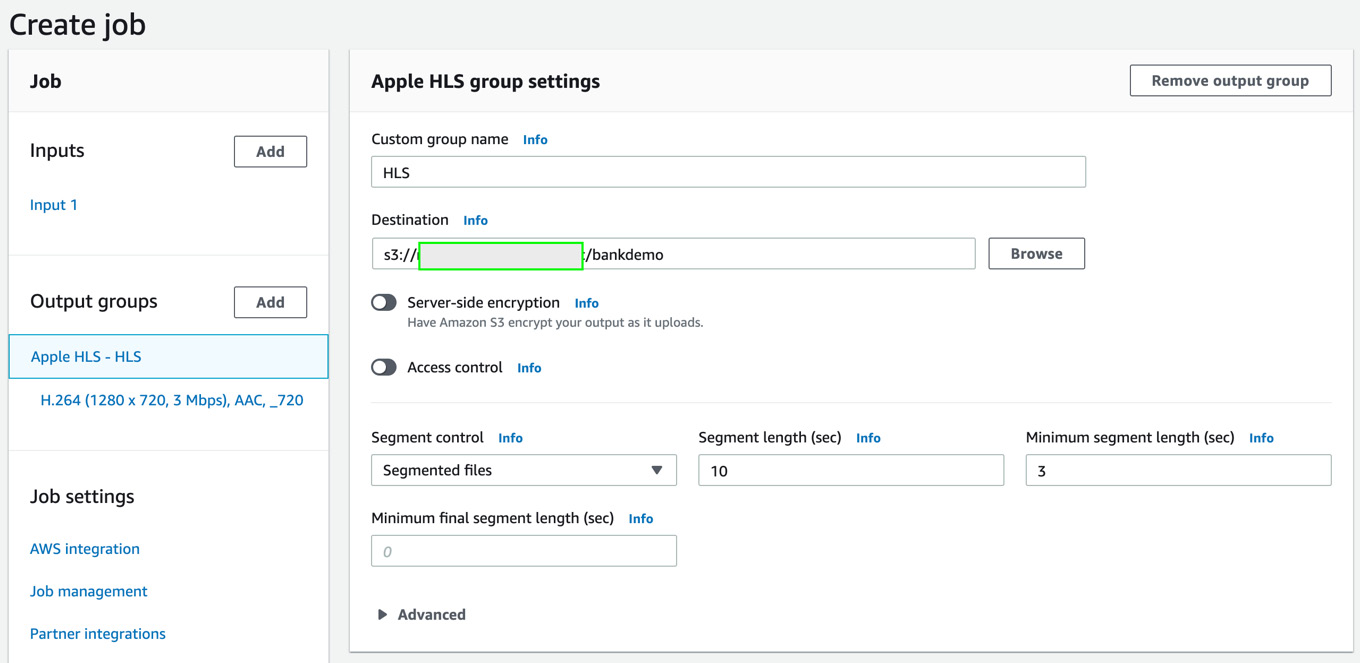
Figure 8.8 – Adding output group settings for the MediaConvert job
- Scroll down to Outputs and type _720 for Name modifier for Output 1. Do not click on Create yet.

Figure 8.9 – Adding outputs for the MediaConvert job
- Now, click Output 1, as shown:
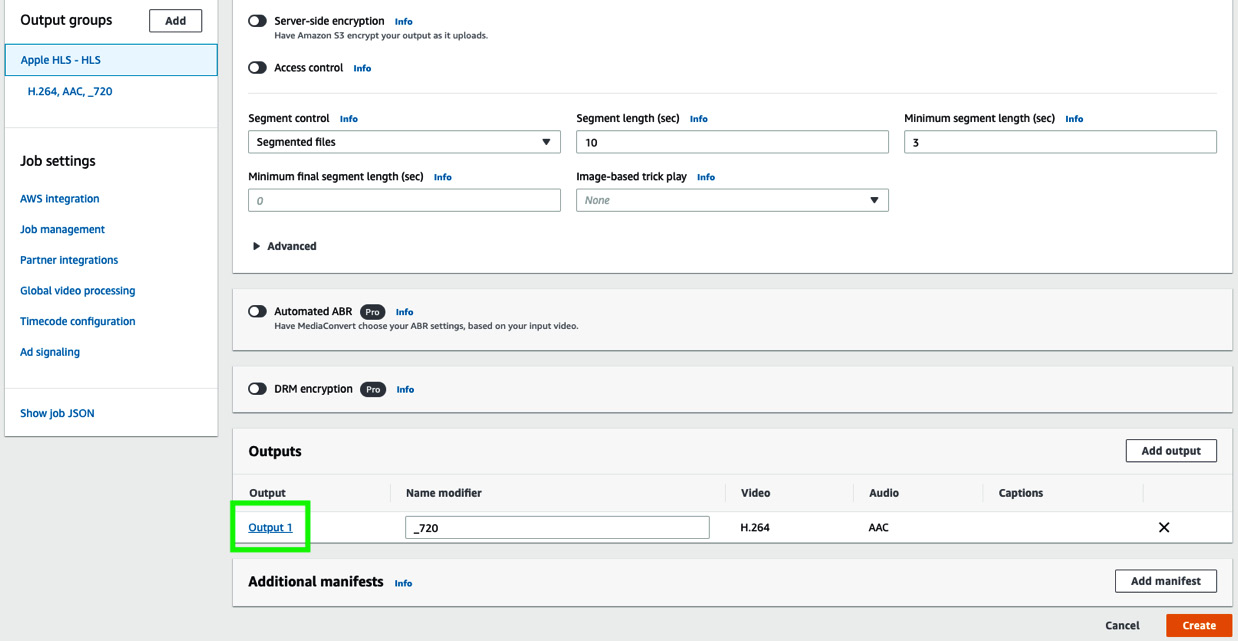
Figure 8.10 – Clicking Output 1
- As shown in the following screenshot, type $dt$ for Segment modifier in Output settings. In the Resolution (w x h) fields, type 1280 and 720. Type 3000000 for Bitrate (bits/s). Leave the rest of the fields as the default.
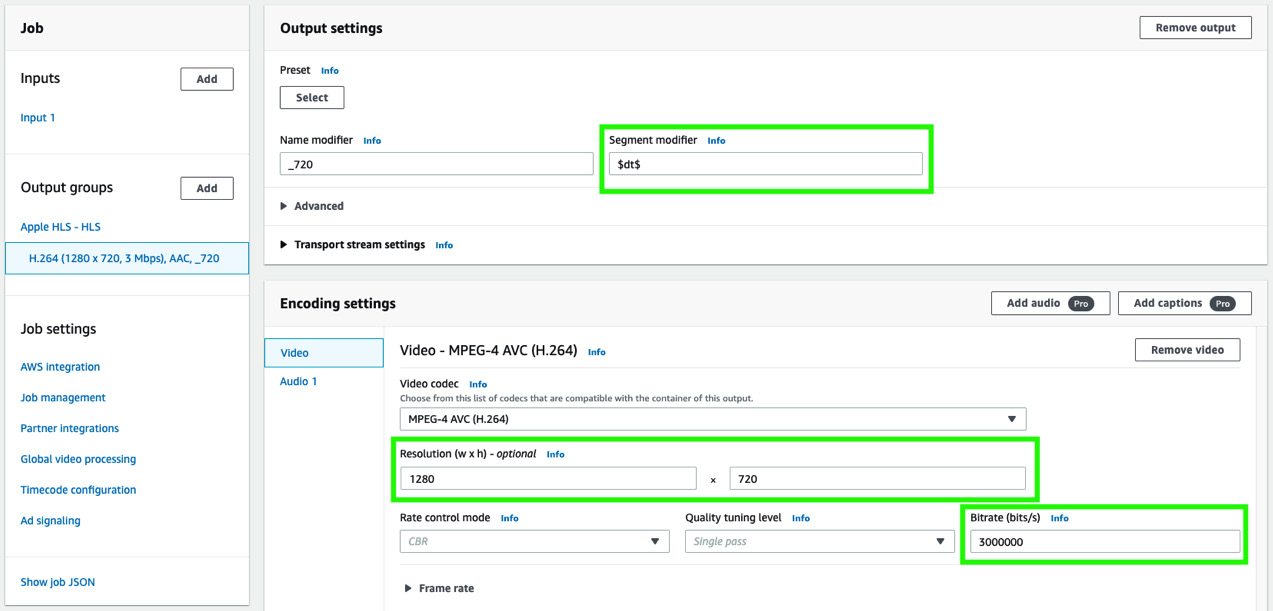
Figure 8.11 – Modifying the output and encoding settings
- On the left panel, under Job settings, click AWS integration. On the right, under Service access, for Service role control, select Create a new service role, full permissions. Accept the default name populated in New role name. Scroll down and click on Create.
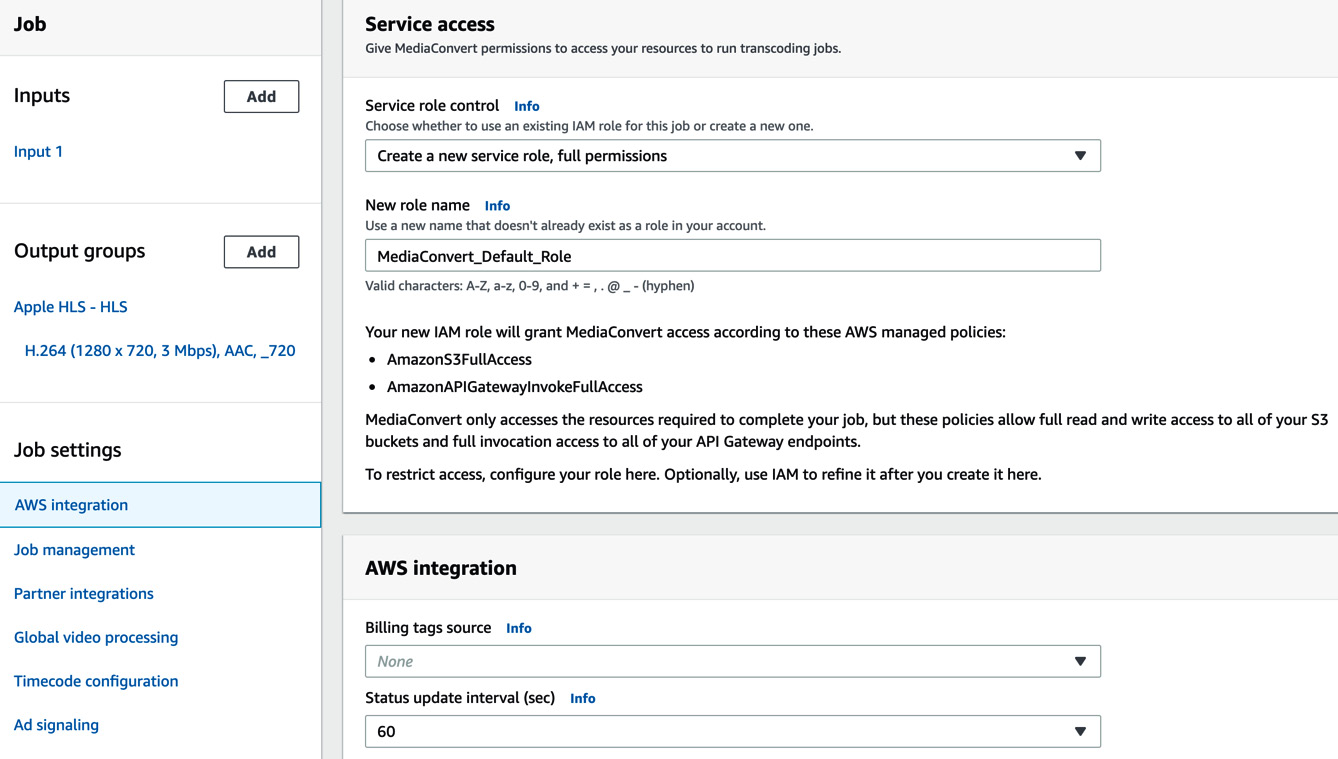
Figure 8.12 – Adding service access for the MediaConvert job
- The job should complete in a couple of minutes. Click on the Job ID to review the summary view of the job, as shown in the following screenshot:
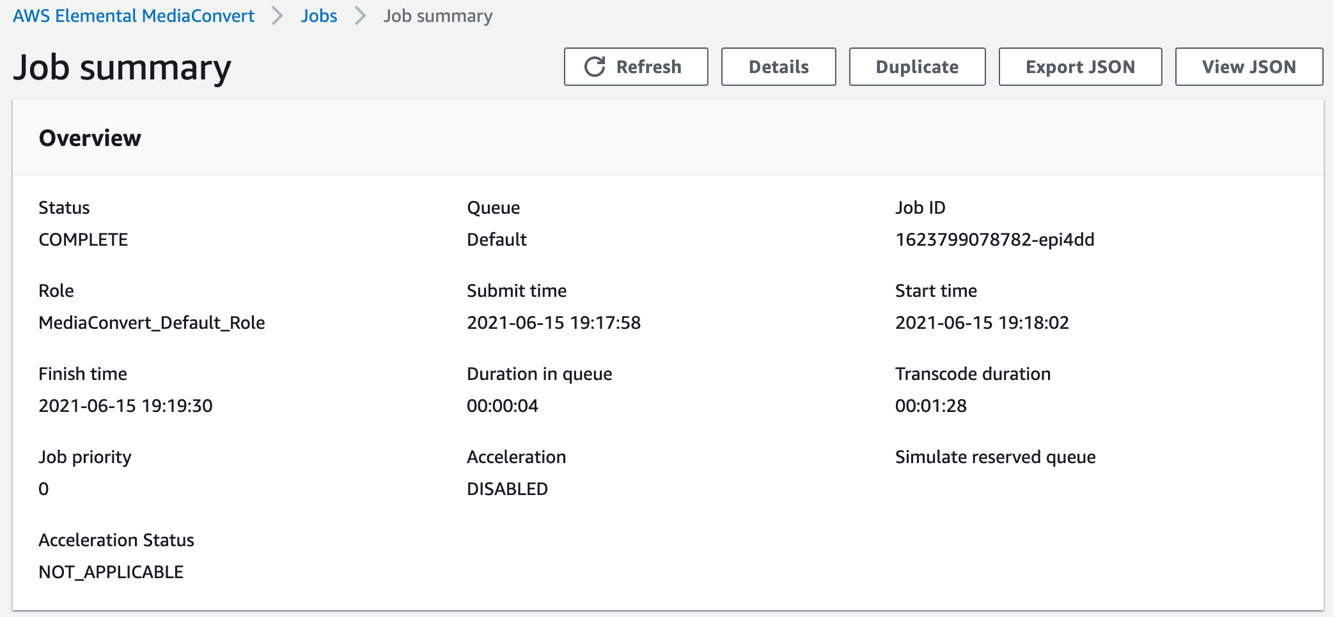
Figure 8.13 – Job summary
- Once the status shows COMPLETE, type S3 in the search bar at the top of the screen and go to the S3 console. Under Buckets, type the name of the media output bucket you created in Step 3 previously and click on the bucket name. You should see a number of files here all starting with the name bankdemo, as shown in the following screenshot:
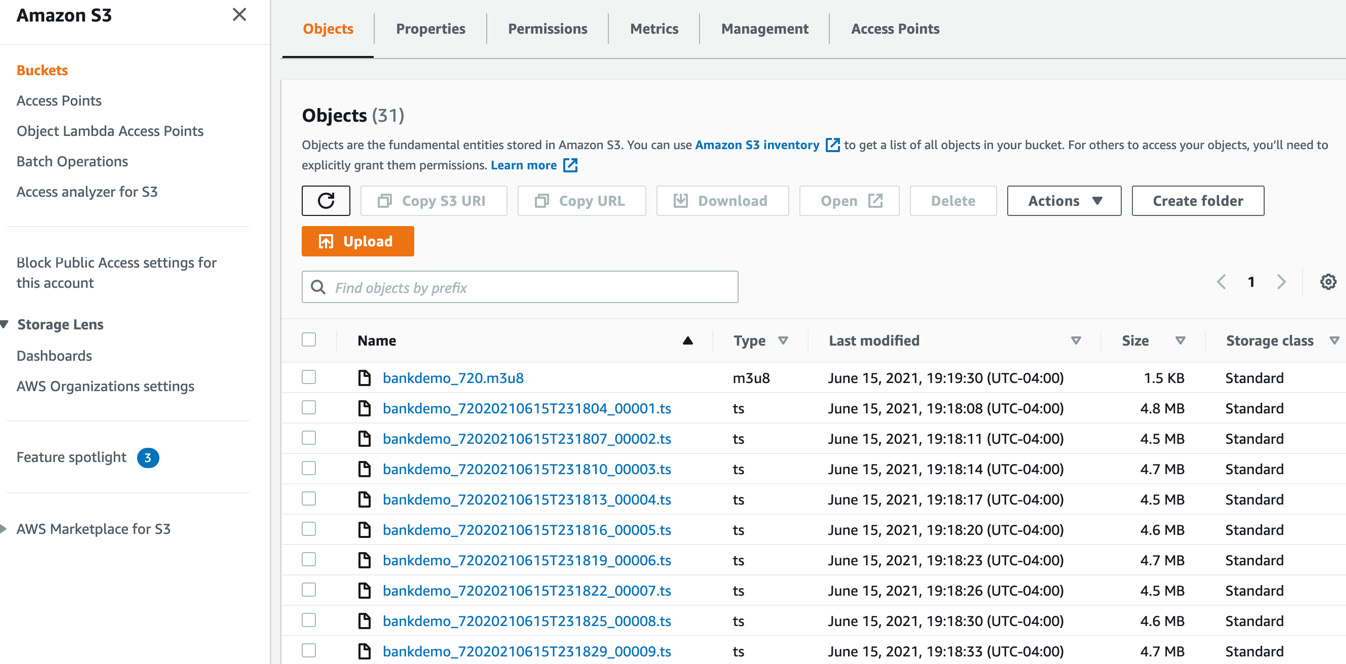
Figure 8.14 – AWS Elemental MediaConvert Apple HLS output files
We have now successfully completed the steps required to convert our sample video file into broadcast-enabled output files, which is required for us to insert ads into the video. In the next section, we will run a transcription of the audio content from our video, run topic modeling, create the VAST ad tag URL required for ad insertion, and show how we can perform content monetization.
Running transcription, finding topics, and creating a VAST ad tag URL
Open the notebook you cloned from the GitHub repository (https://github.com/PacktPublishing/Natural-Language-Processing-with-AWS-AI-Services/blob/main/Chapter%2008/contextual-ad-marking-for-content-monetization-with-nlp-github.ipynb) in the Setting up to solve the use case section and execute the cells step by step, as follows:
Note
Please ensure you have executed the steps in the Technical requirements, Setting up to solve the use case, and Uploading the sample video and converting it for broadcast sections before you execute the cells in the notebook.
- Execute the first three cells under the Transcribe section to ensure we have the libraries we need for the notebook. Note that in the first cell you are importing libraries, in the second cell you are creating folders needed for Topic Modeling, and in the third cell you are specifying the S3 bucket and prefix. You should have already created two S3 buckets prior to running this notebook, as mentioned in the Uploading the sample video and converting it for broadcast section. Please provide the media input bucket name in the line, type a prefix of your choice, or you can accept what is already provided in the notebook. In this cell, we also define the Python SDK handle for Amazon S3 using Boto3, an AWS SDK for Python development (https://boto3.amazonaws.com/v1/documentation/api/latest/index.html):
bucket = '<your-s3-bucket>'
prefix = 'chapter8'
s3=boto3.client('s3')
- Execute the next cell to define a method for running an Amazon Transcribe transcription job to convert the audio content of our sample video file to text. Note that we are setting MediaFormat as mp4. We will be using the original sample video file from the GitHub repository (https://github.com/PacktPublishing/Natural-Language-Processing-with-AWS-AI-Services/blob/main/Chapter%2008/media-content/bank-demo-prem-ranga.mp4) as the input for the transcription job:
import time
import boto3
def transcribe_file(job_name, file_uri, transcribe_client):
transcribe_client.start_transcription_job(
TranscriptionJobName=job_name,
Media={'MediaFileUri': file_uri},
MediaFormat='mp4',
LanguageCode='en-US'
)
- Provide a job name (a text string) for the transcription so we are able to identify this job down the line. Get the Boto3 handle for the Amazon Transcribe service, pass the S3 location of our sample video file we loaded in the media input S3 bucket, and call the transcribe_file method to run the transcription job:
job_name = 'media-monetization-transcribe'
transcribe_client = boto3.client('transcribe')
file_uri = 's3://'+bucket+'/'+prefix+'/'+'rawvideo/bank-demo-prem-ranga.mp4'
transcribe_file(job_name, file_uri, transcribe_client)
- Now, navigate to the AWS Management Console in a new tab, type Amazon Transcribe in the search bar at the top, and open the Amazon Transcribe console. Click on Transcription jobs in the left pane. You should see your transcription job with the job name you specified earlier. When the job completes, the status should change to Complete.
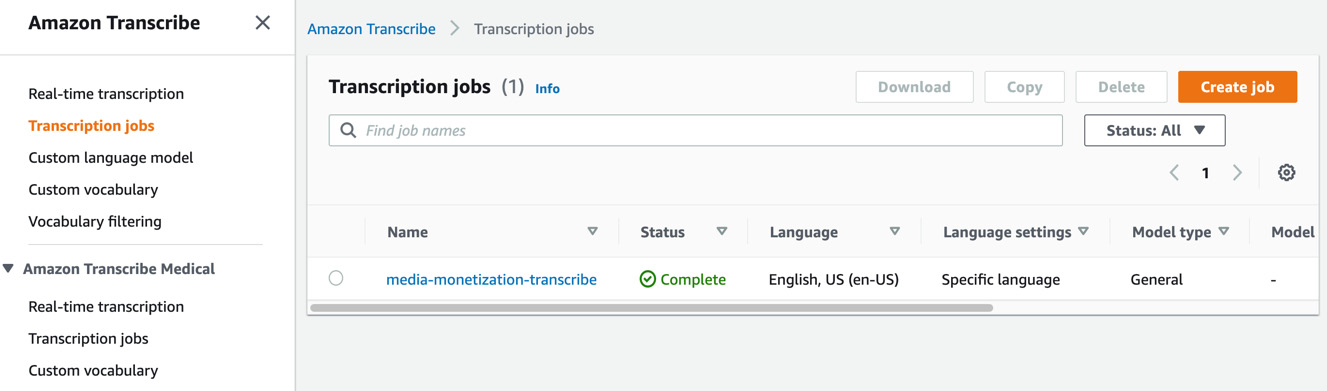
Figure 8.15 – Amazon Transcribe transcription job
- Now come back to the notebook and execute the next cell to get the S3 location of the transcription results:
job = transcribe_client.get_transcription_job(TranscriptionJobName=job_name)
job_status = job['TranscriptionJob']['TranscriptionJobStatus']
if job_status in ['COMPLETED', 'FAILED']:
print(f"Job {job_name} is {job_status}.")
if job_status == 'COMPLETED':
print(f"Download the transcript from "
f" {job['TranscriptionJob']['Transcript']['TranscriptFileUri']}")
- We will now execute the code cells in the Comprehend Topic Modeling section step by step. As a first step, we will retrieve the transcription output (transcript.csv) to convert the paragraph of text into individual lines (transcript_formatted.csv) to send as input to the Amazon Comprehend Topic Modeling job. Execute the code in the notebook cell as shown in the following code block:
raw_df = pd.read_json(job['TranscriptionJob']['Transcript']['TranscriptFileUri'])
raw_df = pd.DataFrame(raw_df.at['transcripts','results'].copy())
raw_df.to_csv('topic-modeling/raw/transcript.csv', header=False, index=False)
import csv
folderpath = r"topic-modeling/raw" # make sure to put the 'r' in front and provide the folder where your files are
filepaths = [os.path.join(folderpath, name) for name in os.listdir(folderpath) if not name.startswith('.')] # do not select hidden directories
fnfull = "topic-modeling/job-input/transcript_formatted.csv"
for path in filepaths:
print(path)
with open(path, 'r') as f:
content = f.read() # Read the whole file
lines = content.split('.') # a list of all sentences
with open(fnfull, "w", encoding='utf-8') as ff:
csv_writer = csv.writer(ff, delimiter=',', quotechar = '"')
for num,line in enumerate(lines): # for each sentence
csv_writer.writerow([line])
f.close()
s3.upload_file('topic-modeling/job-input/transcript_formatted.csv', bucket, prefix+'/topic-modeling/job-input/tm-input.csv')
- We will run an Amazon Comprehend Topic Modeling job on this formatted CSV file to extract a set of topics that are applicable for our transcript. These topics represent and help us identify what the subject area or the theme for the related text is and represent the common set of words with the same contextual reference throughout the transcript. For more details, please refer to Amazon Comprehend Topic Modeling: https://docs.aws.amazon.com/comprehend/latest/dg/topic-modeling.html.
- To get started, go to the AWS Management Console (please refer to Technical requirements in Chapter 2, Introducing Amazon Textract, of this book if you don't have access to the AWS Management Console), type Amazon Comprehend in the services search bar at the top of the console, and navigate to the Amazon Comprehend console:
Click the Launch Amazon Comprehend button.
Click on Analysis jobs in the left pane and click on Create job on the right, as follows:

Figure 8.16 – Creating an analysis job
Type a name for your analysis job and set the analysis type as Topic modeling from the built-in jobs list:

Figure 8.17 – Creating Topic Modeling job inputs 1
Provide the location of the CSV file (the transcript_formatted.csv file that we uploaded to S3 in preceding steps) in your S3 bucket in the Input Data section with the data source as My documents and the number of topics as 2, as shown:
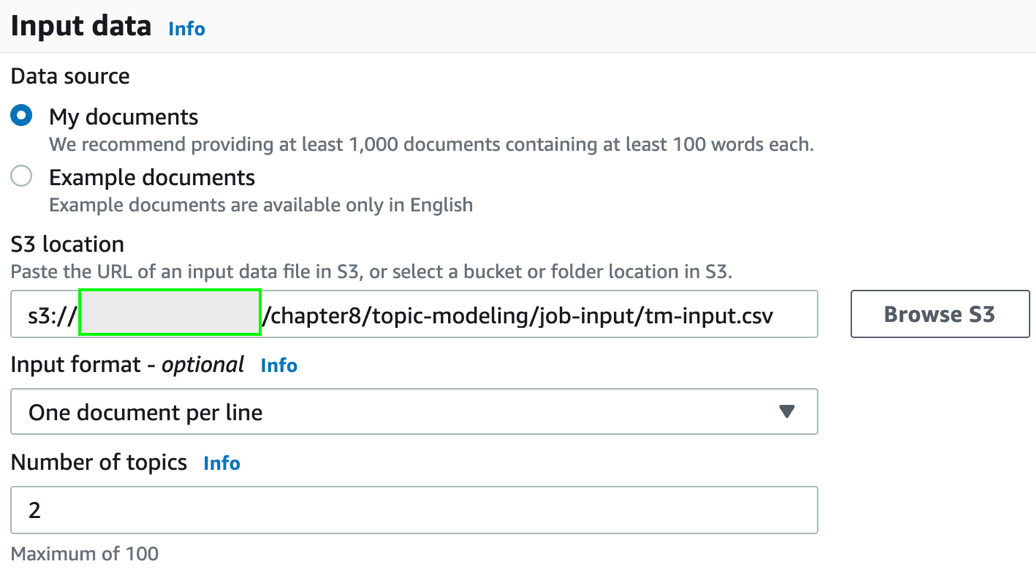
Figure 8.18 – Creating Topic Modeling job inputs 2
Provide the Output data S3 location, as shown (you can use the same S3 bucket you used for input), and then type a name suffix and click on Create job.
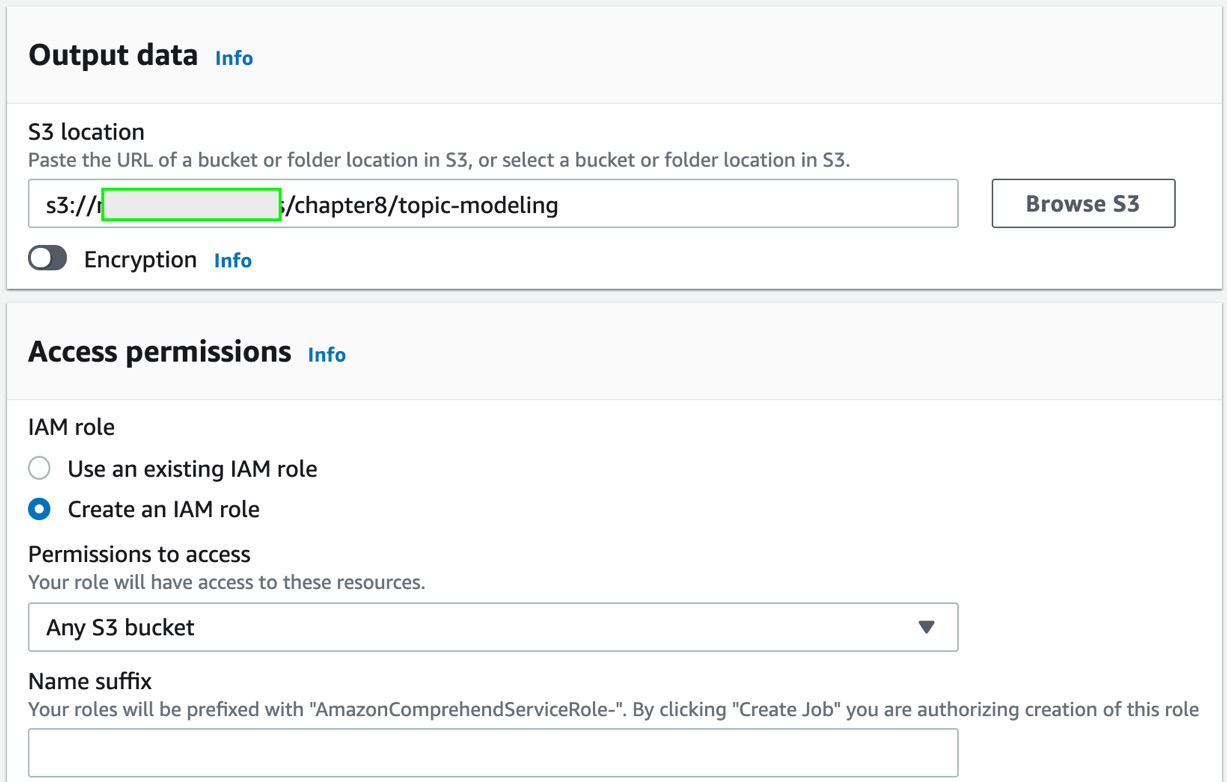
Figure 8.19 – Creating Topic Modeling job inputs 3
You should see a job submitted status after the IAM role propagation is completed. After 30 minutes, the job status should change to Completed. Now click on the job name and copy the S3 link provided in the Output data location field and go back to your notebook. We will continue the steps in the notebook.
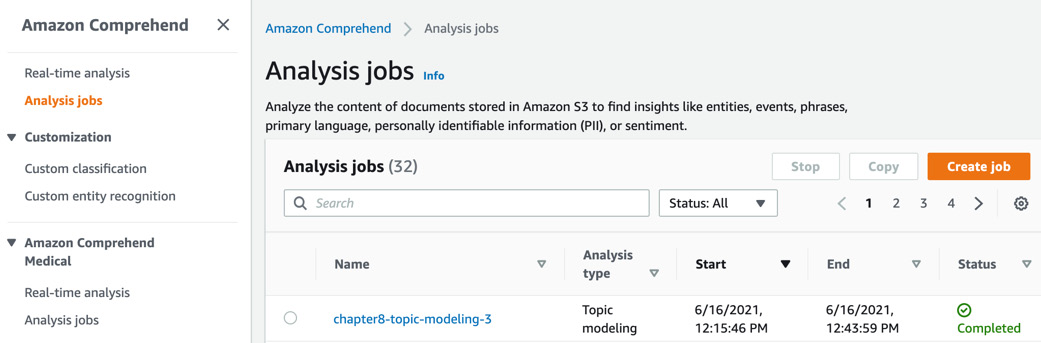
Figure 8.20 – Topic Modeling job completed
- We will now execute the cells in the Process Topic Modeling Results section:
a.) To download the results of the Topic Modeling job, we need the output data location S3 URI that we copied in the previous step. In the first cell in this section of the notebook, replace the contents of the tpprefix variable, specifically <path-to-job-output-tar>, with the string highlighted in bold from the S3 URI you copied shown in the following code block.
Note
The output data location S3 URI you copied in the preceding step is s3://<your-s3-bucket>/chapter8/topic-modeling/<aws-account-nr>-TOPICS-<long-hash-nr>/output/output.tar.gz
b.) The revised code should look as follows and when executed will download the output.tar.gz file locally and extract it:
directory = "results"
parent_dir = os.getcwd()+'/topic-modeling'
path = os.path.join(parent_dir, directory)
os.makedirs(path, exist_ok = True)
print("Directory '%s' created successfully" %directory)
tpprefix = prefix+'/'+' topic-modeling/<aws-account-nr>-TOPICS-<long-hash-nr>/output/output.tar.gz'
s3.download_file(bucket, tpprefix, 'topic-modeling/results/output.tar.gz')
!tar -xzvf topic-modeling/results/output.tar.gz
c.) Now, load each of the resulting CSV files to their own pandas DataFrames:
tt_df = pd.read_csv('topic-terms.csv')
dt_df = pd.read_csv('doc-topics.csv')
d.) The topic terms DataFrame contains the topic number, what term corresponds to the topic, and the weightage this term contributes to the topic. Execute the code shown in the following code block to review the contents of the topic terms DataFrame:
for i,x in tt_df.iterrows():
print(str(x['topic'])+":"+x['term']+":"+str (x['weight']))
e.) We may have multiple topics on the same line, but for this solution, we are not interested in these duplicates, so we will drop them:
dt_df = dt_df.drop_duplicates(subset=['docname'])
f.) Let's now filter the topics such that we select the topic with the maximum weight distribution for the text it refers to:
ttdf_max = tt_df.groupby(['topic'], sort=False)['weight'].max()
g.) Load these into their own DataFrame and display it:
newtt_df = pd.DataFrame()
for x in ttdf_max:
newtt_df = newtt_df.append(tt_df.query('weight == @x'))
newtt_df = newtt_df.reset_index(drop=True)
newtt_df
h.) We will select the content topic term as it has the highest weight and assign this to a variable for use in the subsequent steps:
adtopic = newtt_df.at[1,'term']
- We will now use the topic to look up ad content and create a VAST ad tag URL that will be used as an input to insert ads into the broadcast video files we created using AWS Elemental MediaConvert. The authors have provided two sample CSV files containing content metadata for looking up ads. ad-index.csv (https://github.com/PacktPublishing/Natural-Language-Processing-with-AWS-AI-Services/blob/main/Chapter%2008/media-content/ad-index.csv) contains a list of topics as keys and sample cmsid and vid values. cmsid indicates the content management source ID in Google Ad Server, which is what we are using as the ad decision server for our example, and vid indicates the video content ID in Google Ad Server. adserver.csv (https://github.com/PacktPublishing/Natural-Language-Processing-with-AWS-AI-Services/blob/main/Chapter%2008/media-content/adserver.csv) contains the sample Google ad decision server URL that we need to modify in this step. For this example, we'll use the topic we discovered from our Topic Modeling job as the key to fetch cmsid and vid.
We will then substitute these in the VAST ad marker URL before creating the AWS Elemental MediaTailor configuration. Execute the code cells as shown in the following code block:
adindex_df = pd.read_csv('media-content/ad-index.csv', header=None, index_col=0)
adindex_df
a.) Please note this is from the sample ad-index.csv file that the authors created for this demo. When you use this solution for your use case, you will need to create a Google Ads account to get the cmsid and vid values. For more details, please see this link: https://support.google.com/admanager/topic/1184139?hl=en&ref_topic=7506089.
b.) Run the code in the following snippet to select the cmsid and vid values based on our topic:
advalue = adindex_df.loc[adtopic]
advalue
c.) We get the following response:
1 cmsid=176
2 vid=short_tencue
d.) Now we will create the ad server URL to use with AWS Elemental MediaTailor. Let's first copy the placeholder URL available in our GitHub repo (https://github.com/PacktPublishing/Natural-Language-Processing-with-AWS-AI-Services/blob/main/Chapter%2008/media-content/adserver.csv), which has pre-roll, mid-roll, and post-roll segments filled in:
ad_rawurl = pd.read_csv('media-content/adserver.csv', header=None).at[0,0].split('&')
ad_rawurl
e.) We get the following response:
['https://pubads.g.doubleclick.net/gampad/ads?sz=640x480',
'iu=/124319096/external/ad_rule_samples',
'ciu_szs=300x250',
'ad_rule=1',
'impl=s',
'gdfp_req=1',
'env=vp',
'output=vmap',
'unviewed_position_start=1',
'cust_params=deployment%3Ddevsite%26sample_ar%3Dpremidpost',
'cmsid=',
'vid=',
'correlator=[avail.random]']
f.) We will now replace the cmsid and vid values highlighted in the preceding response with the values corresponding to our topic and reformat the URL:
ad_formattedurl = ''
for x in ad_rawurl:
if 'cmsid' in x:
x = advalue[1]
if 'vid' in x:
x = advalue[2]
ad_formattedurl += x + '&'
ad_formattedurl = ad_formattedurl.rstrip('&')
ad_formattedurl
g.) We get the following response. Copy the contents of the following URL:
'https://pubads.g.doubleclick.net/gampad/ads?sz=640x480&iu=/124319096/external/ad_rule_samples&ciu_szs=300x250&ad_rule=1&impl=s&gdfp_req=1&env=vp&output=vmap&unviewed_position_start=1&cust_params=deployment%3Ddevsite%26sample_ar%3Dpremidpost&cmsid=176&vid=short_tencue&correlator=[avail.random]'
Alright, that brings us to the end of this section. We successfully transcribed our sample video file using Amazon Transcribe, ran an Amazon Comprehend Topic Modeling job on the transcript, selected a topic, and stitched together an ad server VAST tag URL with the ad content ID corresponding to the topic. In the next section, we will use AWS Elemental MediaTailor to create new video output with the ad segments inserted, and we will test it by playing the video.
Inserting ads and testing our video
Before we can proceed forward, we need to create an Amazon CloudFront (https://aws.amazon.com/cloudfront/) content delivery distribution for the video output files we transcoded with AWS Elemental MediaConvert in the Uploading the sample video and converting it for broadcast section.
Amazon CloudFront is a managed content delivery network that can be used for site hosting, APIs, and image, media, and video file delivery, with live or on-demand streaming formats, configured for global distribution or based on the selected price class. Please follow the next steps to set up the CloudFront distribution for your transcoded video files:
- In the AWS Management Console, type CloudFront in the search bar at the top, and then select Amazon CloudFront and click Create Distribution.

Figure 8.21 – Amazon CloudFront Create Distribution
- On the next page, click Get Started to proceed to the Create Distribution page. Please note there are multiple sections to be filled. In the Origin Settings part of the page, click the list box for Origin Domain Name and select the media output bucket that contains the video output files from the AWS Elemental MediaConvert job. Select Yes for Restrict Bucket Access, and select Create a New Identity for Origin Access Identity. Select Yes, Update Bucket Policy for Grant Read Permissions on Bucket.
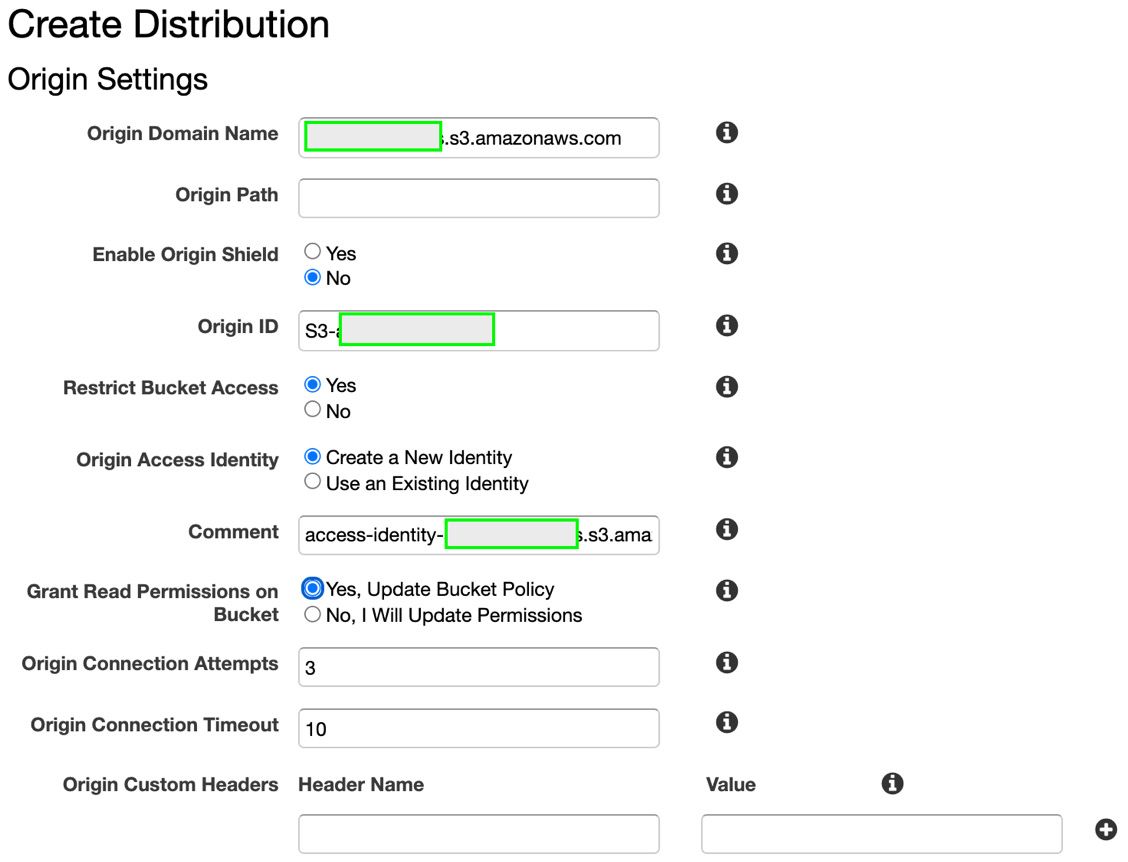
Figure 8.22 – Origin Settings for Create Distribution in Amazon CloudFront
- Scroll down to the Default Cache Behavior Settings area and change Viewer Protocol Policy to Redirect HTTP to HTTPS. For Cache Policy, click the list box and select Managed-Elemental-MediaPackage.
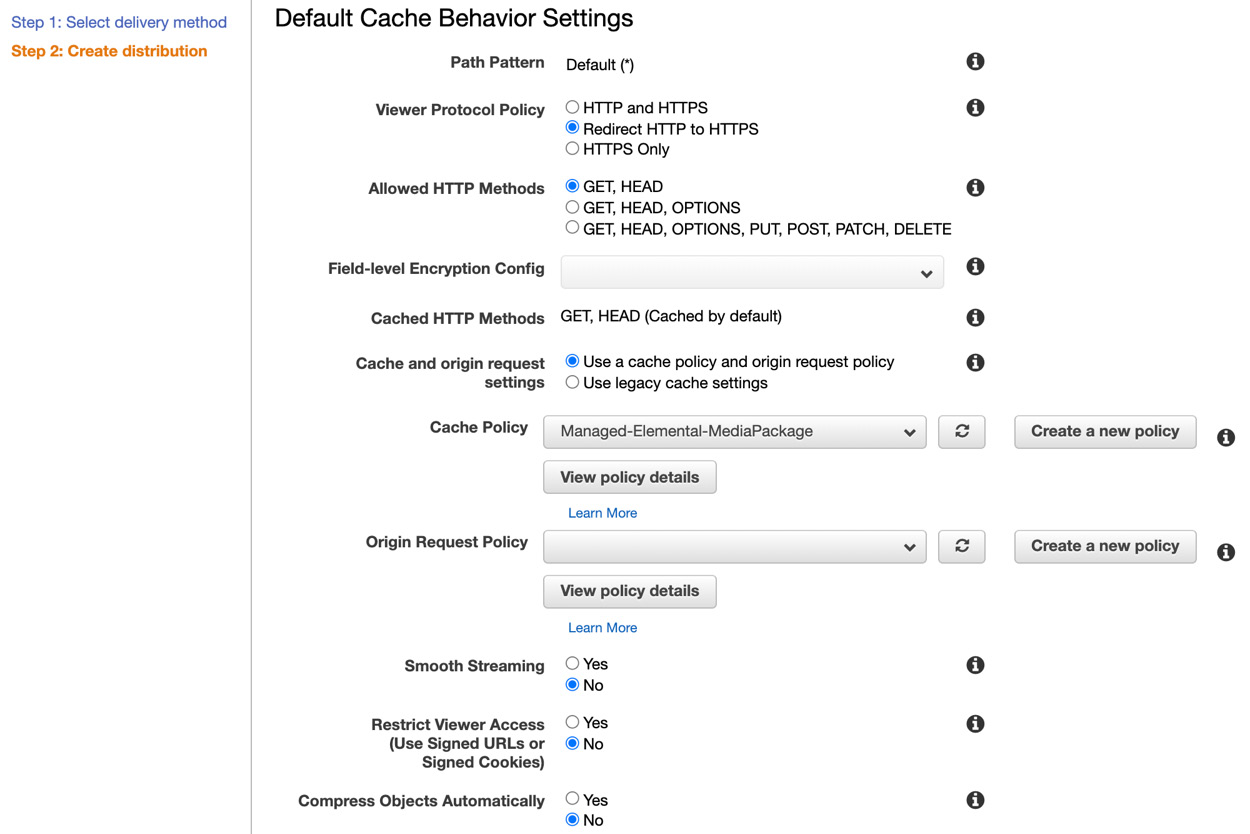
Figure 8.23 – Default Cache Behavior Settings
- Scroll down to the Distribution Settings area and select the price class based on where you are located. Leave the rest of the settings as they are, scroll down, and click Create Distribution.
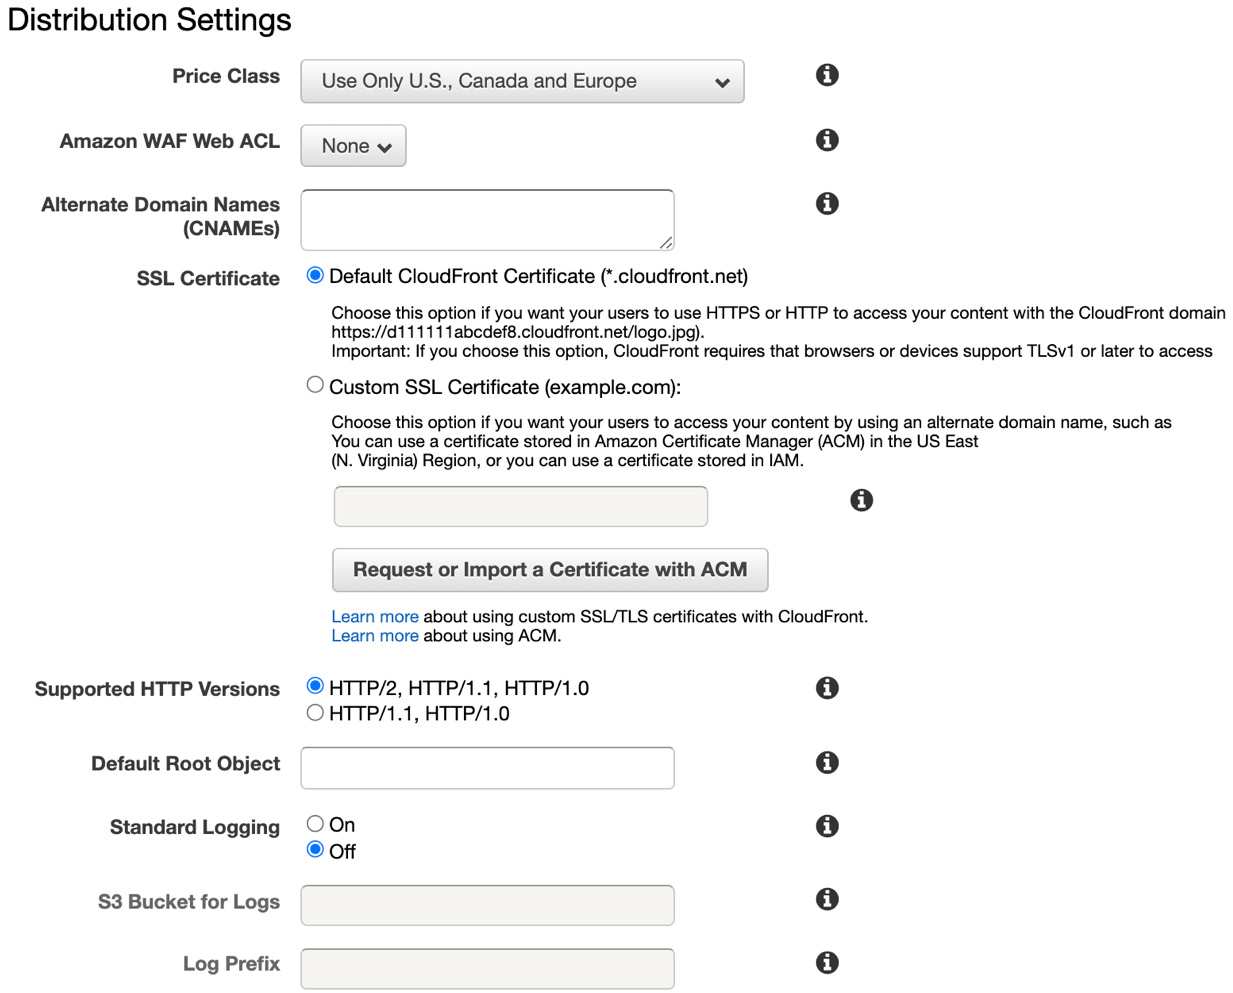
Figure 8.24 – Distribution Settings
- Once the distribution is created, the status will change to Deployed and the state will change to Enabled. Copy the value of the domain name from the distribution.
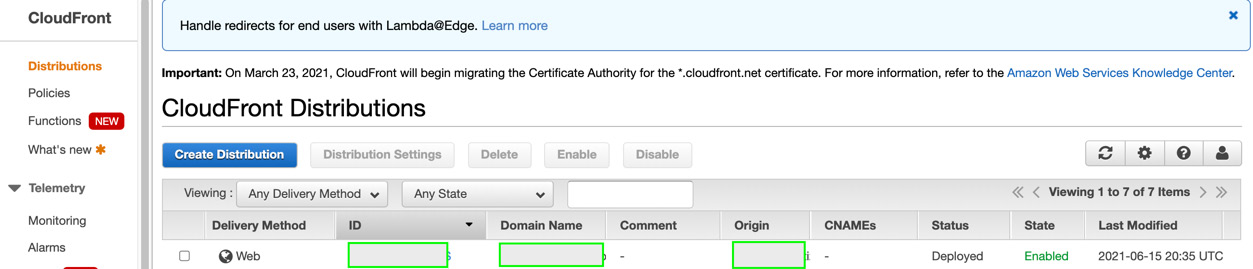
Figure 8.25 – Distribution is enabled
- We will now use this distribution as a content source to create new video output with the ads inserted. In the AWS Management Console, type MediaTailor in the services search bar, and select it to go to the AWS Elemental MediaTailor console. Click Create configuration to get started.

Figure 8.26 – AWS Elemental MediaTailor
- On the Create configuration page, under Required settings, provide an ad campaign name. In the Content source field, paste the Amazon CloudFront distribution domain name that you copied in the preceding steps. Finally, in the Ad decision server field, type the modified VAST ad tag URL you created in the last step of the Running transcription, finding topics, and creating a VAST ad tag URL section. Scroll down and click Create configuration.
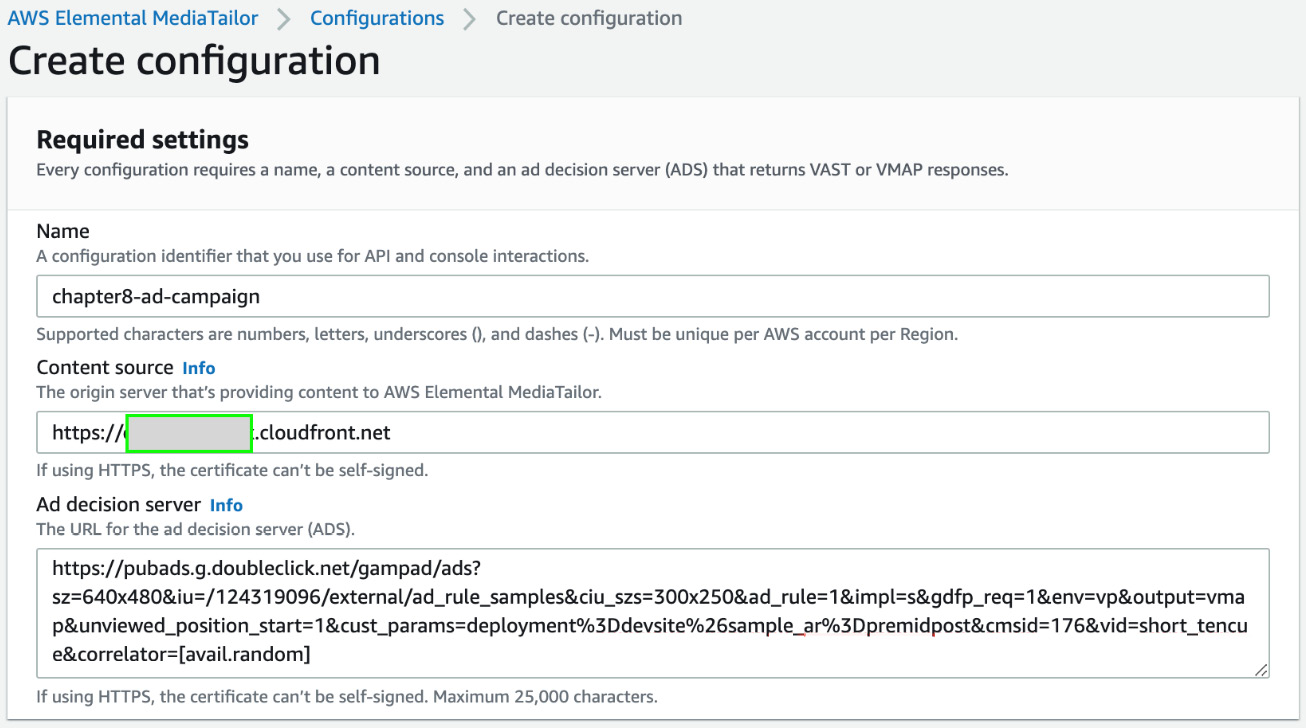
Figure 8.27 – Creating MediaTailor configuration
- The created configuration is displayed as shown in the following screenshot. Copy the HLS playback prefix as we need it in the next step.
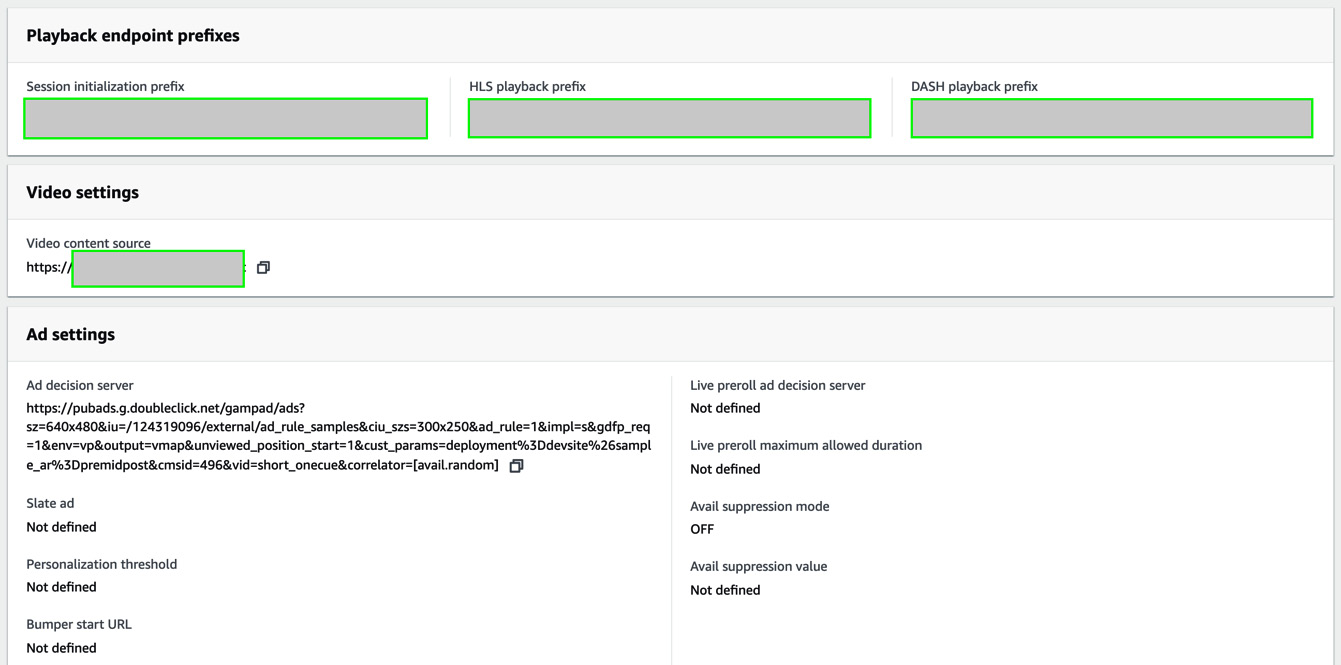
Figure 8.28 – MediaTailor playback endpoint prefixes
- Download the VLC media player (https://www.videolan.org/) and open it. Click on File and then Open Network. In the URL field, paste the HLS playback prefix you copied in the previous step, and at the end of the string, after the forward slash, type bankdemo.m3u8. This is the manifest file for the MediaTailor video output with the ads inserted. The full URL should look as follows (this is an example representative URL): https://<generated-hash-nr>.mediatailor.us-east-1.amazonaws.com/v1/master/<generated-hash-nr>/<chapter8-ad-campaign>/bankdemo.m3u8.
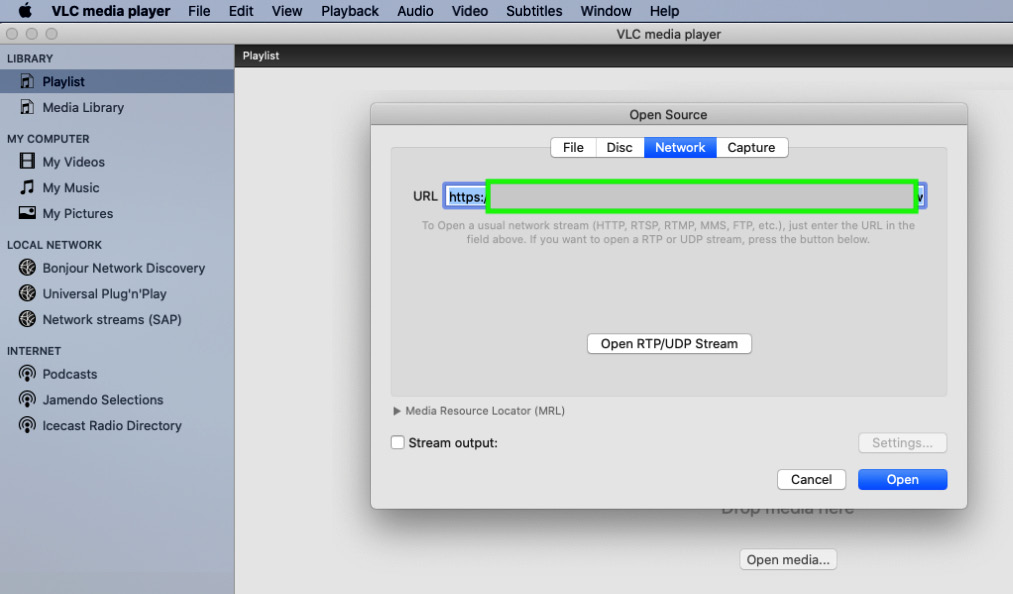
Figure 8.29 – Testing the video output using the VLC media player
- Click Open. The video will start playing momentarily. Please note it takes a couple of minutes for the ad insertion to reflect in the video. You should see a 10-second pre-roll, a 10-second mid-roll, and post-roll ad space in the video. Since we used the sample ad server URL, we don't see actual ads here, but once you register with an ad decision server, you can get the actual ad content included by following the steps in this solution.
And that concludes the solution build for this chapter. Please refer to the Further reading section for more details on media content monetization with AWS AI and media services.
Summary
In this chapter, we learned how to build an intelligent solution for media content monetization using the AWS AI services Amazon Transcribe and Amazon Comprehend, the Amazon CloudFront content delivery network, and the AWS media services Elemental MediaConvert and Elemental MediaTailor by taking a sample MP4 video file. We covered all this by first transcoding it into Apple HLS output files using MediaConvert, then creating atranscription from the MP4 file using Amazon Transcribe, analyzing the transcript, and detecting topics using Amazon Comprehend Topic Modeling, creating a VAST ad decision server URL. We also covered creating a distribution for the transcoded video content using Amazon CloudFront and using this distribution and the ad decision server URL to insert ads into the transcoded video using MediaTailor.
For our solution, we started by introducing the content monetization use case for LiveRight, the requirement for a cost-effective expansion resulting in using content to pay for content creation. We then designed an architecture that used AWS AI services, media services, and the content delivery network to assemble an end-to-end walk-through of how to monetize content in video files. We assumed that you, the reader, are the architect assigned to this project, and we reviewed an overview of the solution components along with an architectural illustration in Figure 8.1.
We then went through the prerequisites for the solution build, set up an Amazon SageMaker notebook instance, cloned our GitHub repository, and started executing the steps using the AWS Management Console and the code in the notebook based on instructions from this chapter.
In the next chapter, we will look at an important use case, metadata extraction, using named entity recognition. We will, as before, introduce the use case, discuss how to design the architecture, establish the prerequisites, and walk through in detail the various steps required to build the solution.
Further reading
- Monetizing your media workflows (https://aws.amazon.com/media/resources/monetization/)
- Announcing AWS Media Intelligence Solutions by Vasi Philozelligence-solutions/)