
Chapter 15: Classifying Documents and Setting up Human in the Loop for Active Learning
In the last chapter, we covered how you can use Amazon Comprehend Custom Entity to extract business entities from your documents, and we showed you how you can use humans in the loop with Amazon Augmented AI (A2I) to augment or improve entity predictions. Lastly, we showed you how you can retrain the Comprehend custom entity model with an augmented dataset to improve accuracy using Amazon A2I.
In this chapter, we will talk about how you can use Amazon Comprehend custom classification to classify documents and then how you can set up active learning feedback with your custom classification model using Amazon A2I.
We will be covering the following topics in this chapter:
- Using comprehend custom classification with human in the loop for active learning
- Building the document classification workflow
Technical requirements
For this chapter, you will need access to an AWS account. Please make sure to follow the instructions specified in the Technical requirements section in Chapter 2, Introducing Amazon Textract, to create your AWS account, and log in to the AWS Management Console before trying the steps in this chapter.
The Python code and sample datasets for setting up Comprehend custom classification with a human-in-the-loop solution are in the following link: https://github.com/PacktPublishing/Natural-Language-Processing-with-AWS-AI-Services/tree/main/Chapter%2015.
Check out the following video to see the Code in Action at https://bit.ly/3BiOjKt.
Please use the instructions in the following sections along with the code in the repository to build the solution.
Using Comprehend custom classification with human in the loop for active learning
Amazon Comprehend provides the capability to classify the data using Amazon Comprehend AutoML and bring your own custom training dataset. You can easily accomplish a lot with the Amazon Comprehend custom classification feature as it requires fewer documents to train Comprehend AutoML models. You are spending less time labeling the dataset and then worrying about setting up infrastructure or choosing the right algorithm.
You can use Amazon Comprehend custom classification for a variety of use cases, such as classifying documents based on type, classifying news articles, or classifying movies based on type.
The fictitious company LiveRight pvt ltd wants to classify the documents submitted by the customers, such as whether the document submitted is an ID or a bank statement, even before analyzing the data inside the document. Moreover, if you are using a classification model to classify the documents based on the type of submitted document, you would also want to improve the accuracy of your predicted outcome in real time, based on the confidence score predicted by the Comprehend custom classification model. This is where humans in the loop with Amazon Augmented AI is going to help.
We covered Amazon A2I in Chapter 13, Improving the Accuracy of Document Processing Workflows. In this chapter, we will walk you through some reference architecture on how you can easily set up a custom classification model using Amazon Comprehend and have a feedback loop set up with Amazon A2I for active learning on your Comprehend custom model.
First, we will walk you through the following architecture on how you can train a custom classification model and create a real-time endpoint for inferencing or classifying documents in near real time.

Figure 15.1 – Comprehend custom classification training workflow
This architecture walks through the following steps:
- Training documents, such as bank statements or pay stubs, are uploaded to Amazon S3.
- Amazon Textract extracts text from these documents and then some post-processing is done to create a labeled training file for Comprehend custom classification training.
- Using the training file, an Amazon Comprehend job is created to classify documents, such as bank statements or pay stubs.
- After training is completed, you have two options with Amazon Comprehend: either you can do batch inferencing on a batch of documents to classify them or you can create real-time endpoints. In the architecture, we are showing how you can set up a real-time endpoint to classify a document type.
We are going to walk you through the preceding conceptual architecture using Jupyter Notebook and a few lines of Python code in the Setting up to solve the use case section.
Now, we have a near real-time document classification endpoint. We will show you how you can set up humans in the loop with this Amazon Comprehend custom classification endpoint and set up a model retraining or active-learning loop to improve your model accuracy using the following architecture:
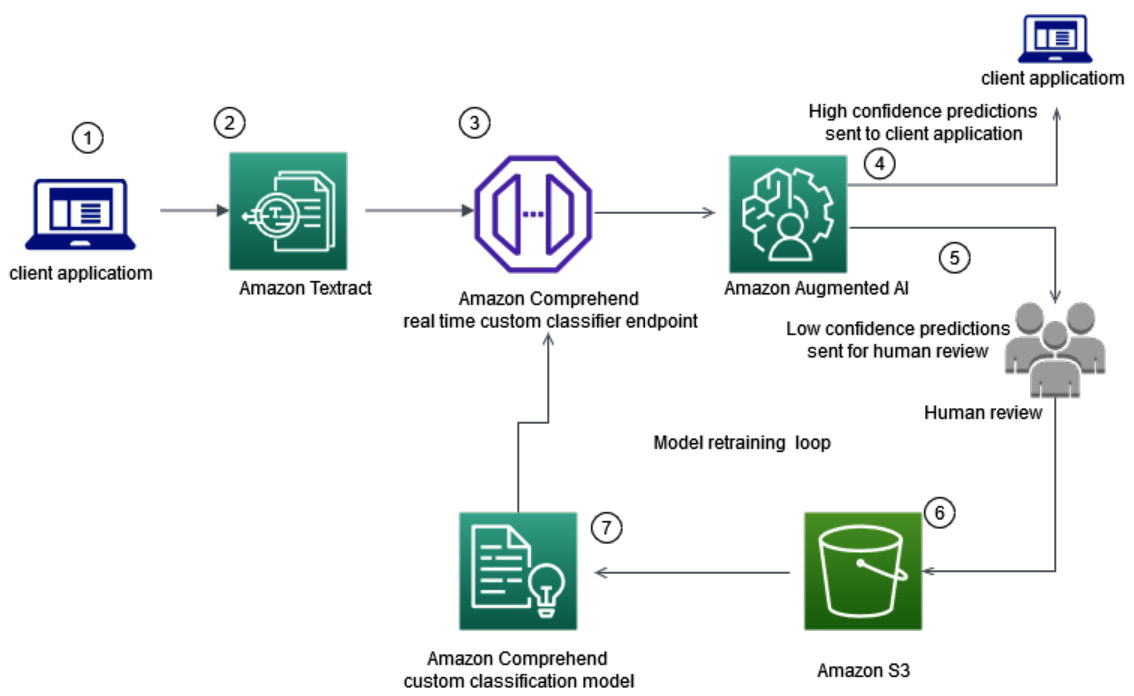
Figure 15.2 – Real-time classification with model retraining
In this architecture, we will walk you through the following steps:
- Client application sends the document to Amazon Textract.
- Amazon Textract extracts the data or text in real-time API and extracted data is passed on to the Amazon Comprehend real-time classifier endpoint.
- The Amazon Comprehend custom classification endpoint classifies this document type.
- This classification endpoint is configured with Amazon A2I human in the loop. If the prediction of classification is high confidence based on your business threshold, which you can configure, the high-confidence predictions are directly sent to client applications.
- For low-confidence predictions, such as anything below the 95% confidence, the score predicted is low confidence for you. A human loop is created, and these predictions are sent for human review. Refer to Chapter 3, Introducing Amazon Comprehend, to understand what a confidence score is and Comprehend custom features.
- The augmented or corrected data from human labelers are saved in an Amazon S3 bucket as a JSON file.
- This data is then combined with the original training dataset and the Amazon Comprehend custom model is retrained for active learning using human feedback.
We will walk you through steps 1 to 6 using Jupyter Notebook in the Setting up the use case section. Feel free to combine the augmented classified labels with the original dataset and try retraining for your understanding. You can automate this architecture using step functions and Lambda functions. We will share with you the blogs that can help you set up this architecture using Lambda functions in the Further reading section.
In this section, we covered the architecture for both model training and retraining or active learning. Now, let's move on to the next section to see these concepts with code.
Building the document classification workflow
In this section, we will get right down to action and start executing the tasks to build our solution. But first, there are prerequisites we will have to take care of.
Setting up to solve the use case
If you have not done so in the previous chapters, you will first have to create an Amazon SageMaker Jupyter notebook and set up Identity and Access Management (IAM) permissions for that notebook role to access the AWS services we will use in this notebook. After that, you will need to clone the GitHub repository (https://github.com/PacktPublishing/Natural-Language-Processing-with-AWS-AI-Services), go to the Chapter 15 folder, and open the chapter15 classify documents with human in the loop.ipynb notebook.
Now, let's move to the next section to show you how you can set up the libraries and upload training data to Amazon S3 using this notebook.
Setting up and uploading sample documents to Amazon S3
In this step, we will follow instructions to set up an S3 bucket and upload documents:
- Go to the notebook and run the cells below Step 1: Set up and upload sample documents to Amazon S3 in the notebook to install libraries such as boto 3 for setup.
- Move on to the next cell and enter a bucket name to create an S3 bucket in your account. Make sure you add the current month and date in MMDD for data_bucket, as shown in the following code block, before executing this cell:
data_bucket = "doc-processing-bucket-MMDD"
region = boto3.session.Session().region_name
os.environ["BUCKET"] = data_bucket
os.environ["REGION"] = region
if region=='us-east-1':
!aws s3api create-bucket --bucket $BUCKET
else:
!aws s3api create-bucket --bucket $BUCKET --create-bucket-configuration LocationConstraint=$REGION
- Now run the following cell to upload or copy a sample bank statement or pay stub image as a training file from your local notebook to the S3 bucket that you just created:
!aws s3 cp documents/train s3://{data_bucket}/train –recursive
- Now run the next two cells in the notebook to list the training images we just copied in Amazon S3. We created a function named get_s3_bucket_items. We are getting the image objects from S3 and saving them as images for Textract processing in future steps. Refer to the notebook to execute these steps.
- Run the following step to define a path or local directory structure to store data extracted from Amazon Textract:
word_prefix=os.getcwd()+'/SAMPLE8/WORDS/'
box_prefix=os.getcwd()+'/SAMPLE8/BBOX/'
We've covered how to create an S3 bucket and we have loaded training data. Now, let's move on to the next section to extract text.
Extracting text from sample documents using Amazon Textract
Go to the notebook and run the calls in Step 2: Extract text from sample documents using Amazon Textract to define a function using Amazon Textract to extract data from the sample images in Amazon S3. We are using the DetectDocumentText sync API to do this extraction; you can also use AsyncAPI or Textract batch APIs to perform data extraction. Refer to Chapter 4, Automating Document Processing Workflows, to dive deep into these APIs:
def data_retriever_from_path(path):
mapping={}
for i in names:
if os.path.isdir(path+i):
mapping[i] = sorted(os.listdir(path+i))
label_compre = []
text_compre = []
for i, j in mapping.items():
for k in j:
label_compre.append(i)
text_compre.append(open(path+i+"/"+k, encoding="utf-8").read().replace(' ',' '))
return label_compre, text_compre
This function takes the image's path and returns the text and labels for the images.
Let's call this function by passing the scanned document's images by running the following cell in the notebook:
tic = time.time()
pool = mp.Pool(mp.cpu_count())
pool.map(textract_store_train_LM, [table for table in images ])
print("--- %s seconds for extracting ---" % (time.time() - tic))
pool.close()
The preceding function extracts the data and saves it in the local directory structure you defined in the Set up and Upload Sample Documents step. The following is the output:
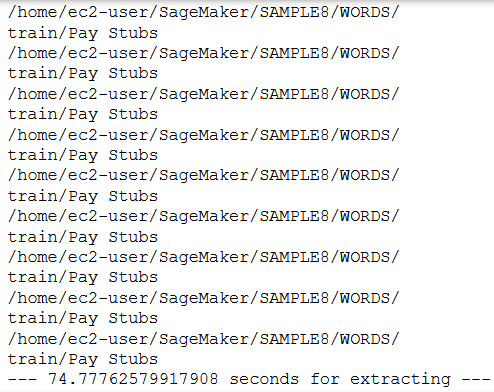
Figure 15.3 – Textract output
Now, we have extracted the text and associated labels, for example, 0 for a bank statement and 1 for pay stubs. Now, let's move to the next section for Comprehend training.
Creating an Amazon Comprehend classification training job
We have extracted the data and labels in the previous step from our sample of scanned documents in Amazon S3. Now, let's understand how to set up a Comprehend classification training job using Step 3: Create Amazon Comprehend Classification training job in the notebook:
- We will first create a function to map the extracted data and labels into a pandas DataFrame so that we can convert that into a CSV training file in the next step. Run the following code to define the function, which takes the extracted data location and returns labels and text from it:
def data_retriever_from_path(path):
mapping={}
for i in names:
if os.path.isdir(path+i):
mapping[i] = sorted(os.listdir(path+i))
# label or class or target list
label_compre = []
# text file data list
text_compre = []
# unpacking and iterating through dictionary
for i, j in mapping.items():
# iterating through list of files for each class
for k in j:
# appending labels/class/target
label_compre.append(i)
# reading the file and appending to data list
text_compre.append(open(path+i+"/"+k, encoding="utf-8").read().replace(' ',' '))
return label_compre, text_compre
- Now, we will call the function we defined in the previous step by running the following cell:
label_compre, text_compre=[],[]
path=word_prefix+'train/'
label_compre_train, text_compre_train=data_retriever_from_path(path)
label_compre.append(label_compre_train)
text_compre.append(text_compre_train)
if type(label_compre[0]) is list:
label_compre=[item for sublist in label_compre for item in sublist]
#print(label_compre)
text_compre=[item for sublist in text_compre for item in sublist]
#print(text_compre)
data_compre= pd.DataFrame()
data_compre["label"] =label_compre
data_compre["document"] = text_compre
data_compre
You will get a pandas DataFrame with labels and documents, shown as follows:
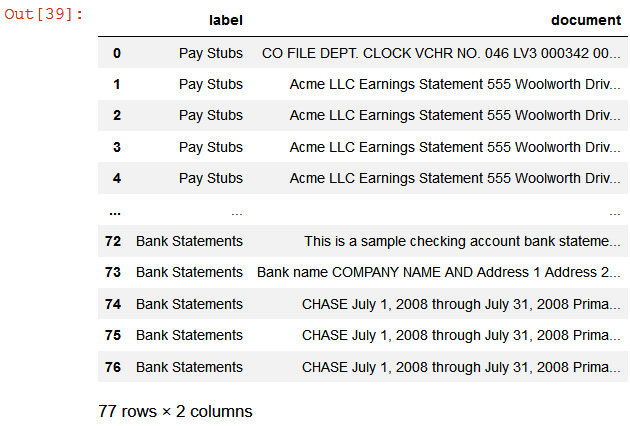
Figure 15.4 – Labeled training DataFrame
- Now, we will save this DataFrame as a CSV and upload it to Amazon S3 using S3. Put the boto3 API object as the Comprehend training file for Amazon Comprehend training:
csv_compre=io.StringIO()
data_compre.to_csv(csv_compre,index=False, header=False)
key='comprehend_train_data.csv'
input_bucket=data_bucket
output_bucket= data_bucket
response2 = s3.put_object(
Body=csv_compre.getvalue(),
Bucket=input_bucket,
Key=key)
- Now, go to the Amazon Comprehend console link (https://console.aws.amazon.com/comprehend/v2/home?region=us-east-1#classification) to create a classification job. Click on Train Classifier.
- In Model name, enter doc-classifier, and in Version name, enter 1, and scroll down to select Using Single-label model for Classifier mode. Also, make sure the data format is csv file.
Important Note
We have the choice to add versions for Amazon Comprehend custom models. To learn more about this feature, refer to this link: https://docs.aws.amazon.com/comprehend/latest/dg/model-versioning.html.

Figure 15.5 – Amazon Comprehend custom classification UI
- For the training data location, browse to the doc-processing-bucket-MMDD S3 bucket created in the Set up and upload sample documents to Amazon S3 step or enter s3://doc-processing-bucket-MMDD/comprehend_train_data.csv.
- For Test Dataset, go with the default Autosplit, which means Amazon Comprehend will automatically split the test data for you. You also have the choice to tune your model by bringing your own test dataset here.
- For output data, enter the s3://doc-processing-bucket-MMDD S3 bucket.
- For access permissions, select Create an IAM Role and enter classifydoc in NameSuffix.
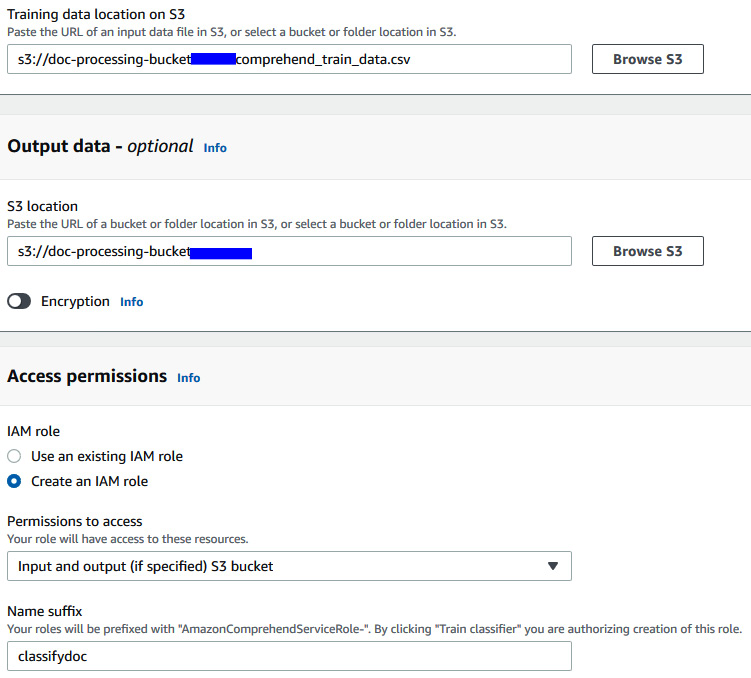
Figure 15.6 – Amazon Comprehend custom classification IAM setting
- Scroll down and click on the Train Classifier button to start training.
Important Note
This training will take 30 minutes to complete as we have a large number of documents to train with in this chapter. You can use this time to set up a private workforce for setting up humans in the loop, which we did in Chapter 13, Improving the Accuracy of Document Processing Workflows.
Once your job is completed, move on to the next step.
Creating Amazon Comprehend real-time endpoints and testing a sample document
In this section, we will show you how you can create a real-time endpoint with the trained model in the AWS Management Console. Comprehend uses the Inference Unit (IU) to analyze how many characters can be analyzed in real time per second. IU is a measure of the endpoint's throughput. You can adjust the IU of an endpoint anytime. After creating the endpoint, we will then show you how you can call this endpoint to test a sample bank statement using the Jupyter Notebook:
- Go to this link, https://console.aws.amazon.com/comprehend/v2/home?region=us-east-1#endpoints, and click on Create Endpoint.
- Enter classify-doc as the endpoint name, set Custom model as doc-classifier, which we trained in the previous step, and set Inference units to 1.
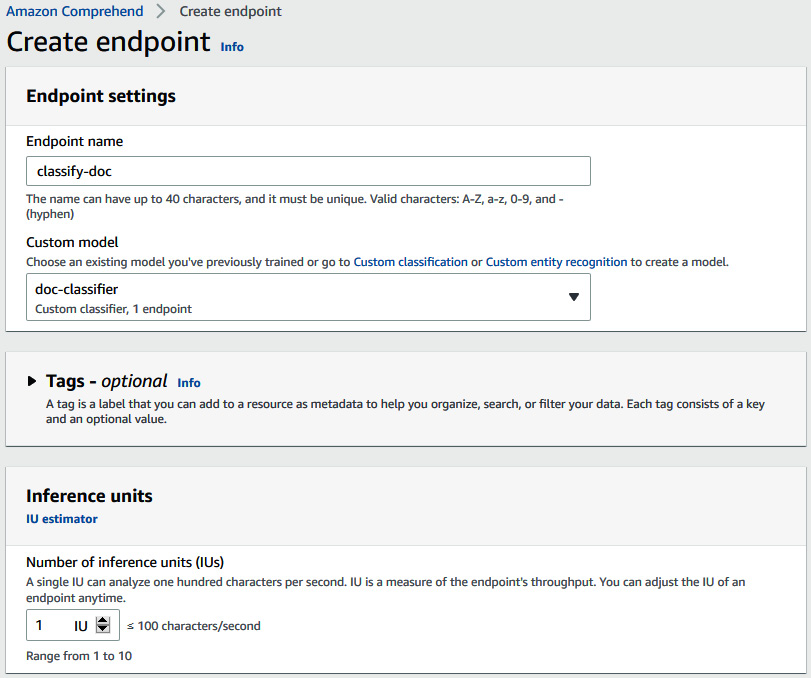
Figure 15.7 – Amazon Comprehend Create real-time endpoint UI
- Scroll down and select I Acknowledge and click on Create Endpoint.
Delete this endpoint at the cleanup section in the notebook to avoid incurring a cost.
- Now, copy the ARN of the endpoint, as shown in the next screenshot, and move to the Jupyter Notebook link:
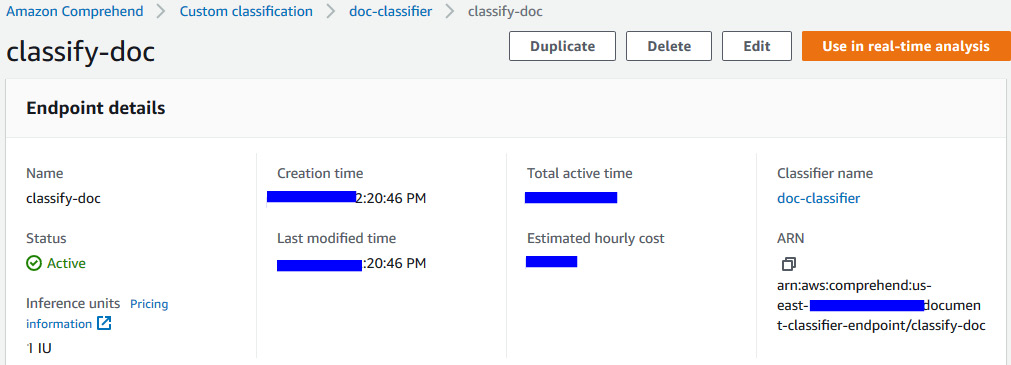
Figure 15.8 – Comprehend custom classification endpoint ARN
- In the notebook, enter the preceding copied endpoint arn in the notebook cell as follows:
ENDPOINT_ARN='your endpoint arn paste here'
- Now, we will take a sample test document or any pay stub not used in training for real-time classification. Run the following code to see the sample pay statement:
documentName = "paystubsample.png"
display(Image(filename=documentName))
You will get the following output:
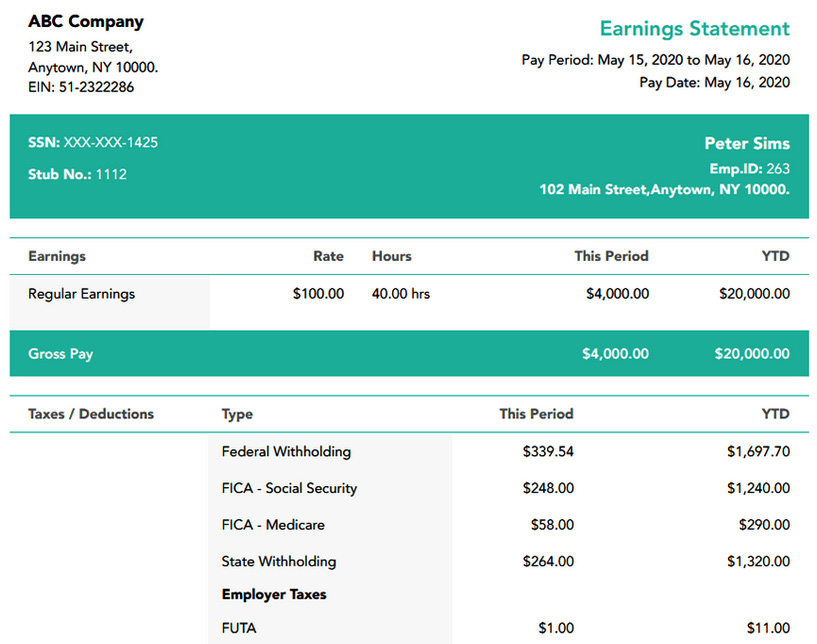
Figure 15.9 – Sample pay stub document
- Run the next two cells in the notebook under Extract Text from this sample doc using Textract to extract text from this sample document.
- Run the following cell, which calls a Comprehend ClassifyDocument API. This method takes the extracted text and custom classification endpoint and returns a response:
response = comprehend.classify_document(
Text= page_string,
EndpointArn=ENDPOINT_ARN
)
print(response)
You will get the following response:

Figure 15.10 – ClassifyDocument response
As per the response, the model endpoint has classified the document as a pay stub with 99% confidence. We tested this endpoint, so now let's move on to the next section to set up a human loop.
Setting up active learning with a Comprehend real-time endpoint using human in the loop
In this section, we are going to show you a custom integration with a Comprehend classifier endpoint, which you can invoke using the A2I StartHumanLoop API. You can pass any type of AI/ML prediction response to this API to trigger a human loop. In Chapter 13, Improving the Accuracy of Document Processing Workflows, we showed you a native integration with the Textract Analyze document API by passing a human loop workflow ARN to the AnalyzeDocument API. Setting up a custom workflow includes the following steps:
- Create a worker task template.
- Create a human review workflow.
- Create and start an A2I human loop.
- Check the human loop status and start labeling.
To get started, you need to create a private workforce and copy the private ARN in the Environment setup step in the Jupyter Notebook:
- To create a private workforce, refer to the Creating a private work team in AWS Console section in Chapter 13, Improving the Accuracy of Document Processing Workflows:
REGION = 'enter your region'
WORKTEAM_ARN= "enter your private workforce arn "
BUCKET = data_bucket
ENDPOINT_ARN= ENDPOINT_ARN
role = sagemaker.get_execution_role()
region = boto3.session.Session().region_name
prefix = "custom-classify" + str(uuid.uuid1())
- Run the next cell and move to the Create worker task template. This is the UI that the workers are going to view while labeling. We will show the prediction results in the UI and the original document data. We have used a pre-built classification template (https://github.com/aws-samples/amazon-a2i-sample-task-uis/blob/master/text/document-classification.liquid.html) for this use case. Run the notebook cell to define the HTML template.
Important Note
You can create a custom UI HTML template based on what type of data you want to show to your labelers. For example, you can show the actual document on the right and entities highlighted on the left using custom UIs.
- We have defined or chosen the HTML template in the preceding step, in which we will create a function to create a UI task using the create_human_task_ui API by running the following code:
def create_task_ui():
response = sagemaker.create_human_task_ui(
HumanTaskUiName=taskUIName,
UiTemplate={'Content': template})
return response
- Run the next cell to invoke the function to create the UI task defined in the previous step. You will get a human task arn response.
- Now, we will define a human review workflow. This human review workflow needs the private workforce you created, the UI template task you created, and a data bucket where you want the output of human review. We will use the sagemaker.create_flow_definition API to create a flow definition or human review workflow by running the following code:
create_workflow_definition_response = sagemaker.create_flow_definition(
FlowDefinitionName= flowDefinitionName,
RoleArn= role,
HumanLoopConfig= {
"WorkteamArn": WORKTEAM_ARN,
"HumanTaskUiArn": humanTaskUiArn,
"TaskCount": 1,
"TaskDescription": "Read the instructions",
"TaskTitle": "Classify the text"
},
OutputConfig={
"S3OutputPath" : "s3://"+BUCKET+"/output"
}
flowDefinitionArn = create_workflow_definition_response['FlowDefinitionArn']
- Now, we will get the response from the Comprehend custom classifier endpoint for the sample document for pay stubs on the sample data and parse this response for the human loop setup:
response = comprehend.classify_document(
Text= page_string,
EndpointArn=ENDPOINT_ARN
)
print(response)
p = response['Classes'][0]['Name']
score = response['Classes'][0]['Score']
#print(f»S:{sentence}, Score:{score}»)
response = {}
response['utterance']=page_string
response['prediction']=p
response['confidence'] = score
print(response)
- Now, using this preceding JSON response, we will set a confidence threshold. This StartHumanloop API needs the workflow ARN or flow definition ARN created in the previous step and the JSON response from the Comprehend classification to create a human loop. We are triggering this loop based on the confidence score threshold, as shown in the next code block:
human_loops_started = []
CONFIDENCE_SCORE_THRESHOLD = .90
if(response['confidence'] > CONFIDENCE_SCORE_THRESHOLD):
humanLoopName = str(uuid.uuid4())
human_loop_input = {}
human_loop_input['taskObject'] = response['utterance']
start_loop_response = a2i_runtime_client.start_human_loop(
HumanLoopName=humanLoopName,
FlowDefinitionArn=flowDefinitionArn,
HumanLoopInput={
"InputContent": json.dumps(human_loop_input)
}
)
print(human_loop_input)
human_loops_started.append(humanLoopName)
print(f'Score is less than the threshold of {CONFIDENCE_SCORE_THRESHOLD}')
print(f'Starting human loop with name: {humanLoopName} ')
else:
print('No human loop created. ')
Important Note
The preceding condition states anything greater than 90% confidence from your model endpoint will trigger a loop. This threshold is for demo purposes and needs to be changed for real use cases, such as anything below 90% that would trigger a human loop.
- Now, run the following code to get the link to your private work team to start labeling:
workteamName = WORKTEAM_ARN[WORKTEAM_ARN.rfind('/') + 1:]
print("Navigate to the private worker portal and do the tasks. Make sure you've invited yourself to your workteam!")
print('https://' + sagemaker.describe_workteam(WorkteamName=workteamName)['Workteam']['SubDomain'])
You will get a link to the following A2I portal:
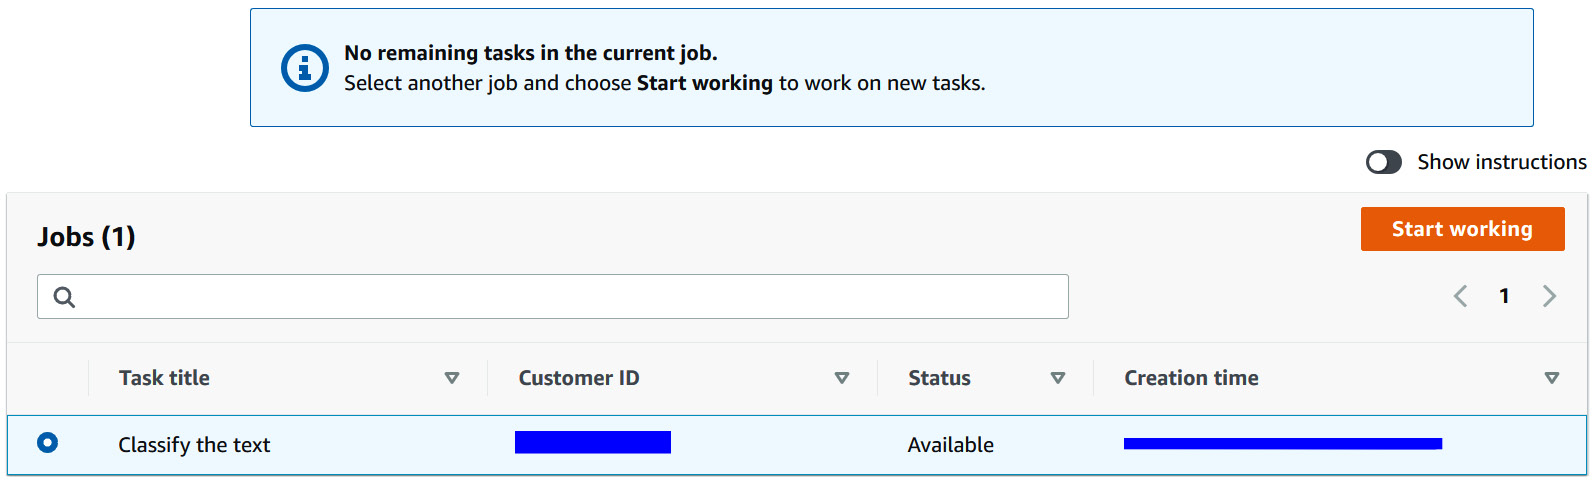
Figure 15.11 – Amazon A2I login console
- Select Task title and click on Start working; you will be redirected to the classification task UI.
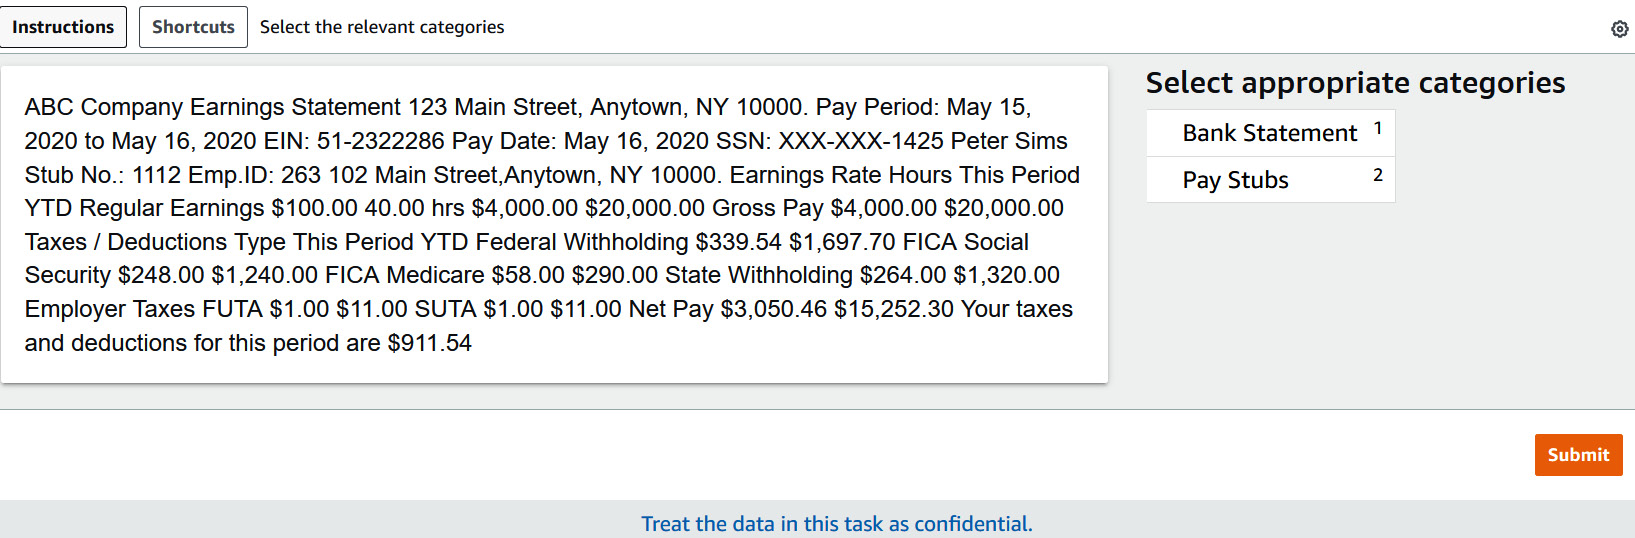
Figure 15.12 – Amazon A2I sample classification task UI
Review the data on the left in the previous screenshot and classify it by selecting the Pay Stubs category, and then click Submit.
- After submitting this classification task as a human reviewer, go back to the notebook and run the following code to get the completed tasks:
completed_human_loops = []
resp = a2i_runtime_client.describe_human_loop(HumanLoopName=humanLoopName)
- Now, we will review the human-reviewed results from completed human reviews, which are stored automatically as a JSON file in Amazon S3 by running the following code:
for resp in completed_human_loops:
splitted_string = re.split('s3://' + data_bucket + '/', resp['HumanLoopOutput']['OutputS3Uri'])
output_bucket_key = splitted_string[1]
response = s3.get_object(Bucket=data_bucket, Key=output_bucket_key)
content = response["Body"].read()
json_output = json.loads(content)
pp.pprint(json_output)
You get the following response:
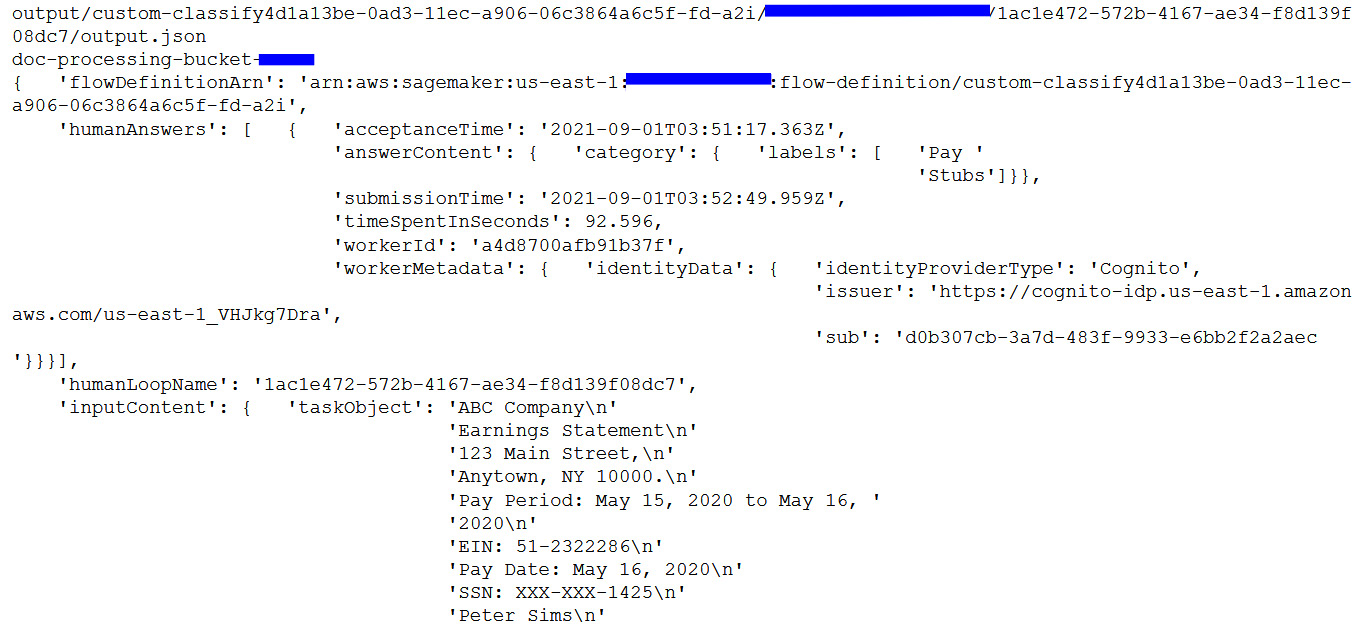
Figure 5.13 – Human-reviewed JSON response
Using this data, you can augment or enrich your existing dataset used for training. Try combining this data with the Comprehend training data we created and try retraining your model to improve accuracy. We will point you to some blogs to accomplish this step in the Further reading section.
Important Note
Please delete the model and the Comprehend endpoints created for the steps we did in this notebook.
Summary
In this chapter, we covered two things using a reference architecture as well as a code walkthrough. Firstly, we covered how you can extract data from various types of documents, such as pay stubs, bank statements, or identification cards using Amazon Textract. Then, we learned how you can perform some post-processing to create a labeled training file for Amazon Comprehend custom classification training.
We showed you that even with 36 bank statement documents and 24 pay stubs as a training sample, you can achieve really good accuracy using Amazon Comprehend transfer-learning capabilities and AutoML with document or text classification. Obviously, the accuracy improves with more data.
Then, you learned how to set up a training job in the AWS Management Console and how to set up a real-time classification endpoint using the AWS Management Console.
Secondly, you learned how you can set up humans in the loop with the real-time classification endpoint to review/verify and validate what the model has classified. We then also discussed how you can retrain your existing model by adding this data with your existing training data and set up a retraining or active-learning loop. Please refer to the Further reading section to automate this workflow using Lambda functions.
In the next chapter, we will cover how you can improve the accuracy of PDF batch processing with Amazon Textract and humans in the loop. So, stay tuned!
Further reading
- Active learning workflow for Amazon Comprehend custom classification models – Part 2, Shanthan Kesharaju, Joyson Neville Lewis, and Mona Mona (https://aws.amazon.com/blogs/machine-learning/active-learning-workflow-for-amazon-comprehend-custom-classification-part-2/)
- Creating and Using Custom Classifiers (https://docs.aws.amazon.com/comprehend/latest/dg/getting-started-document-classification.html)