
Chapter 16: Improving the Accuracy of PDF Batch Processing
Congratulations on getting so far in this book! At this point, you are an advanced builder of real-world applications that harness the power of NLP and AI to deliver tangible business benefits. You may not have realized it but the topics we've covered so far – and will continue to cover – address some of the most popular, in-demand business challenges that we have helped our customers with. Intelligent Document Processing (IDP) is a very hot requirement today and is something prevalent across almost every industry type. We started reading about advanced concepts from Chapter 13, Improving the Accuracy of Document Processing Workflows onward, and we saw how Amazon A2I (https://aws.amazon.com/augmented-ai/) plays a key role in making human reviews of your ML workflows easier and more accurate, enabling active learning in the process.
In this chapter, we will tackle an operational need that has been around for a while, is ubiquitous, and yet organizations struggle to address it efficiently. This is known as PDF batch processing. Think of this as setting up an automated document processing workflow (similar to what we built in the previous chapters) but with the added flexibility of bulk processing PDF documents, combined with the intelligence to automatically route specific text passages in the document for human reviews due to low - confidence detection caused by illegible or erroneous text.
By now, due to your diligent efforts in implementing advanced AI solutions, LiveRight Holdings has seen its profitability go through the roof. This growth has resulted in LiveRight spinning up a couple of subsidiaries as independent organizations in their own right, and the board has decided that all three companies will go public in the mid-term. You have been promoted to Chief Architect of Operations at LiveRight, and the CIO has tasked you with building the necessary components to automate the registration process for the three companies with the Securities and Exchanges Commission (SEC) as publicly traded companies.
In this chapter, we will cover the following topics:
- Introducing the PDF batch processing use case
- Building the solution
Technical requirements
For this chapter, you will need access to an AWS account, which you can get by going to https://aws.amazon.com/console/. Please refer to the Signing up for an AWS account subsection within the Setting up your AWS environment section of Chapter 2, Introducing Amazon Textract, for detailed instructions on how to sign up for an AWS account and sign into the AWS Management Console.
The Python code and sample datasets for the solution discussed in this chapter can be found in this book's GitHub repository: https://github.com/PacktPublishing/Natural-Language-Processing-with-AWS-AI-Services/tree/main/Chapter%2016.
Check out the following video to see the Code in Action at https://bit.ly/3nobrCo.
Introducing the PDF batch processing use case
To determine what the architecture will look like, you talk to your accounting department to understand the process for registering companies with the SEC. As per the process, the accounting department will generate PDF documents using the SEC's template for registration, also known as Form S20 (https://www.sec.gov/files/forms-20.pdf). The process also involves creating all the supporting documentation, along with the registration, which will be sent together to the SEC using an API call. LiveRight's Partner Integration team has the handshake with SEC in place, and they need the form data to be available in an Amazon DynamoDB (https://aws.amazon.com/dynamodb/) table that they will consume to create the message call to the SEC API.
However, before making the data available to the Partner Integration team, the accounting team mentioned that they need to review a collection of text lines that have been detected in the PDF document, specifically the ones that may not have been interpreted correctly due to document quality issues.
With this input, you realize that you need to add a batch component to your document processing solution. This will enable bulk detection of text from PDF documents and routing of those text lines that fall below a confidence threshold to a human review loop comprised of the accounting team members. You decide to use the asynchronous document text detection API from Amazon Textract to leverage its pre-trained ML model for text extraction from PDF documents, Amazon A2I, to set up a human workflow to review and modify text detected with a confidence of less than 95%, and Amazon DynamoDB to store the original detected text, along with the corrections for consumption by the Partner Integration team.
We will be building our solution using an Amazon SageMaker Jupyter notebook that will allow us to review the code and results as we execute it step by step. We will be performing the following tasks:
- As a first step, we will create a private labeling workforce for human review using the Amazon SageMaker Console. For more details, please refer to https://docs.aws.amazon.com/sagemaker/latest/dg/sms-workforce-private.html.
- We will start the solution workflow by inspecting the sample registration forms available to us when we clone the GitHub repository for this chapter. We will use Amazon Textract to start an asynchronous text detection job.
- Then, we will get the results for the text detection job, select specific lines from the document, and inspect the detection confidence scores.
- We will set up an Amazon A2I human review loop using the tabular task UI template and send the text lines from each document for all the documents to the human loop.
- Logging in as a private worker, we will work on the allocated review task, making changes to the text lines with low - confidence detection scores for all the documents.
- We will upload the detected and corrected text lines to a DynamoDB table for downstream processing.
Now that we've got the context for the exercise and gone over our intended process, let's start building the solution.
Building the solution
In the previous section, we introduced our use case, which is to submit company registrations for public trading to the SEC, covered the architecture of the solution we will be building, and briefly walked through the solution components and workflow steps. In this section, we will get right down to business and start executing the tasks that will build our solution. But first, there are some prerequisites we have to take care of.
Setting up for the solution build
If you have not done so in the previous chapters, you will have to create an Amazon SageMaker Jupyter notebook, as well as setting up Identity and Access Management (IAM) permissions for that notebook role to access the AWS services we will use in this notebook. After that, you will need to clone this book's GitHub repository (https://github.com/PacktPublishing/Natural-Language-Processing-with-AWS-AI-Services), create an Amazon S3 (https://aws.amazon.com/s3/) bucket, and provide the bucket's name in the notebook to start execution.
Note
Please ensure that you have completed the tasks mentioned in the Technical requirements section.
Follow these steps to complete these tasks before we execute the cells from our notebook:
- Follow the instructions documented in the Creating an Amazon SageMaker Jupyter notebook instance subsection in the Setting up your AWS environment section of Chapter 2, Introducing Amazon Textract, to create your Jupyter notebook instance.
IAM role Permissions While Creating Amazon SageMaker Jupyter Notebooks
Accept the default for the IAM role at notebook creation time to allow access for any S3 bucket.
- Once you have created the notebook instance and its status is InService, click on Open Jupyter in the Actions menu heading for the notebook instance.
- This will take you to the home folder of your notebook instance.
- Click on New and select Terminal.
- In the terminal window, type cd SageMaker and then git clone https://github.com/PacktPublishing/Natural-Language-Processing-with-AWS-AI-Services.
- Now, exit the terminal window, go back to the home folder, and you will see a folder called Natural-Language-Processing-with-AWS-AI-Services. Click this folder to bring up the chapter folders and click Chapter 16.
- Open this folder by clicking on it. You should see a notebook called Improve-accuracy-of-pdf-processing-with-Amazon-Textract-and-Amazon-A2I-forGitHub.ipynb.
- Open this notebook by clicking on it.
- Follow the steps in this notebook that correspond to the next few subheadings in this section by executing one cell at a time. Please read the descriptions that were added to each notebook cell.
Next, we'll cover some additional IAM prerequisites.
Additional IAM prerequisites
We have to enable additional policies for our SageMaker Notebook role. Please refer to the Changing IAM permissions and trust relationships for the Amazon SageMaker Notebook execution role subsection in the Setting up your AWS environment section in Chapter 2, Introducing Amazon Textract, for detailed instructions on how to execute the following steps:
- Please attach the TextractFullAccess and AmazonAugmentedAIFullAccess policies to your Amazon SageMaker Notebook IAM role if you've not already done so.
- Add an iam:PassRole permission as an inline policy to your SageMaker Notebook execution role:
{ "Version": "2012-10-17", "Statement": [ {
"Action": [
"iam:PassRole"
],
"Effect": "Allow",
"Resource": "<your sagemaker notebook execution role ARN">
}
]
}
Now that we have set up our notebook and set up an IAM role to run the walkthrough notebook, we will create the private labeling workforce.
Creating a private team for the human loop
Refer to Step 0 in the notebook (https://github.com/PacktPublishing/Natural-Language-Processing-with-AWS-AI-Services/blob/main/Chapter%2016/Improve-accuracy-of-pdf-processing-with-Amazon-Textract-and-Amazon-A2I-forGitHub.ipynb) for the instructions we will execute now. In this section, we will create a private team using the Amazon SageMaker labeling workforce console, and we will add ourselves to the private team as a worker. This is required so that we can log in to the labeling task UI when we reach the Amazon A2I step in this solution. Please execute the following steps:
- Log in to the AWS Management Console if you've not already done so (please refer to the Technical requirements section at the beginning of this chapter for more details), type Amazon SageMaker in the Services search bar, and go to the Amazon SageMaker console. Once there, on the left of the UI, click on Ground Truth and then Labelling workforces. On the screen, select the Private tab at the top and click on Create private team.
- Enter a name for your private team in the Team Name field and leave the default selection of Create a new Amazon Cognito user group as-is in the Add Workers section. Scroll down and click Create private team.
- You will be returned to the Labelling workforces screen. The private nlp-doc-team team should be visible under Private teams. Next to that, you will see an ARN, which is a long string that looks like arn:aws:sagemaker:region-name-123456:workteam/private-crowd/team-name. Please copy this ARN and provide it in the notebook in Step 1 – Cell 1:
WORKTEAM_ARN= '<your-private-workteam-arn>'
- Next, scroll down the previous screen, go to the Workers section, and click on Invite new workers. Provide your email address and click Invite new workers. You will receive an email from [email protected]. Follow the instructions provided to complete the signup process.
- Now, add yourself to the private team by clicking on nlp-doc-team and then Add workers to team. Select your email address from the list and click on Add workers to team.
Now that we have added the private team, let's create an Amazon S3 bucket.
Creating an Amazon S3 bucket
Follow the instructions documented in the Creating an Amazon S3 bucket, a folder, and uploading objects subsection in the Setting up your AWS environment section of Chapter 2, Introducing Amazon Textract, to create your Amazon S3 bucket. If you created an S3 bucket in the previous sections, please reuse that bucket. For this chapter, you just need to create the S3 bucket. We will create the folders and upload the objects directly from the notebook:
- Once you have the bucket's name, please type it in Step 1 – Cell 1 of the notebook:
bucket = "<S3-bucket-name>"
- Execute Step 1 – Cell 1 of the notebook by clicking the Run button in the top menu of the notebook UI. This will import the libraries we need, initialize the variables, and get our kernel ready for the next set of steps.
- Finally, execute Step 1 – Cell 2 in the notebook to upload the registration documents to our S3 bucket:
s3_client = boto3.client('s3')
for secfile in os.listdir():
if secfile.endswith('pdf'):
response = s3_client.upload_file(secfile, bucket, prefix+'/'+secfile)
print("Uploaded {} to S3 bucket {} in folder {}".format(secfile, bucket, prefix))
Now that we have created the S3 bucket, imported the libraries we need, and uploaded the documents to our S3 bucket, let's extract the contents using Amazon Textract.
Extracting the registration document's contents using Amazon Textract
This section corresponds to Steps 2 and 3 in the notebook (https://github.com/PacktPublishing/Natural-Language-Processing-with-AWS-AI-Services/blob/main/Chapter%2016/Improve-accuracy-of-pdf-processing-with-Amazon-Textract-and-Amazon-A2I-forGitHub.ipynb). In this section, we will submit an asynchronous text detection job using Amazon Textract. Once the job completes, we will get the results of the text detection and load them into a pandas DataFrame (https://pandas.pydata.org/docs/reference/api/pandas.DataFrame.html), select the text lines we need, and review the results. Follow these steps using the aforementioned notebook and execute the cells to perform the tasks required:
- Execute Step 2 – Cell 1 to define the bucket handle and declare a dictionary for storing Textract Job IDs for each of our documents:
input_bucket = s3.Bucket(bucket)
jobids = {}
- Execute Step 2 – Cell 2 to submit the three text detection jobs, one for each registration document:
for doc in input_bucket.objects.all():
if doc.key.startswith(prefix) and doc.key.endswith('pdf'):
tres = textract.start_document_text_detection(
DocumentLocation={
"S3Object": {
"Bucket": bucket,
"Name": doc.key
}
}
)
jobids[doc.key.split('/')[2]] = tres['JobId']
Note
When you build this solution in an event-driven architecture using AWS Lambda (https://aws.amazon.com/lambda/), an event-driven serverless compute service, you can pass the NotificationChannel attribute as input to the Textract StartDocumentTextDetection API (https://docs.aws.amazon.com/textract/latest/dg/API_StartDocumentTextDetection.html) to indicate the Amazon SNS (https://aws.amazon.com/sns) topic that the message will be sent to when the job completes. You can set up AWS Lambda to subscribe to the topic, and on receipt of the message, you can call the Textract GetDocumentTextDetection API (https://docs.aws.amazon.com/textract/latest/dg/API_GetDocumentTextDetection.html) to retrieve the extracted text. We will execute this API in the notebook in Step 3 – Cell 1 here.
- Finally, execute Step 2 – Cell 3 to print the Job IDs for each of the documents:
for j in jobids:
print("Textract detection Job ID for {} is {}".format(j,str(jobids[j])))
- Now, we must go to Step 3 in the notebook. Here, we will define the helper classes to parse the JSON response from Textract. Then, we will load the text lines we need into a dictionary that we will use in the subsequent steps. Click Run in the notebook to execute Step 3 – Cell 1.
- Execute Step 3 – Cell 2 to call the helper class we defined in the previous section and extract the text for each of our registration documents. The extracted text will be loaded into a DataFrame called df_indoc:
text_extractor = TextExtractor()
indoc = {}
df_indoc = pd.DataFrame(columns = ['DocName','LineNr','DetectedText','Confidence', 'CorrectedText', 'Comments'])
for x in jobids:
pages = text_extractor.extract_text(jobids[x])
contdict =pages[1]['Content']
for row in range(1,(int(len(contdict)/2))+1):
df_indoc.loc[len(df_indoc.index)] = [x, row, contdict['Text'+str(row)], round(contdict['Confidence'+str(row)],1),'','']
- Execute Step 3 – Cell 3 in the notebook to define the filter criteria for what text lines are important to us when reviewing the registration documents. Finally, execute Step 3 – Cell 4 to create a new DataFrame that only contains the text lines we are interested in:
df_newdoc = pd.DataFrame(columns = ['DocName','LineNr','DetectedText','Confidence','CorrectedText','Comments'])
for idx, row in df_indoc.iterrows():
if str(row['LineNr']) in bounding_dict['lines'].split(':'):
df_newdoc.loc[len(df_newdoc.index)] = [row['DocName'],row['LineNr'], row['DetectedText'], row['Confidence'], row['CorrectedText'],row['Comments']]
df_newdoc
- The DataFrame's results are shown in the following screenshot. Some of the low - confidence entries are highlighted here:
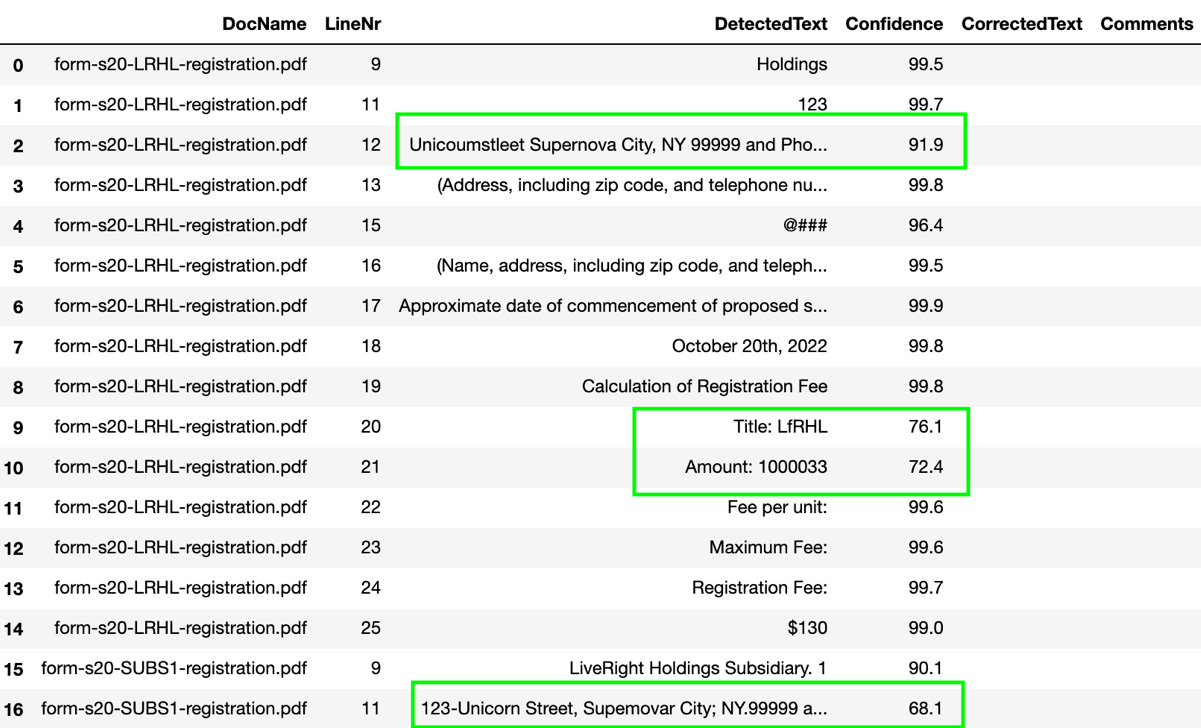
Figure 16.1 – Text lines from the SEC registration documents
Note
The text entries appear garbled because these were intentionally introduced in the PDF documents for our use case to trigger low - confidence predictions.
Now that we have digitized the text we need from the registration documents, let's cover setting up our human review workflow using Amazon A2I.
Setting up an Amazon A2I human workflow loop
For the code blocks discussed here, please refer to Steps 4, 5, and 6 in the notebook (https://github.com/PacktPublishing/Natural-Language-Processing-with-AWS-AI-Services/blob/main/Chapter%2016/Improve-accuracy-of-pdf-processing-with-Amazon-Textract-and-Amazon-A2I-forGitHub.ipynb). It is time to set up a human workflow using the Private Team we created in Step 0 and send the results to the Amazon A2I human loop for review and modifications, as required:
- Let's start by initializing some variables we will need for the next few tasks. Please execute Step 4 – Cell 1 in the notebook.
- Execute Step 4 – Cell 2 in the notebook to define the human task UI template that we will use for the human review activity. We selected the task template for tabular data from the Amazon A2I Sample task UI GitHub repository (https://github.com/aws-samples/amazon-a2i-sample-task-uis) and customized it for our needs.
- Execute Step 4 – Cell 3 to create the task UI based on the template:
def create_task_ui():
response = sagemaker.create_human_task_ui(
HumanTaskUiName=taskUIName,
UiTemplate={'Content': template})
return response
# Create task UI
humanTaskUiResponse = create_task_ui()
humanTaskUiArn = humanTaskUiResponse['HumanTaskUiArn']
print(humanTaskUiArn)
- We will get the following output:
arn:aws:sagemaker:us-east-1:<aws-account-nr>:human-task-ui /ui-pdf-docs-<timestamp>
- Now, execute Step 5 – Cell 1 in the notebook to create an Amazon A2I Flow Definition that orchestrates tasks to workforces and collects output data:
create_workflow_definition_response = sagemaker_client.create_flow_definition(
FlowDefinitionName=flowDefinitionName,
RoleArn=role,
HumanLoopConfig= {
"WorkteamArn": WORKTEAM_ARN,
"HumanTaskUiArn": humanTaskUiArn,
"TaskCount": 1,
"TaskDescription": "Review the contents and correct values as indicated",
"TaskTitle": "SEC Registration Form Review"
},
OutputConfig={
"S3OutputPath" : OUTPUT_PATH
}
)
flowDefinitionArn = create_workflow_definition_response['FlowDefinitionArn'] # let's save this ARN for future use
- Execute Step 5 – Cell 2 to start the human workflow loop:
for x in range(60):
describeFlowDefinitionResponse = sagemaker_client.describe_flow_definition(FlowDefinitionName=flowDefinitionName)
print(describeFlowDefinitionResponse ['FlowDefinitionStatus'])
if (describeFlowDefinitionResponse ['FlowDefinitionStatus'] == 'Active'):
print("Flow Definition is active")
break
time.sleep(2)
- We will get the following results:
Initializing
Active
Flow Definition is active
- Execute Step 6 – Cell 1 to upload the scanned images for the first page of the registration documents to our S3 bucket. We will refer to these images from within the Amazon A2I task UI:
reg_images = {}
for image in os.listdir():
if image.endswith('png'):
reg_images[image.split('_')[0]] = S3Uploader.upload(image, 's3://{}/{}'.format(bucket, prefix))
- Execute Step 6 – Cell 2 to start the human loop for all three registration documents in our use case. In this cell, we will create a random name for each human loop, select specific lines from each document that fall below the confidence threshold of 95%, and send those inputs to an Amazon A2I StartHumanLoop API call (https://docs.aws.amazon.com/augmented-ai/2019-11-07/APIReference/API_StartHumanLoop.html):
humanLoopName = {}
docs = df_newdoc.DocName.unique()
# confidence threshold
confidence_threshold = 95
for doc in docs:
doc_list = []
humanLoopName[doc] = str(uuid.uuid4())
for idx, line in df_newdoc.iterrows():
# Send only those lines whose confidence score is less than threshold
if line['DocName'] == doc and line['Confidence'] <= confidence_threshold:
doc_list.append({'linenr': line['LineNr'], 'detectedtext': line['DetectedText'], 'confidence':line['Confidence']})
ip_content = {"document": doc_list,
'image': reg_images[doc.split('.')[0]]
}
start_loop_response = a2i.start_human_loop(
HumanLoopName=humanLoopName[doc],
FlowDefinitionArn=flowDefinitionArn,
HumanLoopInput={
"InputContent": json.dumps(ip_content)
}
)
- Execute Step 6 – Cell 3 to check the status of our human loops; the status should be InProgress:
completed_human_loops = []
for doc in humanLoopName:
resp = a2i.describe_human_loop(HumanLoopName=humanLoopName[doc])
print(f'HumanLoop Name: {humanLoopName[doc]}')
print(f'HumanLoop Status: {resp["HumanLoopStatus"]}')
print(f'HumanLoop Output Destination: {resp["HumanLoopOutput"]}')
print(' ')
- Now, we will log in to the Amazon A2I task UI to review and modify the text lines. Let's log in to the worker portal to review the predictions and modify them as required. Execute Step 6 – Cell 4 to get the URL to our Task UI:
workteamName = WORKTEAM_ARN[WORKTEAM_ARN.rfind('/') + 1:]
print("Navigate to the private worker portal and do the tasks. Make sure you've invited yourself to your workteam!")
print('https://' + sagemaker.describe_workteam(WorkteamName=workteamName)['Workteam']['SubDomain'])
- Use the credentials you set up in Step 0 when creating the labeling workforce to log in to the task UI. You will see a task called SEC Registration Form Review. Select it and click on Start working.
- The first page of the original registration form will be displayed:
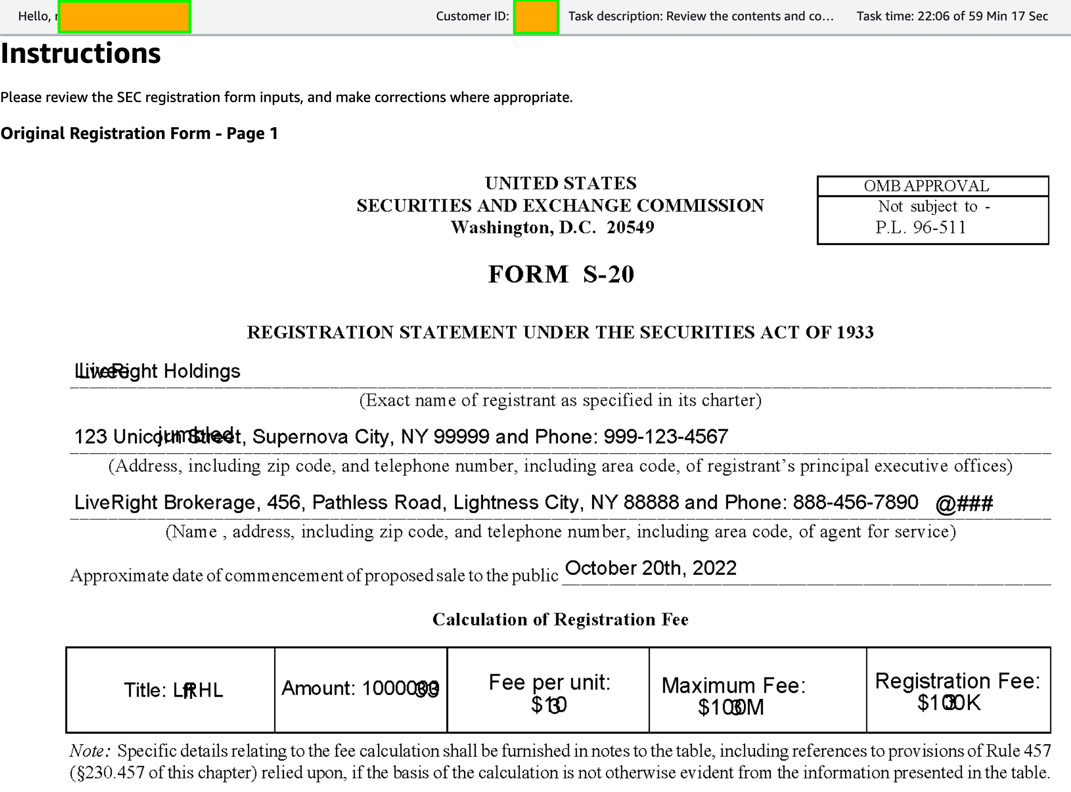
Figure 16.2 – Task UI displaying an image of the registration form with illegible text
- Scroll down the page to find a table that displays what Textract detected, the confidence score of the text line, a radio button to check if we think the detected text is correct or incorrect, an input area for us to modify the detected text, and a comments field. Make changes to the table and click the Submit button at the lower left of the page:
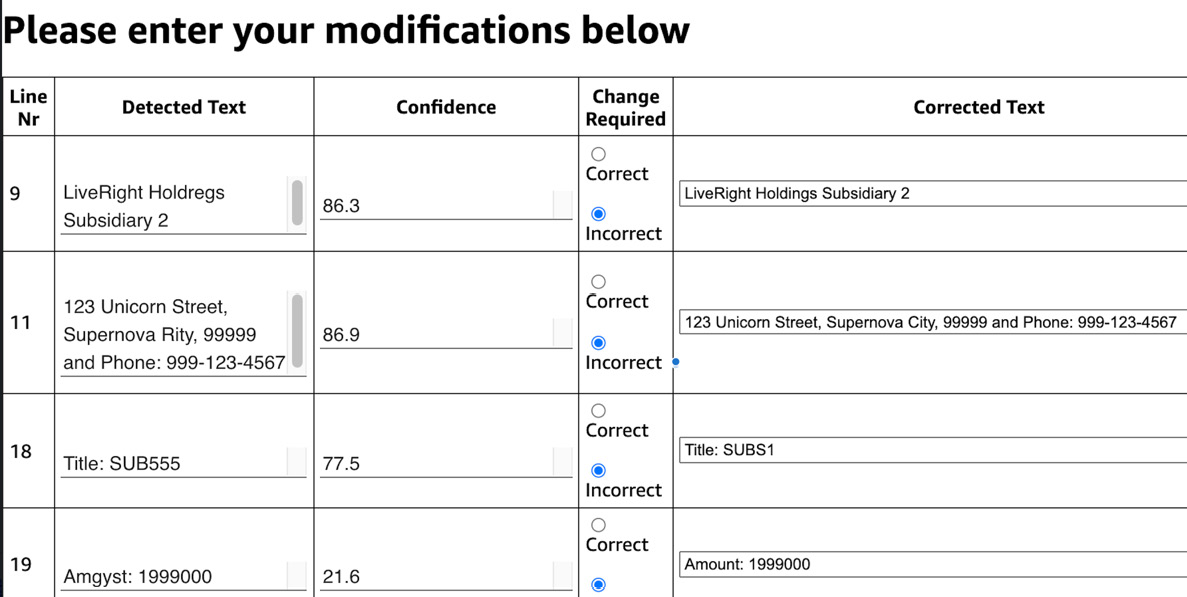
Figure 16.3 – The document modifications page in Amazon A2I
- Now, the task UI will be refreshed to show the next document from the three we sent to Amazon A2I for human review. Repeat the preceding two steps to review the image, scroll down to make changes in the table, and click Submit. You will have to repeat this for the last document as well.
- Once you have made your changes and submitted the task for all three documents, go back to the notebook and execute Step 6 – Cell 5 to check the status of the human loops. All three human loops will have a status of Completed.
- Finally, execute Step 6 – Cell 7 in the notebook to retrieve the changes that were made by the human reviewers and add this to our DataFrame. When inspecting the DataFrame, we will see the following result:

Figure 16.4 – A2I human review results updated
In this section, we covered the majority of the processing needs for this solution by using Amazon Textract asynchronous APIs to extract text from multiple PDF documents. After that, we used Amazon A2I to set up a human loop to review and correct low - confidence text detections. As the final step in our solution, we will persist the results of our activity.
Storing results for downstream processing
Now that we understand how to set up a review workflow, let's persist the results for consumption by downstream applications. We will be executing the cells in Step 7 of the notebook for this section:
- Execute Step 7 – Cell 1 to create an Amazon DynamoDB table, a managed database service for storing and accessing key-value pairs with very low latency.
- Execute Step 7 – Cell 2 to upload the contents of our DataFrame to the DynamoDB table:
for idx, row in df_newdoc.iterrows():
table.put_item(
Item={
'row_nr': idx,
'doc_name': str(row['DocName']) ,
'line_nr': str(row['LineNr']),
'detected_line': str(row['DetectedText']),
'confidence': str(row['Confidence']),
'corrected_line': str(row['CorrectedText']),
'change_comments': str(row['Comments'])
}
)
print("Items were successfully created in DynamoDB table")
- The values will be inserted into the DynamoDB table, as follows:
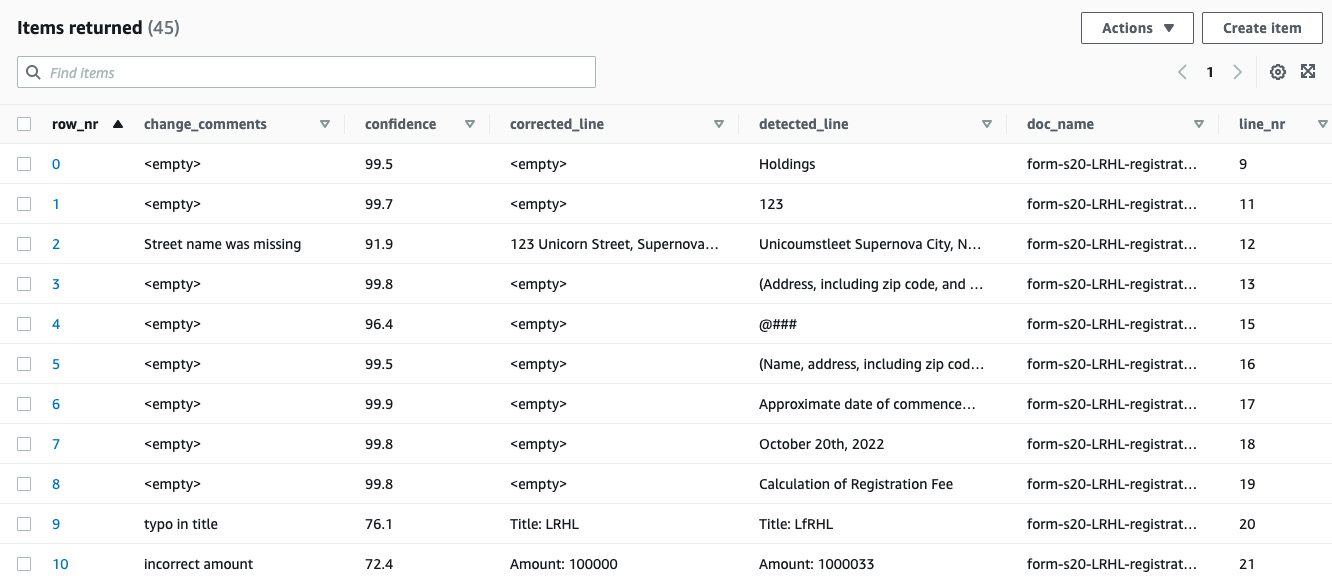
Figure 16.5 – Corrected registration document entries in DynamoDB
That concludes the solution build. Please refer to the Further reading section for a code sample for building a similar solution using AWS Lambda and CloudFormation.
Summary
In this chapter, we continued building advanced NLP solutions to address real-world requirements. We focused on asynchronously processing PDF documents and improving their accuracy by reviewing and modifying low - confidence detections using Amazon Textract and Amazon A2I.
We learned how to register companies to the SEC use case with a need to extract text, and then validate and modify specific text lines in the documents before they could be passed to the Partner Integration team for submission to SEC. We considered an architecture built for scale and ease of setup. We assumed that you are the chief architect overseeing this project, and we then proceeded to provide an overview of the solution components in the Introducing the PDF batch processing use case section.
We then went through the prerequisites for the solution build, set up an Amazon SageMaker Notebook instance, cloned our GitHub repository, and started executing the code in the notebook based on the instructions provided in this chapter. We covered setting up our private work team using Amazon SageMaker labeling workforces, extracting the relevant content from the PDF documents in batch mode using Amazon Textract, forwarding the detection results to an Amazon A2I human review loop, completing the human task steps using the UI, reviewing the results, and storing the document's contents, along with the corrections, in an Amazon DynamoDB table for downstream processing.
In the next chapter, we will be addressing one more interesting feature in Amazon Textract, namely handwriting detection, and how to set up a solution to detect handwritten content for review, modification, and consumption.
Further reading
Please refer to the following resources for more information:
- Deriving conversational insights from invoices with Amazon Textract, Amazon Comprehend and Amazon Lex, by Mona Mona, Prem Ranga, and Saida Chanda (https://aws.amazon.com/blogs/machine-learning/deriving-conversational-insights-from-invoices-with-amazon-textract-amazon-comprehend-and-amazon-lex/).
- Amazon Textract documentation for asynchronous operations (https://docs.aws.amazon.com/textract/latest/dg/async.html).