Delve is the workload of Microsoft 365, which lets users easily view all their relevant content in one place. Delve will not only show you your content but also content that your colleagues have been working on and have shared with you. This content includes OneDrive for Business documents, SharePoint Online documents, and documents that were shared with you through email attachments. Delve automatically surfaces all this content without even needing for the users to search for it.
Delve is powered by Microsoft Graph, the same AI-based tool that powers Microsoft Search.
Office Graph plays three critical roles in Delve in particular and Microsoft 365 in general:
- First, it monitors your interaction with content and people across multiple Microsoft 365 workloads, such as (but not limited to) SharePoint, Teams, OneDrive for Business, and Outlook.
- Based on these interactions, it uses machine learning to understand the connections between you, those people, and the crawled content.
- It then uses the developed understanding to automatically surface content in the order of relevance for you.
Things like what you've been working on, who you've been work with, what they've been working with, who your manager is, who else has the same manager as you – all of these impacts the relevance of the content that you see in Delve. This helps you find and discover the most relevant and fresh content first, instead of having to go through a list of search results, or for that matter, even having to perform a search in the first place!
In this chapter, we will cover the following topics:
- Navigating to your Delve profile page
- Changing your profile photo
- Updating your profile information
- Grouping documents through boards
Navigating to your Delve profile page
Delve essentially has two landing pages:
- Your Delve profile landing page
- The Delve home page
In this recipe, you will see how you can get to your profile page in Delve. We will then discuss, in subsequent sections, the difference between these two pages and also how you can get to the Delve home page.
Getting ready
The only requirement for you to be able to access Delve is that your administrator should have enabled it for your organization.
How to do it...
To get to your Delve profile page, follow these steps:
- Browse to the Microsoft 365 home page or the home page of any app in your Microsoft 365 tenant.
- Click your profile image in the top-right corner.
- Click on My Officeprofile, as shown in the following screenshot:

- You will now be taken to your Delve profile page. Here, you will see documents and people's profiles that are most relevant to you.
Congratulations! You just learned how to browse to your Delve profile page. In the next sections, we will learn about the various sections on this page in greater detail.
How it works...
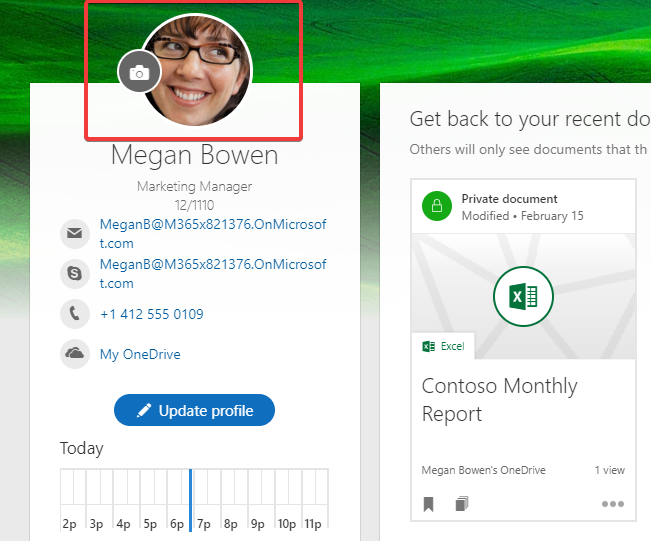
The Delve profile page is a great way to quickly get back to what you were working on and also discover relevant content around you:

As shown in the preceding screenshot, the content on the page is subdivided into these three sections:
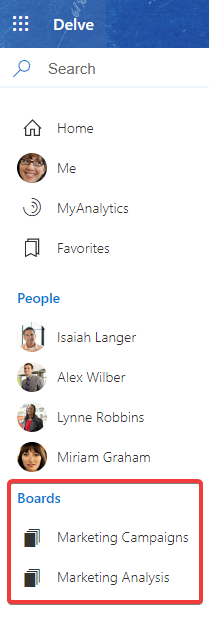
- Search and left navigation: You can perform the following actions from this section:
- Search: You can perform an organization-wide search from the search box in this section. Note that this search is slightly different from the usual Microsoft 365 search:
- When bringing back search results, it gives more weight to what's relevant for you and shows that content first.
- It will only show you people results, documents, and Delve boards (we will learn more about boards in a subsequent recipe in this chapter) in the search results.
- You cannot use the advanced search filters when searching from Delve.
- Home: Click this link to go to the Delve home page.
- Me: Click this to view your profile page.
- MyAnalytics: This is a Microsoft 365 app that provides insights into your work patterns within Microsoft 365. You can read more about it at: https://m365book.page.link/MyAnalytics.
- Favorites: You can mark documents as favorites and then view all your favorites in one place from here.
- People: This section shows a list of people that you've been working with most or whose profiles are the most relevant to you. You can click a person's name or picture to see their profile page.
- Boards: This section shows you your favorite boards. We will learn more about boards in the Grouping documents through boards recipe, later in this chapter.
- Search: You can perform an organization-wide search from the search box in this section. Note that this search is slightly different from the usual Microsoft 365 search:
- Your profile information section: This section lets you do the following:
- Add or change your profile photo: This is where you change your profile photo. We have covered this in more detail in the Changing your profile photo recipe, later in this chapter.
- View a snapshot of today's calendar: This is a quick snapshot of your Outlook calendar for the day. If you are viewing someone else's profile, you will see their Outlook calendar here.
- View or update profile information: You can view a snapshot of your profile information in the About me section. You can also click the Update profile button to make changes to it. This is covered in more detail in theUpdating your profile information recipe, later in this chapter. If you are viewing someone else's profile, you will see a View profile button below the About mesection. Clicking this button will show you detailed contact and profile information for that person.
- View the organization hierarchy: This section shows a limited graphical view of the organizational hierarchy for the person whose Delve profile you are viewing.
- Relevant content and profiles (driven by Office Graph):
- View the recent documents and email attachments: This sub-section shows you the recent documents that you've been working on. This includes documents in any emails that you may have exchanged with others. Documents within Delve are presented in the form of document cards. Document cards are unique to Delve, and we will see in a little bit all the things that you can do with a document card. You can also click See all to get an expanded view showing more documents that you recently worked on. This view also provides a few additional filtering capabilities.
- View the Delve profile page of people that you most work with: This sub-section shows you a list of people that are most relevant to you based on your interactions in Microsoft 365. Clicking on a person's image will take you to their profile page, which is similar in structure to yours but shows content that is centered around them, and that you have access to via permissions.
- Discover relevant documents from people around you: This section shows you relevant documents from the people around you. Remember that the relevance is based on a multitude of factors, including but not limited to things that you've been working on, who you report to, who you work with, and what's most popular among them. Also, remember that these documents are shown using the document cards described previously.
Delve home page
Similar to the profile page, the Delve home page also surfaces relevant content for you and helps you stay in touch with the documents that are popular and relevant for you. You can browse to the Delve home page by clicking on the Delve app in the Microsoft 365 app launcher, as shown in the following screenshot:

You can also click the Home hyperlink from anywhere in Delve to be taken to the Delve home page.
There's more...
Document cards provide a nice way to view information related to a document. We will look at document cards in the next section. We will then discuss how Delve only shows you content that you have access to. We will finally look at how to completely turn off Delve if you need to do so for any reason.
Document cards
The following screenshot shows a preview of document cards in Delve:

For an Outlook attachment, clicking anywhere in the document card opens a preview of the document in Outlook. For SharePoint and OneDrive documents, you can perform the following additional actions through a document card:
- Click the document name to open it in a new browser window.
- View the document within the original library: You can see a hyperlinked name of the parent SharePoint site or the OneDrive for Business folder toward the bottom left of the card. Clicking this link takes you to the site and specifically the corresponding library containing the document within that site.
- Click the bookmark/favorites icon toward the bottom left to add or remove the document from your favorites list. As mentioned earlier, all your favorite documents can be accessed in one place through the Favoritesoption in the navigation menu on the left of the page.
- Click theManage boardsicon to manage the boards for this document.
- Click on the three dots toward the bottom right corner of the card to do any of the following:
- Copy and/or directly email a link to the document using Copy linkorSend a link.
- View the permissions(who has access to it) for the document by clicking Who can see this?. We will cover this in more detail in the next section, Delve and security.
- See the number of times the document has been viewed.
Delve and security
Delve always only brings back relevant content based on what you have access to, and never changes any permissions on it. This means the following:
- Only you can see content that is private to you, and others do not see any documents that you have not shared with them.
- Others will only see their private content or content that they were given access to through permissions.
- Similarly, you will only see content from others that you have been granted access to.
Who sees a document is ultimately determined by the respective document permissions in the corresponding library in SharePoint or OneDrive for Business. You can view who has access to a particular document by clicking on the three dots toward the bottom of the respective document card and then clicking Who can see this?:

Clicking this link will open the corresponding library in a new browser tab or window and shows you the current permissions on that document:

Turning off Delve
Delve can help you quickly get to the relevant content and people. If your organization has enabled Delve, you cannot completely turn it off. You may, however, turn it off just for yourself so that when others view your profile, they will not see your documents. Once you do that, you too will not be able to view documents on their profile page. They will still be able to visit your profile page and view your profile details and organization chart. To turn off Delve for your profile, click the gear settings icon in the top-right corner of your profile page, click Feature settings,andthen turn the toggle under the Documentsheading fromOn toOffand click the OKbutton, as shown in the following screenshot:

From that point on, you will start seeing a message on the Delve profile page indicating the fact that you've turned off documents in Delve. This is shown in the following screenshot:

In addition to completely turning off Delve on your profile, you can also prevent individual documents from showing up at all in Delve. This page describes the steps to do that in detail: https://m365book.page.link/Hide-From-Delve.
You will need to be an admin on the site that contains the document(s) that you'd like to hide from Delve.
See also
- The Determining and revoking permissions in a site recipe in Chapter 3, Working with Modern Sites in SharePoint Online
- The Changing list permissions recipe in Chapter 4, Working with Lists, Libraries in SharePoint Online
Changing your profile photo
Your profile photo shows across various Microsoft 365 workloads. It shows up in the navigation bar in the top-right corner for most workloads. In Teams, it shows against the conversations that you participate in. In SharePoint, it shows against the documents that you have modified and various other places.
You can change this profile photo from your Delve profile page. At the time of writing this book,Teamsis the only other workload of Microsoft 365 that also lets you change your profile photo.
This recipe shows you how to change your profile photo from the Delve home page as well as using Teams.
Getting ready
Delve should have been enabled by your organization for you to be able to change your profile photo from there. Your organization should also have allowed changes to the profile photo in Delve.
Similarly, for you to be able to change the profile photo from Teams, your organization should have assigned a Teams license to you and they should have allowed making changes to the profile photo.
How to do it...
To change your profile photo in Microsoft 365 using Delve, follow these steps:
- Browse to your profile page in Delve, as described in the previous recipe in this chapter, Navigating to your Delve profile page.
- Click on the camera next to your profile image, as shown in the following screenshot:
- Click Upload a new photo on the next screen to select a photo from your computer.
- Once you select the photo, you can pan or zoom using the controls on this screen, as shown in the following screenshot:

- Click Apply to save your changes.
- Your new photo should immediately show up on the Delve home page. It might take a couple of hours though for the photo to be reflected in other Microsoft 365 workloads.
That's it! You just saw how to change your profile photo in Microsoft 365 from the Delve profile page.
To change your profile photo in Teams, follow these steps:
- Open Teams in the desktop app or the browser.
- Click your profile photo in the top-right corner.
- Click the Change picturelink under your profile name.
- Click Upload picture, as shown in the following screenshot:

- Select the new photo.
- Click Save.
That's it! This will update your profile photo in Teams. Just like Delve, changes made to the profile photo from within Teams also sync across the other Microsoft 365 workloads.
How it works...
Both Delve and Teams let you change the profile photo in one single place and then sync it across all workloads. Note that once you change your profile photo from these workloads, it may take up to 24 hours for it to reflect across other workloads. Until the new picture is synchronized, you will continue to see the old photo in these workloads.
See also
- Chapter 11, Microsoft Teams
Updating your profile information
Your profile properties help you to showcase your credentials, skills, and interests to others in your organization. Besides, they help others to easily find you through search. In this recipe, we will see how you can keep your profile information up to date. As an example, we will add the SEO Marketing skill to our existing profile.
Getting ready
Delve should have been enabled by your organization for you to be able to make these changes. Also, some organizations like to control the profile properties that are allowed to be directly updated by the users. For you to be able to make updates to your profile properties, your organization should have not locked these properties from being edited.
How to do it...
To update your skills in Delve, follow these steps:
- Browse to your profile page in Delve, as described in an earlier recipe in this chapter, Navigating to your Delve profile page.
- Click the Update profile button located below the profile picture.
- Click the Skills and expertise link, as shown in the following screenshot:

- Type your skill and click Add skill:

- That's it! The newly added skill will now show up along with the existing skills. As long as the privacy setting for this section is public, anyone viewing your profile will also see this newly added skill right away:

- A Microsoft 365 search for SEO Marketing will now also bring back your profile in the search results. This is depicted in the following screenshot. Please note, however, that it might take a little bit of time before the search crawler re-crawls your profile and updates the search index. Please refer to the How it works... section of the Advanced Search in SharePoint Online recipe in Chapter 8, Search in Microsoft 365, for details on how the search crawler works:

Congratulations! You just learned how to update your profile. Among other benefits, keeping your profile updated helps others in your organization to easily find you.
How it works...
The Delve profile page contains the following sections that let you view and/or edit various aspects of your contact and profile information:
- Contact information: This section contains information such as your name, title, department, location, email, and phone number. Most of this information is usually maintained by your organization's IT/HR departments through external systems and is not editable from here. As shown in the following screenshot, you will see a small pencil icon next to the properties that you are allowed to edit. For each property, Delve will also show you whether that property is visible only to you or if it's also visible to others who view your profile from your organization. There are some properties, such as your birthday, for which you can change the privacy. As also shown in the following screenshot, for properties where you can edit the privacy, you will be able to specify whether this property is private or if it's visible to others:

- About me: This is a short blurb about you.
- Projects: This is where you can enter the names of various projects that you have worked on in the past. You can choose whether your projects should only be visible to you or visible to others in your organization.
- Skills and expertise: This is where you can mention your professional skills and things that others can reach out to you for.
- Schools and education: You can mention the schools you've attended here.
- Interests and hobbies: Here, you can mention the things that you like to do in your leisure time. Again, you can set the privacy of this section.
Remember also that properties from your profile are only searchable if their privacy is set to public. If you set a property to be visible only to you, it will not be indexed and will therefore not be brought back as part of the search results.
Also, for each profile property, your organization can control the following:
- Whether or not it is displayed on the Delve profile page
- Whether or not it is changeable by you
- The default privacy setting for it
- Whether or not you can change that privacy setting
See also
- The Advanced Search in SharePoint Online recipe in Chapter 8, Search in Microsoft 365
- The Finding experts and people recipe in Chapter 8, Search in Microsoft 365
Grouping documents through boards
As mentioned earlier in this chapter, Delve uses Office Graph to surface content for you from all over Microsoft 365. Boards in Delve help you to better organize related content and share it with others in your organization.
This recipe will show you how to create a board in Delve and thus share related content from that board with others. For our scenario, we will create a new board to organize the marketing campaigns within our organization.
Getting ready
The only requirement for you to be able to create boards is that your organization should have enabled Delve for you.
How to do it...
To create a board in Delve, follow these steps:
- Browse to your Delve profile page or the Delve home page to view a list of relevant documents.
- Click on the manage boards icon for the document that you would like to add to the board, as shown in the following screenshot:

- This opens the Manage boards screen with a text box toward the bottom to enter the name of your board:

- As shown in the following screenshot, you will see a list of existing boards as you start typing the name in this text box:

- You can then select an existing board to add the document to it or create a new one if you did not find a match. Since we did not find a match for Marketing Campaigns, we will continue typing the board name and then press the Enter key when done. This creates the new board and adds the document to it.
- This will also add it to your Delve favorites list so the new board appears in the Boards section toward the bottom of the left menu, as shown in the following screenshot:
- From within Delve, we can also search for other relevant documents and add them to the board we just created, as shown in the following screenshot:

- If you now click on the board in the Boards section in the left menu, you will see all related content in one place as part of the new board that you just created. The following screenshot shows the Marketing Campaigns board that we just created:

- Boards are viewable by everyone in your organization. This means that anyone in your organization can search for boards and view related content that is part of the board. You can also directly share boards with others by clicking the Send a linkoption from the top of your board. Doing so will open an email with a link to the board. You can also copy a link to the board from the browser address bar and then share it with others in your organization.
Congratulations! You just learned how to create a board in Delve so you can organize all related content in one single place and share it with others in your organization.
How it works...
Boards are a great way to group related content and then share it with others. Remember that boards are public, in that as soon as you create them, anyone in the organization can view them via the following means:
- Through search results in Delve
- By clicking Manage boardson a document card for a document that's already part of a board
- Through the auto-complete results on theManage boardsscreen, when trying to add a document to a board
- Through a direct link to the board that could have been emailed to them
Once they find a board, they can permanently add it to their favorites. Doing so will start showing the board under the Boards heading in the left-hand navigation menu in their Delve.
It is important to note that even though boards are public, documents within those boards are governed by permissions defined for them. This means that once you click on a board to view the documents within it, whether or not you will see a specific document from within that board will depend on your permissions for that document itself. Even though your co-workers may have added various documents to that board, you will only see the documents that you have access to via individual permissions for each of them. For this reason, different viewers of a board may see different documents on it, depending on which documents from that board they have access to.