PowerVirtual Agents (PVAs) is a Software-as-a-Service (SaaS) offering that lets you build smart bots that can answer queries from your customers round the clock. You can design bots by simply using a guided, no-code graphical interface. What this means is that subject matter experts can build bots themselves without having to involve development teams. They can test and debug bots in real-time using the Test Console.
PVAs are a part of the Power Platform, which lets citizen developers build solutions for themselves. As of April 2020, PVA is offered as a separate SaaS offering outside Microsoft 365.
Microsoft already has an Azure Bot Service that lets you build intelligent, enterprise-grade bots. Using the bot framework, you can build bots that range from simple Q&A bots to sophisticated virtual assistants. The bot framework, along with other Azure services such as Cognitive Service, gives you the ability to speak, listen, understand, and learn from your users.
However, building and publishing bots using the bot framework requires developer know-how. You need to write lines of code to build a bot and deploy it. You also have to plan ongoing support to maintain the code in the future.
Using a code-based method poses another challenge. While testing the bot, every time you find an issue, the bot has to go through a development cycle. This slows down the delivery process.
Creating a bot with PVAs is easy and requires no development knowledge. Hence, it lets the subject matter experts build bots without requiring a developer. Citizen developers can build bots and test them using a conversational UI in a matter of minutes, without writing a single line of code. Someone who has experience in building flows using Power Automate can take the bot to an even higher level. PVAs come with a testing console. Since the end-users can build bot themselves, they can test the bots logic in the development cycle itself.
In this chapter, we'll learn about the following recipes:
- Creating a bot
- Creating a topic
- Testing a bot
- Deploying a bot
Let's get started!
Creating a bot
Bots perform tasks that are simple and repetitive. They are much faster than a human and can provide 24/7 support.
Let's see what it takes to build a new bot. We are going to build a bot that will enable our users to register themselves for a course.
Getting ready
You will need a Power Virtual Agent license to complete this recipe. Alternatively, you can sign up for a trial by visiting: https://m365book.page.link/pva-trial
How to do it...
Follow these steps to complete this recipe:
- Go to https://powerva.microsoft.com/ and sign in with your organization account.
- If you do not have a license, sign up for a trial.
- In the Create a new bot dialog box, enter a name for your bot. Let's name it Course Selector
- SelectCreateto initiate the bot-building process.
- If you already have created one bot and want to create another, click on the Bot icon at the top and click New bot:

It can take up to 15 minutes to create the first bot; subsequent bots take less time. You will see the following screen when the bot building process is over:

How it works...
By default, the bot gets provisioned in your default environment. You can change the environment during the provisioning process by selecting a particular environment, as shown in the following screenshot:

If you don't see all your environments listed in the drop-down menu, this is probably because you do not have access to the environment.
If you encounter an error saying You do not have permissions to any environments. Please get access from an administrator, you'll need tocreate a new environment and use that environment to create your bot.
See also
- The Creating a solution recipe in Chapter 13, Power Automate (Microsoft Flow) (to read more about environments)
- The Creating a topic recipein this chapter
- The Deploying a bot recipein this chapter
Creating a topic
In Power Virtual Agents, a topic defines the bot's business logic and process flow. Topicsare individual process flows that have a trigger and one or more nodes.
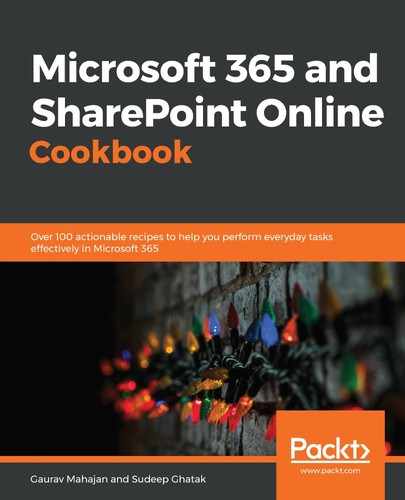
When you create a bot, you will see that some topics are available by default. You get four default user topics and eight default system topics. You can edit both of these topic types in the same manner as the topics you create, but you cannot delete them:
A bot will execute a specific topic based on what the user types. A topic has a number of trigger phrases. Phrases are the questions or keywords that the user is likely to type. The bot uses natural language understanding to interpret what a customer wants to know. An example can be seen here.
The topic shown in the following screenshot gets triggered if the user types one of the phrases provided:

Getting ready
You will need a Power Virtual Agent license to complete this recipe. Alternatively, you can sign up for a trial by visiting: https://m365book.page.link/pva-trial
How to do it...
Follow these steps to complete this recipe:
- Go to https://powerva.microsoft.com/ and sign in with your organization account.
- If you do not have a license, sign up for a trial.
- Click on the link that saysTopics, as shown in the following screenshot:

- To create a new topic, click+ New topic:

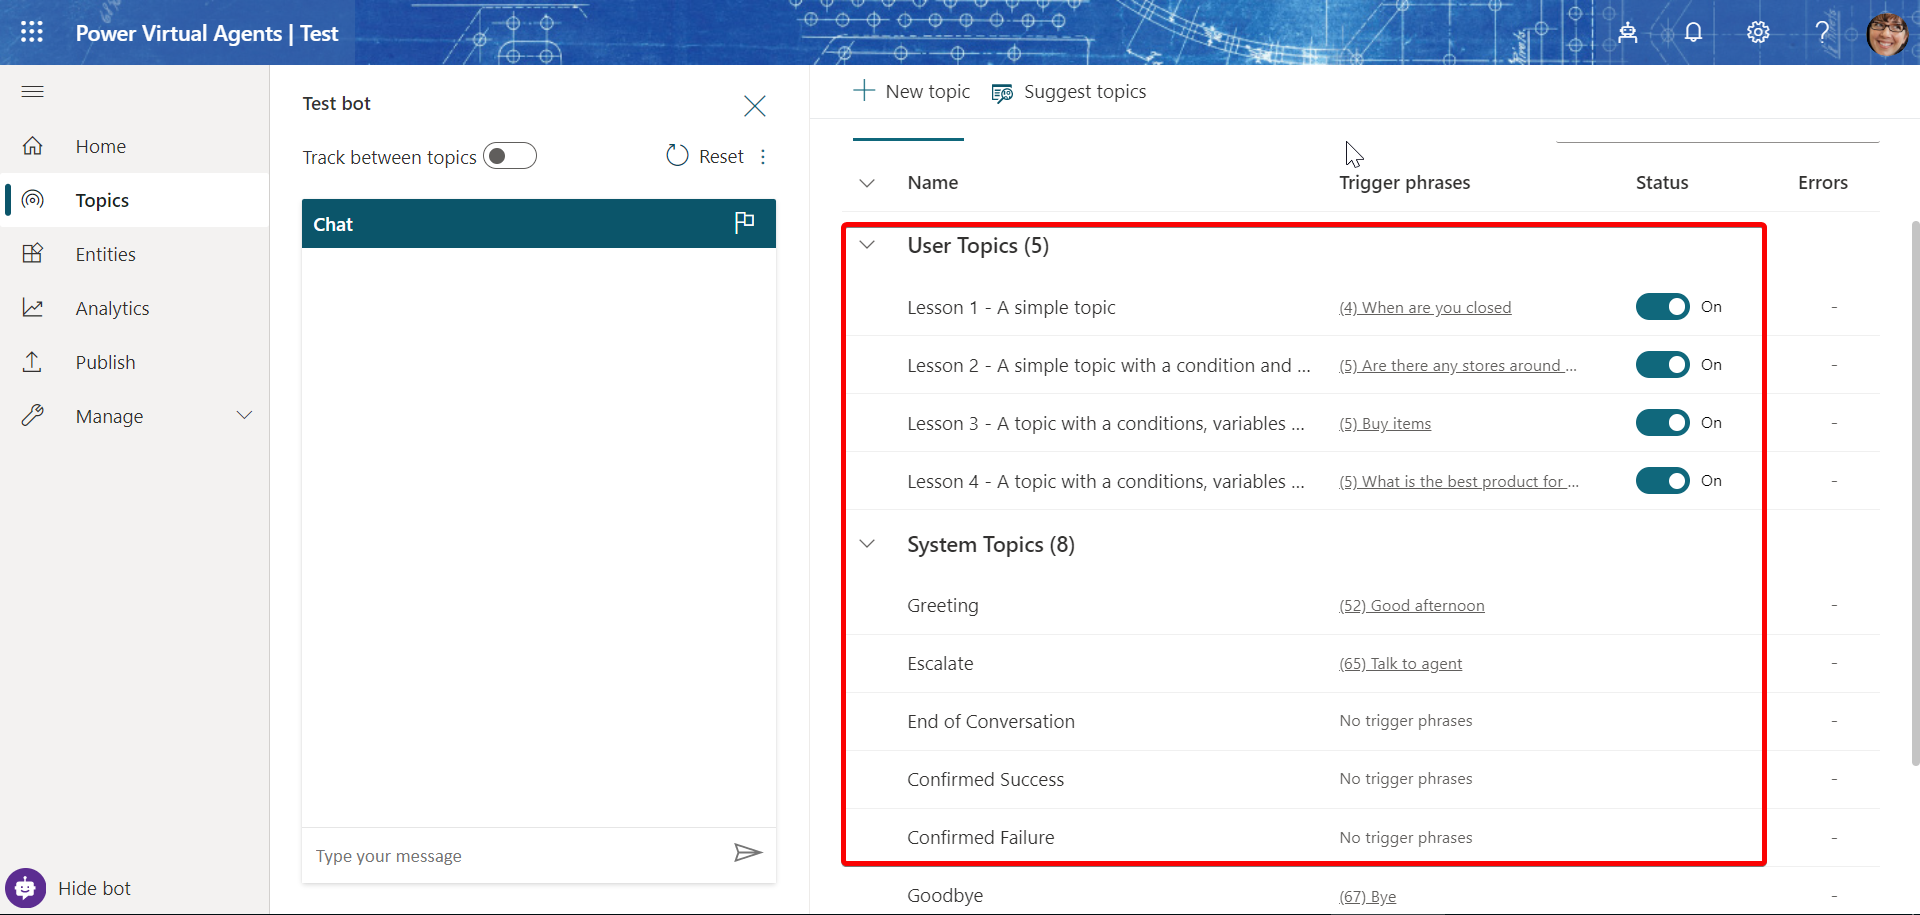
- Name the new topic Course Topic and add the following phrases to it:

- ClickSave topicto add the topic to the Topics list.
- Click onGo to authoring canvas to build the logic behind the topic.
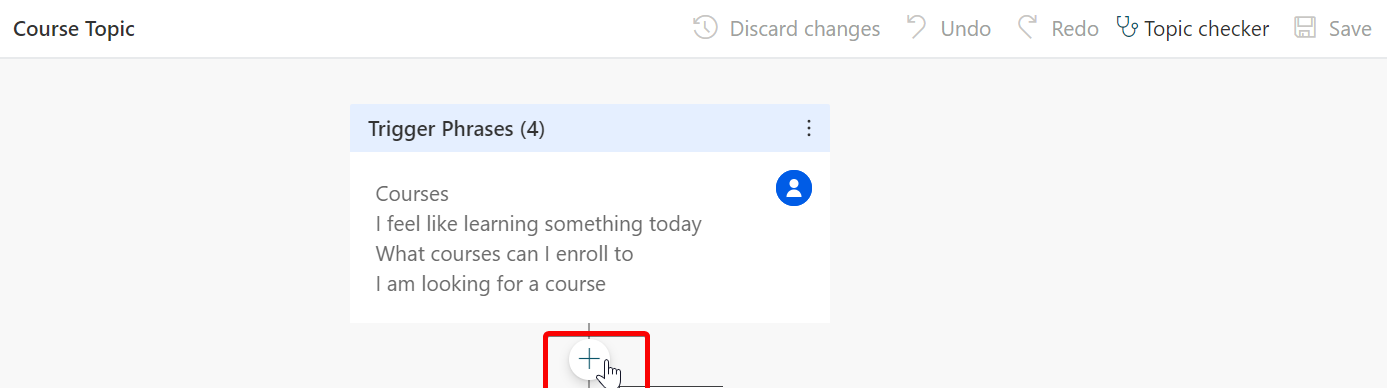
- The authoring canvas displays the topic trigger phrases with a message node. Click on the (+) icon to add a node:
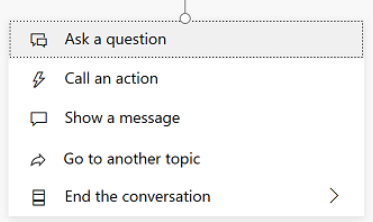
- When adding a node, you can choose from five options, as shown in the following screenshot:
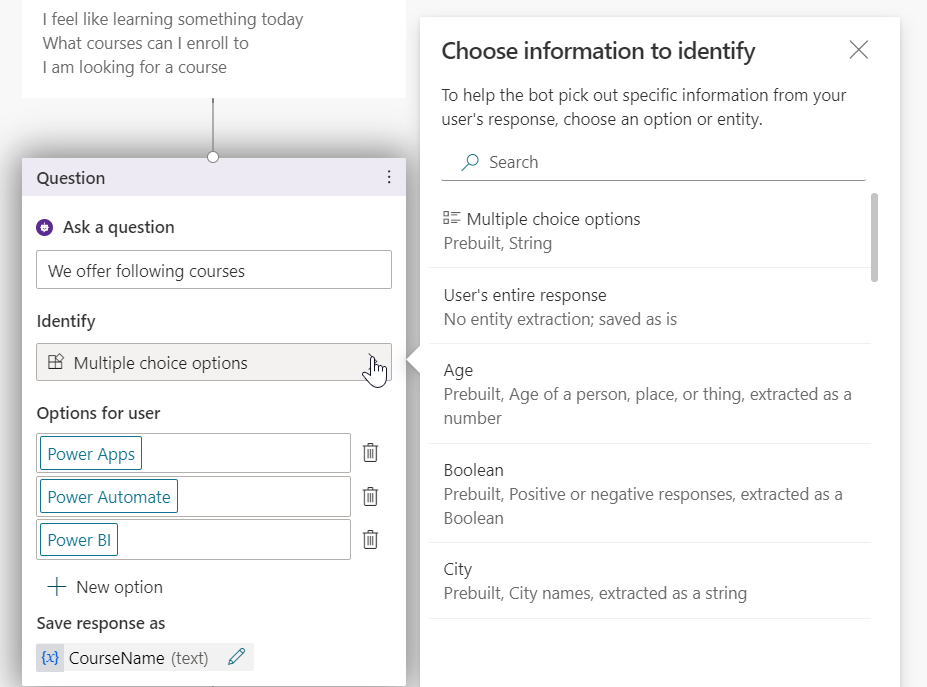
- Let's pick Ask a question. Set the desired question, as shown in the following screenshot. Save the response in a variable. Update the variable name to CourseName:

- Next, add a Condition node, as shown in the following screenshot:

- Now, we will configure each course branch. For the sake of this example, let's assume that the registration for the Power Apps has closed but that registration is open for other courses:

- Those who expressed an interest in the Power Apps will see a sorry message, and then the bot will transfer the user to an agent who'll discuss other options with the user. Here, we need to selectTransfer to Agentto insert a hand-off node. Enter a private message you want to send to the agent. See how we have used the CourseName variable here to add context:

- We'll end the other two course branches with a survey:

- Save the authoring canvas logic by clicking on Save.
How it works...
Let's take a closer look at some of the nodes that are available for use.
Show a message
This is the simplest of all nodes and simply displays a text message to the user.
Ask a question
In our example, while adding the question, we picked the Multiple choice optionsoption. As the name suggests, this option lets us specify multiple options for the user to choose from. We also chose to set the Identify type to entity, as shown in the following screenshot:
An entity enables the bot to extract information units from natural language. For instance, if the bot asks a question that is related to a city, a user can reply in a variety of ways. An entity deciphers the required information from the natural language, as shown in the following screenshot:

End the conversation
There are two ways to end a conversation. Let's go over them now.
End with a survey
This node will end the conversation flow with a survey to rate the conversation experience, as shown in the following screenshot:

Transfer to agent
As you saw previously, we can hand off conversations to an agent. This can be done seamlessly and contextually within the authoring canvas. Click on the gear icon and choose Transfer to agent:

There are multiple options you can choose from to transfer the flow, as shown in the following screenshot:

Configuring these engagement apps is beyond the scope of this book. During the transfer process, Power Virtual Agents sends additional information to the agent, along with a transcript of the chat session, as shown in the following screenshot:

Go to another topic
The user is transferred to another topic when they type in a phrase that matches one of the phrases listed in the topic. You can transfer a user intentionally by adding the Go to another topic node. With this, the bot transfers the conversation flow from the current topic to the specified topic.
Call an action
This option lets you trigger an existing flow or create a new flow, as shown in the following screenshot:

See also
- The Creating a solutionrecipe in this chapter (to read more about environments)
- The Creating a bot recipein this chapter
- The Deploying a bot recipein this chapter
Testing a bot
Power Virtual Agent allows you to build and test bots simultaneously. While testing a bot, you can actually see the required steps being executed. This allows you to find and fix unexpected behavior.
As with any software project, user acceptance testing is crucial. Since it is the subject matter experts who would know exactly how the bot is supposed to behave, they can tweak the bot logic while performing user acceptance testing.
Getting ready
You will need a Power Virtual Agent license to complete this recipe. Alternatively, you can sign up for a trial by visiting: https://m365book.page.link/pva-trial
How to do it...
Follow these steps to complete this recipe:
- Go to https://powerva.microsoft.com/ and sign in with your organization account.
- If you do not have a license, sign up for a trial.
- Usually, the Testconsole is on the landing page itself. If not, open it by selectingTest your bot. Once you've done that, the link will change to Hide bot, as shown in the following screenshot:

- Just where the text box appears, enter one of the trigger phrases we defined for Course Topic. Let's go with Courses.
- When the courses are all listed, pick Power BI.
- End the conversation by providing feedback, as shown in the following screenshot:

- Restart testing by clicking on Reset.
How it works...
There are three more features of the testing console. These can be seen in the following screenshot:

Let's go over these features:
- Track between topics lets you follow through the conversation path step by step when your bot moves from one topic to another (1).
- If the bot is behaving unexpectedly and you need to have a closer look at the diagnostics, you can click on Save Snapshot (2).
- If you are having issueswiththe Power Virtual Agent platform itself, you canFlag an issueby clicking on theFlagicon. This brings up a dialog box and displays a Conversation ID to help Microsoft debug the issue. The request is submitted anonymously and your test data never leaves your tenant (labeled 3in the screenshot).
A dialog box will appear to save the snapshot. Click Save.
A file namedDSAT.zip will be downloaded to your device. This contains two files:
- dialog.json, which contains conversational diagnostics, including detailed descriptions of errors
- botContent.json, which contains the bot's topics and other content, including entities and variables that are being used in the bot:

See also
- The Creating a bot recipein this chapter
- The Creating a topic recipein this chapter
- The Deploying a bot recipein this chapter
Deploying a bot
Deploying a bot is done in two stages:
- Publishing a bot
- Connecting the bot to a channel
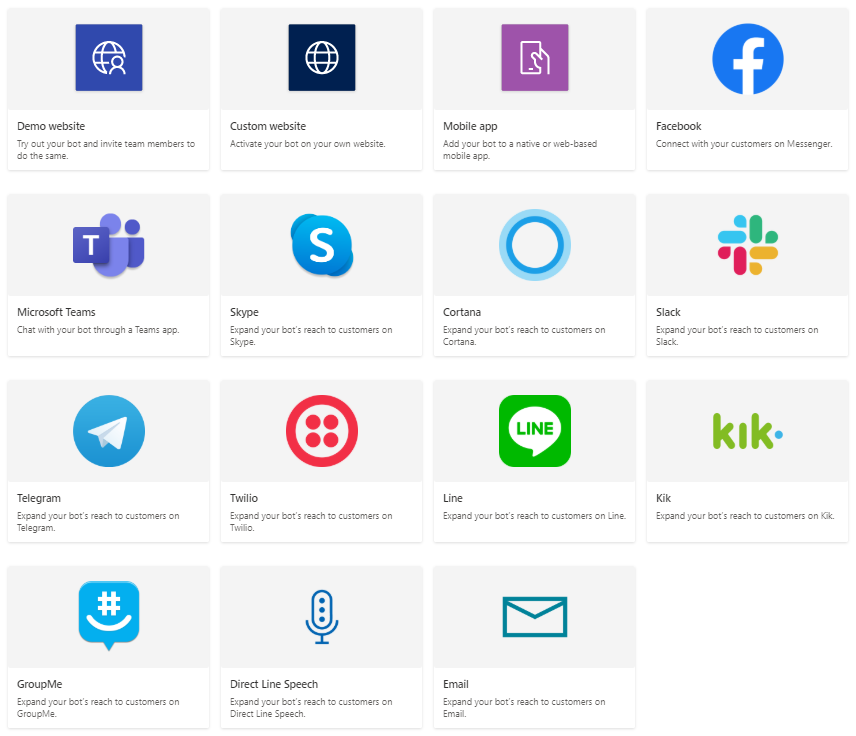
Power Virtual Agent lets you publish bots on multiple platforms or channels, as shown in the following screenshot:
You can connect your bot to as many channels you like, provided that it has been published at least once. Power Virtual Agents lets you publish the bot from within the app. If your bot is already connected to a channel, PVA takes care of publishing the bot to the channels you have connected it to. Once you've published the bot, you can share it with your colleagues and customers.
Let's go through the steps involved in the publishing process. In the following steps, we'll show you how to add the bot to Microsoft Teams.
Getting ready
Install Microsoft Teams App Studioand launch it in Microsoft Teams. The app can be download from https://m365book.page.link/app-studio
How to do it...
Follow these steps to complete this recipe:
- Go to https://powerva.microsoft.com/ and sign in with your organization account.
- Click Publish in the left navigation pane and select Publish again from the right-hand pane:

- A pop up will appear. Select Publish again.
- A confirmation message will appear on your screen, as shown in the following screenshot:
![]()
Now, you need to connect your bot to a channel.
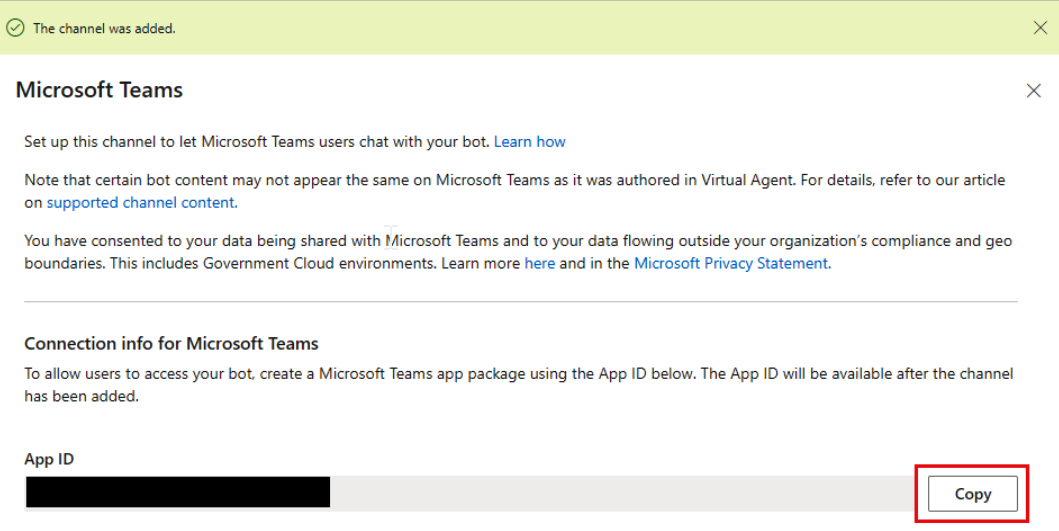
- SelectManageon the side navigation pane and go to theChannelstab.
- SelectMicrosoft Teamsand then selectAdd. Copy the App ID and save it for later:
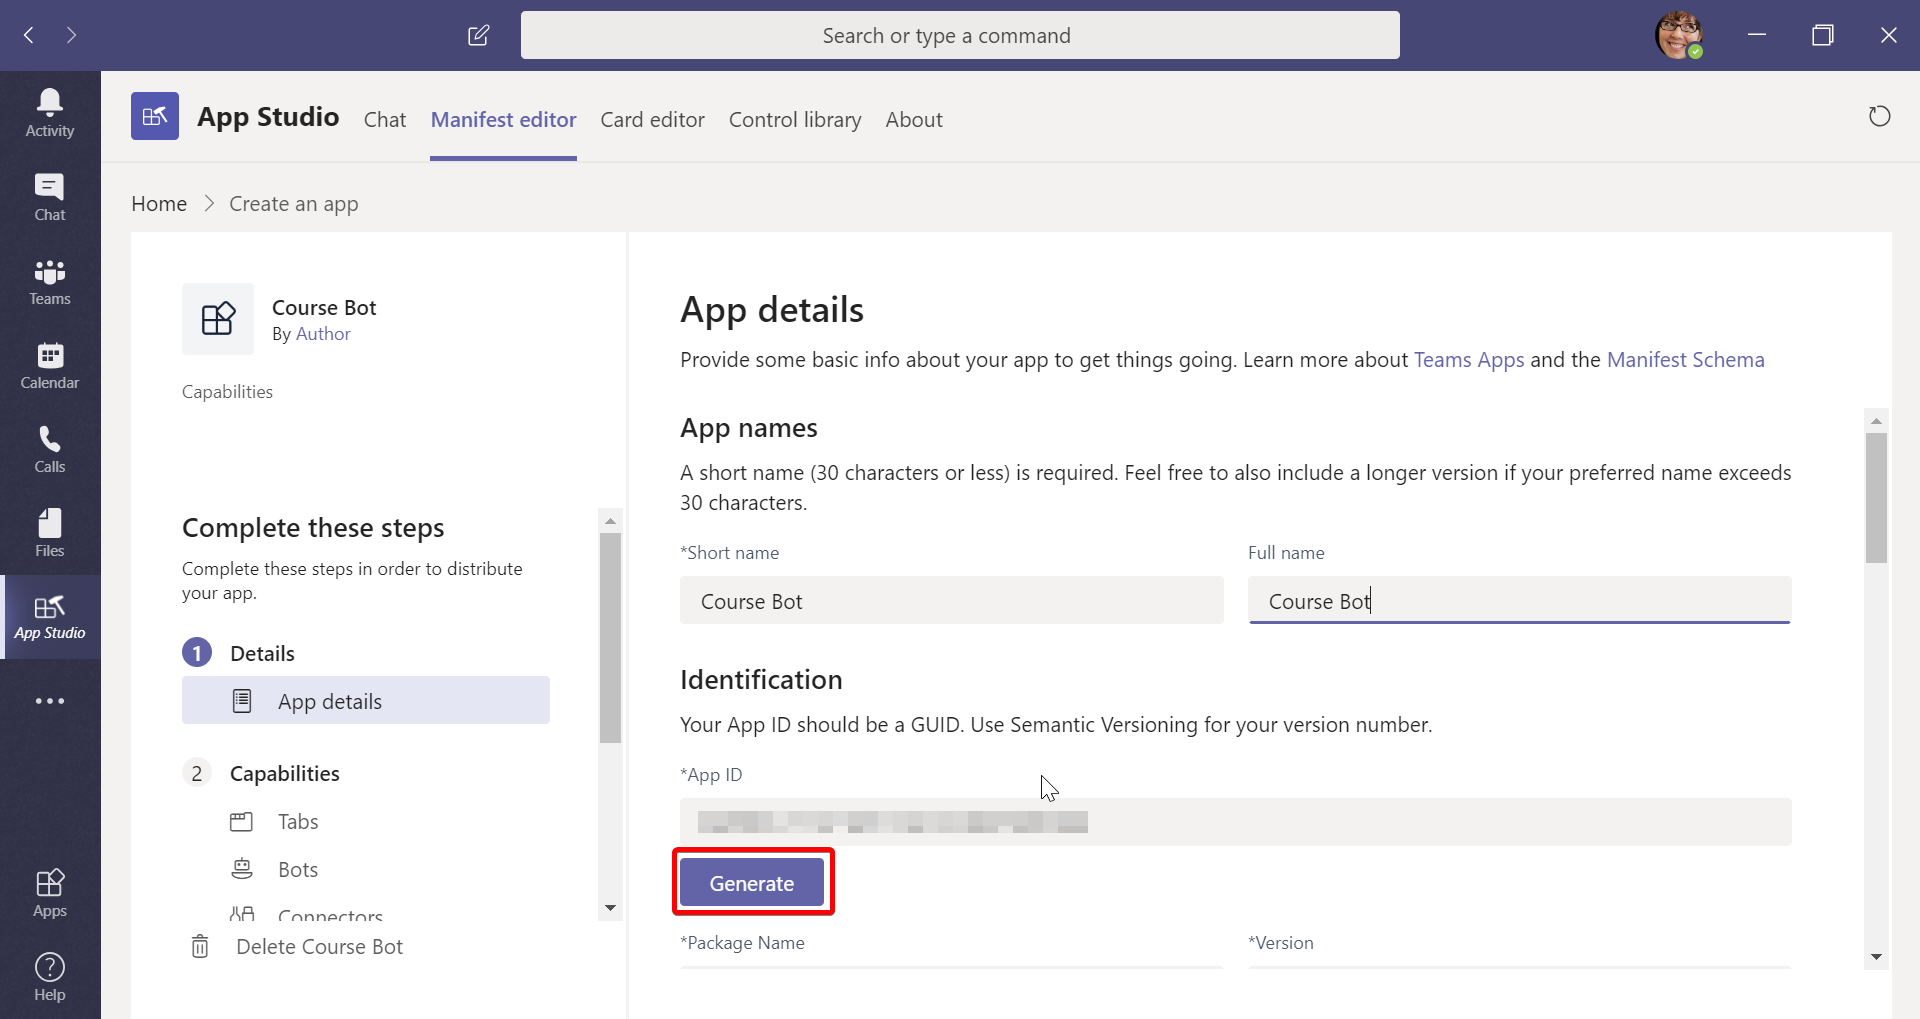
- Open the Teams app, navigate to App Studio, and select Manifest editor. Then, click on Create a new app:

- Give your bot a name and fill in all the required fields:
- Under Capabilities, choose Bots and click on Set up:
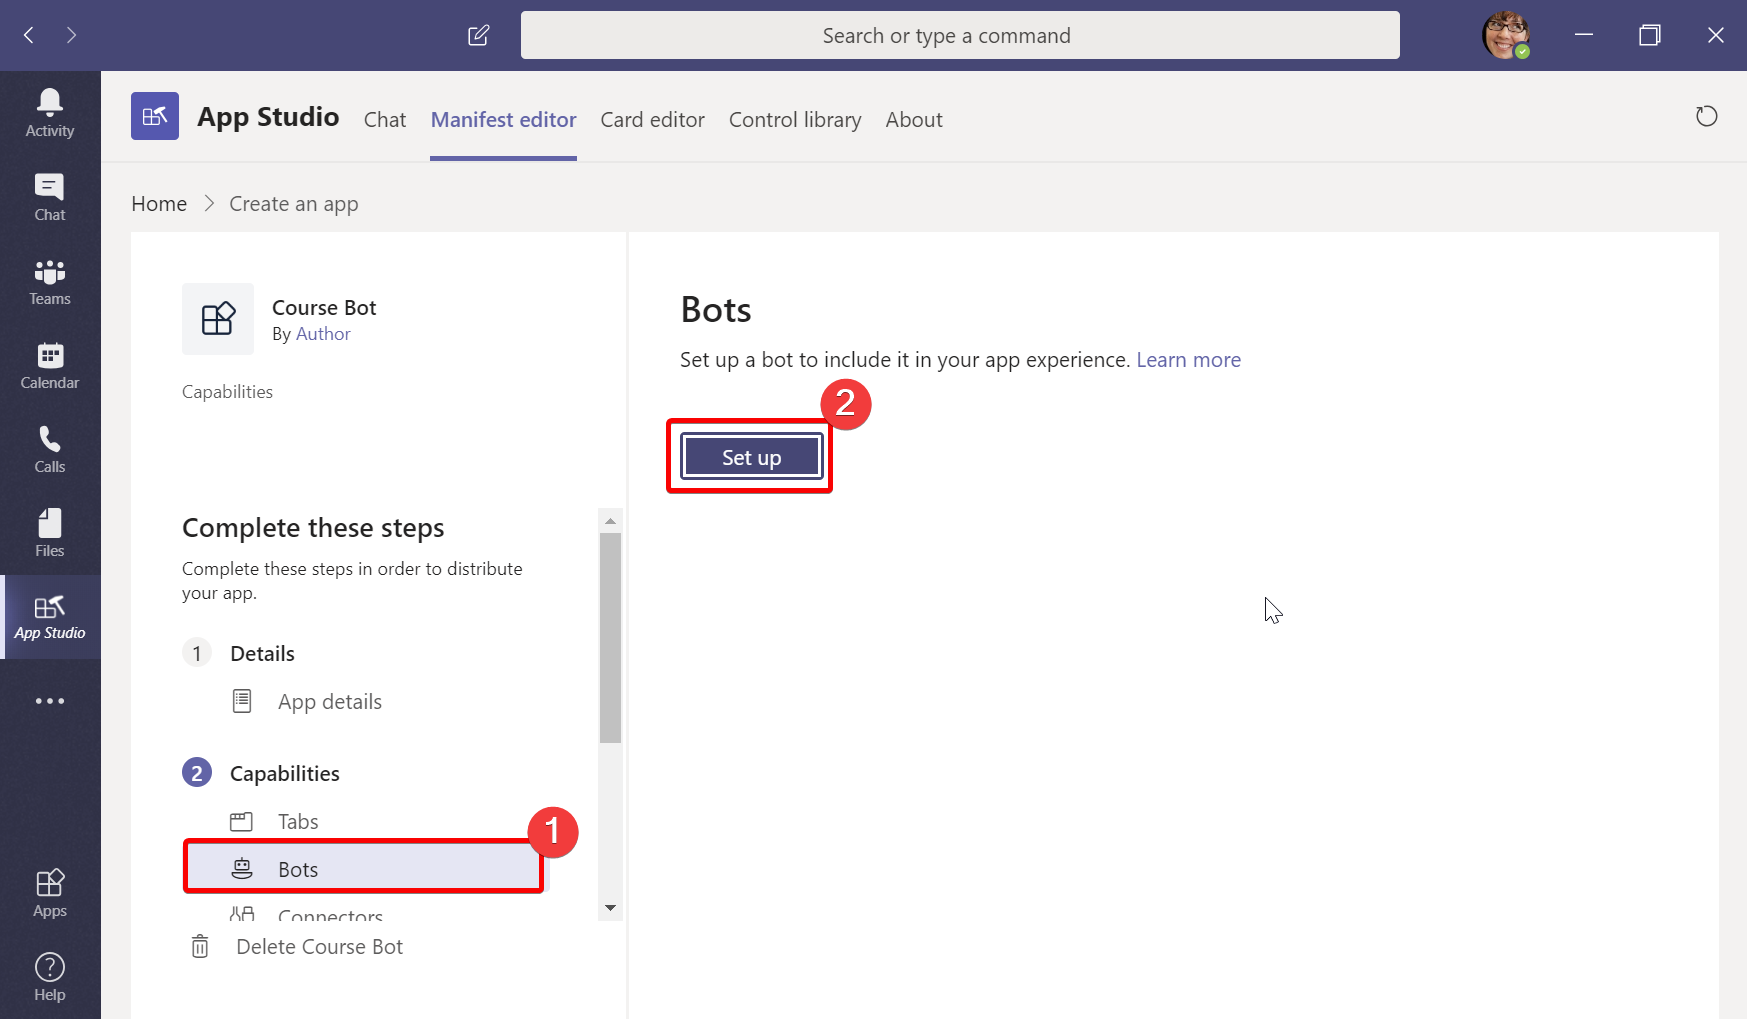
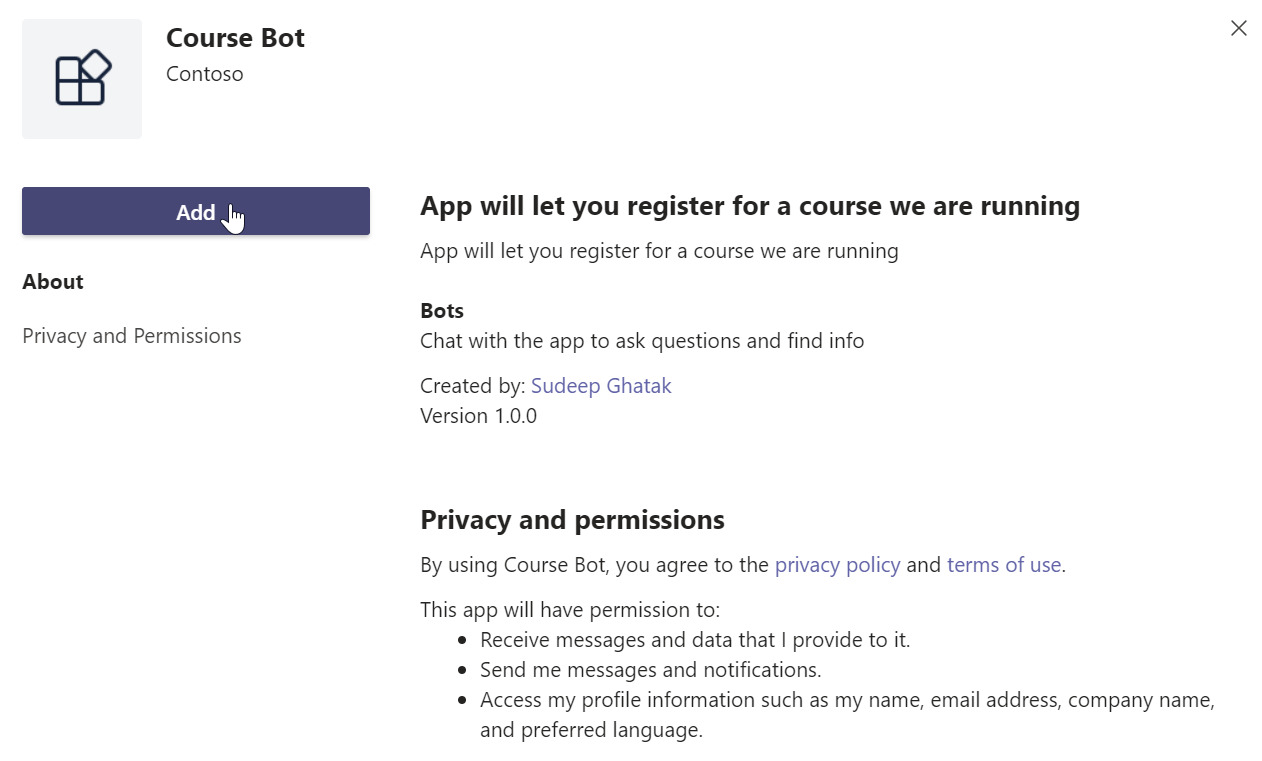
- Select the Existing bot option and specify the App ID you copied in step 6. Set Scope to Personal (if you just want to test the bot experience within Teams). Finally, click Save:

- Now, your bot is ready to be distributed. The last step is to click on Test and distribute:

- Click on Install to install the bot on your local Teams client:

- Click on Add to install the app:
- The bot can now be accessed by clicking on the ... link in the left navigation pane:

- If the app fails to install for some reason, download the package shown in step 12 and upload it via Teams | Apps | Upload a custom app:

- You can now use the app in your Teams app:

How it works...
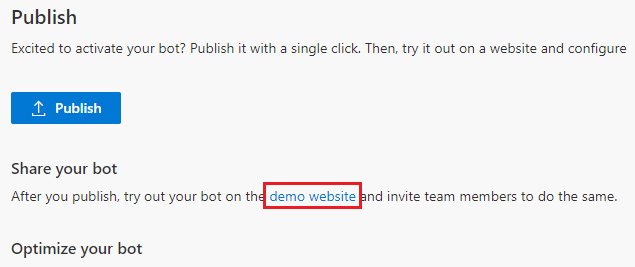
The publication process deploys the bot to ademo website by default. The demo website can be used to gather feedback from your peers and customers. The link will open a new tab and display a prebuilt demo website where you and your team can interact with the bot.
This instance is not meant for production deployment. You can, however, share the link with your testers and customers to test how the bot responds to various inputs:
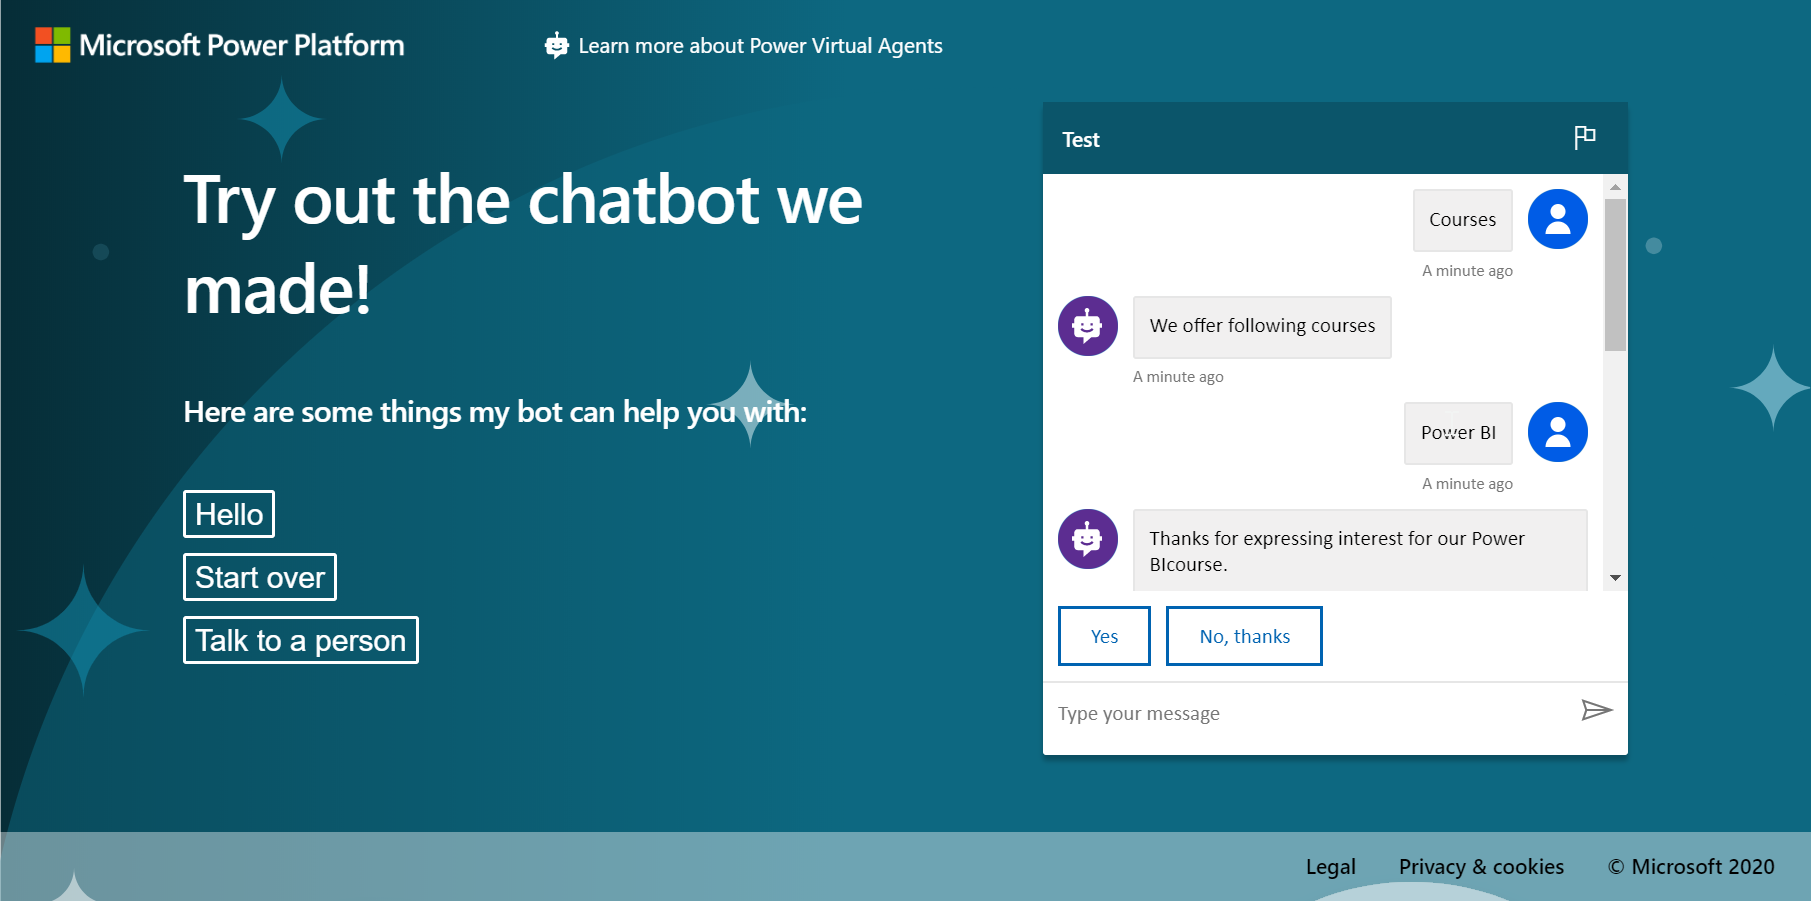
The following screenshot shows what the bot will look like on the demo site:
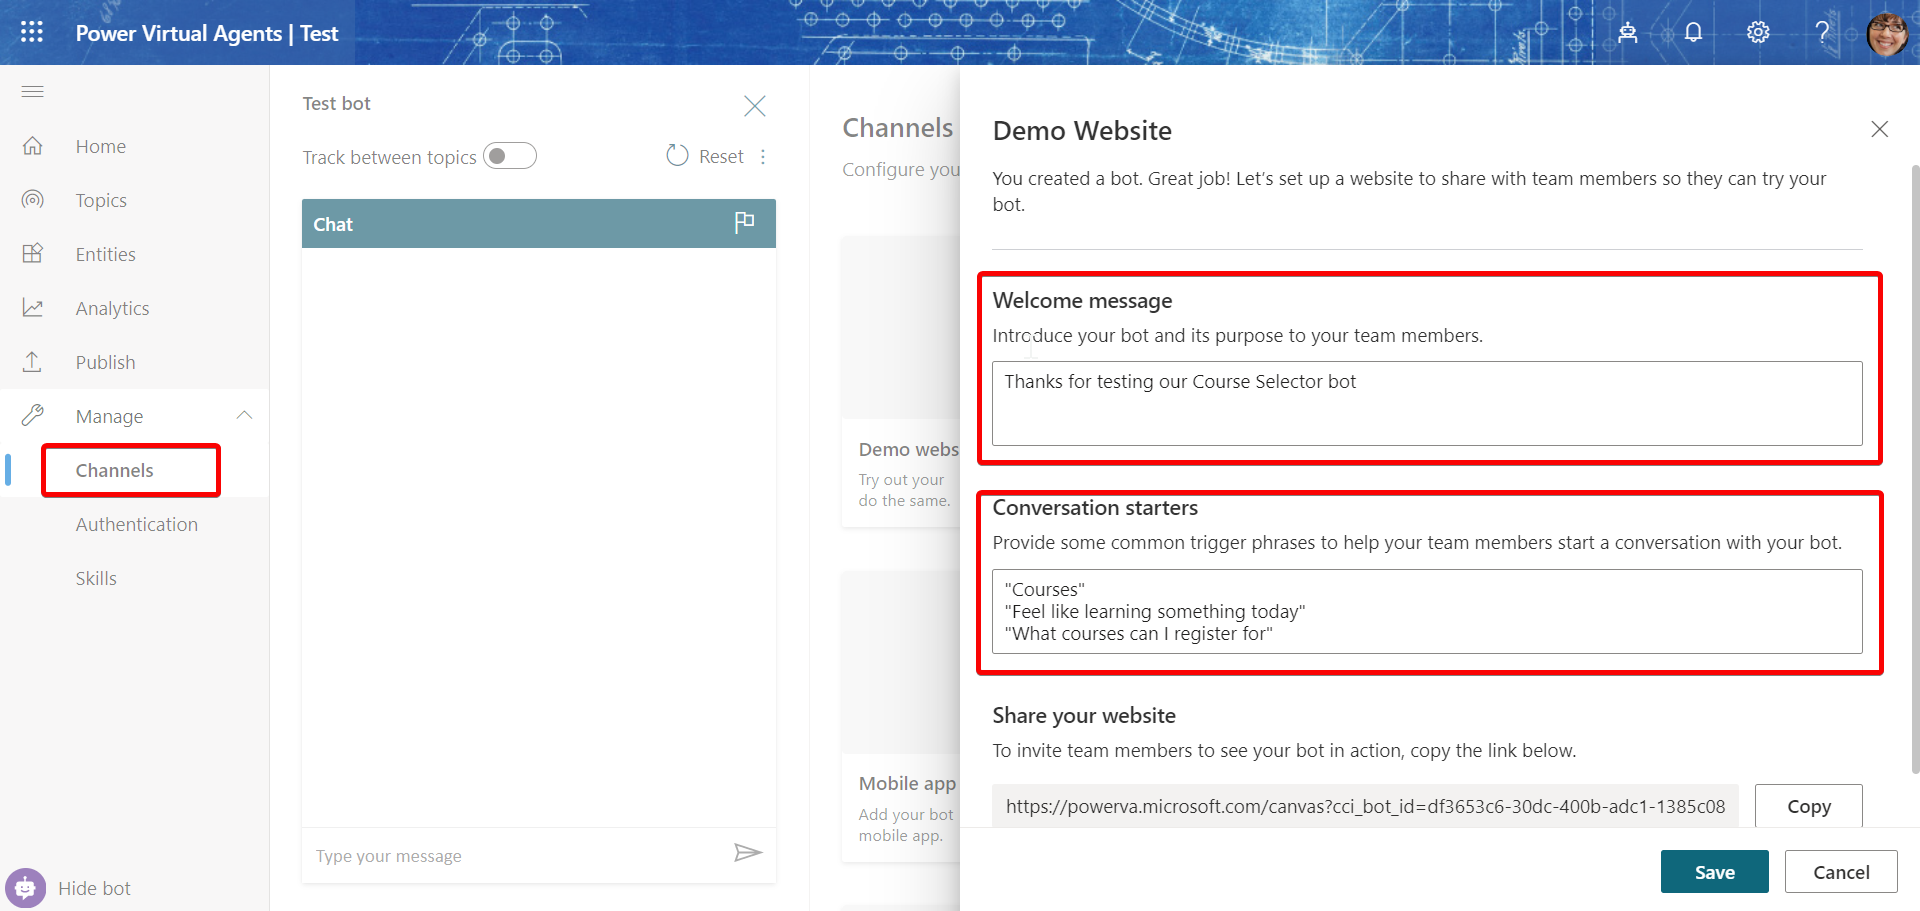
You can change the Title of the site, along with the phrases that you want the users to use. You can do that by updating the Demo Website channel, as shown in the following screenshot:
There's more...
Power Virtual Agents lets you keep an eye on how your bots are performing using powerful metrics and AI-driven dashboards. With this, you can easily see which topics are doing well and where the bot can improve, as well as quickly make adjustments to improve performance:
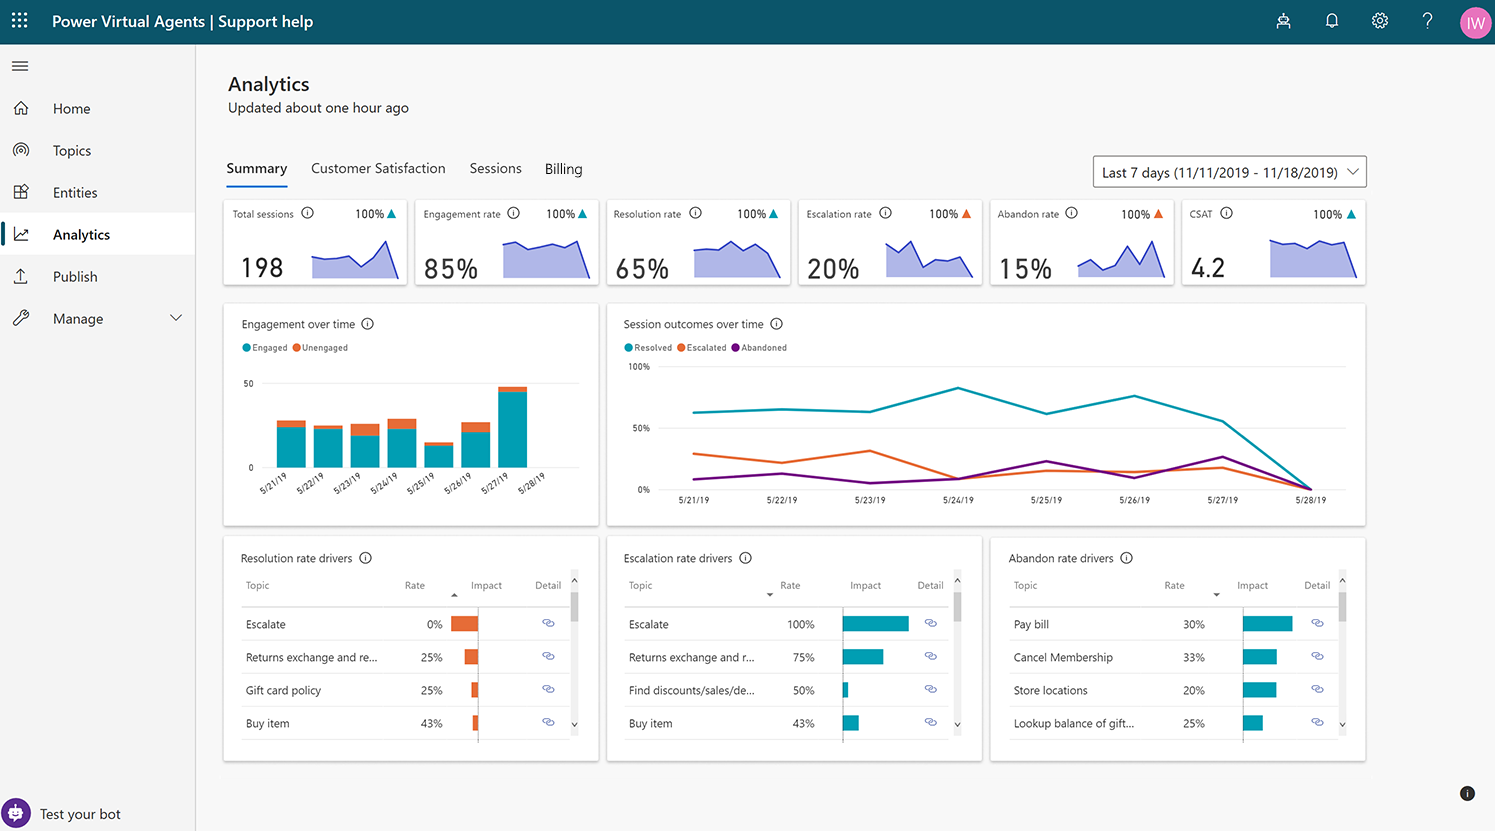
Power Virtual Agents has a comprehensive set of analytics that show you the key performance indicators for your bot.
Multiple charts show you trends and usage for your bot's topics. These charts use AI to highlight the topics that have the greatest impact on your bot's performance.
See also
- The Creating a bot recipein this chapter
- The Creating a topic recipein this chapter
- The Deploying a bot recipein this chapter