Lists in SharePoint are containers that let you view and maintain information, just as with an Excel spreadsheet or a database table. Just like spreadsheets or database tables, lists have columns and rows. Each column identifies the type of information that gets stored in the list. Each row, also called a list item, stores said information. SharePoint comes with a set of ready-to-use templates that can be used to create lists with built-in functionality. Examples of such lists are Announcements, Contacts, and Tasks lists. All lists come with some standard and useful features, such as the following:
- The ability to add or remove various types of columns as needed
- The ability to specify validations for the columns (such as maximum field lengths, whether a field is required or not, and so on)
- The ability to customize the organization of information presented through views
- Native forms to view and edit the information
- The ability to embed information from these lists in other pages in Microsoft 365
- Allowing permissions to be specified for the entire list or individual items within the list
- The ability to search through the list information, depending on your permissions for the list or individual items
- Item-level versioning and history
- The ability to subscribe to alerts for changes in the list
Lists further extend out as libraries, in that libraries are lists that are centered around documents. We will learn more about libraries in Chapter 5, Document Management in SharePoint Online. However, for this chapter, it is sufficient to note that almost all concepts that apply to lists also apply to libraries. The recipes surrounding the lists that we will review in this chapter will therefore also apply to libraries.
The following recipes in this chapter will show us how to work with lists in SharePoint:
- Creating a list using a built-in template
- Adding a column
- Creating a custom list view
- UsingQuick Editto bulk-edit list items
- Viewing and changing list settings
- Viewing and changing list permissions
- Adding alerts
Creating a list using a built-in list template
In Chapter 2, Introduction to SharePoint Online, we saw how to create a custom list from scratch. In this chapter, we'll see how to create lists using predefined list templates. For our recipe, we will use theAnnouncements list template. You can use the Announcements list to easily share news, updates, and announcements about your department or organization. You can use the inbuilt rich text editor to add images, links, and rich formatting to these announcements. You can then add this list as a web part on the home page of your site so that the announcements are prominently visible to your site visitors. You can additionally set an expiration date for each announcement so that it drops off the list after that date.
We will now see how to use this list template to create a Marketing Announcementslist on our site.
Getting ready
You will need Edit, Design, or Full Control permissions in your site to be able to create lists.
How to do it...
To create a new list based on the Announcements template, follow these steps:
- Browse to the site in which you would like to create the list.
- Click the settings gear icon in the top-right corner.
- Click Add an app,as shown in the following screenshot:

- Search for the term Announcementin the Find an appsearch box.
- Click the Announcementssearch result.
- Enter Marketing Announcements for the list name and click the Create button.
For that reason, you should avoid entering spaces or other special characters when creating lists or libraries in SharePoint. Doing so will ensure that the URL for your list is clean and does not contain any special characters. In the preceding example, you would want to enter Marketing Announcements as the list name. This would create a list with the following URL: https://tenant-name.sharepoint.com/sites/Marketing/MarketingAnnouncements(without the %20 in the URL).
Once the list is created, you can go back and rename it to add the spaces and special characters to it as desired (Marketing Announcements in our example, with a space in between). Renaming the list after it's created does not change the URL of the list, and your users would still see the same clean URL that got generated while creating the list, at the same time benefiting from a more user-friendly title.
Congratulations! You just created a list using the Announcements list template in SharePoint.
How it works...
In addition to the ability to create lists from scratch, SharePoint also provides templates that you can use to create lists and libraries in your site. When you create a list or library using one of the existing templates, SharePoint will automatically create and configure predefined columns, views, and settings based on that template. As is, such lists and libraries are generally geared toward addressing very focused needs so that you can start using them right away. If required, however, you can also customize them to meet any specific needs that you may have.
As an example, the Marketing Announcements list that we just created comes with fields that let you create an announcement, giving it a title, body, expiration date, and—optionally—add file attachments to it. The next few recipes will show you how to further customize the Marketing Announcements list by adding new columns and creating custom views for it.
Finally, in addition to creating a list this way, you can also create a list based on the following:
- Click on the New menu from the home page (or any other modern page) on your site and then click App, as shown in the following screenshot:

- Similarly, you can click the New menu and then App from the Site contents page to be taken to the Apps you can add page. If you are not familiar with the Site contents page, you can view the Viewing site contents recipe in Chapter 2, Introduction to SharePoint Online, to see how to browse to it from your site.
There's more...
Just like the Announcements list template, SharePoint comes with multiple other inbuilt list and library templates. You can also create lists based on existing lists that you may have created within your site.
In this section, we will first see a brief list of the other such native list and library templates that SharePoint offers. We will then discuss a few advanced ways to export the list so that it can be recreated within your site, other sites in your organization, or even across organizations.
Inbuilt list and library templates
SharePoint comes with multiple inbuilt templates that you can use to quickly create lists and libraries with predefined capabilities. The following is a list of all such templates in SharePoint:
| Template Name | Type | Description |
| Announcements | List | A list of news items, statuses, and other short bits of information. |
| Calendar | List | A calendar of upcoming meetings, deadlines, or other events. Calendar information can be synchronized with Microsoft Outlook or other compatible programs. |
| Contacts | List | A list of people that your team works with, such as customers or partners. Contacts lists can synchronize with Microsoft Outlook or other compatible programs. |
| Custom List | List |
Create your own list from scratch.
|
| Custom List in Datasheet View | List |
A custom list that is displayed as a spreadsheet to allow easy data entry. You can add your own columns and additional views, just like in a regular list.
|
| Discussion Board | List |
A place to have newsgroup-style discussions. Discussion boards make it easy to manage discussion threads and can be configured to require approval for all posts.
|
| Document Library | Library |
Use a document library to store, organize, sync, and share documents with people.
|
| Issue Tracking | List |
A list of issues or problems associated with a project or item. You can assign, prioritize, and track issue status.
|
| Links | List |
A list of web pages or other resources.
|
| Picture Library | Library |
A place to upload and share pictures.
|
| Promoted Links | List |
Use this list to display a set of link actions in a tile-based visual layout.
|
| Survey | List |
A list of questions that you would like to have people answer. Surveys let you quickly create questions and view graphical summaries of the responses.
|
| Site Assets | Library |
This library is used to store files and other assets required for the functioning of the site. Examples of files stored in this library are page images and videos, OneNote notebook, site logo, and so on.
|
| Site Pages | Library | This library contains the pages used within the site. |
| Style Library | Library |
The purpose of this library is to store style elements for your site.
|
| Tasks | List |
A place for team or personal tasks.
|
For more information regarding the list templates listed previously, please view the Types of lists section at: https://m365book.page.link/List-Types. For more information regarding the library templates, please view the Types of libraries section at: https://m365book.page.link/library-types.
Saving a list as a template
In addition to using the inbuilt templates to create lists, you can also create lists based on existing lists that you may have already created within your site.
We saw how to create a new list that is based on an existing list as part of the How to do it... section in the Creating a list recipe in Chapter 2, Introduction to SharePoint Online. For the most part, you should be able to use it to recreate an existing list with its columns, views, and formatting. There are, however, a few limitations in that approach:
- When selecting the source list, you will only see sites and lists that you have access to, via permissions. Consequently, you will not be able to see or create lists based on other lists that you do not have access to.
- You will not be able to copy over data using this approach.
- You will be unable to copy over any list settings that you may have changed from the defaults.
- You cannot use this approach if you would like to automate the creation of certain predefined lists when provisioning new sites.
This is where some of the additional methods discussed in this recipe come in handy. Using these methods, your SharePoint admins, or others who have access to the existing list, can export it as a template and share it with you so that you can recreate a new list in your site based on that template. The one drawback of these methods is that you will require administrator or developer help to be able to use them to export and import your lists.
We will briefly discuss these additional methods to save existing lists as templates and then reuse them to create new lists. Note that you canreuse the exported list templates to not only recreate lists within the same site or other sites in your organization but even across organizations/tenants if you need to do so.
Exporting a list using site scripts
We discussed site designs and site scripts as part of the Custom provisioning using site designs and site scripts topic of the Creating a subsite recipe in Chapter 3,Working with Modern Sites in SharePoint Online.
We can use the Get-SPOSiteScriptFromList command to export the list as a script. For more details, go to the following link: https://m365book.page.link/Get-SPOSiteScriptFromList.
Once the list is exported, you can import it to an existing site or make it part of a site's design, to be provisioned to a new site.
Remember that in addition to using PowerShell for site designs and site scripts, you can also use the Microsoft 365 representational state transfer (REST) application programming interface (API) to carry out the same tasks, as described here:https://m365book.page.link/SiteDesign-RestAPI.
Exporting a list using PnP
The PnP (short for Patterns and Practices) provisioning engine also gives us commands for exporting your lists as reusable templates.
You can use the Export-PnPListToProvisioningTemplate command to export the list, as described here: https://m365book.page.link/Export-PnPListToProvisioningTemplate.
You would then use the Apply-PnPProvisioningTemplate command to recreate the list in a new or existing site, as described here: https://m365book.page.link/Apply-PnPProvisioningTemplate.
You can read more about the PnP provisioning engine and the templating capabilities here: https://m365book.page.link/PnP-Provisioning-Engine.
Exporting a list using list settings
Finally, you can also use the Save list as template list setting to save a list as a template. To do so, browse to the List settings page, as described in the Viewing and changing list settings recipe later in this chapter. Then, click the Save list astemplate heading under the Permissions and Management heading.
You can then enter the values on this screen, as shown in the following screenshot, and then click the OKbutton to save the list as a template:
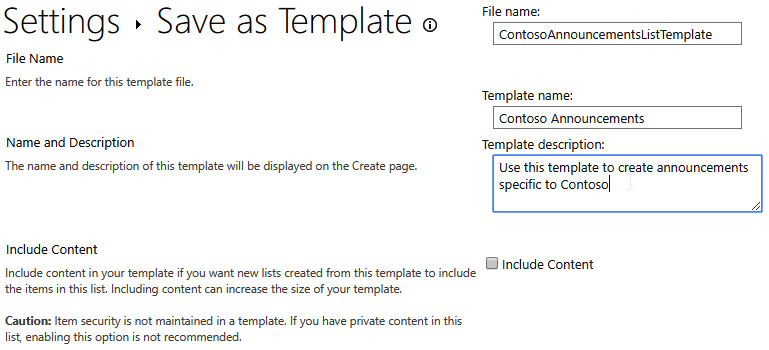
You will now start seeing this list in the Add an appscreen, as shown in the following screenshot:

You can also download the list template file and use it to create lists on other sites. You can also read more about saving and using list templates here: https://m365book.page.link/Manage-list-templates.
See also
- The Creating a list recipe in Chapter 2, Introduction to SharePoint Online
- The There's more... section of the Creating a subsite recipe in Chapter 3, Working with Modern Sites in SharePoint Online
- The SharePoint PnP topic in the Officedevelopment frameworks section of the Appendix
Adding a column
Columns in lists define the nature and type of information that is stored in those lists. We briefly saw how to create new columns on a custom list as part of the Creating a list recipe in Chapter 2, Introduction to SharePoint Online.
In this recipe, we'll see how to add a new column to the Marketing Announcements list that we just created. We will add a new Announcement Start Date column to the list. We will then discuss some more advanced concepts around column creation in the sections to follow.
Getting ready
You will needEdit, Design, or Full Control permissionsin your site to be able to add columns to your list.
How to do it...
To add a new column to your list:
- Browse to the list for which you would like to add the new column.
- Click Add column to see a list of the types of columns that you can add to the list.
- Click Date to create a column that lets you store dates or date-time values.
- In the Create a column window, enter or select values for various column properties, as shown in the following screenshot:
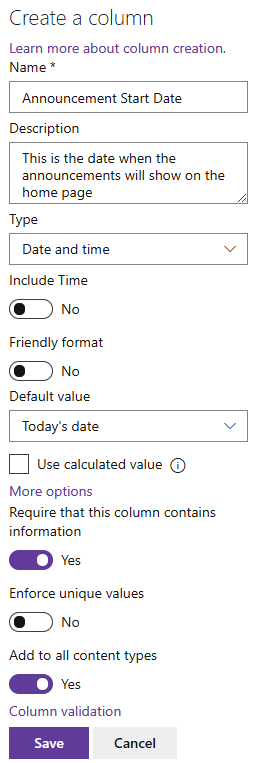
- Click the Save button to save the properties and create your new column.
That's it! You just learned how to create a new column to your list.
How it works...
Columns allow for information to be associated with individual items in your list. For document libraries, they act as metadata that gets associated with the respective documents. Just as with columns in an Excel worksheet, SharePoint lists and libraries let you specify the type of information these columns can hold. Similarly, you can sort, filter, and group information using columns in SharePoint.
SharePoint supports various types of columns, as shown in the following screenshot:
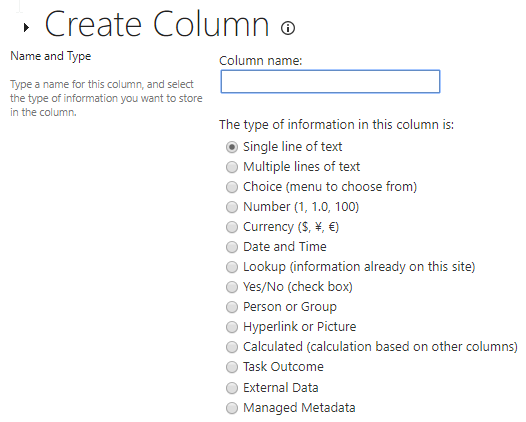
After you select a column type, you can choose to specify additional properties for that column. For example, for the Single line of text column type, you can specify the maximum number of characters that the users can enter (with an upper limit of 255 characters). In addition to such column-specific properties, SharePoint also lets you specify some common properties, such as whether or not this will be a required column. You can view detailed descriptions of the different types of columns and their properties through this support article: https://m365book.page.link/Column-types.
Once a column is created, you can view and edit any of its properties through the List settings page. This is also where you can delete the column if you no longer see the need for it. The List settings page also lets you specify the order of columns to be shown in the data entry form. The Viewing and changing list settings recipe later in this chapter covers the List settings page in greater detail.
There's more...
In this section, we will learn about a few more actions that you can perform with columns. We will also learn about how to make your columns reusable across various lists and libraries in your site through the use of Site Columns.
Editing or deleting a column
Once a column is created, you can easily make changes to it, or even completely delete it. To do so, simply click on the column name, then click Column settings and then Edit to view the column in Edit mode:

This will show you the Edit column screen, just like the one you saw when creating the columns. Here, you can make changes to the column and then click Save to save those changes. You can also delete the column by simply clicking the Delete button toward the bottom of the screen:

Clicking More options from the Edit column screen lets you set additional properties for the column:

As shown in the preceding screenshot, in addition to specifying whether or not the column is mandatory and whether it should enforce unique values, you can also set validation for the values that the column would allow. In the example from this screenshot, we are validating for the start date to be greater than or equal to today's date (the date on which the item is being created or edited). We are also providing a message that SharePoint will display to users if the selected start date does not meet the validation criteria.
Other column settings
In addition to editing a column, clicking on Column settingslets you perform a couple of other actions with the column:
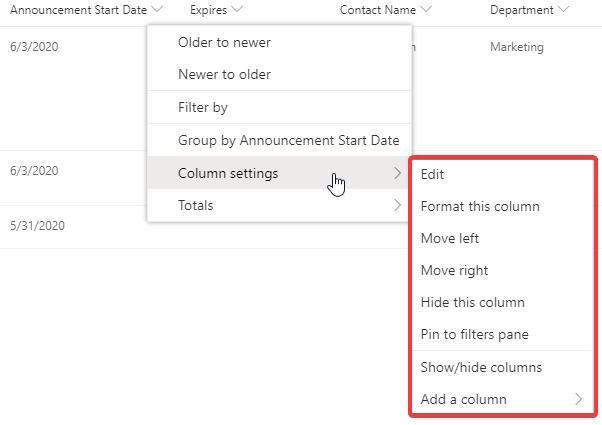
Here's a brief description of these settings:
- Format this column: Column formatting lets you customize the display of columns within the list or library. Column formatting is very similar to view formatting, which we have described in greater detail as part of the Advanced view formatting topic in the next recipe, Creating a custom list view. You can read more about column formatting here: https://m365book.page.link/About-Column-formatting. You can read more about using column formatting to customize SharePoint here: https://m365book.page.link/use-column-formatting.
- Move left/Move right: Moves the column toward the left or right in the view. You can also simply drag the column to reposition it within the view.
- Hide this column: Hides the column from the current view. The column can still be available through other views and/or forms.
- Pin to filters pane: This allows the column to be pinned to the filters pane for the view. We have discussed this in more detail through the Filters pane topic in the next recipe, Creating a custom list view.
- Show/hide columns: Clicking this option opens a list of all the columns from the list or library and enables you to select or deselect columns to be shown in the current view.
- Add a column: You can add a new column to the list using this option.
Site Columns
One disadvantage of creating columns the way we have created them previously is that they are local to that list or library. This means if someone else needs a similar column in another list or library in the site, they will have to create a similar column elsewhere. In addition to effort duplication, this also often leads to inconsistencies between columns that are similar to each other but have subtle differences because they were created independently of each other. These inconsistencies are further amplified in Choice type fields where users have to select one value from a list of predefined values. For example, one list could contain Human Resources as a department, while another list could contain HR as a choice for the department name. Furthermore, let's say you need to make modifications to such a column that is replicated across multiple lists or libraries. You will now need to do that in multiple places.
This is whereSite Columns shine compared to individual list or library columns. Site Columns are similar to list or library columns, only that that they are defined and maintained at the site level. You will need Design or Full Controlpermissions on the site to be able to create Site Columns.
You can create Site Columns by browsing to the Site Settings page and then clicking the Site Columns link under the Web Designer Galleries heading. We discussed the Site Settings page as part of the Viewing and changing site settings recipe in Chapter 3, Working with Modern Sites in SharePoint Online. Once you are on the Site Columns page, you will see a list of the existing Site Columns for your site. You will also be able to click on the Create link on the top of the page to create a new Site Column:

From this point on, the steps to create the Site Column will be similar to those earlier in the recipe. The only difference will be that you will be prompted to choose a Groupfor your Site Column, as shown in the following screenshot:
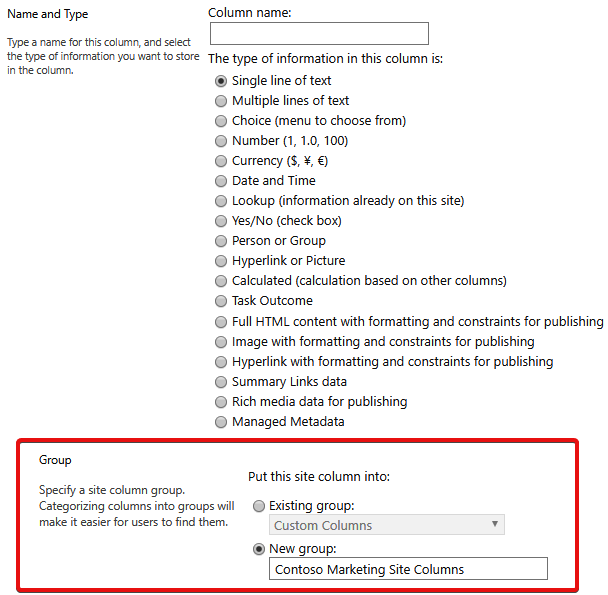
A Group is just a logical means of grouping Site Columns under one heading. It does not have any impact on the functionality of the Site Column. Once your Site Column is created, you can go back to your list and add it to the list through the Add from existing Site Columnslink on theList settings page. We will discuss the List settings page in more detail in the Viewing and changing list settings recipe later in this chapter.
See also
- The Creating a list recipe in Chapter 2, Introduction to SharePoint Online
- The Viewing and changing site settings recipe in Chapter 3, Working with Modern Sites in SharePoint Online
- The Viewing and changing list settings recipein this chapter
- The Creating a Managed Metadata Site Column recipe in Chapter 6, Term Store and Content Types in SharePoint Online
Creating a custom list view
Views in SharePoint enable you to organize and show list or library items that are the most relevant for you and your users. Through views, you can select which columns to show to users, filter data in the view based on various criteria, and select the order in which to show your data. Every list or library in SharePoint comes with an inbuilt view called All Items. Unless a list admin or a site admin changes it to something else, this view is shown by default anytime that a user browses to a list or library. For this reason, it is also sometimes known as the default view for that list or library. We can create additional custom views for our list to meet our data display needs. We can then show or hide columns in this view, change the sort and/or filter criteria, group by one or more fields, and add formatting to a view.
In this recipe, we will see how to create a custom view for the Marketing Announcements list that we just created. We will then save the view as the default view so that anyone who browses to the list will see the new view that we created.
Getting ready
You will need Edit, Design, or FullControl permissions to the list to be able to create public views for it.
You can create a personal view on a list for which you haveContribute access.
How to do it...
To create a new view for your list, follow these steps:
- Browse to the list for which you would like to create a new view.
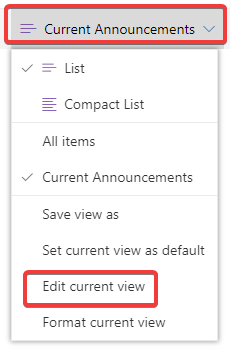
- Click All items and thenSave view as toward the top-right corner of the page, as shown in the following screenshot:
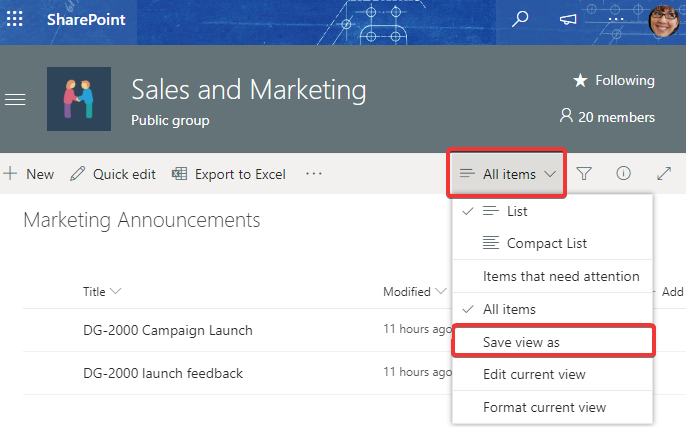
- Give your view a name (for example,Current Announcements) and click Save. This will create a new view. Next, we will add columns to it.
- Click Add column and then Show/hide columns, as shown in the following screenshot:
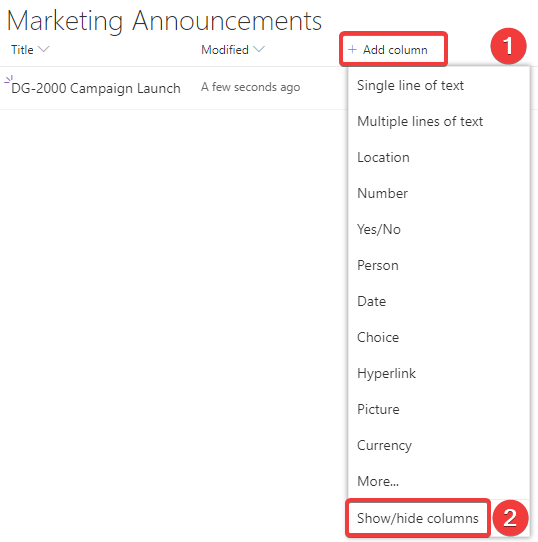
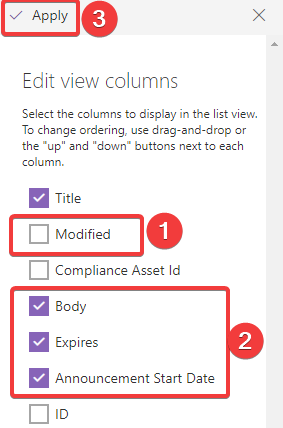
- Select the columns you would like to show on the new view, and deselect the columns you would like to hide. For the Marketing Announcements list that we created earlier, we will deselect the Modified column, then select the Body, Expires, and Announcement Start Datecolumns. Then, we will click the Apply button on the top. This is shown in the following screenshot:
- Then, drag the Expires column toward the extreme right from the main view itself, as shown in the following screenshot:

- Next, we will add a filter to the view so that we only see current announcements. Click Current Announcements and then Edit current view, as shown in the following screenshot:
- Scroll down on the Edit Viewpage to the Sort section, and change the value in the First sort by the column drop-down option to Announcement Start Date. Then, select the Show items in ascending order option to sort the announcements in ascending order of the Announcement Start Date.
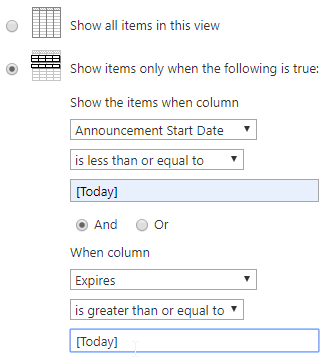
- Scroll down further to the Filter section and change the filter values to the ones shown in the following screenshot:
- Scroll to the bottom of the page and click OK to save your changes.
- Finally, click on the Current Announcements view and then click Set current view as default. Doing so will make this new view the default view for the list:
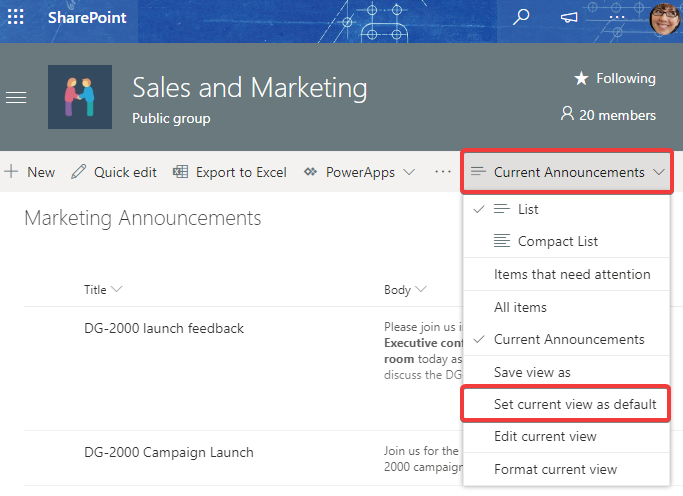
Congratulations! We just learned how to create a new view and then modify it for basic column ordering and sorting. We then saw how to edit the view, create a filter, and sort the items in that view. Specifically, for the Marketing Announcements list, the Current Announcements view only shows announcements where today's date lies between the Announcement Start Date and the date indicated by the Expires column. Finally, we set the new Current Announcements view as the default view so that users browsing this list will always see the Current Announcements by default. They will be able to change the view to the All items option if they want to see past announcements or others that happened to be filtered due to the criteria specified in the new view.
How it works...
Views are the presentation layer for information stored in lists and libraries. You can create multiple views to easily organize this information. You can create public views that are visible to anyone who has access to the list, or you can create personal views that are only visible to you.
In this recipe, we saw how to edit a view to filter and sort information in it. There are a few additional actions you can carry out when editing a view from the Edit View page, as shown in the following screenshot:
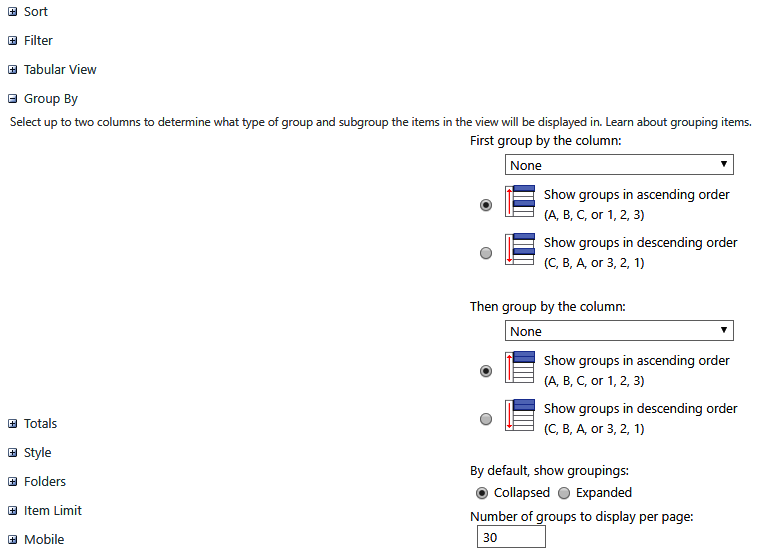
Some of the more prominent actions are as follows:
- Select or deselect the columns that get shown in the view and specify the order of those columns from left to right
- Specify a multi-column filter and sort criteria (we saw this earlier in this recipe)
- Group the items up to two group levels
- Specify some basic styles for the view
- Specify whether to show items in folders or to show them without the folders
- Specify a limit on the number of items shown per page or, optionally, a limit on the total number of items that get shown in the view
- Specify whether or not to show a separate view for mobile requests and basic settings for the mobile view
Finally, you can also delete a view from this page. To do so, simply click the Delete button in the top- or bottom-right corner of the page:

Note that you can only delete the view if it's not currently set up as the default view for the selected list or library.
There's more...
In this section, we will see the additional things that you can do with list views.
The Items that need attention view
SharePoint will provide you various indicators if you have items in your list or library that are missing the required information. As shown by (A), (B), and (C) in the following screenshot, it will show this through different means:
- (A): By showing a missing metadata icon next to the Title field
- (B): By clearly showing the missing information
- (C): By showing a red dot against the view name:

However, sometimes, a view may contain many items, or, for a document library, it may contain items nested within folders, making it difficult to find and work with just the items that are missing values. You can use the Items that needattention view, shown by (D) in the preceding screenshot, in such situations.
Switching to this view will only show you those items that are missing values. You can then easily work with such items in either the regular or the Quick Edit view that we discuss in the next recipe.
Bulk-editing properties
SharePoint lets you select multiple items and bulk-edit their properties. This is particularly useful when you need to backfill the property values after these items have been created. To bulk-edit multiple items, simply select the checkboxes next to them to open the details pane, as shown in the following screenshot:
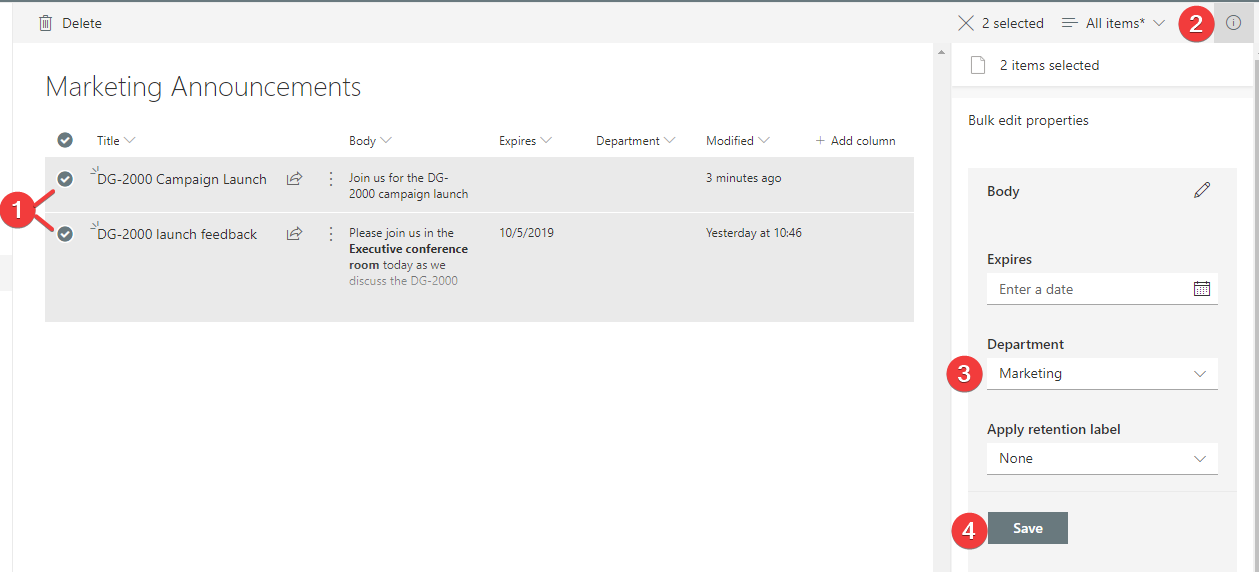
Then, simply enter or select values for the properties that you'd like to change, and click the Save button toward the bottom.
Exporting to Excel
SharePoint also lets you export the list items from the current view if you'd like to work with them in Excel. To do that, simply click Export to Excel from the top of your view and open the downloaded .iqy file, as shown in the following screenshot:
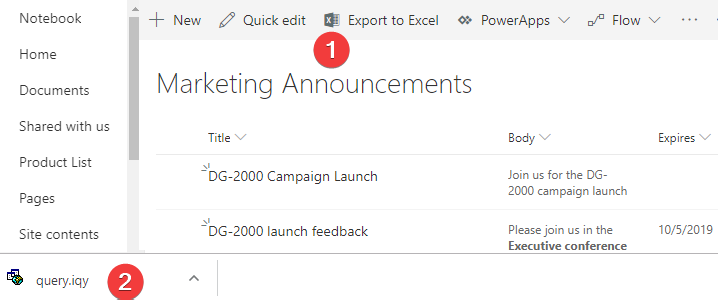
This will open the items from the view in an Excel workbook, as shown in the following screenshot:

You can now work with this information just as you would with any other spreadsheet. Note that this is not a connected spreadsheet, in that the changes that you make here will not be published back to the corresponding list in SharePoint Online.
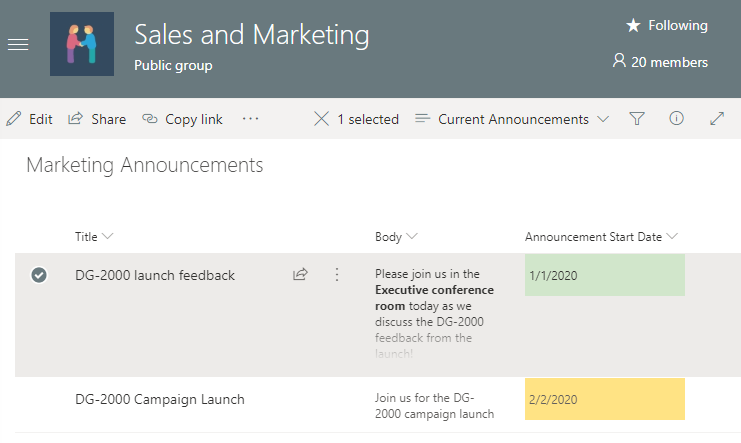
Advanced view formatting
Modern lists enable you to easily and significantly enhance the visual display of your views. A very common use of such formatting is when your list has a Status column and you'd like to highlight the items in the view based on the status values or other similar criteria. The following screenshot shows an example where we have highlighted the Announcement Start Date column of the Marketing Announcements list, based on the start month:
To format your view, simply click on your view name and then click Format current view, as shown in the following screenshot:

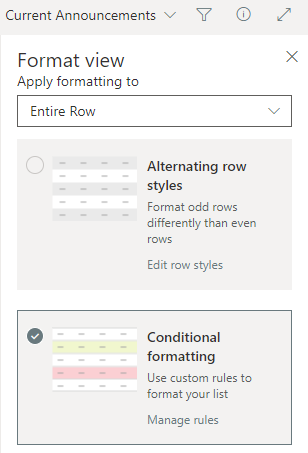
Then, select whether you would like the formatting to be applied to one of the columns or the entire row. Selecting an entire row will let you either specify alternating row styles or rule-based conditional styling to be applied to the entire row, as shown in the following screenshot:
If you choose to apply the formatting to just a single column, SharePoint will show you options based on the type of column that you selected. In the following example, we are seeing the two different options that can be specified for date columns:

You can then specify formatting such as that in the rule shown in the following screenshot:

You can also click the Advanced mode link toward the bottom of the Format viewpane to define more complex formatting for the view. An example of such advanced view formatting is shown in the following screenshot, where you can use basic code to convert the view display from this native, unformatted view:

The code will convert the display to a nicer-looking view, such as this:

Advanced view formatting involves writing a little bit of code (JavaScript Object Notation (JSON)), and hence is beyond the purview of this chapter. You can learn more about JSON view formatting through these Microsoft support articles:
- Formatting list views: https://m365book.page.link/Formatting-list-views
- Use column formatting to customize SharePoint: https://m365book.page.link/use-column-formatting
- PnP list view formatting samples: https://m365book.page.link/pnp-list-formatting-samples
In-place view filtering,sorting, and grouping
The steps in the Creating a custom list view recipe showed you how to filter and sort your view using the view settings page. SharePoint also lets you filter and sort the current view of your list by columns from within the view itself. To sort a view by a particular column order, simply click the column name and then select a sort order. The sort optionsthat you see will depend on the type of column that you are sorting on. These are shown by(A)in the screenshot that follows. You can only sort your view by one column at a time using this option.
To filter the view based on a column, click the column name and then clickFilter by to reveal the values that you can filter on. This is shown by (B)in the screenshot that follows. Unlike sorting, you can filter by multiple columns. You can also use the filters pane, discussed in the next topic, for advanced filtering.
To group by a column, select the Group by Column name option, shown by (C) in the screenshot that follows. You can only group by one column using this approach. You can use the view settings page described in the preceding How it works... section to group by an additional column. Further, you can also show group totals and an overall total by clicking the Totals option, shown by (D), (E), and (F) in the following screenshot:
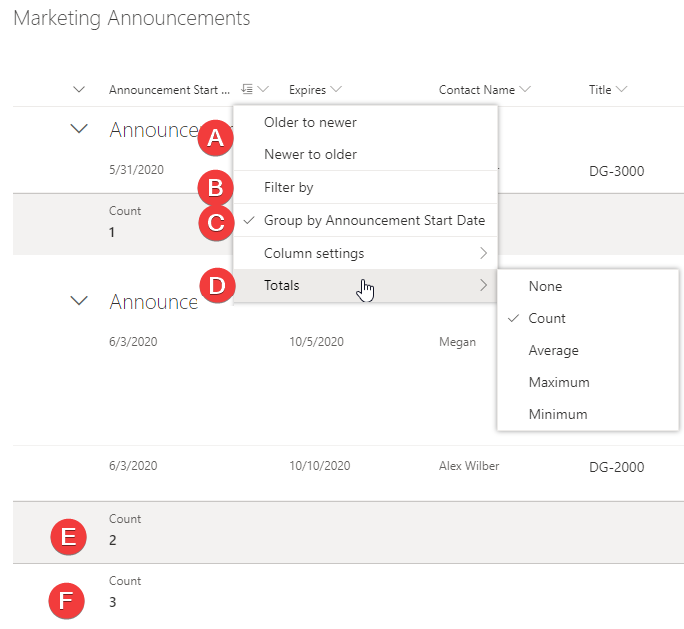
Further, the aggregation options that you will see under the Totals menu will depend on the type of column. The options shown in the preceding screenshot are those for a date column. A text column would only have shown Count as the aggregation option.
Filters pane
As we saw in the Creating a custom list view recipe, you can apply some basic filters on individual columns to create a filtered view. In addition to that, you can also create advanced filters on multiple columns in the view. As shown by (A) in the following screenshot, you can click the filter icon toward the right of your list or library menu to open the filters pane:
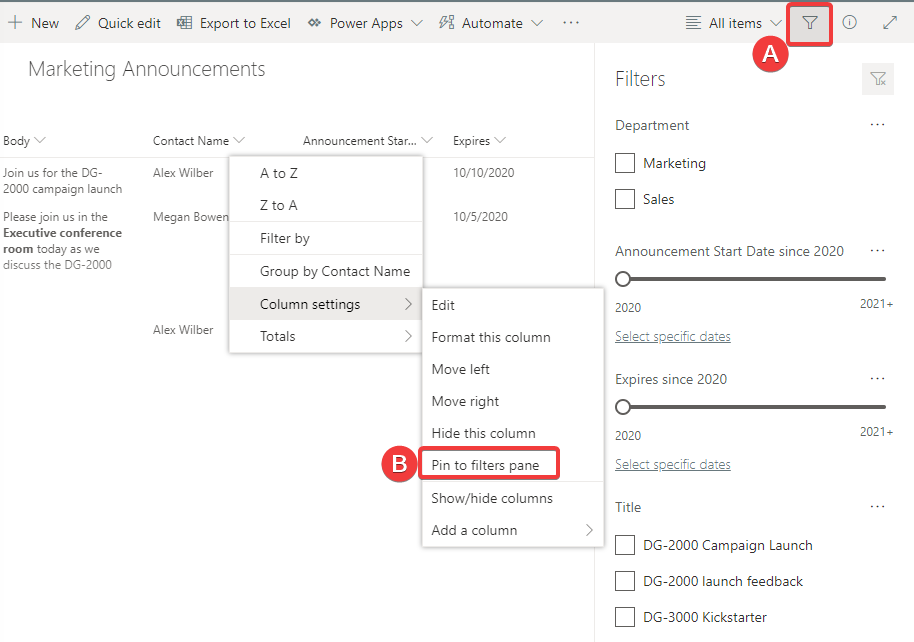
Here, you will see a list of columns with values that you can filter on. Only columns from your view will be shown here. You can add columns to the filters pane by clicking on the corresponding column name, then clicking Column settings, and then Pin to filters pane. Once the column is added to the filters pane, you can choose to filter your view using the values from this column in combination with the others already present in this pane. To make your filters permanent, simply save the view by selecting the view name, and then click Save view as, as described earlier in the recipe.
The following support articles provide additional details regarding the features and limitations of the filters pane:
- What is the list and library filters pane?: https://m365book.page.link/Filters-Pane
- Use filtering to modify a SharePoint view: https://m365book.page.link/Use-Filters
Working with large lists and libraries
You can store millions of items in a SharePoint list or library (30 million items, to be precise, at the time of writing). However, due to technical reasons beyond the scope of this book, there are special considerations to keep in mind when the number of items grows beyond 5,000. When that happens, you will be restricted from carrying out certain tasks in the list or library, including the following:
- Being able to show more than 5,000 items in a single view
- Programmatically retrieving more than 5,000 items through a single request
- Adding columns
There are multiple ways to overcome these limitations, including organizing documents within folders in a document library, but the most recommended approach is to create one or more indexed columns on your list. You will need to create the indexed column(s) before the items in your list or library exceed the 5,000-item limit. It is recommended that you index all columns that are being used or are anticipated to be used for filtering or sorting items in your list or library. As a list or library owner, you will, therefore, want to put in thought and planning upfront when you are expecting the information in your lists or libraries to grow beyond the 5,000-item limit.
You can read more about this important topic through these Microsoft support articles:
- Manage large lists and libraries in SharePoint: https://m365book.page.link/Large-Lists
- Add an index to a SharePoint column: https://m365book.page.link/Add-Column-Index
Using Quick Edit to bulk-edit list items
The Quick Edit view is a special view that is similar to Excel worksheets. In this recipe, we will see how to use Quick Edit to modify multiple list items. We will use the previously created Marketing Announcements list as an illustration for this recipe.
Getting ready
You will needContribute, Edit, Design, or Full Control permissions to the list to be able to bulk-edit items in it.
How to do it...
- Browse to the list for which you would like to bulk-edit the items.
- Click Quick Edit in the navigation bar.
- Doing this reveals the datasheet view of the list. You can now directly enter and edit items in the list through this view, just like you would in an Excel spreadsheet.
- Point to the first cell in the last row and simply start typing, or double-click the cell to make it editable.
You can use theTab key, the arrow keys on the keyboard, or the mouse to move to the next cell in the row.
You can also use the arrow keys to navigate to other rows in the list. Doing so saves the current row, as long as you have entered all required information for that row.
- Enter values for the other cells in the row, as shown in the following screenshot for the Marketing Announcements list:

- Click the cell in theExpires column in the second row of the list shown in the preceding screenshot. Then, use the Ctrl + C keys to copy the date value from the selected cell.
- Select the two empty cells under the Expires column for the last two rows and paste the copied value, as shown in the following screenshot:

That's it! You just learned how to use the Quick Edit view to bulk-edit your list items.
How it works...
Working with lists is somewhat identical to working with database tables and Excel worksheets. TheQuick Editview lets you work with list items just as you would work with information in an Excel worksheet. Just like in Excel, you can click individual cells in a list to edit the items in those cells. Just as with Excel, you can carry bulk copy-paste operations in these cells. You can even add new columns through the datasheet view by clicking the + sign toward the top-right corner of the datasheet view. Clicking the+symbol opens a menu for you to select the column type:

Clicking the column type will create a column and then let you enter a name for it, as shown in the following screenshot:

When you create a column using the Add column functionality in a regular view, SharePoint will automatically create the internal name by removing spaces from within the column display name. For example, it will generate ContactName as the internal name for the Contact Name column shown in the preceding screenshot, when created through a regular list view. However, when you create a column using the Quick Edit view described in this recipe, it will give the column a randomly generated internal name. This is usually not a problem for most use cases but it might become a minor annoyance for some scenarios, especially those related to development surrounding such lists.
Viewing and changing list settings
SharePoint lets you view and change a variety of settings for your list.
In this recipe, we will use the Marketing Announcements list that we created earlier to add validation rules for the information that users can add to your list. We will add validation rules to ensure the following:
- The Announcement Start Date value is greater than the current date
- The Expires date entered by the users is greater than the Announcement Start Date value
Getting ready
You will need Edit, Design, or Full Control access permissions to the list for which you'd like to view or change settings.
How to do it...
- Browse to the list for which you would like to view or change the settings.
- Click the settings gear icon in the top-right corner.
- Click List settings, as shown in the following screenshot:

- On the Settings page, click the Validation settings link under General Settings.
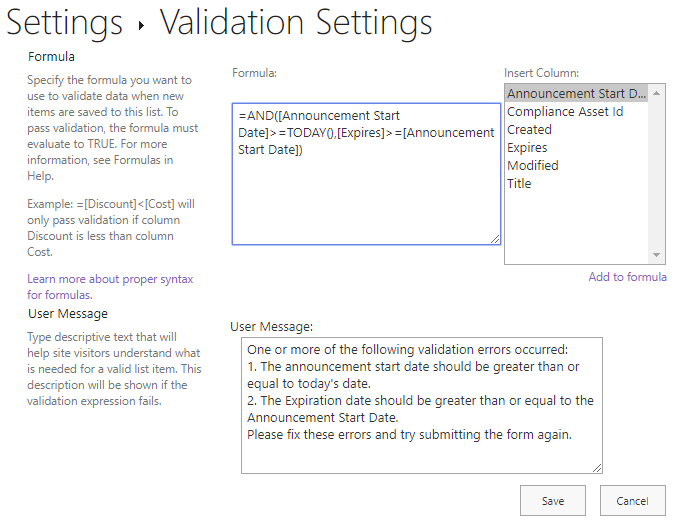
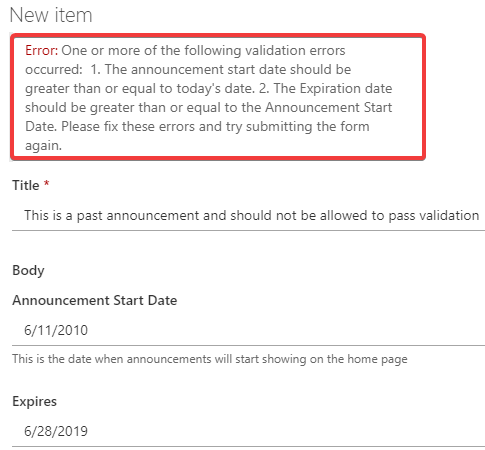
- Enter the desired validation formula in the Formula textbox. We are going to add the following formula for our example:
=AND([Announcement Start Date]>=TODAY(), [Expires]>=[Announcement Start Date])
- Enter text in the User Message textbox to indicate details about the validation error. We are going to enter the following message for our example:
One or more of the following validation errors occurred:
 1. The announcement start date should be greater than or equal to today's date.
 2. The Expiration date should be greater than or equal to the Announcement Start Date.
 Please fix these errors and try submitting the form again.
- The Validation Settings screen should then look like this:
- Click the Savebutton to save the changes.
- Browse to your list again.
- Click the New menu option to add a new item to your list.
- Enter information in the list so that it satisfies the error condition. For our example, we are going to enter a past date for the Announcement Start Date field.
- Click the Save button.
- Notice the validation error message toward the top of the form, as shown in the following screenshot for our example:
Note that this validation also works when editing items and also in the Quick Edit view that we saw in an earlier recipe.
Congratulations! You just saw how to view and modify settings for a SharePoint list. You further saw how to set up validation for your list.
How it works...
SharePoint lets you manage your lists and libraries through various settings. We've already seen a couple of these important list settings through some of our previous recipes. Here are a few other more common list settings that we have not discussed so far:
- List name, description, andnavigation: This is where you can change the title and description for your list. Note that the list URL remains the same even after you change the list name. This is where you can also specify whether or not to show the list in the site's Quick Launch (refer to the Modifying the left navigation recipe in Chapter 3, Working with Modern Sites in SharePoint Online).
- Versioning settings: This allows us to control whether or not to keep a version history of the changes to the list items. We will look at versioning in greater detail in a subsequent chapter.
- Advanced Settings (the more commonly used ones):
- Content types: We will learn about content types in a subsequent chapter but at this point, it is sufficient to be aware that this setting is part of the list's/library's Advanced Settings.
- Item-level Permissions: This setting allows you to define individual permissions for each item in the list. This setting is only applicable to lists (and not to libraries). We will discuss item-level permissions as part of the next recipe.
- Attachments: Whether or not to allow attachment uploads for the lists. It is a good governance practice to consider enabling or disabling this setting every time a list is created. This setting is also available only for lists (and not document libraries).
- Folders: Whether or not folder creation should be enabled for the list. Again, you should make a conscious decision as to whether or not to enable this setting for every list or library that gets created.
- Search: This option defines whether or not items from this list should show up in the search results. For most use cases, you will set this option to Yes. Instead of excluding items from just the search results, you should instead update the list or item permissions if you would like to hide items from other users. Once you change the list permissions, items from this list will also not show up in search results for users that don't have access to them. If, however, you have a compelling case to not show the list items in search results but still allow users to be able to access them, you simply change this setting to No. Doing so will hide the items from this list in the search results, while still allowing them to have direct access to them when they browse to the list or access them through shared links. Please refer to the Viewing and changing list permissions recipe later in this chapter for details on how to modify list and item permissions.
- ReindexList: Microsoft Search should automatically pick up new items from this list as part of the search results. Also, items that get deleted from this list should get dropped from the search results. If, however, for any reason you are not seeing appropriate items from this list in the search results, and you have waited sufficiently long enough for the search crawler to crawl and index this list, you can click the Reindex List button to completely delete and recreate the index as a way to fix the search results. Please refer to Chapter 8, Search in Microsoft 365, for more details on the different components of Microsoft Search and how it works in general.
- List experience: This lets you deviate from the default list experience setting for the site. Here, you can choose to explicitly use the classic list experience or the new modern experience for your list or library. Please see the next section in this recipe for the details of the modern versus classic list experience.
- Delete this list: Clicking on this link deletes the list and sends it to the Recycle Bin of that site. Deleting a list or library sends it to the recycle bin, where it stays for a couple of days until it gets moved to the second-stage recycle bin or gets permanently deleted. You can restore deleted lists or libraries, as long as they are still in the recycle bin and have not been permanently deleted. Please refer to the Viewing site contents recipe in Chapter 2, Introduction to SharePoint Online, to read more about the site recycle bin.
- Workflow settings: This allows us to specify workflow settings for the lists and libraries. Workflows are being replaced by Microsoft Flow. We have covered Microsoft Flow as part of a subsequent chapter. We will discuss workflows as part of the Appendix.
- Columns: This section lists the different columns for the list or library. You can click on the column names to view and change column settings.
- Create column: This link allows you to create a new column for the list.
- Add from existing Site Columns: Click this link to add a previously created Site Column to this list or library. We discussed Site Columns as part of the Adding a column recipe earlier in this chapter.
- Column ordering: Click this link to specify or change the order of the columns as shown from top to bottom in the Details pane or the add/edit forms for this list or library.
- Index columns: Specifying column indexes improves list performance when using filtered views. These are especially useful for large lists. You can use this link to specify indexes for your list or library.
- Views: This section shows the views currently configured for the list or library. You can edit existing views or create new views from this section.
The following support article provides a comprehensive listing of all the settings that are available for lists in SharePoint: https://m365book.page.link/List-Settings.
There's more...
SharePoint is an ever-evolving platform. Microsoft recently introduced a more modern, flexible, and mobile-friendly user experience for SharePoint. Modern lists and libraries are part of this new experience.
Modern versus classic list and library experience
Modern lists are faster, easier to use, less SharePoint, and mobile friendly. Some of the key benefits of modern lists and libraries are as follows:
- Easier to create and upload files and folders
- Easily add, sort, filter, and organize columns and views
- Easy access to file previews and information
- A better search experiences
- Easy customizations to the view display using column and list view formatting
- Ability to pin important documents to the top of the screen
- Ability to add files as links instead of having to copy them across sites
- A responsive experience
The classic experience is now deprecated and the modern experience is the default for newly created lists or libraries. To switch to the classic list experience, click Return to classic SharePoint from the bottom-left corner of the view page of your list or library. Note that while Microsoft lets you switch to the classic list experience, it is recommended that you continue to use the enhanced modern list and library experience unless there's a compelling and well-thought-out reason not to do so.
See also
- The Adding an item to a listrecipe in Chapter 2, Introduction to SharePoint Online
- The Viewing site contents recipe in Chapter 2, Introduction to SharePoint Online
- The Adding a column recipe in this chapter
- The Creating a custom list view recipe in this chapter
- The Viewing and changing list permissions recipe in this chapter
- The Adding a content type to a list or library recipe in Chapter 6, Term Store and Content Types in SharePoint Online
- Chapter 8, Search in Microsoft 365
Viewing and changing list permissions
Just as in a site, you can adjust permissions on a list in a manner that allows control over who can view the list or edit items in it.
In this recipe, we will see how to view and change permissions in a SharePoint list.
Getting ready
You will needFull Control access to the list for which you'd like to view or change the permissions.
How to do it...
To modify list permissions, follow these steps:
- Browse to the list for which you would like to view or change the settings.
- Click the settings gear icon in the top-right corner.
- Click List settings, as shown in the following screenshot:

- On theSettingspage, click the Permissions for this listlink under Permissions and Management.You can now view the current permissions for that list on this screen.
- Click Stop Inheriting Permissions from the PERMISSIONStab in the top navigation menu, as shown in the following screenshot:

- Click OK on the confirmation message.
- You can now independently adjust the permissions on this list by carrying out one or more of the following actions:
- Granting permissions to additional users or groups
- Changing permissions for selected users or groups that already have access
- Completely revoking access for existing users or groups that have access to the list
- Select one or more existing users and click the Edit User Permissions menu option, as shown in the following screenshot:
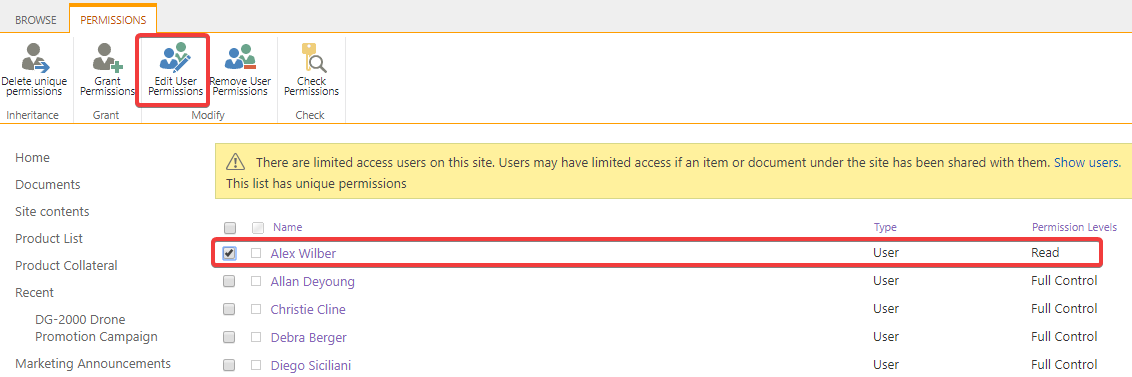
- Change the permissions for the user and click the OKbutton, as shown in the following screenshot:

Congratulations! You just set up permissions for your list in a way that is different from the parent site.
How it works...
We saw permissions management in great detail in the Determining and revoking permissions in a siterecipe inChapter 3, Working with Modern Sites in SharePoint Online. We encourage you to review the recipe and related notes for more details on permissions in SharePoint, but to summarize, we covered the following:
- We reviewed permission levels in SharePoint.
- We saw how these permission levels relate to things that you are allowed to do and not allowed to do in SharePoint.
- We learned how to configure and adjust SharePoint permissions using these permission levels.
Permissions management inLists and Libraryworks similarly to permissions management on a site. When new lists and libraries are created, they inherit the security settings from the site, meaning that whatever access users have to your site, they will have the same level of access to the list. If, for example, a user hasReadaccess to your site, they will by default have Readaccess to the list. After the List or Library is created, however, you can alter these permissions using the steps mentioned in this recipe.
There's more...
The permission hierarchy explained previously and subsequent management of this further trickles down to the item level, meaning that every item in a list and every document in a library by default inherits its permissions from the parent list or library. You can, however, break away from the inherited permissions and define distinct permissions for individual items. We discuss this and other related areas in the topics to follow.
Item permissions
Just as lists and libraries inherit permissions from their sites, items in lists and documents in libraries by default inherit permissions from the corresponding lists or libraries. SharePoint, however, lets you deviate from the norm and specify unique permissions for individual list items or documents. There are essentially two unique scenarios where you might want distinct permissions on individual items or documents within lists and libraries:
- The first scenario is where for all items in a list, you may want users to be able to only see their submissions to that list. An example of such a scenario could be a time-off request form, where individual department employees would submit their time off requests and department managers would approve or deny them. Such a scenario in SharePoint is easily handled by simply enabling item-level permissions through the list settings. To enable item-level permissions in your list, browse to the List settings page, as described in the previous recipe. Then, click Advanced settings link under the General Settings section. You will then see the Item-level Permissions section, as shown in the following screenshot:

You can specify the following settings in this section:
-
- Readaccess: You can specify whether individual items can be read by everyone or can only be read by the users who created them.
- Create and Editaccess: This is where you specify whether or not users can edit items created by others.
Please note that you will need Designor Full Control access to be able to update these settings. Also, worth noting is the fact that users with certain access levels, such as those having Design and Full Control access, will be able to view and edit all items in the list, irrespective of these settings. Also, these settings are only available for lists. You cannot configure item-level permissions for document libraries such as this. We'll cover how to apply unique permissions to documents in the next scenario.
- The second scenario is where you may want to deviate from the permissions norm for a single list item or for one or more documents in a library (since the item-level permissions described previously are not applicable to document libraries). Let's say that you'd like to get internal reviews done on a presentation before sharing it with a wider audience that has access to it via the parent container library. Until then, you would like to only share it with a few fellow colleagues for their review. For such scenarios, SharePoint lets you stop inheriting permissions from the parent library and specify custom permissions for the document in question. To do so, follow these steps:
- You would click the ellipsis next to the document and then click Manage access, as shown in the following screenshot:

-
- Then, click Advanced, all the way at the bottom of the Manage Access panel, as shown in the following screenshot:

- This will take you to the Permissions screen for that document. Here, you can view the existing permissions and also modify the permissions for this document as needed.
The steps to modify document permissions from this point on are the same as the steps to modify the list permissions, which we've described earlier in this recipe.
Navigation and search visibility
Modifying the permissions on lists or libraries and corresponding items or documents within them automatically ensures that the corresponding objects are not visible anywhere in the quick launch or global navigation. Furthermore, a search in SharePoint is also security trimmed to only show items that users have at least read access to. Any time that permissions on a document get updated, whether or not the document shows up in the search results for a user will depend on whether the user still has permissions to access the document.
See also
- The Viewing and changing list settings recipe in this chapter
- The Determining and revoking permissions in a site recipe in Chapter 3, Working with Modern Sites in SharePoint Online
- The Searching content recipe in Chapter 2, Introduction to SharePoint Online
Adding alerts
SharePoint notifies you by email when items are added, edited, or deleted in lists or libraries.
In this recipe, we will see how to create email alerts for SharePoint lists and libraries.
Getting ready
You will need at least Readaccess on the list or library for which you'd like to get alerted.
How to do it...
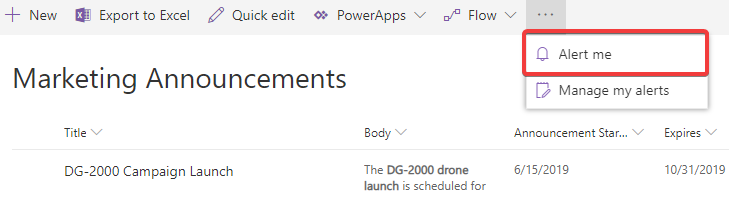
- Browse to the list for which you would like to view or change the settings.
- Click Alert me,as shown in the following screenshot:
- This shows the Alert me dialog box. Here, you can specify various properties and settings for the alert to be created:
- Alert Title: Specify a title for the alert that is descriptive of what the alert is for. The title will be shown in the subject line of the email alert that the selected users will receive.
- Send Alerts To: Users with Full Control access to the list, such as the list owners, see this additional option. This option enables you to subscribe other users to receive these alerts. Note that only users that have at least Read access to the list will be able to receive alerts from it.
- Delivery Method: The alert delivery method defaults to email. Note that even though the screen shows a Text message (SMS) option, that option is no longer enabled for SharePoint Online (at least, at the time of writing).
- Change Type: This is where you can specify what kind of change triggers the alert—that is, would you like to get alerted if anything changes in that list or would you like to get alerted only if items are either added, modified, or deleted?
- Send Alerts for These Changes: This lets you specify filters for when you would want to get alerted. You can select to be alerted when anything changes or when items that you have created or modified have changed. You can also restrict your alerts to trigger only when items in a particular view are changed by someone.
- When to Send Alerts: This final option lets you select the alert frequency. You can choose to receive an immediate alert or schedule a daily or weekly summary alert. If you opt to receive a daily or weekly summary alert, you can also choose the time at which you receive the summary notification email.
How it works...
Alerts in SharePoint are a very handy way to get notified about changes in a list or library. Announcements, Contacts, Issue Tracking/ Tasks lists, and Calendar are examples of where you might want to get notified of such changes. In addition to setting up alerts on entire lists and libraries, SharePoint also lets you set alerts on individual list items and/or documents, as shown in the following screenshot:
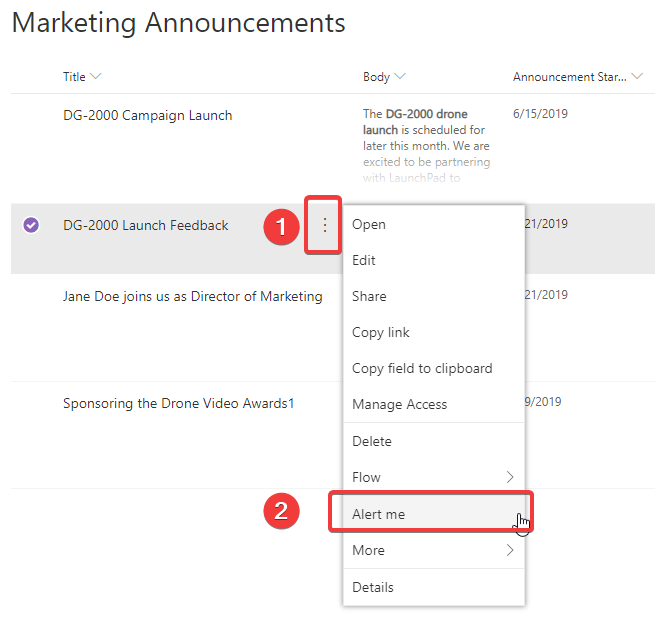
This can be handy when, for example, you are collaborating with your team on important documents and would like to stay up to date on any changes made to them.
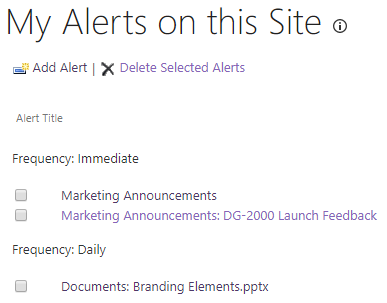
Once you've created a list- or item-level alert, you can modify and/or delete it through the Manage my alerts menu option, as shown in the following screenshot:

Clicking Manage my alerts will take you to the following screen, which will show you your alerts for all the lists, libraries, items, and documents across the entire site:
 .
.
Clicking the alert name will enable you to make changes to it. Selecting one or more alert(s) and clicking Delete Selected Alerts will delete the alert(s). Note that unlike various other information types in SharePoint, deleted alerts don't go to the recycle bin, and hence cannot be recovered.
There's more...
When you sign up for alerts in SharePoint, you receive detailed email notifications every time that the alert is triggered. These emails contain various details about the item itself and metadata surrounding the triggering event. In the next section, we will look at these emails in more detail. We will then see how, as a site administrator, you can view and manage alerts that other site users may have subscribed to.
Notification emails
SharePoint sends two types of emails for alerts:
- An email notifying you that the alert has successfully been created: When you sign up for alerts on a list or library, SharePoint sends a confirmation email letting you know that an alert has been created. The following screenshot shows an example of such an email:

As you can see from the preceding example, the notification email contains the following information:
-
- The name of the list or library that the alert is for
- A link to the site that contains the list or library
- A link to the view/manage alerts page that we discussed in the preceding section
- The actual alert email: SharePoint sends an alert email when an activity occurs that matches your specified criteria. The following screenshot shows an example of an alert notification email:

As you can see from the preceding example, the notification email contains the following information:
-
- Name of the item that the alert is for—the name hyperlinks to the corresponding item in the list
- The type of change that triggered the alert
- Details of the item, including who triggered the action and when
- A hyperlink to modify the alert settings
- A hyperlink to view the corresponding list
Finding and deleting other users' alerts
As a site administrator, you can not only view and manage your alerts but you can also view and delete alerts for other users of your site. To do so, browse to the Site Settings page of your site, as described in the Viewing and changing site settings recipe inChapter 3, Working with Modern Sites in SharePoint Online. Then, click User Alertsunder the Site Administrationheading. This will take you to the User Alertspage, as shown in the following screenshot:
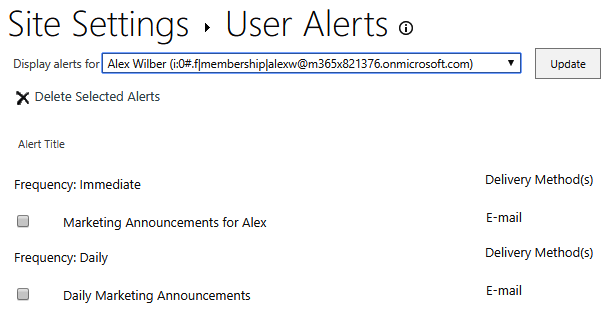
Here, you can select a user from the Display alerts for drop-down option, and click Update to view alerts that they are subscribed to. You can then select appropriate alerts and delete them by clickingDelete Selected Alerts.
See also
- The Viewing and changing site settings recipe, Chapter 3, Working with Modern Sites in SharePoint Online