OneDrive for Business is a cloud-based storage solution for your personal files. In a way similar to using a SharePoint document library to store and share files that your team is co-working on, OneDrive for Business lets you store and work on files that are private to you. It is your personal space for files that belong just to you and/or are not yet ready to be shared with a wider team. In that sense, your OneDrive area is like any other library on SharePoint Online. However, there are a few key differences between the two, which we will cover in later sections of this chapter, but for the most part, your OneDrive area is a simplified document library that you are the owner of and have full access to. You can add, update, and delete files or folders in your OneDrive area as you would in any other document library. You can then share these files with others in your organization as well as those external to your organization, and in the process of doing so, grant them viewing or editing rights to these files.
As with any other file on a SharePoint Online library, you can view and edit your OneDrive files from a multitude of mobile and desktop devices. OneDrive for Business also comes with a client app that you can install on your devices. This app (also referred to as the Sync client) then helps you maintain on-demand copies of your files for offline viewing and editing. It also ensures that any updates you make to these files from one device are replicated to your online OneDrive storage area and to any other devices that run the app. The app also lets you share files with your co-workers from any device without you having to visit OneDrive for Business online on Microsoft 365.
OneDrive comes in two different forms:
- OneDrive: This is your personal (non-work) online storage area, which you can access when you set up a free or paid Microsoft home or personal account. You can use your personal OneDrive area to store documents, photos, videos, and other files in the cloud and share them with your friends and family. You can get started with a free account, which gives you a limited amount of free space. It lets you and your family or friends to view and edit various file types on the cloud, which includes co-authoring capabilities for Microsoft Office documents. You can also install the OneDrive sync app to sync your files and work with them on your favorite devices.
- OneDrive for Business: This is an online storage area offered through your work or school account. You get 1 TB of storage (or more) for individual use. Your account and certain account policies, such as external sharing, are managed by your organization. Additionally, you can install the OneDrive for Business app to sync your files on your favorite devices and work with them, if permitted by your organization.
You can, potentially, have access to both versions of OneDrive—through your work or school and through your personal Microsoft account. You can install both versions of the sync client in parallel on the same device and also concurrently work with the files in either type of client app.
The recipes in this chapter will show you how to work with the files in OneDrive for Business through your school or work account, although most of the recipes will also apply to your personal OneDrive account. We will also learn how to use the OneDrive for Business app to locally sync your files and how to share them with others within and outside your organization.
In this chapter, we will cover the following recipes:
- Uploading a file to OneDrive for Business
- Syncing files and folders
- Sharing a file
Uploading a file to OneDrive for Business
Saving files in OneDrive and, in broader terms, saving them to the cloud, lets you access them from anywhere on various devices. As we saw in earlier chapters,saving files to the cloud also makes sharing easier as it lets us share just the links to files, rather than having to send over copies of files each time. This enables you to maintain a single version of a file. You can continue to make changes to your copy of that file, and others who have access to it can easily see these changes as they happen.
In this recipe, you will learn how to browse your OneDrive for Business account and upload a file to it.
Getting ready
There are no special requirements for accessing OneDrive for Business. As long as you have access to SharePoint Online, you will also have access to OneDrive for Business.
How to do it...
To upload a file to OneDrive for Business, take the following steps:
- Browse to any page in your organization's Microsoft 365 tenant. You may be asked to sign in with your work credentials if you are not already signed in.
- Click the app launcher in the top left-hand corner of the page and then click OneDrive. The following screenshot shows you what this looks like from the SharePoint Online home page:

You will then be taken to your OneDrive home page, which shows you all your files.
- Click Upload and then Files from the navigation menu at the top of the page:

This is the same navigation menu that you previously saw in the Uploading an existing document to the library recipe in Chapter 2, Introduction to SharePoint Online.
- As the following screenshot shows, the document will upload to your OneDrive area. You will also receive a notification confirming this. The notification message will also give you the option to share the document with others. We will look at sharing documents in more detail in the Sharing a file recipe in this chapter:
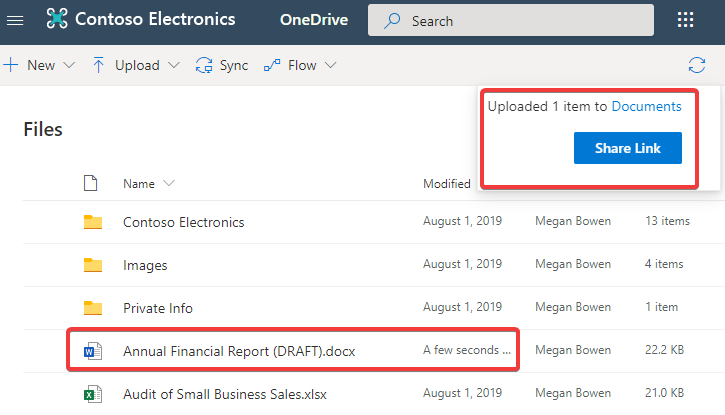
That's it! You have just learned how to browse your OneDrive for Business account and upload a file to it.
How it works...
Saving your files to the cloud enables you to access them from anywhere and through your favorite devices. Doing so also makes it easy for you to share these files with your colleagues by just sending them a link to the file instead of sending copies of the file itself. In addition, you can work on these files offline using the OneDrive for Business app, which we will see how to do in the Syncing files and folders recipe in this chapter.
File and folder operations
Since your OneDrive area is a simplified document library, most of the actions that you can perform in a document library can also be performed here, too. We discussed most of these actions in the following chapters:
As well as these actions that were described in the recipes of previous chapters, you can perform the following actions in your OneDrive area:
- Create new files or folders
- Upload existing files or folders
- Save Microsoft Office documents and other supported document types directly to Microsoft 365 using Save As:

- View and edit existing files in your OneDrive
- Delete files or folders
- Move or copy files and folders between OneDrive and SharePoint
- Share files or folders with others
In addition to using the online browser-based interface, you can also perform these actions using the OneDrive for Business app. We will describe this in more detail in the Syncing files and folders and Sharing a file recipes later in this chapter.
You can upload any file type to OneDrive for Business, but the maximum file size should not exceed 100 GB. You can also preview hundreds of file types in the browser. The Viewing and editing documents in the browser recipe in Chapter 5, Document Management in SharePoint Online, discussed the file types that are supported for viewing and editing in Microsoft 365.
If you are using a mobile device, you can use the OneDrive app to scan a document, whiteboard, or business card directly to your OneDrive for Business account, as well as upload existing photos, videos, or files from it. Go to https://m365book.page.link/OneDrive-Mobile to find out how to do that.
There's more...
While the primary function of OneDrive for Business is to help you with your private files, it truly is more than just a single library. Your OneDrive for Business account is actually a single SharePoint site collection area that you are the owner of. Refer to theCreating a modern team site recipe inChapter 2,Introduction to SharePoint Online, if you would like to understand more about what site collections are. Your OneDrive home page, which lets you interact with all your OneDrive files, is just one of the pages on your OneDrivesite.
Other pages on OneDrive for Business online
The following screenshot shows some of the additional functionalities that your OneDrive account has to offer:
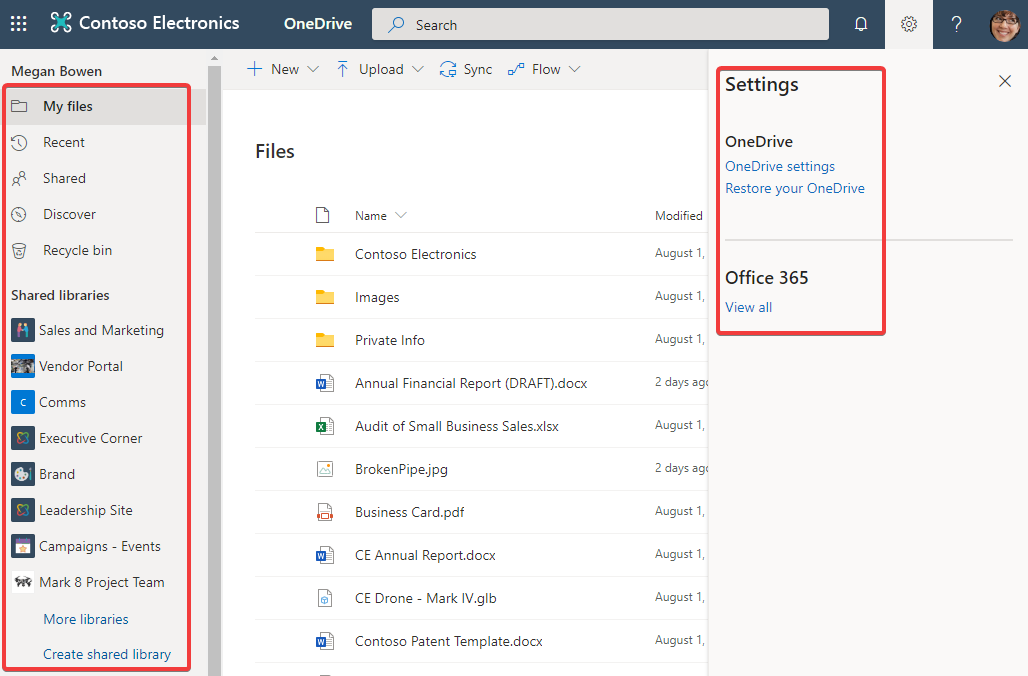
Let's discuss these features further:
- My files: The My files page is the home page for your OneDrive for Business account.We saw this page in the How to do it... section of this recipe. This page enables you to interact and work with your private files.
- Recent: This page shows you the recent files that you have worked on across all connected sites.
- Shared: Here, you can view the OneDrive files that others have shared with you or that you have shared with others.
- Discover: This section uses artificial intelligence and machine learning to understand your work patterns and then shows you content that is relevant to you. Refer to Chapter 9, Office Delve, to understand how this feature works.
- Recycle bin: Click this tab to show your recently deleted OneDrive files. From here, you can select a file and permanently delete it or restore it back to your OneDrive area. Files stay in the recycle bin for 90 days, after which they are moved to a second-stage recycle bin, where they stay for another 90 days before they are permanently deleted. Usually (on SharePoint sites), the second-stage recycle bin is only available to certain admins. However, since you are the owner of your OneDrive site collection, you have access to the second-stage recycle bin as well. This, therefore, gives you a total of 180 days to recover any files or folders that you may have accidentally deleted. Refer to the Site recycle bin section of the Viewing site contents recipe in Chapter 2, Introduction to SharePoint Online.
- Sharedlibraries: Here, you will see a listing of the top eight SharePoint document libraries that you have access to and that you use the most. Clicking on More libraries toward the bottom of the list will take you to a page where you can see an expanded list of your most frequented libraries. On this page, you will also see a list of the sites that you are following. Refer to the Getting to the SharePoint home page recipe in Chapter 2, Introduction to SharePoint Online, to learn how to follow a site. Clicking the name of a site on this page will show you the document libraries for that site.
- Create shared library: Clicking on this link will let you create a new team site connected to Microsoft 365 Groups. The default document library that comes with the team site will then be shown in the Shared libraries section mentioned in the previous point.
- OneDrive settings: This page lets you view and change your notification settings, as well as other settings for your OneDrive account. The notifications you can manage from here are self-explanatory, so we will not cover them in more detail. Similarly, the settings are either legacy settings or far too advanced for the scope of this book. There is, however, one setting that's worth mentioning here:
- Run sharing report: Clicking on this link generates a report that lists all of the files or folders that you have shared, as well as who you have shared them with and what permissions they have on each file or folder. It then places a copy of this report in a folder of your choice in your OneDrive area. The following screenshot shows an example of the information that is generated in this report:

- Restore your OneDrive: The OneDrive app synchronizes files from your devices to OneDrive online (and vice versa). If the files on your device become corrupted—for example, by malware or a virus—you can use this feature to restore your OneDrive files. You can read more about this feature at https://m365book.page.link/OneDrive-Restore.
See also
- The Creating a modern team site recipe in Chapter 2, Introduction to SharePoint Online
- The Uploading an existing document to the library recipe in Chapter 2, Introduction to SharePoint Online
- The Site recycle bin section of the Viewing site contents recipe in Chapter 2, Introduction to SharePoint Online
- The Viewing and editing documents in the browser recipe in Chapter 5, Document Management in SharePoint Online
- The Moving and copying documents recipe inChapter 5, Document Management in SharePoint Online
- Chapter 9, Office Delve
- The Sharing a file recipe in this chapter
Syncing files and folders
OneDrive for Business comes with the OneDrive sync app, which can be installed on a multitude of devices. The OneDrive app lets you work with your files locally, as you would with any other file on your computer or mobile.
In this recipe, we will look at how to sync your OneDrive online files to your local computer.
Getting ready
You should have the OneDrive sync client installed on your machine or have appropriate permissions to be able to install it. The following steps assume that you are using Windows as your OS. While the underlying concepts are the same, the installation steps for OneDrive are different for macOS. Refer to https://m365book.page.link/OneDrive-Macfor the installation and configuration steps for macOS.
How to do it...
You can use the OneDrive sync app to sync either your OneDrive for Business files and/or your SharePoint files locally to your computer.
To sync files from your OneDrive for Business account, take the following steps:
- Browse to your OneDrive account in the Microsoft 365 portal.
- Click the Sync option in the header menu, as shown here:

- At this point, you will be prompted to launch OneDrive on your computer. You will also receive the following message indicating that OneDrive is launching on your computer. The message also provides a link to download OneDrive if you haven't already done so:

- If this is your first time signing in, follow these steps:
- You will be prompted to log in to the client app:

-
- You will also be prompted to select a location for OneDrive to store synced files. You can keep the default location suggested by OneDrive or change it if needed.
- Next, the setup wizard will take you through a few information screens and will also prompt you to get the mobile app. It is highly recommended that you download the mobile app so that you can access your OneDrive files on the go on your mobile devices.
- Upon completing the wizard, you will be prompted to open the newly installed OneDrive app.
- OneDrive will now create a local sync folder and will start to sync your files.
- Once the app is installed, clicking the Sync option from OneDrive in your browser will start the OneDrive app, if it isn't already running, and will also give you the option to open the local OneDrive sync folder.
- The OneDrive icon will now show up in the Windows taskbar. You can right-click on this icon to see the status of the current sync operation, as shown in the following screenshot:

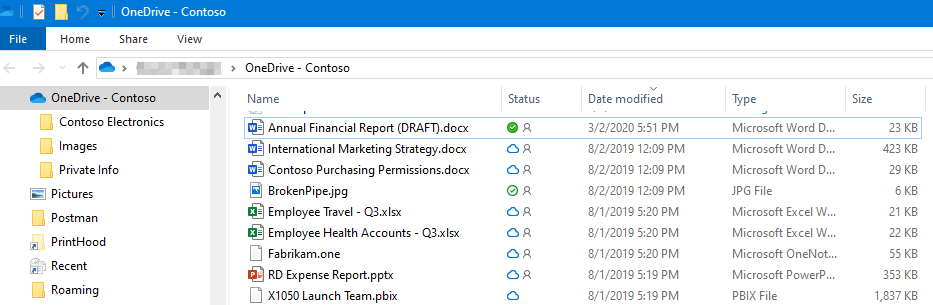
- From here, you can also click on Open folder to open your OneDrive folder in Windows File Explorer. As the following screenshot shows, this folder shows all the files in your online OneDrive library:
To sync the files and folders from a SharePoint library, take the following steps:
- Browse to your SharePoint library.
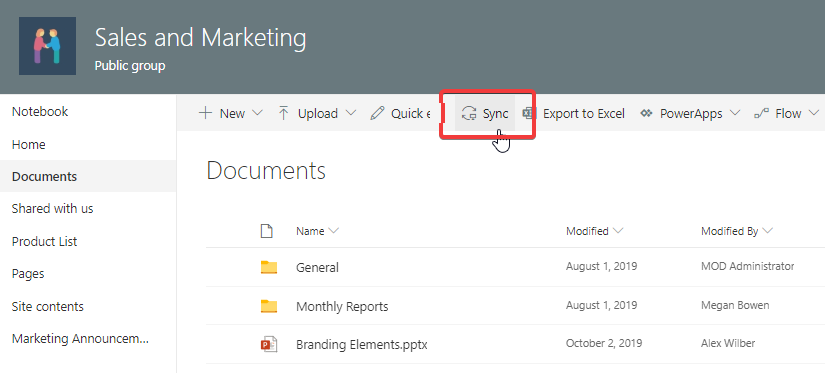
- Click the Sync option from the library's menu bar, as shown here:
- Follow the steps similar to those described for syncing files from OneDrive to set up the sync (steps 3, 4 and 5 described previously).
- You will see the following notification in your notification center once the sync is successfully set up:

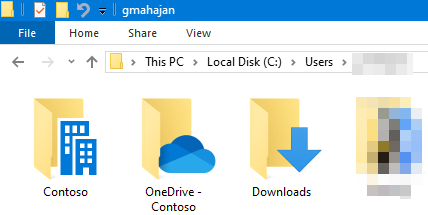
- OneDrive will now create a folder with the name of your organization under the C:Users<YourLoginName> folder, as shown here:
- As the following screenshot shows, it will then create a folder for each library that you sync:

- Opening or expanding the libraries in Windows Explorer will then show you a local representation of the online files and folders from that library:

Congratulations! You have just learned how to set up and configure the OneDrive sync locally. From this point on, you can work with the files locally on your computer.
How it works...
Once the OneDrive sync is set up, you can work on files in your local OneDrive folder, just as you would with files in any other folder on your computer. Any updates that you make to the files in your local OneDrive folder will also be automatically synced to your online OneDrive, and vice versa. You can add, view, edit, and delete files or folders locally as you normally would. If you are connected to the internet, your changes will be copied over immediately to your online OneDrive and to other devices where you have OneDrive installed. If you are not connected to the internet while making these changes, OneDrive will cache your changes and sync them as soon as you are next online. In the meantime, OneDrive will still let you work on the file, as long as a local copy of the file was previously synced to the device that you are working on.
The OneDrive app has various settings that enable you to control and manage your sync options.
OneDrive app settings
We are going to review some key OneDrive settings in this section.
- Clicking the OneDrive icon and then clicking on Moreshows the following options:

-
- Open your OneDrive - [Organization Name] folder: Clicking this option opens your local OneDrive sync folder in the file explorer.
- Open your [Organization Name] folder: Clicking this option opens your local profile folder, which contains all the SharePoint libraries that you are synchronizing with SharePoint Online.
- Settings: This option opens the advanced settings for the OneDrive app. We will look at these settings shortly.
- View online: Clicking this option opens your online OneDrive area.
- Pause syncing: This enables you to pause the sync for 2, 8, or 24 hours. You can always resume the sync whenever you need to.
- Close OneDrive: This closes the OneDrive sync client. This option is generally not recommended as this may cause your local OneDrive and SharePoint files to be out of sync with the online files.
- Clicking the Settings option from the preceding menu options opens the advanced settings dialog, which has the following tabs:
- Settings: Most settings on this page are self-explanatory and you should leave them at their default selections. The most important setting that you should know about is the Files On-Demand setting. If you uncheck this setting, OneDrive will restart and then download all files from OneDrive online, as well as any SharePoint Online libraries that you might be syncing. Depending on the files stored on your OneDrive online and the SharePoint Online libraries that you are syncing, this may cause significant local storage to be used on your device. It's generally not recommended to deselect this setting. Also, note that the Always keep on this device and Free up space options that we had discussed earlier will only show up when Files On-Demand is enabled.
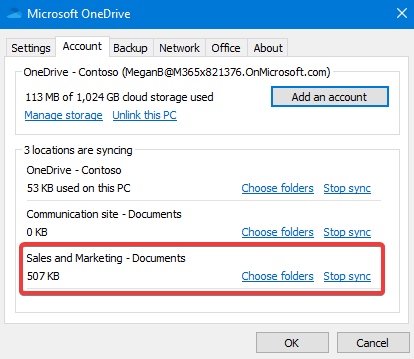
- Account: If you work for multiple organizations, you can manage your accounts from this tab. This is also where, for each library that you are synchronizing, you can manage which folders to sync for which library. You can also stop syncing individual libraries from this page:
-
- Backup: This tab lets you enable a continuous backup of files from the Desktop, Documents, and Pictures folders on your computer. It is recommended that you turn on this option so that your local files are always backed up and available to you through the cloud. One important thing to note here is that if you turn off the backup after enabling it, OneDrive will end up deleting all the content from your local Desktop, Documents, and Pictures folders. This content is, however, still available on your OneDrive. You should, therefore, only turn on the Backup option if you don't intend to cancel it.
- Network: You can throttle the bandwidth that your OneDrive app uses to sync files to OneDrive and SharePoint Online. You would generally leave these settings at the default values. You can read more about them at https://m365book.page.link/OneDrive-Network.
- Office: You can use this tab to manage how your Office files are synced online. You can read more about the settings on this tab at https://m365book.page.link/OneDrive-OfficeApps-Sync.
There's more...
Instead of downloading all the files and folders from your OneDrive area or from a Sharepoint library at once, the OneDrive app lets you download these fileson-demand as you need them. We will review this feature in more detail in the next section. Then we will look at why the sync app can sometimes fail to sync the files, how to identify and fix such sync issues.
Files on demand
You can enable or disable the files on-demand feature through the Settings tab in the OneDrive sync client settings.
When you first set up the OneDrive sync from a library, OneDrive will only replicate the folders in that library or those from your OneDrive online area. It will not download the actual files and will only create placeholders for them. By not downloading all the files from your online library, it helps save space on your computer, while still allowing you to work on those files locally, just as if this was another local file on your device. These files and folders are indicated by a cloudicon, as shown in all the following screenshot:

These files are only available when you are connected to the internet and so don't take up space on your computer. If you are working offline (that is, you are not connected to the internet), trying to open these files will result in the following error:

Clicking Download laterwill download the file to your computer once you are online (and connected to the internet) again.
Once you open an online-only file from your device, the OneDrive app automatically downloads it before opening it locally. These files are indicated by a blank circle with a checkmark in it:

You can open these files at any time, even if you are not connected to the internet. OneDrive will then sync your changes to your online OneDrive area or to the corresponding SharePoint library when you next connect to the internet. Once you are done with your changes and you don't need to access the file locally—or if you'd like to remove the files from your local storage altogether—you can right-click on the local OneDrive file or folder in question and then click Free up space. As the following screenshot shows, doing so will remove these local files and change their status to online-only, indicated by the cloud icon. Compare the icons in this screenshot to the status icons for these filesshown earlier:

Finally, you can make sure that a file (or all the files in a folder) is always available on your computer, even when you are offline. To do so, right-click on the file or folder and then click Always keep on this device. Doing so will change the status icon to a green circle with a checkmark in it, as shown in the following screenshot:

As mentioned earlier, you can always click Free up spaceto remove the local copies of these files or folders.
Note that the status icons and the OneDrive context menu shown in the previous screenshot will only appear in the OneDrive folders on your local device. Also, they will only show up when the OneDrive sync client is running.
Sync issues
The OneDrive sync app is very robust and has come a long way from when it was first introduced. One of the key gotchas of the sync client concerns filenames and invalid characters. Also, you may run into file lock issues and sync conflicts due to the nature of what the sync client does. You may find the following articles useful if you run into issues like this or you would like to read more about the file naming conventions and restrictions:
- Invalid file names and file types in OneDrive and SharePoint: https://m365book.page.link/OneDrive-InvalidFiles
- Fix OneDrive sync problems: https://m365book.page.link/OneDrive-SyncIssues
Sharing a file
We saw how to share documents in the Sharing a document recipe in Chapter 2, Introduction to SharePoint Online. Sharing files or folders from OneDrive works in the same way. The one minor exception is that your organization can set up different sharing restrictions on the files stored in OneDrive for Business versus those stored in SharePoint Online. For example, your organization may have turned off anonymous link sharing (signing in is not required to view a shared document) for your SharePoint sites, but might have enabled it for OneDrive.
In this recipe, we will use the OneDrive client to share a document from a local OneDrive folder on our computer.
Getting ready
There are no special requirements for sharing a file through OneDrive for Business online. As long as you have access to SharePoint Online, you will also have access to OneDrive for Business and you can share any files from there.
You should have the OneDrive sync client installed on your machine or the appropriate permissions to install it in order to share files directly from your computer.
How to do it...
To share a file or folder from your computer, take the following steps:
- Make sure the OneDrive sync client is running and then go to your local OneDrive folder.
- Right-click on the file or folder that you would like to share and then click Share, as shown in the following screenshot:

- This will open the OneDrive sharing dialog box with the default sharing option selected. As the following screenshot shows, the People you specify can edit option was shown for me, by default:

- As we saw in theSharing a document recipe in Chapter 2, Introduction to SharePoint Online, we can select the people we want to share the document with. There is also an option to enter a message. After this, click Send to share the document with them. The person will receive an email containing a link to the document.
That's it! You have just learned how to directly share a link to a document stored on your OneDrive for Business area from the OneDrive synced folder on your local machine.
How it works...
The sharing options that you will see when sharing from the OneDrive client will be the same as those that you will see from OneDrive online. The one added functionality you will notice, however, when you share using the OneDrive app on your device is the More Apps widget toward the bottom of the Share screen:

Clicking More Apps will enable you to share a link through other apps installed on your device. For example, on a mobile device, it will let you text a link to the document or send it via a Teams message, as shown in the following screenshot:

You can also similarly share a document that's in your OneDrive area right from within the document editing app that you are working on:
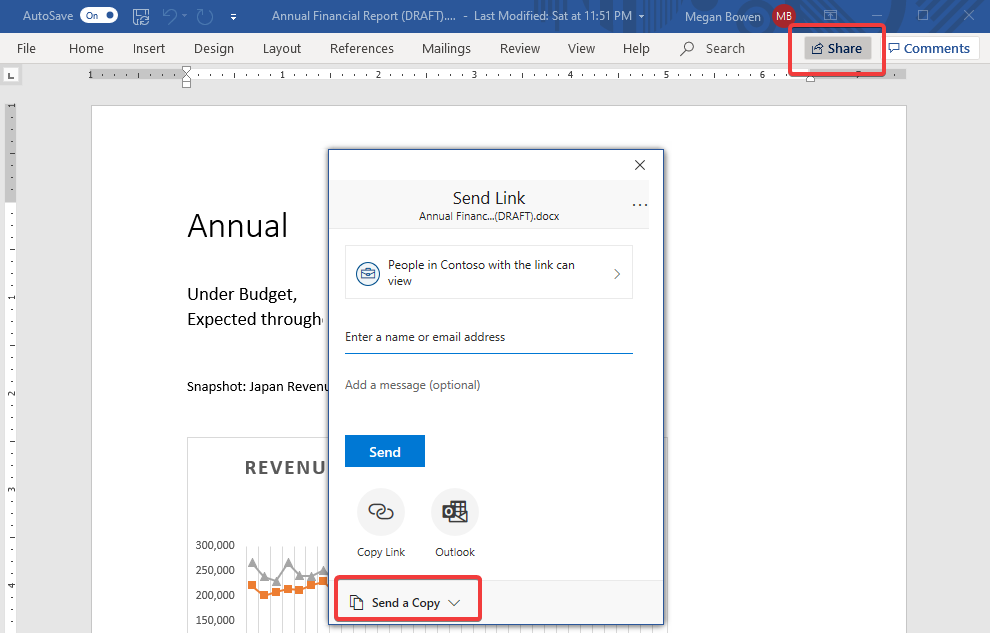
Note the Send a Copy option toward the bottom of this sharing screen. Clicking this option will open a new email and attach a Word or a PDF copy of the document to it.
There's more...
We saw how to check document permissions in SharePoint Online in the View existing permissions section in the Sharing a document recipe of Chapter 2, Introduction to SharePoint Online. When you do that, the document information pane will also show you all the links that you can use to grant access to the document to other people and who they provide access to. You can use these steps to view existing permissions on a file stored on your OneDrive for Business account.
If you are working on a OneDrive or SharePoint Online document from your local OneDrive synced folder, you can still view the links for providing access right from theSharescreen we discussed in the previous section.
Links granting access
To view the existing links that grant access to other individuals, click the three dots at the top-right corner of the Sharescreen and then click Manage Access:

Doing so will show you all the links to grant others access to the document and who they will provide access to. If a link has an expiration date set on it, you can also view that here, as shown in the following screenshot:

Please note that this screen will not show you any users that have access to the document through inherited permissions (if the document inherits permissions from the parent library). You will need to view the permissions of that document by browsing to the corresponding library in SharePoint Online. You can then view the permissions that users may have on a document by accessing the parent library. Please refer to the Permission inheritance topic in the Determining and revoking permissions in a site recipe ofChapter 3, Working with Modern Sites in SharePoint Online.
See also
- The Syncing files and folders recipe in this chapter
- The Sharing a document recipe in Chapter 2, Introduction to SharePoint Online
- TheDetermining and revoking permissions in a site recipe in Chapter 3, Working with Modern Sites in SharePoint Online
- The Changing list permissions recipe in Chapter 4, Working with Lists and Libraries in SharePoint Online