While we have tried to cover all the major Microsoft 365 applications, we acknowledge that new applications are being added to the Microsoft 365 fabric all the time. We have used our collective judgment to promote certain important applications throughout this book while mentioning some other applications that are worthy in the Appendix section. Let's go over some of the apps and Microsoft 365 concepts that you might hear of.
OneNote
OneNote is a note-taking application that actually deserves a chapter of its own. The application is rich with features that make it possible to capture ideas, thoughts, and tasks at any time on any device. Since it's part of the Microsoft Office Suite of Applications, it integrates seamlessly with Outlook, Microsoft Teams, and other Microsoft Office apps and services. You can take notes in OneNote during an Outlook or Teams meeting.
OneNote components
OneNote is comprised of notebooks that contain sections and pages. If you are using the OneNote app, the notebooks get synced with OneNote online if and when you are connected to the internet. You can share a notebook with your colleagues to share an idea or meeting notes.
Sections within the notebook are like chapters in a book:

Taking notes
Besides digital notes, OneNote also supports handwritten notes (using a stylus) and audio/video notes. It can convert your handwritten notes into digital notes so they can be searched for throughout the document. It can also translate notes taken in one language into another language.
You can also insert images, videos, and documents on your pages. You can arrange the content on the page just by dragging and moving it around.
OneNote doesn't have a save button. This is because it autosaves the content, which speeds up the note-taking process.
Sharing notes
You can share a notebook with your colleagues simply by clicking on the Share option. This shares the entire notebook, along with all of its sections. You can't share a single section but can copy or move a section from one notebook to another:

SharePoint workflows
So far, we learned how to build processes using Microsoft Flow. Before Flow was included in the Microsoft 365 suite, workflows were designed using SharePoint Designer. SharePoint Designer is a free executable that helps you modify sites and web pages and create workflows with SharePoint. You can download it from https://m365book.page.link/sp-designer. Microsoft has not released any new versions of SharePoint Designer after SharePoint Designer 2013, but you can still use it to build legacy SharePoint workflows on SharePoint Online.
SharePoint workflows can be attached to a site, a list, or a specific content type.
To build a workflow, open a SharePoint site using SharePoint Designer:

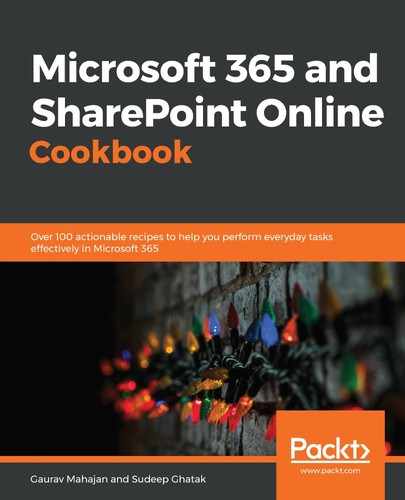
Click on WORKFLOWS on the left to see all the SharePoint workflows that have been deployed on the site. From here, you can choose the type of workflow and the workflow designer will load up:

SharePoint workflows use a very old-fashioned editor. It requires you to learn the syntax and the logic isn't easy to debug:
If you are still supporting workflows built on the designer platform, I would recommend rebuilding these workflows using Microsoft Flow.
Microsoft Forms
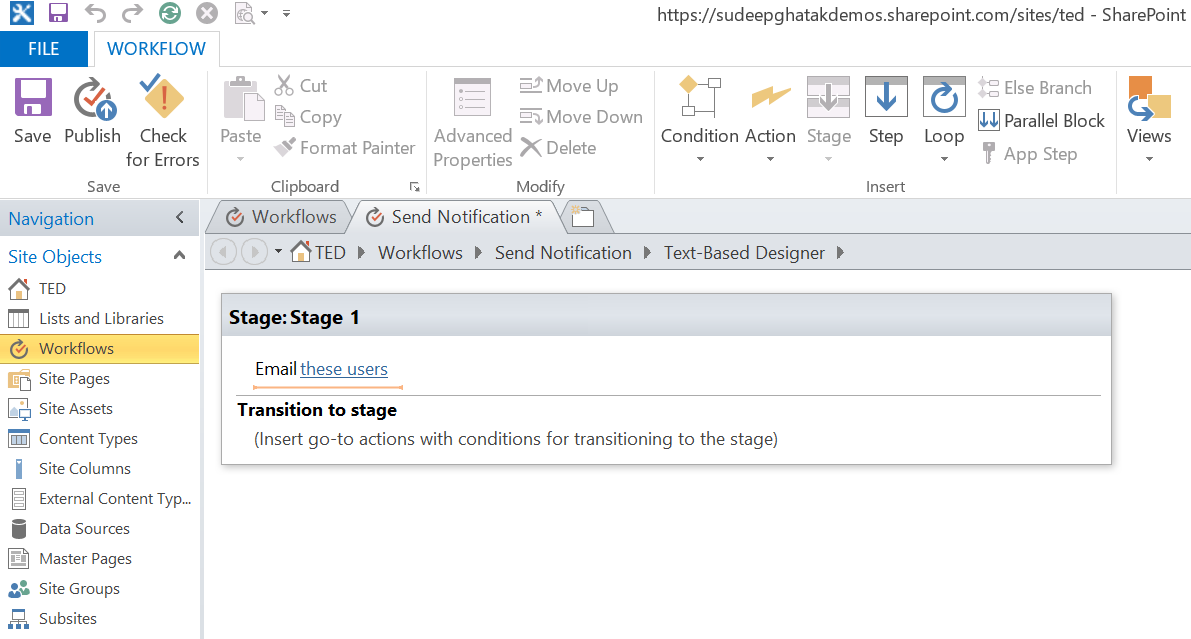
Microsoft 365 Forms or Microsoft Forms is an application that lets you create survey forms, and quizzes. You can create forms and surveys to get information from your coworkers or even from people outside your organization. To create a form, visit https://forms.microsoft.com and log in with your organization account. Once you've logged in, you can create a form or a quiz. The form creation wizard is simple and easy to use, as shown here:
Start by clicking Add new, which lets you add questions. These questions could be simple text boxes, radio buttons, date fields, or rating fields. Once you have added all your questions, you can preview the form by clicking on Preview on the top banner.
The form can be accessed via a link that is generated when you click Share. This link can be public or private to the organization, depending on the sharing settings.
The form creator can look at the responses as they arrive. You can view these by clicking on the Responses tab:

This page provides a summary of the responses. Individual responses can be viewed by clicking on View Results. The responses can also be exported to Excel.
Microsoft Stream
Microsoft Stream is an Enterprise streaming video service available with Microsoft 365. Company staff can upload, share, and view video content created within the company. It also supports social features such as tagging and comments, which enable discussions around the video's content.
Microsoft Stream lets you upload recorded presentations and live events for later viewing. Meetings recorded using Microsoft Teams get uploaded to Stream automatically.
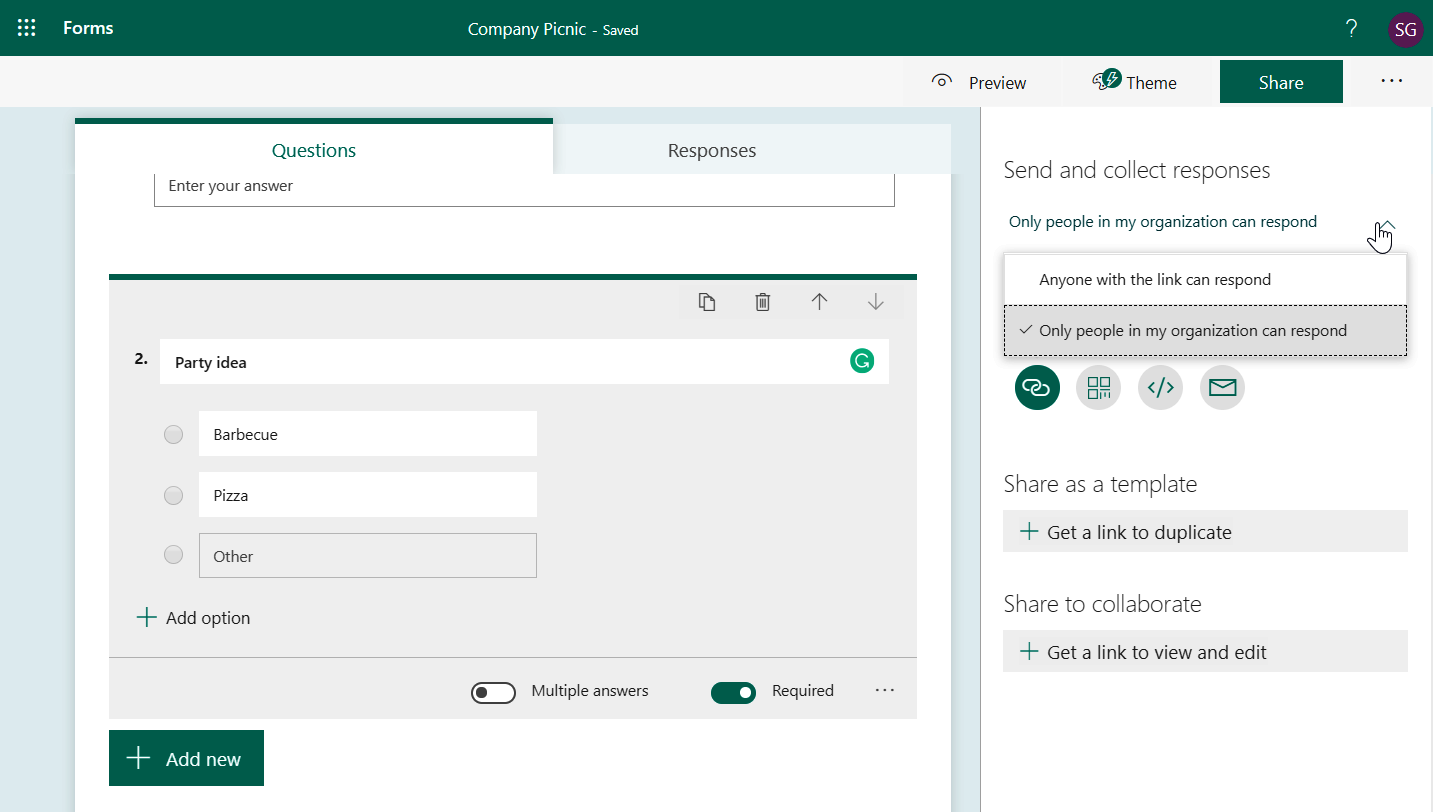
The transcript of the audio/video is generated automatically for any Stream video. The best part is that the transcript is searchable, which means you can skip to the point in the video timeline where a given word was mentioned by searching for the word in the transcript area.
Microsoft Teams meeting recordings have another great feature. When a meeting is being recorded, Teams tags the people speaking during the meeting while the video is playing. With this, you can click on an avatar of one of the people from the meeting and be taken straight to the section where the person was speaking, as shown in the following screenshot:
Microsoft Stream video can be securely shared with a group, individual, or the entire company. You can also assign owners to a specific video, which lets them change the metadata information.
You can also embed Microsoft Stream content in your SharePoint pages, as well as Sway and PowerPoint presentations.
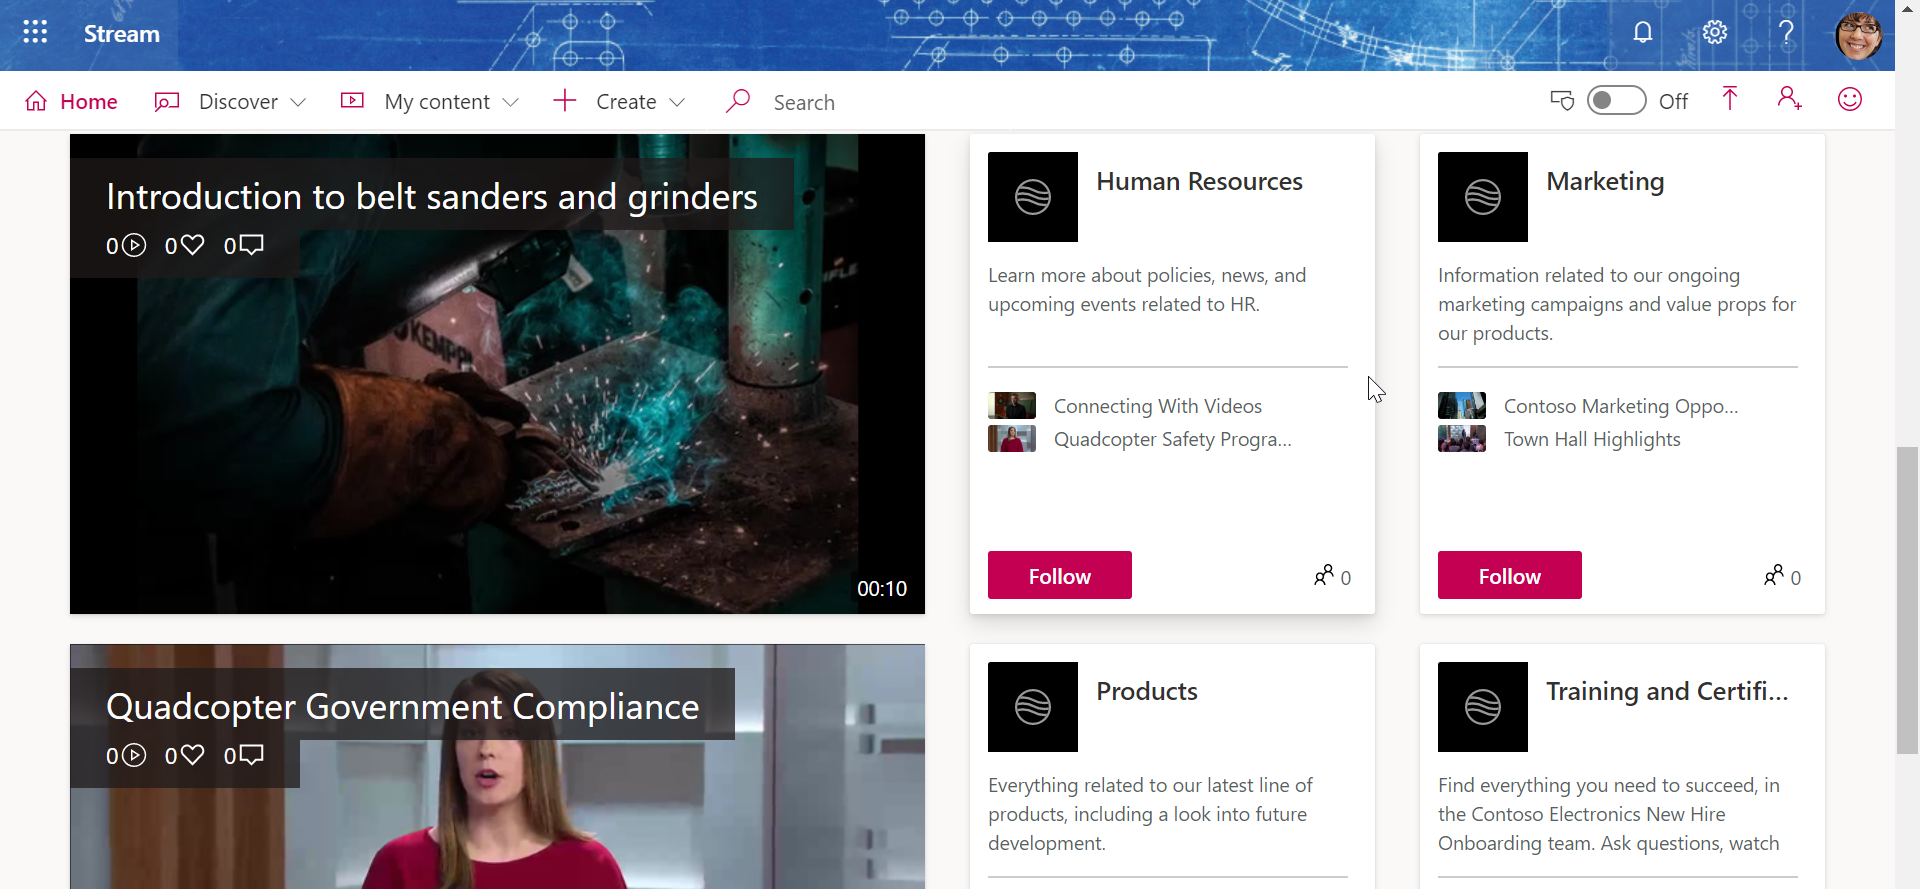
Stream lets you group your videos in channels. You can add videos to a channel to group them logically. You can create channels organization-wide or for specific groups, as shown in the following screenshot:

Having the videos added to the channel lets your staff identify them by the category they are in. You can have channels for training, certifications, product launches, and more, as shown in the following screenshot:
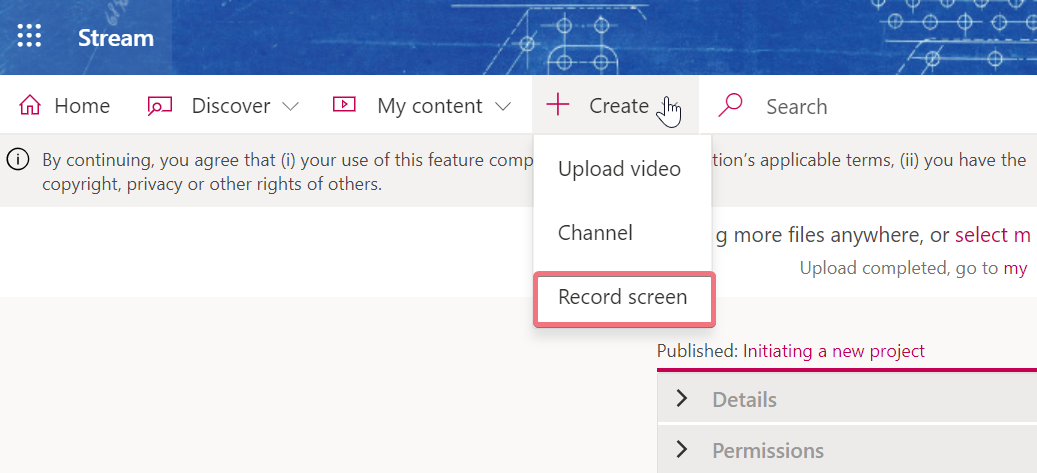
Stream also lets you make screen recordings. So, next time you need to record a training video for your company, try this out:
Sway
Sway is a tool that lets you build stunning presentations and interactive reports without you having to worry about the design or the layout. All your presentations will be responsive and render beautifully on any device.
Sway is a free service. However, if you have a Microsoft 365 license, you can do even more with Sway. The following web page compares the free version of Sway to the one that comes with a Microsoft 365 subscription, at https://m365book.page.link/sway.
Sway lets you add text, images, and videos to a web page interface that looks pretty similar to a modern SharePoint page. As you add content, Sway will provide you with suggestions, as shown in the following screenshot:

Once your Sway content is ready, you can share it with colleagues or friends. You can build public Sways that people can view without having to sign in. At the same time, you can also create secure Sway content that can only be viewed by people you share it with.
To build your own Sway, go to www.sway.office.comand sign in with your personal Microsoft account or the Microsoft 365 login credentials provided by your organization.
To Do
Just like Sway, To Do is a free service available for personal use, as well as a part of your organization's Microsoft 365 subscription.
To Do lets you create and manage your tasks. It lets you capture notes and ideas and tag them with photos, files, and more. You can assign due dates to these tasks so that they appear in your To Do lists.
To Do has a very simple interface, which makes it easy to use.
At its core, you have the tasks screen, which loads when you open To Do. You can assign a due date, add reminders, and provide additional information such as notes and file attachments. A task can be further broken down into steps where needed.
These tasks are added to lists. To Do provides some inbuilt lists, as follows:
- My Day: You can pick any task and add it to the My Day list so that you can keep track of the tasks you need to focus on.
- Important: Any task that you tag as important will appear in this list.
- Planned: Tasks that have a due date assigned to them will appear in this list.
- Tasks: This is the default list that the tasks get added to when they're created.
In addition to these lists, you can create custom lists and move your tasks to them.
You can create tasks directly from your mobile device via the To Do app, which is available on both Android and iOS.
The following screenshot shows what the app looks like on mobile. In the following screenshots, I am demonstrating how, using To do, I can manage the tasks required to author a book:

Office development frameworks
Microsoft 365 has a robust development framework that supports customizations being made to various M365 services. The framework is used by Microsoft partners and ISVs who build a rich ecosystem of applications and apps that extend the power of Microsoft 365. For instance, there's an app that lets you receive digital signatures on your documents and an Outlook add-in that lets you save your documents from Outlook to SharePoint.
Companies using Microsoft 365 use the developer framework to customize and build custom solutions that fit their internal requirements. Many such success stories can be read at https://betterwith.office.com/.
Let's look at some of the most widely used development features.
Microsoft Graph
Microsoft Graph (formerly known as Microsoft 365 Graph) is a collection of endpoints that lets you build your own applications that interact with data within your Microsoft 365 environment.
Microsoft Graph lets you work with the following:
- Microsoft 365 users
- Social
- OneDrive
- Excel
- Outlook
- Microsoft 365 groups
- Tasks
- SharePoint
- Azure Active Directory
The beauty of Microsoft Graph is that you can interact with all these objects using a single endpoint; that is, https://graph.microsoft.com.
The following diagram (borrowed from the Microsoft website) shows how Graph interacts with Microsoft services:

What this means is that you can build applications using the same APIs that Microsoft uses to build its products. By releasing the API to the community, Microsoft has welcomed developers to come up with applications that suit their specific needs.
Microsoft Graph uses REST calls to query information. Representational State
Transfer (REST) is a widely accepted architectural style that is used to perform Read, Create, Update, and Delete operations using a variety of languages (C#, JavaScript, Perl, Java, Node.js, Angular, and more).
Therefore, irrespective of the language the developer opts for, they can make use of Graph APIs to build custom solutions such as the following:
- A mobile app that creates a summary of what is trending (by looking into Yammer and Teams conversations).
- A resource booking app that helps you identify people who are overbooked, as well as those who are on the bench (based on their calendar bookings).
- A Power BI dashboard showing the usage of Microsoft Teams based on conversations and files exchanged.
If you are planning to build an application using Microsoft Graph, start with Microsoft's Graph Explorer, about which you can find out more at https://m365book.page.link/graph-ex.
Graph Explorer lets you test your results by allowing you to log in with your Microsoft 365 credentials and run REST calls, as shown in the following screenshot:

For more information, please refer to the official Microsoft Graph documentation at https://m365book.page.link/graph-doc .
PowerShell
PowerShell is a scripting language that lets you execute Microsoft 365 tasks from the command line. Some tasks that you can perform using Powershell are as follows:
- Add users to Microsoft 365 by reading a CSV file.
- Assign licenses to users in Microsoft 365.
- Migrate documents from one SharePoint site into another.
- Provision of a Microsoft Team and create a private channel.
- And the list goes on...
Basically, PowerShell lets you do anything that you would usually do using the user interface in Microsoft 365, provided that the service exposes an API.
You can read more about Microsoft 365 Powershell by visiting https://m365book.page.link/Powershell.
Further, in order to work with a specific application, say Teams or SharePoint, you need to install the respective Powershell module. Powershell modules are groups of functions that are associated with specific applications. You can install PowerShell modules by using the Install-Module command
Some notable modules for Microsoft 365 are:
- AzureAD: to work with Azure Active directory
- MicrosoftTeams: to work with Teams
- ExchangeOnlineManagement: to work with Exchange Online
Specifically, with SharePoint, there are two modules that are often used:
- Microsoft.Online.SharePoint.PowerShell: This module is officially supported by Microsoft and contains SPO in the command name (e.g. Connect-SPOService). Please refer to the following documentation from Microsoft to read more about the SharePoint Online management shell and to get started: https://m365book.page.link/PowerShell-SPO
- SharePoint PnP: This module is community-driven with contributions from Microsoft employees and other community leaders. Due to its popularity, we have discussed this module in more detail in the next topic. Due to the open-source nature of this module, you will find that this module is more feature-rich, however, it doesn't guarantee an SLA should you run into issues. You should keep this in mind while running scripts using the commands.
SharePoint PnP
Patterns and Practices (PnP) and is an open-source, community-driven initiative, coordinated by the Microsoft engineering team. This is a wide community of experts and developers from within and outside Microsoft who have built a huge repository of reusable components that can be added to your site, thereby enhancing the user experience of your customers. PnP provides open-source tools, commands, and scripts that you can use for automating various tasks in your SharePoint environment. The following web page provides a good overview of PnP at https://m365book.page.link/pnp-community.
These articlesgive you good overviews of getting started with the two PnP development options:
- PnP PowerShell overview: https://m365book.page.link/PnP-PowerShell
- Getting started with PnPjs: https://m365book.page.link/PnPJs-Getting-Started
The community runsweekly webcasts, demo videos, tutorials, and other videos and also has a GitHub repository at https://github.com/pnp/.
Office Add-ins
Office Add-ins let you build solutions that extend Office applications (Word, Excel, Outlook, and so on) and interact with content inside Office documents. Add-ins can be built using simple web technologies such as HTML, CSS, and JavaScript. As a result of this, they can run seamlessly on all platforms, including iOS and Windows.
If you would like to know more about Office Add-ins, visit https://m365book.page.link/office-addins.
Learning pathways
Microsoft 365 learning pathways are a learning solution designed to simplify adoption and increase usage of Microsoft 365 services in your organization. It lets you do the following:
- Install the prebuilt Microsoft 365 training site.
- Customize the services you want to provide training on.
The site is connected to Microsoft Online Catalog, so the training content is always up to date.
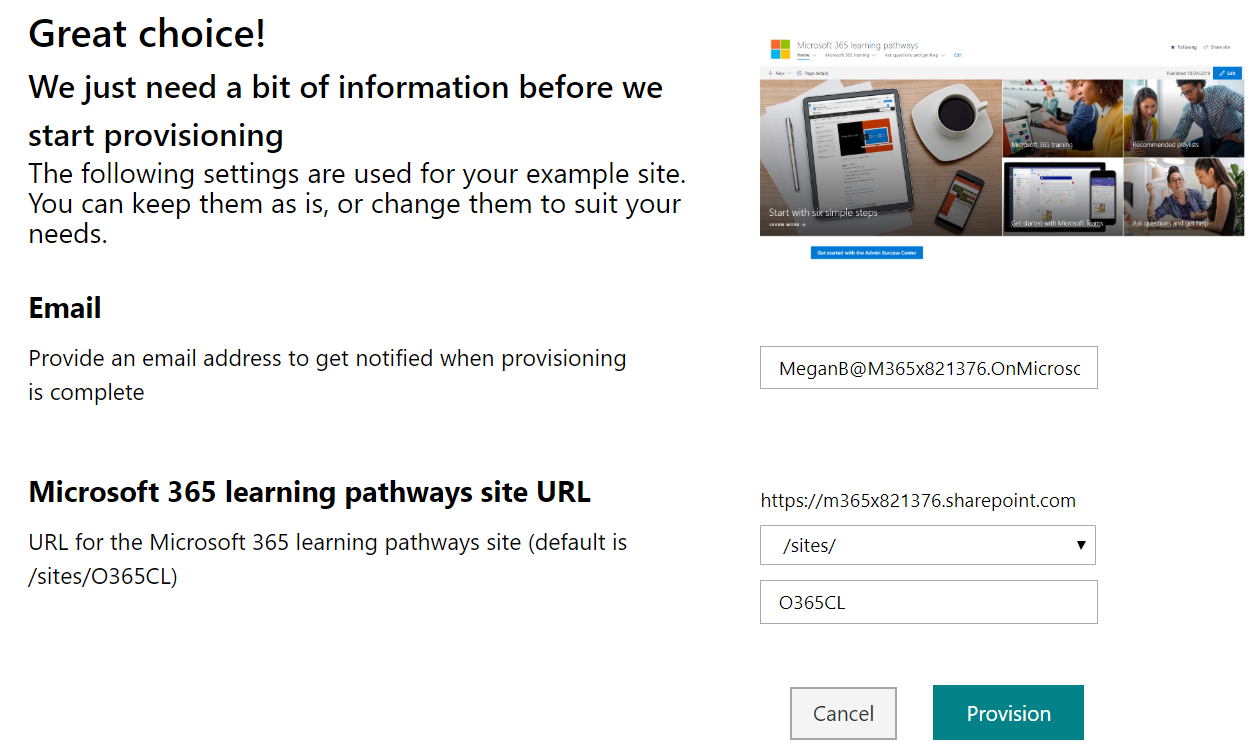
The best way to install a learning/training site is to do the following:
- Get your tenant administrator to create an App catalog. The instructions to set up an App catalog have been provided here at https://m365book.page.link/catalog.
- Wait at least 2 hours and then visit https://m365book.page.link/learning-m365.
Click Add to yourtenant, as shown in the following screenshot:

The next screen will ask you to verify the details of your tenant. Click Provision, as shown in the following screenshot:
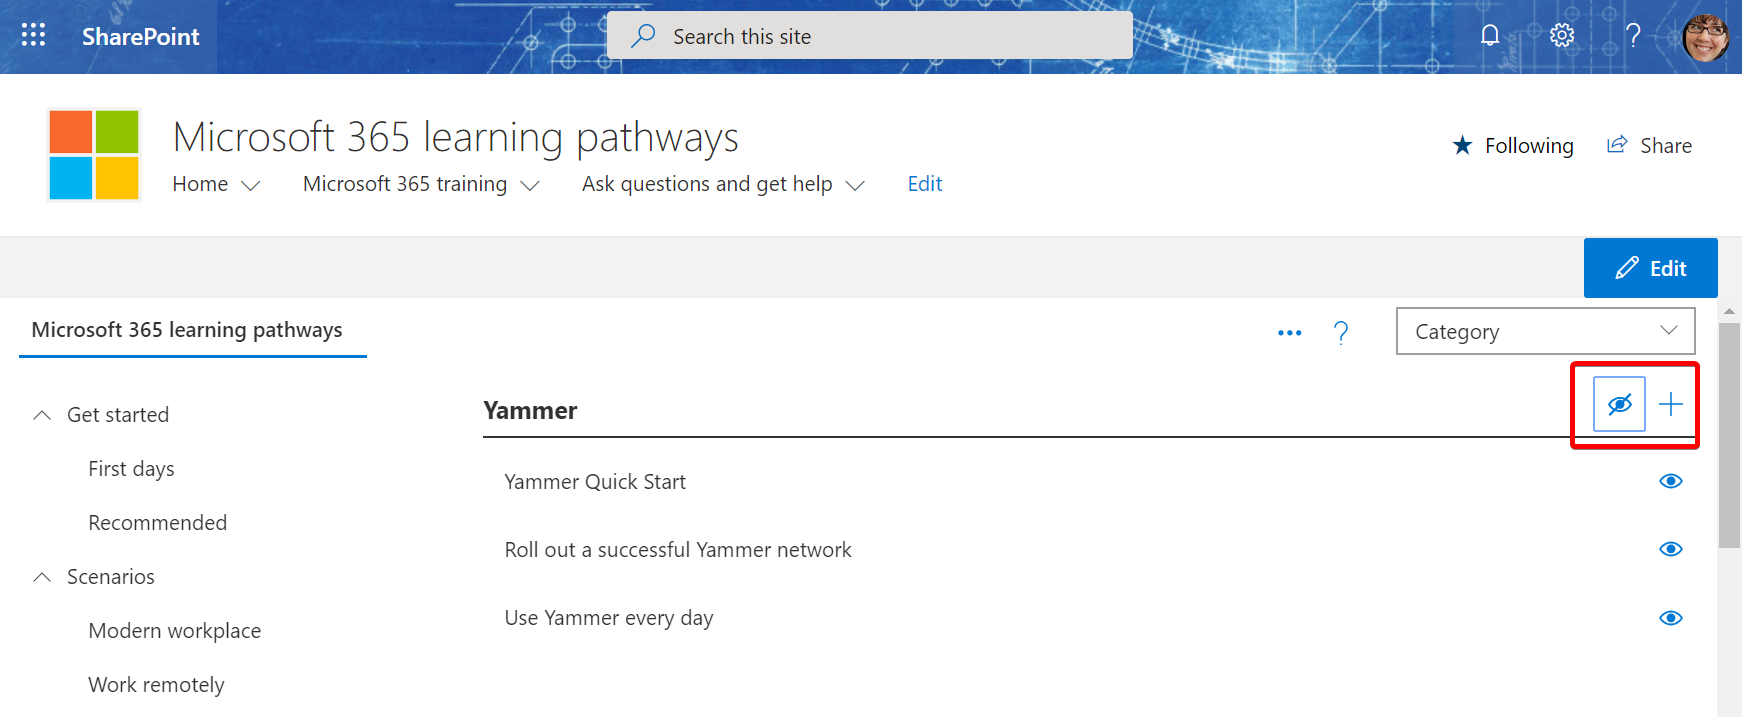
With that, your learning pathways site is ready. Go to the Microsoft 365 training link, as shown in the following screenshot:

Click on the Settings icon to customize its content:

You can Show/Hide content based on your organization's needs:
Project Cortex
Project Cortex is a new member that has joined the Microsoft 365 family that uses Microsoft Search and Microsoft Graph to surface contextual information about a specific keyword via topic cards. Imagine that you receive a work email that has a reference to Project ABC (which might be a project running in the company). Project Cortex will convert that word into a hyperlink that displays additional information about what the project is, people involved with the project, and other supporting information.
This reduces the overhead of additional documentation. Project Cortex makes the first attempt at collating information from Microsoft 365 related to the term using artificial intelligence. The SMEs could then go and enrich the content on the pages if they want to. The possibilities it presents are endless. With a tool like Project Cortex, the time you need to onboard a new employee or person joining a new role is reduced. These are still early days for Project Cortex (at the time of writing this book) but watch this space.
The following is a mock-up of how Project Cortex can mine information and provide additional context/information to the end user:

SharePoint spaces
SharePoint spaces is a web-based platform that lets you create mixed reality vision by using 2D and 3D web parts on your SharePoint page. SharePoint lets you add web parts for your 3D objects, 360° images, and videos, 2D images and text, and more.
SharePoint spaces can be used for training staff, organizing virtual tours, engaging classroom teaching, and much more.
To use SharePoint spaces in your site, you need to turn the following Site feature on:

Once this feature is turned on, you will get an option to create Space pages in the page library of your site. You can now add 2D and 3D elements to your page:

SharePoint spaces look even better when you view them using a VR headset. Developers can enrich the experience even further using the SharePoint Framework.
Fluid Framework
Fluid Framework takes collaboration and co-authoring to the next level. With Fluid Framework (which was only recently announced at the time of writing this book), you can add components that interact with each other while you are creating content. It lets you @mention your colleagues and tracks the document changes in real-time.
You can save the Fluid files in your OneDrive or Teams applications and share it with your colleagues. People get access to the document automatically if you @mention them.
There are several components that you can add to your document, some of which are as follows:
- Action Items
- Table
- Person
- Date
- Check List
- Bulleted List
- Numbered List
- Image
- Agenda