A library in SharePoint is a special list built specifically for managing files and the metadata around them. Libraries are similar to lists in that:
- Just like list items in SharePoint lists, libraries contain individual files that you can work with.
- Just as columns in lists define the information that gets stored as part of each list item, columns in libraries define the metadata that you can associate with each file. Once the columns for a library are defined, you can tag individual files with appropriate metadata.
- Similar to how you manage information in lists individually or together as a group of items, you can manage metadata in libraries individually or as part of groups of items.
- Just like list items, you can also individually manage permissions for these files.
From these perspectives (and in a lot of other ways), lists and libraries are similar to each other. One main difference between lists and libraries is that the library features are focused on files. A few notable examples of such capabilities are as follows:
- The file editing and sharing experience
- In-place file previews
- Copying and moving files
- Ability to pin important files to the top
- Check in/Check out, versioning, and approval experience
Libraries typically contain documents, but they can also contain various other file types. SharePoint provides a few pre-built libraries with different file types and associated capabilities in mind. We saw a listing of such library types in the Builtin list and library templates topic in the Creating a list using a built-in list template recipe of Chapter 4,Working with Lists and Libraries in SharePoint Online. Some notable examples of such pre-built libraries are as follows:
- Site Pages library: The purpose of this library is to store pages within a site.
- Picture library: The functionality of this library is centered around images.
- Site Assets library: This library is used to store reusable assets for your site (such as page images, stylesheets, and OneNote notebooks).
As the name suggests, a Document library is a type of library that is centered around documents. That said, there is no restriction at all on the types of files that you can upload to a Document library. We got some insight into working with document libraries and documents as part of Chapter 2, Introduction to SharePoint Online.
Also,Chapter 4, Working with Lists and Libraries in SharePoint Online, walked us throughlists in great detail. We saw how to add columns, modify views, and modify other settings in a list. Since libraries are special types of lists, almost all of the guidance applicable to lists also applies to libraries. Before proceeding with the recipes in this chapter, it is highly recommended to review that chapter if you have not already done so. In this chapter, we will discuss recipes that we haven't discussed before since they are unique to libraries.
In this chapter, we will discuss the following recipes:
- Creating a new document
- Associating a document template
- Viewing and editing documents in the browser
- Viewing and editing documents in the client
- Downloading documents
- Moving and copying documents
- Viewing and changing document library settings
- Versioning settings, content approval, and document checkout
Creating a new document
In Chapter 2, Introduction to SharePoint Online, we saw how to upload existing documents and folders to a document library. In addition to uploading existing documents, you can create new documents from scratch within a document library.
There are two ways to create new documents within a library:
- Create it using the New menu in the library
- Create it using the local Microsoft Office app
This recipe will show you how to create a new Word document using either approach.
Getting ready
You will need Contribute permissions or higher to the library to be able to create a new document within it.
How to do it...
To create a document using the New menu in a document library, follow these steps:
- Browse to the library where you would like to create the new document.
- Click the New menu from the navigation bar on top of the library:

- Click on the type of new document you would like to create. We will choose a Word document for our example. Doing so will create a blank word document in the library and will open it for editing in a new browser window.
- Click on the Document - Saved text at the top of the screen (above the ribbon menu):

- Give a name for your document and then press the Enter key or click anywhere outside the text box to save the change:

To create a new document using the Microsoft Office app on your computer, follow these steps:
- Open the Office desktop application locally. We will open Microsoft Word since we are creating a Word document in this example.
- Create or edit content in it like you typically would.
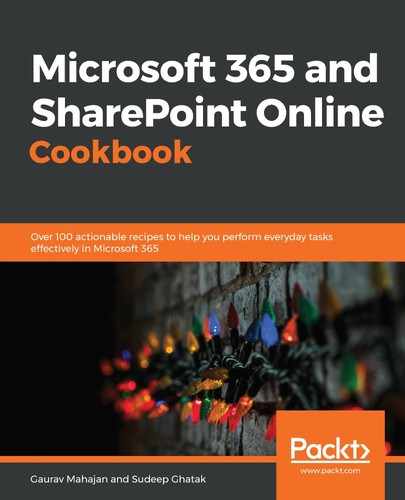
- Click the Filemenu and then click Save or Save As. You will now be shown a list of your recent locations. These recent locations could be your online SharePoint and OneDrive libraries, or local folders on your computer:
- If you see your SharePoint Online library here, you can select it, enter a name for your file, and then save it here, as shown in the following screenshot:

Notice that you can click the pin icon alongside your frequently used locations so they are pinned to the top of the list.
- If you did not find your library in the list of recent libraries, you can click the Sites - <YourOrganizationName> option to view a list of your frequently accessed or followed sites:

- Clicking a site name then shows you the document libraries in those sites. You can then select a library and then save your document there, similar to the image shown in step 4.
- Finally, if you do not see your site on this list, you can click the Browse button to open the Save as dialog. Then enter the URL of the library (without the trailing Forms/AllItems.aspx) and click Save, as shown in the following screenshot:

- This takes you to the default view of the library (just like you would see it in the browser).
- Enter a filename and click Saveagain to save the document to the library.
- If your library contained mandatory columns for additional metadata, you will be prompted to enter values for those columns before you can save the document. If that happens, you will need to select or enter the required metadata and then click the Retry Save button:

- Doing so will save the document to the location that you had previously selected.
Congratulations! You just created a new document in the library. You learned how to do so by using the New menu from within the library or by using the corresponding Microsoft Office app from your local device.
How it works...
The one big difference between creating a document in SharePoint Online versus creating it locally is that when you create a new document in a SharePoint document library, it automatically becomes available to anyone else who has access to that library. Other users that have access can also collaborate on this document. Among other benefits, creating online documents also makes it easy to share them with others by merely emailing them links to those documents using the Share orCopy link functionality in SharePoint Online.
Governance and information architecture
Depending on their permissions, members of your site can create lists and libraries within it. They can further create columns within the libraries, create folders, customize library views, and change other settings for these libraries. This can quickly lead to lists and libraries all over your site, and along with that, multiple columns, views, and folders within those libraries.
For this reason, if you are a site owner or owner of a library, you should put some upfront thought into planning the permissions for your site and/or lists and libraries within the site. Also, you will want to plan the structure and organization of content that will be hosted within these sites. You should ideally do this before users start creating or uploading files in the library. As a site owner, you should think about whether content should be hosted in one library or multiple libraries. As a library owner, you should think about the following:
- The columns (a.k.a. metadata) that should be captured for the documents in the library
- The views that should be created for the library
- Whether you need to create folders to organize the files
- Versioning, Check out, and other settings for the library
In addition to this, you should think about the different audiences for the library and subsequently the permission settings for it.
See also
- Uploading documents to a library in Chapter 2, Introduction to SharePoint Online
- Associating a document template in this chapter
- Adding alerts in Chapter 4, Working with Lists, Libraries in SharePoint Online
- The Creating a content type recipe in Chapter 6, Term Store and Content Types in SharePoint Online
Associating a document template
The Newmenu in a library lets you create documents using the standard inbuilt document types:

Clicking any of these document types will result in a blank document being created for you. There are times, however, when you would want your users to create documents using standard document templates defined by your organization. These templates might contain pre-defined branding, standard cover pages, footers, and headers as an example. You can modify theNewmenu to enable document creation using such templates and also optionally hide the default templates.
This recipe will show you how to associate such a pre-created document template with the New menu in your library. We will also see how to show this template at the top and then disable the inbuilt Word document option.
Getting ready
You will need the Edit permission or higher to be able to edit the New menu for a library.
How to do it...
To add a new template to the list of options in the Newmenu:
- Click the Newoption in the menu bar.
- Click Add templatetoward the bottom of the menu:

- This opens the usual file selection dialog box for your computer.
- Browse to the appropriate document template and then select it.
- This will add the new document template to this menu, as shown in the following screenshot:

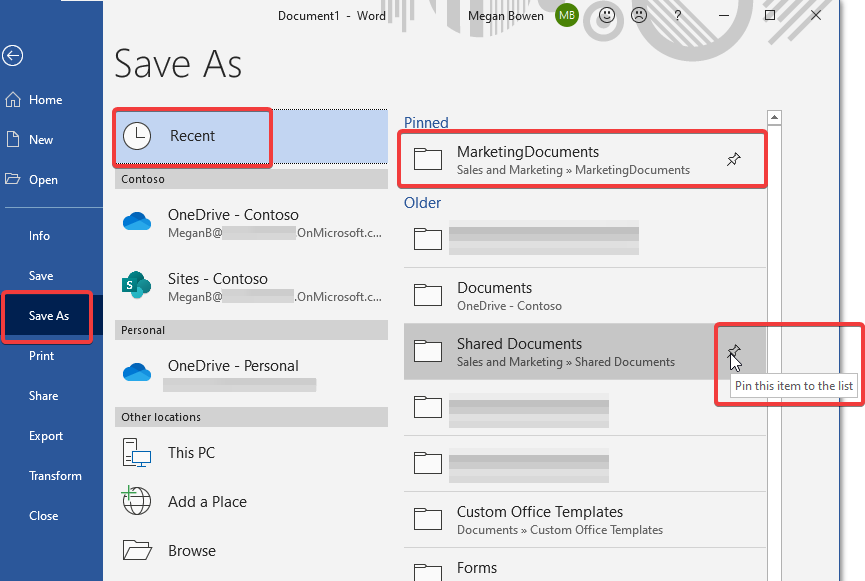
To modify the order of the different document types that the users see in theNewmenu, or to completely hide them:
- Click the Newoption from the menu bar.
- Click Edit New menutoward the bottom of the menu.
- This brings up the Edit New menuscreen. Here, you can hide the existing menu options, reorder them, or completely delete any custom options by clicking the ellipses to the right of the option:
- You can then click the Savebutton to save your changes to the New menu.
Congratulations, you just learned how to associate a document template with the New menu in your library. You then learned how to rearrange the order of the various menu options and then to hide the options that are not needed.
How it works
It is usually a good idea to associate document templates with your document libraries instead of your site users creating documents using the native blank templates. This further ties into the governance and information architecture discussion from the previous recipe in this chapter. Doing so where possible helps to further improve the quality of content and consistency within your site. Please note that your users can still upload documents to the library that may not be based on the template that you have defined. SharePoint cannot validate if the documents uploaded by the users of your library were created using a specific template.
See also
- The Creating a new document recipe in this chapter
Viewing and editing documents in the browser
Microsoft 365 conveniently enables you to view and edit files directly in the browser, without even having to download a local copy. This recipe will show you how to do that.
Getting ready
You will need Read permissions or higher on the document that you'd like to view and Contributepermissions or higher on it if you'd like to edit it.
How to do it...
To open a document in the browser, follow these steps:
- Browse to the library that contains the document that you'd like to view or edit.
- Click on the document you'd like to view or edit. This will open the document in a new browser window.
If you are the owner of such a library, we will discuss how you can change this behavior in a subsequent recipe in this chapter.
- Depending on your permissions to the document, you will directly be able to view it or edit it in place in the browser.
That's it! You just learned how to view and edit documents from a SharePoint library in the browser.
How it works...
Office Online (now simply called Office andpreviously known as Office Web Apps) is the online Office suite that enables viewing and editing files in the browser. It supports hundreds of file types for viewing in the browser. This link provides a list of all such file types: https://m365book.page.link/Preview-File-Types.
In addition to the ability to view files within the browser, Office Online also enables you to edit a subset of these file types right from your browser. At the time of writing, the ability to edit documents in the browser was available for most Microsoft Office file types, such as .docx, .pptx, and .xlsx, and most text file types, such as .txt, .css, .html, and .js.
Please note that even though there is a limit on the file types that can be viewed or edited in the browser, there's practically no limit on the file types that can be uploaded to it. However, the browser viewing and editing experiences slightly vary depending on the type of file. Further, if SharePoint is unable to render a file type in the browser, clicking such a file will prompt you to download it to your computer. You can then open the file as you usually would on your computer.
Some of the advantages of browser editing are as follows:
- No additional licensing or software is required: Office Online is included with your Microsoft 365 subscription without an additional cost (a.k.a. free!). Further, it does not require any software to be installed (not even the Microsoft Office desktop software) and simply works out of the box with most commonly used browsers.
- Quick and convenient: It is certainly very convenient to be able to edit the documents from within the browser, instead of having to first download them. You can not only view and edit these documents on your desktop browser but also with a variety of mobile browsers and office mobile apps on a variety of other devices as well. Also, your changes are automatically saved so you don't need to manually save them.
The one main limitation of using Office Online to view or edit your documents in the browser is that not all features that are available in the corresponding desktop apps are available in Office Online. For example, not all transitions and animations are available in PowerPoint Online. Having said that, the capabilities available in Office Online still cover the most common usage scenarios. This article provides a detailed comparison of features that are available in the client apps versus those available in the corresponding web apps: https://m365book.page.link/office-online-service-description.
There's more...
We will discuss the co-authoring experience in SharePoint online in the next topic.
Co-authoring documents in the browser
Co-authoring is two or more people working on a document at the same time.Co-authoring in Office not only enables multiple people to simultaneously work on the same document but also lets them see each other's changes in real time. You can co-author MS Word, PowerPoint, Excel, or OneNote files that are stored in SharePoint Online or OneDrive. The following screenshot shows an example of co-authoring:

In the example shown in the preceding screenshot, a user, Alex, is making changes to a Word document. As shown in the screenshot, another user, Megan Bowen, is simultaneously editing the same document. Alex can see that Megan is editing the document by way of her image showing up in the top right corner of the document (illustrated by the rectangle marked number 1). Further, Alex can also see the changes that Megan is currently making in real time by way of a cursor that shows the initials of her name -MB (illustrated by the rectangle marked number 2).
Similar to this, Megan will also see the changes that Alex is making in real time through a presence indicator along with a cursor showing the initials of his name. If more than two users were editing this document, Word would similarly indicate their presence along with the real-time updates that they are making to the documents.
This support article provides more details on co-authoring: https://m365book.page.link/co-authoring.
See also
- The Viewing and editing documents in the client recipe in this chapter
- The Adding alerts recipe in Chapter 4, Working with Lists and Libraries in SharePoint Online
Viewing and editing documents in the client
Besides being able to view and edit documents in the browser, SharePoint also lets you view and edit online documents in the corresponding desktop applications. There are two ways to open an online document in the desktop app:
- Browse to the library and then open the document from there.
- Directly open an online document from the app.
In this recipe, we will see how to use both methods to view and edit a document that was uploaded to a SharePoint library in the corresponding desktop application.
Getting ready
You will need Read permissions or higher on the document that you'd like to view and Contributepermissions or higher on it if you'd like to edit it.
How to do it...
To open the online document from the library, follow these steps:
- Browse to the library that contains the document that you would like to view or edit.
- Click the ellipses next to the document (1).
- Click or mouse-over the Open submenu option (2).
- Click Open in app, as shown in the following screenshot (3):

- If you are opening a Word document, like we are in the preceding screenshot, click Open Word on the prompt that appears to confirm that you'd like to open the document in Word.
- The selected document will now open in the Word app. If you have the right to edit the document, you can start making changes to it and your changes will automatically be saved to the document library in SharePoint.
To open the document directly from the client app, follow these steps:
- Open the corresponding desktop app, like you usually would.
- Once you open the app, you will be shown the Home tab. Here, you can see all your recently opened documents, which include documents from Office Online. Click on the document to open it if you see it here. Otherwise, we can move on to the next step.
- Click the Open tab orFile| Open – the option you see will depend on the type of document that you are trying to open.
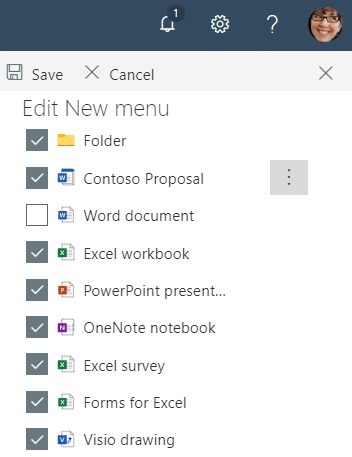
- Here, you will again see a list of your recent files. If you have previously connected your Microsoft 365 account through the desktop client, you will also see a list of organizations that you have recently accessed.
- Clicking on the organization name will show you your frequent and followed sites from the organization:
- You can then click on the site and then the library to view all the folders and documents in that library.
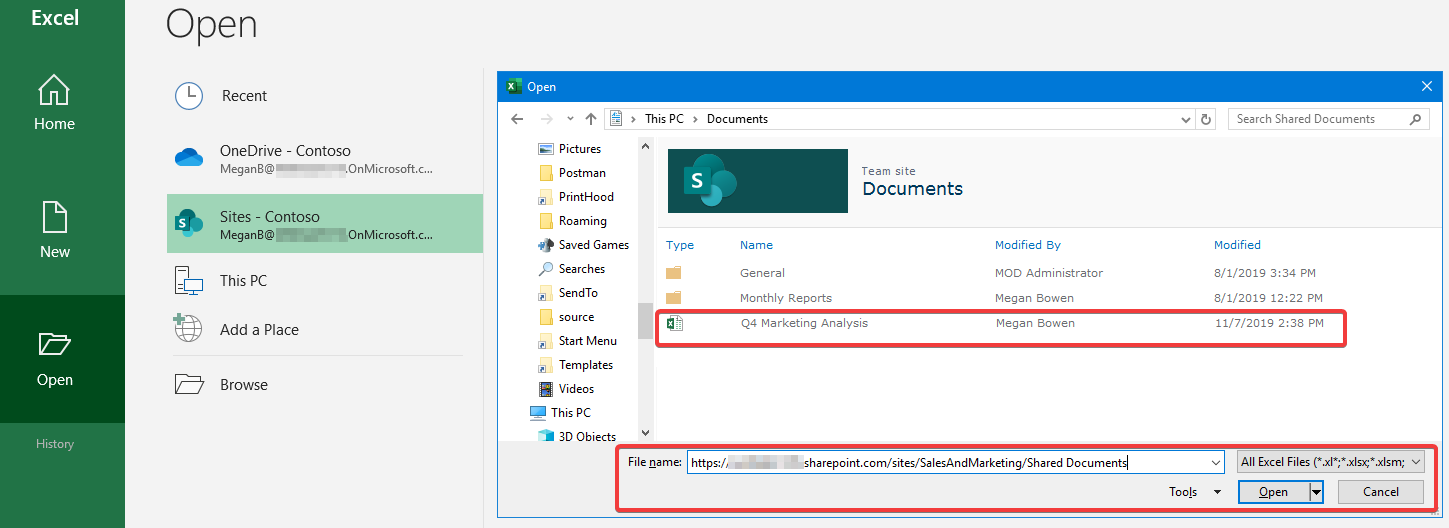
- You can click on the document to open it if you found your document here. If not, we will move on to the next step.
- Click theBrowse button to open the usual file selection dialog box.
- Enter the URL of your site and then clickOpento see a list of the libraries in that site.
Consequently, the correct URL to enter in the file dialog for this site is https://<OrganizationName>.sharepoint.com/sites/SalesAndMarketing/.
- Select the library that contains your document and then click Open to view a list of documents in that library.
- Select the document you'd like to open, and then clickOpen, as shown in the following screenshot:
- Doing so willdirectly open that document in the desktop client.
Congratulations! You just learned how to directly view and edit documents from a SharePoint library in a client app. Please note that you can currently only open Microsoft Office documents this way.
How it works...
Being able to edit documents online is very convenient. However, it lacks the advanced editing controls that the Microsoft Office desktop apps provide. The client editing capability brings together the best of both worlds. It lets you store and share your documents on the cloud, where they are easily accessible to everyone. Also, you can use the rich client capabilities to make modifications to your documents. As of now, you can only edit Microsoft Office documents connected to the cloud this way. All other file types that you would like to edit using the client applications will first need to be downloaded, edited, and then uploaded back to the library.
In addition to directly opening online documents in a desktop app, you can also use the Open in Desktop App option to open, in the corresponding desktop app, any online documents that you may be viewing or editing in your browser.
The Open in Desktop App option
When editing documents in the browser, SharePoint Online presents an Open in Desktop App menu option, as shown in the following screenshot. Clicking this option also opens the document in the corresponding desktop app:

There's more...
We discussed co-authoring as part of the last recipe. The discussion was focused on a browser-based co-authoring experience in that all users were using their browser to work with the documents. In the context of the current recipe, it is also possible to use the corresponding Microsoft Office desktop apps to co-author documents.
Co-authoring documents in the client app
While you edit the document in a desktop app, your co-workers could either be using the browser or a desktop app to view and edit the same document. The Office desktop app would provide you similar notifications and indicators to not only show you who else is editing the document but will also show their edits in real time.
One added benefit of using the desktop app for co-authoring is that clicking a person's presence indicator in the app lets you perform the following additional actions:
- Go to the location that the person is at in the document.
- Email the person.
- View their contact information.
Document metadata
When the document library containing the document is configured with columns to store additional metadata/information for the document, Microsoft Officelets you edit that metadata from within the client application. Further, if any of those columns are mandatory, the client application will require you to enter that information before you can save the document. It shows these columns through a properties pane, as shown in the following screenshot:
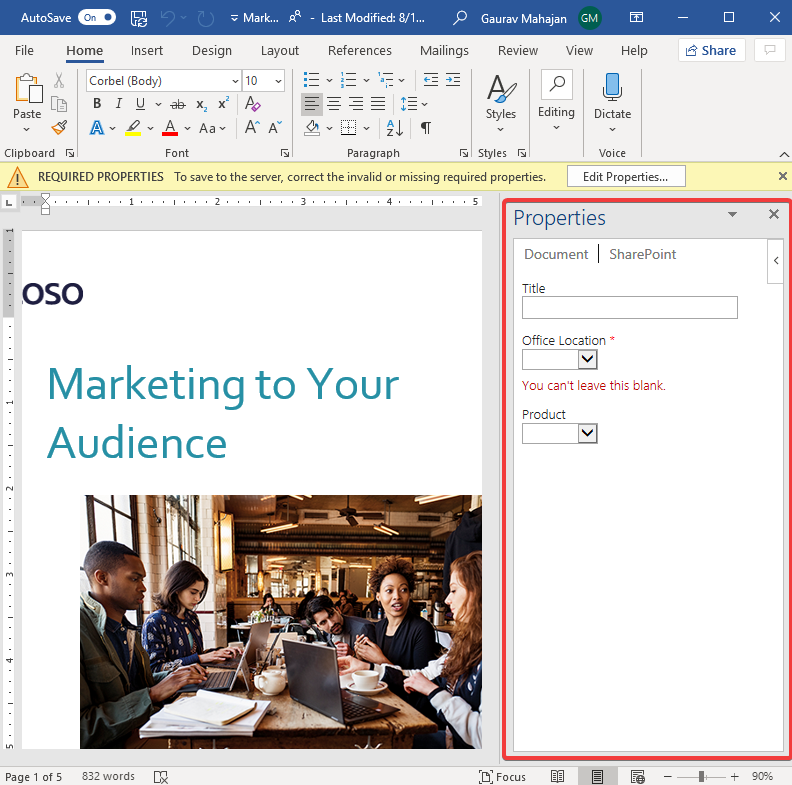
This property pane is also sometimes referred to as the Document Information Panel. The Office client will save your document to SharePoint once you update its properties through this panel. This experience is similar to the desktop app authoring experience that we discussed in the Creating a new document recipe earlier in this chapter.
See also
- The Viewing and editing documents in the browser recipe in this chapter
- The Adding alerts recipe in Chapter 4, Working with Lists and Libraries in SharePoint Online
- The Versioning settings, content approval, and document checkout recipe in this chapter
Downloading documents
In addition to viewing and editing documents in browsers or client apps, you can also download them for offline viewing. This recipe shows you how to do that.
Getting ready
You will need Read permissions or higher on the document that you'd like to download.
How to do it...
To download a document, follow these steps:
- Browse to the library that contains the document that you would like to download and select the document that you would like to download.
- Click the Download option from the menu at the top:
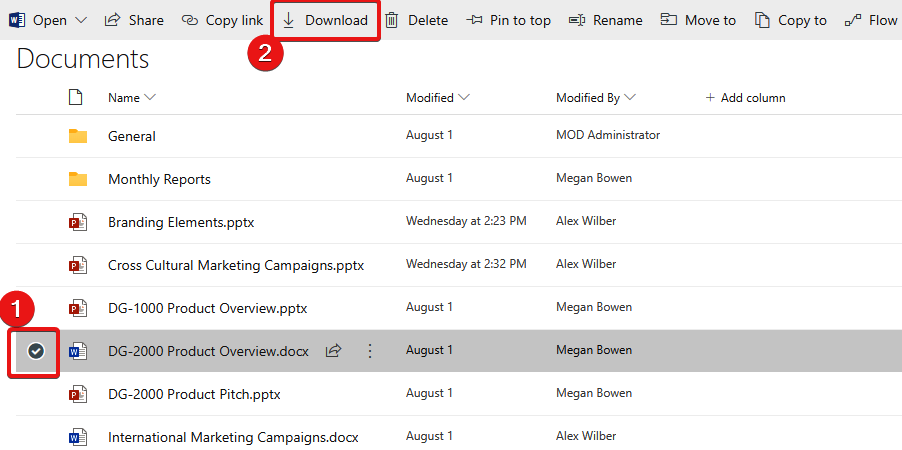
That's it! You just downloaded a copy of the document for offline use.
How it works...
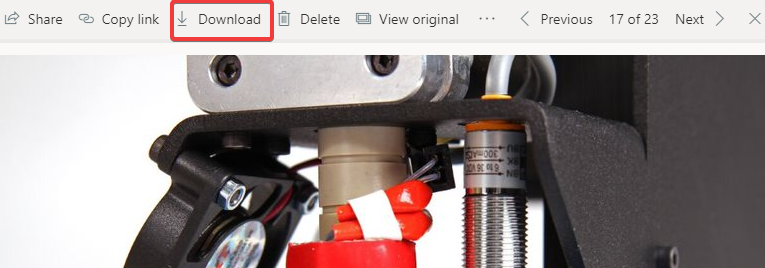
You can download any file for offline viewing and editing. For file types that you can view in the browser, Office for web provides two different ways of downloading the files, depending on the file type:
- For Microsoft Office documents, once you have the document open in your browser window, you can click the File menu, then Save As, and then Download a Copy. You will also see some additional options depending on the type of Office document that you are viewing (Word, Excel, or PowerPoint). Word, for example, additionally presents a Download as PDF option:

- For all other file types, you will be able to download the file by clicking the Download option in the top menu bar, which appears when viewing those files in the browser, as shown in the following screenshot for an image file:
When you download and edit files this way, they are not connected to SharePoint online, meaning that your local edits to the documents will be saved locally and not to the cloud. Downloading files this way should, therefore, be avoided unless you have a very specific need that requires you to use an offline and disconnected copy of the file. For Microsoft Office file types, you can use the connected browser and desktop editing experience that we previously discussed. For viewing and editing non-Office file types, it is recommended that you use the Syncmenu option to locally sync the documents from your library. Once you do that, any changes you make to the local files will continuously be synchronized with the online document. We will discuss OneDrive and how the sync works in more detail in a subsequent chapter.
See also
- Chapter 7, OneDrive for Business
Moving and copying documents
You can copy or move your documents from one site to another site in your tenant. In this recipe, we will see how to copy a document to a different library in another site.
Getting ready
To copy a document, you will need Read access to the library from which you are copying the document. If you are moving a document, you will need Contribute permissions or higher from where you are moving the document.
In addition, you will need Contribute access to the library where you are moving or copying the documents to.
How to do it...
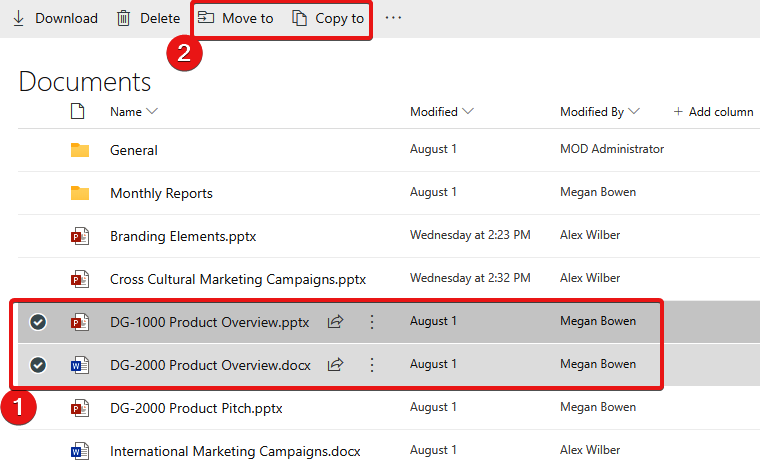
To copy or move one or more documents, follow these steps:
- Browse to the library that contains the documents that you'd like to copy or move.
- Select the documents that you'd like to move or copy and click the Move to or Copy to options in the menu at the top, as shown in the following screenshot:
- Choose a destination to move or copy your file to. You can choose from the following options, as shown in the following screenshot:
- Create a copy of the file within the same library
- Move or copy the file over to a folder in your OneDrive
- Choose a library from a list of recently used sites
- Browse to a site not shown in the list of recently used sites:
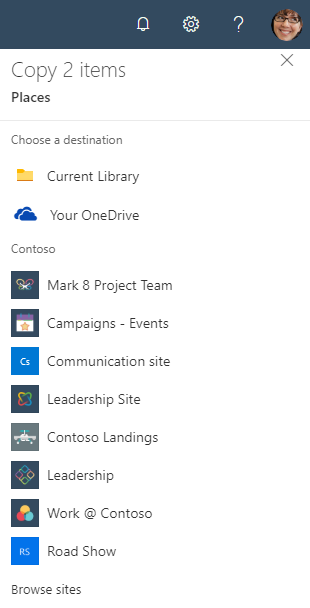
We will select the Road Show site for this example.
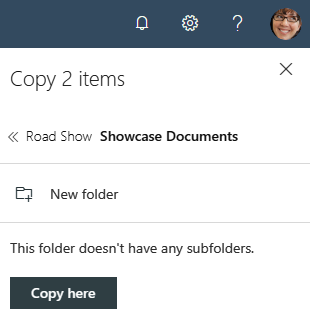
- We will then select a library on this site.
- If needed, we can further create new folders, or select existing subfolders, and then click Move here or Copy here to move or copy the files over to the selected library:
That's it! You just learned how to copy or move files in SharePoint to another destination within SharePoint or OneDrive.
How it works...
Copying or moving files in SharePoint Online is quite similar to copying or moving files on your computer. If you are moving a file, the source file is deleted. If you are copying a file, the source file is maintained and a new copy of the file is created in the destination. Similar to when you are copying or moving files locally, SharePoint provides appropriate indicators when the file operation starts and once it succeeds or fails. The one difference between the copy and move operations in SharePoint is that since copying effectively creates a new file in the destination, certain properties of the file such as the version history do not carry over. Moving the file, on the other hand, results in the version history also being brought over to the destination file.
Also, if you have custom metadata associated with the document being copied or moved, that metadata is copied over along with it as long as the destination library has the same column as the source to store that information.
Finally, please note that at the time of writing, SharePoint restricts the maximum size of a copy or move operation to 100 GB, when the operation is across two sites. You can read more about this here: https://m365book.page.link/Move-Copy-Limits.
Viewing and changing document library settings
We saw several list settings as part of the Viewing and changing list settingsrecipe in Chapter 4,Working with Lists and Libraries in SharePoint Online. As mentioned earlier, libraries are an extension of lists, and hence these settings also inherently apply to libraries. They, however, also have a few additional settings of their own that are relevant to the way you work with files and documents.
We will look at some of these settings as part of this recipe. As an example, we will see how to change the default way that browser-enabled documents open. When you click on a document in a library, the default setting results in SharePoint opening the document in the browser. However, as described in the 'Viewing and editing documents in the browser' recipe, earlier in this chapter, the browser editing experience has its limitations. You may, therefore, require the documents in a particular library to open in the corresponding office clients so you can get that rich editing experience. This recipe will show you how to do that.
Getting ready
You will need Edit, Design, or Full Controlaccess to the library that you'd like to view or change the settings of.
How to do it...
To change the default open behavior for documents in a library, follow these steps:
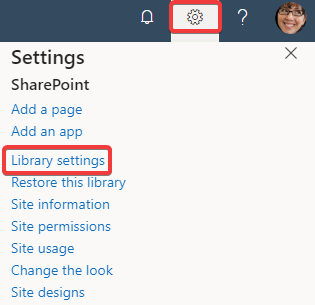
- Browse to the library for which you would like to change this behavior.
- Click the settings gear icon in the top-right corner.
- Click Library settings,as shown in the following screenshot:
- This takes you to the Settings page for the library. Here you can view and modify various settings for the list.
- Click the Advanced settings link and scroll down to the Opening Documents in the Browser setting.
- Select the Open in the client application option.
- Click the OK button the bottom of the screen.
You just changed the default open behavior for browser-enabled documents. Clicking a document in the library will now prompt you to directly open it in the corresponding client app.
How it works...
As we saw in earlier recipes, working in the client has its advantages as well as drawbacks. This means you will want to carefully choose the default open behavior based on the specific needs of your team. Also note that since you can edit only Microsoft Office documents directly in the client, this setting will only impact those file types. Other files will continue to open in the browser (for file types that support browser viewing) or will get downloaded, based on the file type.
Some of the other settings relevant to documents are as follows:
- General Settings – Advanced settings – Offline client availability: This setting prevents documents in this library being synced locally using the OneDrive sync. Note that users can still download these documents – it's just that they will not be synced through the OneDrive sync client.
- General Settings – Column default value settings: This is one of the more useful but overlooked settings in SharePoint Online. This settings page helps you to define default metadata values for your library, based on the folder that the documents are being saved to. As an example, let's assume there's a Policies library in your intranet site that is used to share the policies across various departments in your organization. The library has department-based folders (such as Communications, Finance, and H.R.) and then sub-folders to hold relevant policy documents. Let's also assume the library has a metadata column called Department so you can tag each policy document by the department it belongs to. You can now define default values for this column so that any documents uploaded to the library get automatically tagged by the department name depending on the folder they are being uploaded to. An example of this is shown in the following screenshot:

In the preceding screenshot, #1 represents the folder (and any subfolders) for which the default metadata is being defined, #2 represents the metadata column (and its type) for which the value is being configured, and #3 represents the default value that will be applied when documents are uploaded to the folder.
- Permissions and Management – Manage files which have no checked-in version: This page shows a list of all files that do not have a checked-in version. We will learn about this setting as part of the next recipe, Versioning settings, content approval, and document checkout.
See also
- The Viewing and changing list settingsrecipe in Chapter 4, Working with Lists and Libraries in SharePoint Online
- The Viewing and editing documents in the browser recipe in this chapter
- The Viewing and editing documents in the client recipe in this chapter
- The Enabling versioning and requiring checkout recipe in this chapter
- The Adding a Content Type to list or library recipe in Chapter 6, Term Store and Content Typesin SharePoint Online
Versioning settings, content approval, and document checkout
The Versioning Settings page lets you control various settings related to document life cycle management, such as document versioning, approval, Check out, and draft document visibility.
In this recipe, we will change the versioning settings to require document Check out. Enabling this option results in the users having to first check out the document before they can make changes to it. This essentially locks down the document exclusively for their editing use. Once a document is checked out, other users will not be able to edit that document unless it's checked in again by the user editing it. Anyone with Read access or higher can still view the document. However, the version of the document that they will see is the one that was last checked in. They will not show the edits that the user who checked out the document is currently making until after they Check in the document.
Getting ready
You will need Edit, Design, or Full Control access to the library for which you'd like to view or change the versioning settings.
How to do it...
To require Check out for the documents in a library, follow these steps:
- Browse to the library settings page as described in the previous recipe.
- Click Versioning settings in the General Settingssection.
- On theVersion Settingspage, scroll all the way down to the Require Check Outsection.
- SelectYesfor Require documents to be checked out before they can be edited?.
- Click OK to save your changes.
- Go back to the library by clicking on the library name in the breadcrumb navigation, as shown in the following screenshot:

- Click any document to open it.
- If your document opened in the browser, you will notice a new Edit Document menu option in the top-right corner of the screen, as shown in the following screenshot:

- Click Edit in Browser and notice that Office Online now requires you to check out the document before editing it:

- Close the browser tab containing the document and go back to the library.
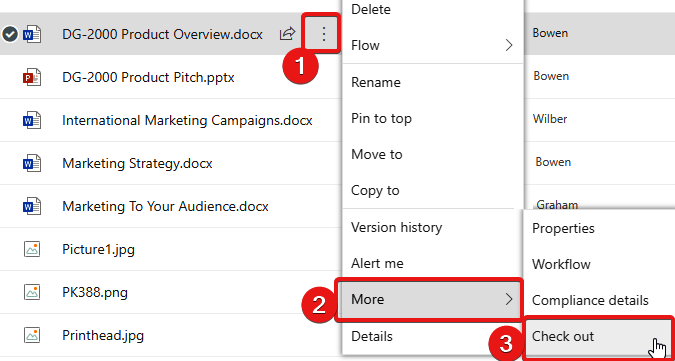
- Click the ellipses next to the document name.
- Click More and then Check out, as shown in the following screenshot:
- Click on the document to open it again in a new browser window.
- Notice that the Edit Document option no longer appears and you are now able to directly make changes to it.
- Close the browser tab to go back to the library once you have made the required changes to your document.
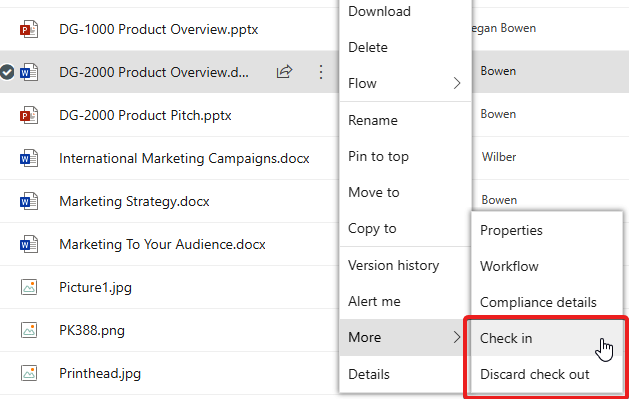
- In the library view, click the ellipses next to the document name again and then click More.
- You can now clickDiscard check outto undo your changes or click Check into save your changes to the document, as shown in the following screenshot:
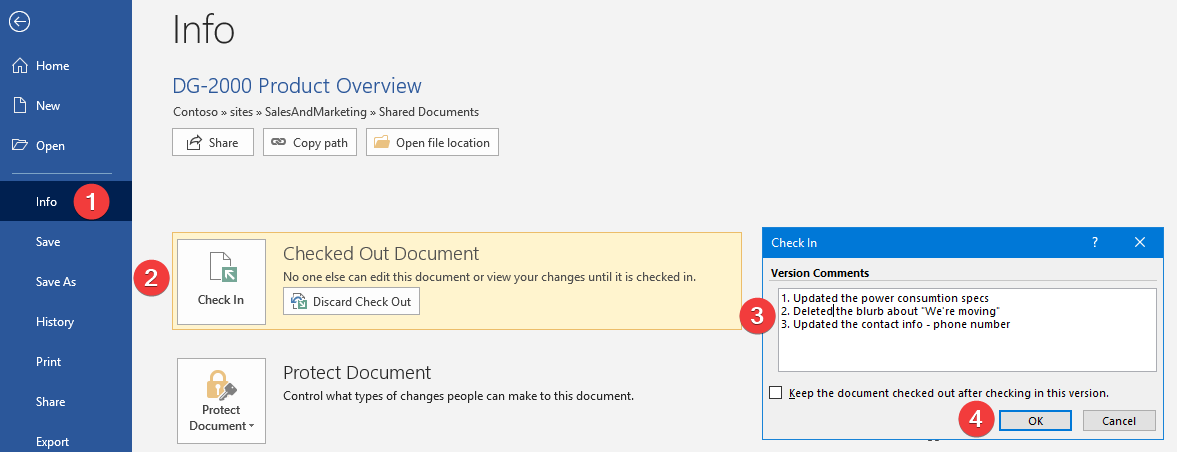
- Clicking Check in opens a window that lets you enter comments for your Check in, as shown in the following screenshot:

- Then click Check in again on the comments screen to Check in your changes and make them visible to others.
You just saw how to enable document Check out for your library. You also saw how to work with documents in a library that requires you to check them out before they can be edited in a browser. The process is a little different for documents that open in the client. We will look at that process as part of the next section.
How it works...
Requiring document Check out is not usually recommended due to the following reasons:
- You cannot co-author: Checking out a document locks it for your exclusive editing and no one else can make changes to it unless it's checked in again. For this reason, co-authoring is not possible on documents in a library that requires document checkout.
- Additional steps are required to create and edit files: For libraries that require Check out, additional steps, such as checking out the documents and then checking them back in, are needed for the documents to be created and for the changes to be visible to others. These additional steps are usually a deterrent to user adoption.
- People forget to Check in: It is not uncommon for users to forget to Check in their changes. At other times, users accidentally Check out the wrong documents for various reasons. This leaves stale checked out documents in such libraries. Someone with appropriate access then needs to go back and either discard these documents (which results in the users losing their changes) or contact individuals to Check in their documents. It can become cumbersome and time-consuming for the library owners to do that.
It makes sense to require checking out in these situations:
- Large viewers and very few collaborators: Requiring Check out inherently allows the document author to make and save changes to it without making those changes visible to rest of the viewers of the file. Others continue to see the previously checked-in document. This is useful in scenarios where you have very few people authoring the documents in that library but a large audience viewing them. Examples of such libraries are organization policy documents, guides, expense forms, and Excel templates.
- Required metadata: If you have libraries that require metadata to be entered, enforcing the Check out/Check in process ensures that the metadata is filled in. If Check out is not required and the users save the document without entering the mandatory metadata, SharePoint will provide an indicator that the metadata is missing but will still allow the users to save such documents. If however Check out/Check in is enabled on that library, SharePoint will prevent users from checking in the documents unless all required metadata is entered.
Other versioning settings
The Versioning Settings additionally let you control the following options for your SharePoint lists and libraries:
- Content Approval: This setting allows you to control whether new documents or revisions to existing documents in the library should undergo content approval or review before they become visible to other users. This is a useful feature if you would like your documents to be reviewed and/or approved before they are visible to a broader group of visitors to your site or library. An Approval Status column is added to the library once content approval is enabled for it. When a new document is uploaded or changes to an existing document are submitted for such a library, the status of the document is changed to Pending. Only users that have the authority to approve documents (typically users having the Design or Full Control permission to the actual document) can view such newly added documents or view changes to existing documents at that point. Such approvers can then approve or reject the changes and the Approval Status for the document is accordingly updated. Upon approval, the changes in the document become visible to regular users. You can read more about content approval in this support article here: https://m365book.page.link/Require-Approval.
- Document Version History: The different options within this setting allow you to specify whether a copy of the document is maintained each time it is edited. Versioning is turned off for lists by default, but you can turn it on. For libraries, versioning is always on and cannot be turned off. In addition to enabling major versions (1, 2, 3...) you can also enable minor versions (1.0, 1.1, 1.2 ...). Minor versions are typically only used along with content approval and publishing scenarios where you would like to Check in your draft (minor) changes from time to time. This also allows content approvers to review the changes before they are published as a major version and become visible to everyone that has access to the item. In addition to enabling major versions (and optionally minor versions), you can also set a limit on the number of versions that SharePoint should keep.
Once versioning is enabled, SharePoint maintains an audit trail of all the edits that were made to your list item or document. You can use the ellipses next to a list item or a document to view all the changes that were previously made to that item by date and time. If Check out was required for the library, this screen will also show you any Check in comments that your co-workers might have entered to describe the changes made to the document as part of that Check in.
As shown in the following screenshot, you can also click on a particular date and time entry to view, restore, or delete a historical version of the item at that point in time:

- Draft Item Security: This setting allows you to specify who can see document drafts in your library. This setting is only available if minor (draft) versions are enabled in your library or if you have required content approvals for items in your list or library. You would typically keep this option set to the default value, which allows only the document author, approvers, and the library owners to see the draft (minor) versions of the documents.
- Require Check out: You can use this setting to specify whether users need to Check out documents before they can make changes to them. We saw this setting in great detail in the preceding recipe.
There's more...
In this section, we will discuss the effect of requiring Check out and enabling versioning on co-authoring and opening documents in the client.
Checkout process for documents that open in the client
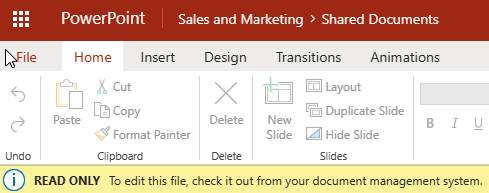
The preceding recipe described the steps to Check out and open documents in a browser. This experience is a little different when you open your documents directly in the desktop client or app. You will see a message toward the top of the client app if your library requires documents to be checked out, and you open a document from such a library in the corresponding client app:

You can then click Check Out and make changes to your document as usual. Since the document was opened from a SharePoint online document library, your changes to it will automatically be saved to the library. You will, however, need to Check in the document for your changes to be visible to others. To do so, follow these steps:
- Click the File menu and then Info.
- Click Check In to initiate the Check in process.
- Enter the Check in comments describing the changes you've made.
- Click OK to Check in your changes to the document, as shown in the following screenshot:
This will then Check in the document and make your changes visible to others in the organization.
Co-authoring and versioning settings
When checkout is not required in a library and two or more users are working with the same document from that library, SharePoint will keep synchronizing and saving the changes being concurrently made by the users. This save operation occurs frequently (within a matter of seconds) and SharePoint will record the name of the last person to make the changes when this save operation occurs.
See also
- The Viewing and editing documents in the browser recipe in this chapter
- The Viewing and editing documents in the client recipe in this chapter
- The Viewing and changing list settings recipe in Chapter 4, Working with Lists and Libraries in SharePoint Online
- The Viewing and changing list permissions recipe in Chapter 4, Working with Lists and Libraries in SharePoint Online