Microsoft Teams is your hub for collaboration in Microsoft 365. While it provides a chat-based workspace that lets you have instant threaded communication, video chats, and meetings with your peers, it also provides a collaboration space to work together and share information. Teams' deep integration with SharePoint and Microsoft 365 groups can change the way your team members communicate, collaborate, and interact with others. The collaboration experience is further enriched by the integration capabilities that Teams provides with other applications.
Those of you who are familiar with Skype for Business (Microsoft's instant communication application) might wonder what’s the difference between Skype for Business and Teams. One of the key aspects of Teams is that, unlike Skype for Business, conversations within Teams are threaded around a specific topic. So, conversations always have a context. Besides conversations, Teams also brings together other Microsoft 365 collaboration services, such as groups, Planner, OneDrive, and SharePoint. Teams also supports connectors to numerous third-party applications, such as Trello, GitHub, Evernote, SurveyMonkey, and so on.
In this chapter, you will learn about the following:
- Installing Teams
- Creating a new team
- Adding a member
- Joining a team
- Leaving a team
- Deleting a team
- Creating channels and tabs
- Initiating conversations via posts
- Scheduling a meeting
- Sharing files
- Searching within Teams
- Adding a connector
Installing Teams
Teams can be accessed from both the web browser (which doesn't require any installation) and the Windows app (which requires an installation). There are some benefits to installing the Windows client as some of the features are not supported on the web (although the web client is catching up fast with its app counterpart). One key difference between the two versions is that the web version requires you to be logged in to your Office account in order to receive notifications. The Teams client, on the other hand, runs in the background, even while you are working on a different application. So, the user receives notifications about team activities and individual messages. Once installed, new updates are applied automatically to the Teams client. It checks for updates every time the client is launched.
In this section, we will learn how to install the Teams app.
Getting ready
To access the Teams app, you need the appropriate Microsoft 365 license plan as described in Chapter 1, Overview of Microsoft 365
Microsoft also provides a Commercial Cloud Trial offer for existing Microsoft 365 users in your organization. They can try the product for 1 year without being licensed for Teams.
How to do it...
To install Teams, follow these instructions:
- Go to www.office.com.
- Sign in with your work account as described in Chapter 1.
- Click on Teams (shown in the following screenshot):
- You will be prompted to download the desktop version by a pop-up screen, as in the following screenshot:

- Click the Get the Windows app button to get the client version of Teams.
This will download the client application installer for you. Running the installer will guide you through the installation process and install Teams for you. You can then sign in to the Teams desktop app by using your organization credentials.
How it works...
Although Teams has a web and client version, the user experience on the web and desktop applications is strikingly similar. The ability to join video calls and share your screen is supported on both the desktop app and the web version (only Edge and Chrome are supported at the moment). However, some features, such as the ability to host "live events," are only available on the desktop version:

Teams Top Panel
The Top panel in the Teams interface provides the following options:

- Allows you to navigate back and forth between Team views.
- Allows you to compose a new chat message (explained in the Chat section that follows).
- Allows you to perform a search and invoke commands (explained in the Searching within Teams recipe in this chapter).
- Allows you to change organization: you will see other organizations in this section if you are invited to collaborate with external teams outside of your organization.
- Clicking the profile picture provides additional settings, such as:
- Setting availability (Available, Busy, so on)
- Setting a status message (for example, I am working from home today)
- Accessing Saved messages (discussed in the Initiating conversations via posts recipe in this chapter
- Updating General Settings such as:
- Choosing a Teams skin color
- Setting default audio devices for Team calls
- Managing notifications (discussed in the Creating channels and tabs recipe in this chapter
- Setting keyboard shortcuts for common Teams tasks
Teams Left Panel
The panel on the left lets you navigate through various features within Teams. Please note that some feature icons might be hidden under ... icon. Let's look at some of these features in more detail.
Activity
Clicking on the Activity tab takes you to the activity feed. This feed rolls up notifications related to all your team channels and team conversations and one-on-one chats or calls. A notification appears in your activity feed when someone does the following:
- Mentions you
- Mentions a team you are part of
- Mentions the channel of the team you are part of
- Replies to your post
- Likes your post
- Adds you to a team
- Makes you a team owner
- Leaves you a chat message
- Calls you (and you missed the call)
If you have any unread notifications and you are not in your activity feed, a red circle with a number appears next to theActivityicon:

Under Activity | Feed | My Activity, you will see all the messages that you posted on any of your Team channels
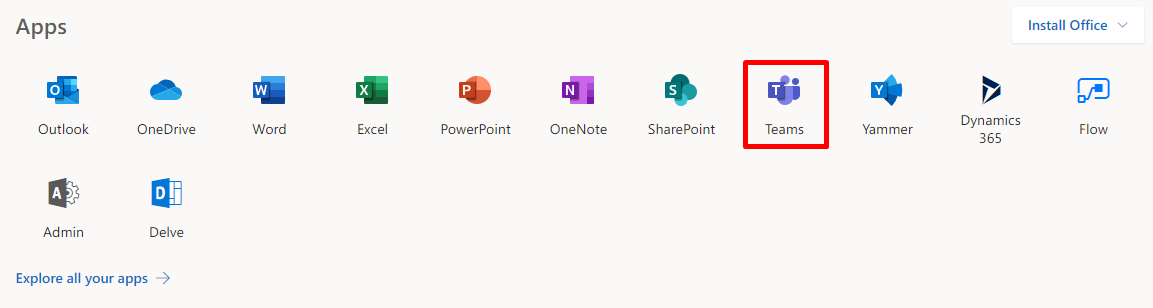
Clicking the filter icon next to the Feed icon displays a text box that lets you type free text, thereby filtering the search results:

You can also click on the ... icon to filter the search results by a certain type:
Clicking the gear icon next to the filter icon takes you to Team settings page, as described
Chat
The Chat tab lets you initiate a chat with an individual or a group. You can have threaded conversations with one or more people. You can also share files by uploading the files in the chat window or just by dragging them to the conversation text window. The files are automatically uploaded to OneDrive and participants receive a link to access them:
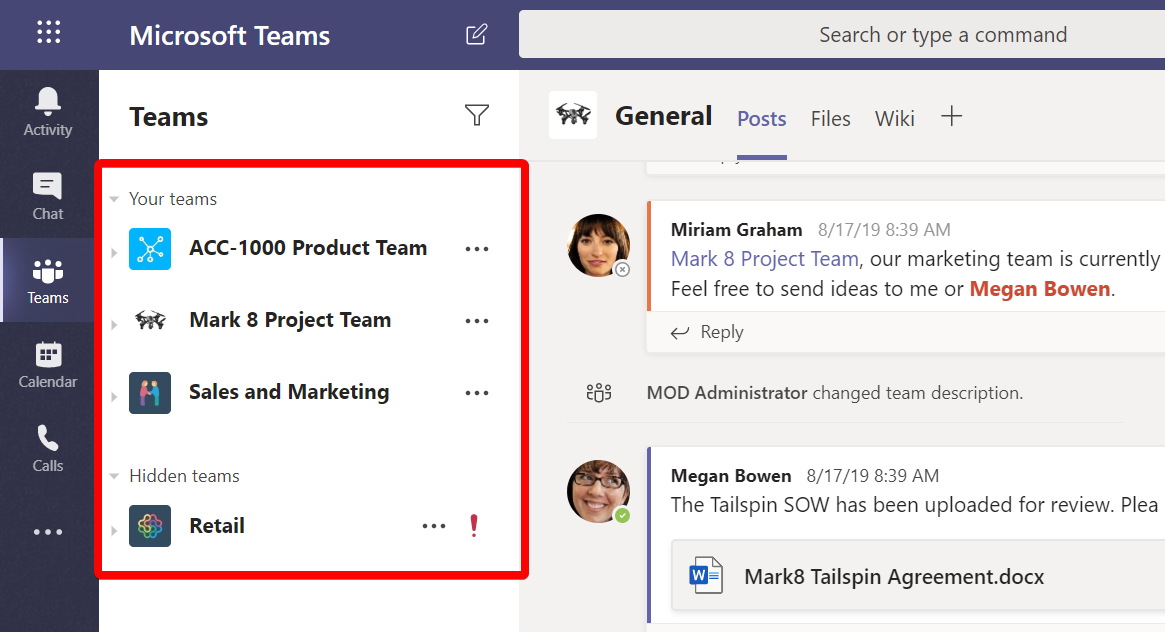
Teams
The Teams tab displays all the teams that you are part of. It also lets you join or create a team:
Every team that you create has a default General channel to start with. Channels let you create focus areas, such as a specific topic, department, or project. We'll learn about channels shortly.
If you are a team owner, you can add more channels:

Each channel gets its own area for posts and a storage place for channel-specific files in SharePoint:

We will learn about channels in the Creating channels and tabs recipe in this chapter.
Calendar
The Calendar option lets you schedule team meetings or audio/video calls with an individual or team. Read more about the Calendar in the Scheduling a meeting recipe
Calls
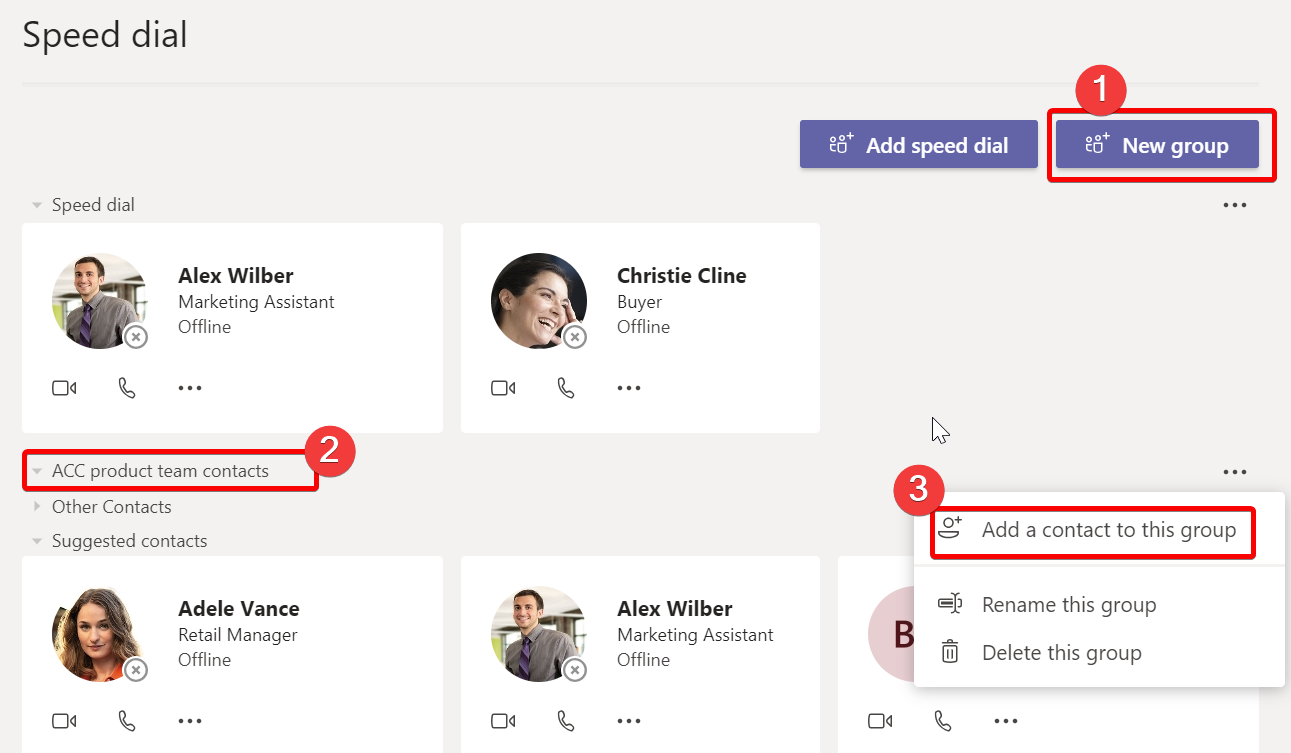
The Call option lets you make audio/video calls with an individual or team. Clicking on this tab, takes you to the Speed dial page where you can see people you frequently interact with. You can add people to your speed dial for quicker access:

You can also create a group to logically club them based on your interactions with them as shown in the following screenshot. To add people into a group, you need to create the group first (1) and then add people (3) into the group (2):
You can access your contact list by selecting Contacts. You can add internal or external contacts from this screen:

You can check the history of calls that you placed or received using the History link.
Teams also support voicemails. People can leave a voicemail for you if you are unable to attend the call. The good thing about voicemails is that it even generates a transcript of the message. So, you can choose to read the message instead of listening to it. This is especially handy when someone leaves you a voicemail while you are in a meeting. Instead of attending the call, you can glance through the transcript of the voicemail.
Read more about Calls in theScheduling a meeting recipe.
Files
Finally, the Files option displays all the files that you have access to or files that have been shared with you in Teams, OneDrive for Business, or SharePoint. The Location column displays where the file actually resides (including other cloud locations like dropbox, google drive, etc.)

You can access your OneDrive files by clicking on the OneDrive link on the left. You can move or copy your files from OneDrive to Teams using the context menu.
There's more...
Microsoft Teams also comes with a free version that can beusedfor chats, file sharing, and video calling. The features that it offers have been listed on the Office website. You can access this at https://m365book.page.link/teams-free.
Microsoft Teams supports keyboard shortcuts and might be handy for those who prefer the keyboard. You can find Teams keyboard shortcuts for Windows and Mac listed in the following link: https://m365book.page.link/teams-shortcuts.
Creating a new team
Microsoft Teams is your one-stop-shop for accessing all your Microsoft 365 applications. Teams enables collaboration; team members achieve more together when all their chats, meetings, files, and apps reside in a single workspace. Creating a team does a lot in the background. It provisions a SharePoint site for you, along with a Microsoft 365 group for the team. Teams lets you connect with other services within Microsoft 365, as well as with third-party apps (via connectors).
In this recipe, we will learn how to create a new team.
Getting ready
You should be able to create a new team as long as your organization has assigned you a valid Teams license and has enabled Team creation.
How to do it...
Follow these steps to create a new team:
- Click on the Join or create a team option:

- Clicking Join or create a team actually takes you to the Join or create a team screen where you can join one of the existing teams, join a team with a code, search for an existing team to join or, create a new team.
- If you Create a new team, you can choose to create a new team (which creates a Microsoft 365 group in the background) or connect the team to an existing Microsoft 365 group. Those of you who are already using Microsoft 365 groups can use the latter option to connect your existing group to Teams:

- You will then be asked whether you want to create a private, public, or organization-wide team.
- Give your team a name.
Now, you have created your own team.
How it works...
We just learned how to create a new Team from scratch. The other option lets you convert an existing Microsoft 365 group into a team. As it turns out, Microsoft 365 groups were released before Microsoft Teams. So, this option allows you to upgrade to Teams, any such groups that were created before Teams was released. We will discuss this more in the next section.
Based on its privacy, a Team can be of the following types:
- A private team: This is a restricted area that is only accessible to the team members.
- A public team: This Team is available to join for everyone in the organization.
- An organization-wide team: This adds all of the organization's staff to a team. Only global administrators can create organization-wide teams. You will automatically be added to an organization-wide team unless your administrator has explicitly disabled your Teams account.
There's more...
The following key considerations should be kept in mind while creating teams:
When you specify the team name while creating a Team, Microsoft 365 doesn't validate whether a Team with the same name already exists. It will instead let you create another one with the same name, as shown in the following screenshot:
The new team with the same name then appears in the Teams interface.
This poses a challenge because a SharePoint site is created for each Team and you cannot have two SharePoint sites with the same URL. In order to assign a separate storage space, Microsoft 365 adds a random number next to the Team name when provisioning the SharePoint site, which can then result in a lot of confusion. As an example, it created the following site for the second Team from the illustration above,https://m365x263078.sharepoint.com/sites/Sales774/Shared%20Documents.
It is, therefore, recommended that you check for an existing team before creating one using the search option on the team creation page, as shown here:

Team owners can assign an email address to each team channel. The email address cannot be changed or modified. The email address assigned is random and appears in your organization's global address list. This feature has some benefits, which we will see later.
See also
- The Joining a team recipe in this chapter
- The Leaving a teamrecipe in this chapter
- The Adding a memberrecipe in this chapter
- The Removing a memberrecipe in this chapter
- Chapter 10, Microsoft 365 Groups
Adding a member
You can add new members to an existing team. They can belong to the same organization or can be added as a guest from another organization. A team can hold up to 5,000 people.
Member of a team can have one of the following roles:
- Owner: The team owner manages the settings for the team. The owner can do the following:
- Add and remove members.
- Add guests.
- Change team settings.
- Restore deleted files or older versions.
- Member: Members are added to a team by the owner. Members can do the following:
- Post messages.
- View, upload, and change files.
- Schedule team meetings.
- Guest: Guests are people outside your organization. They can only be invited by the team owner. They can post messages and share files with the team.
Follow the instructions provided in the next section to add a member to a team.
Getting ready
Members can be added to a team by the team owner. Only an owner can promote another member to the Owner role.
How to do it...
To add a new member:
- Select Teams from the left-hand side pane.
- Click on the ... link next to the team name.
- This brings up a context menu with an Add member option.
- Type the name of the person you would like to add.
- Change the role of the member to Owner (if you have owner privileges).
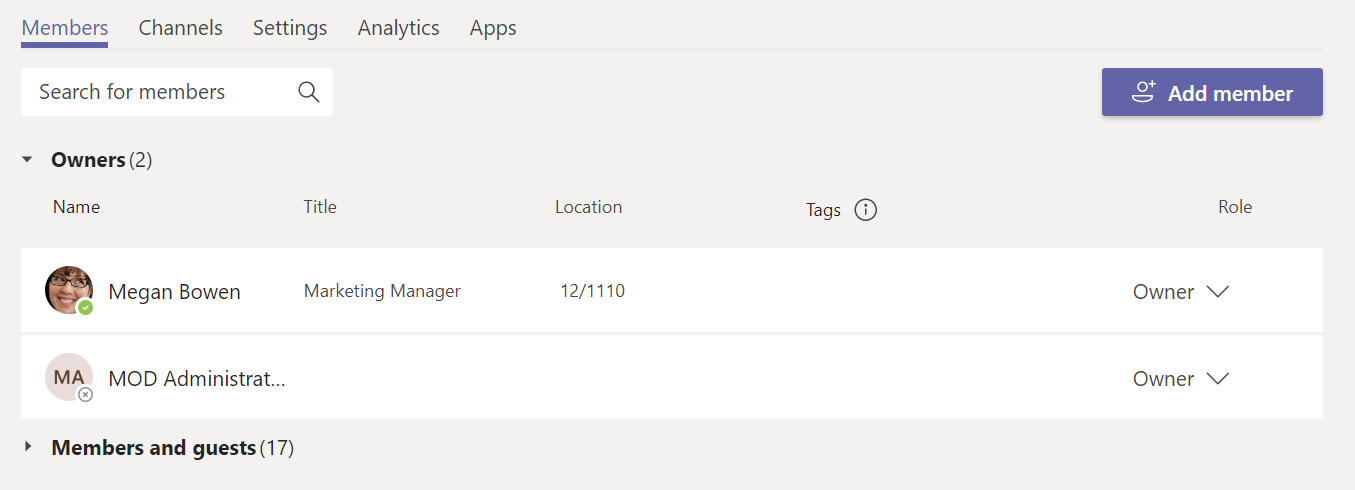
The team members section will look as follows:
How it works...
The new member automatically gets access to all the related Microsoft 365 services, such as SharePoint, Planner, and Microsoft 365 groups. The new member receives an introductory email after being added.
You, and other members of your Team, are notified via the General tab about new members being added to your team:
What a member or a guest can or cannot do is set by the team owner through the Teams settings:

You can request to Join a Team even if you were not specifically added to it by an owner. We'll see how to join a team in the next topic.
See also
- The Joining a teamrecipe in this chapter
- The Leaving a teamrecipe in this chapter
- The Removing a memberrecipe in this chapter
Joining a team
You can join an existing team by either using the Join option (in the case of public teams) or asking the owner to add you as a member (in the case of private teams). This recipe will show youhow to join a new team.
Getting ready
You are added to an organization-wide team as soon as you are added to your organization's Microsoft 365 tenant. For public and private teams, you need to take the following steps.
How to do it...
To join a team, do the following:
- Select Teams from the left-hand side pane.
- To join a public team, click on the Join or create a team option.
- You should see all the publicly available teams.
- Click on the Join team option to join the team.
- To join private teams, the team owner will have to either add you as a member or send you a team code. A team code can be generated by going to Team | Settings | Team code.
- Click the 3 dots next to the team name -> Manage team | Settings | Expand Team code | Generate
How it works...
After joining a team, you can participate in team conversations. You can also view conversations that have taken place in the past. When you are part of a team, you can access all the channels within that team. Once you have joined it, the team starts to appear in the left-hand side navigation pane along with the other teams you are part of.
See also
- The Leaving a teamrecipe in this chapter
- The Adding a memberrecipe in this chapter
- The Removing a memberrecipe in this chapter
Leaving a team
If you think you no longer need to contribute to a teamor you find that a team is no longer relevant to you, you can leave the team. To leave a team, follow the steps provided in the next section.
Getting ready
You do not need special permission to leave a private or public team.
How to do it...
To leave a team:
- Select Teams from the left-hand side pane.
- Click on ... next to the name of the team you want to leave.
- Select the Leave the team option from the context menu, as shown here:

How it works...
When you click Leave the team, all the permissions associated with that team and its channels are revoked. You also lose access to the underlying SharePoint site and all the content within it.
See also
- The Deleting a teamrecipe in this chapter
- The Joining a teamrecipe in this chapter
Deleting a team
You need to be the owner in order to delete a team. In addition to deleting a Team from the Teams app, you can also delete it via the Outlook client, Outlook Web Access, or the Outlook mobile app.
Getting ready
You need to be the owner in order to delete a team. You can delete a team via the Outlook client, Outlook Web Access, or the Outlook mobile app.
How to do it...
- To delete a team, do the following:
- Click on ... next to the name of the team you want to delete.
- Select the Delete the team option from the context menu, as shown:
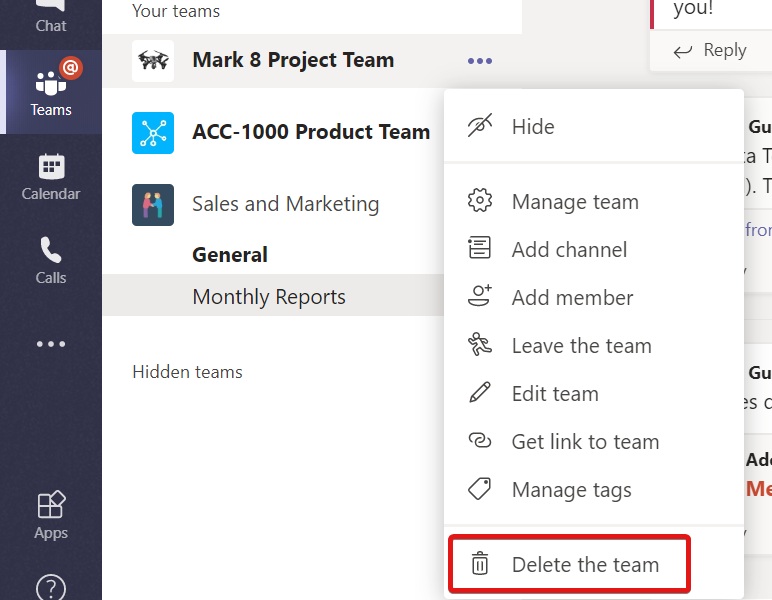
How it works...
By deleting a team, you lose all of its associated components, such as the team mailbox, calendar, SharePoint site, notebook, Planner tasks, and so on.
See also
- The Leaving a teamrecipe in this chapter
- The Joining a teamrecipe in this chapter
Creating channels and tabs
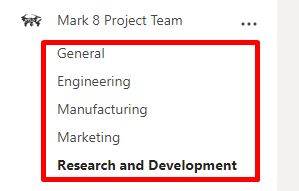
Channels are dedicated spaces that keep conversations and files around a topic together. Every team comes with a default channel named General but additional channels can be added. Every team supports up to 200 channels. All team conversations happen within a specific channel. The following section explains how you can create new channels and tabs.
Getting ready
Team owner can create new channels. The owner decides if members can create channels and tabs.
How to do it...
To add a channel:
- Select Teams from the left-hand side pane.
- Click on ... next to the name of the team you want to add a channel to.
- Select the Add channel option from the context menu, as shown:
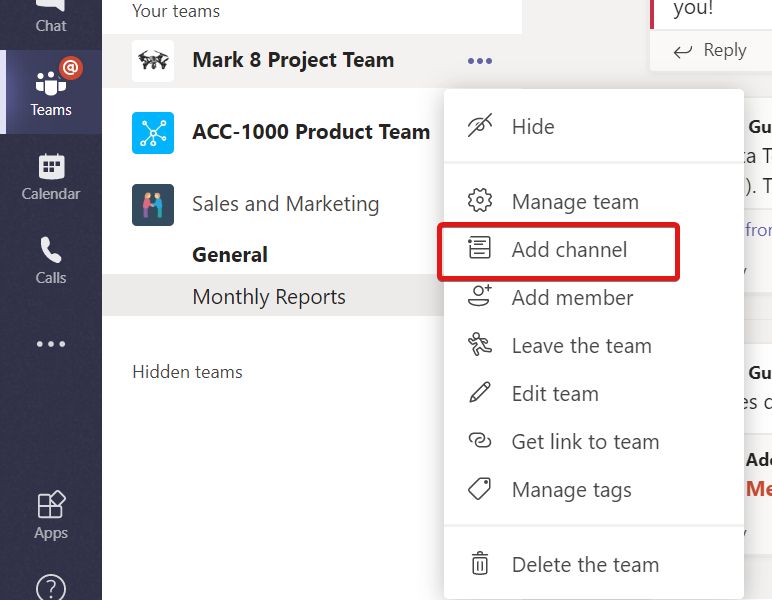
- Provide a channel name and set the Privacy option:

Adding a channel adds two tabs to the channel—one for conversations and the other for shared files.
Besides the standard apps, a channel lets you enhance the Teams experience by connecting other Microsoft 365 or third-party applications. You can use connectors for scenarios that include the following:
- Managing team backlog items in Trello
- Posting messages in your team channel using Microsoft Flow
- Enhancing team conversations using actionable cards
To add additional tabs, do the following:
- Click on the + symbol next to the Files tab.
- Choose an app from the list or search for it, as shown here:
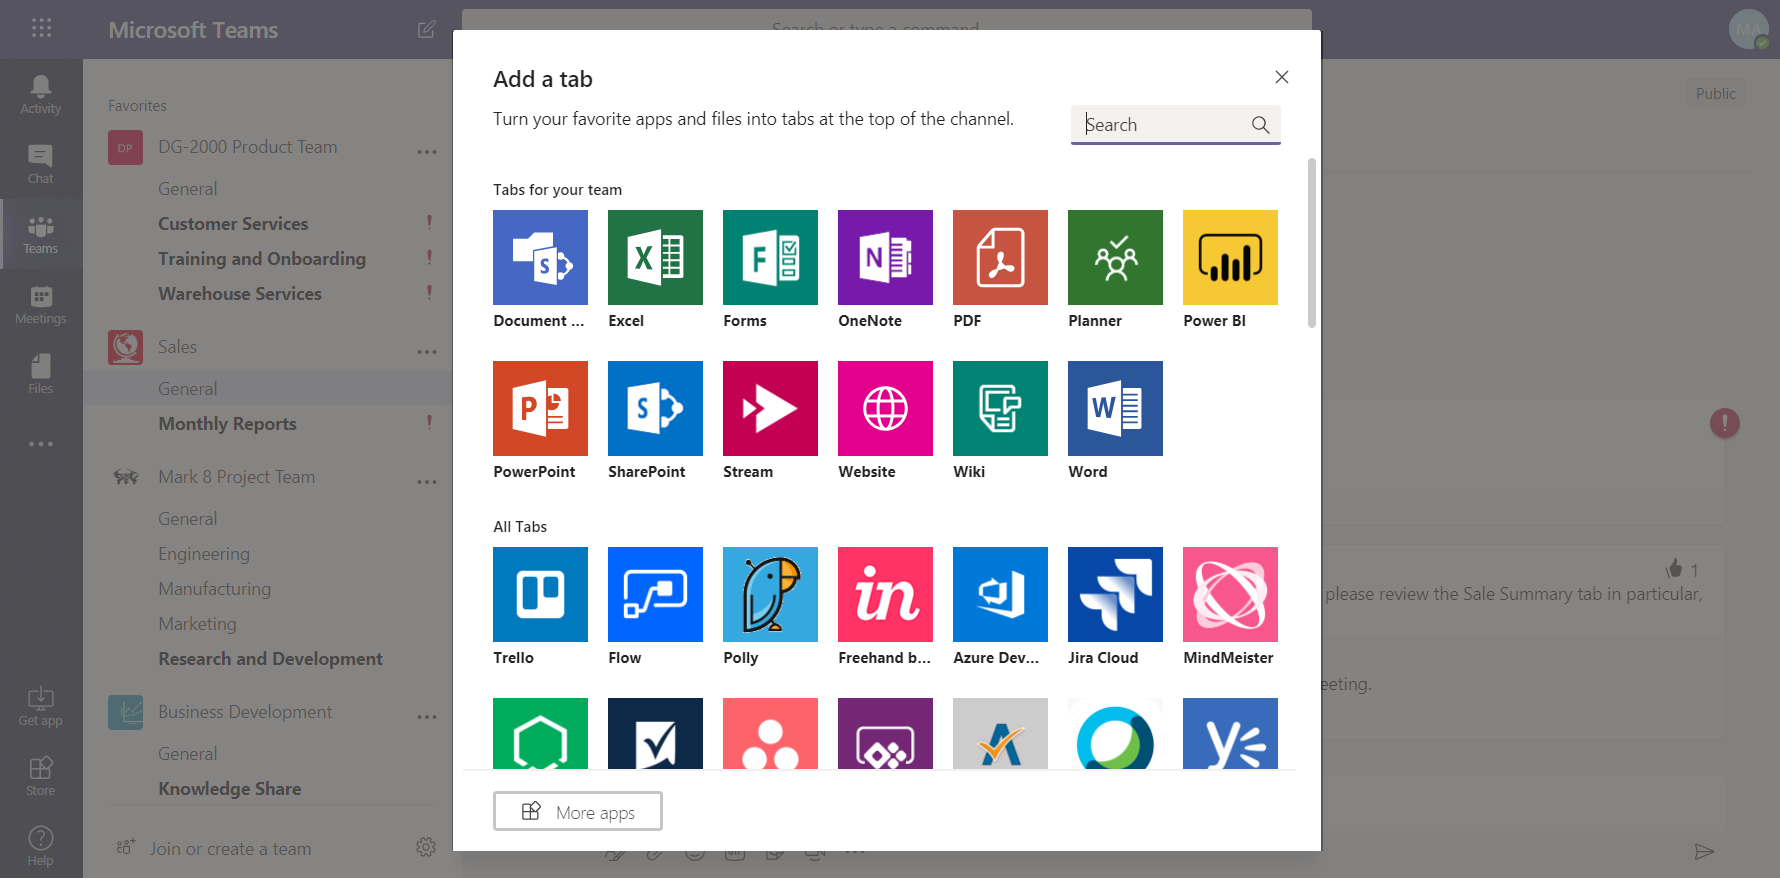
- Provide the details required for the specific app and click Save.
How it works...
Creating a channel provides you with a dedicated conversation area and a place to store all your files. Channels are public or private. All public channels in a team share a common SharePoint document library in a team site.
However, creating a private channel assigns you with a separate SharePoint site collection altogether. Owners or members of the private channel are the only ones who can access the channel.
Private channels appear with a lock icon (![]() ) in front of the channel name.
) in front of the channel name.
Tabs in the channel let you connect to both Microsoft 365 as well as to connect to other third-party apps to your team. There are two types of tabs:
Static tabs provide a personalized experience to each individual (such as a tab for your personal notes in the channel).
Configurable tabs need you to provide additional configuration information while adding the app, such as the following:
- In order to add a Power BI dashboard, you need to specify the workspace name.
- In order to add an Excel app, you need to provide the worksheet name.
Tabs offer interactive web content to the user without them having to leave the team's interface.
Showing or hiding teams and channels
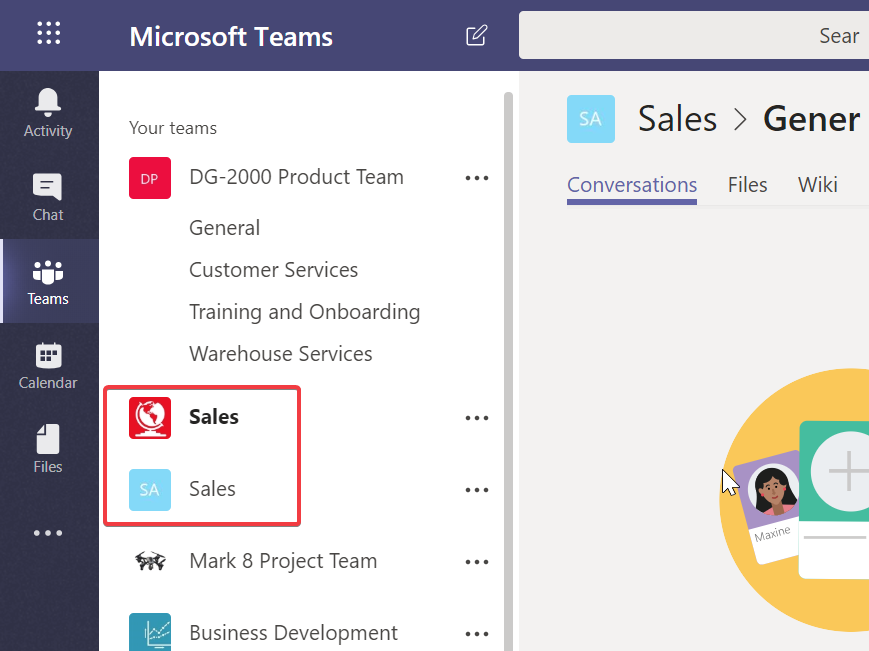
Keep your list of teams and channels tidy and relevant by hiding any teams or channels you don't want to see. Just click on the three dots (...) beside the team/channel name and select Show or Hide:

Hiding a team will remove it from your list of teams, but you can always access or show it again by expanding the Hidden teams section towards the bottom of the teams list. If you know you're a member of a team but you can't see it, you can scroll down to this section, locate your team, click the three dots next to it and then click Show to move it to the Your teams section:

Managing notifications
There are, broadly, three types of notifications that you receive in teams.
A banner: This alert pops up on your device (on desktop, your web browser, or mobile) even when you are using another application:

In the feed: A badge notification appears on the icon:
An email: A notification arrives in your inbox:

There are lots of different ways to access and manage these notifications in Teams.
A good place to start is via the notification settings—click your profile picture at the top-right of the screen (or initials if you don’t have a profile picture), then go toSettings | Notifications. This is where you can turn your notifications (and their associated sounds) on and off and select how you would like them to display. There are lots of things you can turn on and off, so you can either set it up to your liking or just stick with the default:
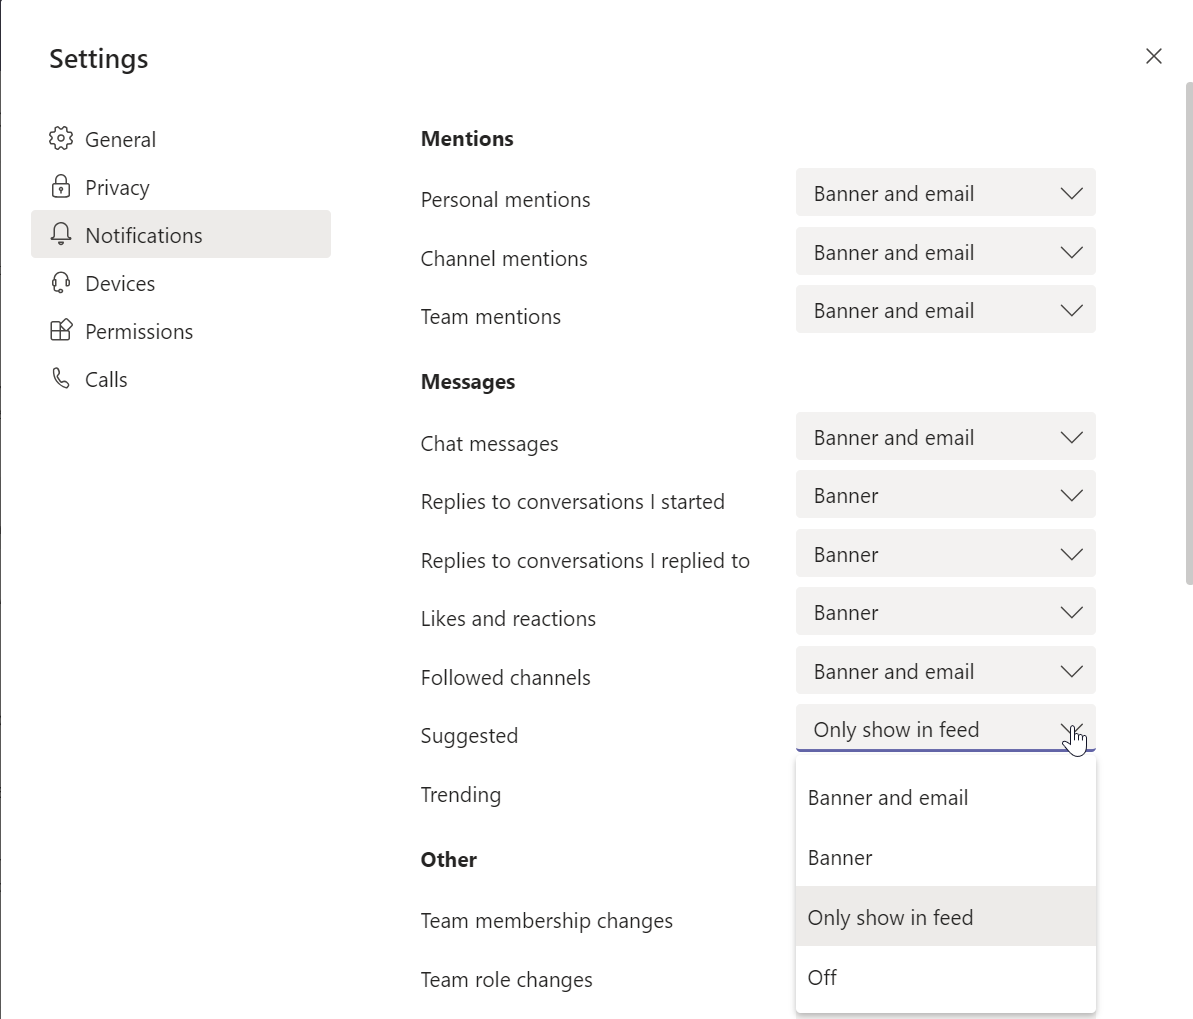
If you receive too many notifications, you can also reduce them by hiding a channel. Hidden channels will only show up in your list if a message is marked important or when someone @mentions you or the channel.
See also
- The Initiating conversations via postsrecipe in this chapter
- The Sharing filesrecipe in this chapter
Initiating conversations via posts
Posts or conversations can be described as group chats where everyone in the team participates. Conversations are located in a team channel. They can be viewed by all members of the team. Teams attempts to reduce reliance on the more formal and conventional mode of communication—email. The following section provides steps for how to initiate a conversation.
Teams is great for conversations with your teammates:
- Conversations are persistent—your conversation history sticks around and you can go back to it later.
- You can share files with offline participants.
- You can add GIFs and memes.
- The conversations are searchable—search for files, content, or people.
Getting ready
We mentioned earlier that every team can have one or more channels. The Poststab in the channel displays team conversations and other channel activity. All team members can view channel conversations and participate in them.
How to do it...
To initiate a conversation:
- Select Teams from the left-hand side pane.
- Click on ... next to the name of the team that you want to post in.
- Select a channel. You will see all the channel activity in the conversation area.
- To participate in conversations, use the text box provided at the bottom, as shown in the following screenshot:

Conversations support @mentions, emojis, attachments, and video calling.
- Press Enter or the
 symbol.
 - To edit a message, click on the ... symbol and choose the Edit option.
The ![]() option lets you save a message. You can search for saved messages later.
option lets you save a message. You can search for saved messages later.
You can upvote a conversation by clicking on the like button, as shown:

How it works...
The options available under the text box are configurable and can be switched on or off by your administrator. This can be done through the team's admin center.
Using @mentions is a way of notifying an individual or team of a message (shown in the following screenshot). When mentioned, the individual or team will receive a notification in their Microsoft Teams client. Using the Reply button will keep messages in the same conversation thread:

A channel appears in bold if there are new, unread conversations in the channel:
There's more...
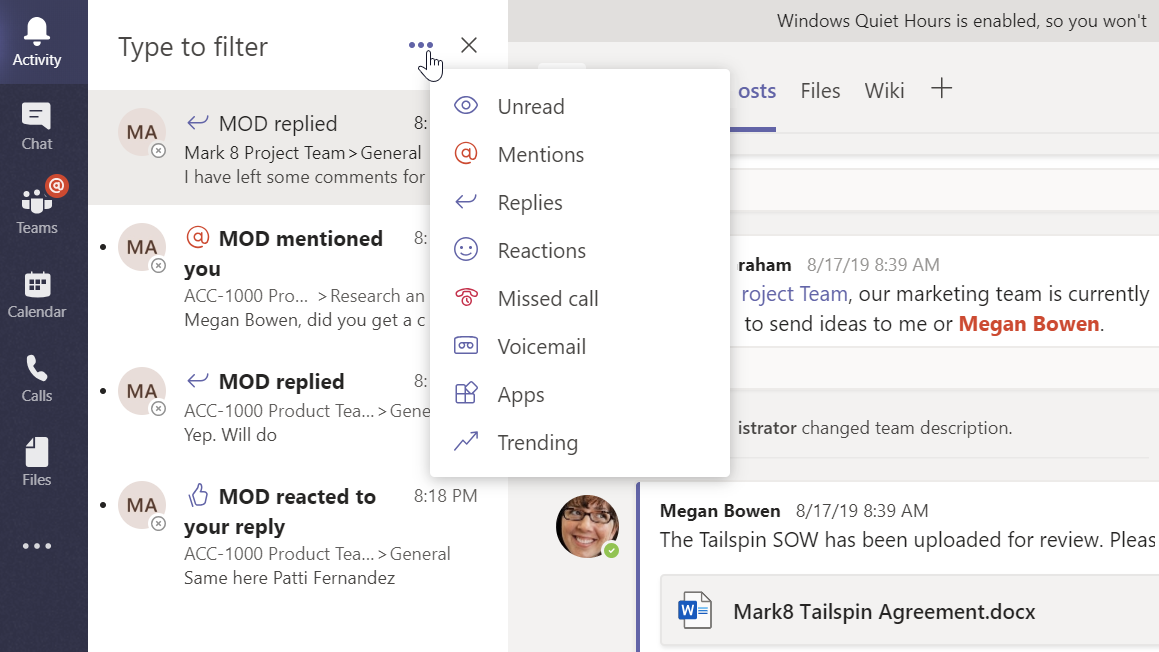
Besides conversations, Teams also supports one-to-one and group chats. These chats can be initiated from the chat icon in the top pane (see 1 in the following screenshot). You can type the name of the individual(s) you would like to chat with (see 2 in the following screenshot). Your conversations are only seen by the participants of the chat. Any files that you share in these chats will be saved in OneDrive and shared with the participants:

See also
- The Sharing filesrecipe in this chapter
- The Adding a connectorrecipe in this chapter
Scheduling a meeting
Microsoft Teams lets you organize team meetings or have one-off audio/video calls with your colleagues.
There are four meeting types that you can use with Teams based on the context:
- Scheduled meetings: When you want to schedule meeting at a future date with an individual or colleagues.
- Meet in a channel: when you need to hold an open meeting in your team, create a meeting in a channel.
- Instant meetings: when you want to convert your ongoing conversation into a desktop sharing session
- Teams live events: when you want to broadcast video and meeting content to a large online audience.
To schedule a meeting in Teams, follow the steps in the next section.
Getting ready
You do not need any special permission to schedule or join a team meeting.
How to do it...
You can set up the various meeting types in the following ways:
Scheduled meetings
- Select Meetings from the left-hand side pane.
- Click on + New meeting:
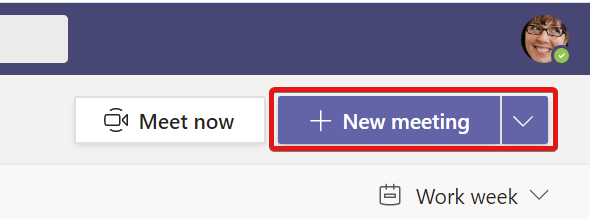
- Provide the required details (such as a title, the participants, and so on), as shown in the following screenshot:

- Click Schedule.
You have now scheduled a meeting.
Meet in a channel
- Select Meetings from the left-hand side pane.
- Click on + New meeting.
- Provide the required details.
- Select a channel as shown in the following screenshot:

- Click Schedule.
Meet Now
- Go to your team's channel (1)
- Go to your team's channel post (2)
- Click on Reply (3) and then click on the video camera (4) icon:

- Specify the Title of the meeting, turn video on or off and click Meet now:

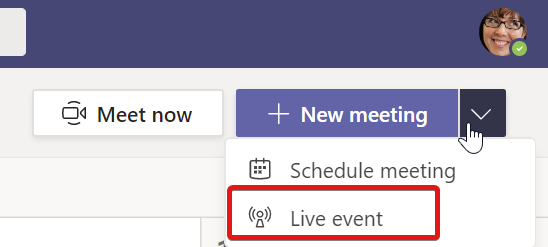
Live Events
- Select Meetings from the left-hand side pane.
- Click on Live event:
- Add presenters, and assign them a producer or presenter role:
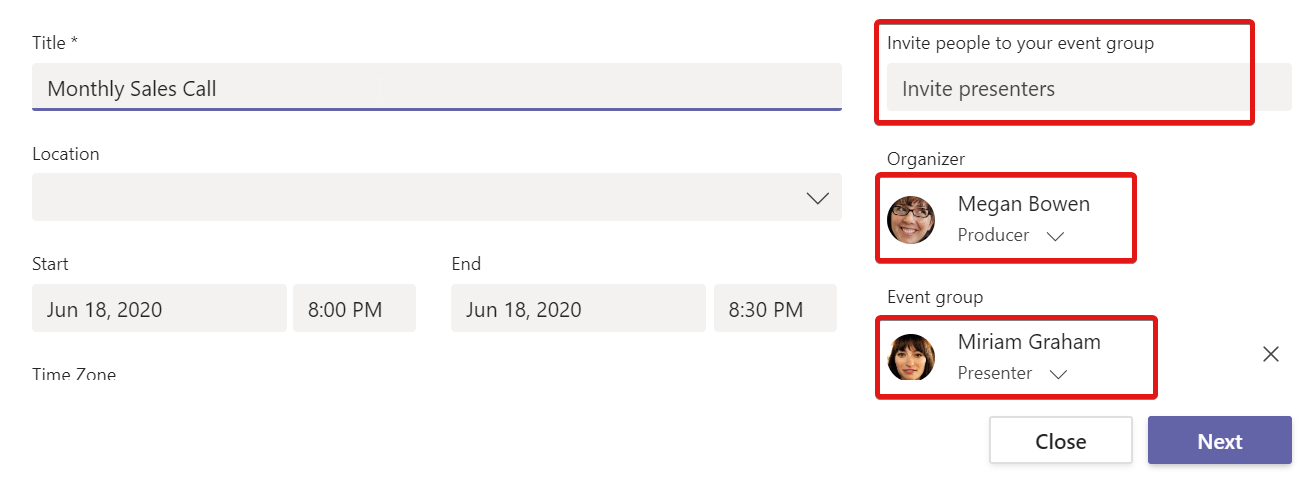
- Define the scope of the live event, you can run it across the company or within a selected group:

- Click Schedule.
How it works...
All meeting types (except live meetings) provide an interactive experience to the attendees. The team's meeting interface displays a control pane when you move your mouse in the meeting interface:

This panel contains options to do the following:
- Turn your video camera on or off.
- Mute the microphone.
- Share your screen or application.
- Raise your hand to ask a question or to request to be unmuted.
- Send a message.
- Share a file.
- Invite more participants.
- Choose your speaker and microphone.
- Bring up the meeting notes pane.
- Reveal meeting information (such as conference bridge details).
- Make the window fullscreen.
- Add background effects (discussed later).
- Launch the keypad.
- Share files.
- Record the meeting.
- End the meeting.
If you record a meeting, they automatically appear in Microsoft Stream and can be shared with others who missed the meeting. A searchable transcript of the recording is also generated:

Teams has various capabilities to enhance the calling experience in meetings.
Live captions
The live captions feature adds real-time captions to a conversation for anyone who wants to use them, which helps make meetings more inclusive and effective. The feature is useful for people with a hearing impairment or differing language proficiencies:
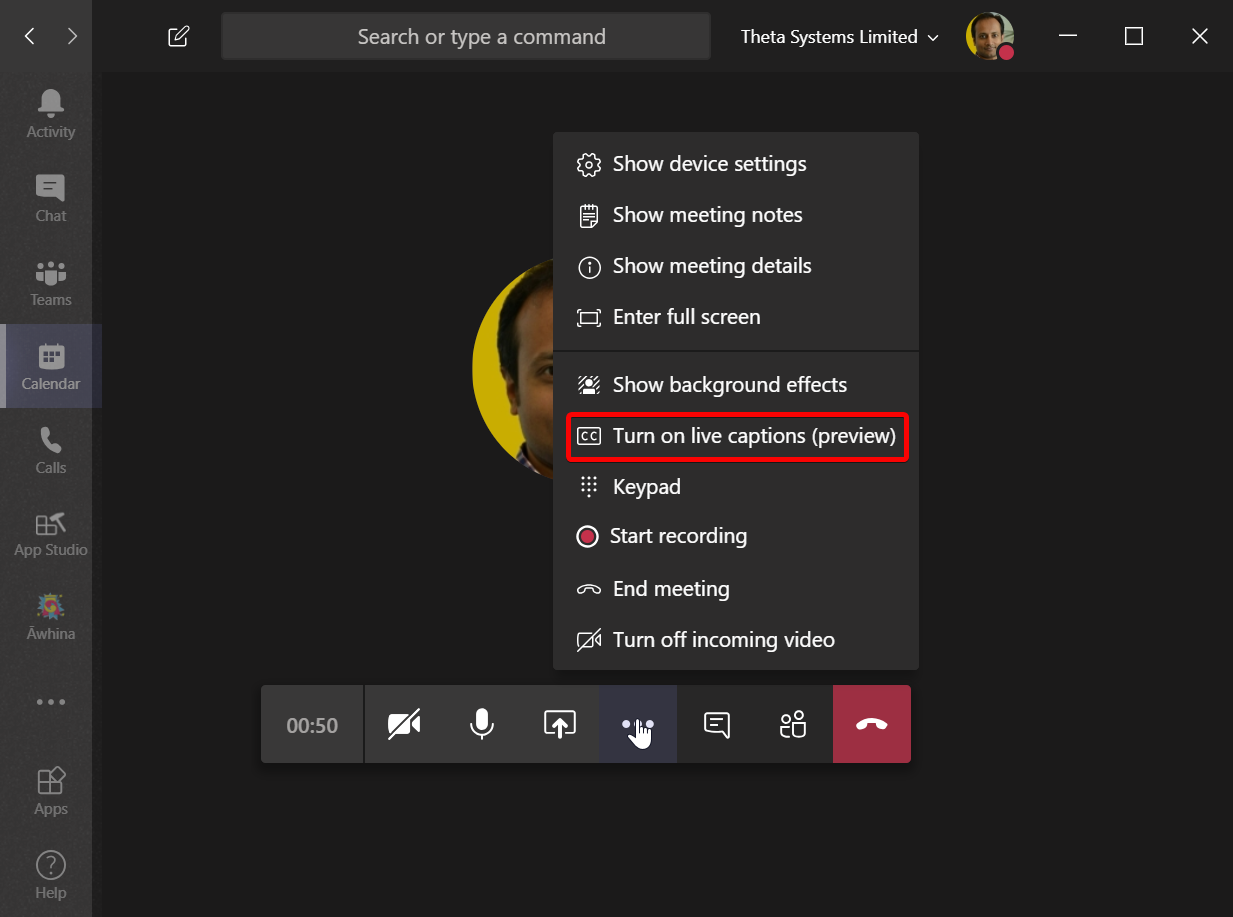
Once it is turned on, the function will transcribe what anyone says and display it as a live caption at the lower-left side of the meeting screen.
Custom backgrounds
This feature lets you add a custom background while keeping your face in focus. It is a useful feature to use when you are in a public place or working from home. There are many custom background images provided by default.
The one highlighted in the following screenshot lets you blur your background:

You can take this even further by using a photo of your office with your company branding or simply use an image to add some humor:

There's more...
Those of you who prefer using Outlook to schedule meetings can use the Teams add-in:
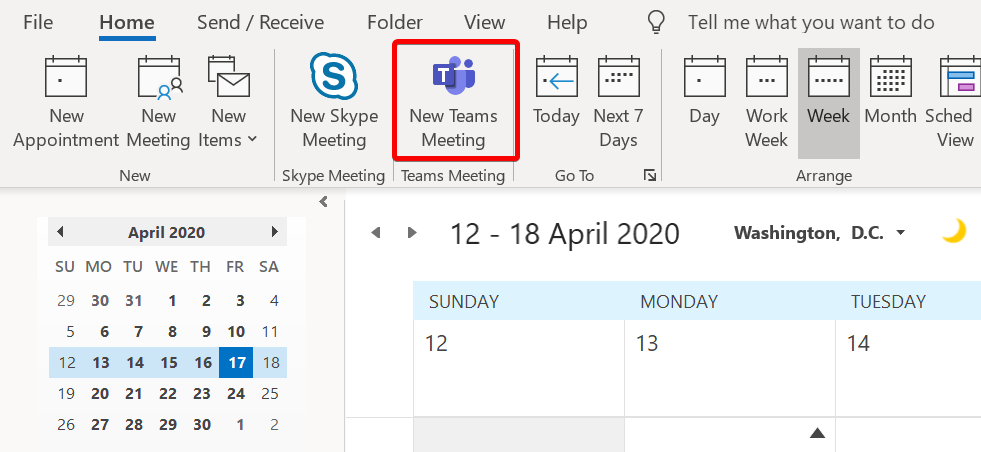
This option lets you leverage Outlook's familiar Scheduling window. A link to the Teams meeting is inserted automatically in the invite and the meeting location is set toMicrosoft Teams Meeting:

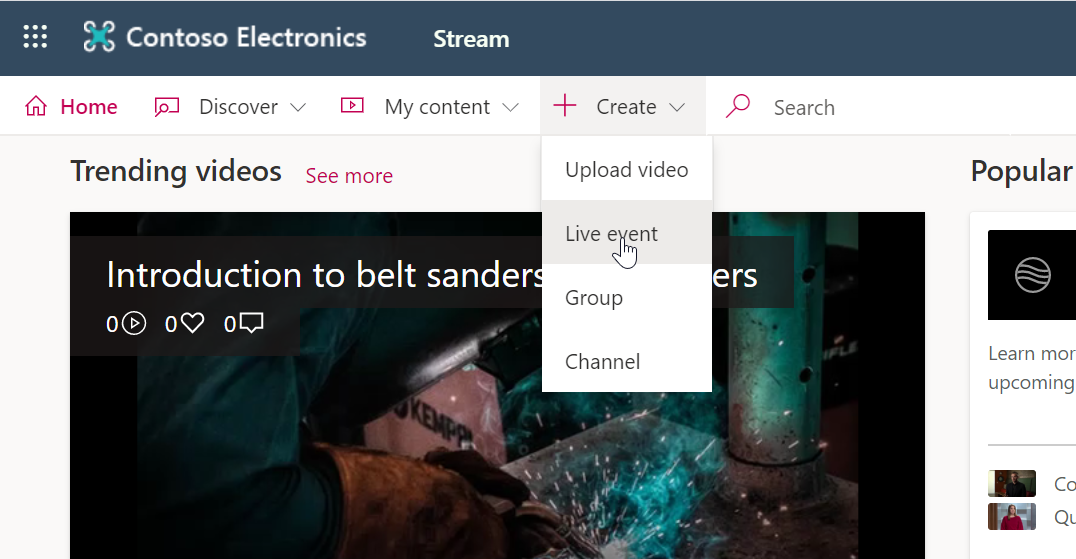
Microsoft Teams also comes with a special meeting type called Live event that lets you stream a video or content to a large audience. You can schedule and run a live event using the Teams client.
When you schedule a live event, you are assigned the role of producer. You can add additional event presenters or co-producers. Besides the meeting time, meeting venue, and meeting agenda, you can choose some other special options:

The Q&A feature is very useful when you are running a webinar and don't want to get distracted by attendees talking in the background. Attendees are all muted; they can ask questions, which appear on the producer's dashboard.
The questions that are asked are not visible to others until the producer chooses to publish them. The producer can publish or delete a question:

The producer controls the streaming content that appears on the screen of live attendees. You can share your desktop, application, or a video feed with the attendees. You can even live stream a video or YouTube clip by turning on the option to share system audio:

You can run a live event from Microsoft Stream as well. You can turn on captions for the event and share a video with subtitles later:
See also
- The Initiating conversations via postsrecipe in this chapter
- The Sharing filesrecipe in this chapter
Sharing files
Teams provides an extremely simple collaboration platform to exchange files with colleagues and teams. Files in public teams can be accessed by everyone. Private teams only provide access to team members. Teams lets you share files within each channel.
The next section explains the different ways that files can be uploaded to Teams.
Getting ready
All members of a team can upload files to any channel they wish to.
How to do it...
There are multiple ways of adding files to your team channel, which we will explore in detail.
Sharing files via the Upload button
To upload files within teams:
- Select Teams from the left-hand side pane.
- Click on a channel.
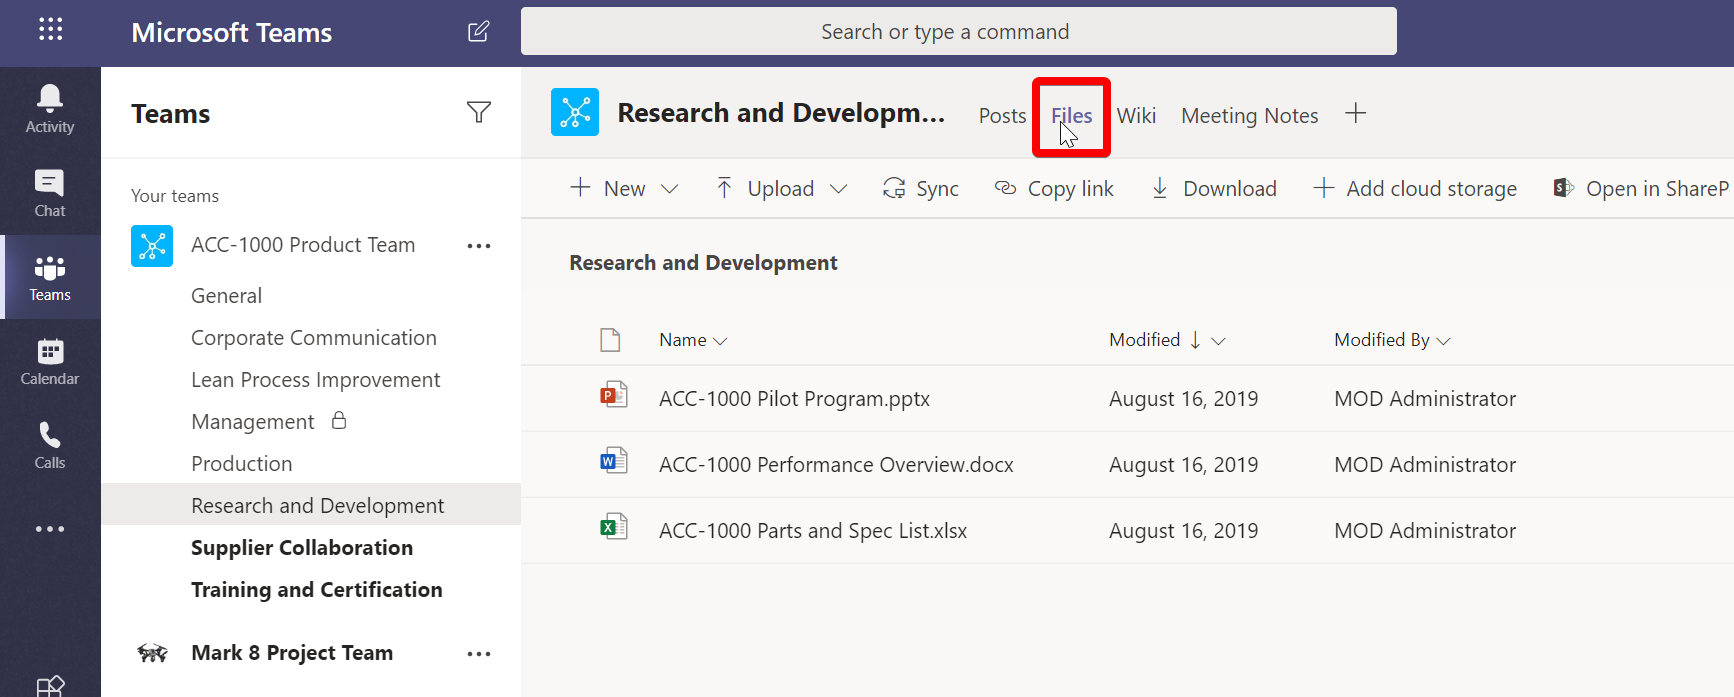
- Go to the Files tab (as shown):

- Click on Upload.
Select the file you want to upload.
Sharing files via conversations
To share files with peers in a conversation:
- Select Teams from the left-hand side pane.
- Click on a channel.
- Drag and drop a file into the conversation area, as shown in the following screenshot:

Also, note that if files are shared in the chat portion of the interface rather than in a channel post, they will be stored in and shared from the user's OneDrive for Business account.
Sharing files via SharePoint
To share files with peers from a SharePoint library, do the following:
- Select Teams from the left-hand side pane.
- Click on a channel.
- Click on ... next to the channel name and click Open in SharePoint.
- Click on Documents in the left-hand side navigation panel.
- Click on the folder with the channel name.
- Drag and drop the file into the folder:

- Once you are in SharePoint, you can add additional libraries to manage the team's files. However, only the files in the Documents library are visible through Teams.
How it works...
Files are stored in the Documents library inside a folder with the same name as the channel name.
Files that are shared in the conversation area are uploaded to the Documents library automatically.
The uploaded files can be copied, moved, or even shared across multiple channels (instead of creating copies of the same files) by using the Get link option and then paste the link in another team or channel.
There is a File option in the left-hand side navigation panel, as shown in the following screenshot:

There is also a File option in each channel:
The difference is that the option in the left-hand side navigation panel displays all the files that you have access to or the ones that have been shared with you by a colleague from within SharePoint, OneDrive for Business, and Teams, whereas the option under the channel area displays only the files shared within that channel.
See also
- The Initiating conversations via postsrecipe in this chapter
- The Creating channels recipein this chapter
- The Scheduling a meetingrecipe in this chapter
Searching within Teams
When you are a member of a vast number of teams, finding specific information you need can become a challenge. That is where the search functionality within Teams comes to the rescue. The search function lets you search for people, conversations/messages, and documents, as well as the contents of documents. The search box provided in Teams' interface serves as both a search and a command box.
To search for messages, people, or files, follow the instructions provided in the next section.
Getting ready
The search feature within Teams is available to everyone. However, you can only search for stuff you have access to.
How to do it...
To search for a message, person, or file:
- Type the word or phrase you are searching for in the search box. In this example, we will search for the word everyone. The search results are grouped under three topics—Messages,People, andFiles:

- Clicking on a search result will reveal the contents of the result.
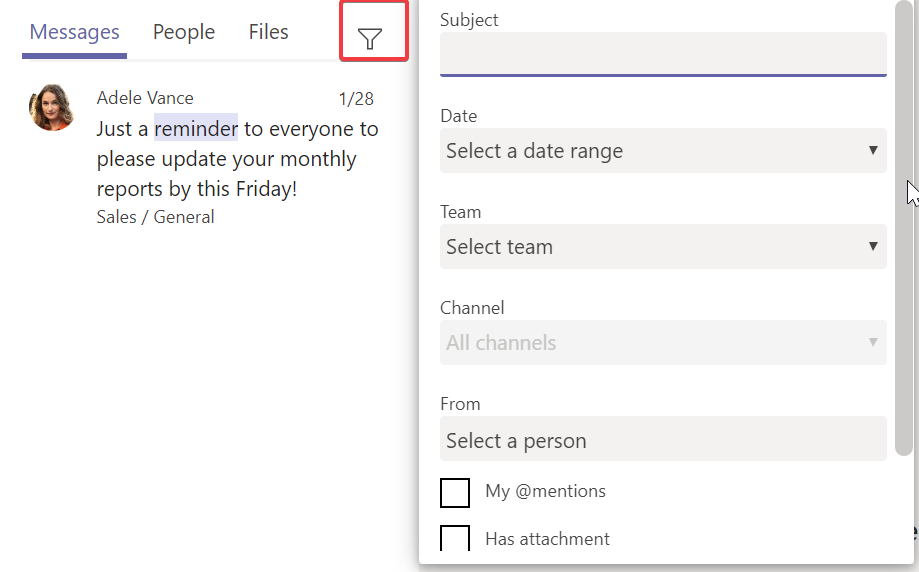
- You can use the filter option to narrow down your search results:
- The search box also serves as a command box if you type / in the search box. The Microsoft Teams interface brings up a list of all the available commands and what each command does:

How it works...
Using Teams, you can search for messages, people, and files.
Searching for messages and conversations within teams
You can search for a keyword across all the channels and teams you have access to. The keyword you entered is highlighted in the search results, along with a preview of the message. Clicking on a preview reveals the entire thread in the main area. You can filter the search results further by specifying a start and end date or specifying a specific team or channel.
Searching for people in your Microsoft 365 tenant
You can search for your colleagues from within the Teams interface:

You can initiate a chat with your colleague using the Teams command box. Simply type /chat followed by the name of the person:

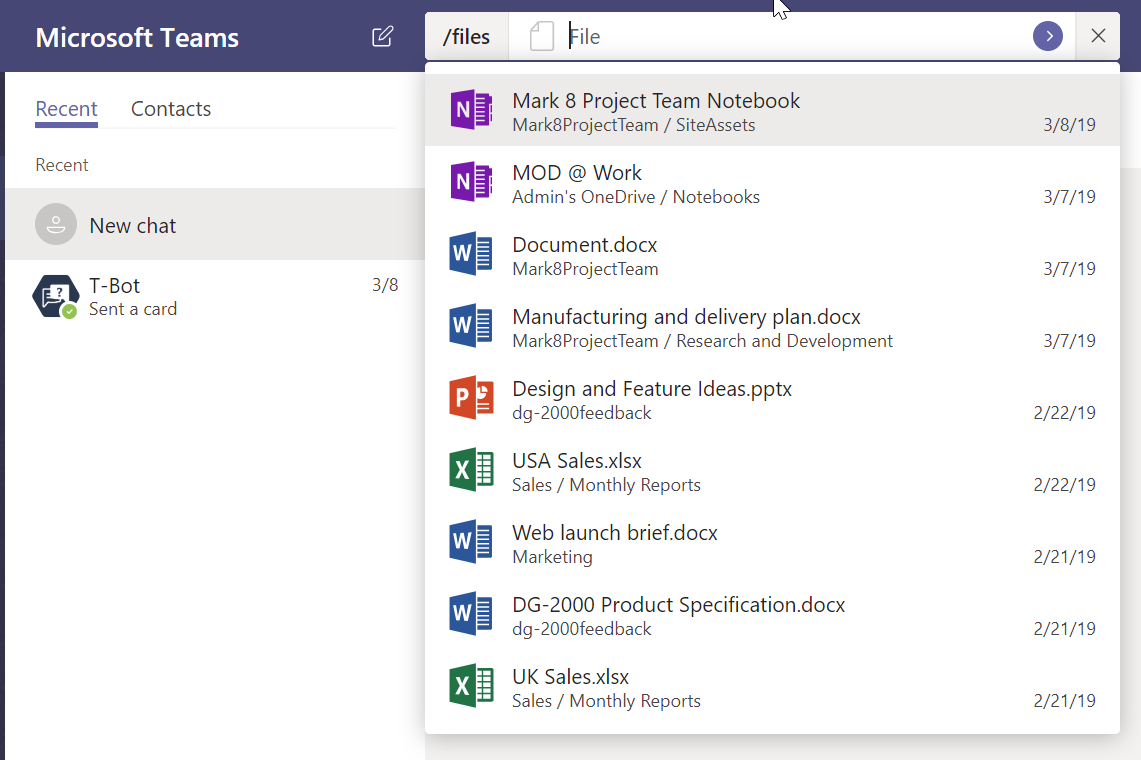
Searching for files within Teams and other Microsoft 365 locations
The /files search feature searches for files across Microsoft 365, including OneDrive and SharePoint. Just typing /files reveals all your recent files. The list is filtered as you type the filename:
See also
- The Initiating conversations via postsrecipe in this chapter
- The Scheduling a meetingrecipe in this chapter
- The Sharing filesrecipe in this chapter
Adding a connector
One of the highly effective features of Teams is the ability to add connectors to other applications inside a channel. Connectors let Teams communicate with an external application. So, you can do things such as manage your GitHub project from within Teams or track your team's progress within Trello.
This is different from adding a tab to a Teams channel. Adding a tab would just render the application within the Teams interface, but it would not actually talk to Teams specifically. However, adding a connector allows you to send or push information from one application to another.
The next section provides steps to integrate other applications with Teams.
Getting ready
You need to be a team owner in order to add a connector.
How to do it...
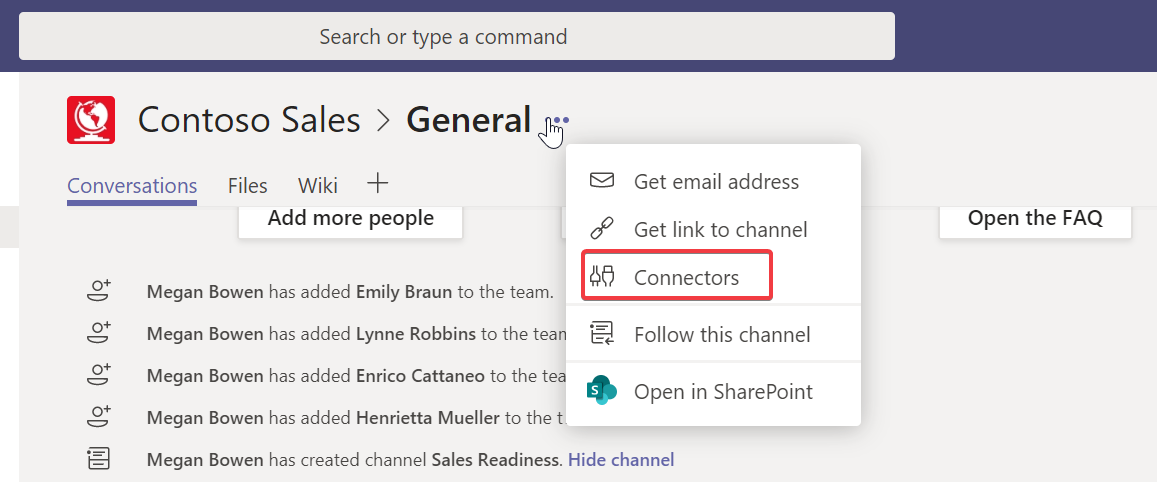
To add an external connector:
- Select a team using the navigation bar on the left.
- Select the channel you want to add the connector to.
- Click on the ... symbol, as shown, select Connectors:
The next screen will display all the available applications that can be connected to Teams. You can use the filters on the left to narrow down the list:
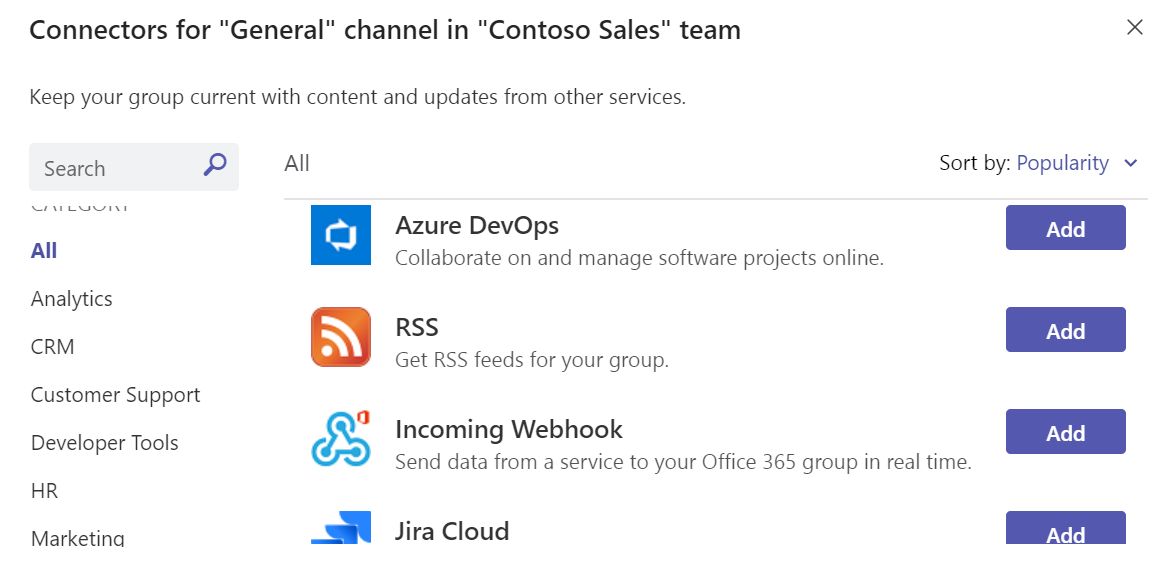
- Click Add and follow the application-specific instructions.
How it works...
Depending on what app you add, you might see subsequent screens that take you through a setup process. For instance, if you add a connector to GitHub, it will ask you to log in with your GitHub credentials and then it will pull your GitHub information through:
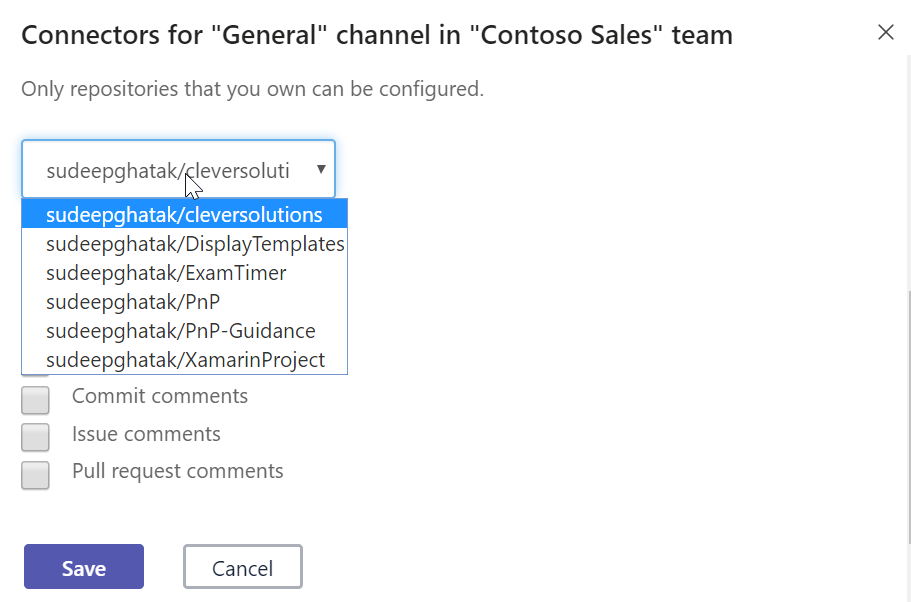
So, now, we don't need to have access to GitHub to track progress. We can track progress right from within a Teams channel conversation area:

There's more...
You can use connectors to create actionable cards in Teams, which lets you perform actions in the external application without having to leave the Teams interface. You can read about actionable cards here https://m365book.page.link/adaptive-cards.
See also
- The Creating channels and tabsrecipe in this chapter