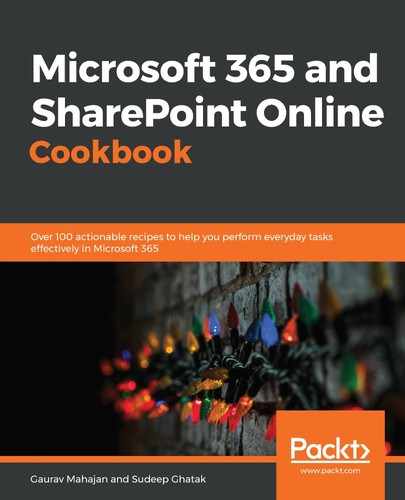
Power Automate (formerly Microsoft Flow) has been launched as Microsoft's lightweight workflow engine for end-users, developers, and IT professionals. It lets you build personal automated workflows using a wide range of services, without having to learn any code. There are hundreds of templates available to build flows that talk to Dropbox, Twitter, Yammer, Facebook, Dynamics, and other services. This makes building flows quicker and easier. There are over 300 services available as of today. Some are shown in the following:
Power Automate provides a rich user interface that allows you to build a process map and configure your actions.
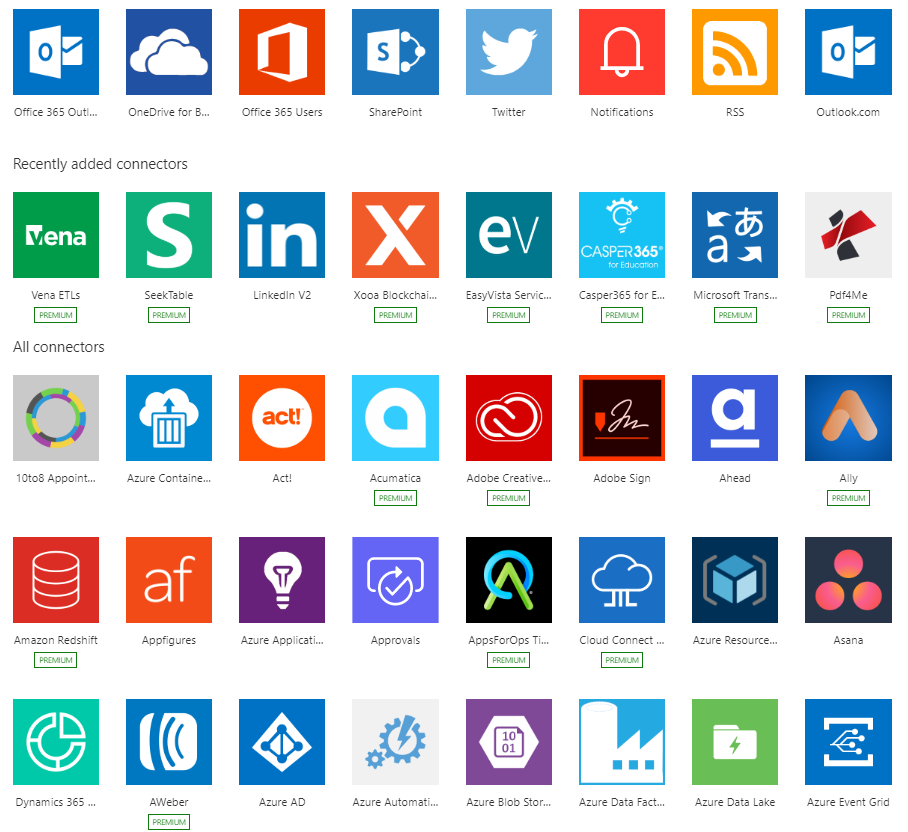
Every flow starts with a trigger. A trigger is an event that will initiate the flow (or the workflow). The following are some examples of triggers:
- When an email arrives in my mailbox
- When a file is created in my OneDrive
- When a new item is created in a SharePoint list
- When I tweet with a hashtag
After a flow is triggered, it can go through a series of steps that are laid out one after the other. Power Automate also lets you create parallel branches and add conditional logic, as shown in the following screenshot:

Power Automate is available in two plans:
- Per user per month
- Flows per month
You can check the pricing of these plans at https://m365book.page.link/flow-pricing.
In this chapter, we will learn about the following:
- Creating a flow using a template
- Editing a flow
- Importing a flow
- Exporting a flow
- Adding owners
- Testing your flow
- Creating a solution
- Creating a flow in a SharePoint library
Creating a flow using a template
If you have an idea in your head, someone probablyhad it before you. So, before building a new flow from scratch, you could look for an existing template. This will save you lots of time since the template will come with actions and a process flow that can then be modified or extended. It will also serve as a quick-start guide and a learning tool. Just as you can use flows created by others, you could submit your own flows to the Flow store. Your flow will appear on the gallery page if it successfully goes through the approval process.
Getting ready
You can sign up for a free Power Automate account at https://flow.microsoft.com. It has a free plan as well as business plans. Power Automate comes with most Microsoft 365 licensing plans. Refer to Microsoft Licensing guide for more details. You can download it from https://m365book.page.link/flow-licensing.
The free plan lets you run a limited number of flows until it expires.
How to do it...
- Log in to https://office.com using your Microsoft 365 account.
- Click on Power Automate from the list of apps
- On the Power Automate landing page scroll to the end of the page to access starter templates. If you can't see what you are looking for, click on See more templates and use the search bar to find more templates:

- Select a template that looks the most like what you are looking for. We'll pick the first one in the preceding list.
- The next job is to provide credentials for all these connectors, as shown in the following screenshot:

- You will then be taken to the Power Automate designer screen, as shown in the following screenshot:

- You can customize the flow as per your requirements at this stage and click on Save in the far-right corner once you are done:

- Click on the name field in the top left to change the name of the flow:
You just built your first flow.
How it works...
In order to understand the basics of a flow, you need to understand the following concepts.
Components of a flow
Trigger: Every flow starts with a trigger. A trigger is a condition that initiates the flow. In the preceding example, creating a list item in SharePoint acted as a trigger, which means that the flow will run every time a new item is created.
You can create three main types of triggers:
- Automated: A flow triggered automatically by an event, such as creating a new item in SharePoint or receiving an email in your inbox.
- Instant: A flow triggered manually by a button.
- Scheduled: A flow that runs once or as a recurring action at a specific time.
Triggers have a setting called trigger conditions, which let you specify one or more expressions that must be true for the trigger to fire—for example, if you have a trigger on an item update event, then the flow will run every time the item is updated. But if you want to refine the trigger condition so that the flow only gets triggered when a particular column (let's say Status) in the list has a specific value (for example, In progress), then you can achieve this by adding a trigger condition:

Action: A trigger is followed by one or more actions. An action could be a query, create, update, insert, or delete operation. The following are some examples of actions:
- Creating a new list item.
- Moving a file from OneDrive.
- Sending an email notification.
Connections: Connections let you interact with data from other systems. To establish a connection, you need to specify credentials to log in to the application you are connecting to.
Flow landing page
This section explains how the flow designer is structured. On your left, you have the following links:
- Home: The home page displays the featured flow templates available for you to use grouped by category. You can even search for flows by use case:
- Action items: All of your approval tasks (across every flow) are going to appear under the Approvals section. You can approve or reject them by providing comments. All your past approval actions can be seen under the History link:

- My flows: The flows that you build appear under the My flows link. If you share these flows with a colleague, then the flows move under the Teams flows link. The banner on this page also lets you create a New flow or Import an existing one:

- Business process flows: There are flows that are built using Common Data Service (CDS). You can think of CDS as a storage option for your business data. CDS stores data within entities, unlike databases, which store data in tables. CDS manages data as well as the entity schema, so you can focus only on the business process (which you can build using Power Automate).
- UI flows: These let you record and playback user interface actions (clicks, keyboard input, and so on) for applications that don't have APIs available. UI flows have a record feature that lets you perform your manual actions and save them as a part of the flow.
- Templates: As the name suggests, this page displays a list of flow templates to choose from.
- Connectors: The connectors in Power Automate provide you access to the functionality of other Microsoft 365 services (SharePoint, OneDrive for Business) or third-party services (Dropbox, MailChimp, and so on). A list of available connectors can be seen at https://m365book.page.link/flow-connectors.
- Data: The data link provides access to CDS entities as described previously. It also enables you to pull data from your on-premises environment through gateways.
- AI Builder: The AI builder lets you leverage Microsoft's artificial intelligence features, such as text recognition, outcome prediction, and so on, to build AI models.
- Solutions: Hosting flows in a solution makes it easier to move them and all their components from one environment to another. You can add multiple flows in a single solution.
Run history
A run history shows you each instance that the flow is executed, or you could also say every time the trigger condition is met:

If you click on a specific run, the flow expands and displays the actions that were executed, along with the time it took to run each action:
Flow properties
You can update the flow properties from the top-right side of the landing screen. The flow properties let you modify the properties of a flow, as shown in the following screenshot:
- Edit: Lets you open the flow in designer mode.
- The toggle switch next to ... More lets you enable or disable a flow.
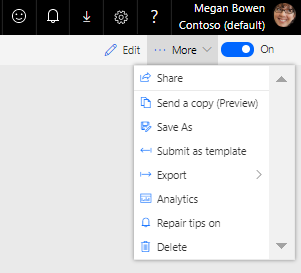
- ... More: Opens up a drop-down menu containing the following elements:
- Share: Add other owners to the flow.
- Send a copy: Allows you to share a copy of this flow with others so that they can build their own version of the flow.
- Save as: Lets you create a copy of the flow.
- Submit as template: Lets you submit your flow to the gallery.
- Export: Lets you save the flow as a package. It can then be imported to another tenant.
- Analytics: Lets you see the metrics related to the flow.
- Delete: Deletes your flow.
There's more
When you build a flow, you are added as the owner automatically. The flow then runs in the context of your user account. This isn't a bad practice. But you need to make the following considerations:
- If you have used Send email actions in your flow, recipients will receive emails from the user who published the flow.
- If your flow is updating SharePoint list items, the Modified By field will display the flow owner's name.
- Your flows will stop running if the user's account gets deleted or disabled.
- The flow will only be able to perform tasks that the user is authorized for.
User accounts can be used for simple scenarios but should be avoided for complex business processes. You should use a service account in such cases. A service account is just a regular Microsoft 365 account that is not associated with a staff member. However, you need to keep the following points in mind while using a service account:
- You need to assign a Flow license to the service account.
- The service account should be given the most limited access that it needs to perform its job.
- They shouldn't be added in privileged groups or other security groups.
- Set the password to never expire. If the password expires, your business process will error out.
- Do not set Multi-Factor Authentication on service accounts.
See also
- The Editing a flow recipe in this chapter
- TheTesting your flow recipe in this chapter
Editing a flow
You can update the flows that you have created. These flows appear under the My flows tab in the flow landing screen. Other flows that have been shared with you can be seen in the Team flows area.
Getting ready
You need to be a flow owner in order to edit it.
How to do it...
- Log in to https://office.com using your Microsoft 365 account.
- Click on Flow. This takes you to the landing page.
- Choose the flow you want to modify or click Edit:

- Edit the flow by clicking on the Edit link in the top right-hand corner.
- Make changes to the flow and click Save.
How it works...
A newer version of the flow is created every time you make a change. Currently, there is no way of going back to an older version. If you would like to save multiple versions of the flow, then you can do so by exporting the flow before making a change and saving the package in a version control system, such as VSTS or GitHub.
See also
- The Creating a flow using a template recipe in this chapter
- The Testing your flow recipe in this chapter
- The Creating a flow on a SharePoint library recipe in this chapter
Exporting a flow
Exporting and importing a flow allows the reusability of the package and its deployment from one environment to another environment. A flow can be saved as a template, along with the dependencies used by the flow and all associated metadata, so that it can be reproduced in another Microsoft 365 tenant. This feature is useful in the absence of a version-control mechanism within a flow.
Flows can also be moved from one environment to another, using solutions, but we'll discuss solutions later in this chapter.
If you want to migrate a single flow, then the Import/Exportoptions are useful features to employ.
Getting ready
You need to be a flow owner in order to save a flow as a template.
How to do it...
- Log in to https://office.com using your Microsoft 365 account.
- Choose the flow you want to export.
- Go to Export | Package (.zip) under the More link in the top right-hand corner, as shown in the following screenshot:

- Give the package a name and click Export Package:

The flow will be downloaded as a ZIP file in the default download folder of your browser.
How it works...
The exported flow file can be saved in two formats: .zip and .json. A zipped version is perhaps the most widely used and user-friendly way to export flows. A JSON file is the coded version of the flow logic and is useful when migrating the flow logic into a separate platform, such as Logic Apps.
See also
- The Importing a flow recipe in this chapter
- The Creating a flow on a SharePoint library recipe in this chapter
Importing a flow
A flow package contains the logic of the flow as well as information about the connectors. It can therefore be imported into a new, completely separate environment, preserving the flow logic; however, the connection information needs to be updated according to the environment it is imported to.
Getting ready
Everyone within an organization can import a flow and publish it.
How to do it...
To import a flow, follow the following steps:
- Go to the Power Automate landing page.
- Click on Import, specify the location of the saved template, and click Import.
- Specify whether you would like to update an existing flow by selecting Update or create a new flow:

- When the flow is imported into a new environment, the connections have to be reconfigured by clicking on the Select during import link:
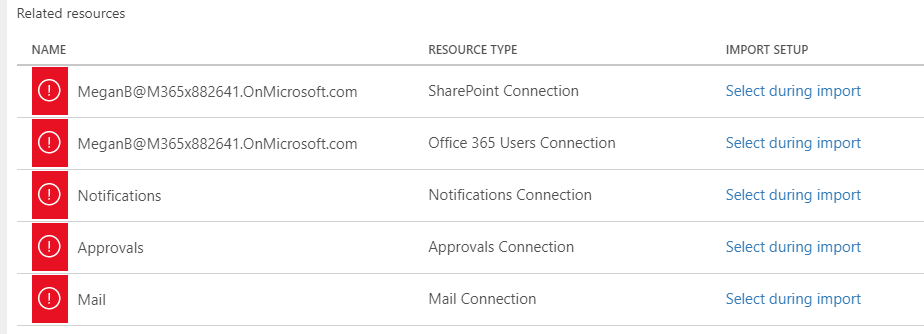
- This brings up a panel on the right that lets you create a connection or choose an existing connection:

- You can save the flow after the connections have been configured.
How it works...
Please ensure that you don't have another flow with the same name in your environment when choosing Update in the Import setup. This operation will overwrite your existing flow, which can't be retrieved once this is done.
See also
- The Creating a flow using a template recipe in this chapter
- The Exporting a flow recipe in this chapter
- The Creating a flow on a SharePoint library recipe in this chapter
Adding owners
Owners can edit and save existing flows. By default, the creator of the flow is added as an owner.
While you could build personal flows to automate some of your personal work (such as monitoring your emails or OneDrive), it is always advisable to have more than one owner if you are designing the flow to achieve a common objective or business process. A flow that has more than one owner is called a team flow.
Besides editing the flow, an owner can also do the following:
- View the history of a given flow.
- Edit the properties of a flow.
- Modify an action or condition.
- Manage owners.
- Delete a flow.
Getting ready
Owners must have a Power Automate plan to create a team flow (you can look at the options at https://flow.microsoft.com/pricing/). Only an owner of the flow can add other owners.
How to do it...
- Go to the Power Automate landing page.
- Go to the Owners section on the bottom right-hand corner of the screen and click Add an owner.
- You should be able to add any individual from the organization or user group.
- A pop-up screen will appear, explaining the permissions that the owner will have regarding the connections inside the flow. Click OK.
The new owner is added!
How it works...
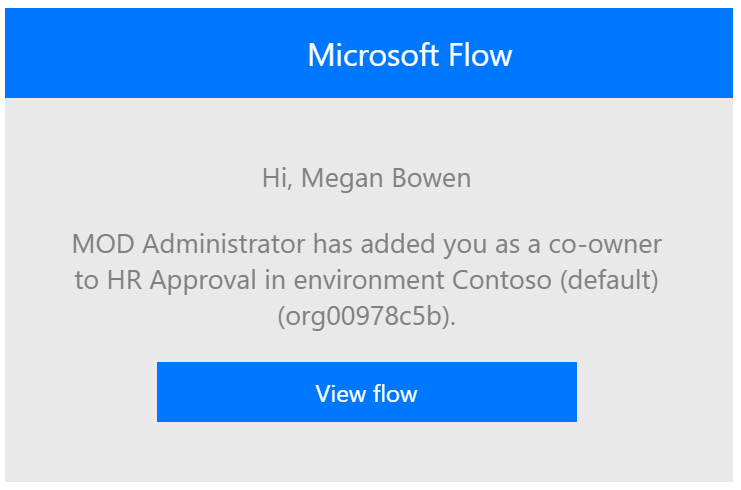
When you add a new person as an owner of the flow, they will receive a notification and the flow will start appearing on their landing page under Team flows:
As a co-owner, you can also add SharePoint lists to a flow so that everyone who has editing access to the list automatically gets editing access to the flow:

Power Automate enables you to share flows with your colleagues either by adding them as co-owners or (for manual flows only) run-only users.
See also
- The Creating a flow using a template recipe in this chapter
- The Editing a flow recipe in this chapter
- The Creating a flow on a SharePoint library recipe in this chapter
Testing your flow
Every solution that is built needs to be validated against a set of test cases to ensure that it does what it was created to deliver. Power Automate offers a very good platform to test the flow logic. The testing process actually runs the business logic, and so you shouldn't test flows on your production (live) system. The flow user interface (as demonstrated in the How to do it...section) can be used to observe inputs and outputs, as well as investigate errors.
Presently, the feature only lets you test the last five flow runs.
Getting ready
Only the flow owner can test the flows, which means that you will need to be added as a co-owner if you want to test the flow.
How to do it...
- Go to the Power Automate landing page.
- Select the flow that you want to test and click Edit.
- Click on the top right-hand corner to test the flow:
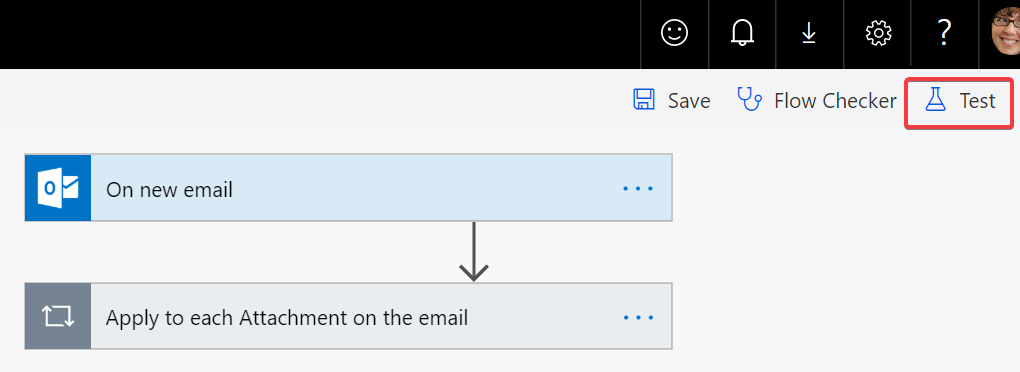
- This will reveal a panel on the right with some options:
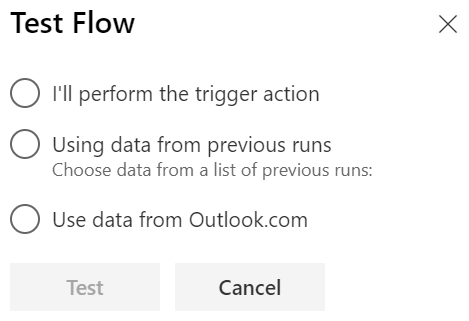
- Choose the appropriate option from the list. This list might look different depending on the type of trigger that is chosen. In order to test the flow, do one of the following:
- Manually satisfy the trigger condition.
- Use data from previous runs to perform the test.
- For certain triggers, you can provide a conditional logic that satisfies criteria—for example, for a SQL trigger, you could pass a query.
How it works...
To ensure that your flows run as expected, perform the trigger, and then review the inputs and outputs that each step in your flow generates.
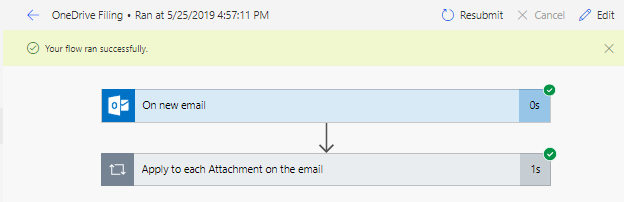
After the flow has run, you can investigate the flow by looking at the flow output in the center of the page.
The actions that succeed have a green check, whereas the ones that fail have a red cross:

Clicking the action (or trigger) reveals more information:

This view lets you investigate the input and output values. In the case of an error, the error information is displayed.
See also
- The Creating a flow using a template recipe in this chapter
- The Editing a flow recipe in this chapter
Creating a solution
Solutions provide the Application Lifecycle Management (ALM) capability for Power Apps and Power Automate. Solutions let you bundle related flows (and apps) within a single deployable unit and migrate them from one environment to another.
An environment is a place to store, manage, and share your organization's business data, Power Apps, and flows. They also act as secure spaces to separate apps that may have different roles, security requirements, or target audiences.
The following are some scenarios where you could consider different environments:
- Creating separate environments for test and production versions of your apps
- Isolating the apps and flows to specific teams or departments in your company
- Creating separate environments for different global branches of your company
Creating and managing environments for Power Platform is beyond the scope of this book. You can read more about creating environments for Power Platform at https://m365book.page.link/environments.
As you might have noticed, when you build flows under My flows, they all appear one below the other, and there is no way of grouping related flows together. Solutions let you logically group the related flows into a single container. So, if your application has multiple flows, you can bundle them all into a solution container, which simplifies navigating and managing these flows.
Getting ready
You must have the following components to create solutions:
- Common Data Service in your Microsoft 365 environment
- An environment with version 9.1.0.267 or later
How to do it...
To create a solution, go through the following steps:
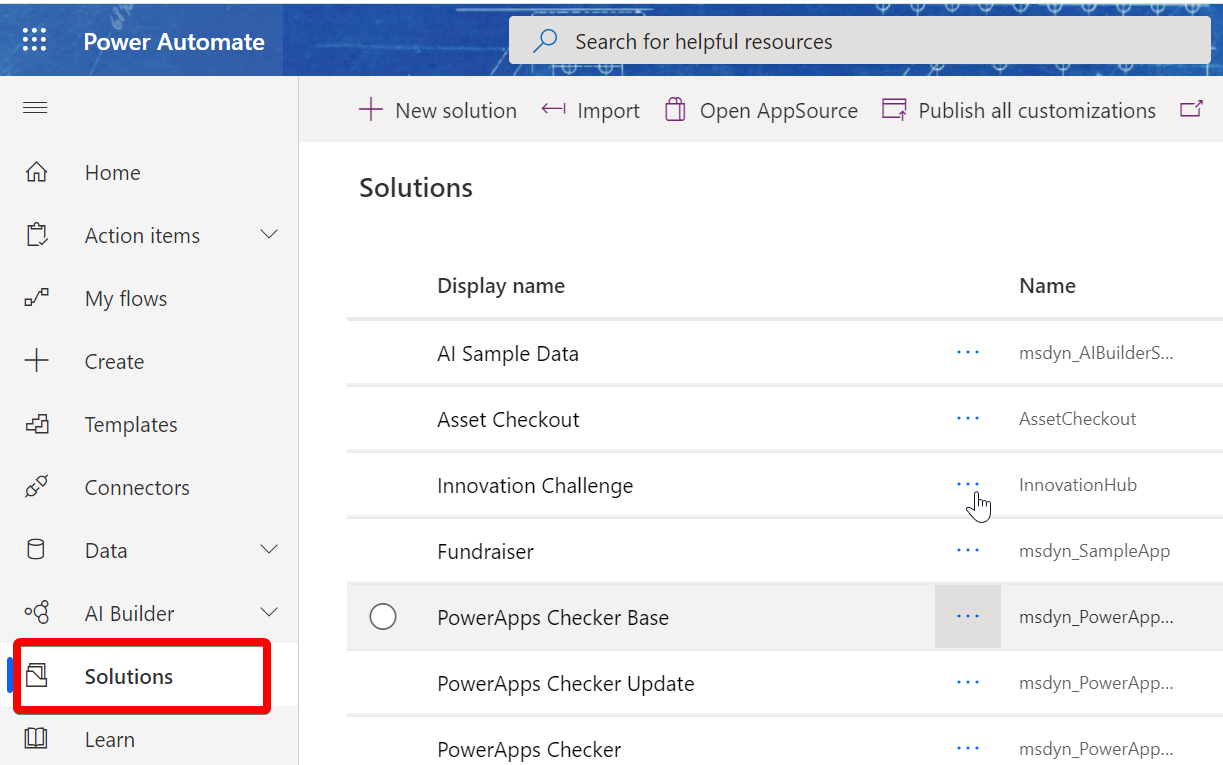
- Go to your Power Automate homepage.
- Select Solutions from the left pane. You'll see all the solutions available in your environment:
- Click on + New solution to create a solution.
- Provide a display name, name (only letters, numbers, and underscores), publisher and version number, as shown in the following screenshot. Click More options to enter additional information:

- Click on Create.
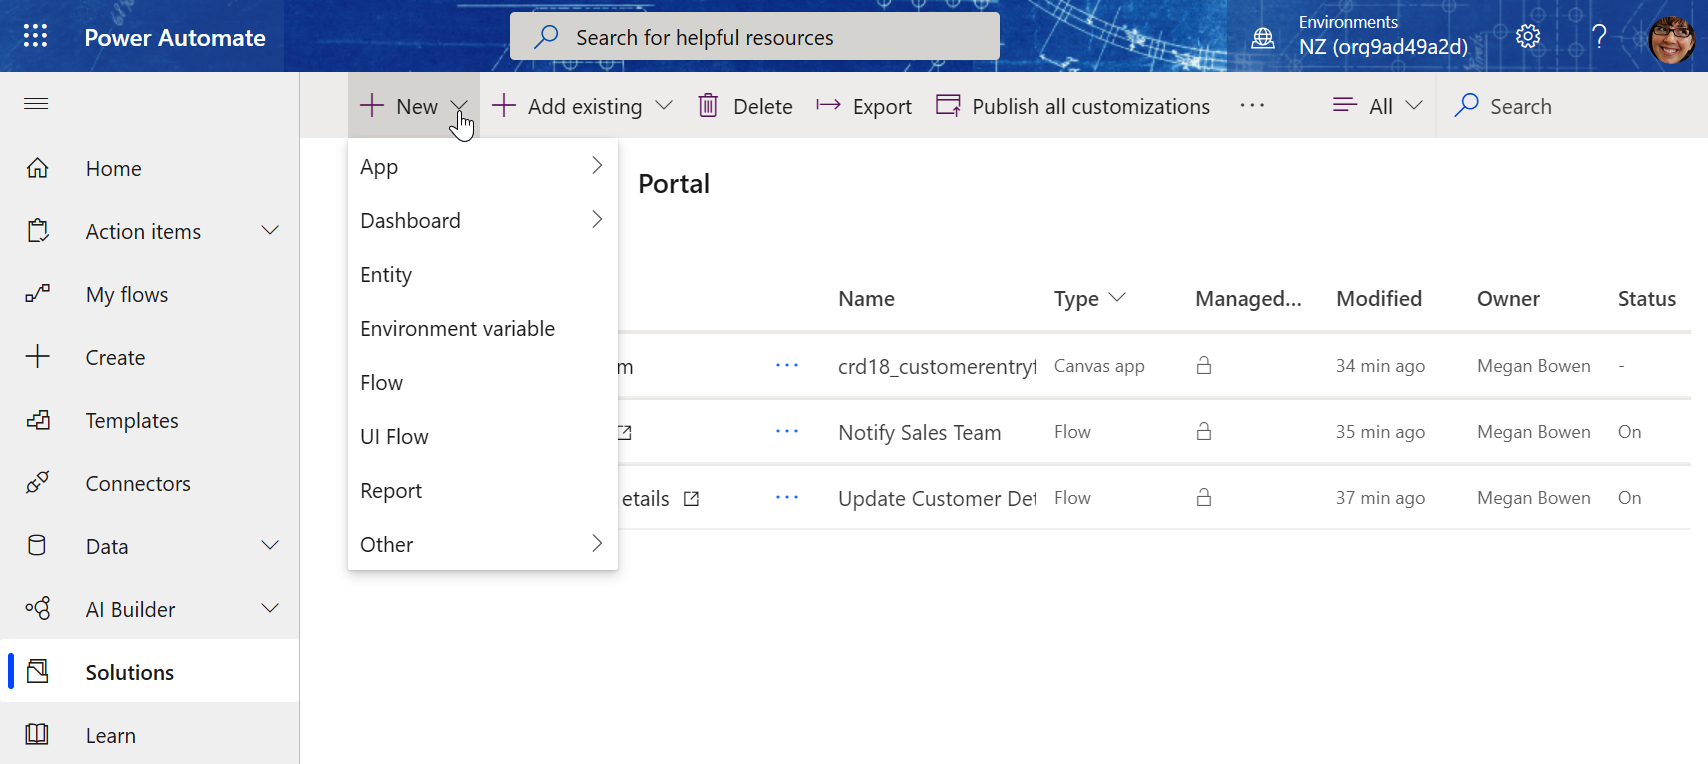
- Now click on the solution you just created. You will be taken to a page that displays the components of the solution.
- Click New to add a new component (which could be a Flow, Power App, Entity, and so on):
Your solution is ready to be exported, along with its components
How it works...
Solutions provide you with a convenient and efficient way of grouping multiple resources (apps, flows, entities, reports, and so on) together. This method lets the independent software vendors (ISVs) deploy their solutions on Microsoft AppSource. Creating solutions lets you deploy your components in another environment without having to go through the pain of exporting each individual component and then importing it in.
You can export a solution by navigating to the Solutions page and selecting the Export option from the context menu, as shown in the following screenshot. Your components need to be published before the solution can be exported:

Clicking Export launches a wizard that takes you through the exporting process. You need to specify the version number and export type during the process:
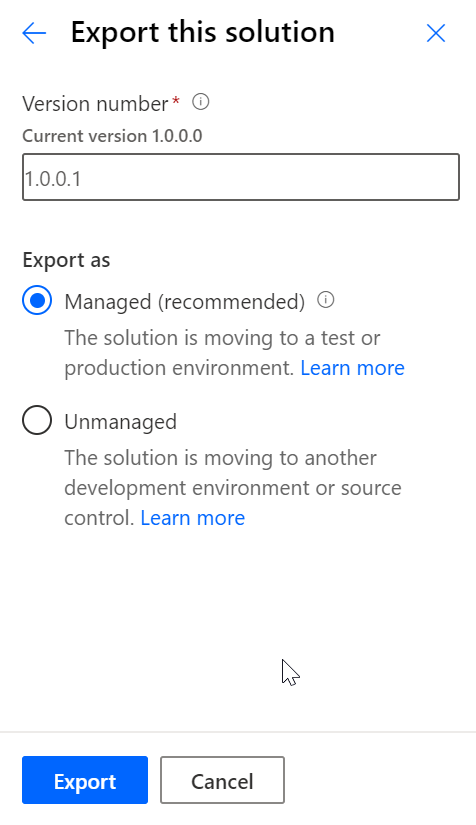
A managed solution only contains customizable solution components that have been customized. We suggest that you first create an unmanaged solution before creating a managed solution.
After exporting the solution, you can move it to a different environment (or even a separate tenant) by importing it. The Import option is available on the Solutions page:

The import process takes you through a series of steps, as shown in the following screenshot. Before running the solution, fix the flow connections:

See also
- The Importing a flow recipe in this chapter
- The Exporting a flow recipe in this chapter
Creating a flow in a SharePoint library
Power Automate is integrated with SharePoint. The Power Automate option appears against every SharePoint list and library. This lets you set up SharePoint-specific triggers right from within the SharePoint list or library. You can use Power Automate to build your custom events, such as the addition of a document, metadata updates, and so on. Within SharePoint, you can run a flow with the following scopes:
- On demand for a selected file
- On demand for a selected list item
- For a specific folder within a library
Getting ready
You need to have a SharePoint license to access SharePoint Online. You also require editing rights for the list in order to add a flow to it.
How to do it...
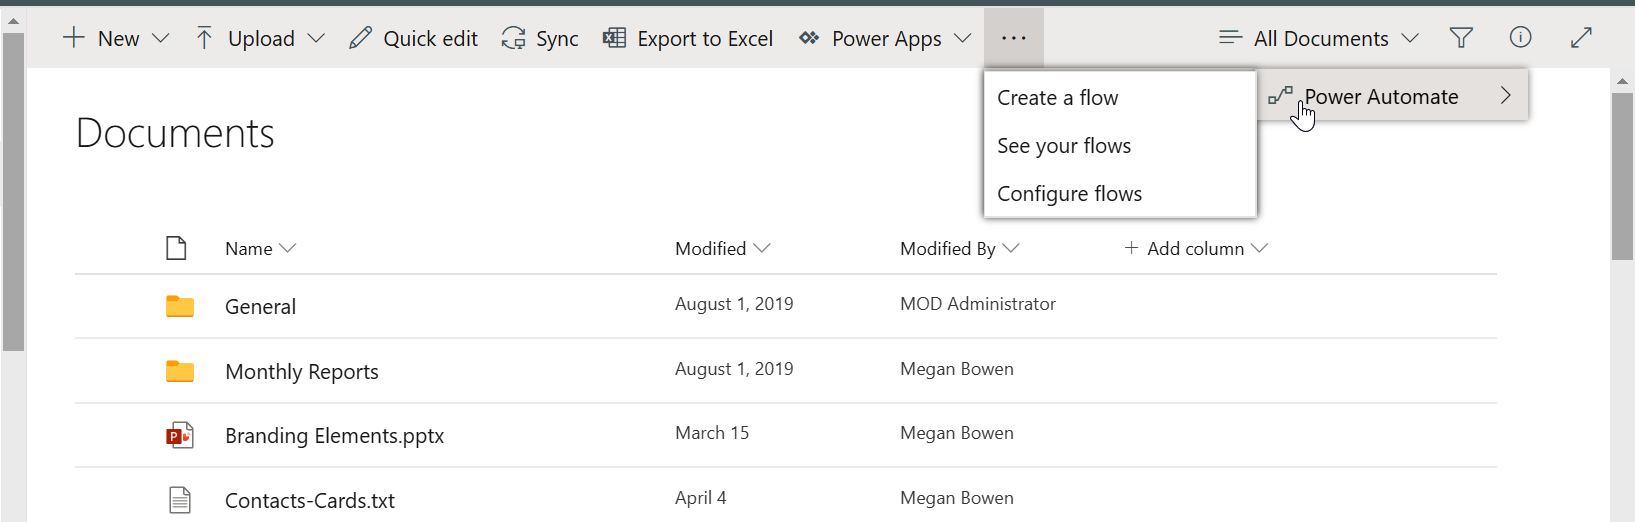
- Navigate to the SharePoint list (or library).
- Select Create a flow from the top menu under Power Automate:
- A panel will appear on the right with all the SharePoint templates:
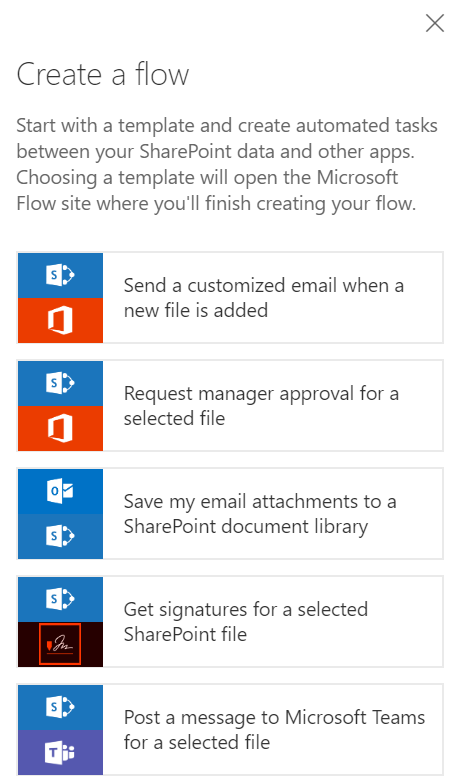
- Select a template and build a flow as we described before.
How it works...
Selecting a template takes you to the flow designer page. The template provides a basic outline that serves as a good starting point. The flow creation logic is the same as described earlier.
See also
- The Creating a flow using a template recipe in this chapter
- The Editing a flow recipe in this chapter