
ArcGIS Pro has reintroduced the concept of projects to Esri users. Esri first introduced the concept of managing your Geographic Information System (GIS) using project files with their ArcView GIS application. ArcView GIS used projects to manage map layouts, views, tables, data connections, and more all within a single .apr file. This allowed us to access everything associated with a project from a single location.
When Esri released ArcGIS in 1999, the previously described method was dropped. In its place, Esri decided to use separate files called map documents (.mxd files) for ArcMap. A map document contains a single map with one or more data frames. So, for each map you need, you will have to create a separate map document. If you also had to create 3D maps, you would need another separate file called a scene (.sxd). All of this means you often have tens to hundreds of files to manage and keep track of, which makes management much harder.
ArcGIS Pro projects greatly simplify GIS management. Now, projects allow you to consolidate all of the resources needed to complete a project in a single place. So, this chapter will help you learn that you no longer need to search for the correct map document. You just need to open the ArcGIS Pro project file for the project that you are interested in and all the maps, data connections, layouts, tools, and more will appear there. This chapter will also help you to locate services much faster. Also, after completing this chapter, you will be able to create your own project and templates.
In this chapter, you will learn how to work with projects. This will include the following topics:
- Working with an ArcGIS Pro project
- Creating a new project and project templates
- Creating custom project templates
Technical requirements
To complete the exercises in this chapter, you will need access to ArcGIS Pro 2.6 or higher. Any license level for the software will suffice.
Working with an ArcGIS Pro project
ArcGIS Pro utilizes project files in place of map documents and scenes to access GIS data, make maps, perform analysis, and share work. Project files have a .aprx file extension and include all the GIS resources that are needed for a given project. Projects can be created and shared on your local network so that others in the project team can quickly access the resources that they need to complete their assigned tasks.
This section will help you learn how to create a new project with Esri templates by working through a hands-on exercise.
Each project will have components and resources that are associated with each specific project. Some of these components and resources will be common to multiple projects, while others will be unique to individual projects. So, just because a component or resource is linked to one project, does not mean it cannot be used in another project.
Projects also have their own terminology associated with them. It will be important to understand this terminology when working with projects. We will now begin by exploring the terminology associated with projects and some of the components or resources that can be included in a project.
Understanding project terminology
Like the ArcGIS Pro application, projects in ArcGIS Pro have a vocabulary associated specifically with them. We will quickly define some of these terms so that you can begin to understand what they mean as you will come across them throughout this book, hear about them at conferences, see them in Esri publications, and so on:
- Project item: A project item is any item, component, or resource stored within an ArcGIS Pro project. Project items include maps, scenes, folder connections, database connections, ArcGIS Server connections, Web Map Service (WMS) connections, toolboxes, locators, and more. These items are accessed within ArcGIS Pro from the Catalog pane or the catalog view.
- Portal: A portal in ArcGIS Pro refers to a connection to either ArcGIS Online or Portal for ArcGIS. ArcGIS Online is Esri's cloud solution for storing and accessing GIS resources, including maps, data, and applications. Portal for ArcGIS provides the same functionality as ArcGIS Online but is installed and hosted on your organization's local infrastructure. Portal for ArcGIS is also part of ArcGIS Enterprise, formerly called ArcGIS Server.
- Portal item: A portal item is any item that is accessed via a designated portal. Portal items might include web maps, feature layers, tile layers, layer packages, map packages, and project packages.
- Project package: A project package is similar to a layer or map package. It bundles or zips all items associated with a project into one consolidated file. A project package can be used to share projects with others that may not be connected to your network or to archive a project. The project package will have a .ppkx file extension and can be stored in a local folder or uploaded to your portal.
- The Home folder: The Home folder refers to the folder where the project file is stored. The Home folder is where ArcGIS Pro creates project-specific content unless the user specifies a different location. The Home folder can only be changed by saving a project to a different folder. The default home folder for new projects is C:Users\%user name%DocumentsArcGISProjects.
- Default geodatabase: The default geodatabase is used by the geoprocessing tools as the automatic default workspace for the resulting output items of the tools. This means new feature classes resulting from the use of analysis, conversion, and other tools will automatically be saved to the default geodatabase unless you specify a different location. Any geodatabase can be used as the default geodatabase. When a new project is created, ArcGIS Pro will automatically create a new geodatabase file for the project in the Home folder.
Now that you understand some of the terms associated with a project, it is time to look at how to manage one. As you will see, a single ArcGIS Pro project can contain a large number of items. In the next section, you will learn how to use the Catalog pane to manage and access these items.
Using the Catalog pane
When you open a project or create a new project in ArcGIS Pro, the Catalog pane will be one of the first things you see. By default, it will be located on the right-hand side of the ArcGIS Pro interface, opposite the Contents pane.
The Catalog pane consists of the following:
- The Project tab
- The Portal tab
- The Favorites tab
We will look at these elements in the following sections.
The Project tab
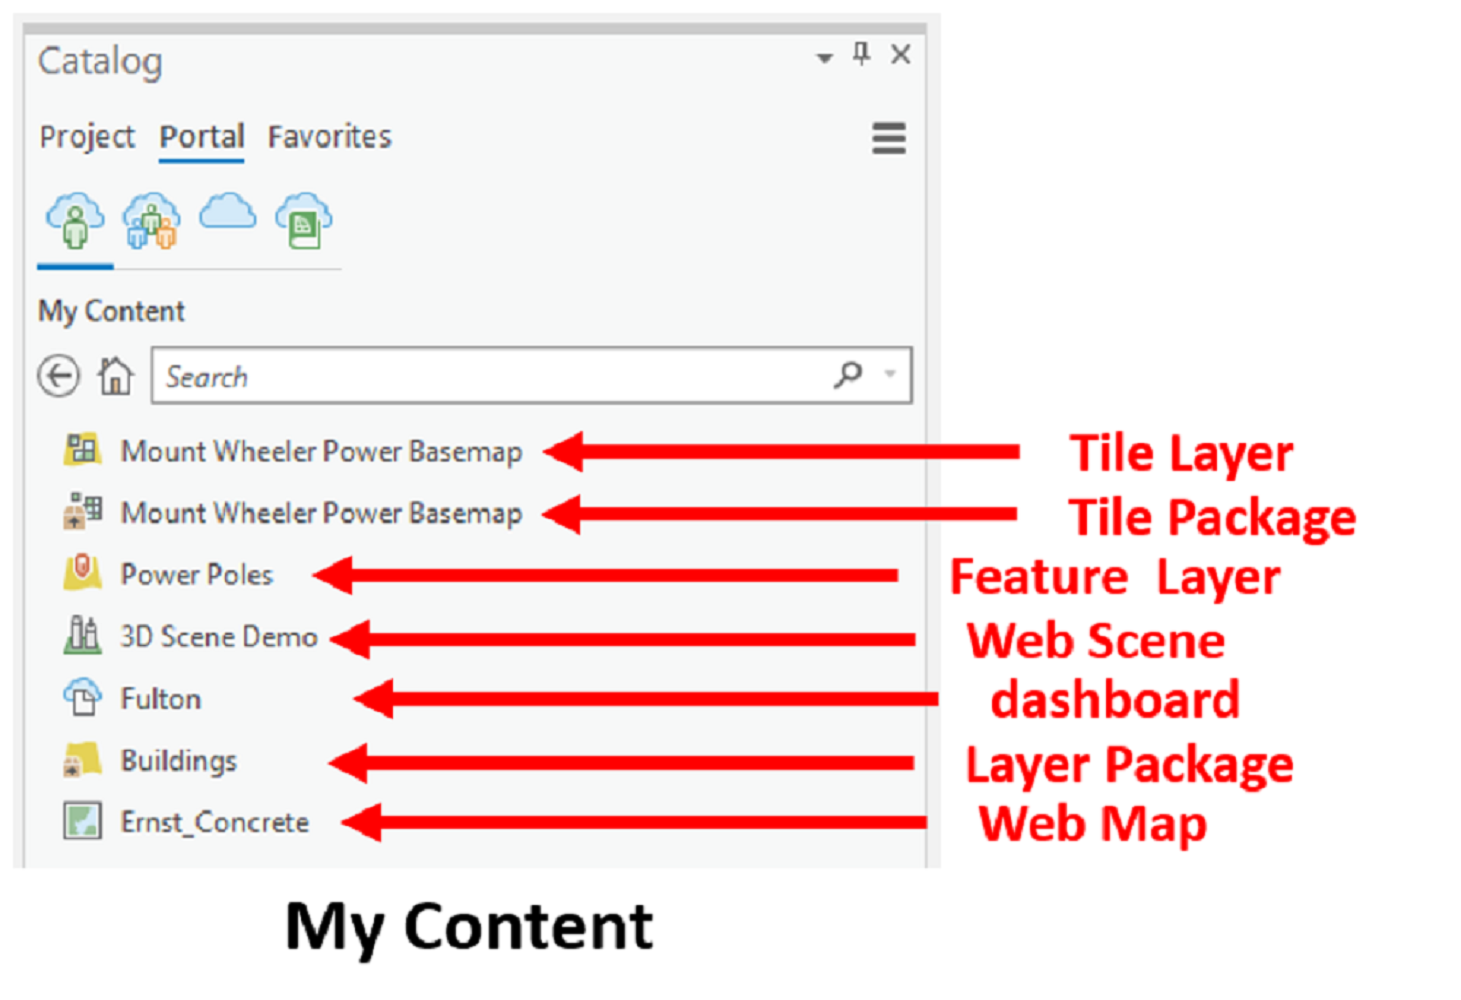
The Catalog pane provides access to the Projectitems. From there, you can access maps, scenes, folder connections, layouts, database connections, and other elements that are associated with the project, as shown in the following screenshot:

The Catalog pane, shown in the previous screenshot, contains three tabs at the top—Project, Portal, and Favorites. The Project tab allows you to access project items that are eitherstored within the project, such as maps or layouts, or that you have established a connection to for the project, such as a folder, database, or web connection. It should be mentioned that ArcGIS Pro does not support personal geodatabases. However, files, workgroups, and enterprise geodatabases are supported.
We will now move on to the Portal tab section.
The Portal tab
The Portal tab provides access to connections that you have established to either ArcGIS Online or Portal for ArcGIS. From this tab, you will be able to access content that has been published and content that you have permission to use. This can include web maps, feature layers, and web apps. The Portal tab has four buttons located on it:
- My Content: The first button is My Content. This allows you to access content that was created by you in ArcGIS Online or Portal for ArcGIS. This might include web maps, web scenes, the dashboard, layer packages, and more:
- Groups: The second button is Groups. This button allows you to see the various groups that you are a member of and the content shared to these groups:

- All Portal: The next button is All Portal. This allows you to see content shared with you in all the portals that you have connected other than your primary portal. If you are connected to ArcGIS Online, this includes any data that has been published in ArcGIS Online and shared with everyone. Because of the amount of data that can be available, when you click on this button, the content area will appear blank. So, you must search for content for it to appear. The following screenshot shows the All Portal tab:

- Living Atlas: The last button is Living Atlas. Esri's Living Atlas feature provides data that you can access that can only be posted from authoritative sources:

General ArcGIS Online content can be published by anyone with an account, but only vetted contributors are allowed to publish data to Living Atlas. This makes it a great starting point if you are looking for data that you can have some level of trust in.
We will now move on to the Favorites tab section.
The Favorites tab
The Favorites tab in the Catalog pane allows you to store connections to databases, folders, and servers that you use on a regular basis across multiple projects. This provides easy access to these resources from ArcGIS Pro and the ability to quickly add them to your current active project.
For example, if your organization has a primary GIS database that it uses for all its projects, then you might want to add it as a favorite so that you can easily add it to new projects as you start them. The following screenshot shows some examples of favorite connections:
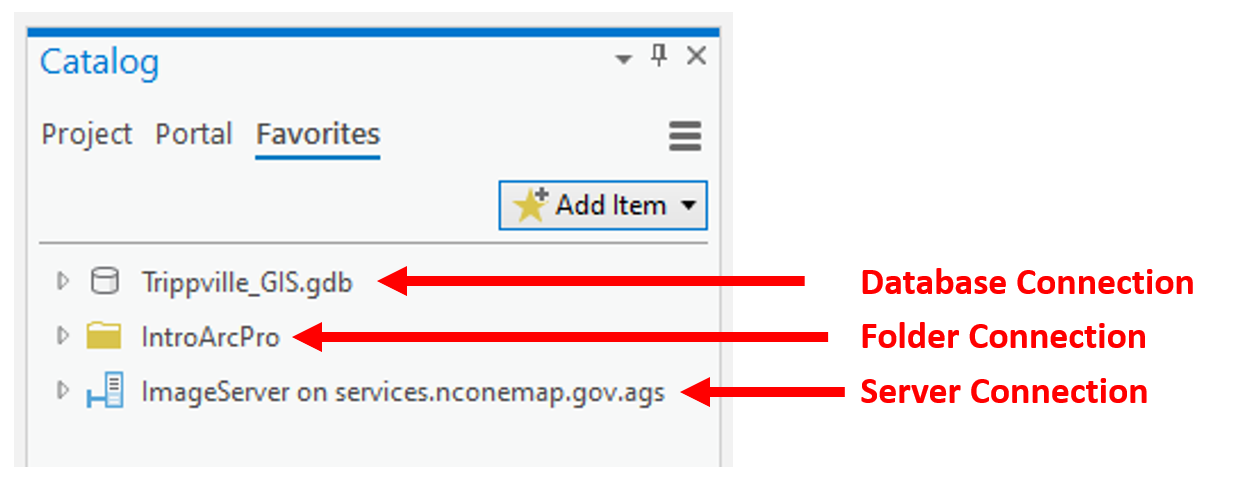
As you can see from the preceding screenshot, favorites are stored as part of your user profile, just like your Documents folder in Windows. If your organization uses roaming profiles, then your ArcGIS favorites will follow you from one computer to another within your network.
If your organization only uses local profiles, which is fairly common, then your favorites will only be available on the computer that you are using when you add the resource to your favorites. As of ArcGIS Pro 2.5 and earlier, there is no way to share favorites with others or through an entire organization.
Once an item has been added to your favorites, you can also choose to have that item automatically added to any new project that you create. This means that it will automatically appear in the Catalog pane and the Project tab for each new project that you create.
Now that you have learned some of the terms associated with a project and have been introduced to the Catalog pane, it is time for you to see it in action.
Exercise 5A – Using the Catalog pane
In this exercise, you will work to create a map that shows the floodplains and drainage basins for Union City. You will need to use the Catalog pane to establish several connections, including a geodatabase and server to access additional information that is needed to create the map. You will start with an existing project that is included with the data that you downloaded, which already contains a basic map.
Step 1 – Opening and saving a project
In this step, you will open an existing project and then save it. This will be the project you will continue to work with during this exercise:
- Start ArcGIS Pro. Again, remember that you will need an internet connection and access to ArcGIS Online.
- Using the skills you have learned in past chapters, open the ArcGIS Pro Exercise 5A project located in C:StudentIntroArcProChapter5.
- Then, save the project as %your name% Ex5A (for example, Tripp Ex5A.aprx). Save the project in the same location as the one you opened in the previous step.
If you have successfully opened the correct project and saved it, you should see the following visual:

Now, let's continue with the exercise and move on to the next step, where you will use the Catalog pane to explore the project you just opened.
Step 2 – Navigating the Catalog pane
Now that you have opened the project, you should see the Catalog pane located on the right-hand side of the ArcGIS Pro interface. In this step, you will see what content is already available in the Catalog pane:
- In the Catalog pane, click on the small arrowhead located on the left-hand side of Maps to expand that section.
- Expand the Databases section under the same pane.
- Expand the ArcGIS Pro Exercise 5A geodatabase to see which feature classes it contains.
- Compare the layers in the map to the feature classes in the geodatabase for the project.
- Expand the remaining sections within the Catalog pane to see the rest of the project items you currently have access to.
- Click on the Portal tab in the Catalog pane. By default, you start on the My Content list.
- Explore the portal items that are available to you in My Content list by moving your pointer over some of them.
- Click on the Groups button located on the Portal tab to see what groups you are a member of or have access to.
Again, you may see nothing here if you have not created groups for your organization in ArcGIS Online or Portal for ArcGIS before. As your organization makes more use of these technologies, expect the list of groups to grow.
Step 3 – Adding a database connection
In this step, you will add a connection to another geodatabase that contains additional data you need for this project:
- Click back on the Project tab in the Catalog pane.
- Right-click on Databases and click on Add Database, as in the following screenshot:

- In the Select Existing Geodatabase window, navigate to C:StudentIntroArcProDatabases. Select UnionCity.gdb and click Open. You should now see the UnionCity geodatabase in theCatalogpane located below ArcGIS Pro Exercise 5A project geodatabase. The UnionCity geodatabase contains additional layers that you will need to add to your map.
- Expand the UnionCity geodatabase so that you can see what feature classes it contains. Select theFloodplainsfeature class.
- Holding down yourCtrlkey, select theWatershedsfeature class.
- Right-click on one of the two selected feature classes and choose the Add to Current Mapoption.
Your map should look similar to the map shown in the following screenshot:

You have just added two layers from a different geodatabase to your map after you made the connection to it.
Although the layers are now visible on the map, you will need to make some adjustments to the layers to improve the readability of the map.
Step 4 – Adjusting the layers
In this step, you will make changes to the symbology and layer orders so that the map is easier to read. First, you will make changes to the layer draw order:
- Select the Watersheds layer in the Contents pane located on the left-hand side of the ArcGIS Pro interface.
- While holding your left mouse button down, drag the Watersheds layer so that it is below the Parcels layer in your layer list.
- Now, drag the Floodplains layer so that it is below the Parcels layer but above the Watersheds layer, as in the following screenshot:

- Right-click on the Floodplains layer and select Zoom to Layer.
Now that you have the layers of the drawing in the order you want them, it is time to work on the symbology for each. You will need to add a new style to your project first that contains the symbol for the floodplains.
- In the Catalog pane, right-click on Styles and select Add | Add Style, as in the following screenshot:

- In the Add a style file window, click on the folders located under Project in the left panel.
- Double-click on the Chaper5A folder in the right-hand side panel of the window.
- Choose ESRI.stylx and click OK. If you are asked to upgrade the style, click Yes.
You have just added this new style to your project, which will allow you to use the symbols it contains for the layers in your map. Styles store symbols, colors, north arrows, scale bars, and other map elements that are used to create maps and layouts.
- Click on the symbology patch located below the Parcels layer to open the Symbology pane.
- Click on the Properties tab and set the Color to No Color using the drop-down arrow.
- Make sure Outline color is set to black and click Apply.
- Select the Floodplains layer in the Contents pane.
- Select the Appearance group tab from the ribbon.
- Click on the symbology drop-down arrow and select Unique Values. This will open the Symbology pane on the right-hand side of the ArcGIS Pro interface.
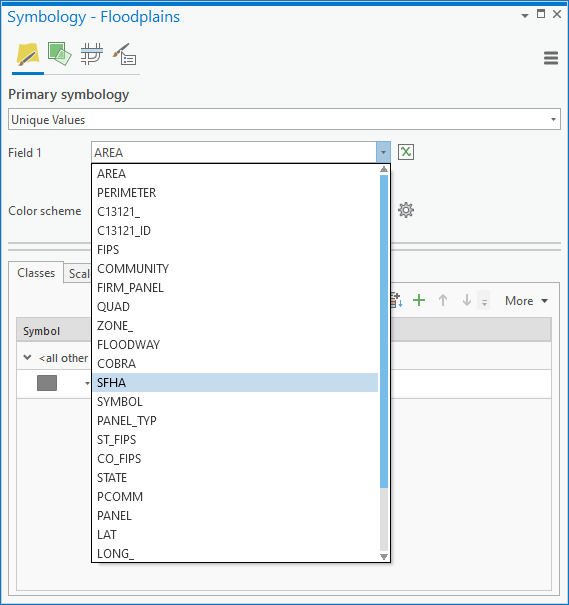
The contents of the Symbology pane should change. You should now see options to select a field to use to control the symbology, as well as a Color Scheme option, a Classes tab, and a Scales tab. We will configure some of these options next to symbolize the Floodplains layer based on values stored in the attribute table associated with this layer.
- For Field 1, select SFHA, as in the following screenshot. This field is used to specify whether an area is in or out of the Special Flood Hazard Area (SFHA), which is also commonly referred to as the 100-year flood zone. You want to symbolize the areas that are in the SHFA:
- Click on the symbol patch located next to IN in the grid.
- Make sure the Gallery tab is selected in the Symbology pane.
- At the top of the Symbology pane in the search bar, type Flood and press the Enter key.
- Select the symbol named 100 Year Flood Overlay. Note that this is in the Esri style you added to the project. It is only available for you to use because you added it.
- Click on the back arrow located in the top-left corner of the Symbology pane to return to the setting for the Floodplain layer.
- Click on the symbol patch next to OUT and set it to Hollow. Use the search function again if needed.
- Click on the back arrow to return to the Unique Values settings.
- In the Symbol grid, select where it says SFHA and type 100 Year Floodplain to replace it, as in the following screenshot:

- Click on More, located on the right-hand side just above the Symbol grid, and deselect or untick Show all other values, as in the following screenshot. This removes the values from appearing in the Contents pane and the legend:

So, you have nowadded a new style to your project and used a symbol contained in that style to update the symbology for theFloodplainslayer. You have one last layer to adjust, theWatershedlayer. We will now apply symbology to this layer using an existing layer file.
- Select the Watersheds layer in the Contents pane.
- Select the Appearance tab in the ribbon.
- Click on the Import tool. This will open the Geoprocessing pane on the right-hand side of the interface.
- Click on the browse button, located next to the Symbology layer.
- Click on the Folders option, located under Project in the left panel.
- Select the Watersheds.lyrx file and click OK.
- Make sure the Type field is set to Value_Field, Source Field is set to WATERSHED, and Target Field is set to WATERSHED under Symbology Fields in the Geoprocessing pane, as in the following screenshot:

- Once you have verified the Symbology Fields options, click the Run button located at the bottom of the Geoprocessing pane.
Your map should now look similar to the one in the following screenshot:
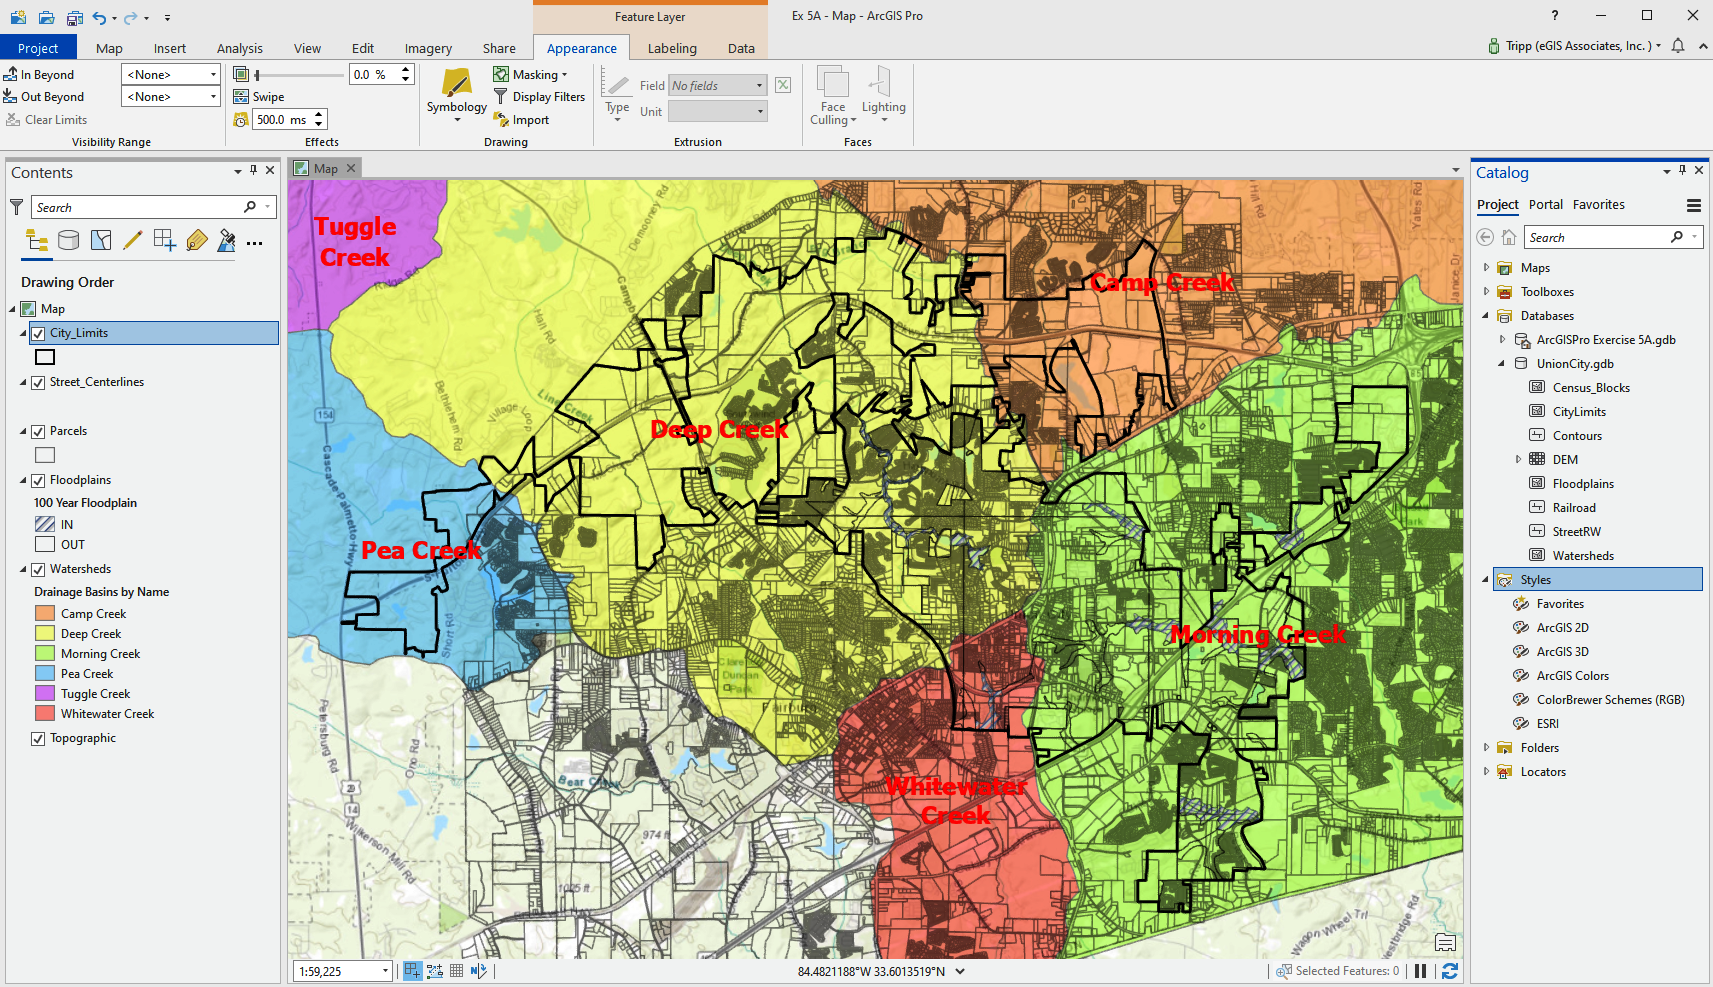
You just used a layer file to adjust the appearance of the Watershed layer. Layer files cannot only be used to apply symbology settings but also to other layer properties, such aslabeling. You can also see that each watershed is labeled with its name.
- Save your project.
So, you have added multiple layers to your map and made several adjustments to the added layers. You adjusted the draw order in the Contents pane so that each layer is visible. Then, you changed the symbology that is used by these layers using different methods.
Step 5 – Accessing and adding a layer from a portal (optional)
We are almost done. Suppose that at the last minute, it has been decided that you need to add an aerial photograph to the map. You have been instructed to use aerials served byFulton Countyto ArcGIS Online. We will use the following steps:
- In the Catalog pane, select the Portal tab at the top.
- Select the All Portal button so that you can access and search all the ArcGIS Online content.
- In the search cell, type Fulton County Pictometry Imagery and press your Enter key.
- Scroll down and locate the most current Pictometry tiled image service, as in the following screenshot:

You should remember that a tiled image service will be indicated by a yellow trapezoid with several green-blue squares on top of it. Do not confuse a tiled image service with a map service.
- Right-click on the most current image, such as the Pictometry2019_NAIP tiled service, and select Add to Current Map.
- Save your project.
You have now added an aerial photography layer to your map from your Portal connection. Next, let's explore how to add a favorite in the Catalog pane.
Step 6 – Adding a folder connection as a favorite
As you know, all the data that you have been using throughout this book is stored in a single folder—IntroArcPro. So, you are going to add this folder to the Favorites tab in the Catalog pane for easy access when needed:
- In the Catalog pane, click on the Favorites tab.
- On the right-hand side, click on the Add Item button and select Add Folder from the menu that appears, as shown:
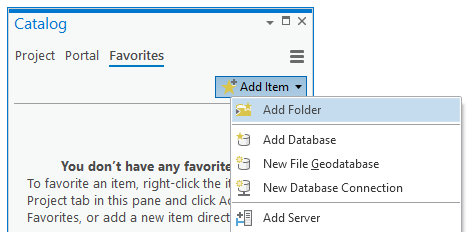
- In the Add Folder Connection window, expand the Computer option in the left panel so that you can see its contents.
- Click on the C: drive so that its contents appear in the right panel of the window.
- Scroll down until you see the Student folder and double-click on it.
- Select the IntroArcPro folder and click OK.
You should now see the IntroArcPro folder in your Favorites list in the Catalog pane. This folder will now always appear in this list on the computer that you are using until you decide to remove it. Next, we will add this favorite to your project.
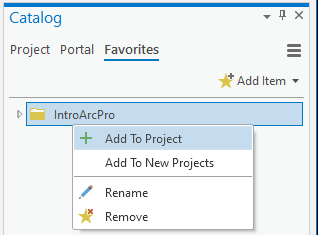
Step 7 – Adding a favorite to a project
Now that you have added a favorite to your list, you will still need to add it to your current project as a connection. This is easy to do now that the folder connection is a favorite. In this step, you will see just how easy this is by adding it to your currently open project:
- In the Catalog pane, click on the Favorites tab, then right-click on the IntroArcPro folder connection that you added in the previous step.
- Select Add to Project from the menu that appears, as in the following screenshot:
- Now, click on the Project tab in the Catalog pane.
- Expand the Folders folder so that you can see the folder connections available in this project.
You should see two folder connections available—Chapter5 and IntroArcPro. The IntroArcPro connection is the one that you just added from your favorites. Now, all the data and other folders stored within the IntroArcPro folder are available for you to access and use in the project that you have been working in. You will also be able to just as quickly add the IntroArcPro connection to any other project you work on now or in the future.
- Save your project and close ArcGIS Pro.
In this exercise, you learned how to navigate the Catalog pane and how to use it to add new layers to your map. You also learned how to access portal connections and create favorite connections that can then be easily added to projects. Next, you will explore how to create new projects from the beginning.
Creating a new project and project templates
As you have seen, projects are the very core of ArcGIS Pro. They contain all the things that a user needs to complete various GIS tasks. So far, the projects that you have used have already been created for you. They have included maps, three-dimensional scenes, and various connections. So, how do you create a new project from scratch?
In this section, you will learn how to create a new project using one of the Esri-provided templates. Then, you will learn how to create your own template that you can use to create new projects.
Creating a new project with Esri templates
When you open ArcGIS Pro, you have the option to open an existing project or create a new one. If you choose to create a new one, you first select a template. The template automatically generates content and connections within the new project that is created. The template can create maps, scenes, layouts, folder connections, database connections, and more.
In addition to what is created by the template, a new project-specific file geodatabase and toolbox are created in the Home folder. Remember that the Home folder is the folder that contains the new project that is created by us. Your new project will set these as the default geodatabase and toolbox used by the new project automatically.
Esri has already created some templates that you can use to begin creating new projects as soon as you install ArcGIS Pro. This includes four templates, each with a specific use in mind. They are as follows:
| Esri Template Name | General Description |
| Map | Primarily for use with two-dimensional data. Automatically includes a two-dimensional map that includes your organization's default basemap layer. |
| Catalog | Creates a new completely empty project with no maps, scenes, or layouts. This was formerly called the Blank template in earlier versions of ArcGIS Pro. |
| Global Scene | Primarily for use with three-dimensional data that covers a large area. Automatically includes a three-dimensional global scene. |
| Local Scene | Primarily for use with three-dimensional data that covers a smaller area. Automatically includes a three-dimensional local scene. |
To use one of the previously mentioned templates, you simply select it from the New panel on the opening screen of ArcGIS Pro, or from the New option located in the Project tab. Since ArcGIS Pro 2.3, you also have the option to start a project without a template. This is similar to using the Catalog template, but it does not automatically create the supporting project structure, which you will learn aboutsoon.
You also have the option to select another project template if you do not want to use one of the four Esri-provided templates. You will learn how to select other templates later in this chapter. Let’s now see how one of these Esri templates works.
Exercise 5B – Using an Esri template to create a new project
In this exercise, you will create a new project that will contain a local scene using some of the same data you used in the last exercise. You have been asked to create a three-dimensional scene for Union City showing the elevation change of the city and the locations of the basins.
Step 1 – Creating a new project using the Local Scene template
In this step, you will create and explore a new blank project created using the Local Scene template:
- Open ArcGIS Pro.
- On the right-hand side in the ArcGIS Pro start page, select the Local Scene template, located under the New column.
- In the Create a New Project window, name your project %Your Name% Ex5B and set your location to C:StudentIntroArcProMy Projects. Your window should look similar to the one in the following screenshot:

- Click OK to open your new project.
Your new project should have opened with a new scene that only contains a two-dimensional Topographic basemap layer. We will now take a moment to explore what else was done automatically by using this Esri template. Explore the Catalog pane.
- Continue to explore the remaining items in the Catalog pane until you have become completely familiar with the new project that you have created and what you currently have access to.
Now, we will take a look at the backend of what happened when you created your new project so that you can see what ArcGIS Pro does when a new project is created. You should look at your project using your operating system's File Explorer.
- Open your File Explorer application. It uses an icon that resembles a file folder in a file organizer. You can normally find it on the taskbar or desktop.
- Once you have opened the File Explorer, navigate to C:StudentIntroArcProMy Projects. You should see a folder inside the My Projects folder named %Your Name% Ex5B. This folder was automatically created by ArcGIS Pro when you created the new project. This is your project's home folder.
- Open the home folder so that you can see its contents. The home folder should contain several folders and files, all of which were automatically generated by ArcGIS Pro when you created the new project, as shown:

Different templates will create different files and folders. Remember, templates are created with specific purposes in mind, so each one will be different to some extent. Feel free to explore some of the folders in-depth, if desired.
- Once you are done, close your File Explorer and return to ArcGIS Pro.
You have just created a new project using the Esri-provided Local Scene template. Now, let's move on to the next step.
Step 2 – Connecting to data sources and adding your surface
In this step, you will connect to the Union City geodatabase that you used in the last exercise. You will then set up your scene to use the Digital Elevation Model (DEM) in that geodatabase as the elevation surface. The elevation surface serves as the ground level or height that all the other layers are overlaid onto within the three-dimensional views provided in a scene:
- Right-click on your scene in the Contents pane and select Properties.
- Click on the General option in the left-hand side window and rename the scene Union City.
- Click on the Coordinate System option in the left-side window, then click on the drop-down arrow located adjacent to the Add Coordinate System button. It looks like a wireframe globe with a green plus sign.
- Select the Import Coordinate System option from the list of options that can be seen in the following screenshot:

- In the Import Coordinate System window, navigate to C:StudentIntroArcProDatabasesUnionCity.gdb. Then, select DEM raster and click the OK button. This sets your scene so that it will use the same coordinate system as the DEM and other layers that you will add to the scene during this exercise.
- Click OK in the Map Properties window to apply your changes, and then close the window.
- In the Catalog pane, right-click on the Databases folder and select Add database from the menu that appears.
- Under Computer, navigate to C:StudentIntroArcProDatabases and select UnionCity.gdb. Click the OK button to add the database connection.
Before you add any layers to your scene, you need to define the elevation surface. By default, ArcGIS Pro uses Esri's World Elevation model from ArcGIS Online. However, you can use your own if you have one. In our case, we do have our own digital elevation model, and it is more accurate than Esri's model. So, should now configure your scene to make use of your local, more accurate DEM.
- Select the Map tab from the ribbon.
- Click on the Add Data text located below the Add Data button in the Layer group, then select the Add Elevation Source option from the list that appears.
- Click on the Databases option, located under Project in the left panel.
- Double-click on UnionCity.gdb in the right panel of the Add Elevation Source window.
- Select the DEM that appears and click OK.
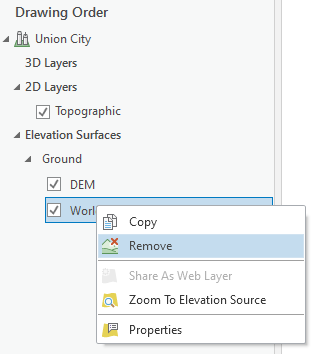
You should now see the Union City DEM above the default ArcGIS Pro ground elevation in the Contents pane. Since we are not concerned with areas outside the immediate Union City area, in this scene, you will remove the default ArcGIS Pro ground surface.
- In the Contents pane, right-click on World Elevation 3D/Terrain 3D surface and select Remove from the menu that appears, as in the following screenshot:
- Using the skills that you learned in previous exercises, add the Floodplains and Watersheds feature classes to the scene.
- Using the same process you used in the last exercise, adjust the symbology so that they are symbolized in the same way that they were in Exercise 5A:

In order to complete this task, you may need to connect to the Chapter5 folder and add the Esri style again.
- Save your project.
- Click on the Map group tab in the ribbon.
- Click on the Add Data button and navigate to the Chapter5 folder located in C:StudentIntroArcPro.
- From the Chapter5 folder, choose 3D Buildings.lyrx and click OK.
You have just added a new layer to your scene using a layer file. As you can see, the layer was automatically assigned specific symbology. This was because you used a layer file to add the data instead of going directly to the geodatabase and adding the feature class. A layer file contains predefined settings for a layer, including symbology, labeling, transparency, the source, and more. It allows you to standardize layers for use in multiple maps.
- Right-click on the Buildings layer you just added and select Zoom to Layer.
- Using the Explore tool, along with the scroll wheel on your mouse, zoom into the area where the Whitewater Creek, Morning Creek, and Deep Creek watershed basins intersect. Zoom in until your map looks as in the following screenshot:
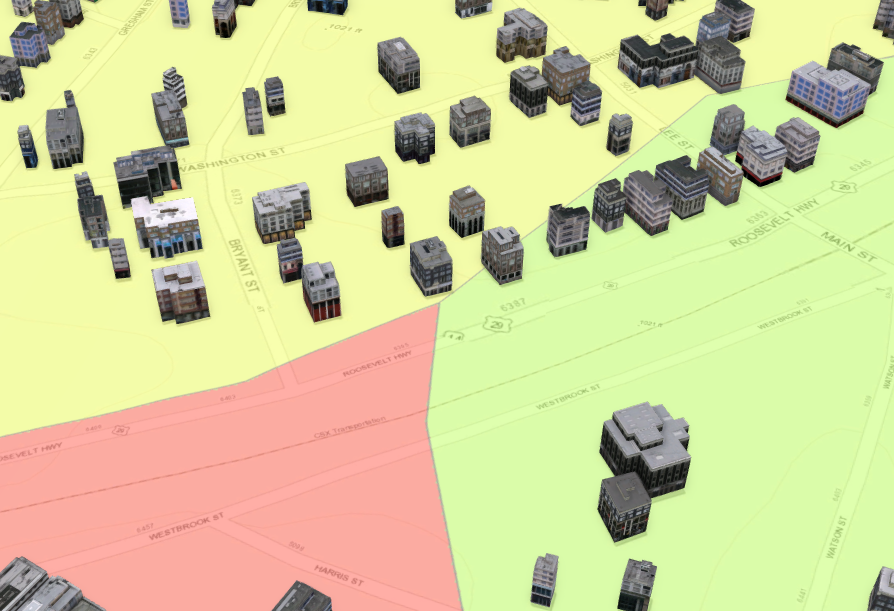
As you can see in the preceding screenshot, you can now see the buildings in 3D with a realistic facing applied. You can see what basin they are in, and if you pan around, you can also see which ones are in the 100-year floodplain.
- Save your project and close ArcGIS Pro.
So, in this section, you have learned how to create a new project using Esri's Local Scene template and how to build out the scene with layers and a local elevation surface. But how do you create your own project templates for use by ArcGIS Pro users in your organization? We will investigate that next.
Creating custom project templates
In the last exercise, you saw how useful a template can be to start a new project. In this section, you will learn how to create a custom project template.
Templates can standardize all the projects that you or your organization create in ArcGIS Pro so that they access the correct databases, contain the appropriate styles, and have the proper layout elements. Project templates are really specialized versions of a project package that can be used to create new projects. They have a .aptx file extension.
Project templates can be saved to several locations. You can save them to your computer, a network share, ArcGIS Online, or Portal for ArcGIS. Where you save them will help determine who can use them.
Project templates saved to your computer generally can only be used by you. This can limit their value to an organization. However, since they are stored locally on your computer, they can be better suited for your personal use. This is because they can contain connections to local resources that exist on your computer, which others may not have access to. Also, if you include connections to secure data sources or files, you do not have to worry about whether other users will have permission to also access those locations.
Project templates you save to a network share—for example, a folder on your file server or to ArcGIS Online—can be used by others in your organization when creating new projects, assuming they have sufficient privileges to access the location. This allows you to standardize projects created by ArcGIS Pro users throughout your organization, which has several advantages:
- Templates can ensure you're using common map layouts, which include standard title blocks, north arrows, logos, and legal disclaimers.
- Templates can ensure everyone accesses the correct data sources, folders, styles, and toolboxes.
- Templates can ensure data and files are saved to the proper locations by standardizing a common project structure.
- Templates can ensure everyone uses the correct basemap when creating maps or scenes.
The preceding points are just a few of the advantages of using templates within an organization. If you are going to save your templates to ArcGIS Online, there is a security concern that you need to make sure to pay careful attention to, which is who you choose to share with.
If your organization has enabled sharing outside your organization, it is possible that others who are not in your organization will access your templates. When you create and save a template to ArcGIS Online, you are asked about who you wish to share the template with. If you select everyone, then you will be sharing your template with any users that have access to ArcGIS Online. That includes those who are not part of your organization. This means ArcGIS Pro users who are not affiliated with your company or group will be able to use your template. This also means they will be able to see everything you included in the template, such as database connections, logos, folder connections, layouts, and more. Access to your templates could represent a security breach waiting to happen if you are not careful. So, when you save a template to ArcGIS Online, make sure to pay attention to who you choose to share it with.
Let's work on another exercise next that helps us create a custom template.
Exercise 5C – Creating a custom project template
Now that you understand why you would want to create custom project templates, let's look at the how to do so. In this exercise, you will create a custom project template that you will save to your computer. This template will include a map, database connections, and more. Once you create the template, you will then create a new project that uses the template.
Step 1 – Creating a project
All templates start as a project. So, to create a new template, you must first have a project that contains all the standard settings you wish to include in the template. So, we will start this step by creating a new project using the Catalog template, which provides you with a blank slate upon which you can build your template:
- Start ArcGIS Pro.
- On the right-hand side in the ArcGIS Pro start page, select the Catalog project template.
- In the Create a New Project window, name your project %Your Name% Ex5C and set your location to C:StudentIntroArcProMy Projects.
- In the Catalog pane, right-click on Database and select Add Database.
- In the Select Existing Geodatabase window, navigate to C:StudentIntroArcProDatabases and then select the Trippville_GIS.gdb file to add it as a connected database.
- Using the skills you have learned, add the ESRI.stylx style to the project.
- Save your project.
We will now move on to the next section, which describes the next step.
Step 2 – Setting up a default map in the template
Now that you have opened a new project and established some default connections to databases and styles, you will now create a default map that will be included in the template. You will configure a basemap and then set a default view extent:
- In the Contents pane, right-click on Project and select New Map. This will add a new map to your project.
- On the Map group tab in the ribbon, click on the small drop-down arrow under Basemap and select Imagery.
- In the Catalog pane, expand the Databases folder and the Trippville_GIS geodatabase that are you connected to.
- Expand the Base feature dataset and right-click on the City_Limit feature class, then select Add to Current Map.
Your map should zoom to the new City Limits layer you just added, so it should look similar to the following screenshot:

Remember that the color for the City_Limit layer may be different in your map because ArcGIS Pro assigns a random color to new layers unless you add the new layer using a layer file.
Adding the City_Limit layer also assigns the coordinate system you wish to use for the map and in your template. Just as with ArcMap, the first layer you add to a map in ArcGIS Pro assigns the coordinate system to the map. Now, you will set the view extents, which will be the default for this map in your project.
- Right-click on Map in the Contents pane and select Properties.
- In the Map Properties window, select Extent from the left-hand side pane.
- Click on Use a Custom extent tab in the right-hand side panel.
- Click on the Current visible extent option located under Get extent from. This will set your map so that when you select the Zoom Full extent button, it will take you to this zoom scale. Then, click OK to apply the setting.
- Using the skills that you learned in Chapter 2, Navigating the Ribbon Interface, make the following changes to the City_Limit layer:
- Set the symbology to a hollow fill.
- Set the outline to Mars Red.
- Set the outline width to 2 pt.
- Rename the layer City Limits.
- Save your project.
You have created a simple map that will be part of the template you are working to create. This means anyone that uses the template will start with this map in their project.
Step 3 – Adding a layout from an existing map document
There is one last thing to add to your project before you save it as a template. We want to add the layout that we have been using in the map documents we created with ArcMap, which is another Esri application. This will allow our maps to look the same, regardless of whether they are created in ArcGIS Pro or ArcMap:
- Click on the Insert group tab in the ribbon.
- Click on the small drop-down arrow located next to New Layout and select Import layout file..., located near the bottom of the window that appears, as shown:

- In the Import window, navigate to C:StudentIntroArcProChapter5. Choose the Sample Layout.mxd file and click OK.
You have just imported the map layout, which was in the map document. This layout was created with ArcMap and is used by your organization as a standard layout for all the maps you print. You will need to make some adjustments to this layout for it to work properly in ArcGIS Pro.
- Right-click on Map Frame in the Contents pane and select Properties to open the Format Map Frame pane on the right-hand side of the interface.
- Make sure the Options button is selected in the pane. It is the first one located under Map Frame.
- You should see two options—General and Map Frame. In the General option, rename the frame Map Frame.
- In the Map Frame option, click on the drop-down menu and select Map. When you do that, you should see the map you created in step 2; it should appear in the layout. It should look like this now:

- Close the Format Map Frame pane.
- You should save a bookmark for this layout so that you can easily return to this location and scale. Select the Layout tab on the ribbon.
- Click on the small arrowhead located below the Bookmarks button in the Map group.
- Then, choose New Bookmark. In the Create Bookmark window, name your bookmark Print Layout. For the Description type, this bookmark will return you to the correct location and scale to print the entire city limits area. Then, click OK.
- Close the sample layout and save your project.
Let's look at the next step in the next section.
Step 4 – Saving a project as a template
Now that you have configured the project to have your standard style and folder connection, plus included a sample map and layout, which will be the common basis for new projects, you are ready to save your project as a template:
- Click on the Share tab on the ribbon.
- Select the Project Template button in the Save As group tab.
- The Create Project Template pane is displayed on the right-hand side of the interface. Under the Start Creating section, select Save the template to file.
- Click the Browse button, located under Name and Location, to specify the location you will save the template to and the name you will give it.
The default location is located in your user profile and the ProjectTemplates folder. You will accept the default location so that the template appears on your list when you start ArcGIS Pro.
- Name your template %your name% 2D Project Template (that is, Tripp 2D Project Template) and click Save.
- You will now need to fill out the item description information for the template. The item description is a shortened form of metadata. Complete the following, as indicated:
- Summary: This serves as a template for two-dimensional ArcGIS Pro projects and includes a single two-dimensional map and a layout. It will automatically connect to the Trippville_GIS geodatabase and add the Esri symbol style.
- Tags: Tags are keywords used by the search function in ArcGIS Pro, such as 2D, Trippville, layout, map, and template.
- Click the Analyze button to make sure your template does not contain any issues that would prevent it from working properly. The Analyze button will automatically take you to the Message tab in the pane. You should not see any errors or warnings. If you do, correct them, as recommended by ArcGIS Pro.
- Once you have no errors in the Messages tab, click on the Create button in the pane. If you are asked whether you want to save your project, click Yes.
When ArcGIS Pro is done creating the template, you will see a message letting you know that it is complete.
- Close ArcGIS Pro. You can choose to save the project if you desire, but it is not required.
We will now move on to the last step of the exercise.
Step 5 – Creating a new project using a custom template
Now that you have created a custom project template, you need to know how to use it when you create a new project. In this step, you will use the project template you just created to create a new ArcGIS Pro project:
- Start ArcGIS Pro.
- In the ArcGIS Pro start page, click on Select another project template, located on the lower-right-hand side, as shown:

- Select the template you created in the previous step. It should appear in the right panel of the Create New Project From Template window. Then, click OK.
- Name your new project %your name% template test.
- Set the save location to C:StudentIntroArcProMy Projects and click OK.
Your new project should open with a map that looks very familiar. You should see the City Limits layer with the Imagery basemap.
- Take some time to explore the Catalog pane. Look at what connections, maps, layouts, and styles are present.
- When you are done exploring your new project, save it and close ArcGIS Pro.
You have just created a new project using your own custom template.
Word of warning
When creating custom templates using ArcGIS Pro, there is something you should know that happens if your template references data or folders that are located on mapped drives. A mapped drive is one that is referred to by a drive letter, such as the C: drive, which is normally the local drive on your computer, or the M: drive, which is located on a network file server.
While using ArcGIS Pro, it is preferred that you don't use mapped drives, especially when creating templates. It's preferred that you use a Universal Naming Convention (UNC) path. So, what is a UNC path? This is what IT people use to connect mapped drive letters to a folder on their server. A UNC path looks something like \GIS_ServerGIS_Data_folder. GIS_Server is the name or IP address for the server on your network. GIS_Data_Folder is a share created by the server administrator on that server to allow others on the network to access the files contained within it.
ArcGIS Pro's preference for UNC paths makes sense for data that resides on a server because it is not uncommon for different people in an office to use different drive letters to reference the same location on a server. For example, I might have \GIS_ServerGIS_Data_folder mapped to the M: drive because I think GIS is mapping, so I think it makes sense to map the GIS data to the M: drive. However, my colleague may map the same server location to the G: drive for GIS. However, if I used the UNC path instead, it would be the same location for both of us.
So, what happens if you create a template that references mapped drives? Well, when you create a new project based on the template, ArcGIS Pro will actually create copies of your data. It does this without any warning and unless you look closely at your layer sources, you will not notice that this has happened. To learn more about this, visit https://youtu.be/tyu439Uownk.
It should be mentioned that if you are referencing an Enterprise/SDE database or web services, this duplication will not happen.
Summary
In this chapter, you learned how important projects are when using ArcGIS Pro. They are the very core of the application. You have seen how they contain all the items associated with a project, including database connections, maps, styles, toolboxes, layouts, server connections, and more. By having all of these in a project, it is much easier to access the resources that you will need to perform GIS work in ArcGIS Pro.
You now know how to create new projects using the Esri-provided templates, as well as custom ones that you can create. Once you create a project, you also know how to add new resources to the project so that you are able to perform the required GIS functions to complete tasks. As you have seen, a project is not limited to a single database, map, folder, or style. You can choose to make as many connections as you wish so that you are able to access whatever datasets, tools, and symbology that you need.
Because a single project can contain multiple connections and other items, it is important to manage all the items included in the project to ensure the project runs effectively and provides access to the most relevant data. The Catalog pane in ArcGIS Pro provides the tools and methods to access, add, view, or remove those resources. This will ensure the project performs efficiently.
Lastly, you learned how a project template can be used to make creating new projects more efficient by preconfiguring various project items. You have the option to use one of the predefined ArcGIS Pro templates, or you can create your own custom templates.
You now have the skills and understanding for creating maps, scenes, and projects. The next chapter will take you through how to create layouts so that you can present your work in a professional manner.