
This chapter explains the different ways of verifying the website responses for each request and the website response in different scenarios such as slow network speed, different browsers, or with different set of users at a given point in time. All these factors affect the website's performance and the response time. Web performance testing helps us to verify whether the website produces the expected result within the expected response time, to identify the problems and rectify them before they happen in an actual production environment, helps in finding out if the hardware can handle the maximum expected requests at a time, or needs additional hardware to handle the traffic and respond to multiple user requests.
Here are some of the main testing highlights that are performed on the web applications for better performance and availability:
- Validation and verification test helps to verify the inputs or the expected entries that satisfy the requirements. For example, if a field requires a date to be entered, the system should check for the date validation and should not allow the user to submit the page until the correct entry is made.
- Web page usability test is the method of simulating the practical user's way of using the application in production and testing the same as per requirements. This could be something like checking the help links, contents in the page, checking the menu options, and their links, think times between the pages, or the message dialogs in the pages.
- Security testing helps us verify the application response for different end users based on the credentials and different other resources required from the local system or a server in the network. For example, this could be writing/reading the log information file in the network share.
- Performance testing verifies the web page responses as per expectations based on the environment. This also includes stress testing and load testing of the application with multiple user scenarios and the volume of data that is explained in detail in Chapter 7, Load Testing.
- Testing web pages compatibility is the method of testing multiple browsers based on the user requirements. The web page presentation depends on how well the components are used and supported on different browsers that the end users may choose.
- Testing web application using different networks is because of the user location that varies based on from the user is accessing the system. The performance and the accessibility of the applications are based directly on the network involved in providing the web pages to the user. This is also a part of performance testing. For example, it could be a local intranet or an Internet with low network speed.
There are many other types of testing that can be performed as part of web performance testing such as using different operating systems, using different databases, or installing different versions of an operating system.
All these testing types, with many additional capabilities, are supported by Microsoft Visual Studio. The dynamic web pages can be created by any of the supported .NET languages through Visual Studio using the ASP.NET web project and web page templates. Custom services, components, and libraries are used in the web application to get the functionality and make it more dynamic. Other scripting languages and technologies, such as JavaScript, Silverlight, and Flash are used in web pages for validations and better presentation on the client machine. Once the web application is ready, it needs to be deployed and tested to check if the web site functionalities and qualities are satisfied as per requirements. To get to this point, Microsoft Visual Studio provides tools for testing the web applications in different ways. One is to use the user interface to record and then add the validation rules and parameters to make it dynamic. The other way is to record the requests and then create the coded web test for the recorded web test, and customize it using the code.
This chapter explains the basic way of web testing using Visual Studio and using the features, such as adding rules and parameterization of dynamic variables. Microsoft Visual Studio 2012 provides many new features to the web performance testing, such as adding new APIs to the Test Results, keeping web performance Test Results in a separate file, looping and branching, and new validation and extraction rules. This chapter provides detailed information on features given in the following list:
- Creating a new web performance test
- Web performance test editor and its properties
- Web request properties, validations, and transactions
- Toolbar options and properties
- Performance session for testing
- Debugging and running the web performance test
The web performance test activates the web performance test recorder to record all the actions performed while browsing the websites and adds it to the performance test. Creating a performance web test is similar to creating any other test in Visual Studio. The different ways to create a new web performance test are as follows:
- Select the Test Project if there is one already added to the solution, right-click, and choose Add.
- Select the Web Performance Test option from the list of different test types as shown in the following image:
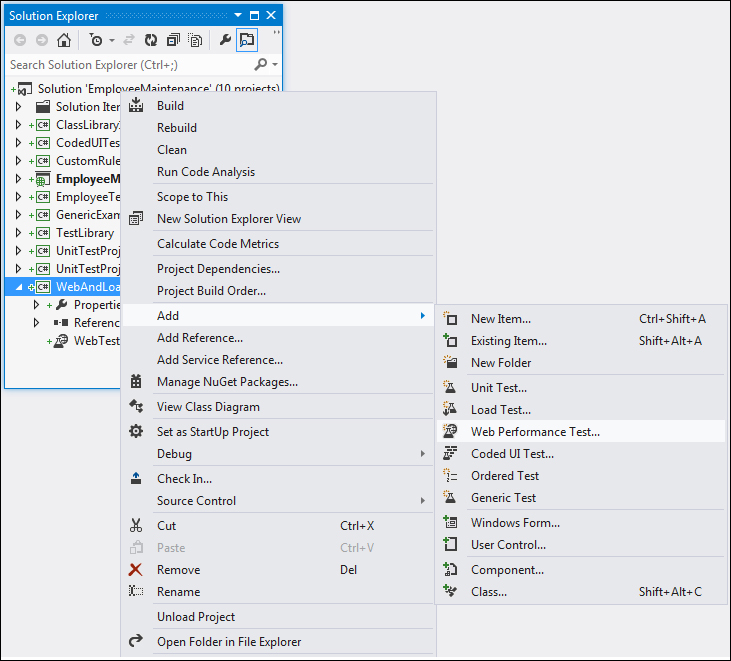
- Once you select the Web Performance Test option, click on OK. A new test will get created under the selected Test Project and a new instance of a web browser opens. The left pane of the browser contains the Web Test Recorder for recording the user actions.
- If the Test Project is not added, select the Add New Project option from the File menu and choose the Web Performance and Load Test Project type from the list for Test Project templates, as shown in the following image:
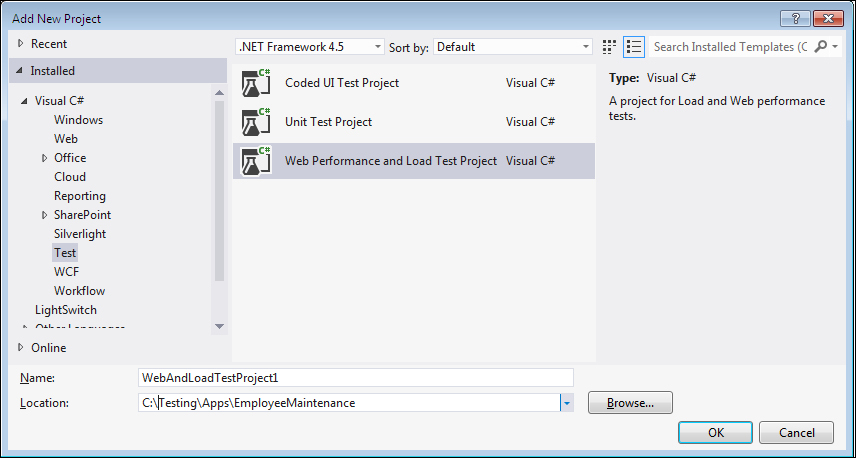
The above option will create the new project, add the web performance test to the project, and then open the recorder as well.
The web test recorder is used mainly to record all the actions performed while browsing the web pages. The recorder records all the requests made and responses received while navigating through the web page.
The test scenario is created by navigating through the web pages and recording. Once the scenario is created, build the scenario or customize it to make it more dynamic using parameters and adding dynamic data source.
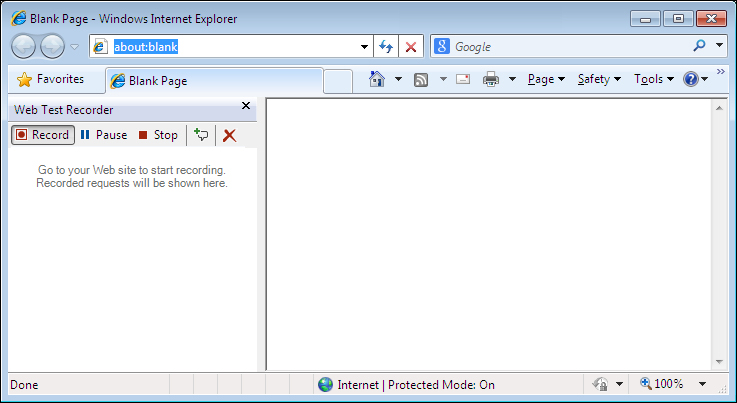
As stated earlier, after starting the web performance test, a new browser window opens with the web test recorder. The recorder has five different options discussed as follows:
- Record: This option is to start recording the web page requests.
- Pause: This option is used to pause the recording. In some cases, recording may not be required for all requests in the web application but we may have to pause the recording and restart it for the forthcoming pages.
- Stop: This option is to stop the recording session. Clicking on the Stop button closes the browser and stops the session.
- Add a Comment: This option is used for adding any additional comments to the current request in the recording.
- Clear all requests: This option is to clear out all the requests in the recording. Sometimes, if there are any mistakes in the recording and you do not want to continue but clear the recording to restart from the beginning, then use this Clear all requests option.
Following is a screenshot that shows all these options available on the recorder:
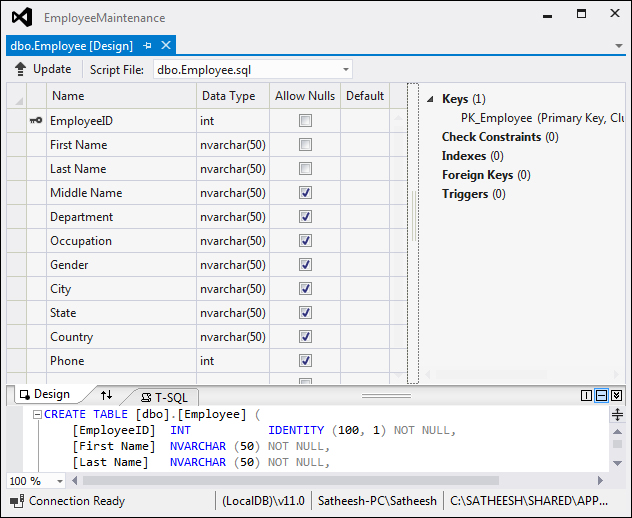
Before proceeding with web testing, create a sample web application for testing. Consider a new employee creation page wherein the user has to provide information, such as First Name, Last Name, Middle Name, Occupation, and Address. This is the minimum information required to keep track of users in the website, which is common in most of the websites. Consider the following simple web page for this example. It contains a Save option which collects all the information entered by the user and saves it to the database table. The user entries are validated as per the requirement, which we will see through the examples in the subsections. The database is the SQL Server Express database, with one table for storing all the information. The following screenshot shows the database table for the sample application:
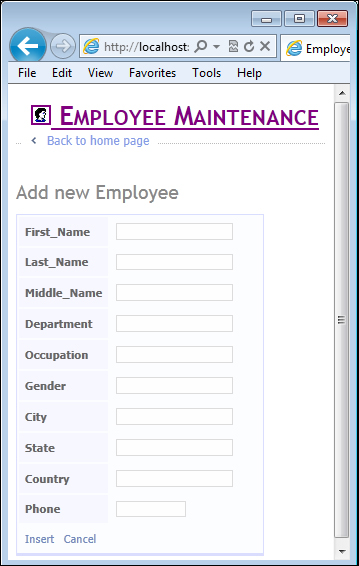
The Add new Employee web page from the sample application is shown here with some required fields, including fields to show the validation error messages and the Insert option to send the details and save it to the database:
The application can be tested when it is hosted on a web server, or when it is running on the local development web server within Visual Studio. The examples given in this chapter are based on the local Visual Studio development server. The approach is the same for hosted applications on a web server.
While using the Visual Studio local development web server, build the new web project and keep it running. Get the web address from the running web application which has the web address with a dynamic port assigned to it.
First, let us look at the features of the web performance test and then go into the details of collecting information from a test and the actual testing.
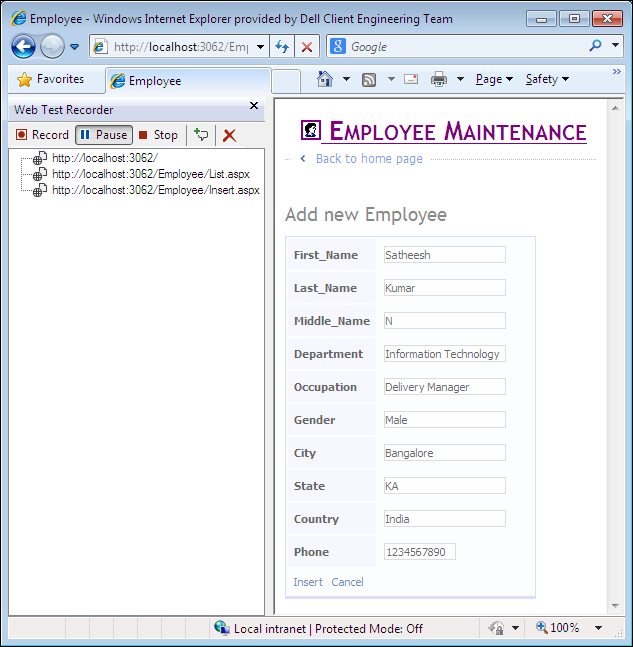
Create a new web performance test which opens the new web test browser recorder window. The web test tool opens the Microsoft Internet Explorer browser for the recording as Internet Explorer is the default web browser for testing. Now in the Address bar, enter the web page address and hit Enter. In this case it is going to be http://localhost:3062/Employee/Insert.aspx (this is a test address using the local web server and will vary based on the dynamic port assigned to it). If you are planning to test the application from the hosted server, then record the test by browsing the web pages from the hosted server. Whether it is hosted on server or a local development server, the web application should be up and running for testing. Once the web page is up, enter all the required details and click on Insert to save the new employee details. Each row gets added to the tree view below the recorder toolbar. All request details are recorded until the test is stopped or paused. To get the correct test scenario, enter all required fields and perform a positive test so that there are no error messages. After recording the scenario, perform invalid entries and test the application.
After entering the URL and hitting Enter in the Address bar, the web page is loaded on the right while the requests are captured on the left as they are recorded.
Enter all request details and then click on the Insert button. Once the insert is successful, stop the recording to complete the insert scenario. The web test shows the recorded pages and the parameters captured while recording the insert page as follows:
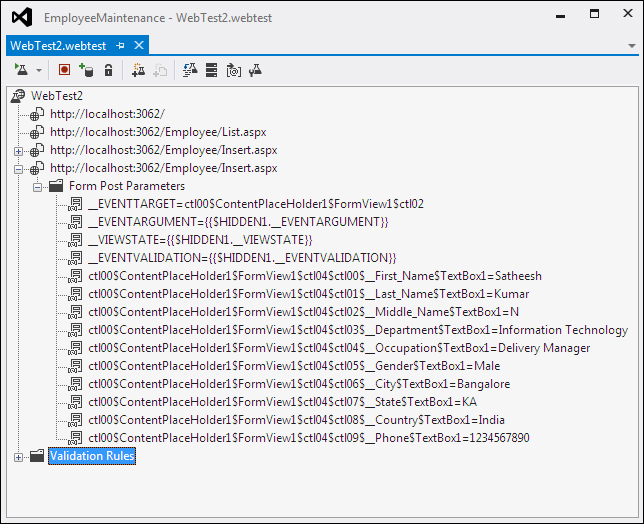
Three requests are captured during recording: one for the main page to select the employee details page, second one is to select the Insert option to enter a new employee's details, and the third one is to save the employee details and display the mail screen. The details of these requests are displayed in the tree view. Expanding the third root node in the tree view shows different values and strings passed through the web page on clicking the Insert button which are captured under the folder Form Post Parameters. Note that the event took place on clicking the Insert button in the web page. All other details are the parameter values posted by the request.
There are different protocols used for sending these requests as follows:
- HTTP-GET: Hypertext Transfer Protocol-GET protocol appends the query strings to the URL. The Query string is the name and the value pair that is created out of the parameters and the data.
- HTTP-POST: Hypertext Transfer Protocol-POST protocol passes the name and value pairs in the body of the HTTP request message.
- SOAP protocol is an XML-based protocol used for sending structured information. This is mostly used by web services.
Recording shows that only the independent requests (GET or POST) are recorded, not the dependent requests such as requests for getting images and other such requests. These requests are reported only when the test is run, but during recording, it will neither be shown nor captured.
When the web application is run, it dynamically generates data, such as session ID and is sent through the Query String parameter values and Form Post parameter values. The web performance test uses such generated parameter values by capturing it from the HTTP response using an extraction rule, and then binding it to the HTTP request. This is known as the promotion of dynamic parameters. Detection of dynamic parameters happens immediately after finishing the web performance test recording. On clicking the Stop button in the recorder window, notice a dialog window with the message Detecting Dynamic Parameters and the progress bar. The dialog displays a message as Did not detect any dynamic parameters for our sample site. If the dynamic parameters are detected, a Promote Dynamic Parameters to Web Test Parameters dialog box appears.
While recording the web page requests, some additional comments may be required to be added to the recording about the page or the test. This comment could be any text with additional information for reference. This is similar to the comments added to the code during development. Sometimes it is required to add information about the steps to be followed during the test. Basically comments are there to record the information about the additional task required during the test, but could easily forget to do. These comments can be added simply by clicking on the Add Comments button in the Web Test Recorder toolbar.
While recording the scenario, all user actions are recorded irrespective of the application under test. Sometimes user navigates to other areas which is irrelevant to the current test. The recording should be paused, not to record the request outside of the current test. But, in case it is not paused during the recording, use the Delete option to remove those requests from the recorded details.
In some situations, same requests may be required to be tested multiple times, for example, page refresh. To simulate this, copy the recorded request and paste it into the recording list. The same request can be copied any number of times. Select the request from the list from the tree view, right-click and Copy or use (Ctrl + C) and then select the destination folder and right-click and choose Paste.
Note
By copying the requests, the order of testing is also changed. This is an easy way to change the order. Instead of copying, cut and paste the request to a different place just to change the order. But be careful when changing the order in this way, that dependent requests are not affected. For example, if request B is dependent on request A, then do not move request B before A. Take extra care while copying and changing the order of tests.
Loop logic is very useful in running the same web request multiple times. Conditional rules and properties can be set to verify whether any specified condition is met or not. The loop logic can be added at the web performance test level or at the web request level. The looping should be used to reproduce a user scenario but should not be used to simulate the number of users.
Let's take the scenario of creating multiple temporary users or employees using the user interface. One way of doing this is to create it manually by entering all the details using the user interface and the other way is to use a data driven UI test by feeding the data from the predefined data source with all user details. In either case there is a good amount of manual work involved. The other best option is to use the recording of a single user creation through UI, use the recording, and loop the request for multiple times. Let's see the step-by-step approach of this feature to create four users. The following steps use two context parameters to hold the values and then use the parameters to increment the value and insert employee details:
- Create the web performance test recording for inserting an employee's details as shown in the previous examples.
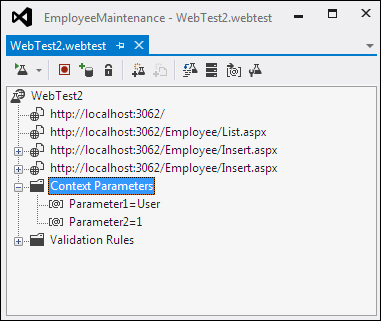
- Select the Web Performance Test option, right-click and then choose Add Context Parameters. Add the parameter and set the value as
Userfor the First name. Add another parameter and set the value as1. The second parameter is to increment the value and set it as the last name to differentiate between the users.The following screenshot shows two context parameters added to the web test:
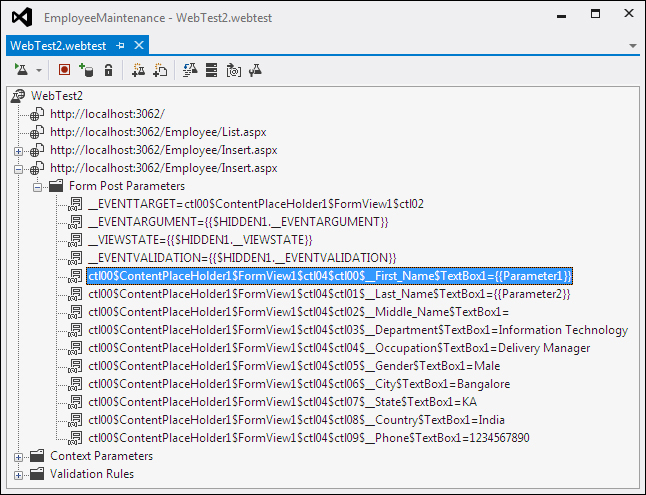
- Open the web test folder and expand the request that captures the insert operation. The web performance test captures all the details under the Form Post Parameters for the web request. Let's use the same details for multiple user or employee creation, except the First Name and Last Name which will differentiate the users or employees.
- Right-click and select the properties for the first name in Form Post Parameter. Navigate to the first parameter as the Value property for the first name. Similarly select the second parameter as the Value property for the Last Name as shown in the following screenshot:
- Now select the web request, right-click and choose the option Insert Loop….
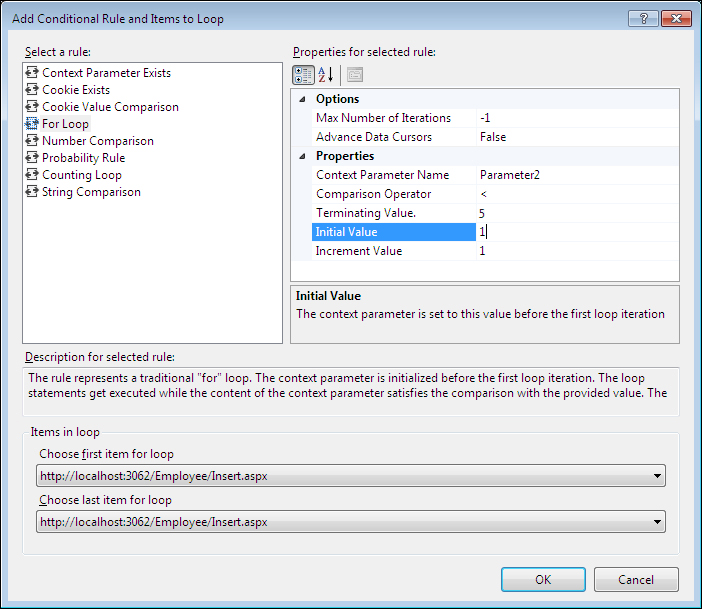
- A new window named Add Conditional Rule and Items to Loop pops up to collect the details for the conditional looping. On the left of the screen there are multiple rules listed and on the right the properties are displayed for the selected rule on the left. Select the rule For Loop and set the properties as following, so that the looping happens four times until the Parameter2 value becomes 5.
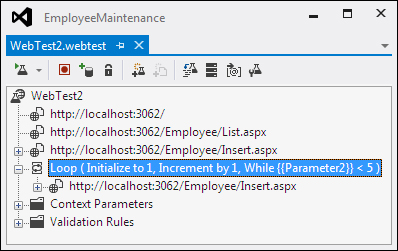
- The looping is now added to the web request with the initialize, increment, and the conditional values as shown in the following screenshot:
- Now everything is set for the looping of the same request with the incremental value of Parameter2. Select the web performance test and run it. The Test Runs with the Parameter2 value getting incremented every time the test is run. The test stops when the context Parameter2 value becomes 5. The following image shows the end result of having four new users or employees added to the stem:
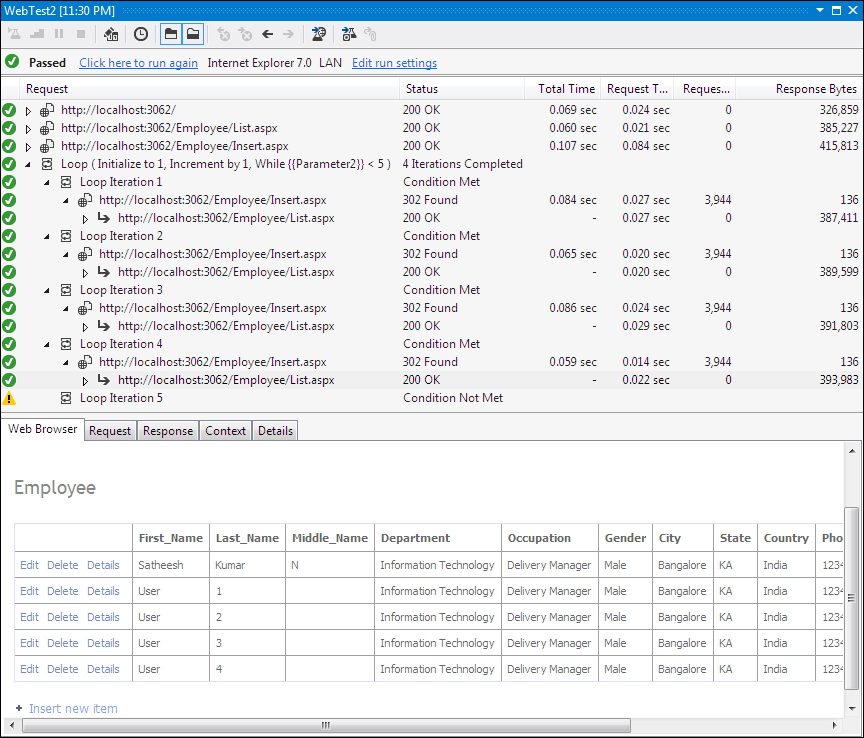
If you check the web requests during the test, you will notice that the same web request is called four times with only the Parameter2 value changing for each iteration.
The following are some of the Conditional rules and items that can be looped:
|
Conditional rule |
Rule description |
|---|---|
|
Context parameter exists |
Test whether or not the specified context parameter exists in the current context. |
|
Cookie exists |
Test whether or not the specified cookie is set. |
|
Cookie value comparison |
The condition is met when the provided string matches the value of the specified cookie. |
|
For loop |
The rule represents a traditional For loop. The context parameter is initialized before the first loop iteration. The loop statements get executed while the content of the context parameter satisfies the comparison with the provided value. The step value is applied at the end of each loop iteration. |
|
Number comparison |
The condition is met when the value of the context parameter satisfies the comparison with the provided value. |
|
Probability rule |
Randomly returns pass or fail based on the percentage provided. |
|
Counting loop |
Executes the requests contained in the loop a specified number of times. |
|
String comparison |
The condition is met when the provided string matches the content of the provided context parameter. |
The Items in loop section in the Add Conditional Rule and Items to Loop window denotes the first and last web request within the loop out of all the recorded requests in the order.
Note
The web performance test that contains loop with a lot of iterations may consume a lot of memory while running the test, as the web Test Results are kept in the memory.
When the web performance test in a load test takes a long time to run, it will have an impact on the test mix. The load test engine will treat running the web performance test as a single iteration.