
We've seen how to create the streams of data for a cube in code, and to be honest it's not pretty! Even a simple shape such as a cube requires so much data that it becomes very difficult for us to keep track of it all and almost impossible to create a more complex 3D shape.
Luckily there is an easier way. We can use a 3D modeling package to create, color, and texture a 3D model and export all the required data in a format that Marmalade can then load and use.
Marmalade comes with exporter plugins for the two modeling packages used in most professional game development studios—Maya and 3DS Max. The details in the following sections apply equally to the exporters for both of these modeling packages.
The exporter plugins are installed to your computer when you install the main SDK, but they are not automatically installed into the modeling package for use. In order to use the exporters, we must use the Marmalade Launch Pad program to set them up, as shown in the following steps:
- Start the Marmalade LaunchPad program. On Windows it can be found inside the Marmalade folder in the Start menu. You should see a window appear, containing a tabbed view.
- Click on the tab labeled Install Exporters. The following screen shown should appear:
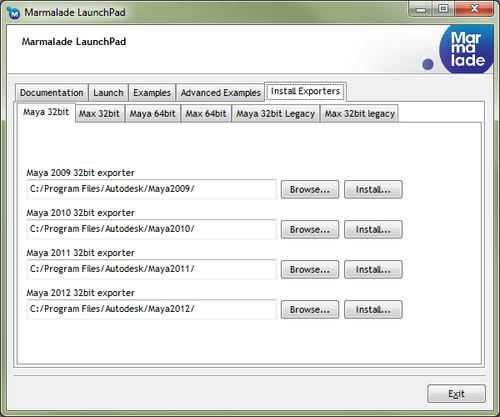
- Use the tabs on this screen to select the version of the 3D modeling package you want to install. You must choose both the correct version of your package and whether it is a 32-bit or 64-bit installation. Maya 7.0 and 3DS Max 8.0 are the oldest supported versions. The older versions of the exporters are contained in the tabs labeled Maya 32bit Legacy and Max 32bit legacy.
- Click on the Install… button next to the required version of your modeling package and the exporter will be installed. Windows User Account Control will probably pop up a request first to ensure you want to proceed, so just click the Yes button in this dialog.
With the plugin installed, start up your 3D modeling package and create or load a model that you wish to export. Since this is a coding book, we won't be going into any details about how to create a 3D model.
Note
If you are a programmer by trade and have no idea how to use a 3D modeling package, don't feel bad. I have seen some truly terrible "programmer art" over the years; so think of this lack of knowledge as a good thing and get a real artist involved in making the artwork for your game. You'll be glad you did!
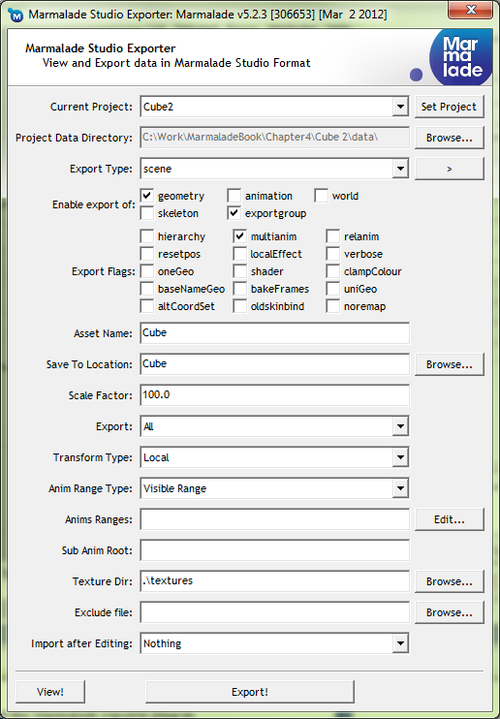
Assuming you have a 3D model ready to export, let's get the Marmalade exporter plugin going. The exporter window itself is shown in the following figure:
The manner in which the exporter window will be displayed depends on the modeling package you are using.
- In Maya you can access the exporter by using the menu option Marmalade Tools | Marmalade Studio: Maya Exporter or from the icon in the Marmalade Studio tab.
- In 3DS Max, the exporter can be opened by clicking on the Utilities tab, then clicking on the Marmalade Studio Exporter button to open the rollout section. Within the rollout, there is another button labeled Marmalade Studio Exporter, which will display the exporter window.
The exporter window should now be on screen, and as you can see there are a great many options available. We can do without most of them for now, so we'll only cover the ones we need in order to export a non-animated 3D model.
The first thing we need to set is the Current Project field. The exporter maintains a list of projects that, at its simplest level, is just a quick way of choosing a directory where the exported model files will be created.
Since we've not yet created an exporter project, let's do so by clicking on the button labeled Set Project. The following dialog will appear:
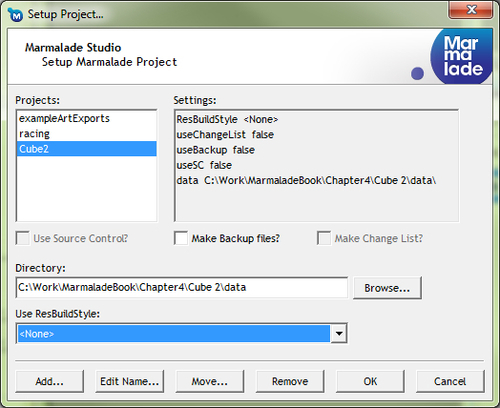
To create a new project click on the Add… button at the bottom of the dialog and you will be prompted to enter a name for the project. Once you've accepted the name, the project will appear in the Projects: list.
Click on the Browse… button and locate the data directory in our code project. All resource files need to reside with our code project's data directory; this will make exporting model files to the correct place much easier.
For now we will ignore the other settings in this dialog as they are beyond the scope of this chapter; so click the OK button to return to the main exporter window, which should now have our newly created project selected in the Current Project drop-down list and the data directory we set above in the Project Data Directory field.
With the project set, we can now follow these steps to export the model:
- First locate the Export Type field. Next to this field is a button with a greater-than symbol. Click this button and choose model from the pop-up menu that appears. The Export Type field should change to scene (model).
- Now look at the first set of checkboxes labeled Enable export of. We only need the geometry and exportgroup options to be ticked to export the correct set of files.
- The next set of checkboxes is labeled Export Flags. We don't need to have any of these settings checked.
- Now we reach the Asset Name field. This specifies the base filename that will be used when the exporter generates the various output files.
- The Save To Location field allows a directory path relative to the Project Data Directory field to be provided. All files generated will be created within this directory, which will itself be created if it does not already exist.
- Scale Factor allows us to provide a numeric scaling factor that will be applied to the x, y, and z components of every exported vertex. This allows artists to create their models using familiar units such as meters in the modeling package, but then convert those units into a different scale for use in the game, such as the ever popular "number that is a power of 2" so beloved of us programmer types. Note, however, that it is vital to ensure that all artists working on a project use the same units and scale factors as each other, otherwise you'll have real problems trying to get all these models to work together properly in the game!
- Next we can choose to export either everything in the current scene, just the selected objects, or just the visible objects using the drop-down list labeled Export.
- The Transform Type drop-down box lets us choose whether the exported vertices should be in model space or world space. In most cases, when exporting individual models we would choose the local option (another way of saying model space!).
- The final setting we may be interested in is the Texture Dir field. This allows a directory to be specified, from which any textures to be used on the model will be exported. It can be either an absolute path or relative to the Project Data Directory.
- That completes all the fields we currently need to be concerned with. All that is left to do is click on the Export! button, which will generate the necessary files and then display a window listing all the files that were created during the export process.
There's no doubt that both Maya and 3DS Max are superb products, but it's also true that they carry a fairly hefty price tag. Unfortunately, Marmalade does kind of rely on using one of these two heavyweight packages.
Admittedly, Marmalade does also ship with a converter for Collada , a file format that was created to enable the interchange of 3D models between different packages. I hesitate to recommend this approach however, as at the time of writing, the Collada converter that ships with Marmalade is known to be a little buggy, particularly when it comes to exporting animations.
Luckily there is a cheaper alternative. There is a 3D modeling package by the name of Blender, which is free to download and use; however, the Blender team is always happy to accept donations to continuously improve the product, so if you find it useful do consider helping them out.
The Marmalade SDK does not come with support for Blender, but thankfully due to the efforts of Benoit Muller there is a rather groovy exporter plugin that does a great job of replacing the 3DS Max and Maya exporters.
If you do not already have Blender installed, head over to the Blender website and download a copy. The URL is as follows:
Installing Blender is just a case of executing the downloaded installer and following the on-screen instructions.
With Blender installed, we now need to get hold of the exporter plugin, which can be found at the following URL:
http://wiki.blender.org/index.php/Extensions:2.6/Py/Scripts/Import-Export/Marmalade_Exporter
The plugin is a Python script that can be installed into Blender using the following steps:
- Copy the downloaded plugin file
io_export_marmalade.pyinto the Blender plugins directory. On Windows this will normally be something likeC:Program FilesBlender FoundationBlender2.63scriptsaddons. - Start Blender and go to File | User Preferences….
- Click on the Addons tab at the top of the preferences window.
- In the Categories list on the left-hand side of the window, click on Import-Export. You should see a screen that looks something like the one shown in the following figure:

- Find the Import-Export: Marmalade Cross-platform Apps (.group) entry and click the checkbox on the right-hand side of it to enable the plugin.
To export a 3D model using the Blender exporter, follow these steps:
- Create or load the model you wish to export into Blender.
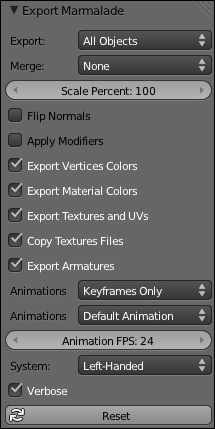
- Go to File | Export | Marmalade cross-platform Apps (.group). The main 3D view will be replaced with a filename requester. The bottom-left corner of the window should contain the exporter options and look like the following image:
- First choose the location you want to export the datafiles to, using the file requester. There are two text edit boxes at the top of the screen; the topmost is the directory to save to and the bottom specifies the filename we want to use for exporting. This filename should be a GROUP file, so its extension should always be
.group. - In the exporter settings, first use the Export drop-down list to select whether you want just the selected models to be exported or all models in the current scene.
- The Merge option controls what happens when there are several models in the scene to be exported. The default option, None, exports each model individually with its coordinates in model space, and is the option we require for now. The other two options allow multiple models to be merged as either a single big mesh of polygons or as a number of separate meshes, with all vertices specified in world space coordinates.
- The Scale Percent value allows model vertices to be scaled up or down so that the artist can build the models using the most convenient measurement units in Blender, yet still allow the exported model to have vertices scaled to a set of units that may be more useful in the game.
- The Flip Normals checkbox will reverse the direction of all exported normals. Normally this can be left unchecked, but it can be useful to fix models that have been lit incorrectly and have their normals pointing in the wrong direction.
- The Apply Modifiers checkbox will cause any mesh modifiers applied to the model in Blender to be evaluated before the export data is created. This defaults to being switched off.
- If vertex colors have been applied to the model, they will only be exported if the Export Vertices Colors checkbox is selected.
- The next checkbox, Export Material Colors, determines whether materials created during the export process will be exported with their defined colors.
- The Export Textures and UVs checkbox should be checked if you have texture-mapped polygons in your model.
- Since Marmalade will need access to any images used in texturing the model, the Copy Textures Files checkbox can be selected to ensure image files are also copied across to the export directory.
- The remaining settings are mostly concerned with exporting animations, so we can ignore them for now; however, it is worth mentioning the Verbose checkbox which logs information about the export process to Blender's console window. This may help you solve problems with your models when the export process doesn't work exactly as expected.
- When all settings have been made, click on the Export Marmalade button, which is at the top right of the Blender window. Alternatively, if you wish to cancel the export process, there is a Cancel button underneath the export button.