
Now that we have the knowledge to create 3D worlds populated with animated characters, we really need to start thinking about how to improve the look of the user interface we present to the player.
In this chapter we'll be covering the following:
- Creating fonts that can be used in a Marmalade project
- Drawing and formatting of text
- Discussing ways of implementing your game's user interface
- Localizing your game into multiple languages
The first step toward improving the look of our game is to say goodbye to the debug font and replace it with something a little more stylish. The Marmalade SDK comes complete with an API called IwGxFont dedicated to font rendering, so let's put it to good use.
By now I'm
sure you must be able to hazard a guess as to how this is done. That's right, just add iwgxfont to the subprojects section in the MKB file, and then make a call to IwGxFontInit to initialize the API, and IwGxFontTerminate to free it at shutdown time.
As the name of this API suggests, it requires IwGx in order to work. We also need IwResManager so we can load the font data into memory, so the initialization call for IwGxFont must occur after these two modules have been initialized, as shown in the following code snippet:
IwGxInit();
IwResManagerInit();
IwGxFontInit();
The first thing we need to do is create a CIwGxFont resource describing the font that we want to use. This is easily done thanks to the Marmalade Studio - Font Builder utility that is installed as part of the Marmalade SDK. The following image shows a screenshot of this program in action:
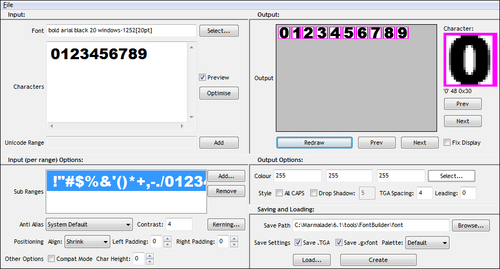
The IwGxFont API renders text by drawing each character individually by using sections of a large bitmap that contains an image of all the characters we need to render. Generating the bitmap itself is fairly trivial and could be done with any art package, but we need to somehow be able to specify which part of the bitmap represents which character. This is where IwGxFont and the font builder utility come to our aid.
Here are the basic steps needed to generate a font resource:
- Start the Marmalade Studio - Font Builder utility. You can find a Windows Start button menu shortcut for it under Marmalade | x.x | Tools, where x.x represents the version number of the Marmalade SDK you have installed.
- In the top-left panel labeled Input, first click on the Select… button to display a font selection dialog. Choose the font, size, and style you require and click on OK. You can choose any installed Windows font, whether it be a scalable TrueType font or a fixed-size bitmapped font.
- The Characters textbox allows you to specify a list of the characters you require in your font. A default selection covering most European languages is present, but you can add or remove as many characters as you want. Fewer characters is obviously better though, as it will reduce the size of the bitmap that gets generated and thus take up less memory. It is also possible to populate this textbox by loading a text file using File | Load Character Map. The Characters textbox will then contain every unique character present in the text file, minus formatting characters such as tabs or newlines.
- Moving on to the section labeled Output Options, you can choose a color for the font using the numeric entry boxes or by clicking on the Select… button to display a color selection dialog. It is recommended that you keep the color set to the default of bright white as the text color can then easily be set at runtime.
- There are also some other settings here that allow you to adjust the look of the font. There are checkboxes to force all characters to be in capitals and to enable the addition of a drop shadow to the font. If this checkbox is ticked, a textbox allows the pixel offset of the drop shadow to be specified.
- Next, look at the top right panel labeled Output. Here we can see a preview of what the generated font characters will look like. Just click on the Redraw button and after a short delay the characters will appear in the view area. You can then use the two sets of Prev and Next buttons to cycle through each character.
- We're nearly ready to export the font; but before we can, we need to specify where we want the font files to be created, which is done in the Saving and Loading panel. Click on the Browse… button to display a file requester to choose the required directory or enter it directly into the Save Path textbox. The last part of this filename is the base filename that will be used to export the font data.
- To create the font files, ensure that the two checkboxes labeled Save .TGA and Save .gxfont are checked, then click on the Create button.
There are a number of options we haven't explored in this run-through, as most of the time you won't need to worry about them. In particular, we skipped the panel labeled Input (per range) Options entirely.
This panel provides control over font features such as kerning, which is the offset between the characters of a font. Kerning can sometimes be useful for bringing certain character combinations closer together. For example, consider the capital letters A and V. The shapes of these characters mean you may want to draw them slightly closer to provide a more natural looking result when they are displayed next to each other.
You can also declare subranges of characters, which allow you to apply different global settings to certain ranges of characters. You can use this facility to use completely different sizes of characters or even completely different source fonts, for different character ranges. This can be particularly useful if we want to create a font that contains characters from the standard ASCII set and characters from another language. The font we use for the ASCII characters may not contain the characters for the other language, so we can create a sub range that allows us to pick a completely different font for those characters.
The font builder utility creates two types of files to define a font resource. The first of these is the actual font bitmap, which is exported in the Targa file format, an image file format usually identified by the file extension .tga.
The second file exported is a GXFONT file, which acts as both a way of allowing the font to be reloaded into the font builder for further editing, and a way of loading the font into our own programs.
The following is an example GXFONT file for a font containing only numeric characters drawn using the standard Windows font Arial Black at 20 points:
//Temp file created by AS Font Builder (User: Sean At: 06/29/12 18:00:06)
//Command Line:
//: -fontdesc "0;-27;0;0;0;900;0;0;0;0;3;2;1;34;Arial Black" 0 4 0 -pad 0 0
//: -col #FFFFFF -shadow 0 -spacing 4 -force16 0

CIwGxFont
{
  utf8 1
  image numbers.tga
  charmap "0123456789"
}
As you can see, it's fairly self-explanatory. The comments at the start of the file are primarily used by the font builder utility to know what settings were used to create the font, so you should leave these values well alone if you want to edit the font later.
he part of the GXFONT file we're really interested in is the definition of the CIwGxFont instance. The three parameters we see here indicate that the character encoding to be used with this font should be UTF-8, the bitmap image to use is called numbers.tga, and the characters present in the font are the numerals zero through nine.
If we've specified any other font settings in the font builder utility, such as character subranges or kerning information, this will also be represented in both the comments at the top of the file and the CIwGxFont structure. We won't cover this here though, since the font builder takes care of all the hard work for us.
As with all the resource types we've seen, we load a font resource into our program by adding a reference to it into a GROUP file, loading the GROUP file using the resource manager, and then searching for the font resource.
For completeness, here is a code snippet showing how to do this:
CIwResGroup* lpResGroup = IwGetResManager()->
LoadGroup("fonts/fonts.group");
CIwGxFont* lpSmallFont = static_cast<CIwGxFont*>(IwGetResManager()->
GetResNamed("small", "CIwGxFont"));With a font resource loaded and a pointer to it obtained, we can start to draw some text on screen with it. First we'll look at the basics of drawing a string of text, then we'll take a look at how we can justify the text, change its size, and how we can make drawing it a little more optimized.
When we were looking at how to create a font resource, it was mentioned that a color could be chosen for the font. It is recommended to choose white so we can change the color of our text at runtime to any color we want. We change the color of the font by modulating the font bitmap with our chosen color, so if the font bitmap is not white this will not produce the desired color change.
We'll be seeing how to change the font color in a moment, but in order for font coloring to work there is one quirk of IwGxFont that must be mentioned first.
With the note about lighting out of the way, the first step in rendering text is to indicate which font we want to use to draw it. This is done by passing a pointer to the relevant CIwGxFont instance into the function IwGxFontSetFont.
Next, we can set the color we want to use with IwGxFontSetCol. There are two versions of this function, one that takes a reference to a const CIwColour instance, and another that takes the color value as a uint32 value. When using the latter, bear in mind that the color is specified as ABGR—that is, alpha in the most significant byte, then blue, green, and red in the least significant byte.
We now need to indicate where on the screen we want the text to appear, which we do by defining a rectangular area in which the text should appear. This is specified by using a CIwRect instance that contains x and y values for the top left of the rectangle, plus a width and height value. The function call we use is IwGxFontSetRect.
Drawing the text is now possible using the IwGxFontDrawText function. The first parameter is the string of text to print and is specified as a const CIwChar pointer. CIwChar is just a typedef type for the standard C char type.
The default encoding for text is UTF-8. For text comprising of characters from the ASCII set, this means we don't have to do anything to the text data at all.
The function also takes a second parameter, which is the length of the text to be drawn. This has a default parameter value of -1, which indicates the entire string should be drawn. Any other value will draw the specified number of characters. This is handy if you want to implement a system common in many games where text appears on screen one character at a time.
Putting this all together, here's an example that draws "Hello World" on the screen in yellow:
IwGxLightingEmissve(true);
IwGxFontSetFont(lpSmallFont);
IwGxFontSetCol(0xFF00FFFF);
IwGxFontSetRect(CIwRect(0, 0,IwGxGetScreenWidth(), 100));
IwGxFontDrawText("Hello World");Wondering why we specified a rectangular area for our text rather than just a screen position? The reason is so that IwGxFont can wrap and justify our text for us.
Note
While Marmalade does allow us to include the line feed character in our code to force a new line in our text, it does not provide support for other formatting characters such as tabs or backspace. It is far better to allow Marmalade to word wrap text for us than to insert line feeds in our text by hand, because if we change the font size or the dimension of the rectangular draw area we won't have to change the text itself in any way.
The default behavior when rendering text is to word wrap whenever a line of text exceeds the bounds of the rectangular area set with IwGxFontSetRect. We can alter this behavior using the IwGxFontSetFlags function, which can take a combination of the following values OR'ed together:
|
Value |
Definition |
|---|---|
|
Uses default font settings. | |
|
Does not wrap text at the edge of the rectangle's boundary. | |
|
Does not perform full word wrapping on text. | |
|
Only renders a single line of text. Rendering stops when a newline character ( | |
|
Forces all numbers to be displayed with the same width. | |
|
Draws the text with underlining. | |
|
Draws the text in italics. | |
|
Draws characters from right to left. Useful for drawing languages such as Arabic. | |
|
Wraps text at the end of words. A word can overlap the end of the rectangle boundary, but the next word will start on the next line. |
Flags can be
cleared again using IwGxFontClearFlags.
We can also specify whether text is drawn left aligned, right aligned, or centered in the rectangular bounding area using the function IwGxFontSetAlignmentHor, which takes one of the following values:
|
Value |
Definition |
|---|---|
|
Aligns text to the left of the bounding box. | |
|
Centres text horizontally in the bounding box. | |
|
Aligns text to the right edge of the bounding box. | |
|
Performs left or right alignment, as defined by the device's localization settings. |
We can do similar alignments vertically as well using IwGxFontSelAlignmentVer with one of these values:
Sometimes it is desirable to be able to animate text by making changes in its size. For example, in a shooting game the score awarded for killing an enemy might appear at the position of the enemy then gradually grow larger and fade out.
The function IwGxFontSetScale enables us to do this. It takes two parameters so the font can be scaled by different amounts, both horizontally and vertically. The scaling factors are passed in as fixed point values, with IW_GEOM_ONE indicating a scaling factor of 1 and therefore no change in size.
IwGxFont draws text by rendering a rectangular polygon for each character in our text, with the relevant part of the font image mapped on to it. By specifying a scaling factor we can change the size of the polygons used to render the individual characters, though this can yield poor results if we scale up by a large factor (for example, more than double the original size of the font).
One of the problems with rendering text is that in order to perform alignment, word wrapping, and the like, it is necessary to format the text by considering it one character at a time to see if the next character crosses the rectangular bounding box area.
If we need to draw a piece of fixed text, such as an instructions screen, we can prevent having to calculate the formatting information in every frame by preparing the text for rendering once and then using some cached data to draw it from then on.
To do this we use the function IwGxFontPrepareText. This function takes a reference to a CIwGxFontPreparedData class instance, the string of text to prepare, and optionally the number of characters in the string that we want to consider. If this parameter is omitted, the entire string is processed.
With the text prepared we can then draw it using another version of the IwGxFontDrawText function. This version takes a reference to the CIwGxFontPreparedData instance and two optional parameters that indicate the first character from the prepared data to draw and the number of characters to draw. Here's a code example:
CIwGxFontPreparedData lFontData;
IwGxFontSetRect(CIwRect(100, 100, 200, 100));
IwGxFontPrepareText(lFontData, "This is the text to be prepared!");
IwGxFontDrawText(lFontData);
Note that the text will be drawn on screen at the position indicated by the formatting rectangle set in the call to IwGxFontSetRect.