
Social media sites such as Facebook provide a great way of advertising our games by getting our players to spread the word for us. There are countless examples of games which allow players to post a message to their Facebook wall or Twitter feed to show off their latest high score or boast about achieving a certain target in the game.
In this section we will take a detailed look at how we can implement integration with Facebook and we will also talk briefly about Twitter.
Marmalade comes with an API called s3eFacebook that wraps up most of the tricky stuff involved in communicating with the Facebook servers. Unfortunately this ease of use does come at a price, which is that it is only supported on iOS and Android.
If Facebook support is required across all platforms, we would need to implement everything from scratch using HTTP requests via the IwHTTP API provided with Marmalade. This is a challenging task, so we'll be using the s3eFacebook API in this part of the book.
The first step in Facebook integration to a Marmalade project is to create a Facebook App on the Facebook website, which is really little more than a way of authenticating the source of any Facebook API requests.
When we create a Facebook App we are provided with two hexadecimal values. One is called the App Id (also known sometimes as the API Key) and the other is the App Secret. These values will be needed when we send requests to Facebook in order to identify our application on the Facebook servers.
To create a Facebook App follow these steps:
- Log in to Facebook by visiting www.facebook.com and entering your username and password. If you do not already have a Facebook account, you can also sign up for one at this address.
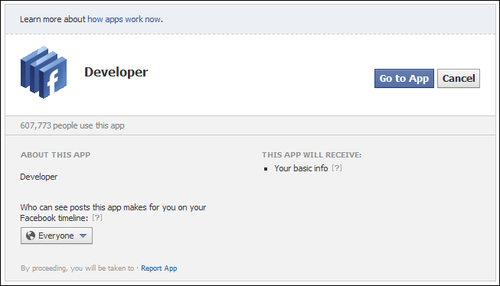
- Once you are logged in to Facebook, visit the URL www.facebook.com/developers. If you have never created a Facebook App before, you will see a dialog like the one in the preceding screenshot. This screen has a single drop-down box that allows you to specify whether everyone or just your friends will be able to see posts created by the application. For now leave this set to the default value of Everyone and click on the Go to App button.
- You will now see a screen detailing all the Facebook Apps you have created, which will be empty assuming this is the first App you have ever created! Click on the + Create New App button to start creating a Facebook App.
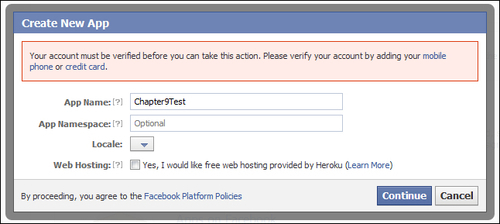
- The previous dialog box shown should now appear, minus the pink box containing the text about verifying your account (more on this in a moment). For the purpose of this chapter all we need to supply is the App Name value, which is a string that will be shown to the user when our Marmalade project first attempts to access Facebook. It therefore makes sense to use the name of the game or perhaps your company name for this field.
- Click the Continue button to create the Facebook App. Note that the remaining fields can be ignored for now. The App Namespace value is used to reference the application on Facebook as a URL or as part of an HTTP request and is for more advanced Facebook integration. The Locale and Web Hosting controls can also be ignored for the purposes of this chapter.
- You will now be shown one of those annoying Captcha dialogs to prove you are a human and not some kind of spamming web bot. Enter the words shown in the image to proceed.
- At this point it is likely that you will be shown the Create New App dialog from step 4 again, this time with the text in the little pink box. This is another security check put in place by Facebook to stop hundreds of rogue Facebook applications from being created. You need to authorize your Facebook account before you can create a Facebook App. I would suggest you click the link labeled mobile phone to verify your account as it is by far the easiest way. You will be asked to enter your mobile phone number so a text message can be sent to you containing an authorization code that you then enter into a dialog to verify yourself.
- Once you have verified your account you will return to the Create New App dialog once again. Ensure the App Name value is correct and click on the Continue button again. The Captcha screen will likely rear its ugly head once more, so fill it in.
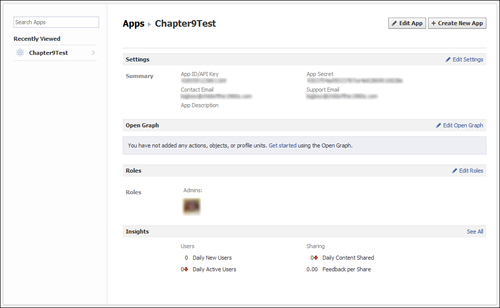
- At this point the Facebook App has been created and you should now be looking at a screen similar to that shown before, which shows various pieces of information about the Facebook App. The most important are the App Id/App Key and App Secret values, which you'll need later; so make a note of them.
We will obviously want to test the Facebook integration of our application out once it has been implemented, but it would be good if we didn't have to spam all our friends with test wall posts and the like. It's therefore a good idea to create a test user.
For understandable reasons Facebook doesn't really want us to create full Facebook accounts for our test users, so instead they allow us to create test users using our Facebook App. Follow these steps to create a test user:
- Log in to Facebook and then visit the www.facebook.com/developers page.
- Click on the relevant Facebook App in the left-hand pane and then click on the link labeled Edit Roles on the right-hand side of the Roles section of the page.
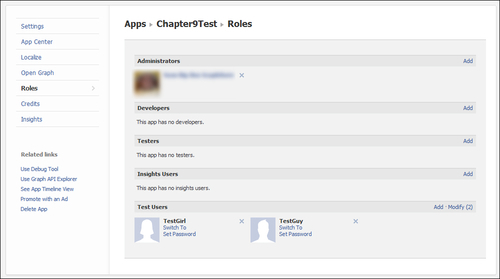
- The Roles page for the Facebook App will be displayed (see previous screenshot). At the bottom there is a section labeled Test Users, which has a link labeled Add that you should click on to create new test users.
- A small dialog box will appear with three options. The first is labeled Number to Add and is a drop-down box allowing between one and ten test users to be generated.
- The Authorize this App checkbox allows us to determine whether the created users have already authorized the Facebook App to use their account. It's worth creating users of both types to fully test our application, but ultimately it's up to you whether you authorize now or when we first try to log in using this user account.
- Finally, the Enable Ticker checkbox lets you decide whether the user will be using the Facebook Ticker interface (which is a real-time timeline of wall posts and other events) or the older standard interface. Not all users have access to the newer Ticker interface, so it is again worth testing your project using both methods.
- Click the Add button to create the new users. You will return to the screen first shown in step 3, but the new users will be shown at the bottom of the page now.
- Each test user will have a couple of links next to them. You should first click on the Set Password link to allow a password to be set for this user. A textbox will appear, to allow you to enter a password.
- Next, click on the Switch To link next to one of the users to log in as that user and display their Facebook wall.
- At the top right of the test user's wall, there should be a button labeled Edit Profile. Click on it.
- On the Edit Profile screen, click on the Contact Information link in the left-hand side panel.
- At the top of the screen there should be two e-mail addresses associated with the profile. One of these should be of the form
<[email protected]>, which is the e-mail address we will need to use later to log in as the test user. Make a note of this e-mail address and the password you set in step 8.
With the Facebook
App and test users configured, let's get down to adding Facebook support to a Marmalade project. The first thing to do is open the project MKB file and add s3eFacebook to the list of subprojects. We can then include the s3eFacebook.h file whenever we need to make use of the s3eFacebook API functions.
We also need to add another configuration setting to the MKB file in the deployments section. The line in question looks like this and is only needed for iOS builds. On iOS our application temporarily loses focus when we log in to Facebook and this value ensures that we regain control when the login process is completed:
iphone-bundle-url-schemes="fb0123456789abcdef"
The hexadecimal value following the initial fb should be replaced with the 16-digit App Id generated
by the Facebook App.
As previously mentioned, the s3eFacebook API is only supported on iOS and Android, so it's good to be able to check at runtime whether we can support Facebook or not. This is easily done using the s3eFacebookAvailable function, which will return S3E_TRUE if the API is available or S3E_FALSE if it isn't.
Before we can call
any of the s3eFacebook APIs, we must first initialize a Facebook session. We do this with a call to the function s3eFBInit that takes a single parameter, a null-terminated string containing the App Id of the Facebook App we want to use.
The function will return a pointer to an s3eFBSession instance, which we will need to use to access the Facebook API and make requests to it.
We can release the Facebook session with a call to s3eFBTerminate, which takes the session pointer returned from s3eFBInit as its only argument.
It is sufficient to call the s3eFBInit function the first time we want to make any Facebook request and then to use this same session information for the execution life of our application. The s3eFBTerminate function only needs to be called at shutdown time.
Before we can make any
Facebook request, we must first log in to Facebook. This is done with the s3eFBSession_LogIn function, which takes five parameters. The first is the s3eFBSession pointer returned from s3eFBInit. We can then specify a callback function, which will be triggered once successfully logged in. A pointer to a block of user data can also be specified, which will be passed into the callback function when it is triggered.
The callback function can be specified as NULL, in which case we need to check for login to be completed by calling the s3eFBSession_LoggedIn function. This takes the session pointer as an argument and will return S3E_TRUE when the session is logged in.
The final two parameters of s3eFBSession_LogIn are an array of null-terminated strings listing the Facebook API permissions we want to make use of and the number of permissions in this array. Permissions allow our application to notify the user that our application wants to perform certain operations on their account, such as posting to their wall or accessing their photo collection. A full list of permissions can be found at the web page http://developers.facebook.com/docs/authentication/permissions/.
The following example
code shows a sample callback function and how to use it with the s3eFBSession_Login function:
// Login callback
void LoginCallback(struct s3eFBSession* apSession,
s3eResult* apLoginResult, void* apUserData)
{
  if (*apLoginResult == S3E_RESULT_SUCCESS)
  {
    // Logged in OK
  }
  else
  {
    // Login failed
  }
}

// Log in to Facebook using the session returned from s3eFBInit.
const char* permissions[] = { "publish_stream" };

s3eFBSession_Login(lpSession, LoginCallback, NULL,
  permissions, 1);
This code attempts to log in to Facebook requesting the publish_stream permission that allows an application to post to a user's wall.
When a Facebook login attempt is made, our application will lose focus and the device's Facebook application will be started. If the user doesn't have a Facebook application installed, the device's web browser will be launched instead.
You will be asked to provide your Facebook account's login details, so for testing purposes enter the details for one of the test user accounts we generated earlier. Once logged in, another screen will appear detailing what our application wants to do with the user's Facebook account. In the previous example this would just be posting to the user's wall. If the Facebook App has not yet been authorized for the Facebook account, the screen will also have two buttons labeled Allow and Don't Allow, which the user can use to grant or disallow access respectively.
Note
The Facebook login process will first look to see if a user is already logged in to Facebook by looking for a browser cookie, and will not ask for username and password details if this is the case. If the test device is also your own personal device, you will probably want to log out of Facebook before testing your application to avoid annoying those on your friends list!
After authorizing (or indeed disallowing) the Facebook App, our application will regain focus and the login callback function will be triggered to say whether the process was successful or not. If the Facebook app was not authorized or there is no Internet connection available, login will fail.
Logging back out of Facebook again is also simple. All we have to do is make a call to s3eFBSession_Logout, passing the s3eFBSession pointer as its only argument. In practice we only ever need to log out of Facebook on closing our application or if you specifically want to log off to allow different user credentials to be used instead. The session will not expire or become invalid as long as our application is executing.
We'll now take a look at one of the most common things that games use Facebook for: posting a message to the user's wall to alert their friends to a new high score or some in-game achievement.
In order to do this we'll be making use of the Facebook Graph API. There are other ways, but the Graph API is the most up-to-date way of doing so and doesn't look likely to be replaced any time soon.
Note
For more information on the Facebook Graph API take a look at the web page http://developers.facebook.com/docs/reference/api/, and for details about wall posts take a look at http://developers.facebook.com/docs/reference/api/post/.
To begin making a Facebook Graph API request, we use the function s3eFBRequest_WithGraphPath. This function takes as arguments the session pointer, the desired Facebook Graph path, and the HTTP method to use (GET or POST). The Graph path and HTTP method are both specified as null-terminated strings.
The function will return a pointer to an s3eFBRequest structure representing the new request if it is successful, or NULL if it fails.
With the request structure created, we can now add the various parameters we need to it using the functions s3eFBRequest_AddParamNumber and s3eFBRequest_AddParamString. Both functions take the s3eFBRequest structure pointer and a null-terminated string for the parameter name as their first two parameters. The third parameter is a 64-bit integer value (Marmalade defines a type called int64 for this) for the former function call, or a const char pointer to a null terminated string for the latter function.
Most Graph
API values will require you to specify an access token to show that your application is authorized to make requests. The access token is provided to our application as part of the login process and we can retrieve it using the s3eFBSession_AccessToken function, which again takes the session pointer as its sole input. The access token is returned as a const char pointer.
The access token can then be added to a Graph request using the s3eFBRequest_AddParamString function by specifying access_token for the parameter name and using the return value from the s3eFBSession_AccessToken function as the value for the parameter.
Once all parameters have been added to the request, we can send it to the Facebook servers using the s3eFBRequest_Send function. This function takes the request pointer as its first input, followed by a callback function and a pointer to an optional block of data that will be passed to the callback function when it is triggered.
The function will return immediately with S3E_RESULT_SUCCESS if the request was sent, or S3E_RESULT_ERROR if there was a problem transmitting it. The s3eFacebook API will wait for the request from Facebook to arrive and will call the specified callback function with the result when it does.
When a request is completed we should make a call to s3eFBRequest_Delete to free any resources associated with it.
Let's look at an example illustrating all of the previous points for posting a simple message to the user's wall:
// Sample callback function for s3eFBRequest_Send function
void RequestCallback(struct s3eFBRequest* apRequest,
   s3eResult* apRequestResult, void* apUserData)
{
   if (*apRequestResult == S3E_RESULT_SUCCESS)
   {
      // Request successful
   }
   else
   {
      // Request failed
   }

   // Free the request resources
   s3eFBRequest_Delete(apRequest);
}

// The following code snippet illustrates how we can send a request
// to Facebook using the Graph API to post a wall message

s3eFBRequest* lpRequest = s3eFBRequest_WithGraphPath(lpSession,
   "me/feed", "POST");
if (lpRequest)
{
   // Add the required parameters
   const char* lpAccessToken = s3eFBSession_AccessToken(lpSession);
   s3eFBRequest_AddParamString(lpRequest, "access_token",
      lpAccessToken);
   s3eFBRequest_AddParamString(lpRequest, "message",
      "Hello Facebook!");

   // Send the request to Facebook
   if (s3eFBRequest_Send(lpRequest, RequestCallback, NULL) ==
      S3E_RESULT_SUCCESS)
   {
      // Wait for the callback to be triggered now!
   }
   else
   {
      // Error occurred sending request, so free it
      s3eFBRequest_Delete(lpRequest);
   }
}The previous sections really just scratch the surface of the kind of Facebook integration that is possible using s3eFacebook. For example, we have made no mention of processing any results sent back to our application by the Facebook API. There is a whole family of functions with the prefix s3eFBRequest_Response that allow the return values from a Facebook request to be analyzed.
For more information on the entire s3eFacebook API, go to Marmalade API Reference | Extensions API Documentation | Facebook Extension | Facebook API Reference in the Marmalade documentation.
Sadly Marmalade provides no dedicated built-in support for Twitter; so if Twitter is important to you, you'll need to provide your own implementation.
One way of doing this would be to use the Twitter API directly by sending HTTP requests to Twitter's servers using the IwHTTP API. This would allow a solution to be created that should work fine on all operating systems; but this might require a lot of code to be implemented to deal with all the possible problems that can occur when working online (for example, lack of internet connection, server timeouts, and so on).
Another possibility, although it would be limited to iOS and Android, would be to use the Marmalade Extensions Development Kit (EDK) to access existing Twitter solutions on these two platforms. This may be simpler to implement since the low level Twitter API HTTP requests will have been taken care of; but the EDK is currently only supported by iOS and Android. Chapter 10, Extending Marmalade with the Extensions Development Kit (EDK), of this book will be looking at the EDK in more detail.
If you are interested in supporting Twitter in Marmalade, the following web page may be of use to you:
https://dev.twitter.com/docs/twitter-libraries#cplusplus
It mentions a number of existing C++-based libraries for accessing Twitter that may form a good starting point for a Marmalade solution.