
In this chapter, we will first be learning how to get the Marmalade SDK set up for development. While Marmalade is available in both Windows and Mac versions, the Windows version is the most developed of the two and is what we shall be primarily covering in this book. By the end of this chapter, we will know how to do the following:
- Set up a Windows PC for development using the Marmalade SDK
- Create and build a "Hello World" project
- Deploy and run the "Hello World" project on several mobile platforms
So without further ado, let's get started!
The following sections will show you how to get your PC set up for development using Marmalade, from installing a suitable development environment through to licensing, downloading, and installing your copy of Marmalade.
Before we can start coding, we will first need to install a version of Microsoft's Visual C++, which is the Windows development environment that Marmalade uses. If you don't already have a version installed, you can download a copy for free. At the time of writing, the Express 2012 version had just been released but the most recent, free version directly supported by Marmalade was still Visual C++ 2010 Express, which can be downloaded from the following URL:
http://www.microsoft.com/visualstudio/en-us/products/2010-editions/visual-cpp-express
Follow the instructions on this web page to download and install the product.
With a suitable development environment in place, we can now get on to downloading Marmalade itself. First, you need to head over to the Marmalade website using the following URL:
http://www.madewithmarmalade.com
At the top of the website are two buttons labeled Buy and Free Trial. Click on one of these (it doesn't matter which, as they both go to the same place!) and you'll see a page explaining the licensing options, which are also described in the following table:
|
License type |
Description |
|---|---|
|
This is free to use but is time limited (currently 45 days), and while you can deploy it to all supported platforms, you are not allowed to distribute the applications built with this version. | |
|
This is the cheapest way of getting started with Marmalade, but you are limited to only being able to release it on iOS and Android, and your application will also feature a Marmalade splash screen on startup. | |
|
This version removes the limitations of the basic license, with no splash screen and the ability to target any supported platform. | |
|
This version adds dedicated support from Marmalade should you face any issues during development, and provides early access to the new versions of Marmalade. |
When you have chosen the license level, you will first need to register with the Marmalade website by providing an e-mail address and password.
Once you are registered, you will be taken to a web page where you can choose the level of license you require. After confirming payment, you will be sent an e-mail that allows you to activate your license and download the Marmalade installer.
Now that you have a valid license, head back to the Marmalade website using the same URL we used earlier.
- If you are not already logged on to the website, do so using the Login link at the top-right corner of the web page.
- Click on the Download button, and you will be taken to a page where you can download both the most recent and previous releases of the Marmalade installer. Click on the button for the version you require, to start downloading it. Once the download is complete, run the installer and follow the instructions. The installer will first ask you to accept the End User License Agreement by selecting a radio button, and will then ask for an installation location.
- Next, enter the file location you want to install to. The default installation directory drops the minor revision number (so version 6.1.1 will be installed into a subdirectory called 6.1). You may want to add the minor revision number back in, to make it easier to have multiple versions of Marmalade installed at the same time.
- Once the installer has finished copying the files to your hard drive, it will then display the Marmalade Configuration Utility, which is described in greater detail in the next section. Once the Configuration Utility has been closed, the installer will then offer you the option of launching some useful resources, such as the SDK documentation, before it exits.
Note
It is possible to have more than one version of the Marmalade SDK installed at a time and switch between versions as you need, hence the advice regarding the installation directory. This becomes very useful when device-specific bugs are fixed in a new version of Marmalade, but you still need to support an older project that requires a different version of Marmalade.
The Marmalade Configuration Utility window appears at the end of the installation process, but it can also be launched from its shortcut icon:
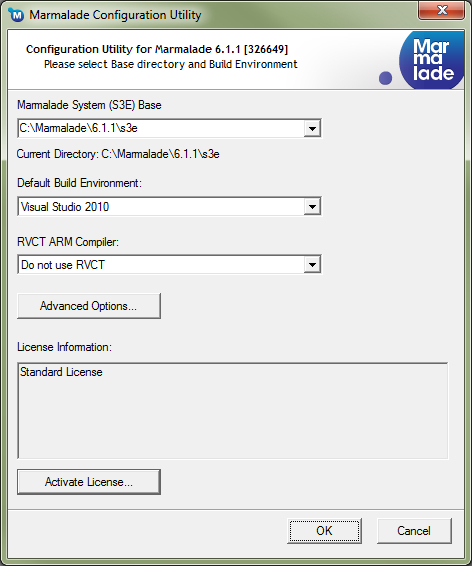
The most important element is the License Information box. Below this is a button labeled Activate License... that allows you to activate your Marmalade installation. Follow these steps to get activated:
- Click on the Activate License... button to display a dialog box that asks you to enter the e-mail address and password you used when obtaining your license.
- The dialog box also has a drop-down box labeled Machine ID (Ethernet MAC address), which you should make sure is set to the MAC address of an Ethernet port that will always be present on your computer. Normally you won't need to change this.
- Click on the OK button to connect to the Marmalade licensing server. You will be asked to select the license you want to install. (Normally there will only be a single option available.) Do so and click on OK.
- A summary of the End User License Agreement (EULA), appropriate to the type of license you are using, will be displayed, so click on OK to accept it. A reference to the full EULA is also provided in the dialog box.
- You should now see a message confirming successful license installation. At this point Marmalade is ready to go!
Before we finish here though, let's look at the other available options. The first is labeled Marmalade System (S3E) Base and consists of a drop-down box that allows you to select the version of the Marmalade SDK you want to use, if you have more than one installed of course!
Note
S3E is short for Segundo Embedded Execution Environment and this is the lowest layer of the Marmalade SDK. This naming convention was adopted by the SDK during its early days of development, and it remains to this day. As you will see later in this book, there are a great many APIs that are prefixed with this name.
The Default Build Environment lets you choose which development environment you wish to use, assuming you have more than one supported version of Visual C++ installed.
The drop-down box labeled RVCT ARM Compiler allows you to change the compiler that will be used when making a device build. (Most mobile devices contain an ARM CPU, so we must compile our code for this processor type.) Marmalade ships with the GCC compiler and uses this by default, but it can also make use of the RVCT C++ compiler from ARM, which is an additional purchase and can produce better optimized code. We normally do not need to change this setting and can leave it on the first option labeled Do not use RVCT.
The Advanced Options... button provides access to a more verbose project-building option and also some experimental parts of the SDK. You will not normally need to make any changes here.
Before we get on to doing some actual coding, it is worth mentioning how you can manage your Marmalade license and account. If you head back to the Marmalade website and log on, you'll notice a link at the top-right corner of the site labeled My Account.
Hover your mouse pointer over this link, and a menu of options that allow you to change your account details and license usage will appear. The following sections provide further information on each of these options.
The menu option called Overview takes you to a page where you can see your personal details along with a summary of the number of licenses and users you have set up under your account. From this screen, there are buttons that allow you to update your profile, modify registered user information, buy new licenses, and manage existing ones.
Clicking the Profile option in the My Account menu or clicking on the Update Profile Information button on the profile overview screen will display a page that allows you to alter information such as your name, contact information, address, and account login password. There is also a checkbox that allows you to sign up for e-mail news updates from Marmalade.
Clicking the Licenses link in the My Account menu or clicking on the button labeled Manage on the overview screen will take you to a page where you can upgrade the level of your license or buy further licenses for new team members.
The Manage Licenses section at the bottom of this page shows all the currently active licenses in your account, and also allows you to release a license that is currently in use so that it can be transferred to another computer.
Releasing a license is useful if you need to work on a different computer for some reason, or if you have a new development computer that you wish to transfer your license to. You can release a license as often as you like, but a single license can only be used on a single computer at a time.
If you are working in a team then you will obviously need more than one Marmalade license, but you also need to manage who has access to those licenses. Clicking on the Users option in the My Account menu or clicking on the Manage Users button on the overview page allows you to do this.
This page shows a list of all the users assigned to your account, and also has an Invite Users section that allows you to add new users to your account. Enter their e-mail addresses in the boxes provided, and click the Send invite button to send them a mail telling them how to activate their own Marmalade account.