
We've now seen how to create a 3D model and display it on the screen, but we're currently limited to non-animated models. Sure, we can rotate or scale to our heart's content, but that really doesn't cut it when you want to animate something more complex than a cube, say for example a human figure.
In this chapter we will be looking at the following topics:
- A quick overview of the concepts involved in 3D animation
- Exporting animations from a 3D modeling package
- Loading and rendering an exported 3D animation in a Marmalade project
Let's start by looking at the ways in which animation of 3D models can be achieved.
By far the simplest and most obvious way of animating a 3D model is to alter its position, orientation, and size. All three of these properties can be specified using the model matrix set at the time of rendering the model.
We could store a matrix in our game class, and for each frame multiply it by a second matrix representing the change in position, rotation, and scale; but this approach is generally not reliable. Over time the matrix starts to degrade due to the cumulative effect of precision errors in the multiplications and additions involved. The matrix will often end up becoming non-orthogonal (that is, its three axes are no longer at right angles to each other), which yields a shearing effect on the 3D model. The scale can also be affected by these precision errors, causing the 3D model to gradually shrink in size!
A far more reliable way is to store the translation, rotation, and scale separately, and calculate a fresh matrix for every frame. How this can be achieved is described in the following sections.
Our game class simply needs to maintain a position vector containing the current world position of the object. We can move an in-game object around the world by adding a velocity vector that indicates how far the game object has moved in this frame and in what direction, with reference to the stored position vector.
To generate the final model matrix all we need to do is copy the position vector into the translation part of the matrix. We normally do this as the last step, as the act of multiplying matrices together when generating the rotation and scale will affect the translation of the matrix.
// lTimeStep is the time elapsed since the last frame (here we're
// setting it to the time interval required to run at 30 frames
// per second).
float lTimeStep = 1.0f / 30.0f;

// Calculate how far we've moved this frame and update position
CIwFVec3 lVelocityStep = mVelocity * lTimeStep;
mPosition += lVelocityStep;

// Copy the position into the matrix used to render the model
mModelMatrix.t = mPosition;
The top left 3 x 3 section of the model matrix specifies the rotation at which we want the model to be drawn. Our game object stores the required rotation and updates it on a frame-by-frame basis. When it is time to render, we just use the stored rotation to calculate the rotation matrix.
There are a number of ways in which the rotation of the object might be stored. Three of the most common ways are shown in the following section.
Euler angles consist of the required angle of rotation in the x, y, and z axes, which we would normally store using a vector. If rotation is not desired around every axis, you may choose to store only those rotation values that you require.
Euler angles are quite easy to both visualize and implement, which is why they are used so often. To convert a set of Euler angles into a rotation matrix, all we need to do is generate three matrices for the rotations around each of the axes and then multiply them together.
However, this is where the problem with Euler angles lies. Matrix multiplication yields different results depending on the order in which you multiply the matrices; so when using Euler angles, it is vital that you choose the order of multiplication carefully, depending on what you are trying to achieve. The following diagram shows an example to illustrate this:
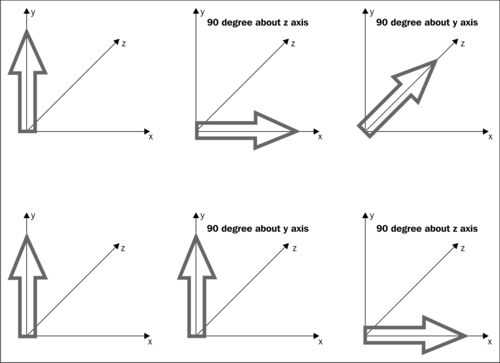
In the diagram, we are rotating an arrow that points straight along the positive y axis. In the first row we rotate by 90 degrees around the z axis and then by 90 degrees around the y axis. The arrow ends up pointing along the z axis.
In the second row of the diagram, we take the same original arrow but apply the rotations in the opposite order. As you can see, this time the arrow finishes in the direction of the x axis.
The following code snippet shows how you can build up a complete rotation matrix for Euler angles applied in the order XYZ:
CIwFMat lMatXYZ;
lMatXYZ.SetRotX(xAngle);
lMatXYZ.PostRotateY(yAngle);
lMatXYZ.PostRotateZ(zAngle);
The axis-angle method of representing a rotation requires a direction vector and an angle of rotation to be stored. The vector represents the direction in which we want an object to be orientated, while the angle allows the object to be rotated around that axis.
We might find this way of specifying a rotation useful when dealing with player characters. For example, to orient a human character we might specify the direction vector as being the positive y axis, which then allows the angle of rotation to be used to change the heading of the character.
Marmalade allows us to convert an axis-angle pair into a matrix for rendering, as follows:
CIwFVec3 lDir(0.0f, 1.0f, 0.0f);
float lAngle = PI / 2.0f;
CIwFMat lMat;
lMat.SetAxisAngle(lDir, lAngle);
A quaternion is yet another method of representing three-dimensional rotations, and is a concept that, when you first come across it, seems a little mind-blowing. Instead of going on about four dimensional hyperspheres and making parts of your brain melt, I'm just going to provide a quick guide to what you need to know in order to use quaternions. If you want to learn more about them, I suggest you search for "quaternions" on Google!
A quaternion consists of four components: x, y, z, and w. A 3D rotation is represented as a unit quaternion, which, in a similar manner to vectors, just means that the magnitude of the sum of the squares of all four components is one.
Multiplying two unit quaternions is similar to multiplying two rotation matrices together. The result represents the first orientation rotated by the second, and the result is different depending on the order in which you perform the multiplication.
The big problem with quaternions is that they are almost impossible to visualize. If given a set of Euler angles or an axis-angle pair, most people can form an image in their mind of what that rotation would look like, but the same can't be said of quaternions.
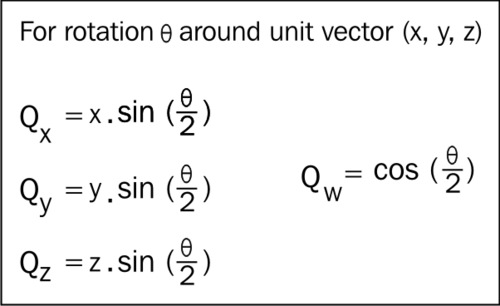
Quaternions can however be created fairly easily from both a rotation matrix (and therefore Euler angles) and an axis-angle pair. The following diagram shows the relationship between the axis-angle pairs and quaternions:
Quaternions really come into their own for 3D animation of boned characters, a topic we will be coming to later in this chapter. This is a technique that requires an awful lot of rotations to be calculated every time you want to update the animation frame, and luckily quaternions make this far more efficient in terms of both memory usage and execution speed.
While the theory behind quaternions may be a little scary for us mere mortals, there is really little need to worry about the math, as Marmalade provides us with a quaternion class, CIwFQuat, that we can use. As an example, creating a quaternion from an axis-angle pair and then producing a rotation matrix from it can be done as follows:
CIwFQuat lQuat;
lQuat.SetAxisAngle(1.0f, 0.0f, 0.0f, PI / 2.0f);
CIwFMat lMat(lQuat);
The scaling factor is normally stored either as a vector containing the required size in the x, y, and z axes, or alternatively as a single scale value which is applied equally to each axis. Often the latter is sufficient, as models tend to look odd when they are not scaled uniformly in each axis.
A scaling matrix is very simple to create, as all you have to do is place the scaling factors required for the x, y, and z axes in the diagonal going from the top left to the bottom right of the 3 x 3 rotation part of the matrix. All the other cells are left as zero.
Since creating a scaling matrix is so simple, the CIwFMat class does not include any methods for creating a general scaling matrix. It does however provide some shortcut methods that make it easy to scale a matrix by the same scaling factor on each axis. The following code snippet provides an example:
CIwFMat lMat;
lMat.SetRotX(PI / 2.0f);
lMat.ScaleRot(2.0f);
This code will create a rotation matrix of 90 degrees around the x axis and then scale up just the rotation part of the matrix by a factor of two. You can also choose to scale up just the translation part of the matrix or both the rotation and translation by using the ScaleTrans and Scale methods respectively.
Model matrix animation is, of course, extremely important, as without it we would be unable to orient and move our 3D models in the game world; but on its own it doesn't make for the most exciting looking game.
Most games require more than this. For example, we might want a human or animal character to walk, run, jump, or perform some other type of motion. Ideally, we need a way of making the overall shape of our 3D model change over time.
The following sections explain how we can achieve this.
A simple approach to 3D model animation is to use morph targets . For this we alter the vertex positions of our 3D model to yield key frames of the animation. A key frame is just a particular set of vertex positions for the model that are an important part of the overall animation, such as the various positions a character's legs move through as they walk. The key frame also has a time associated with it.
The following diagram shows a very simple example of a stick man raising his arm. Key Frame 1 at time index 0 seconds has the arm in a lowered position, while Key Frame 2 at time index 2 seconds has it raised. Each of these key frames can be thought of as an individually exported 3D model.
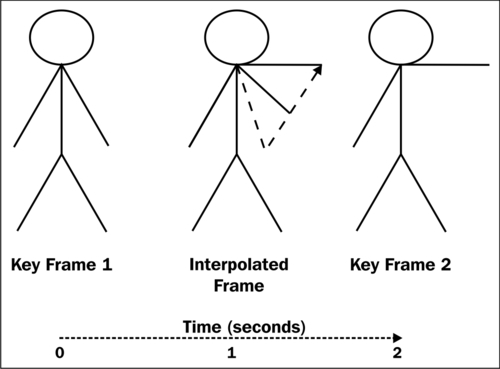
If we want to play back this animation, we could just draw the relevant 3D model at the correct time, but this would yield very jerky results akin to 2D bitmap animation. Instead, we can calculate an Interpolated Frame for any time index between 0 and 2 seconds to give a much smoother result.
Calculating the interpolated frame is simple enough. We work out a delta vector from each vertex in the first key frame to the corresponding vertex in the second key frame. We then scale the delta vector by the ratio of the time index we want to calculate for, divided by the total time between the two key frames, and add the scaled result on to the position of the vertex in the first key frame.
In the diagram, we want to calculate an interpolated frame at time index 1 second, so we would scale the delta vectors by a factor of half. The end result will be the frame shown where the arm is half raised.
This approach may be easy to implement, but ultimately we find that there are a few problems with it, as follows:
- Accuracy of resultant animation: Take a good look at the interpolated frame of the stick man in the previous diagram and you will see that the stick man's arm has actually shrunk. This is because we are interpolating the vertex positions in a straight line, whereas we really need the end vertices to be rotated around the shoulder point.
- Number of key frames required: In order to produce a good quality animation we need to store a good number of key frames. In the example of our stick man animation, we could provide additional key frames that would then minimize the arm shortening effect. However, since we need to store the position of every vertex in the model, whether it has moved or not, this soon becomes a large amount of data.
- The need to ensure that the vertex order does not change between key frames: The only way we can reliably implement morph target animation is if every vertex in the model is in the same position in the vertex stream for every key frame. When exporting a 3D model from a modeling package, the vertex stream order can end up changing between frames, which would then cause our animation to behave incorrectly as vertices interpolate between completely wrong positions.
For the reasons listed, Marmalade does not support morph target animations, though it is fairly trivial to implement such an approach if you so wish. Morph targets can still be extremely useful for tasks such as facial animation, which, with the increasing power of mobile devices, may soon be a more common feature in mobile games.
Most 3D video games will implement the animation of 3D models using a boned animation system. This method works by allowing an animator to set up a skeleton of virtual bones, which can then be used to deform the vertices of a 3D model. The 3D model itself often gets referred to as the skin for purposes of animation.
To set up a boned animation, the first step is to use a 3D modeling package to create the 3D model you want to animate in its bind pose. The bind pose is normally chosen to be a position in which it is easy to access every polygon in the model for texturing and coloring purposes, as well as for laying out the skeleton. For a human character this often means a pose where the arms are held outstretched horizontally from the body and the feet are spaced a short distance apart.
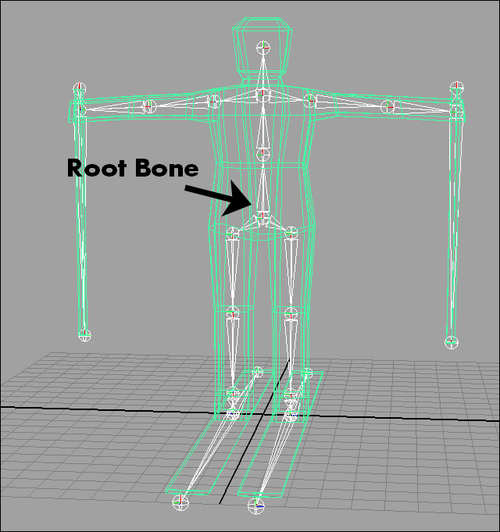
With the bind pose created, the animator then starts the rigging process. This involves adding the skeleton to the model by placing bones in relevant places. The bones are linked together to form a hierarchy; so whenever a bone is moved, all the bones which are linked to it as children will move too. Ultimately there will be one top-level parent bone in the hierarchy and this is called the root bone.
For performance reasons it is good to keep the number of bones to a minimum, but this must be balanced against having enough to allow good quality animation. The following diagram shows what the 3D skier character used in our example game project looks like after being rigged:
Once the bones have been laid out, the next step is to bind the skin (in other words, the mesh of polygons) to the skeleton. This is done by allowing each vertex of the 3D model to be modified by one or more bones.
If a vertex is mapped to more than one bone, a weight is also defined for each bone that determines how much of an effect it will have on the vertex. Weights range from zero to one and the sum of all the weights for a particular vertex should add up to one.
Most 3D modeling packages will have a good first attempt at doing the binding process automatically, but normally the animator will need to make some adjustments to the binding so that the skin animates correctly when the bones of the skeleton are moved.
With all that done, the animator can then make the character do whatever they want simply by rotating and moving the bones around to define the required key frame positions, just like with morph targets. The boned system will produce much better quality in the final animation, and the amount of memory required to store the key frames is normally not too large, since all that needs to be stored is the orientation and position of each bone.
The Marmalade SDK comes complete with a boned animation system, which we will be learning about in the rest of this chapter. The system is very flexible and there are very few limitations to it.
The main things to be aware of are that you can only have a single root bone, a maximum of 256 bones in total, and each vertex can only be affected by a maximum of four bones. In most cases these limitations are unlikely to cause you any problems.