
Let's look at pulling together all of the information you've learned in this chapter to create an interactive, expressive conversation between characters and the learner.
You already have the knowledge needed to do this including inserting characters, creating states, adding audio, timing the display of slide objects, and using triggers to create an action. So, let's give it a go!
Be sure to have Exercise 4 – Workplace Compliance open. This exercise works through a simple example of an interactive conversation. Forthcoming exercises will build upon this, adding new functionality and interactivity to the conversation.
- Switch to Story View and double-click on the 3.1 Privacy slide.
- Press Ctrl + D to duplicate the slide. Rename the new copy as
Phone Call. - Select the 3.1 Privacy slide and add an animation to the cell phone by choosing Animations and adding an entrance effect of Spin and Grow.
- Add a new textbox and type
The phone is ringing!. Place this to the right of the phone, make it red, and increase the font size. You may want to switch to a casual font, something like Comic Sans. - Select the cell phone and add a trigger to jump to the next slide when the user clicks on the cell phone.
- Navigate to the 3.2 Phone Call slide and delete the Scrolling Panel as well as the Google search image.
- Retitle this slide as
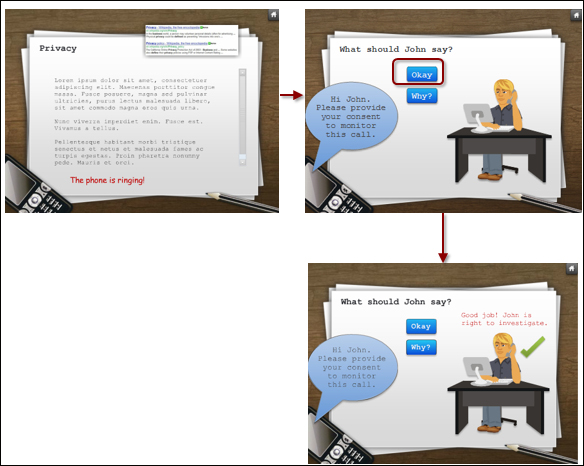
What should John do?. - Insert a speech bubble and add text that says "Hi John. Please provide your consent to monitor this call." Size and format the bubble so that it's pointing from the cell phone and hovering just above it (see the example screenshots at the end of the exercise).
- Add an entrance animation to the bubble so that it fades in.
- Insert a character who will be answering the phone. To do this, choose Insert | Character | Illustrated and pick Male 13, select the Left position, and choose a pose of Sitting at computer with phone.
- Move the character to the right side of the white paper image.
- Add two buttons, one that says "Okay" and the other that says "Why?". Place these buttons vertically in the middle of the slide (see the example screenshots at the end of the exercise).
- Add a trigger to the Okay button that changes the state of the John character to Alarmed when clicked.
- Add a trigger to the Why? Button that changes the state of the John character to Thinking when clicked.
- Now let's edit the states of the character by selecting the character, clicking on the States panel, and choosing Edit States. You'll notice that Storyline automatically added the two new states to the character image.
- Click on the Alarmed state and insert two textboxes.
- John should not have said that: Position this above the character and format it so the font is 14 pt and is red.
- Click the Next button to find out why: Position this to the right of the character and format it in the same way.
- Insert a checkmark shape and format it to be green.
- Click on the Thinking state and insert a textbox that says "Good Job! John is right to investigate." Add an X shape and format it red.
- Press Ctrl + D to duplicate this slide and rename the copy as
Wrong. Navigate to this slide. - Delete the buttons and adjust the text as follows:
- Change the speech bubble text to "That's great. So let's review some of your personal details..."
- Add a new textbox with the following text:
By not investigating, John doesn't know who he is providing details to or why. This is a privacy and security issue.
- Format this to fit near the top of the slide, perhaps in red so that it stands out and reinforces that the learner response was incorrect.
- Preview this scene by clicking on Preview in the ribbon and choosing This Scene. While previewing, click on the phone to see the phone call and click on both buttons to see how the states are working. Click on the Next button to see the incorrect feedback.
- Close Preview and save the file.
The following screenshots show the previewed results when selecting the right answer:
The following screenshots show the previewed results when selecting the wrong answer.

This exercise demonstrated basic interaction techniques. Most interactions are created using the built-in quizzing feature, triggers, and variables to precisely control what information appears and when it appears. As you progress through this book you will have opportunities to put into practice some of the more advanced features of Storyline.