
This chapter focuses on a powerful Storyline concept called layers. Layers are useful in organizing and extending the slide's content within a single slide as opposed to spreading content over multiple slides. Layers can help optimize your story by reducing the number of overall slides, making for smaller file sizes and faster publishing times.
In this chapter you will learn:
- When and why you might use a layer
- How to create and edit layers
- How to configure the settings of layers
- The techniques for displaying and hiding layers
- To work with built-in interactions that work or complement layers
If you've used Articulate Studio or PowerPoint previously, you will have noticed that each slide can contain any number of objects that can be placed in front or behind other objects. You can do the same with Storyline by controlling the order of slide objects in the Timeline.
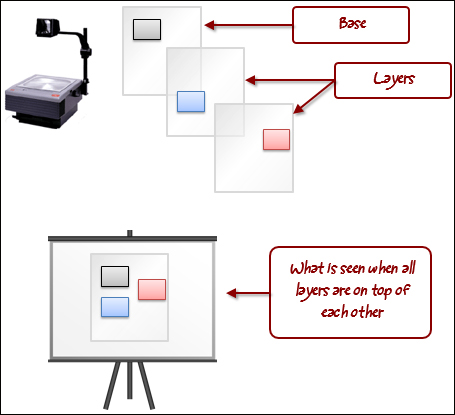
Slide layers are like slide objects that can be layered on top of each other. Think of it like using a transparency sheet on a projector. You can place one transparency at a time on the projector or you can add one on top of the other and keep the information on the bottom transparency visible while adding new information to it. Storyline slide layers can work like this with transparency or can be solid where they do not allow objects on the base layer or other layers to show through.
Here's an example that uses a three-tab interaction. To build an interaction like this in Articulate Studio (shown on the left), you would need to use multiple slides, one for each tab, just like placing one transparency at a time on a projector. In Storyline, you could also use multiple slides with hyperlinks to achieve this, however, you might opt to use multiple layers since it would result in one slide instead of three. This is like placing one transparency on top of another, stacking information over multiple levels instead of spreading it over different slides. By using layers, you keep the entire tabbed interaction together on a single slide.

Layers are also useful with rollovers or button clicks to reveal glossary definitions, pop-up tips, hints, and so on. In Articulate Studio, you'd have to create a separate slide for the information that is to be revealed by the rollover or button click. This second slide often contains duplicated information that leads to larger file sizes and increased development time.
There are times when layers might not be so useful, particularly when a single slide has a lot of information in it. For editing and organization, you'll find it easier to spread content-heavy slides over multiple slides. This helps reduce on-screen content, making it easier for the learner to digest and easier for you to edit.
Just like working with regular slides, each layer has its own Timeline, and you can place any number of objects in a layer using all of the regular formatting commands and Storyline features, such as animations and effects.
To this point you have been working with just the base layer of a slide. This layer appears by default as soon as the slide starts. All other layers on a slide remain hidden from display until they are triggered to appear. This could be by the click of a button or by a timed event; for example, when a particular image appears on the Timeline, a layer will automatically display. Hiding layers works similarly; you can conceal a layer by a trigger or a timed event.
Follow these steps to add a layer:
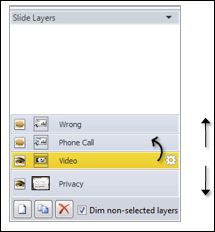
- Choose Insert | Slide Layer from the ribbon or select the New Layer icon from the Slide Layers panel.
- The new layer is called Untitled Layer 1 by default. It's a good habit to give each layer a descriptive name. You can do this by right-clicking on a layer in the Slide Layers panel and then renaming it.
You may want to hide, duplicate, delete, or create another layer. All of these commands are found at the bottom of the Slide Layers panel. By default, all layers except the one you're working on will appear dimmed. If you'd rather see them in full color, you can unmark the box called Dim non-selected layers in the Slide Layers panel.

Slide layers display on top of the base layer. By default, objects on a layer are only visible when the layer is viewed, however, this default can be changed. You can configure a layer so that objects on other layers are visible when the layer is viewed, and when this occurs, objects on other layers will appear in the same layer-order as they are listed in the Slide Layers panel, from bottom to top. This is similar to objects on a slide where those that are at the Timeline appear underneath those at the top.
To change the layer order, select a layer in the Slide Layers panel and drag it up or down to a different position.
Each slide layer can be customized to control how it appears and functions. Click on the small gear icon to the right of the layer name to display the Layer Properties window. You can also right-click on a layer and choose Properties.

Formatting a layer usually involves adding and editing objects on the layer. In addition to controlling the visibility of other layers, you can also hide or show all or some of the objects on the base layer. There is also a master slide that can be used to create consistent formatting between layers.
Here are the steps to control the visibility of base layer objects:
- Select a layer and view the Timeline of the layer.
- Scroll down the Timeline until you see a group named Base Layer Objects.
- Click on the group to expand it and then click on the Show/Hide icon (eye) to hide or show individual objects on the base layer. You might need to expand the height of the Timeline panel or scroll down in the timeline to see all of the objects within the group.
You can create a consistent look and feel for layers, just like you can for slides, by using master layouts.
Later in this book we'll explore quizzing and formatting quiz results using the Feedback Master, for now, it's important to note that Storyline uses the blank layout of the Feedback Master as the default layout for slide layers.
This means you can adjust the blank layout to customize the look and feel of multiple layers. You can also assign different master layouts to different layers. Just like Slide Masters save time and enable consistency between slides, so do Feedback Masters when you have multiple layers in a project that are similarly formatted.
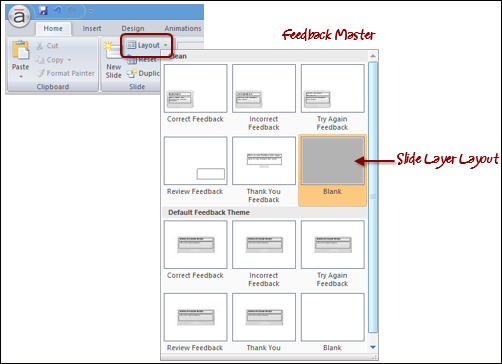
The following are the steps to change or modify the layout for a slide layer:
- Select the layer you want to change.
- From the Home tab, click on the Layout icon or drop-down list. Storyline highlights the Feedback Master layout that is currently being used.
- You can choose another layout to use, or from the View tab, choose Feedback Master to change the layout as you would change a Slide Master layout.
Tip
You can adjust the transparency of slide layers by using the Format Background option on the slide layout in the Feedback Master that is associated with a layer. By setting a fill color and adjusting the transparency value, this will make objects on the base layer appear dim, similar to a lightbox effect.