Quizzing is at the heart of many e-learning courses where often the quiz questions need to be randomized or even reused in different sections of a single course (that is, the same questions for a pre and post-test). The concept of building once and reusing many times works well with several aspects of Storyline. We'll start with quizzing and a feature called Question Banks as follows:
Question Bank offers a way to pool, reuse, and randomize questions within a project. Slides in a question bank are housed within the project file but are not visible until placed into the story. Question Banks can include groups of quiz slides and regular slides (that is, you might include a regular slide if you need to provide instructions for the quiz or would like to include a post-quiz summary).
When you want to include questions from a Question Bank, you just need to insert a new Quizzing slide, and then choose Draw from Bank. You can then select one or more questions to include and randomize them if desired.
This exercise will use the sample project file created in Chapter 8 called, Exercise 8 – Identity Theft. This should be open in order to begin the exercise. You will be removing three questions from a scene and moving them into a question bank. This will allow you to draw one or more of those questions at any point in the project where the quiz questions are needed, as follows:
- From the Home tab, choose Question Banks, and then Create Question bank. Title this Identity Theft Questions.
- Notice that a new tab has opened in Normal View. The Question Bank appears in this tab. Click on the Import link and navigate to question slides 2, 3, and 4. From the Import drop-down menu at the top, select move questions into question bank.
- Click on the Story View tab and notice the three slides containing the quiz questions are no longer in the story. Click back on the Identity Theft tab and notice that they are located here. The questions will not become a part of the story until the next step, when you draw them from the bank.
- In Story View, click once on slide 1 to select it, and then from the Home tab, choose Question Banks and New Draw from Question Bank.
- From the Question Bank drop-down menu, select Identity Theft Questions. All questions will be selected by default and will be randomized after being placed into the story. This means that the learner will need to answer three questions before continuing onto the next slide in the story. Click on Insert.
- The Question Bank draw has been inserted as slide 2. To see how this works, Preview the scene.
- Save as
Exercise 11 – Identity Theft Quiz.
Tip
There are multiple ways to get back to the questions that are in a question bank. You can do this by selecting the tab the questions are located in (in this case, Identity Theft), you can view the question bank slide in Normal View or choose Question Banks from the Home tab and navigate to the name of the question bank you'd like to edit.
Whether a question or interaction is created from scratch, from templates that came with Storyline, or that someone else provided you will likely modify it to suit your needs. To reuse a question or interaction, you can save it in a Storyline file by itself and then import it into a project. All formatting, media, animations, and triggers will come along with it.
You created an interaction in Chapter 6
, Using Variables to Customize the Learning Experience that asked the learner to type their thoughts, and then displayed those thoughts alongside the feedback. This is a common interaction that could be used in many projects. Let's save it out on its own then bring it into our Identity Theft Quiz. We'll start this exercise with a new, blank project as follows:
- With a new, blank project opened, select New Slide from the Home tab, choose Import and navigate to Storyline. Locate
Exercise 6 - Sales Trainingand click on Open. - Select None in the upper-right corner of the Import window to deselect all slides, and then navigate to the Module 1 section and select just the Details slide.
- Select import into Current Scene, and then click on the Import button.
- Delete the first blank slide.
- On the newly imported slide, in the Triggers panel, delete the Slide Trigger (set Mod1Complete…) and Player Trigger (jump to…).
- Save this as
Exercise 11 – User Thought Interaction. - Open
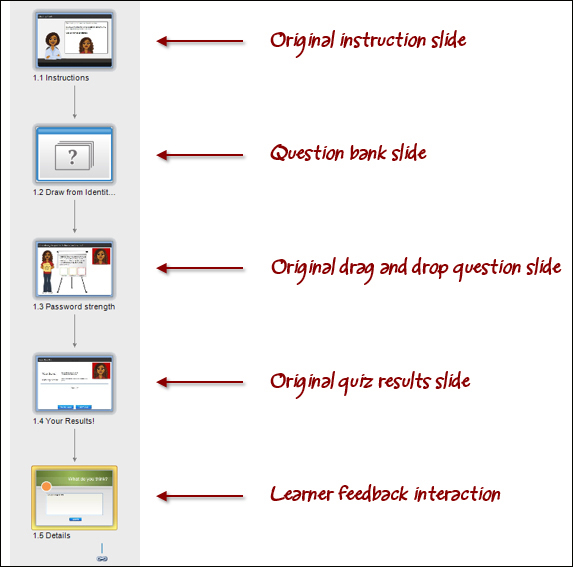
Exercise 11 – Identity Theft Quizand select the last slide. - Let's bring in the interaction by selecting the Insert tab and choosing New Slide then Import. Select Storyline and locate
Exercise 11 – User Thought Interaction. Only one slide will be selected, choose to import this into the Current Scene and click the Import button. - Open the TextEntry trigger that displays in the Trigger panel on the newly imported interaction and change the variable to
Thoughts. - Preview the slide and test functionality.
- Save the file.
The Storyline Player includes tabs that contain glossary terms and definitions as well as resources for links to supporting documents and websites. What if you want to use the same glossary to resources listing in more than one project?
You might think that, by saving the Player, the glossary and resources will also be saved with it, however, this isn't what happens. The glossary and resources stay with the project and not the Player.
To reuse these items you will need to save the current project as a template by selecting the Articulate file icon (upper-left corner of the Storyline window) and choosing Save As…, and then select the Storyline template from the file type drop-down menu. When the template is used to create a new project, the glossary and resources will come along with it (note that this works only when creating new projects with the template).
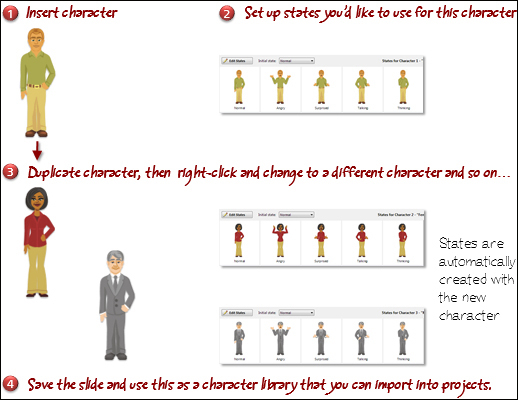
The Characters feature in Storyline is terrific for being able to insert high quality cutout images of people into your e-learning courses. The fact that there are so many poses and expressions lends itself to all sorts of creative ways to use these images.
The characters are available in every project, but how they are set up in terms of poses and expressions needs to be manually configured each time you use a character. For example, if you use a female character that is in a happy pose, but when clicked changes to a confused pose, that means you have two states for the character. If you want to use this character with these states in another project, you'll need to manually re-create it, unless you save the characters in a file and import them into a project.
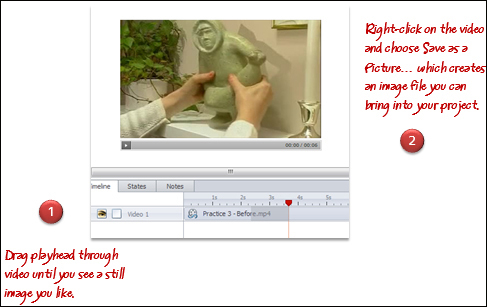
Another useful way to reuse existing media is to create images from video clips that you may have for a project. Instead of spending time trying to locate fresh images, why not create them from video footage you already have You can do this using the technique shown here:?