
Inserting shapes, text, and other objects onto a slide is similar to when using Microsoft Word, Excel, or PowerPoint. For example, to add a rectangle shape to a slide, select the Insert tab and click on the Shape option to choose a rectangle shape, and click-and-drag the slide to insert, position, and size the rectangle.

Once you have objects, images, text, or other content on a slide, you can format them in a familiar way as you would with Microsoft Office products:

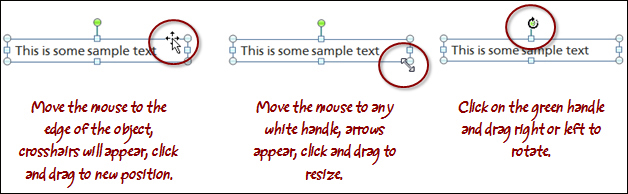
You also use familiar mouse gestures when working with slide objects:
Here are some common adjustments you might make to a Storyline shape:
- Change Shape: This is handy if you'd like to change an object to another shape, for example, a textbox that is a box into a circle.
- Quick Styles: This is an easy way to change the fill color, font, outline, and effect of a shape. The color choices depend on the current design theme (design themes are covered in more detail later in this chapter).
- Shape Fill, Outline, and Effects: You can fill a shape with a solid or semi-transparent fill color, picture, gradient, or texture. You can also add a line around a textbox of various colors, widths, and styles.
- Shape Effects: This can add shadows, reflections, glows, and soft edges.
Tip
The Format Painter is a handy feature found on the Home tab, making it easy to apply formatting from one object to another. Select the object whose format you wish to apply, click on Format Painter and then click on the object to format. You can also double-click on the Format Painter to apply formatting to multiple objects.
You can group objects together to help with slide organization. For example, if five objects make up the image of a folder, you can group those objects together and name the group as "file folder". In that way all objects related to the folder are kept together.
To group objects, select all of the objects to be grouped by drawing an outline around them on the slide or shift-clicking to select multiple objects. Then press Ctrl + G or right-click and select Group.
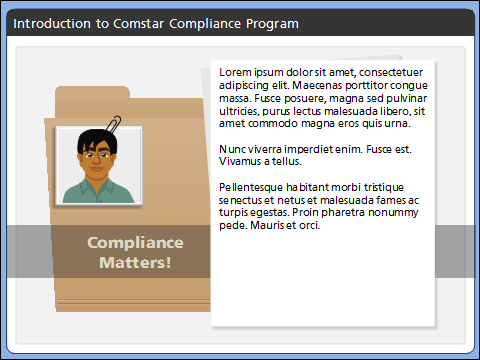
Let's turn back to Exercise 2 – Workplace Compliance, this time the focus will be on editing and adding objects to the slide:
- Click on the text placeholder, where it says Click to add text. Type
=lorem()and then press Enter. This is a quick way to insert sample text into a textbox. - Resize the employee image to make it large and then, while the image is selected, click on the green handle above the image to rotate it so that the image appears straight. Now let's move it so that it looks similar to the following screenshot:
- Refine the look of the employee image by adding an Offset Diagonal Bottom Left shadow to it.
- Select the employee and the paper clip and group them by pressing Ctrl + G.
- Rename this group from Group 1 in the Timeline to
employee. - Insert a textbox below the
employeeimage and typeCompliance Matters! - Rename this textbox from Text Box 1 to be
compliance matters. - Adjust the width of the box to go from edge to edge of the visible portion of the folder image changing the font to Articulate Extrabold, the size to 18pt and alignment to be centered.
- Insert a rectangle shape and draw it so it goes across the white part of the slide and make it tall enough to cover the words
Compliance Matters! - Right-click on the rectangle, choose Format Shape and change the following attributes:
- Change the Shape Fill to black.
- Turn the Shape Outline off by selecting No Outline.
- Change the slide Transparency to 60 percent. Click on Close when done.
- Rename Rectangle 1 to be
compliance box. - Move the
compliance boxso that it is centered over the words Compliance Matters! - Select the words Compliance Matters! then change the font to a lighter color.
- Move the words Compliance Matters! above the compliance box in the Timeline.
- Select
compliance mattersandcompliance boxthen group them. - Rename the new group titled Group 1 to be
subtitle. - Move the
subtitlegroup belowintro paperin the Timeline. - Move the
subtitlegroup to begin at the 2.5 seconds mark in the Timeline. - Save the file:
By now you've seen that inserting, sizing, and formatting text objects in Storyline is similar to with PowerPoint and other Microsoft Office products. There are two features in Storyline that provide additional functionality to text in your story:
A scrolling panel lets you place a large volume of text (or just about any other object) that would normally consume a lot of space on a slide, into a contained area. If the text overflows, the learner will be able to scroll vertically and horizontally to see all of the information. You can have as many scrolling panels on a single slide as you like.
To create a scrolling panel, choose the Insert tab from the ribbon and then select Scrolling Panel.
If you've used Articulate Presenter you will be familiar with slide notes. Storyline handles this the same way, allowing you to add notes to each slide. Notes can be viewed in the published story as transcripts, narration captions, or instructions.
To add slide notes, click on the Notes tab in the Timeline, States, and Notes panel. You can format notes using most of the text and paragraph formatting options including fonts, bullets, and alignment.
The following screenshot provides examples of scrolling panels and slide notes:

You can insert a picture from your computer or a screenshot using Storyline's built-in screenshot tool.
Tip
Storyline does not have a clipart feature like PowerPoint. To work with Microsoft clipart, download the images needed from http://office.microsoft.com/en-us/images/ and insert them into Storyline.
Storyline's screenshot tool lets you capture images from other applications that are running on your computer or any portion of the screen.
Here's how to add screenshots:
- While viewing a slide, click on the Insert tab and choose Screenshot.
- A drop-down list appears displaying all open applications or windows on your computer. Minimized applications or windows will not appear on the list.
- Move the mouse over any thumbnail in the list to see the application or window name and click to insert a screenshot of that item into the current slide.
- To take a screenshot of just a portion of the screen, choose Screen Clipping instead. Storyline will temporarily disappear to allow you to click-and-drag the mouse to select the area of the screen to be clipped. The selected area will not be dim. Just release the mouse to insert the screenshot into the current slide.
Similar to adjusting the way a textbox or shape appears, you can apply graphic treatments to images. These are similar to the options in PowerPoint, though not quite as many:

It's fairly common practice to edit your images in a tool other than Storyline, however, if you don't have another image editing tool or just need to make a few minor adjustments, here are some things you can do:
- Touch up a picture by adjusting brightness, contrast, and color.
- Add a cool picture style. This is an easy way to alter the look of an image without any fuss.
- Change the shape of a picture to create interesting effects.
- Add a border.
- Jazz up a picture by adding shadows, reflections, glows, and soft edges.
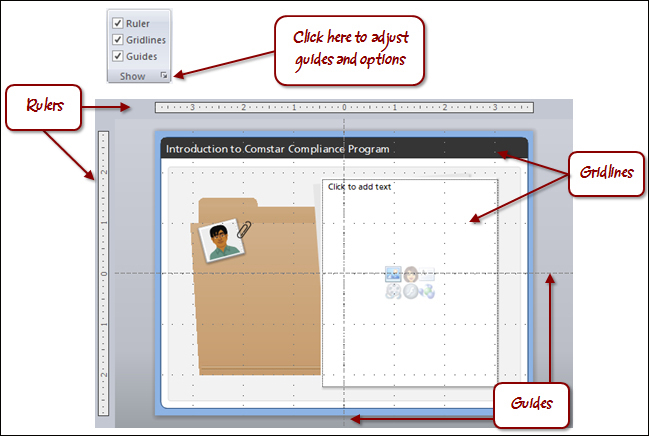
When working with objects on a slide, like a textbox or other shape, it's a good practice to turn on visual guidance to assist with positioning and alignment. There are three tools available that can be toggled on or off by right-clicking on the outside area of the slide or from the View tab in the ribbon:
- Ruler: This displays vertical and horizontal rulers in the slide stage area.
- Guidelines: This displays rows and columns of dotted lines, each eight pixels wide, creating a grid. This can be adjusted by expanding the Show option.
- Guides: This is a vertical and horizontal guide which appears initially in the center of the slide, however, you can use the mouse to click-and-drag these guides into position and Ctrl + click to create new ones.
Tip
By default, when you move an object around a slide it will align itself to the nearest gridline even if gridlines aren't turned on. While this is usually helpful, it can occasionally interfere with the precise alignment of objects. You may opt to temporarily turn this feature off. You can do this from the View tab, expanding the Show option (under Ruler, Gridlines, and Guides) and turning off the checkmark beside Snap objects to grid.