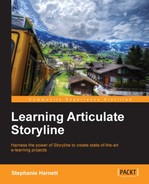
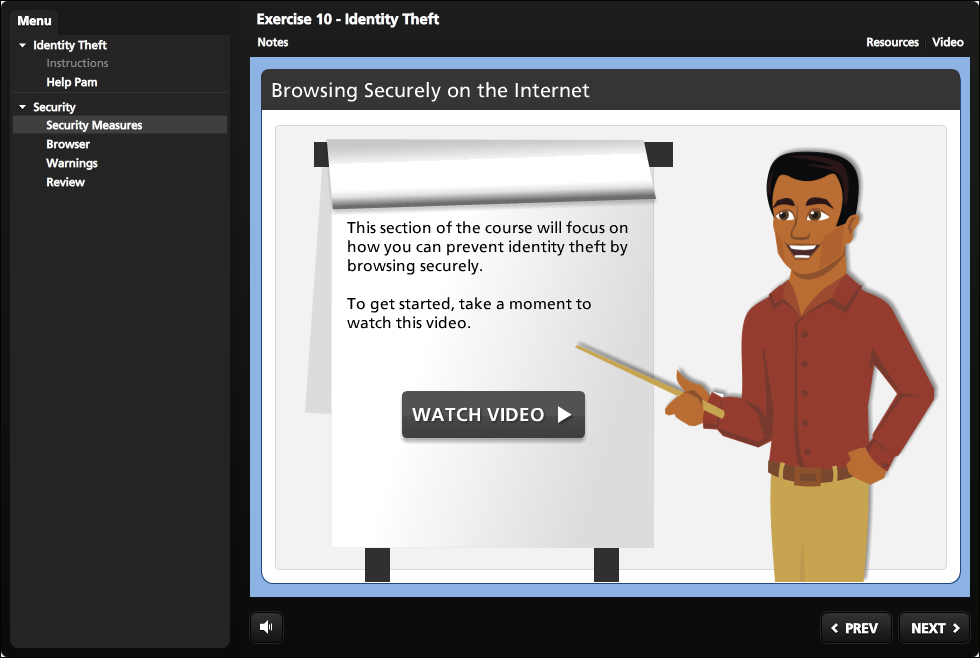
When you previewed the exercises in this book, you probably noticed that course content, words, media, and other objects on a slide, were surrounded by an interface. This is called the Player and it can be as minimal as a 10 pixel border all the way around a course or more elaborate to include logos, menus, and playback controls.
What's really great with this feature is that Storyline lets you fully customize how the Player looks and what features appear on it. You can then save that setup and reuse the player with other Storyline projects; a big time saver and a great way to deliver consistent results.
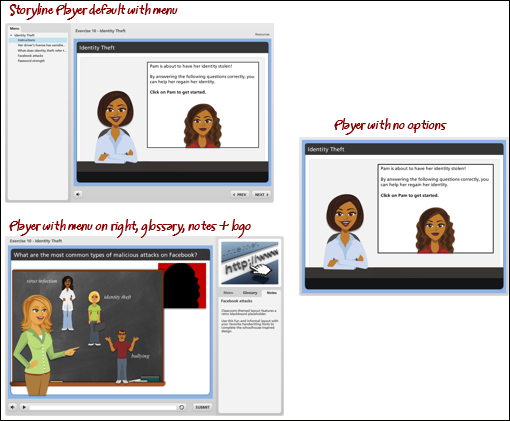
Customizing the player is done by clicking on the Player option from the Home tab. Player options are wide and varied; we'll highlight some of the features you should be aware of and take some time to get to understand better. First, let's take a look at the player interface:

After clicking on the Player option, a number of properties appear and they are organized in three sections in the RIbbon at the top; layout, data, and custom.
You can rename, remove, add, and reposition the Player tabs that appear along the top and sides of the player from this area. This is a powerful feature that can be used to make various forms of supporting content available to learners at any point during the course. The Controls area at the bottom of the Properties window defines the default appearance for playback controls for all slides in the story. Most of the options here can be overridden at the slide-level with the exception of volume, search, and logo. Make sure that the Course Title, if checked, isn't left blank or contains special characters or symbols, as this is known to cause issues with some LMS's.
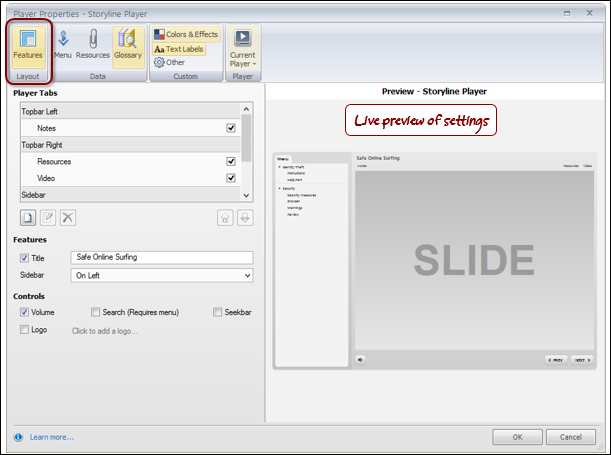
When the Menu tab is enabled in the Features area, a menu option appears showing the learner what's inside the course. By default, each scene and the slides within are grouped using the names of the scenes and slides as depicted in the story itself.
You would usually make adjustments for how the menu content appears by using friendly scene and slide names, and removing slides the learner doesn't need to see listed in the menu or have direct access to. An example might be to remove subtopic slides leaving just the major topics visible from the course menu. Removing a slide from the menu doesn't delete the content, it just hides it from displaying as an item in the menu.
In the following example, the left column shows that the course menu, by default, lists all of the scenes and slides in the course. After some adjustments, the middle column shows only two of the three scenes and fewer slides. The right-most column shows how these menu adjustments look when published:
You can change the name of the scenes and slides and re-order them. Renaming slides in the menu does not change the actual slide names used in the story. In fact, any adjustments you make to how the menu is displayed will not affect the functionality of the course or the presentation order of the content.
The menu shows slide numbering alongside the slide name. If you re-order slides, the numbering can appear to be out of sequence. This number sequencing doesn't actually appear to the learner, by default, no menu appears at all. You can adjust this in Menu Options by clicking on the gear icon in the lower right corner and checking the number entries in the menu automatically. When you do this, numbering appears sequential to the learner.
Also within Menu Options, the Navigation Restriction drop-down controls how the learner moves through a course. The default is Free, meaning learners can use the back and next buttons as well as the menu to view the presentation in any order they'd like. You can change this to Restricted so learners are able to move backward but can't skip ahead or you can choose Locked which forces learners to view content in the order you've designed. They won't be able to move backward or forward unless there is a specific trigger allowing them to do so.
The Following is a screenshot of the Menu options that are accessed by clicking on the Gear icon:

This feature lets you attach supporting content, such as file attachments and links in the Resources tab that appears at the top of the Player. Content contained in any Player tab is accessible throughout the course.
The glossary lets you include terms and definitions. This content, though accessible throughout the course, is not directly linked to any terms that may appear within the slide content.
You can alter the color of the player by switching from one built-in theme to another. You can also alter a theme and create new themes with individual color changes for various elements similar to how you would alter other theme colors found in Storyline and PowerPoint. What's interesting is that you can control the transparency levels for almost all elements, allowing for greater design options. You can save a color scheme so that it can be used for other Storyline projects.
This feature lets you customize the default text that appears in the player and the course. For example, you may want the Notes tab to appear as transcript or the Previous button to be called Back instead. Storyline supports multiple languages as well.
This option lets you specify how a published course appears in a browser. The options you set here will relate to the size and design of your story as well as the quality of media within. You can allow the learner to maximize the browser window and have the course scale to fill the window. Storyline stretches the content to achieve this effect. Since Storyline content is raster not vector, lower resolution images may appear fuzzy when stretched beyond their original dimensions. You can lock the player at an optimal size so that the course won't stretch, but if your story size is 720 x 540 and it's being played back on a large, high resolution monitor it will appear quite small.
You can set the Resume option so that when a learner returns to the course, Storyline will prompt to resume, so they can choose to pick up from where they left off, or this can be set so the course always automatically resumes, or never resumes. This can be further configured so the resume action occurs only if the course is running in an LMS.
In this exercise you will work with the player to configure some of the settings. Following the exercise, there is a list of the key player properties that you can review.
- As a first step, open
Exercise 9 – Identity Theftand save it asExercise 10 – Identity Theft. - Click the Player button on the Home tab. You can see in the preview windows that all of the scenes in this project along with all of the slides are visible in the menu. We don't want the learner to see everything, so let's work with the menu to tidy this up:
- Click on the Menu tab
- Rename the 1.2 menu item to be
Help Pam - Delete menu items 1.3, 1.4, and 1.5 by selecting each and clicking on the red x delete button at the bottom of the window. Remember deleting here doesn't delete the actual slide, just the items in the menu list in the player.
- Delete 2.2 Quiz and 2.5 Introduction; we don't want learners to jump to the quiz, and the introduction is a video that appears in a lightbox so it shouldn't be visible in the menu.
- Delete the entire last scene with children (slides), scene 3 Security Tab, as this is the step-by-step interaction that the learner will get from a link on another slide so it doesn't need to appear in the menu. Notice that the preview window is updating as you are making changes.
- Select the Features tab and navigate to Notes to include any details that appear in the Notes panel on each slide. Note that content is edited on each slide in the Notes area and typically is used as a transcript for voice narration but can include any text.
- Navigate to the Notes item, then using the up arrow (beneath the Player tab) click it several times so the Notes tab appears in the top bar left section. Look at the preview window to see if it is correctly positioned. You can also click on the tab to see how it looks expanded.

- Add a resource by clicking on the Resource tab and then click on the New Item icon in the lower left corner. Enter the Articulate website address of www.articulate.com and click on Test to make sure it works and then click on Save.
- It would be great to provide the introduction video to learners no matter where they are in the course as a quick reminder of some of the key messages. Let's add a new custom tab to the player to achieve this:
- Click on the Features tab and then click on the New Item icon that appears beneath the Player tab.
- Type the tab name as
Videothen set it so that Storyline places the 2.5 Introduction slide into a lightbox when the user clicks on the tab.
- Click on Colors and Effects and change the Color Scheme to Black.
- Click on OK to save the player changes.
- Preview the entire project and note the player changes, particularly the custom Video tab, link in the resources tab (which won't work during preview), and the Notes tab.
- While still previewing, navigate to the Review slide in the Security section. Notice that the recorded video plays back but there aren't any controls on the player to allow the learner to pause this video. This is where preview can really help you fix things as you go. We caught this problem, so let's change it:
- Close out of preview and switch to Story View
- Navigate to the 2.6 Review slide and on the right side under Player Features, select Custom for the selected slide
- Check the Seekbar option.
- Preview just this slide to ensure the seekbar is visible and you can control the recorded video.
- Save the file.
When the time comes to fully test your course in the environment it will reside in, you will need to publish the project. This is typically done locally using one of the five available publishing formats: Web, Articulate online, LMS (Learning Management System), CD, or Word. Once published, the resulting files and folders are usually copied to a web folder, network location, or LMS.
The first time a project is published, it will take a few minutes to complete in order to generate the necessary files and folders as well as optimize and compress audio and video files. Subsequent publishing will go a little faster.
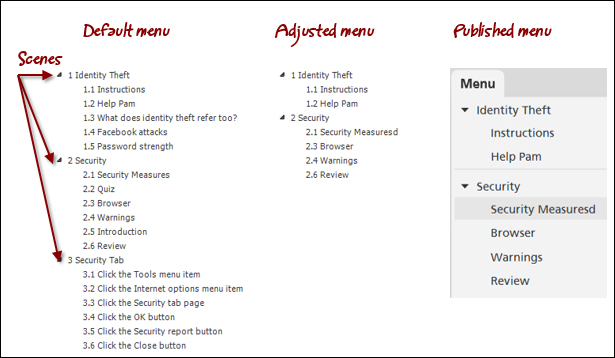
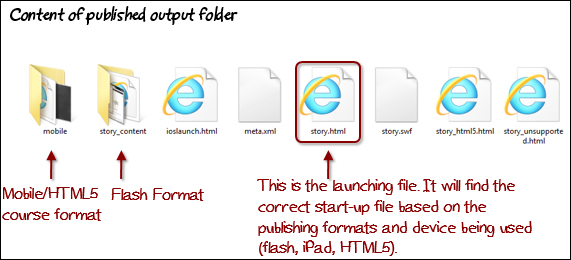
Storyline doesn't publish a single file, it actually creates hundreds of files contained in a few folders. The entire published output folder structure will need to be copied to the hosting destination in order for the course to operate correctly.
Here is an example of the published output folder:
Use the Publishing to the Web option when you'd like the course to be accessible on the web or an internal intranet and you don't need to track learner progress or completion.
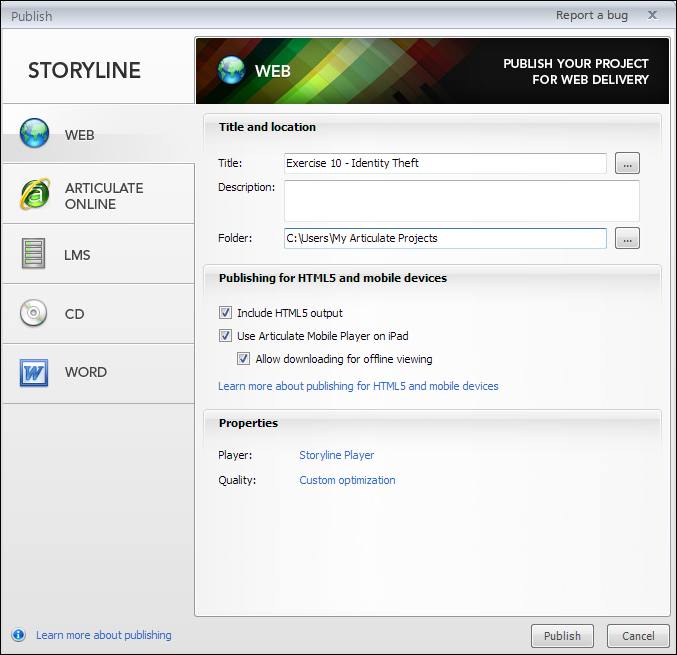
- To begin, from the Publish tab, navigate to the Web option and give the course a Title and a Description.
- Enter the optional details by clicking on the ellipses buttons to the right of Title.
- Choose a publish location. By default this is DocumentsMy Articulate Projects but you can change this by clicking on the ellipses next to the Folder location box.
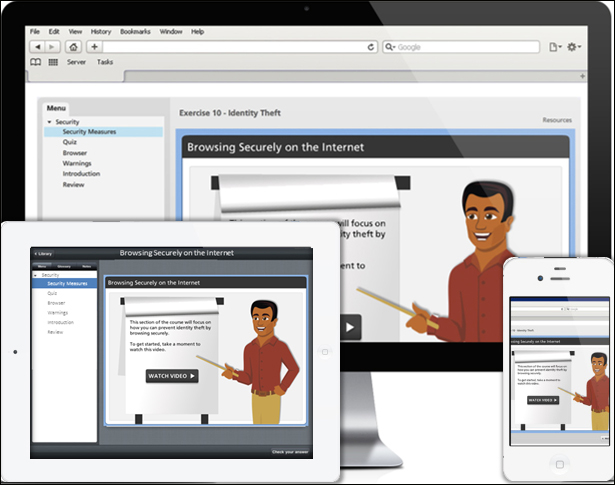
- Decide if you are going to include support for HTML 5 devices and/or the Articulate Mobile Player app for the iPad.
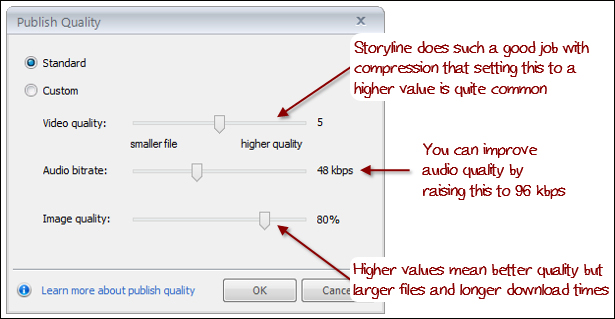
- Adjust the player to be used, if needed, and the quality settings to fine tune audio and video compression.
- Click on Publish.
- After publishing is complete, a window appears notifying you that the publishing process was successful. You can then view the published course or you can e-mail, ftp, zip it, or open the folder where the published output files are located.
Publishing to the Web, Articulate Online, LMS, or CD offers the ability to include HTML 5 and iPad support. If you choose both, here's how Storyline determines which version of the course to display:
Tip
You may find that viewing a published Storyline project on your local computer does not work as expected. This may be due to local security restrictions on your computer, the Flash player, or browser security. To view a published story locally on a Windows PC without security restrictions, you can use the Publish for CD option instead and launch the course using the Launch_Story.exe file.
The time has come to publish our story. In this exercise you will publish to the web without tracking. Some additional information and considerations that you should be aware of will follow this exercise.
- Let's start by opening
Exercise 10 – Identity Theftand clicking on the Publish button from the Home tab. - Adjust the Title to be Safe Online Surfing.
- Click on the ellipsis next to the title and enter any other details you wish to further describe the course. This is particularly useful for courses that are hosted on a tracking system.
- Add the Description of a primer on operating securely on the Internet.
- Select the folder to contain the published output.
- Click on Publish.
- When the completion prompt appears, click on View Project to review the course and test functionality.
- When you return to Storyline, close the completion prompt, and save the file.
- Outside of Storyline, navigate to the folder where the published output is located. The published output will be in a folder called
Safe Online Surfingoutput. Take a look at the files and note that you can launch the course again by double-clicking on thestory.htmlfile.
You'll need an LMS to capture tracking and completion information. Storyline can publish to Articulate Online, its own LMS, or an LMS of your choice. The options between the two are similar with the exception of tracking; when publishing to an LMS you can choose from several output formats, including SCORM 1, 2, SCORM 2004, AICC, or Tin Can API. In all cases, you'll need to identify how reporting and tracking will be handled:
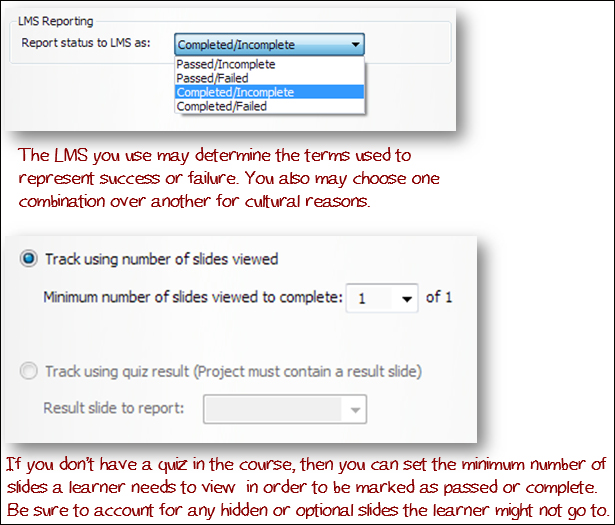
You will want to keep in mind the following points when working with your course and adjusting tracking settings:
- If you do not have a quiz in your course and must mark the course as complete, you can do this as mentioned earlier by setting the number of slides viewed. If you need more precision, you can create a hidden quiz question and use the associated results slide for course completion. Here is a tutorial on how to do this http://www.articulate.com/support/kb_article.php?product=st1&id=8bi7nnp5g3z7.
- If you have a single quiz, you can record learner completion based on the associated results slide.
- If you have multiple quizzes, you can use only one results slide to mark the course as passed or completed.
- If you are using the Tin Can API, the quiz result slide you select will report overall results that includes individual questions from all quizzes and results slides.
Storyline includes two other publishing options. The first option is Publish to CD, which creates a version of the course that launches from an executable file. This can be used for CD, DVD, or USB drive playback.
The other option is Publish to Word. This is actually quite handy for review cycles during development. A document is created that contains each slide, and optionally slide layers along with slide notes. This includes quizzes with possible options and the correct choices. It creates a visual transcript of a course and is a terrific feature you can leverage to speed up documentation effort and content review processes for your course.
The biggest challenge when it comes to publishing is playback on HTML 5 browsers and mobile devices. The iPad generally works quite well when launching courses from the Articulate Mobile Player app (downloaded for free from the App Store).
Playback outside of Flash-based browsers or the iPad app, is fairly limited. This is due, in part, to the infancy of the HTML 5 standard. HTML 5 is not fully implemented and each browser and platform/device handles things slightly differently, making it challenging to create one course and have it operate as expected across multiple browsers, platforms, and mobile devices. You'll get close by simplifying your course content and removing content features that aren't supported across all platforms, or by creating multiple versions optimized for the target environments.
The Appendix provides a link to a detailed chart of feature support when working with Flash, HTML 5 and iOS (iPad output).
Storyline makes it easy to publish a course and customize the way it appears when published. It does this with simplicity and offers enough options to help you tailor the experience so that it fits your design and cultural requirements.
Being able to save a player and re-use this for other Storyline courses is a great time saver. Sharing with other developers helps create consistency within development teams.
The many configuration settings offer another way to create original, custom experiences for your learners. You might consider creating several players to suit different types of courses as follows:
- Sidebar menu visible with restricted navigation for linear courses
- No Previous and Next buttons for courses with custom navigation built within the Slide Masters.
- No seekbar for courses that contain video clips with their own controls to play, pause, step, and replay the video.
- Chromeless, which means every player option is disabled leaving only a 10 pixel border around the slide content that can also be made transparent leaving just the slide without any player controls at all. This is a crisp and clean format that's great for self-running presentations or courses with your own custom navigation built within the slide content.
The next chapter offers some advice to help you make the most from what you've learned about Storyline.