
It's easy to expand content in your story by inserting new slides. You can do this from the Insert tab by selecting Insert Slide.
There will be several options; in each case click on the thumbnail image in the template, basic layouts, quizzing, screen recordings, or import to insert a slide into the project.
You have control over how this is inserted; into the current location in the current scene, in the same way as how it is set up in the template (it can be a single slide or a slide within a scene) or as a slide in a new scene in the existing project.
Here's a brief description of each Insert New Slide options:
- Templates: These are a great way to leverage and reuse content. There are templates that come pre-packaged with Storyline, templates that can be downloaded from the Articulate community, or templates that you've created.
- Basic Layouts: These show options that are available based on existing Slide Masters and slide layouts within the project that's currently open. Storyline comes with default layouts that you can customize or you can create your own new layouts.
- Quizzing: This lets you insert a graded question, a survey question, or one of the several freeform-style interactions.
- Screen Recordings: These let you insert a simple movie of your screen that shows learners how to perform a task or an interactive video that learners can interact with to try or test their knowledge.
- Import: This is used to bring in content from an existing PowerPoint file, an Articulate Quizmaker quiz, an Articulate Engage interaction, or another Storyline project as covered in Chapter 1, Creating a Story.
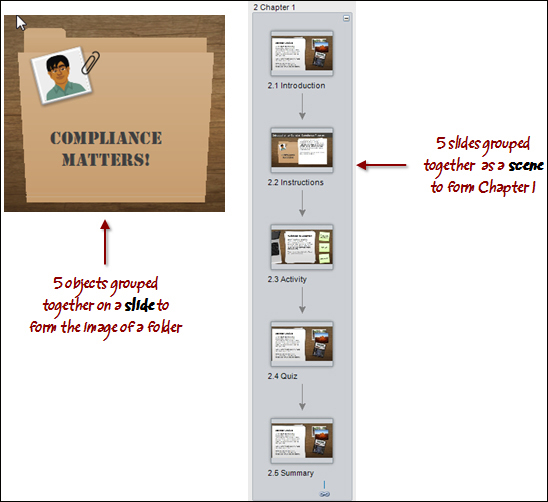
Once there are a few slides in your story, you can switch to Story View by clicking on the Story View tab or choosing the View tab then selecting Story View.
Scenes and slides are automatically numbered in Story View. This numbering system is dynamic and will update depending on where a slide or scene is positioned. Slide numbering and scene numbering does not affect when navigational structure.
From Story View you can see a bigger picture of all the slides in the story and can begin to organize and arrange the slides within a scene, or create multiple scenes to group related slides together similar to how you group multiple objects on a slide:
To move slides within a scene in Story View:
- Click on the slide you wish to move (a yellow box will appear around the selected slide).
- Click-and-drag the slide into the position in the scene where you would like it to appear.
To create a new scene in Story View, click on the Home tab then select New Scene.
To expand and collapse scenes, click on the minus or plus icon on the right-hand side of the scene to expand or collapse a scene.
Here is how we set the starting scene:
The starting scene in Storyline is the scene that begins an e-learning project; the very first thing the learner sees. The starting scene is indicated in Story View by a green flag. You can control which scene is the starting scene by right-clicking on the scene and by choosing Starting Scene.
Let's continue with Exercise 2 – Workplace Compliance, this time the focus will be on expanding the course, organizing slides, and customizing content. The first step in the process is to add new slides into the story to expand each of the compliance topics. You will work with a prebuilt Articulate template to do this (note that you will need to sign up for a free Articulate community forums account to download the template):
- Select the Insert tab and choose New Slide.
- Click on the Templates tab and click on the down arrow in the Template drop-down list to view the existing templates you have installed. If Desktop Overhead is not listed, click on the Download free templates link. This will open the browser and direct you to the Articulate template download site located at http://community.articulate.com/downloads/g/storyline/default.aspx.
- From the template site, click on Desktop Overhead and then on the Download this file link. When asked to open or save the file, choose Open. The Desktop Overhead template now appears in your templates list.
Tip
If you encounter problems opening the template, choose to save it instead when downloading from the Articulate site. Open the location in Windows Explorer where the template was saved and copy the
1-DesktopOverhead.storytemplatefile to the Storyline templates folder on your computer (My Articulate ProjectsStoryline Templates). - The Desktop Overhead template contains five slide layout variations. Select the Benefits slide. Click on Import to insert a new slide based on this template.
- Rename this slide as
Menuand then work within the slide to remove some of the interactivity (you will recreate this in the subsequent exercises):- Select the three yellow post-it notes and delete them.
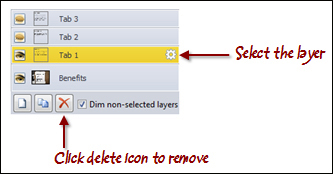
- There are three layers in the Slide layers pane on the right-hand side of the screen. You won't be needing these right now so let's remove them (we will go into more detail regarding layers in the subsequent chapter). Click on the layer titled Tab 1 and then click on the red X icon to remove the layer. Select Yes to confirm. Repeat the steps for Tab 2 and Tab 3:
- Save the file.
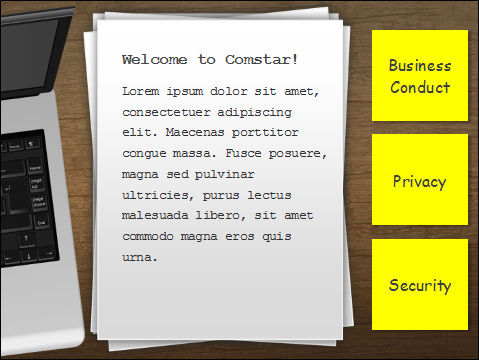
- Click inside the textbox that displays the words Bonus Plus and rename it as
Welcome to Comstar! - In the Timeline, rename the first textbox as
Introductionand the second asWelcome. - Select all of the text inside the
Introductiontextbox and replace with=lorem(). Delete the last two paragraphs to shorten the volume of sample text. - Recreate the post-it notes by performing the following steps:
- Insert a rectangle of the size of the previous post-it notes. Format it as follows:
- Change the Shape Fill option to yellow, the Shape Outline option to No Outline, and add an Offset Diagonal Bottom Right shadow under Shape Effects.
- Type
Business Conductas the name to appear on the note. Change the font color to Black, size to 18pt, and font to something casual like Comic Sans. - Rename the rectangle from Rectangle 1 to
Business Conduct. - Duplicate the note two times by selecting the note and pressing Ctrl + D twice or holding down the Ctrl key, clicking the mouse then dragging two times. Align the copies vertically on the right-hand side of the slide. Change the second note to be renamed as
Privacyand the third note to be renamed asSecurity. - Select the three notes, click on the Format tab, and navigate to Align | Distribute Vertically. Now choose Align Left:
- Insert two new slides by selecting the Insert tab and choosing New Slide. From the Desktop Overhead template, select the Welcome and Objectives layouts.
- Rename the first Welcome slide to
Business Conductand make the following changes:- Change the title of Welcome to Comstar to
Business Conduct. - Select all of the text below the title and replace it with
=lorem(). - Add a screenshot and picture zoom by performing the following steps:
- Open your browser, go to Google and search for corporate privacy definition. Keep the browser open (do not minimize it) and switch back to Storyline.
- Select the Privacy slide.
- Click on the Insert tab and then navigate to Screenshot | Screen Clipping.
- The Storyline window disappears temporarily and the desktop dims. You should see the browser with the search results. Click and draw a box around a small portion of the results and release the mouse.
- You will return to Storyline with an image of the screen. Resize and move the image to the upper-right corner.
- Click on the image and click on the Format tab.
- Add a picture style to the image (whatever you think looks best) and then click on the Zoom Picture command. This will enlarge the picture when the user clicks on it:

- Change the title of Welcome to Comstar to
- Rename the second Welcome slide to
Privacyand make the following changes:- Change the title from Company Overview to
Privacy. - Delete the image of people and the click to view video note.
- Add a scrolling textbox to display longer segments of text. To do this, perform the following steps:
- Click on the Insert tab and then on Scrolling Panel.
- Draw an area in the middle of the page, where the scrolling panel will appear (similar to the screenshot above).
- Insert a new textbox making it about half the width of the slide and type
=lorem()to fill with sample text. Press Enter a couple times after the first sample text ends and type=lorem()again so that you have lots of text. - Drag the textbox and release it inside the area drawn as a scrolling panel. You'll notice that the scroll bars appear. These can be used to scroll up and down through this section of the text.
- Change the title from Company Overview to
- Rename the last slide to
Securityand make the following changes:- Change the title from Course Objectives to
Security. - Resize and center the title so that it fits within the yellow paper.
- Replace the text underneath the title to
=lorem()removing the last paragraph as this goes off slide and is not needed:
- Change the title from Course Objectives to
- Switch to Story View to see how the flow of the course is shaping up. Switch back to Normal View when done and save the file.