
Animation loops are the scripts to simulate movement more lively by switching costumes. We will create different costumes based on the robot costume we just created.
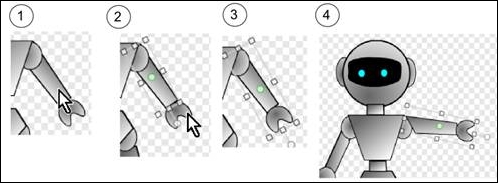
Let's first create a costume called left arm up. Duplicate the robot costume and name the copy as right arm up. Then, perform the following steps to update the left arm up costume:
- Press and hold the Shift key. With the Select tool, click on the robot's left arm.
- While the Shift key is still pressed, click on the left hand.
- Now both the left arm and the left hand are selected.
- Use the rotation handle to rotate the arm and hand as shown in the following screenshot:
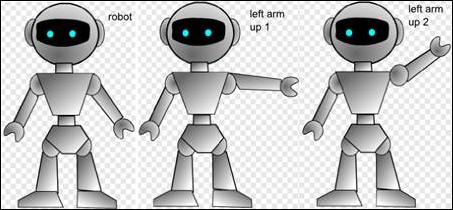
Using the same technique (duplicate costume, then move or rotate body parts), you can easily create costumes that can be used in animation loops. The complete project includes three costumes, namely robot, left arm up 1, left arm up 2 ,as shown in the following screenshot:
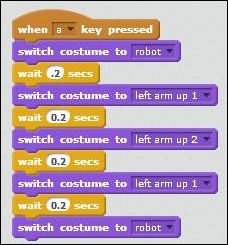
To create an animation loop for the left arm up and down, perform the following steps:
- Start with the when <a> key pressed block.
- Set the switch costume to <robot> and wait (.2) secs blocks. Note that the delay is needed for this costume to show long enough for the game player to see.
- Set the switch costume to <left arm up 1> and wait (.2) secs blocks.
- Set the switch costume to <left arm up 2> and wait (.2) secs blocks.
- Set the switch costume to <left arm up 1> and wait (.2) secs blocks.
- Set the switch costume to <robot> and wait (.2) secs blocks.
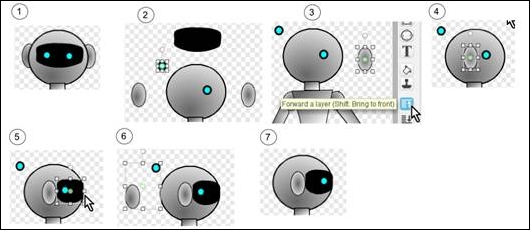
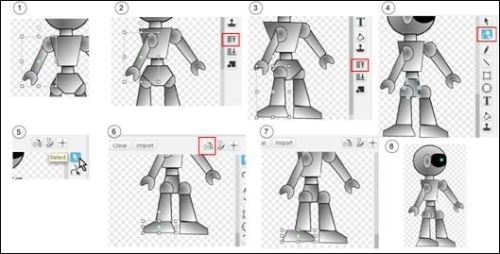
Next, let's update the walk right costume to face to the right. First, update the head by performing the following steps:
- Observe the head and visualize how it should look like if it was facing the right.
- Use the Select tool to move both ears, the visor, and both eyes away from the head.
- To move the ear to the top, select the ear, press the Shift key, then click on the Forward a layer button.
- Verify that the ear is on top and visible.
- Click on the Reshape tool and adjust the visor size.
- Select unneeded parts and hit Delete key to delete the parts.
- Select and adjust the position of the eye, as shown in the following screenshot:
Next, update the rest of the walk right costume, by performing the following steps:
- To select the robot's right arm and hand together, click on the Select button, press the Shift key, and then click on both. There will be a light-gray box around the selected parts.
- While the robot's right arm and hand are still selected, press and hold the Shift key, and click on the Forward a layer button to bring both to the top.
- To select the robot's right leg joint and the leg together, click on the Select button, press and hold the Shift key, and then click on both the robot's right leg joint and the leg. While the Shift key is still pressed, click on the Forward a layer button to bring the right leg joint and the leg to the front.
- Select the Reshape tool, and adjust the upper torso and the lower torso accordingly.
- Click on the Select tool.
- Select the right foot, and click on the Flip left-right button to flip it horizontally.
- Adjust the foot's location.
- We are done with the costume.
Refer to the following screenshot:
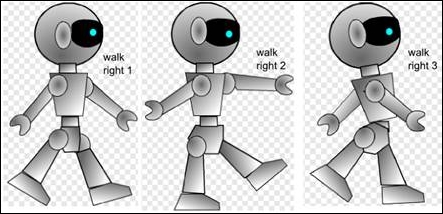
Based on the costume walk right 1, you can rotate the robot's arms and legs to create additional costumes such as walk right 2 and walk right 3 as shown in the following screenshot:
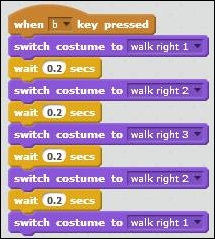
To create an animation loop to mimic walking to the right, perform the following steps:
- Start with the when <b> key pressed block.
- Set the switch costume to <walk right 1> and wait (.2) secs blocks. Note that the delay is needed for this costume to show long enough for the game player to see.
- Set the switch costume to <walk right 2> and wait (.2) secs blocks.
- Set the switch costume to <walk right 3> and wait (.2) secs blocks.
- Set the switch costume to <walk right 2> and wait (.2) secs blocks.
- Set the switch costume to <walk right 1> and wait (.2) secs blocks.
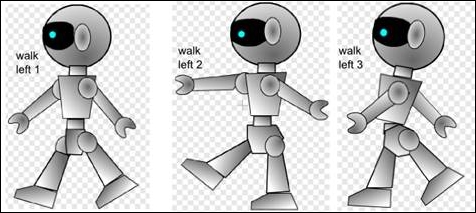
To create costumes for walking towards left, just duplicate each costume and use the Flip left-right tool. Refer to the following screenshot:
In this section, we created costumes by duplicating the robot costume and making changes, mostly small changes, to create new costumes to be used in the animation sequence. We also demonstrated how to script animation loops by switching to the next costume in an animation sequence, pause, then to the next, until we get back to the costume that the sequence starts with.