
Limiting the offensive power of the player helps to make the game a bit more challenging. But a single group of five enemies isn't much of an attack force to withstand. Let's give the player some more work to do by increasing the number of enemies and then create more enemy variants.
We will copy and edit a few scripts that we have already built to create more waves of enemies as shown in the following steps:
- Go to the enemy's Scripts tab.
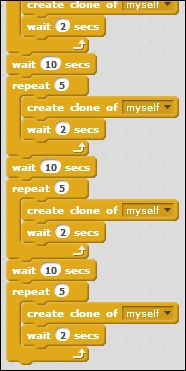
- Look at the <green flag> script and see how we first set the enemy sprite to the correct position and then made a few clones in a limited repeat loop.
- Right-click on the wait block just before the repeat loop and select duplicate. This will create a copy of the block and everything underneath it.
- Drag the copy to the bottom of the script and click on it again to attach it.
- Move the cursor back to the first wait command and repeat the process to create four consecutive repeat loops.
- Change the numbers in the second, third, and fourth wait block from
3to10. This will increase the time between waves and makes sure one wave has moved a good distance along the road before the next wave is spawned. - Instead of just five enemies to defeat, we now have 20, separated in four waves. A fair challenge but still not too exciting.
Enemies currently die on the first hit they receive. This makes them very weak and also not very Tower Defense-like. The enemies in these games usually have a healthbar , requiring multiple hits before they go down. This not only makes the game more challenging, but it's also visually appealing as you see the cannons tracking the enemies and trying to defeat them before they move out of range. So let's create a healthbar for our enemies. Instead of going down in one hit, they will be able to take 10 hits before being defeated.
There are multiple ways to solve this problem. But the easiest way of doing it is by creating multiple costumes, each with a slightly shorter healthbar graphic. Each time an enemy gets hit, it will advance to the next costume until it reaches the last one, after which it will be destroyed. The following are the steps to create the costumes:
- Open the enemies' Costumes tab.
- We make sure that we are editing the costumes in Vector Mode.
- Select a bright green color for the healthbar.
- Click on the Line tool and draw a horizontal line underneath the red circle.
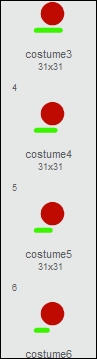
- Create nine more costumes for the sprite by right-clicking on it and choosing duplicate.
- Use the Erase tool to remove a part of the healthbar at each costume. The last costume should have no visible bar left.
At each step, the healthbar should be shortened a little. Since Scratch doesn't have a ruler in its drawing tools, you can't be pixel-perfect about it. I found the best way of doing it is to keep cutting the list of costumes in half. The first one has a full healthbar. The last one (number 10) has no healthbar left. So costume number five should have only half healthbar. Costume 2.5 (which doesn't exist, so we'll pick number 3) should have three quarters of the healthbar showing. Number 7.5 (again we pick a whole number, so 8) should only show a quarter.
Click back and forth through the costumes to visually check that you diminish the healthbar in equal steps for each costume.
Since the last costume is the enemies' dead state, we are going to reshape it to inform the player he has vanquished an enemy, as shown in the following steps:
- Click on the last costume (number 10) in the list to select it.
- Click on the Reshape tool.
- Then click on the red circle.
- You'll see some circular widgets show up on the edge of the circle. You can reshape a form by dragging these widgets with the mouse. Drag the points at the cardinal compass directions inwards towards the center.
- Drag the other points out a bit.
- This will create a cross-like shape, signifying that the enemy is dead as shown in the following screenshot:

With a script, we will step through the different costumes on each hit. This will make it appear that the hit bar shrinks and eventually the enemy is killed. The following are the steps to do it:
- Go to the Scripts tab to start making use of the new costumes. We will make changes to the clone script.
- Drag the collision check condition out of the script and put it aside for later use.
- Remove the forever loop from the script.
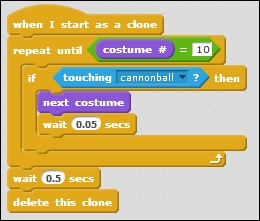
- In its place, put a repeat until … block.
- Set the collision check inside this block.
- Get a = operator block and place it in the condition slot of the repeat until … block.
- Place the costume# variable from the Looks category in one slot of the equation.
- Type
10in the other slot. This will cause the script to repeat until the sprite is showing costume number 10, the dead state we just drew. - The clone should only be destroyed after the repeat condition is met. So drag the delete this clone block out of the if statement and re-attach it at the bottom of the script.
- Instead of immediately deleting itself, the clone should advance a costume when hit by a cannonball. Place a next costume block inside the if statement to achieve this.
- To prevent the sprite from stepping through multiple costumes on a single hit, make the loop to wait for
0.05by using the wait ... secs block. - To prevent the sprite from immediately disappearing on receiving the last hit, and thus not showing the dead costume, we place another wait
0.5secs block just before the delete command. - As a final step, to make sure the enemies always start at costume number 1 when the game starts, we place a switch costume to <costume1> block in the <green flag> script. Note that this is the name of the costume.
Test the game again to see that the enemies are indeed showing a healthbar and are losing health as they get shot, before disappearing after being hit 10 times. Now, we are well on our way to creating an enjoyable game.
To make things even more interesting, we will create two more enemy types. These behave in largely the same way as the first enemy. But with some minor changes to their scripts, we can make them behave quite differently. We will create a faster enemy that takes less time to travel the length of the road. We will also create a slower enemy that is harder to kill than the first enemy. Each type of enemy will be depicted in a different color.
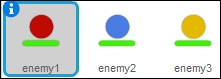
Let's start with the fast enemy, the blues. The following are the steps to create it:
- Right-click on the enemy sprite in the Sprites view and select duplicate to make a copy of this sprite and all its scripts.
- Go to the Costumes tab of the copied sprite and change its color from red to blue using the Fill tool. You have to recolor all the costumes.
- Then go to the Scripts tab to make some changes.
- To make this enemy faster than the red one, we need to change the multiplier value. Create a new variable called
multiplier_B(for blue). - Replace all the multiplier_R variables in the scripts with the new multiplier_B variables.
- Change the multiplier_B value in the <green flag> script to
0.15. This will make the blue enemies twice as fast as the red ones.
We also change a few things about the wave patterns so these new enemies won't arrive at the same time as the original ones. To do this, follow the steps given:
- Remove the last wait and repeat segments and delete them. Three waves of fast enemies are enough of a challenge.
- Change the wait numbers to
8,20, and5to change the pauses between waves. - Change the number of repeats to
3for all repeat loops. This will decrease the number of enemies spawned per wave.
That's all there is to do to create fast enemies. Let's move on to the third type of enemy. Follow the steps given:
- Again select duplicate to make a copy of the red enemy sprite to create a third enemy type.
- Go to the Costumes tab of the new enemy and color the costumes yellow.
- To make this enemy harder to kill, we will give it more costumes. Copy each costume once to make a total of 20 costumes. Don't make a copy of the final dead state. You only need one of those.
- You might have to rearrange the newly created costumes to display a continuously shrinking healthbar as you move through the costumes.
- Erase a small bit of each second costume as an in-between step for the healthbar steps you made earlier.
- Go to the Scripts tab to make some changes to the script, making this enemy slower and tougher.
- To make use of all 20 costumes, change the number to check in the clone script from
10to20. This is all that's needed to make the enemy go through 20 hits before being destroyed. - To make it a bit easier for the player to destroy this enemy in time, we will make it a bit slower than the other ones.
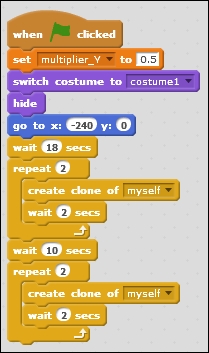
- Create a new variable called
multiplier_Yand again replace all instances of muliplier_R with the new one. - Change the value of the multiplier_Y variable to
0.5to make this enemy slower than the red enemy. - Remove the last two repeat segments to create only two waves of these heavy enemies.
- Change the wait times to
18and10. - Change the number of repeats to
2to only create two enemies per wave. - After this, save the project to make sure you don't lose your progress. The following screenshot shows the altered script for the third enemy type:
We now have an interesting army of enemies coming our way. Test the game and see how it looks. Take special note of when the enemies spawn, how fast they move, and how they respond to incoming fire. You can play around with the numbers in the < green flag> scripts to make the enemies appear in different patterns.